

23R1.0 Functionality Guide
The Functionality Guide is intended for Sales Operations, Business Administrators, System Integrators, and others responsible for making decisions about what features are needed for end users to be successful and deciding which features work together with existing customer configurations.
Account Management
Lightning for My Accounts
Lightning for My Accounts provides users with improved performance and an enhanced Lightning UI.
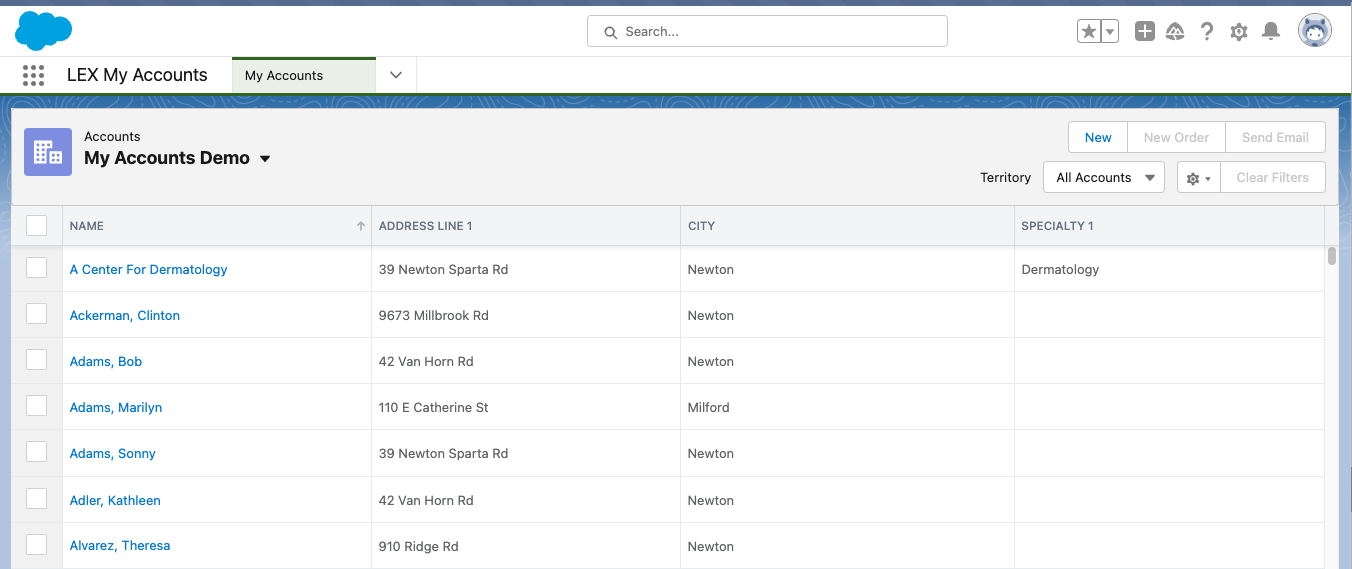
Once configured, users can access the following functionality in Lightning for My Accounts:
- Use Account Lists and Account Views
- Create, Edit, and Delete Lists and Views
- Use Child Account Lists and Views
- Create new accounts
- Create new orders
- Send Approved Email messages
- Navigate to specific account records
Lightning Web Security for Lightning web components is not supported. Admins can disable this setting in Setup > Security > Session Settings.
Functionality
Lightning for My Accounts functionality differs from Browser (Classic) as follows:
- The number of accounts included in the first search is not limited in the Lightning experience.
- The Regional Manager Governors limitation does not apply to the Lightning experience, but still applies to Browser (Classic).
- If multiple Dynamic Attribute criteria exist on a view, the Territory drop-down list remains enabled in the Lightning experience.
Users can access much of the same core functionality in Lightning for My Accounts as they did before. However, some existing My Accounts functionality is not supported in the current version of Lightning for My Accounts, and new functionality is available in Lightning.
For an overview of the differences in supported functionality between the existing My Accounts and Lightning for My Accounts, see the following table:
| Functionality | Classic Tab | New Lightning Tab |
|---|---|---|
|
|
|
|
|
|
|
Dynamic attributes with a type of Picklist that end with a space character do not display in Lightning for My Accounts. Remove the trailing space character to display them.
Selecting Lists and Views
All lists and views the user has access to are listed alphabetically.
Lists and Views do not include accounts with inactive addresses.
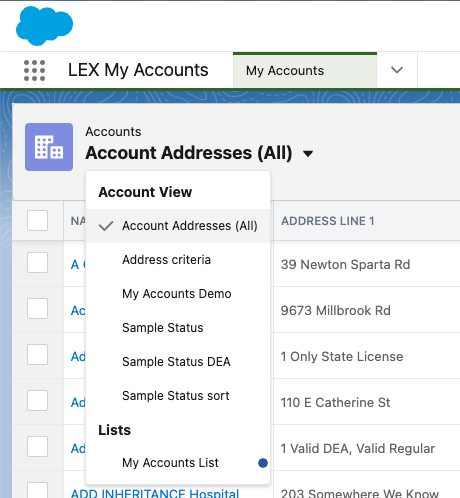
Use the dropdown to select a list or view.
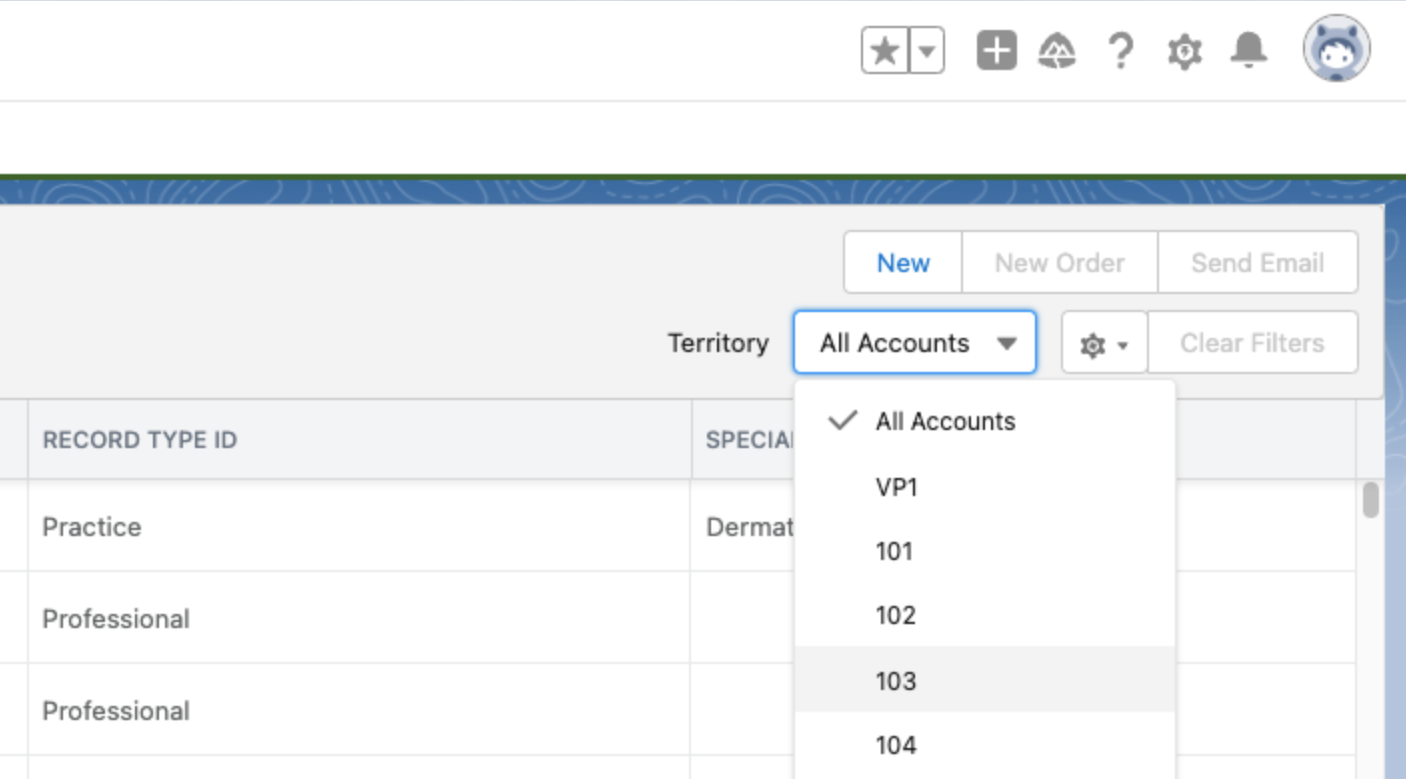
To select a different territory, use the Territory dropdown. Any sorting or selected filters are retained when a user selects a different territory. For information on the All Accounts option in the Territory drop-down menu, see Visibility of Accounts and Territories .
Sort order and selected filters are not retained when a user selects a different list or view.
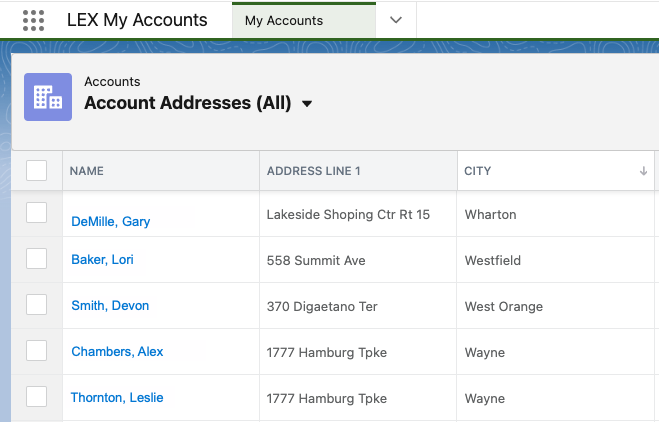
Sorting Accounts
To sort the list of accounts by a particular column, select the column header. Select the header to toggle between ascending and descending sort order.
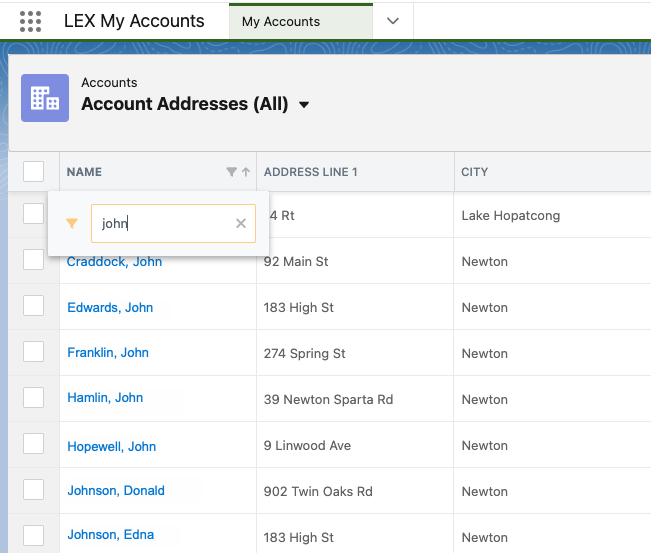
Filtering Accounts Views and Lists
To filter the list of accounts, select the Filter button in the column header, enter text in the Filter field, and select enter. The list of accounts is filtered to display only those containing the entered text. To remove the applied filters, select the Clear Filters button.
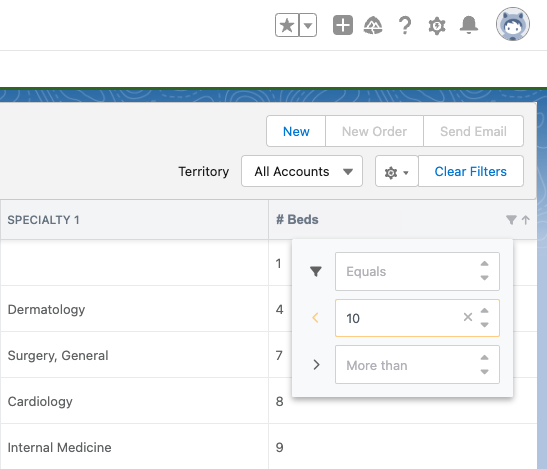
Use the numeric filter for columns of the following types:
- date
- date/time
For date/time fields, the filter compares the date portion of the value and ignores time.
- currency
- number
- percent
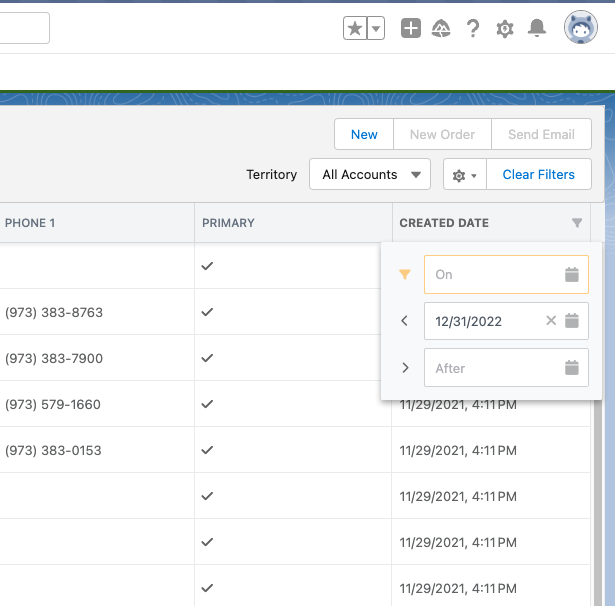
For date and date/time columns, select the date for the filter using the calendar. The calendar picker allows dates up to 20 years before and after the current date.
Creating, Editing, and Deleting Views and Lists
Use the List View controls menu to create, edit, or delete views and lists using the List View Controls menu.

To group manually selected accounts together using a list:
- Select the rows of one or more accounts you want to include in the list.
- Select the Create New List menu option.
- Enter a name and select a color to represent the list. The color defaults to red if a color is not selected.
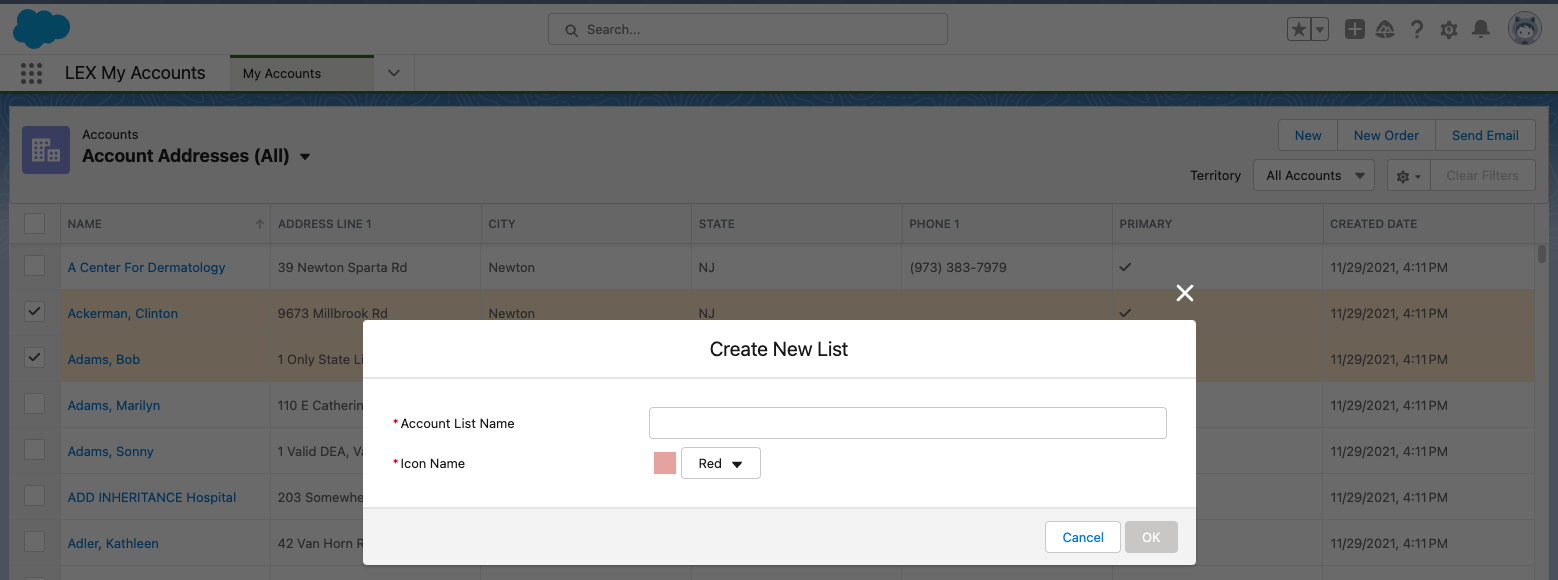
- Select Save.
The new list is available in the Views dropdown, and automatically displays.
- To add an account to the list, select the row for an account and select Add To List.
- To remove an account from the list, select the row for an account and select Remove from List.
- To delete a list, select the list from the dropdown and then select Delete.
- To rename a list, select the Edit button, enter a new name, and select Save.
If a list includes more than 200k rows, only 200k results display. A message displays in the header notifying users of the limit.
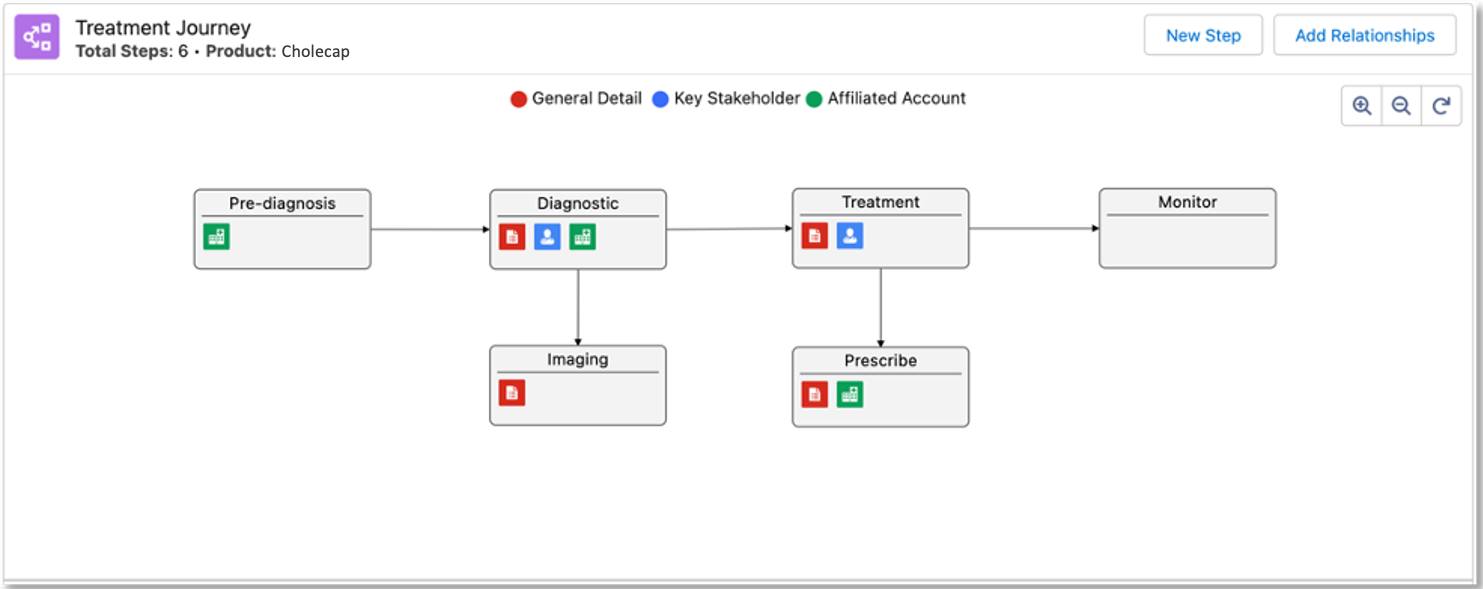
Patient Journey Data Model
The Patient Journey data model can be used to create patient journeys that describe the series of steps a patient will normally experience as they navigate the healthcare system for a given condition or treatment, not their individual journey. These journeys can be created generically for a product, or they can be tailored for a specific account. This data model allows you to do the following:
- Define steps representing the various interaction points or milestones for the patient journey
- Group journey steps in broader phases representing stages of the journey, such as Diagnosis, Treatment, or Monitoring.
- Associate a step in a journey with data in CRM to call out that a step is related to a specific Account, Key Stakeholder, or Account Plan strategy. This is especially helpful when defining account-level patient journeys, as this can help expose things like referral patterns through an organization, and be used to visualize how aspects of an Account Plan impact the different stages of a patient journey within an account.
For example, Bob Brown, a Brand Manager for Verteo BioPharma, wants to create a patient journey visualization that his team members can use to detail what a typical patient might go through if they were to be prescribed Cholecap. He defines the steps for diagnosis, treatment, and monitoring. Finally, he creates a visualization that displays the journey stages.
Creating a Visualization Using the Journey Data Model
Customers can create their own visualizations for these journeys, or if you need help integrating patient journeys with your specific business requirements, contact your Account Partner. If MyInsights is used to create a visualization to view and manage the patient journey, then you can define where in Veeva CRM you want to display the visualization, such as within an Account Plan, Account page, or the Home Page and on which platforms.
Implementing the customer journey data model is up to each organization. This is an example of how the data model can be implemented.
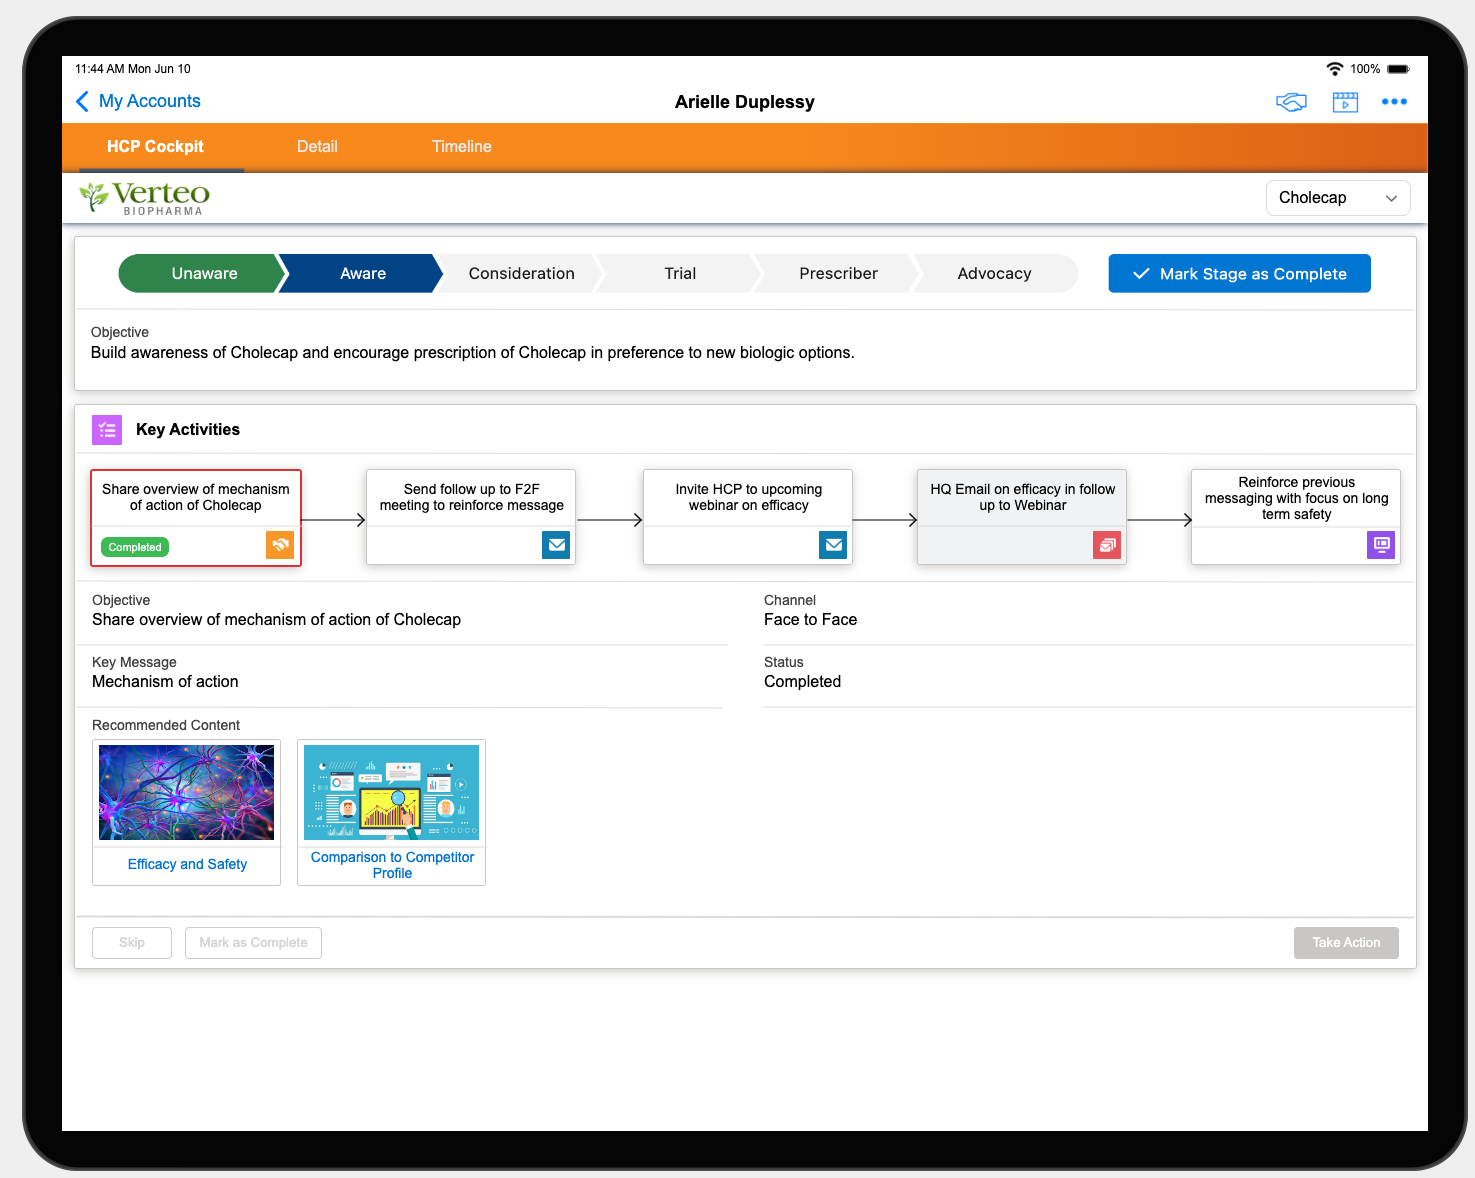
Customer Journey Data Model
The Customer Journey data model can be used to store customer journey data and create visualizations. This data model allows you to do the following:
- Create a Customer Journey for each product in CRM and link it to a Brand Plan
- Assign HCPs to a stage in a Customer Journey based on where they are in the particular product’s journey
- Define Customer Journey Stages with recommended promotional activities that assist users in promoting the product and moving HCPs along the product journey
For example, Bob Brown, a Brand Manager for Verteo BioPharma, wants to create a customer journey visualization that his team members can use to track HCP progress for Cholecap. He uses the Customer Journey data model to add four stages he wants customers to move through as they become more familiar with the product. Finally, he creates a page layout that displays the journey stages.
Creating a Visualization Using the Journey Data Model
Users can create a visualization using the data model and provided page layouts to track activities identified for each journey stage for planned versus completed or skipped activities, types of touch points (channels) used to complete activities, message delivery, changes in customer level of adoption, and HCP progression through the Adoption Stages.
If you need help integrating customer journeys with your specific business requirements, contact your Account Partner. If MyInsights is used to create the visualizations to view and manage the customer journey, you can define where in Veeva CRM you want to display the visualization, for example, within an Account Plan, Account page, or the Home Page and on which platforms.
Implementing the customer journey data model is up to each organization. There is no out-of-the-box functionality for building customer journey visualizations. The image below is an example of how the data model might be implemented.
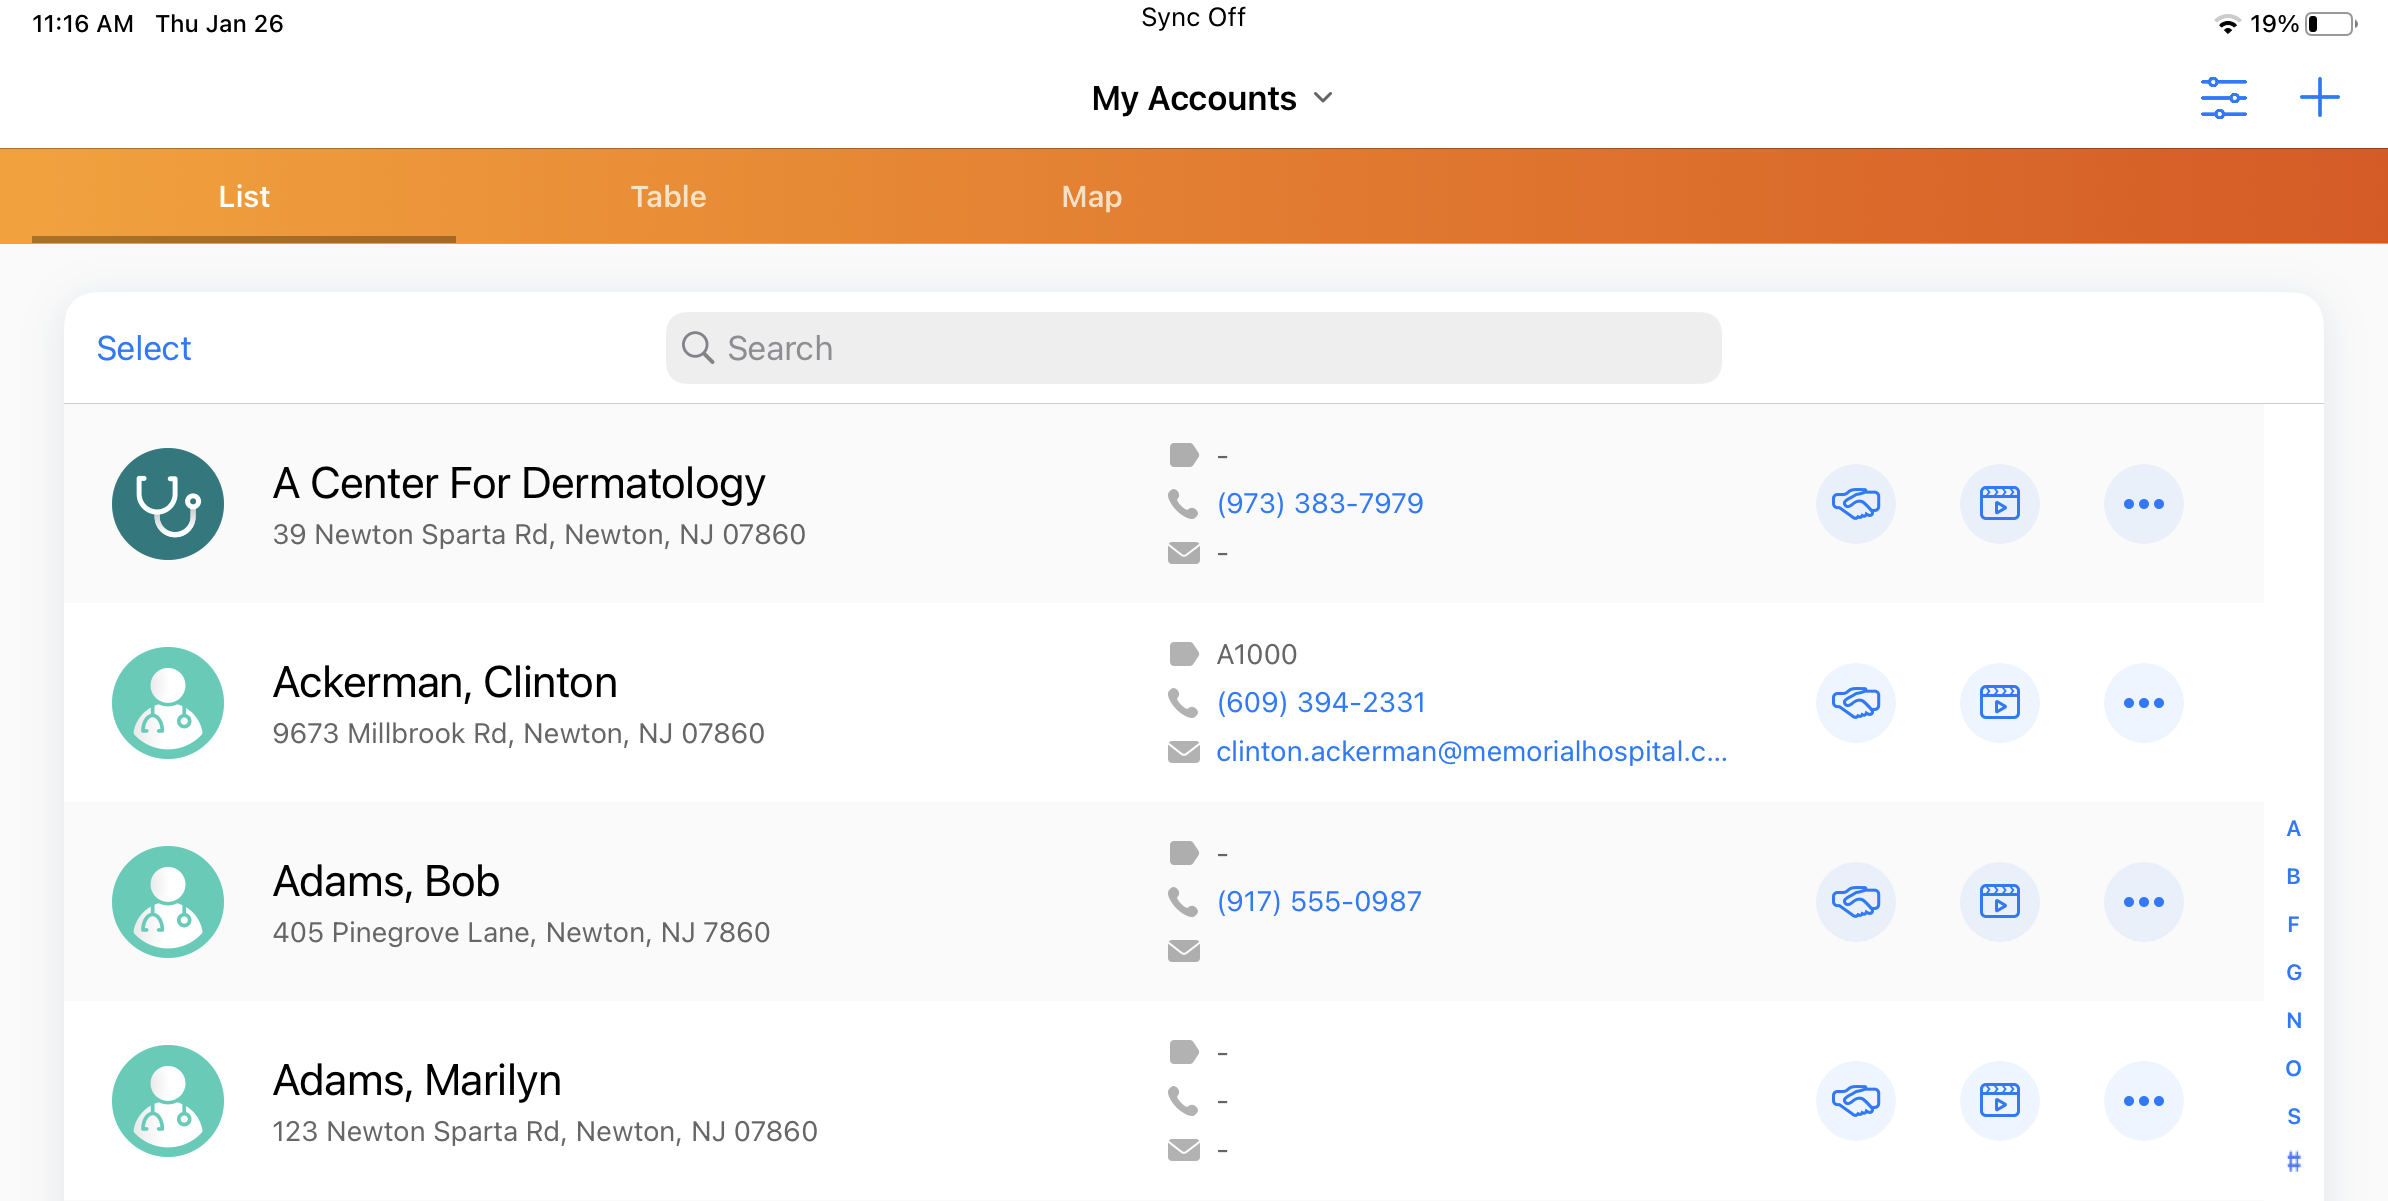
My Accounts Alphabar on iPad
To allow users to find accounts quickly, the List tab on My Accounts displays an alphabar on the right side of the page. Users can select a letter to navigate to that section of the account list.
For example, Sarah Jones has many accounts listed on the List tab of the My Accounts page on her iPad. She wants to view account details for Dr. Lori Baker. She selects the letter B in the alphabar to see the accounts beginning with that letter. Sarah sees Dr. Baker’s name is listed near the top and selects the account to view the details.
Using the My Accounts Alphabar on iPad
The following conditions determine when and how the alphabar displays:
- At least two accounts beginning with different letters must be listed in My Accounts for the alphabar to display
- Letters without corresponding accounts do not display in the alphabar
The order of the index sections in the alphabar matches the sorting of the List tab.
Approved Email
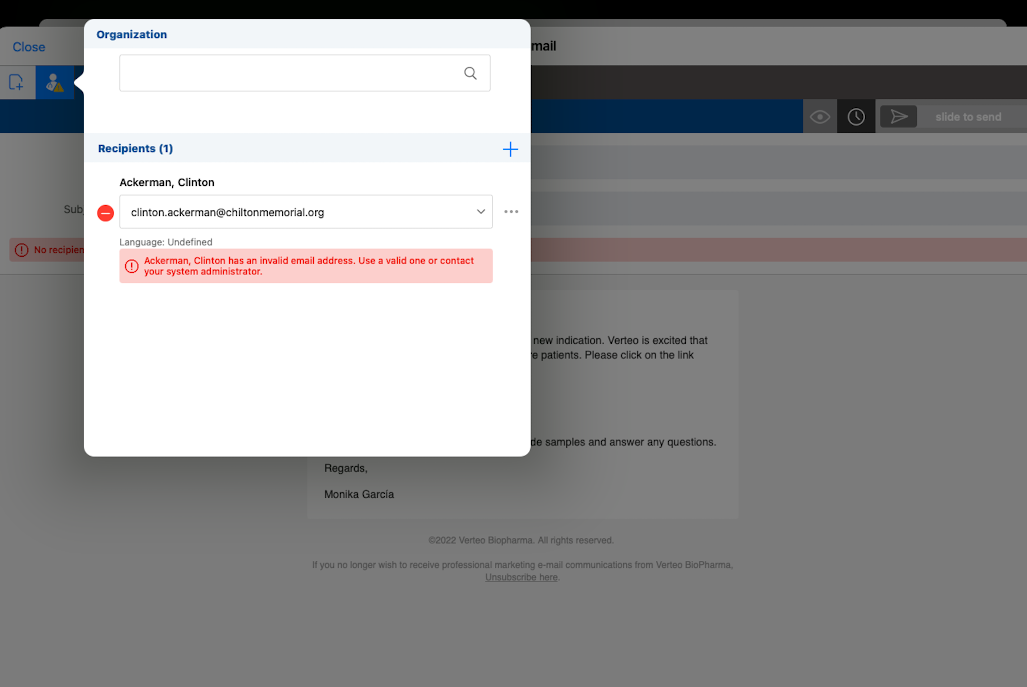
Bounced Email Management
To allow users to fix email addresses that previously bounced, an error message displays so users can verify the address and make changes. This prevents additional attempts to send emails to the incorrect address for the HCP.
For example, Sarah Jones asks Dr. Ackerman for his email address; however, she enters the email address incorrectly. Her first email to Dr. Ackerman bounces. When she tries to add him as a recipient for a future email, an error displays indicating the address is incorrect, and Sarah is unable to send the message. Sarah saves the message as a draft, then follows up with Dr. Ackerman to verify and correct his email address before resending the email.
Managing Bounced Email
When a user sends an email to an address, and delivery fails due to a bounced or dropped event, a Channel_Metrics_vod record is created to store the information about the bounced email. Changes are not made to the consent records to prevent an automatic opt-out leading to another attempt to confirm consent. If any user attempts to add that address as a recipient, an error message displays.
To change the error message text, admins can update the APPROVED_EMAIL_BOUNCED_ERROR Veeva Message.
The user cannot send the message until they select a valid email address. To select another email address, select the dropdown, or select the Manage Email Addresses button to enter a correct address. Select away from the popup to continue composing your email. If an email was scheduled using the address, the email is not sent, and the status of the Sent Email record is set to failed.
Bounced email management also applies to consent capture. If a user attempts to resend a consent capture email that previously bounced, an error displays. If your organization requires explicit consent, see Capturing Consent for more information.
To resolve temporary bounce issues, admins can follow these steps:
- Verify the email address is valid.
- Work with the HCP or HCO to resolve any issues on their end that may have caused the email to bounce.
- Contact Veeva Support to remove the email address from the suppression list.
- Do one of the following:
- Delete the Channel Metrics record
- Update the Email_Delivery_Error_vod field on the Channel Metrics record to use a blank or custom picklist value
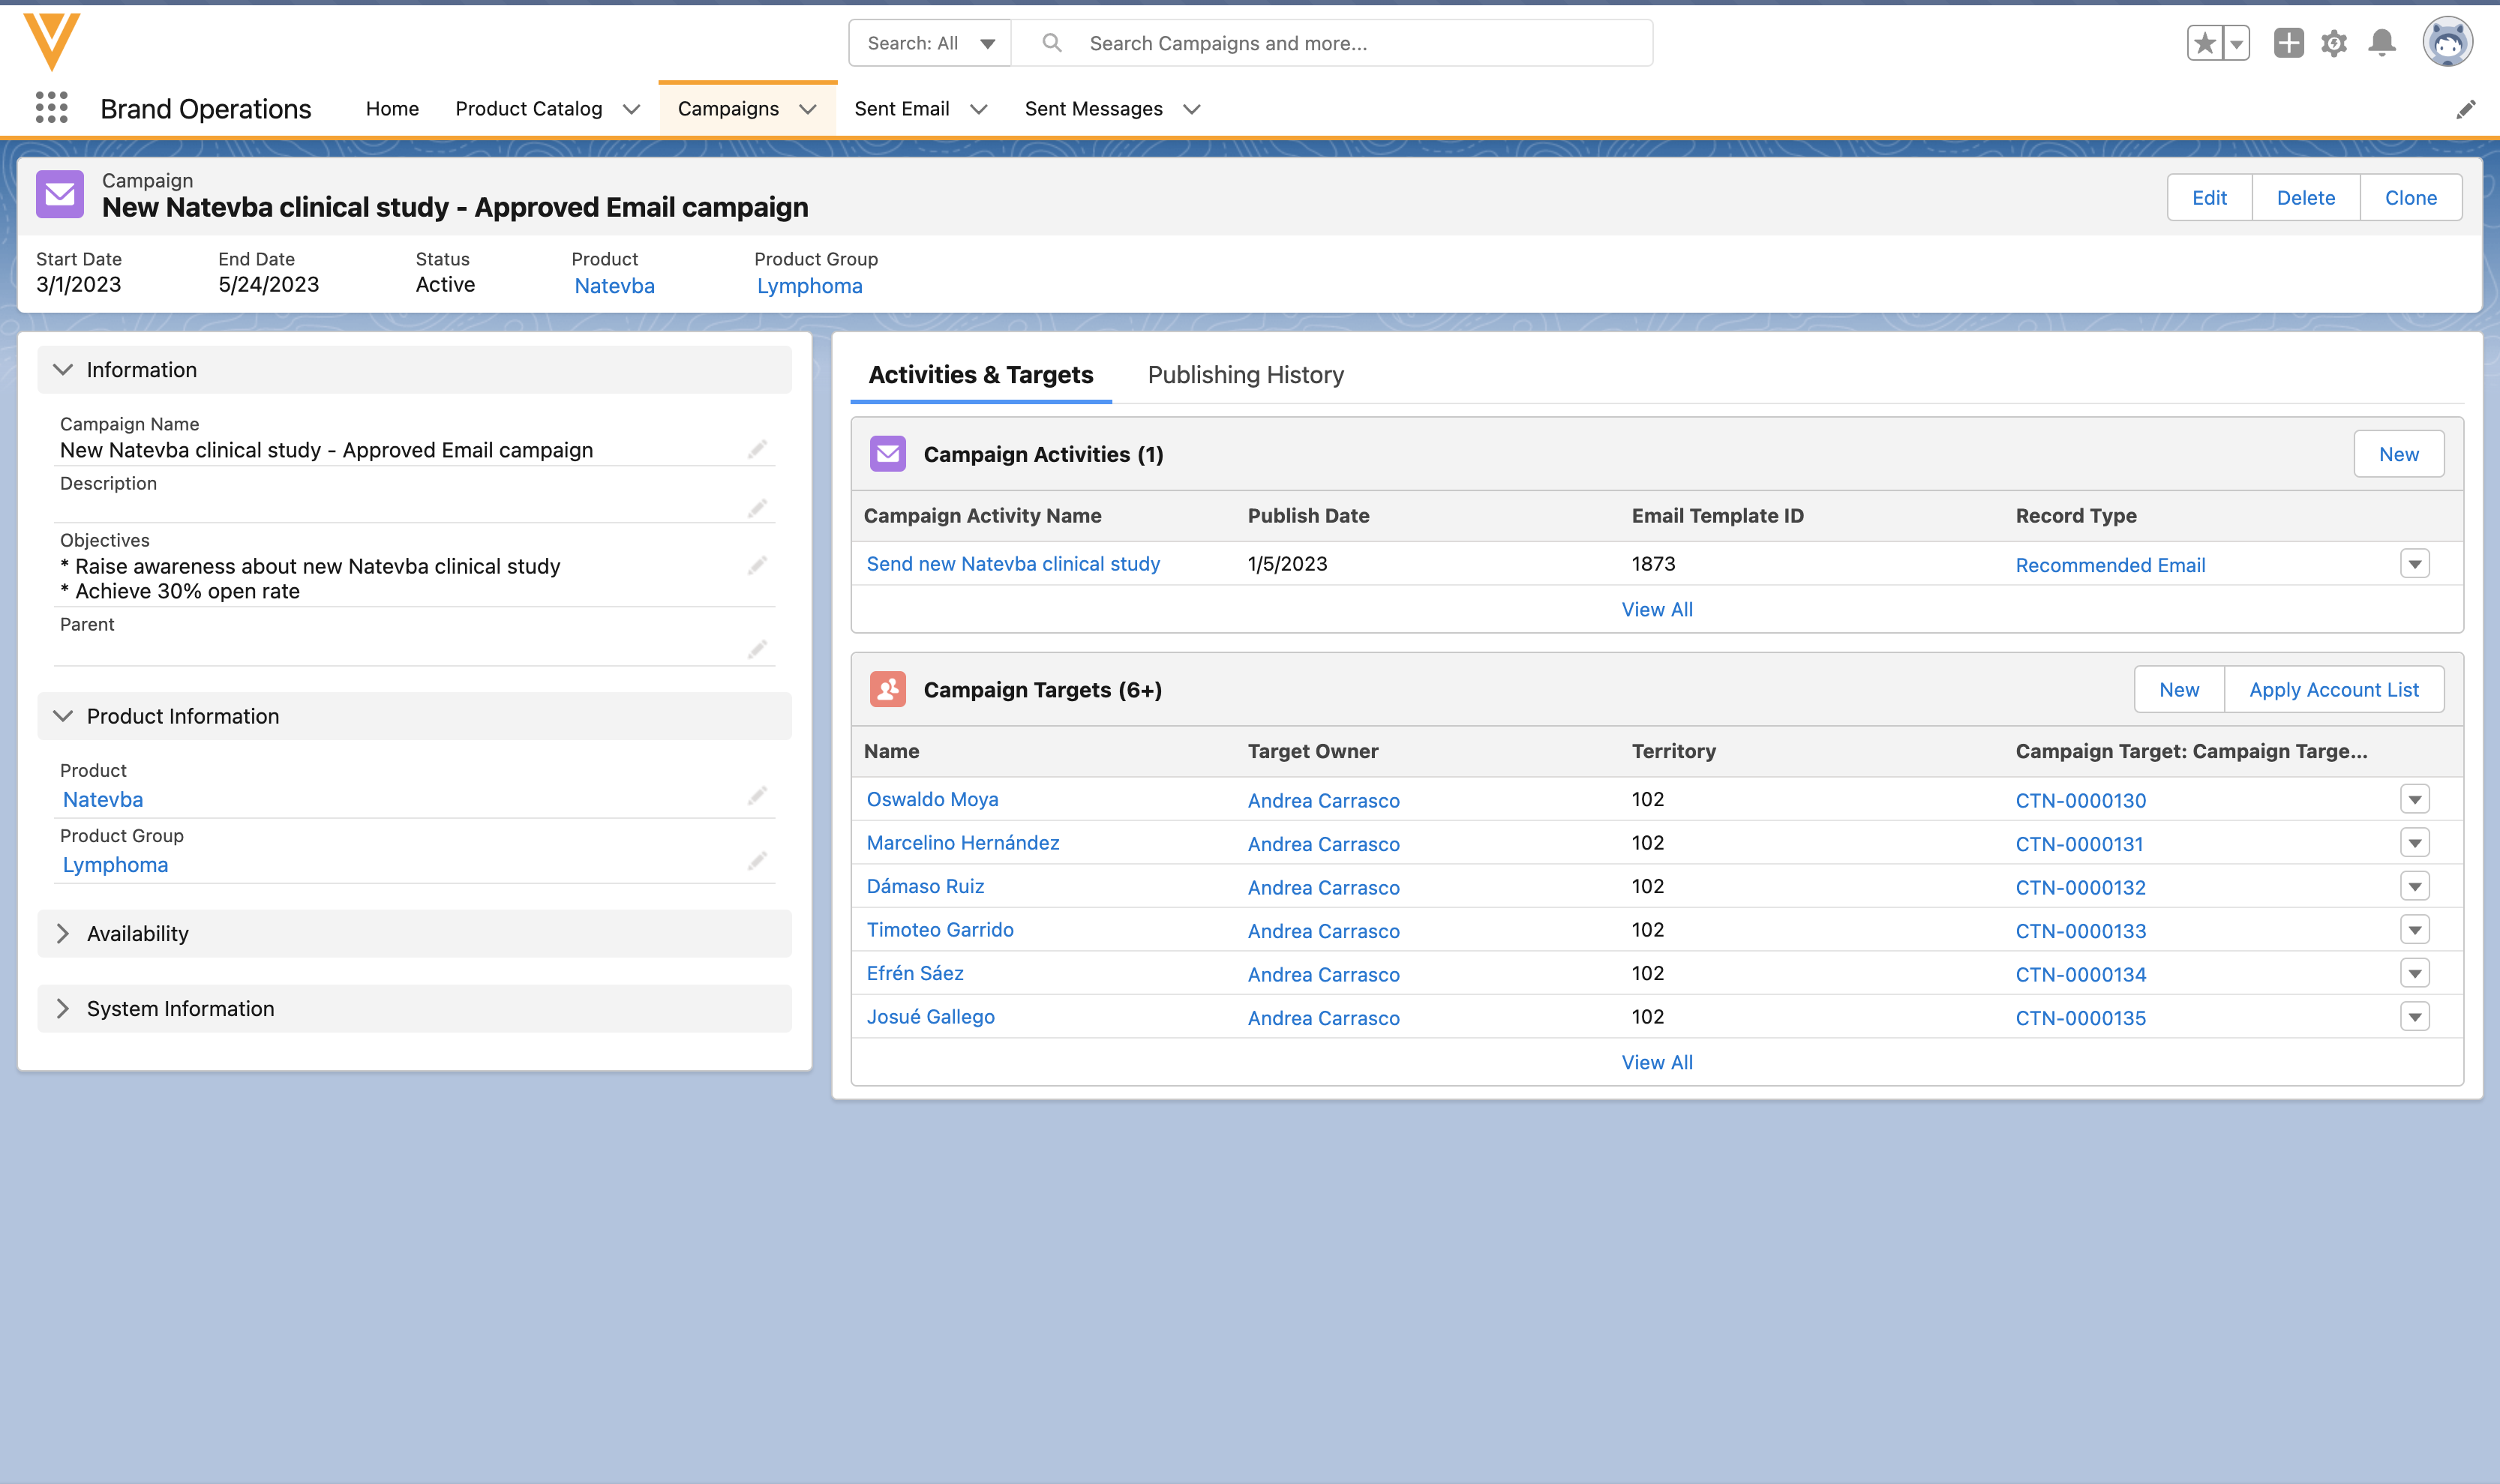
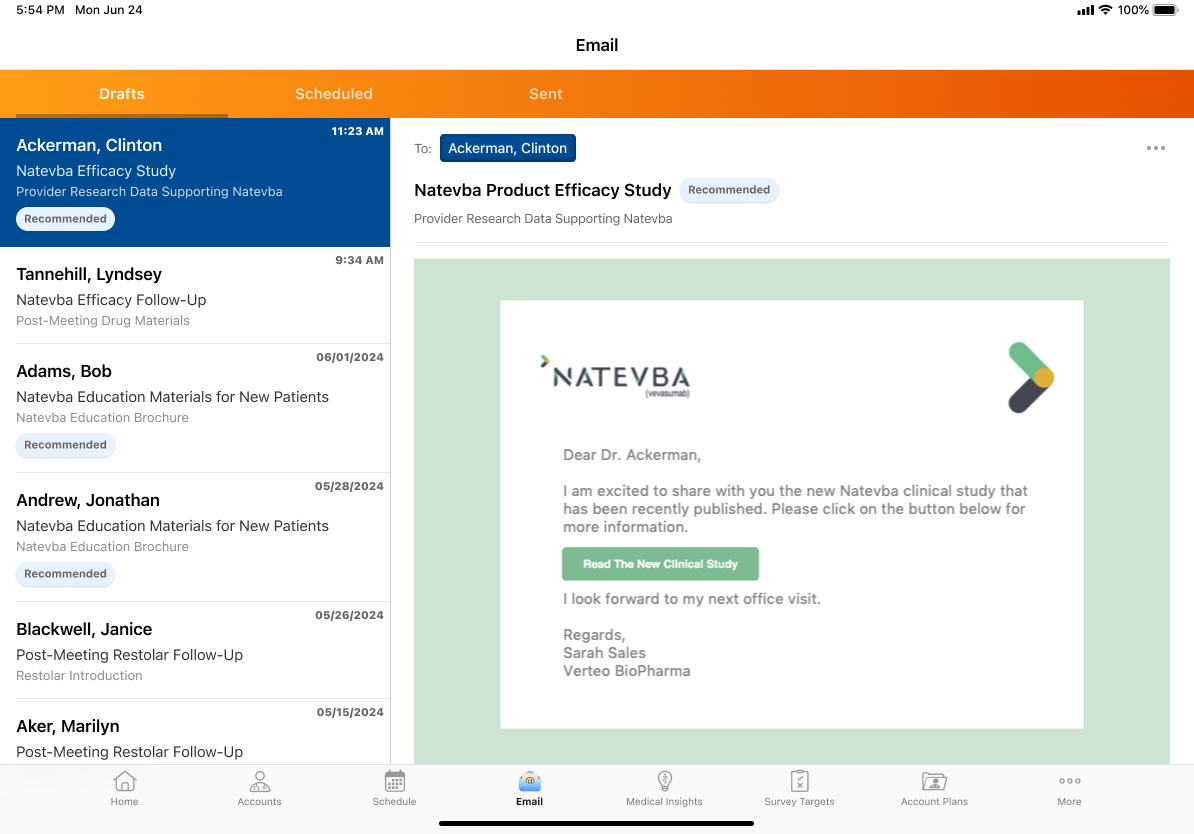
Recommended Emails
Recommended Emails allows business admins to publish fully prepared compliant emails for end users to send to accounts. Veeva CRM creates drafts or scheduled emails based on campaign records, and recommends them to end users to be modified, rescheduled, or sent as-is to the campaign targets.
For example, a new Cholecap study is available. Mark Mitchell, at Verteo Biopharma, prepares an email campaign to share the new information with HCPs. He selects the content, including the new study, and selects targets for the campaign. He publishes the campaign to create pre-composed emails for users to send to the targeted accounts. When Sarah Jones navigates to the Email Tab, she sees the recommended email for Dr. Clinton Ackerman and quickly sends the email as-is.
Recommended emails should only be created for users with access to the Email Tab, as users can only review and send Recommended emails from the Email Tab.
Creating Campaigns
Use campaigns to organize and define Recommended Email activities. For example, create a single campaign called “New Cholecap Study” to group all recommended Cholecap study emails for your targets.
See Veeva CRM Campaigns to create a campaign.
Creating Activities
To create an activity for a Recommended Email campaign:
- Select New from the Campaign Activities related list.
- Select the Recommended Email record type.
- Enter a name for the Campaign Activity, for example, New Cholecap Study.
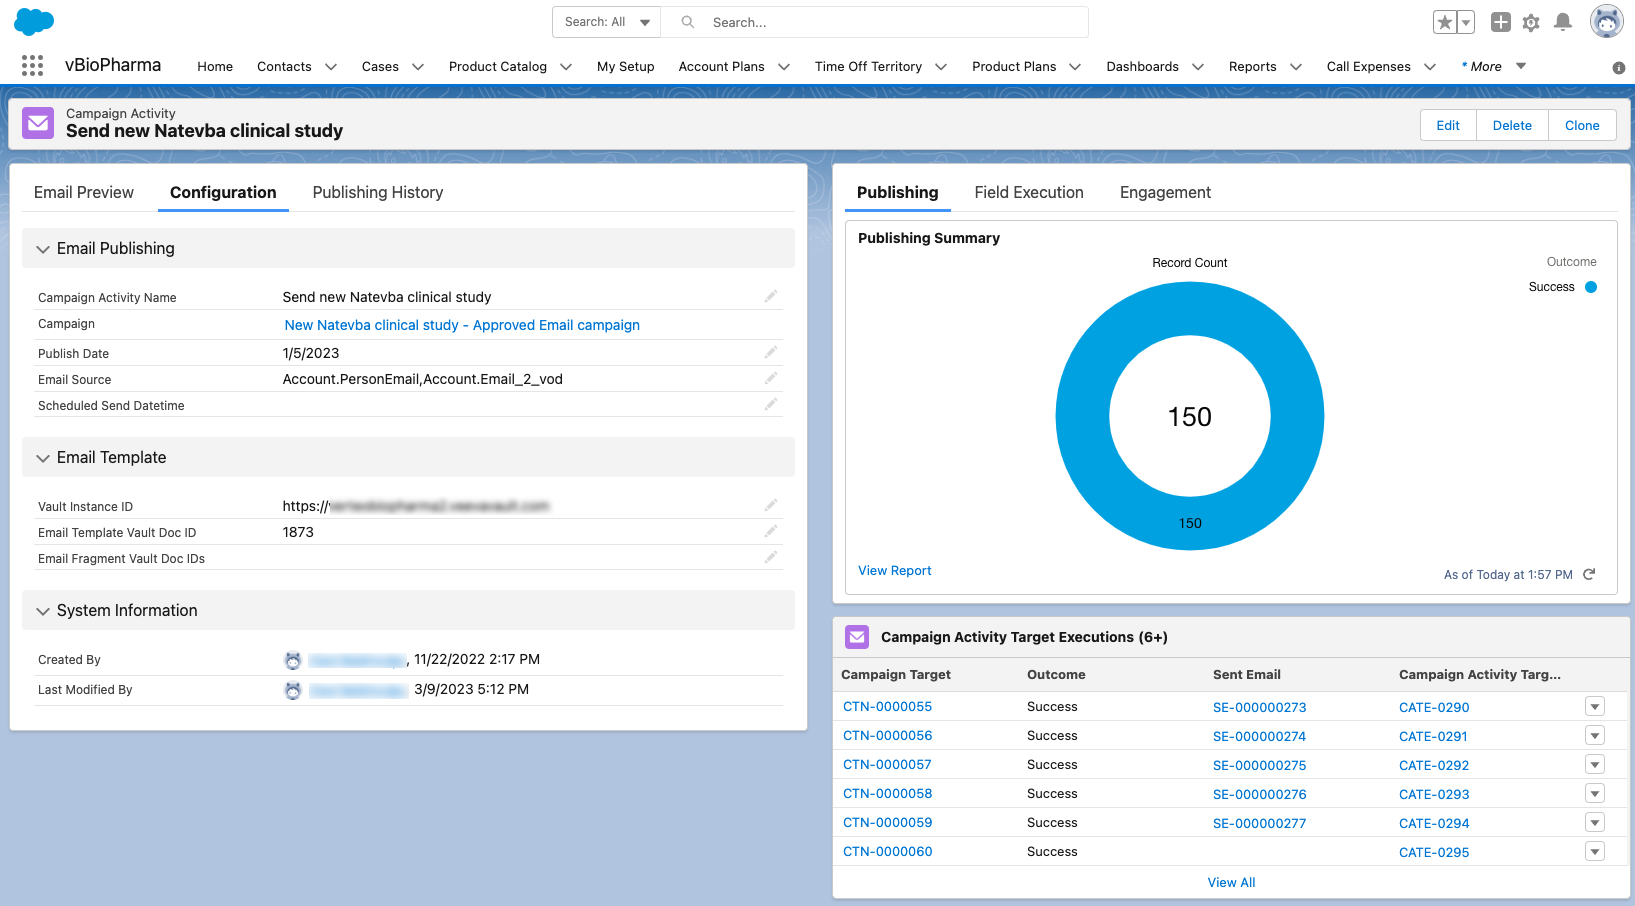
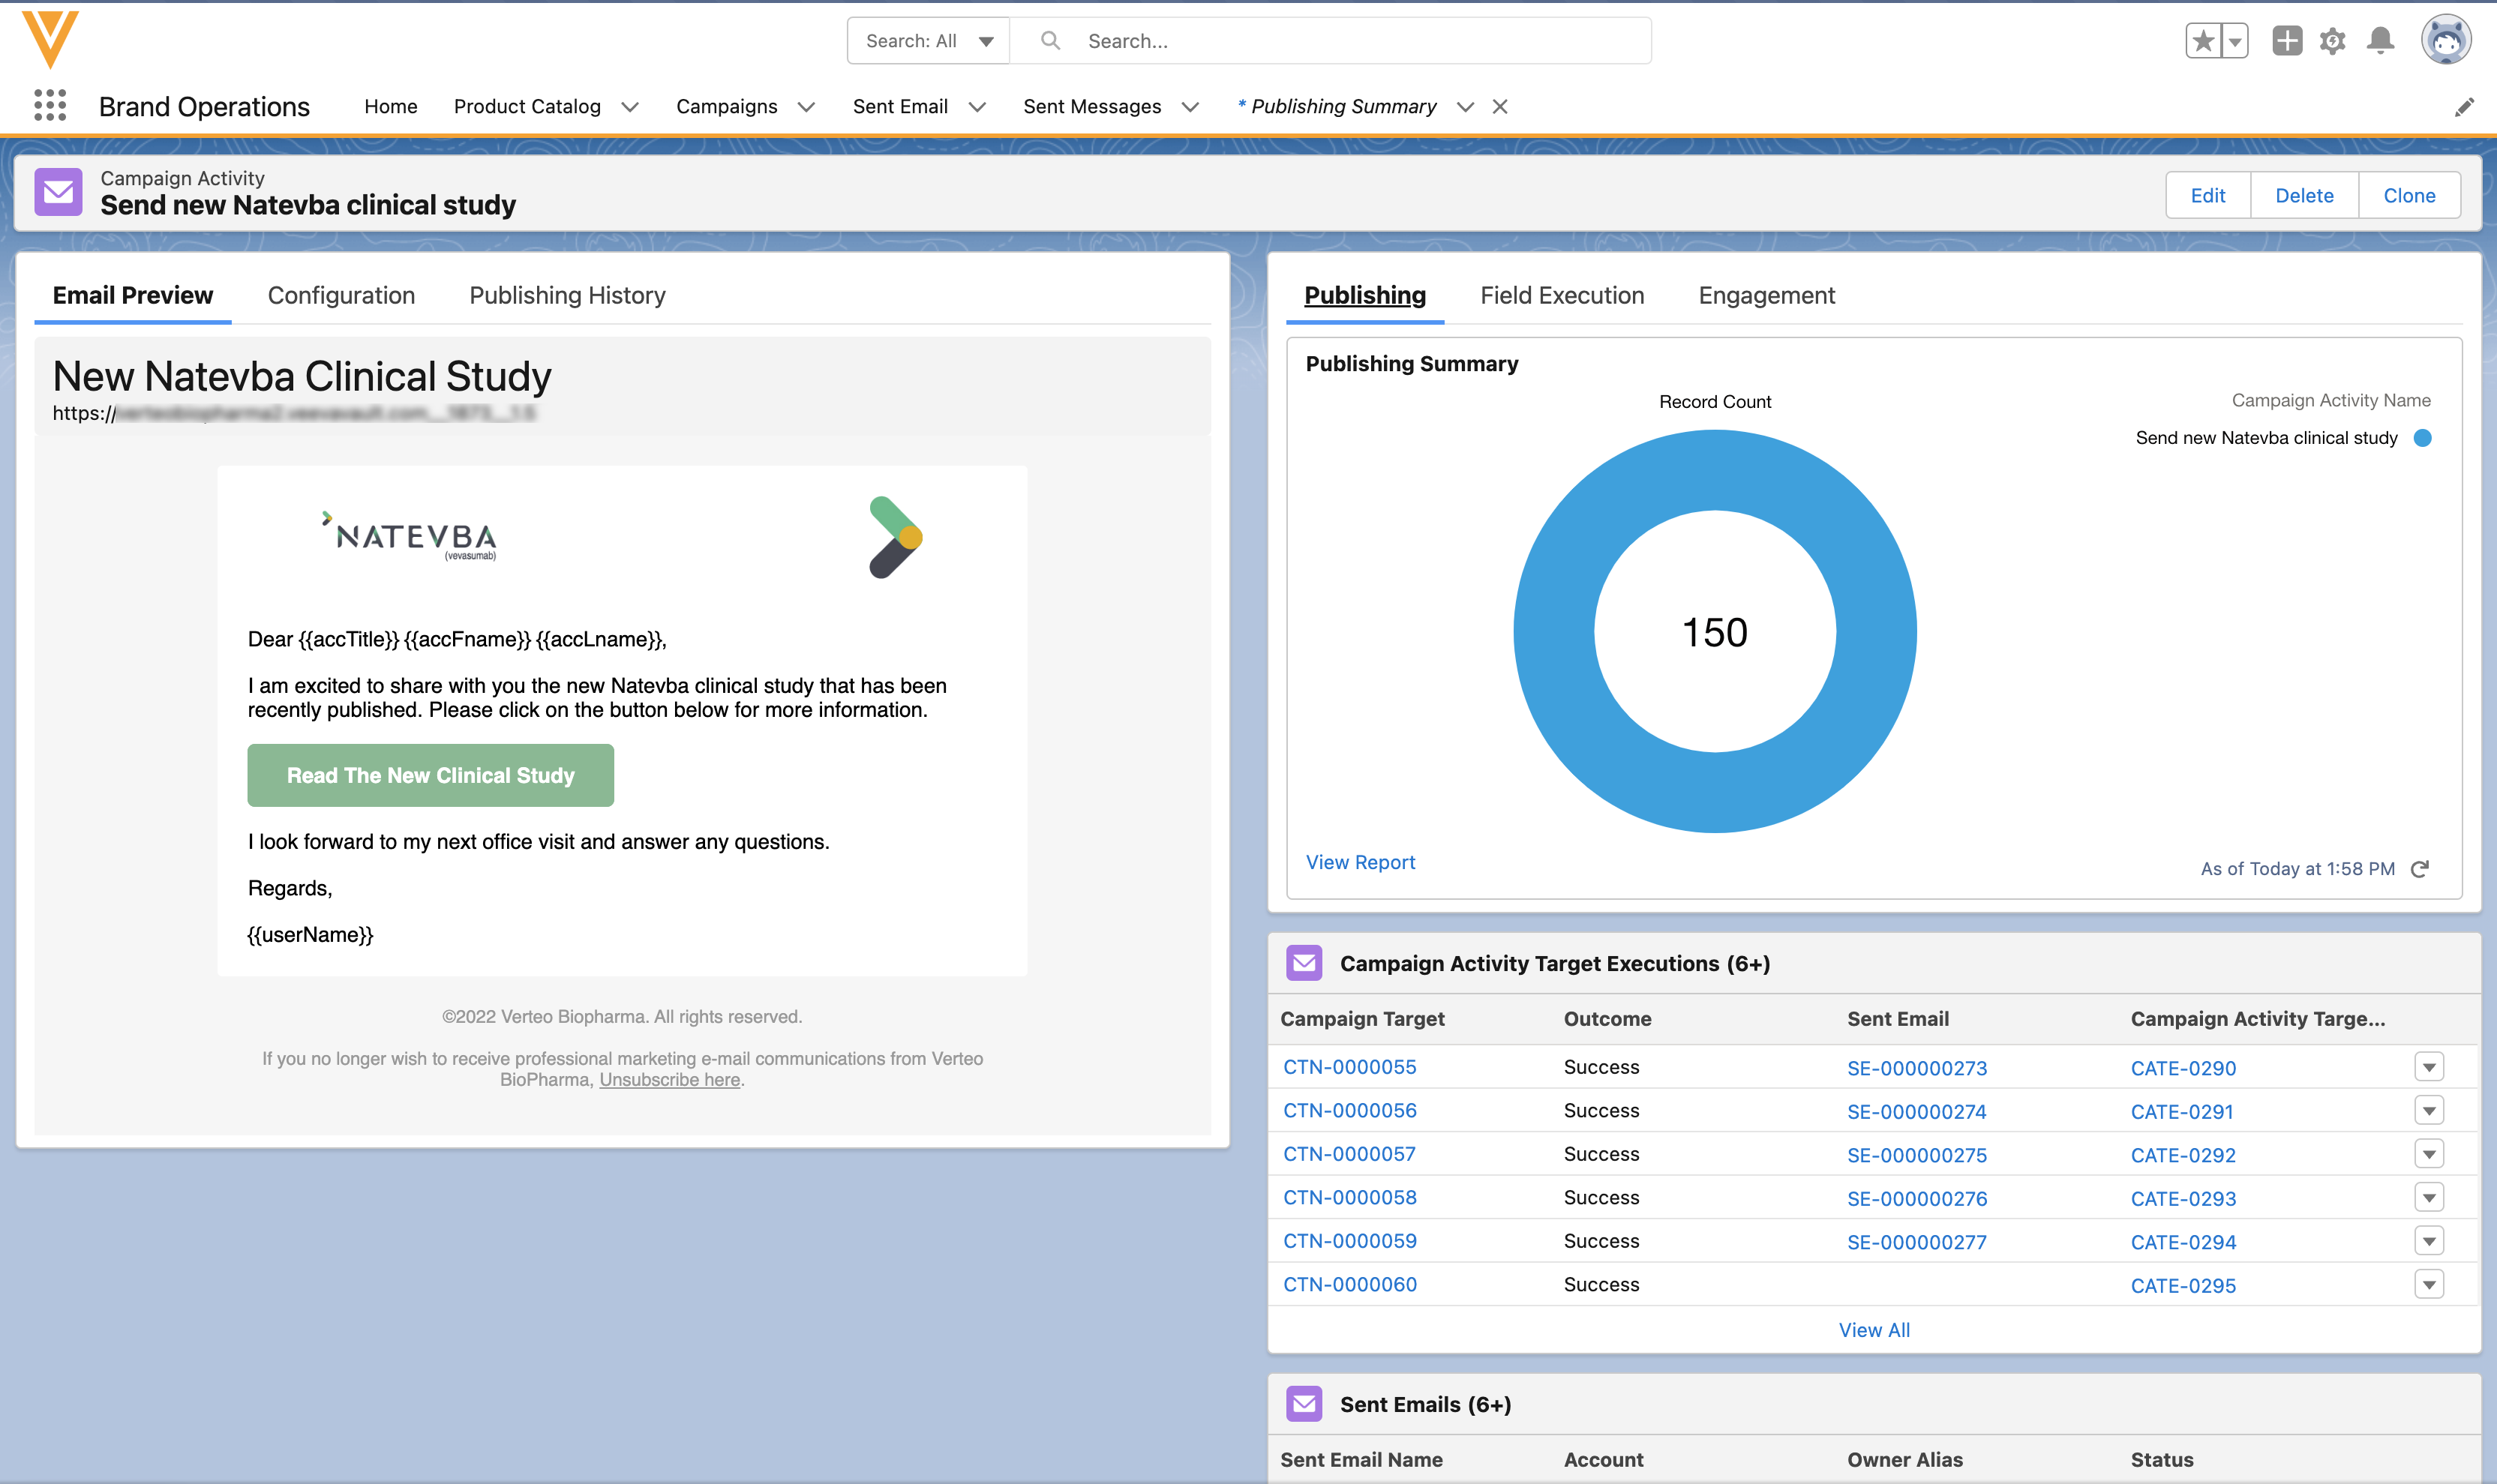
- Enter a Scheduled Send Datetime that is between the campaign activity start and end date to schedule the message, or leave the field blank to create draft emails.
- Enter a Publish Date. This date should be on or after the campaign activity start date, and before the end date. The Approved Email Integration Process creates the Sent Email records on this day.
The Publish Date should be at least one day before the Scheduled Send Datetime value when publishing scheduled recommended emails.
- Enter up to five fields from the Account or Address objects in the Email Source field, to use as sources where the process should look for the recipient’s email address. For more than one address, enter a comma-separated list. For example:
Account.PersonEmail,Account.Email_2,Address_vod__c.PM_Email
- If a single value is configured on the Campaign Activity, this field's value is used to determine the email source field
- If a delimited list is populated, each field is checked sequentially, following the order of configuration
Example value: Account.PersonEmail,Account.Email_2,Address_vod__c.PM_Email
In this example, the process checks Account.PersonEmail and finds no value. The process checks Account.Email_2 and finds 'test@email.com', looks no further, and uses this email address as the recipient of the email. (Address_vod__c.PM_Email is not checked.)
- If email fields are configured from the Address_vod object, the process finds the email as follows:
- Use the Preferred Address from the Target Owner's TSF record
- Use the Primary Address (if no TSF Preferred Address exists)
- Use the First Address (if no Primary exists) that has an email value
-
Enter a Vault Instance ID. This is the URL of the Vault instance where the email template and email fragments for the Campaign Activity are stored. For example: https://yourvault.veevavault.com
- Enter a Template ID using the template's Vault Doc ID. This template is used to render the message.
When a Tempate ID has multiple associated Approved_Document_vod records, the Campaign Activity Product (Product_vod) and / or Detail Group (Detail_Group_vod) fields are used to determine and return the appropriate Approved Document.
- When Product is populated and Detail Group is empty on the Campaign Activity, the rendered record is an exact match on the Product of the Approved Document, and Detail Group must be empty
- When both Product and Detail Group are populated on the Campaign Activity, the rendered record is an exact match on Product and Detail Group
For information on creating Approved Email templates and fragments, see Creating Approved Email Content.
Only templates with the Email_Template_vod record type are supported.
It is not recommended to configure Scheduled Recommended Emails with an email template that has User Input Tokens. Those are not resolved automatically and require end-user input.
The {{insertEmailFragments[Minimum,Maximum]}} token is not supported.
To prevent this template from displaying in other Send Email entry points, see Preventing Approved Email Content from Displaying.
- Enter any fragments to include in the message, in the Fragment IDs field. For more than one ID, enter a comma-separated list. For example: 5,29,92839
- Save the Campaign Activity.
- Preview the message to ensure everything looks as expected. If errors display, review the Requirements for Successful Email Publishing.
The email template preview may render differently from the sent email. We recommend using the email test process to view the final format of the email.
Requirements for Successful Email Publishing
- Campaign must have a status of Active
- Campaign Activity must be of type Recommended_Email_vod
- Campaign Target (Account) must have a Campaign Target Owner (User) assigned
- Campaign Target (Account) and Campaign Target Owner (User) must have a matching Territory
- Campaign Target Owner (User) must have access to the Product and Detail Group (if applicable) the Approved Email template is linked to (via MySetup)
- Email Template and Fragments must exist in CRM and must be in Approved status
- Campaign Target (Account) must be a person account
- Campaign Target (Account) must have an email address
- Consent is valid for the Campaign Target (Account) and the Email Template
- Email Template product cannot be listed as restricted for the Campaign Target Account
- If Allowed Products verification is enabled, the Email Template and Email Fragment product(s) are listed as allowed products on the Campaign Target's (Account) TSF record
-
The matching of the Campaign Target's (Account) Territory to the TSF territory (TSF_vod.Territory_vod) is case-sensitive; the process does not complete successfully if the case does not match
This validation is skipped if the Allowed_Products_vod field is blank.
Adding Campaign Targets
Campaign managers can add targets using the following methods:
- One at a time through the CRM interface
- Multiple at a time using Data Loading
For each target, specify the Account (email recipient), Target Owner User (email sender), and Territory.
Testing Recommended Email Campaigns
After creating a Recommended Email campaign, admins can test the campaign using a test email address. Emails are sent to the test address instead of the HCP email addresses.
The Email Template specified in the Activity must have a status of Approved in order for the test to work.
To test a Recommended Email campaign, populate the organization-wide or integration user profile’s APPROVED_EMAIL_TEST_ADDRESS_vod Approved Email custom setting with a test email address, for example test@verteo.com. When the Veeva Process Scheduler runs the Approved Email Process, the test address is used in place of all target Account email addresses. The process creates draft or scheduled emails that a test user (target owner) can view on their iPad, and either reschedule them or send them to the test email address.
The integration user's Approved Email Admin setting is not taken into consideration for Recommended Email campaigns.
For more information, see Testing Staged Approved Email Content.
Reviewing and Sending Recommended Emails
End users can access recommended emails from the Email Tab. A Recommended label displays in the List View and Preview View to indicate a message was created by a Recommended Email campaign.
After reviewing recommended emails, users can send, discard, or reschedule the emails created for the campaign.
When an organization creates a recommended email, that email displays on the Email Tab as a draft or scheduled email in the list of email messages for each campaign target. Draft emails remain in the Drafts tab until the user decides to send, schedule, or delete them; they are not automatically deleted when the campaign ends.
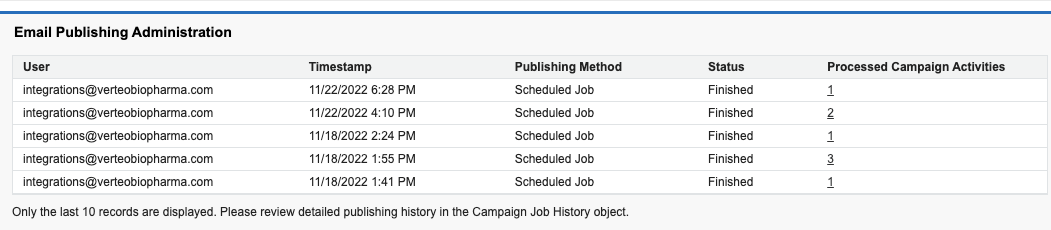
Viewing Publish History
Admins can view the Publishing History from the Approved Email Admin tab and the Campaign Activity record. The Publishing History shows the status of the process and the number of processed campaign activities. Admins can select the number of processed campaign activities to download a CSV file with details for each processed activity.
Campaign Activity Target Executions allow Campaign Managers to see a detailed overview of the publishing outcome. A record is created for each Campaign Target picked up during email publishing and contains a history record for the Sent Email created.
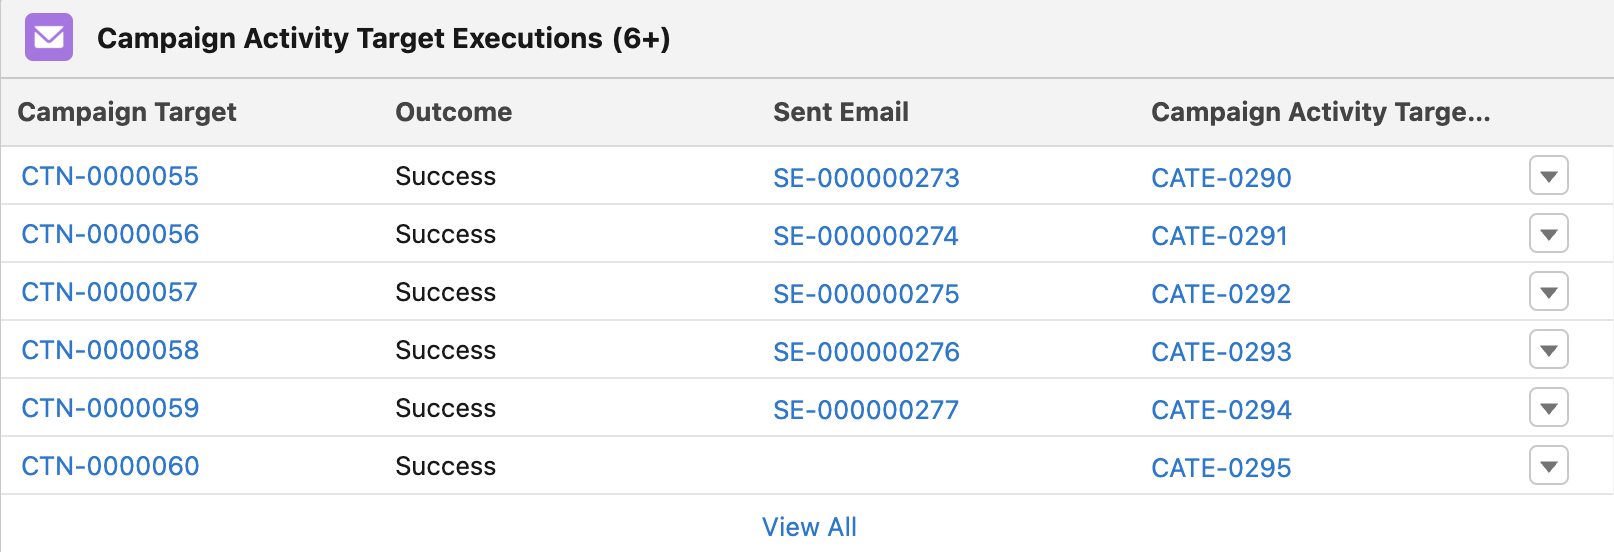
Records where the Outcome value is Success and the Sent Email lookup value is null indicate the rep discarded the recommended email from the Email Tab.
Troubleshooting Errors
Errors that can occur during the publish process are displayed in the logs. Campaign Job Histories store a summary of a recommended email publishing run. The related list can be added to either the Campaign or Campaign Activity page layouts.
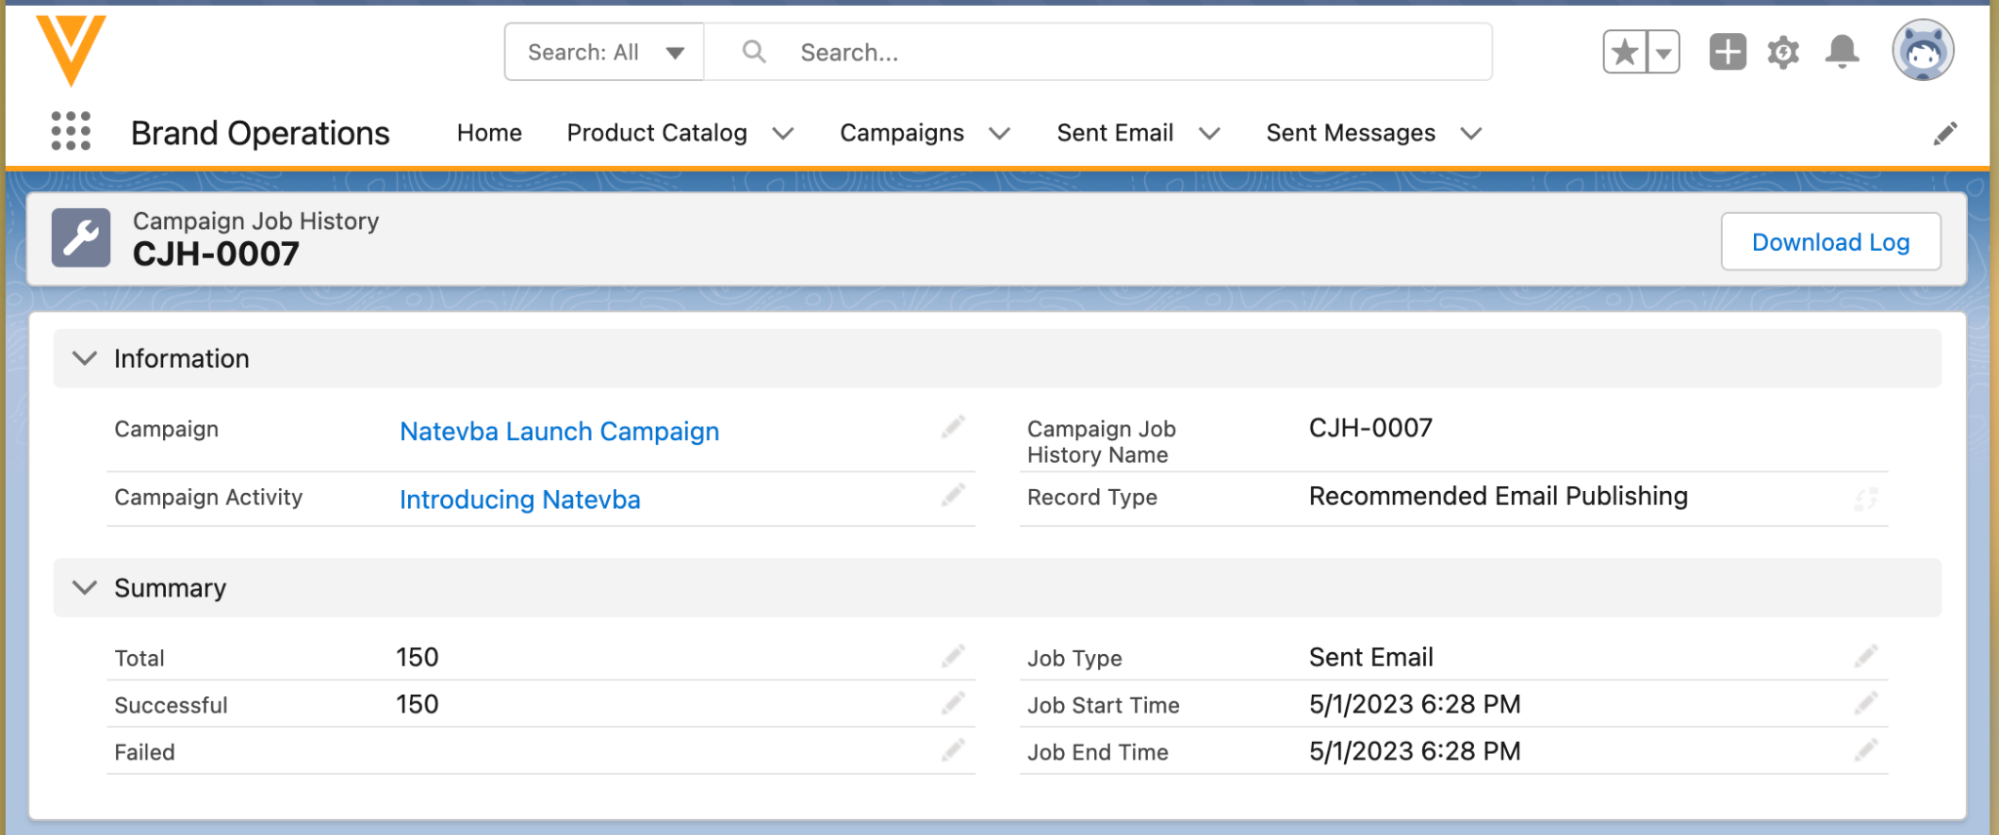
To access a log, select a Campaign Job History record from the related list and select the Download Log action.
For example, if a recommended email is created from a Campaign Activity that includes a template that is no longer valid, an error displays in the log. The recommended email cannot be published until the error is resolved.
After any errors are resolved, the next scheduled Integration Process will try publishing the recommended email.
Errors must be resolved within the same day for successful email publishing. The Integration Process will only retry the publishing of recommended emails that have a Publish Date of the current day.
Data Loading Campaigns, Targets, and Activities
Admins can data load campaigns, campaign targets, and campaign activities ready to be published. To data load recommended email campaign information, follow the sequence below and map the fields.
- Campaign_vod
- Name
- Start_Date_vod
- End_Date_vod
- Product_vod
- Status_vod
- Detail_Group_vod (optional)
- Parent_Campaign_vod (optional)
- Objectives_vod (optional)
- Description_vod (optional)
- Country_User_vod (optional)
- Campaign_Activity_vod
- Name
- Campaign_vod
- Publish_Date_vod
- Email_Source_vod
- Vault_DNS_vod
- Email_Template_ID_vod
- Email_Fragment_IDs_vod
- Scheduled_Send_Datetime_vod (optional)
- Description_vod (optional)
- Campaign_Target_vod
- Campaign_vod
- Target_Account_vod (SFDC ID of Account)
- Target_Owner_User_vod (SFDC ID of User)
- Territory_vod
- External ID
The data loading process validates the following details. The record is not saved if validation errors occur.
- Schedule Send Datetime, if populated, must be greater or equal to the parent campaign's Start Date and lower or equal to the parent campaign's End Date
- Schedule Send Datetime, if populated, must have a Publish Date at least 1 day earlier than the date of the Scheduled Send Datetime
- The Publish Date cannot be later than the campaign's End Date
- The Email_Source_vod field is limited to no more than 5 fields
Call Planning
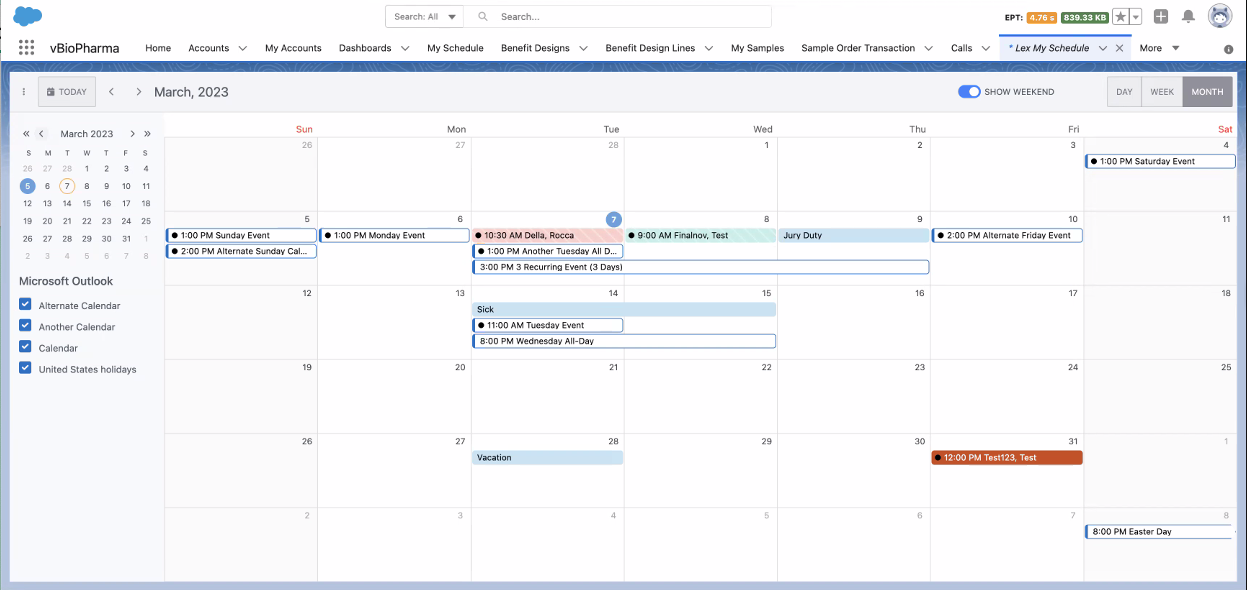
Lightning for My Schedule
Lightning for My Schedule provides users with improved performance and an enhanced Lightning UI. Once configured, users can access the following core functionality in Lightning for My Schedule:
- Scheduling Calls
- Scheduling a Call from a Suggestion
- Displaying Call Conflict Warnings
- Viewing and Searching Accounts in My Schedule
- Viewing Users' Calendars with Manager View
- Creating Unavailable Time Slots in My Schedule
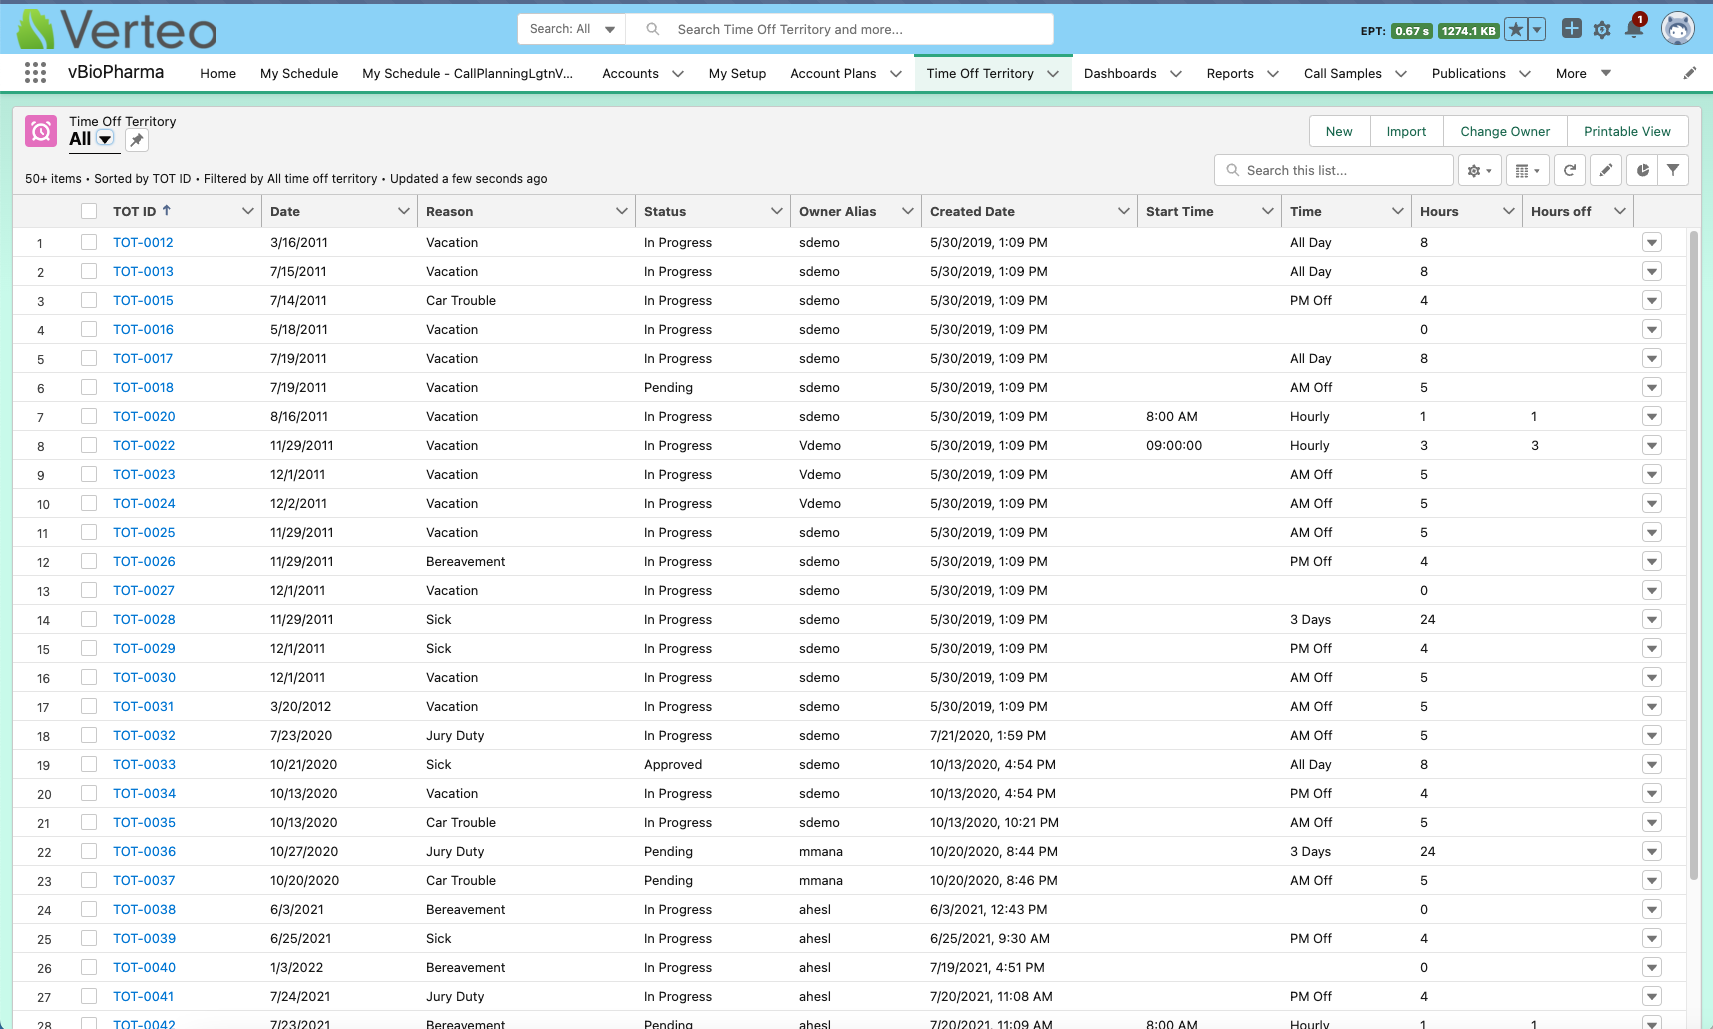
- Creating Time Off Territory in My Schedule
- Creating Unavailable Time Slots from Time Off Territory
- Including Weekend Days in Time Off Territory
- Managing Call Cycles
- Associating Accounts with Tracked CLM Activity
- Integrating My Schedule and Microsoft Outlook Calendars
- Users can view and edit the following entry types:
- Calls
- Calendar Entries
- Time Off Territory
- Medical Events
- Unavailable Time Slots - new with Lightning for My Schedule
- Users can view and action the following entry types:
- Unassigned Presentations - new with Lightning for My Schedule
- Meeting Requests - new with Lightning for My Schedule
- Users can view the following entry types:
- Events Management events
- Outlook Calendar entries - new with Lightning for My Schedule
For more details, see Functionality and Using Lightning for My Schedule. Additional Lightning for My Schedule functionality will be available in future releases.
Functionality
Users can access much of the same core functionality in Lightning for My Schedule as they did before. However, some existing My Schedule functionality is not supported in the current version of Lightning for My Schedule, and new functionality is available in Lightning.
For an overview of the differences in supported functionality between the existing My Schedule and Lightning for My Schedule, see the following table:
|
Functionality |
Supported in existing My Schedule |
Supported in Lightning for My Schedule |
|---|---|---|
|
|
|
|
|
Editing Entries Within My Schedule for:
|

|

|
|
|
|
|
|
|
|
|
|
|
|
|
|
Integrated Scheduling: Accepting and Declining Meeting Requests in My Schedule |
|
|
|
Creating, viewing, and editing Unavailable Time Slots |
|
|
|
|
|
|
|
|
|
|
|
|
|
|
|
|
|
|
|
Creating new calendar entries |
|
* |
|
Deleting calls, calendar entries, or Time Off Territory |
|
* |
|
Rescheduling calendar entries |
|
|
|
Custom filtering and display-by functionality: |
|
|
|
|
|
|
|
|
|
|
|
|
|
|
|
Viewing Pre-Call and Next-Call Notes in Agenda View |
|
|
|
|
|
|
|
|
|
|
|
Additional options on the call context menu in My Schedule, for example:
|
|
|
*Partially supported depending on the configuration of your org. See Partially Supported Functionality for more information.
Using My Schedule for Lightning
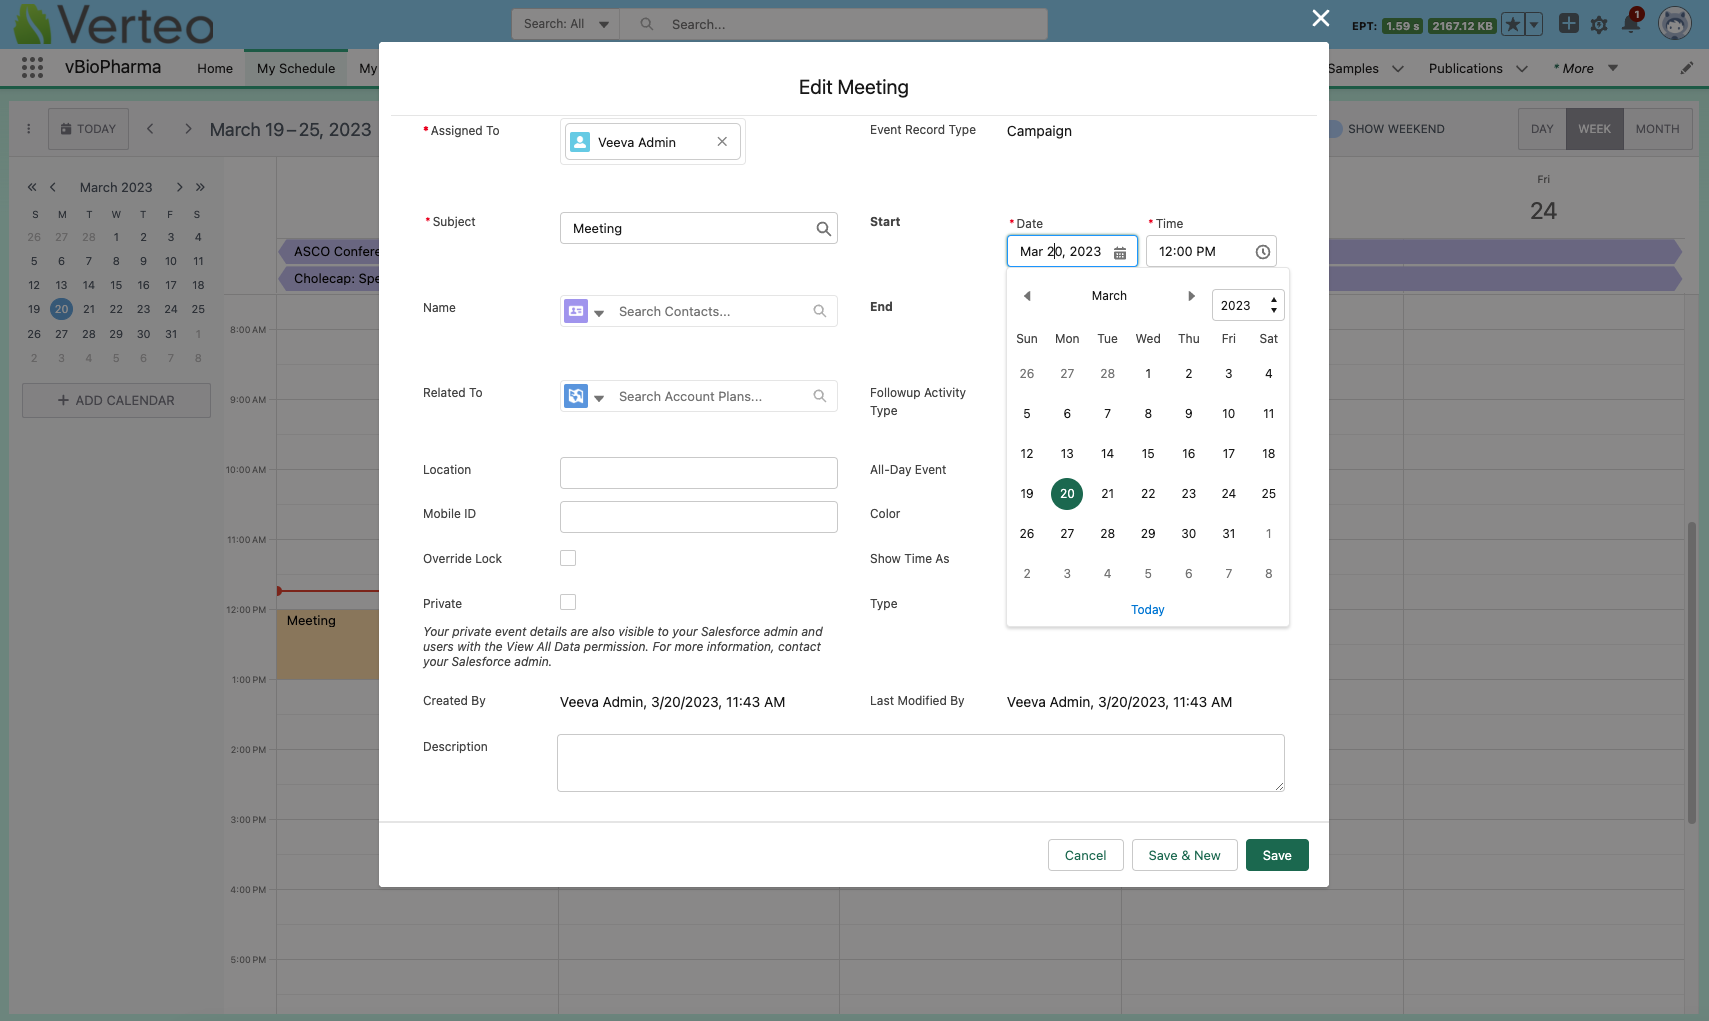
Scheduling Calls in Lightning for My Schedule
To schedule a call, left select a time slot on the calendar, then select Add Call to display the account search modal.
Users cannot create calls against child accounts in Lightning for My Schedule. Users can edit and view calls against child accounts.
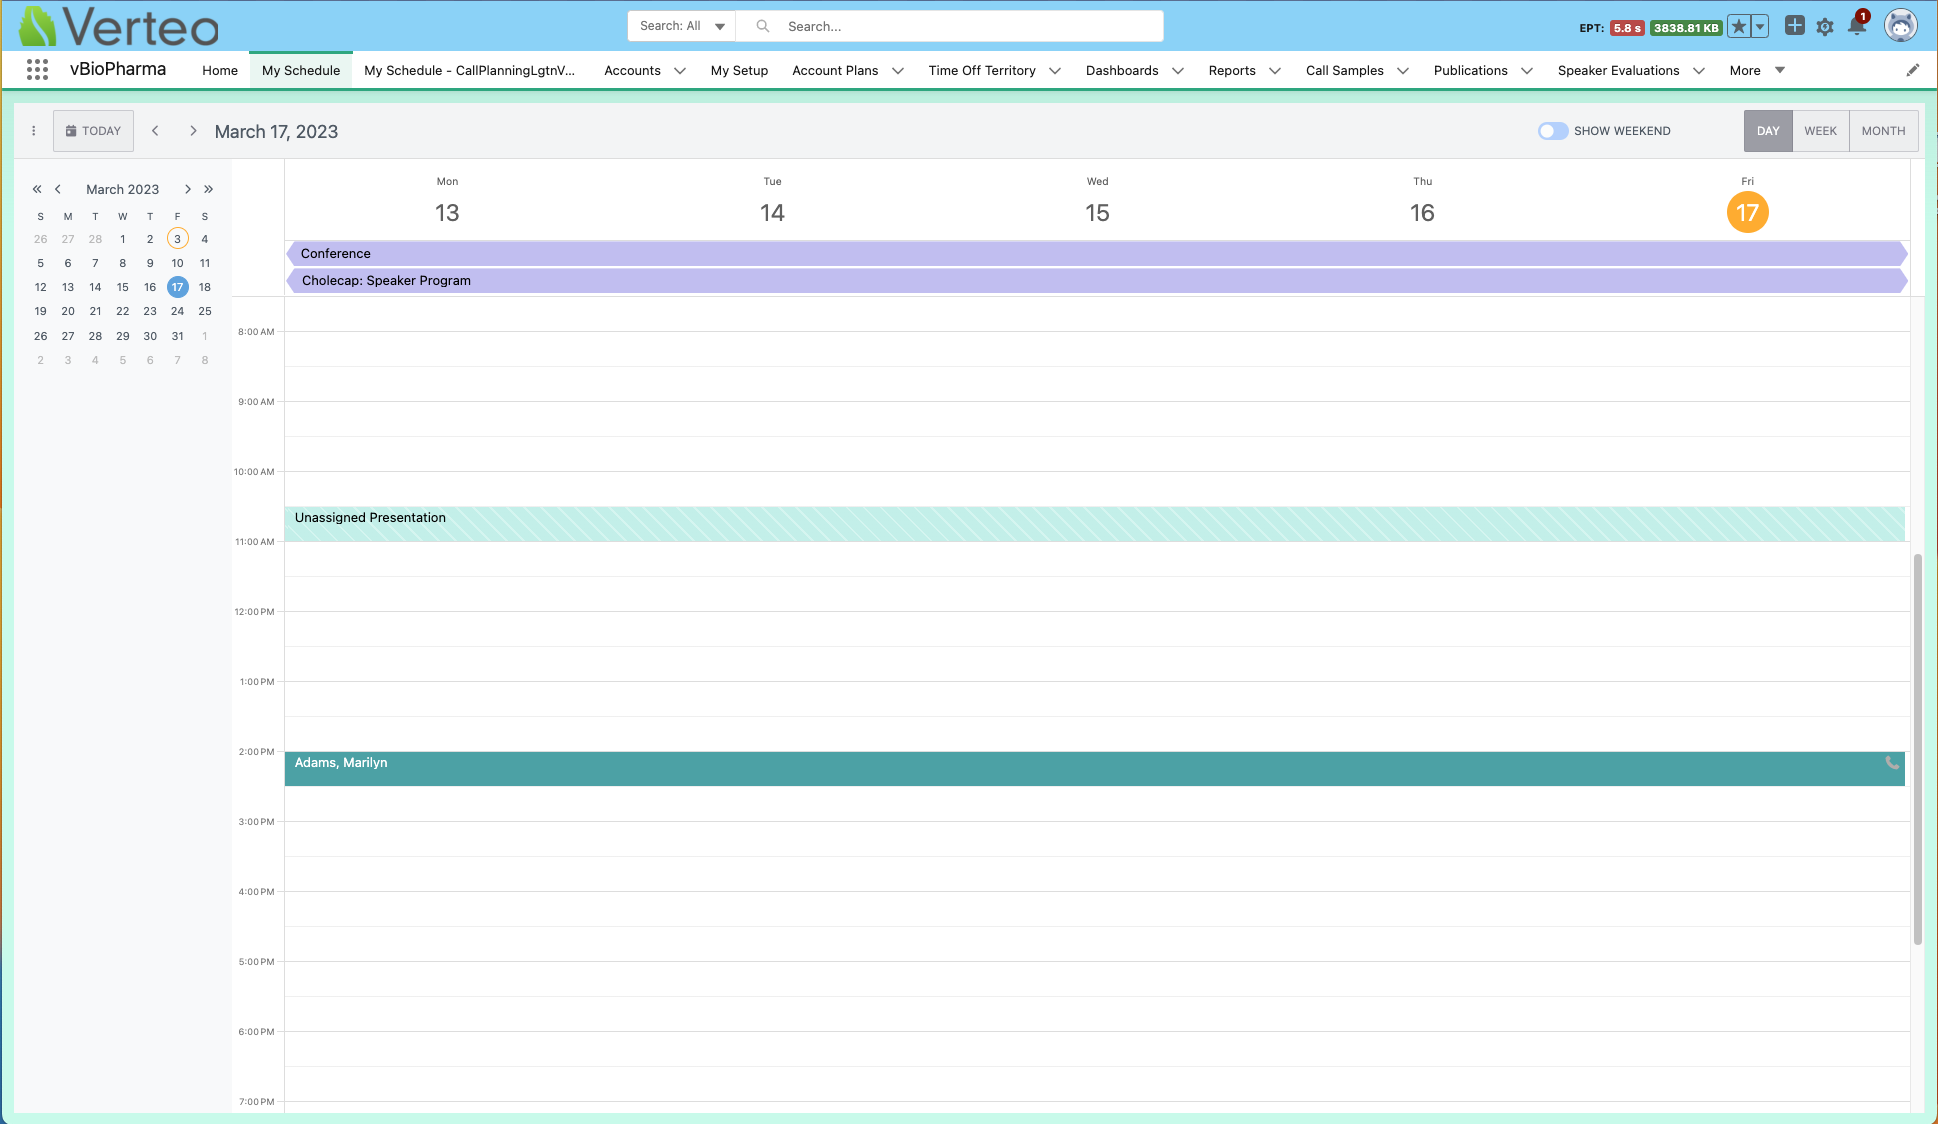
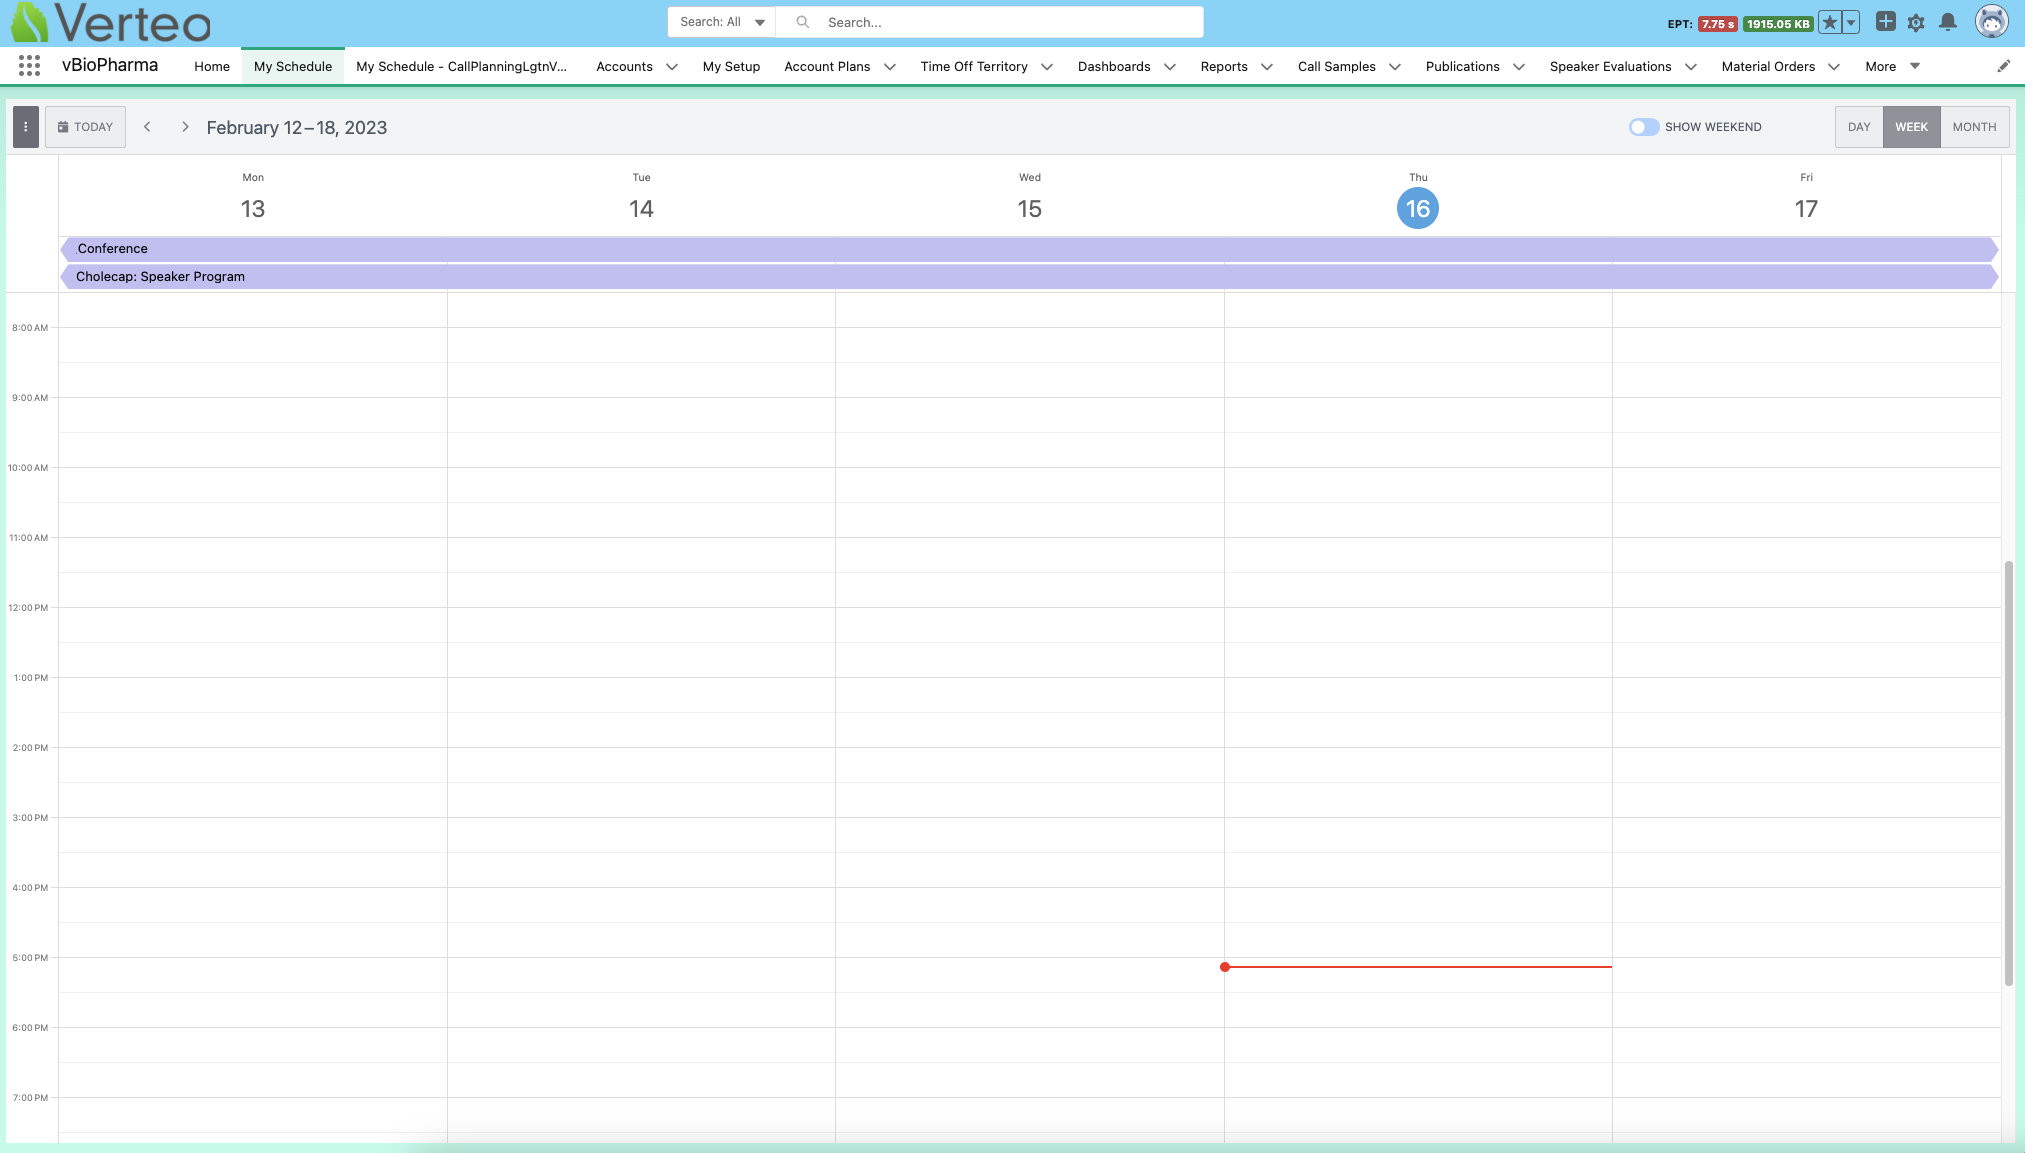
Using My Schedule in Day View
Day View displays users’ daily agenda, with other days of the week available at the top of the calendar. Unlike the existing My Schedule, pre-call and next call notes do not display.
Viewing the Calendar Panel
A calendar displays in the upper left corner of My Schedule. To change dates, users can either select a date from this calendar or use the previous and next buttons. To quickly return to the current date, select the Today button.
To hide the calendar panel, select the sidebar button to the left of the Today button.
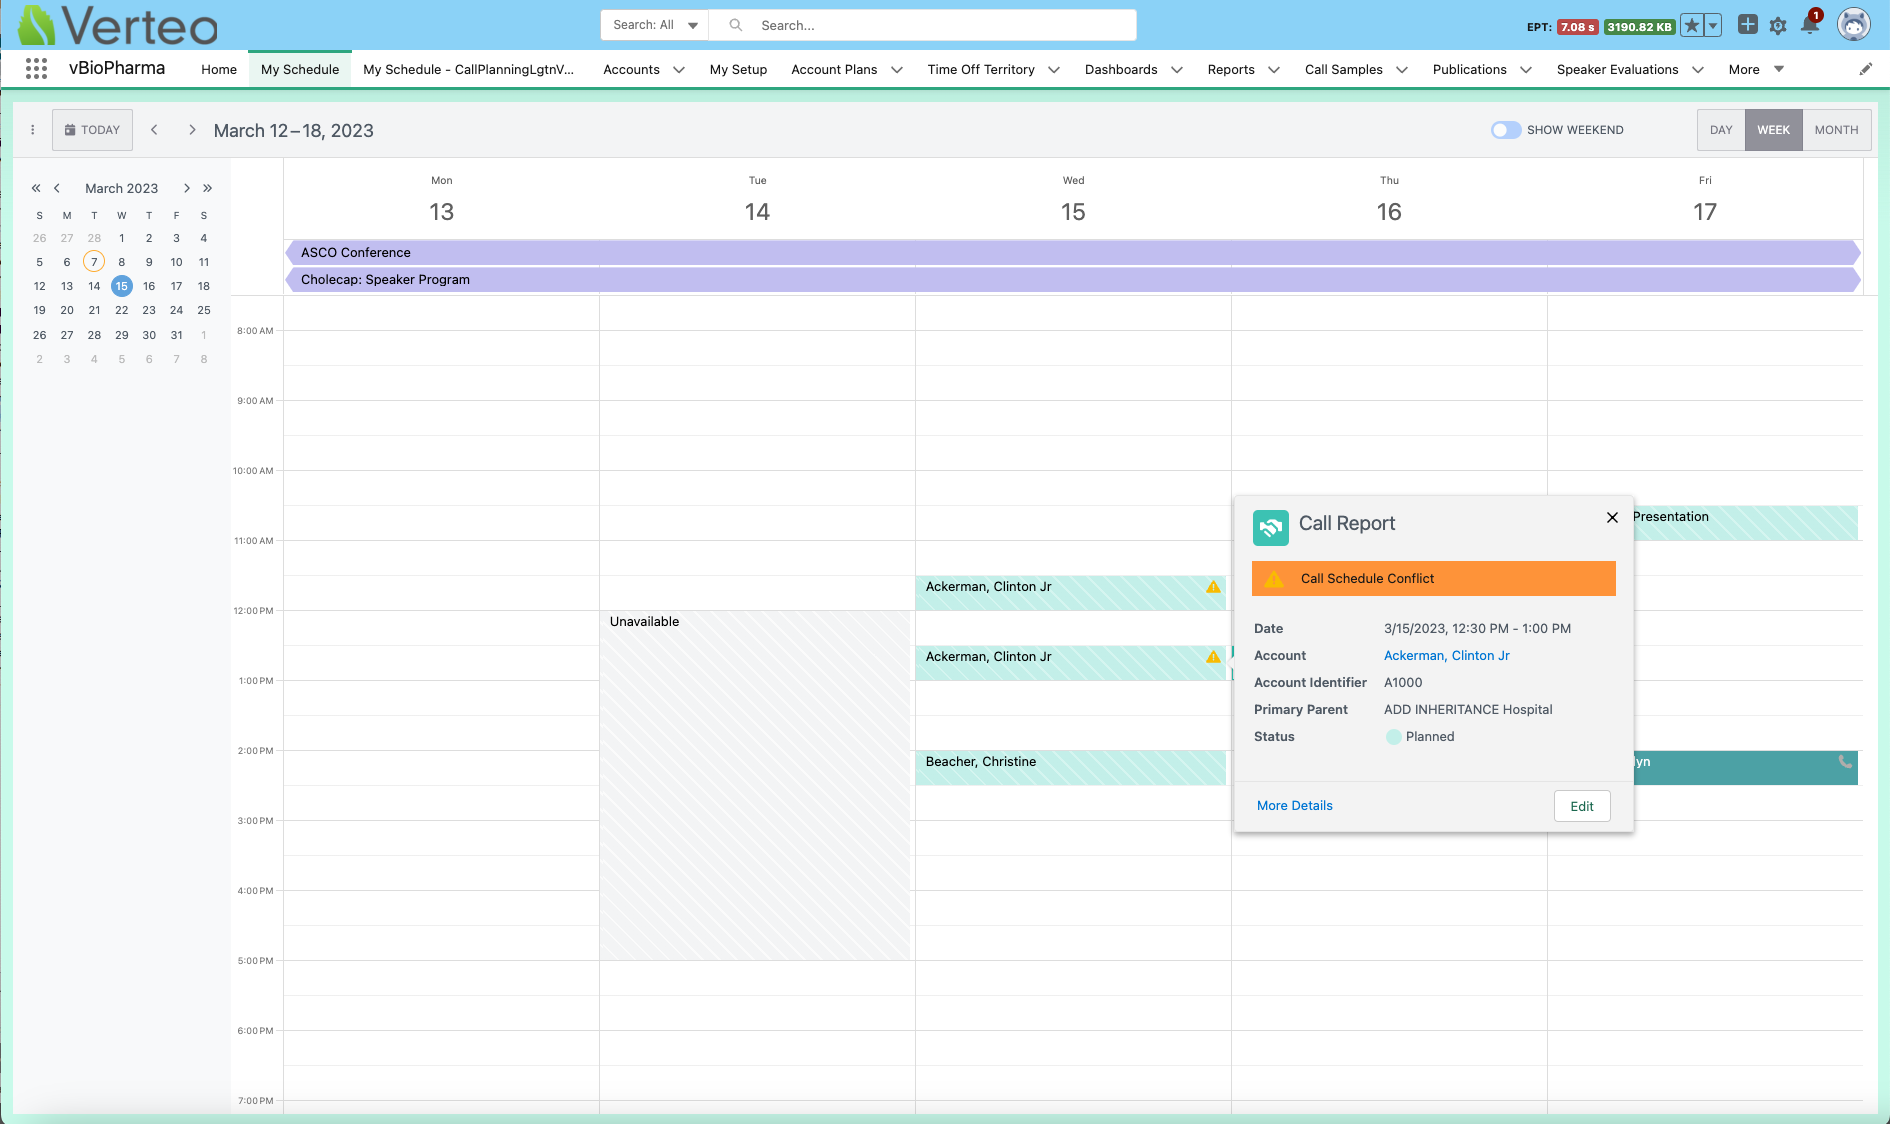
Viewing the Entry Popover
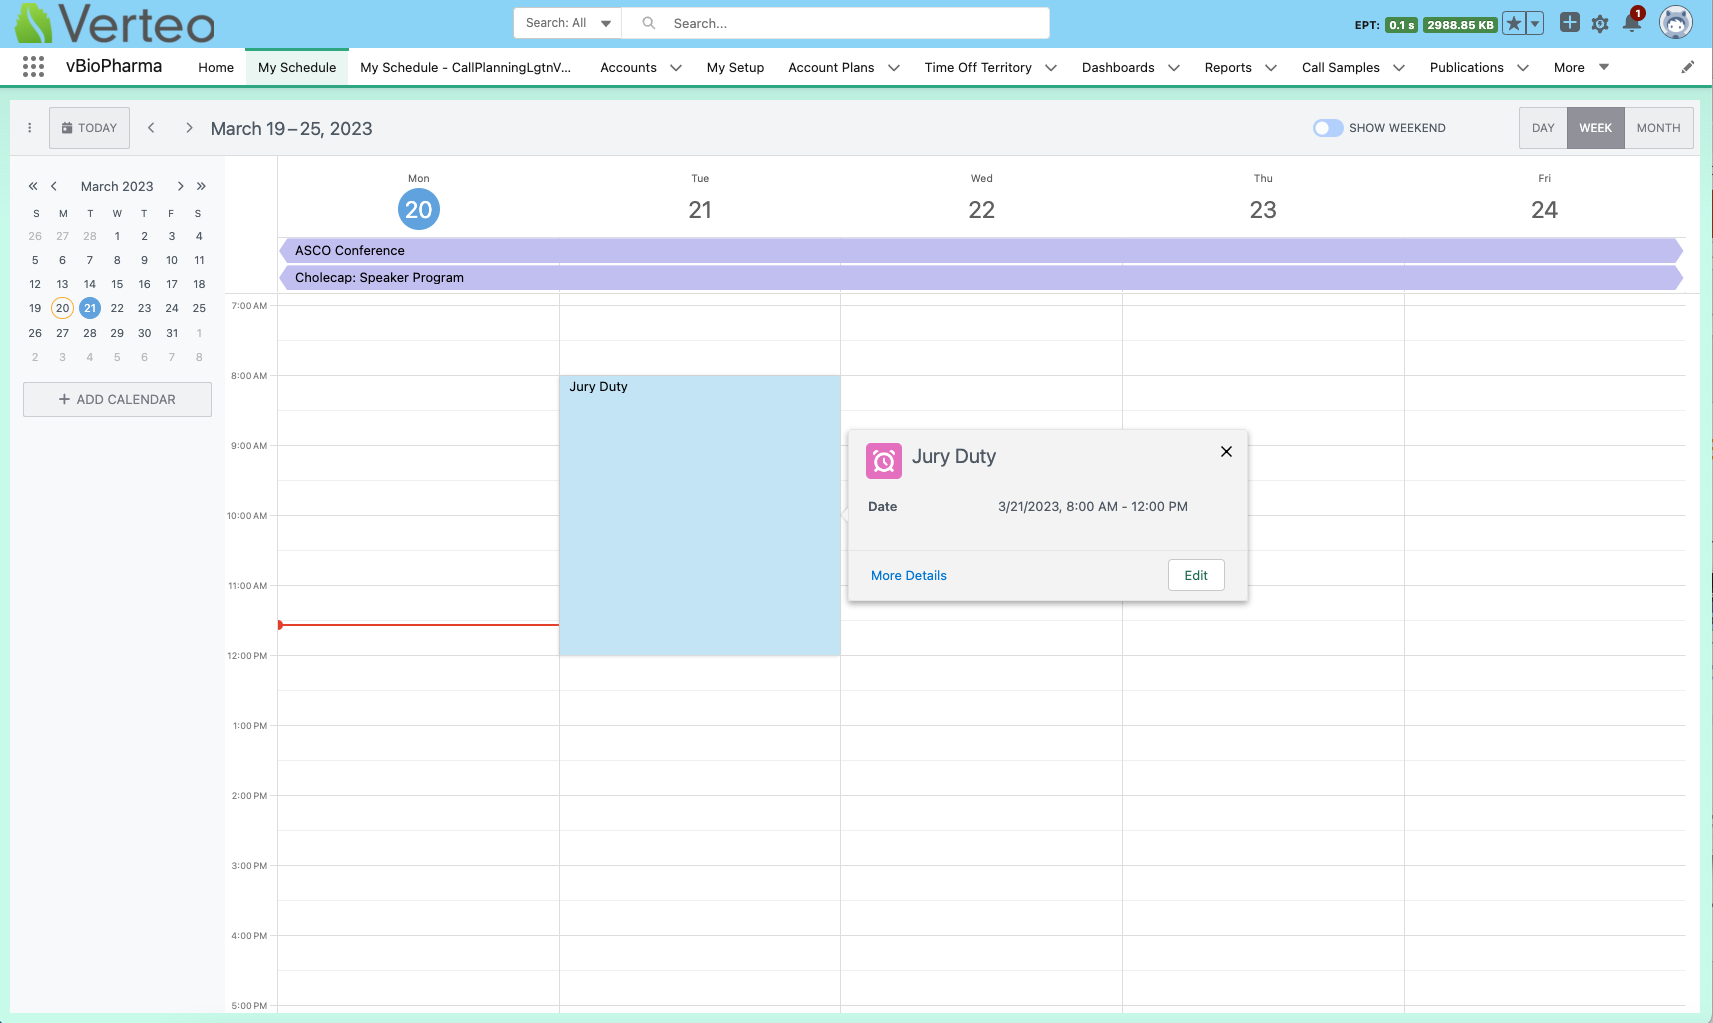
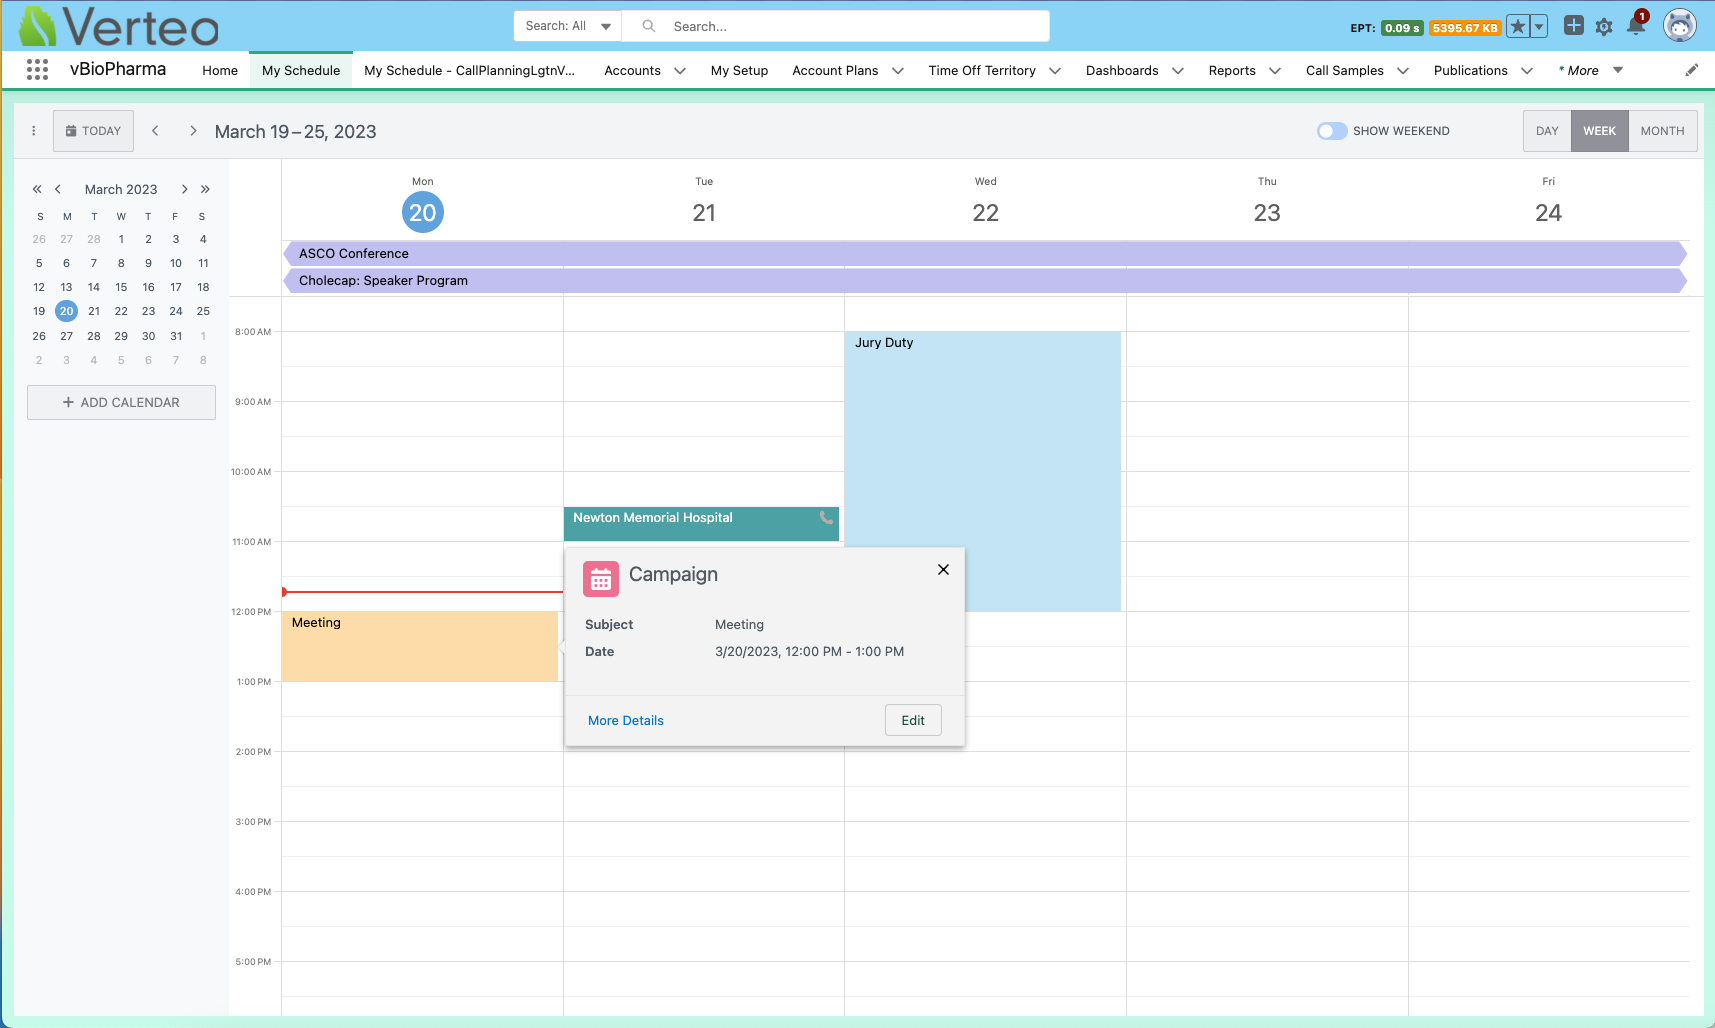
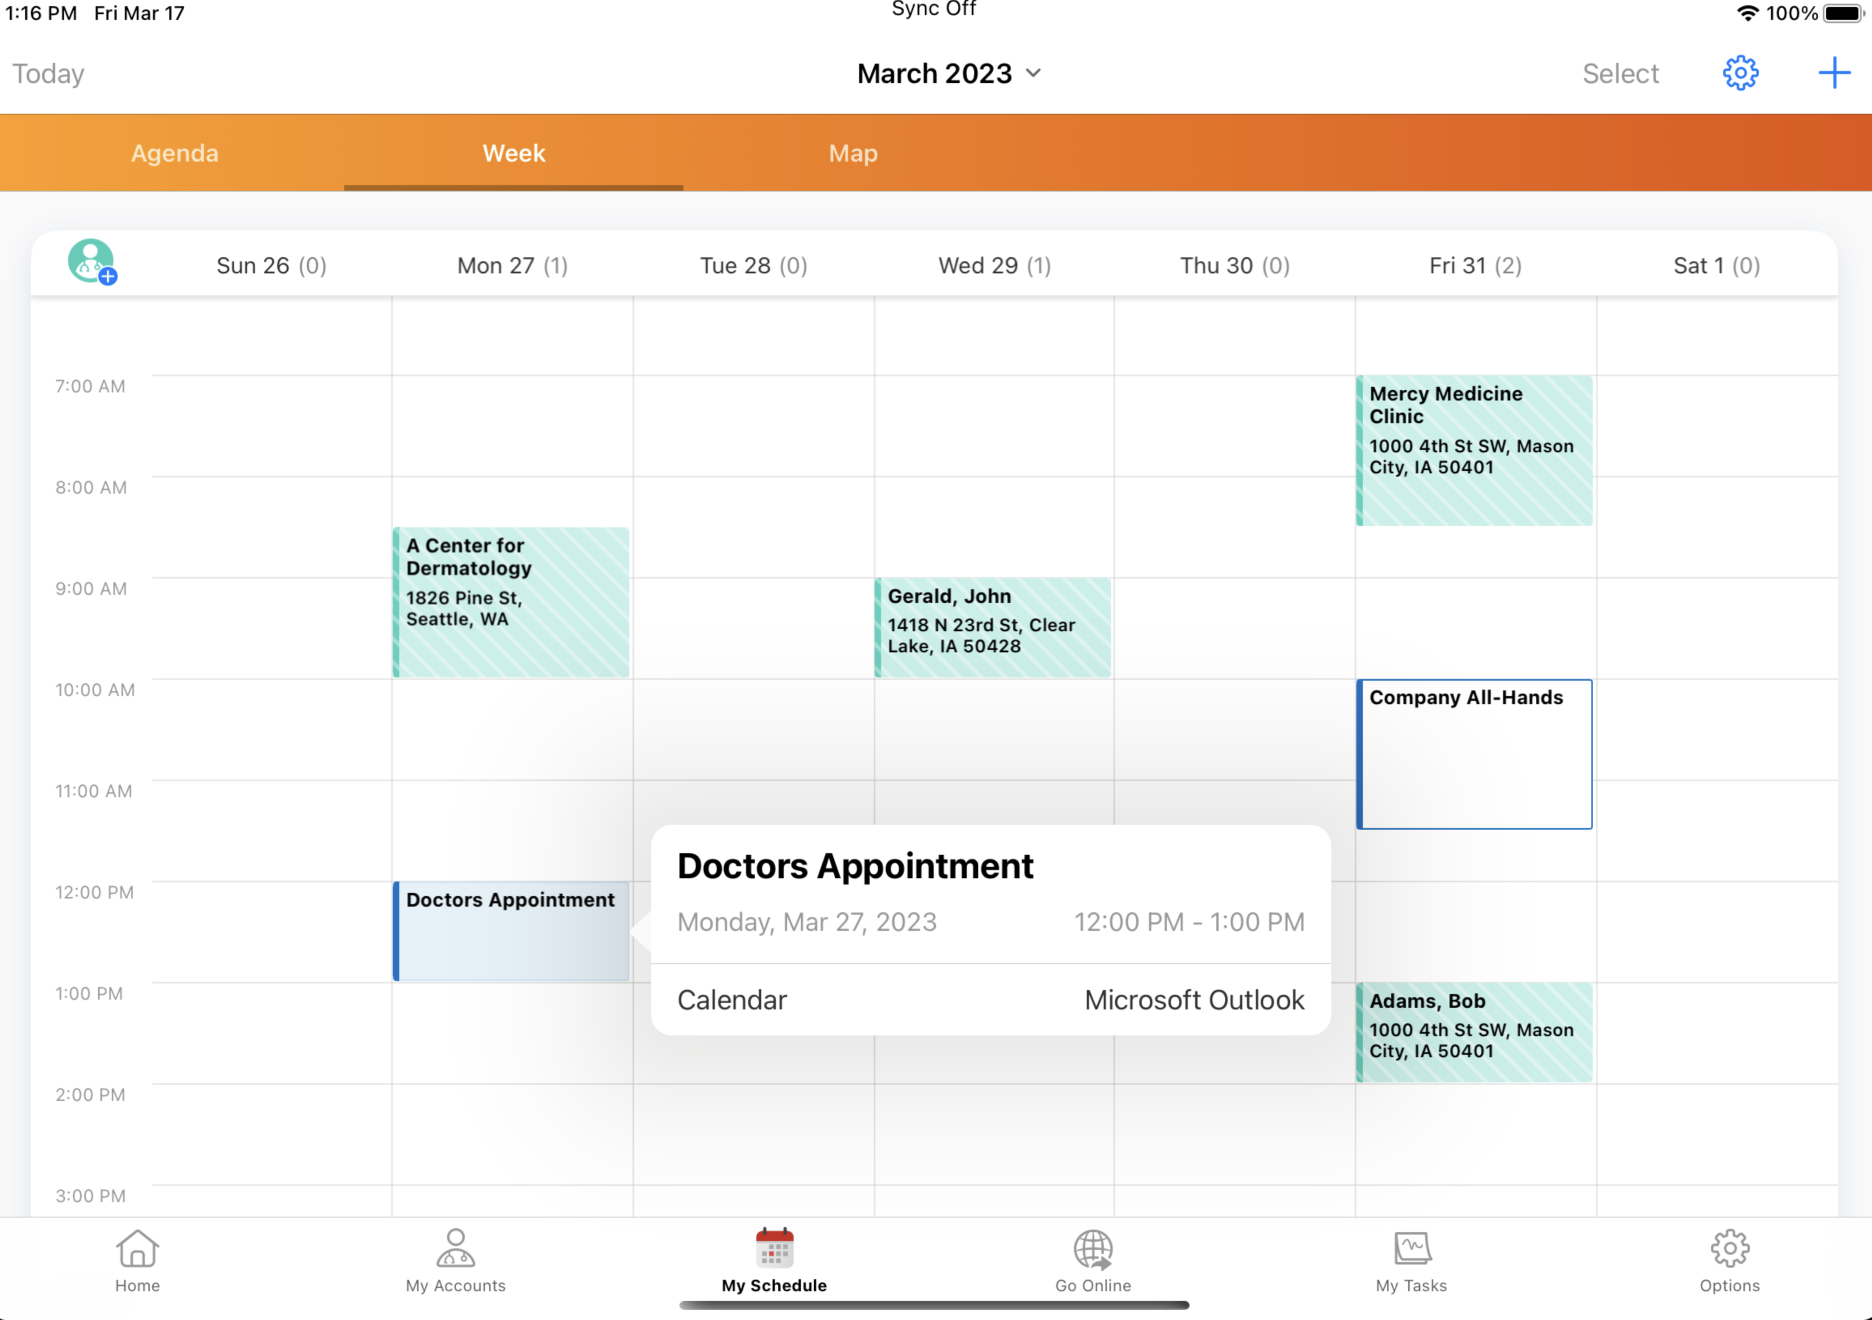
When users select an entry in My Schedule, the popover displays the Lightning tab icon assigned to that object. If Displaying Call Conflict Warnings is enabled, a banner displays on the call popover to highlight the conflict.
Editing Entries in My Schedule
When users select an entry, a popover with more information and an Edit button displays.

Select the Edit button to access the record for the entry. When users edit entries within My Schedule, edits display automatically after the user saves the edits.
Select More Details from the popover to open the record in a new tab, outside of My Schedule.
If the record is edited outside of My Schedule, users must reload My Schedule to view updates.
Call reports always open outside of My Schedule, regardless of whether users select More Details or Edit.
Displaying the Call Channel Icon
To help users easily identify which channel a call is scheduled for, the call channel icon displays on calls and on the call popover in My Schedule.
Displaying Child Account Identifiers
For calls against child accounts, the account identifier also displays on the call details popover.

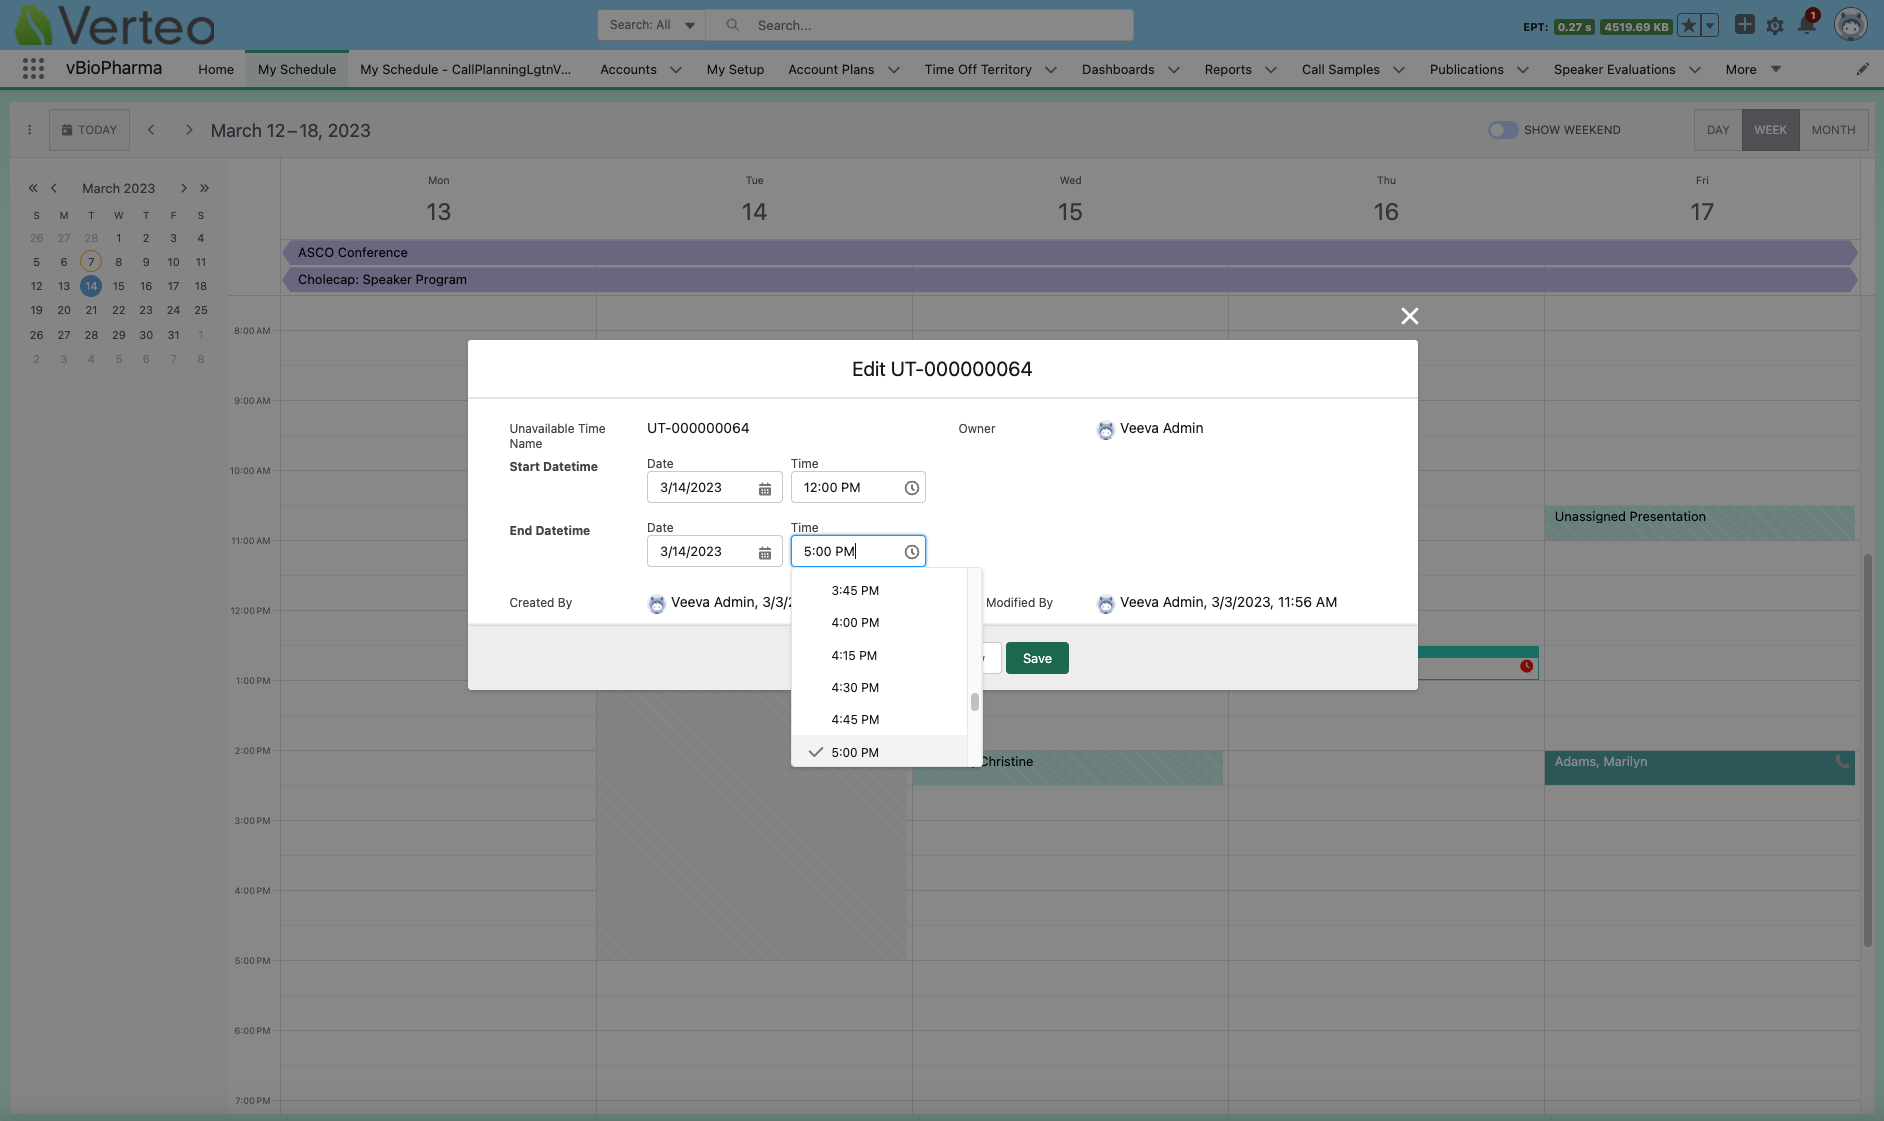
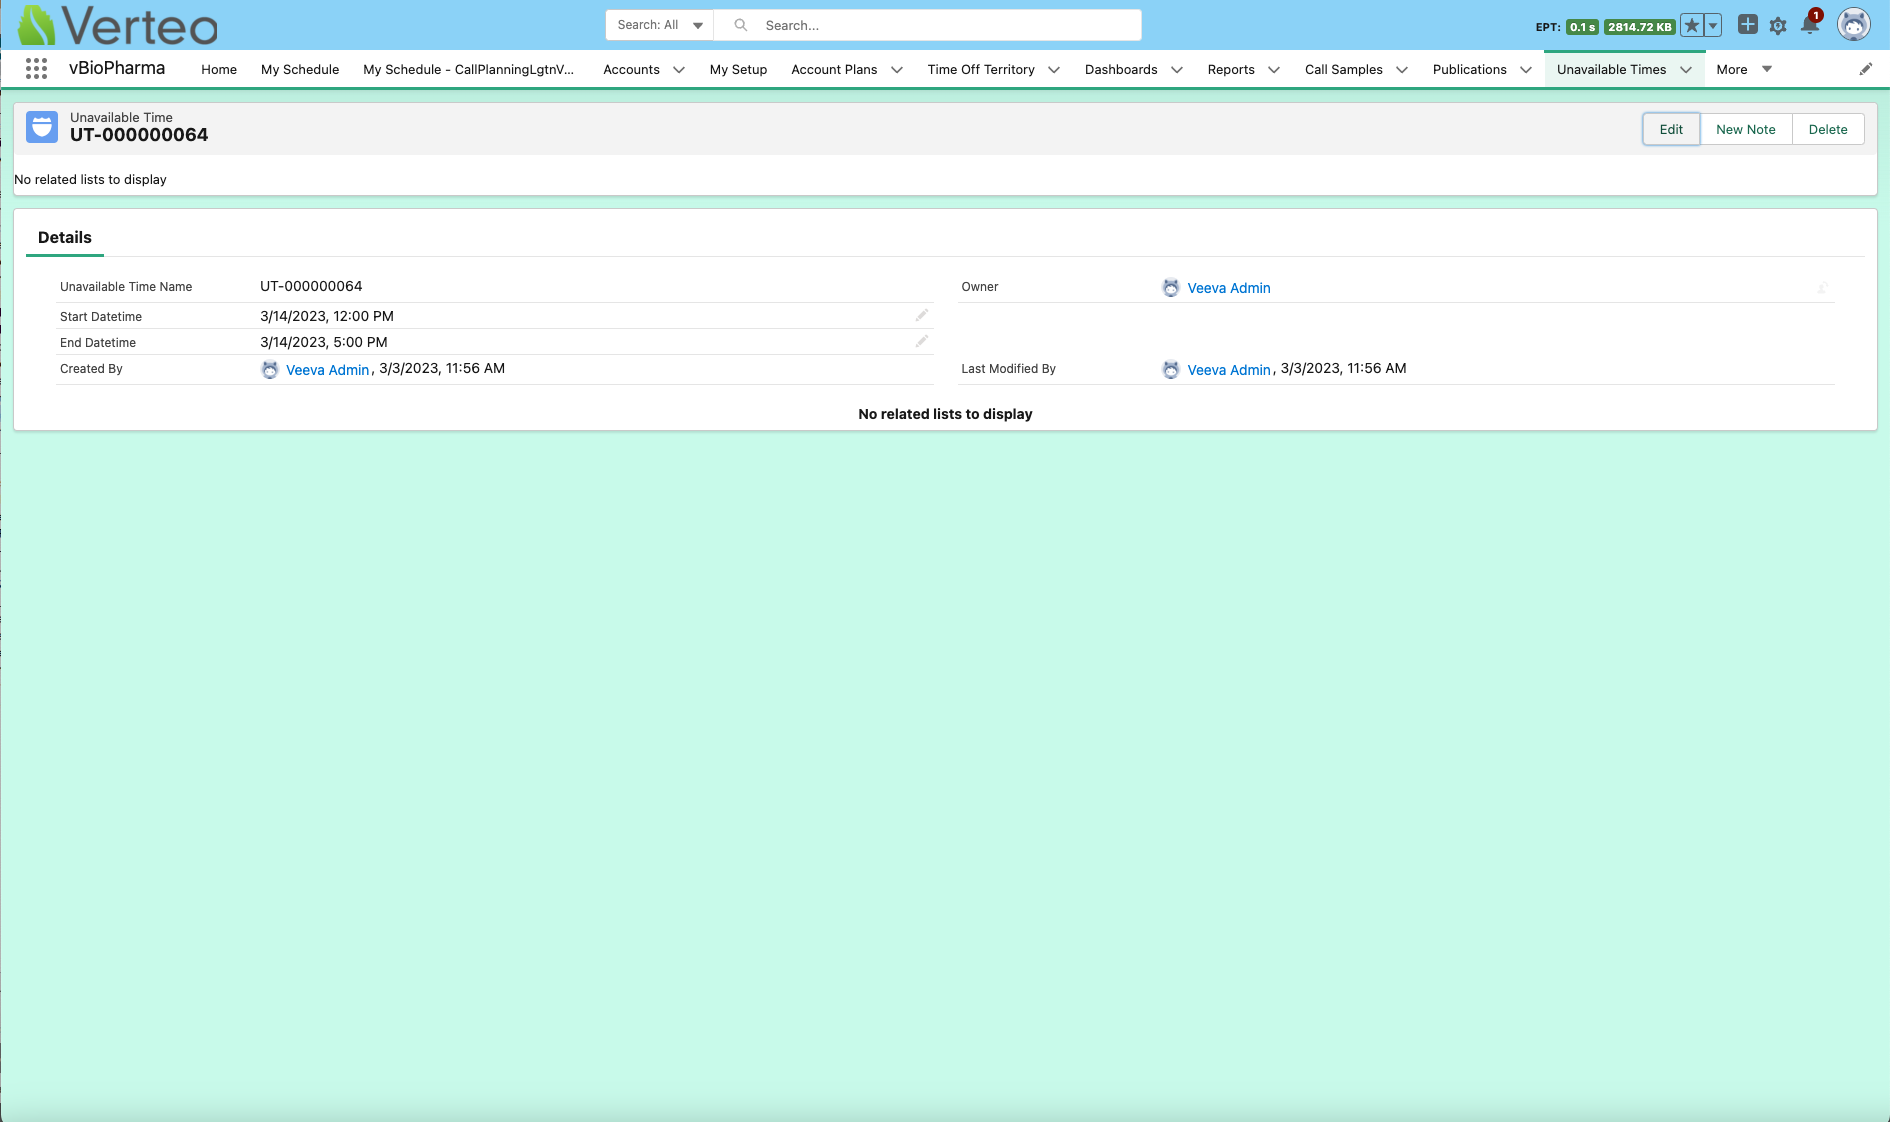
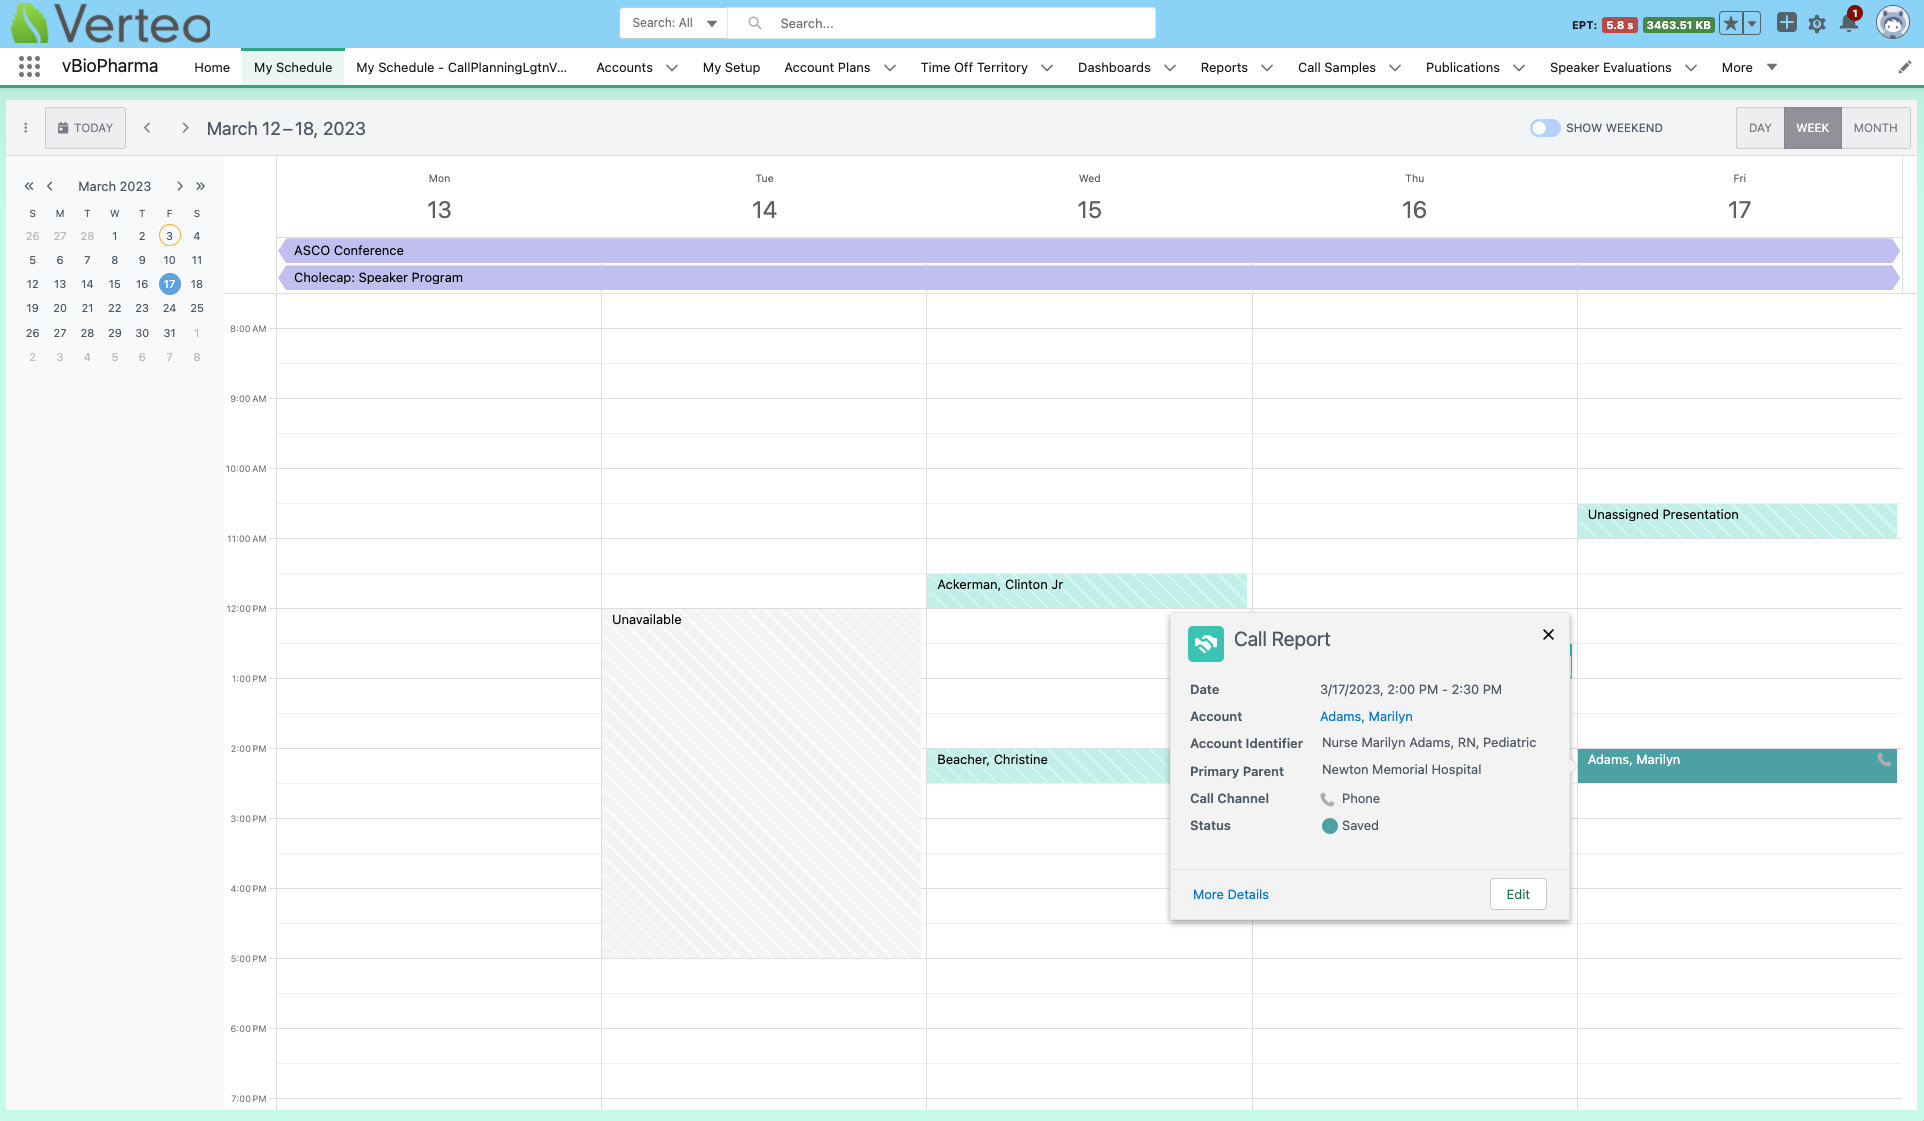
Viewing and Editing Unavailable Time Slots
If Creating Time Off Territory in My Schedule is enabled, users can view and edit unavailable time slots in My Schedule.
Creating Unavailable Time from Time Off Territory
If Creating Unavailable Time Slots from Time Off Territory is enabled, users can edit Time Off Territory entries and mark them as unavailable for Engage Scheduling.
Integrating My Schedule and Outlook Calendars
If Integrating My Schedule and Microsoft Outlook Calendars is enabled, users can view their Outlook events in My Schedule and vice versa.
Viewing Meeting Requests
If Integrated Scheduling: Accepting and Declining Meeting Requests in My Schedule is enabled, users can view meeting requests in My Schedule.
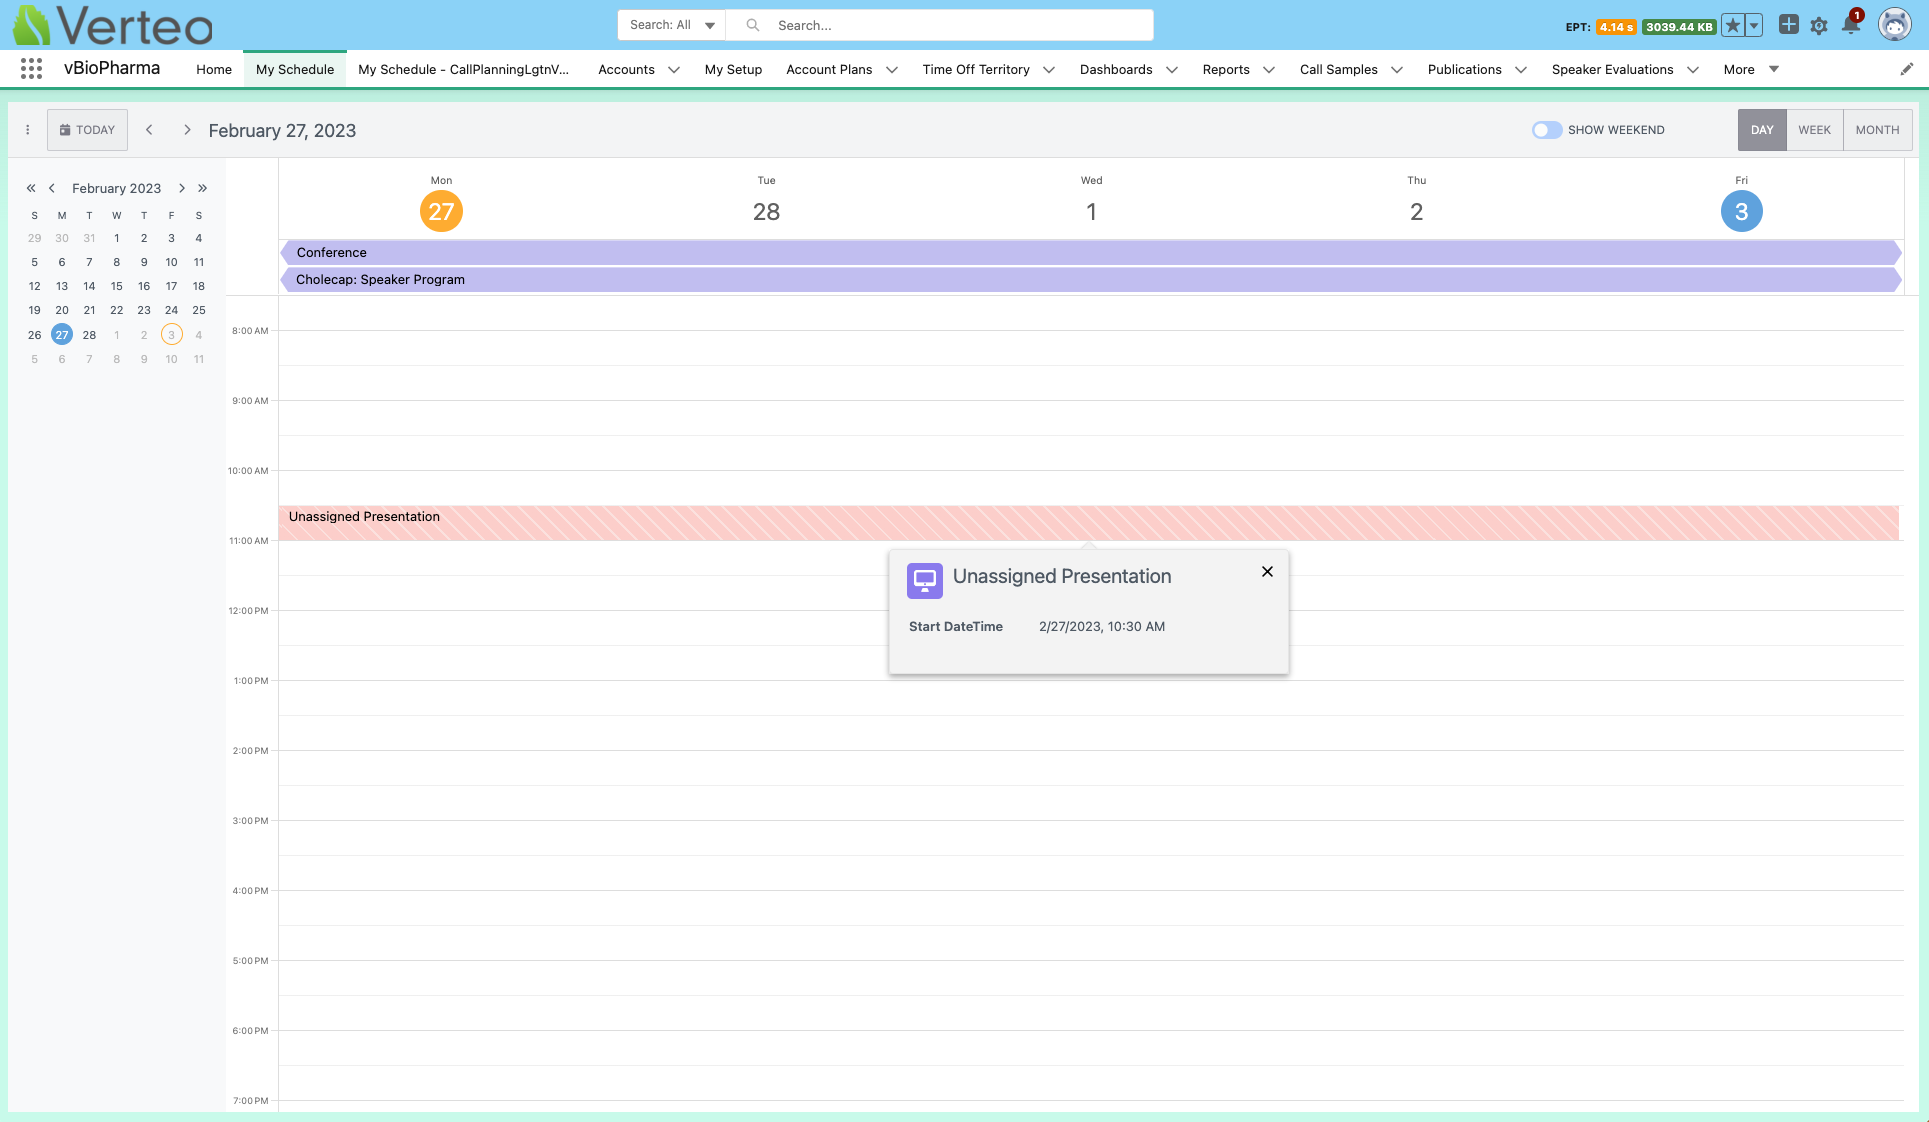
Viewing Unassigned Presentations
If Associating Accounts with Tracked CLM Activity is enabled, unassigned presentations display in My Schedule. Unassigned presentations display as 30-minute time slots. Unlike on the iPad platform, the value in the Total_Duration_vod field is not considered. To display a popover with more information on the unassigned presentation, hover over the calendar entry. The start datetime and a list of viewed presentation names display. Thumbnails do not display for presentations.
Associating calls with unassigned presentations is not supported. Unassigned presentations are read-only in Lightning for My Schedule.

To follow the same color patterns used for call reports, past unassigned presentations display in red and future unassigned presentation display in teal.
|
|
Partially Supported Functionality
The following functionality is partially supported in Lightning for My Schedule:
- Creating Calendar Entries or Time Off Territory
- Deleting Calls, Calendar Entries, or Time Off Territory
- Rescheduling Calls or Calendar Entries
Creating Calendar Entries or Time Off Territory
To create a calendar entry or Time Off Territory record:
- Navigate to the appropriate object tab.
Ensure users have access to the standard Event tab and the Time_Off_Territory_vod tab.
- Select the New button.
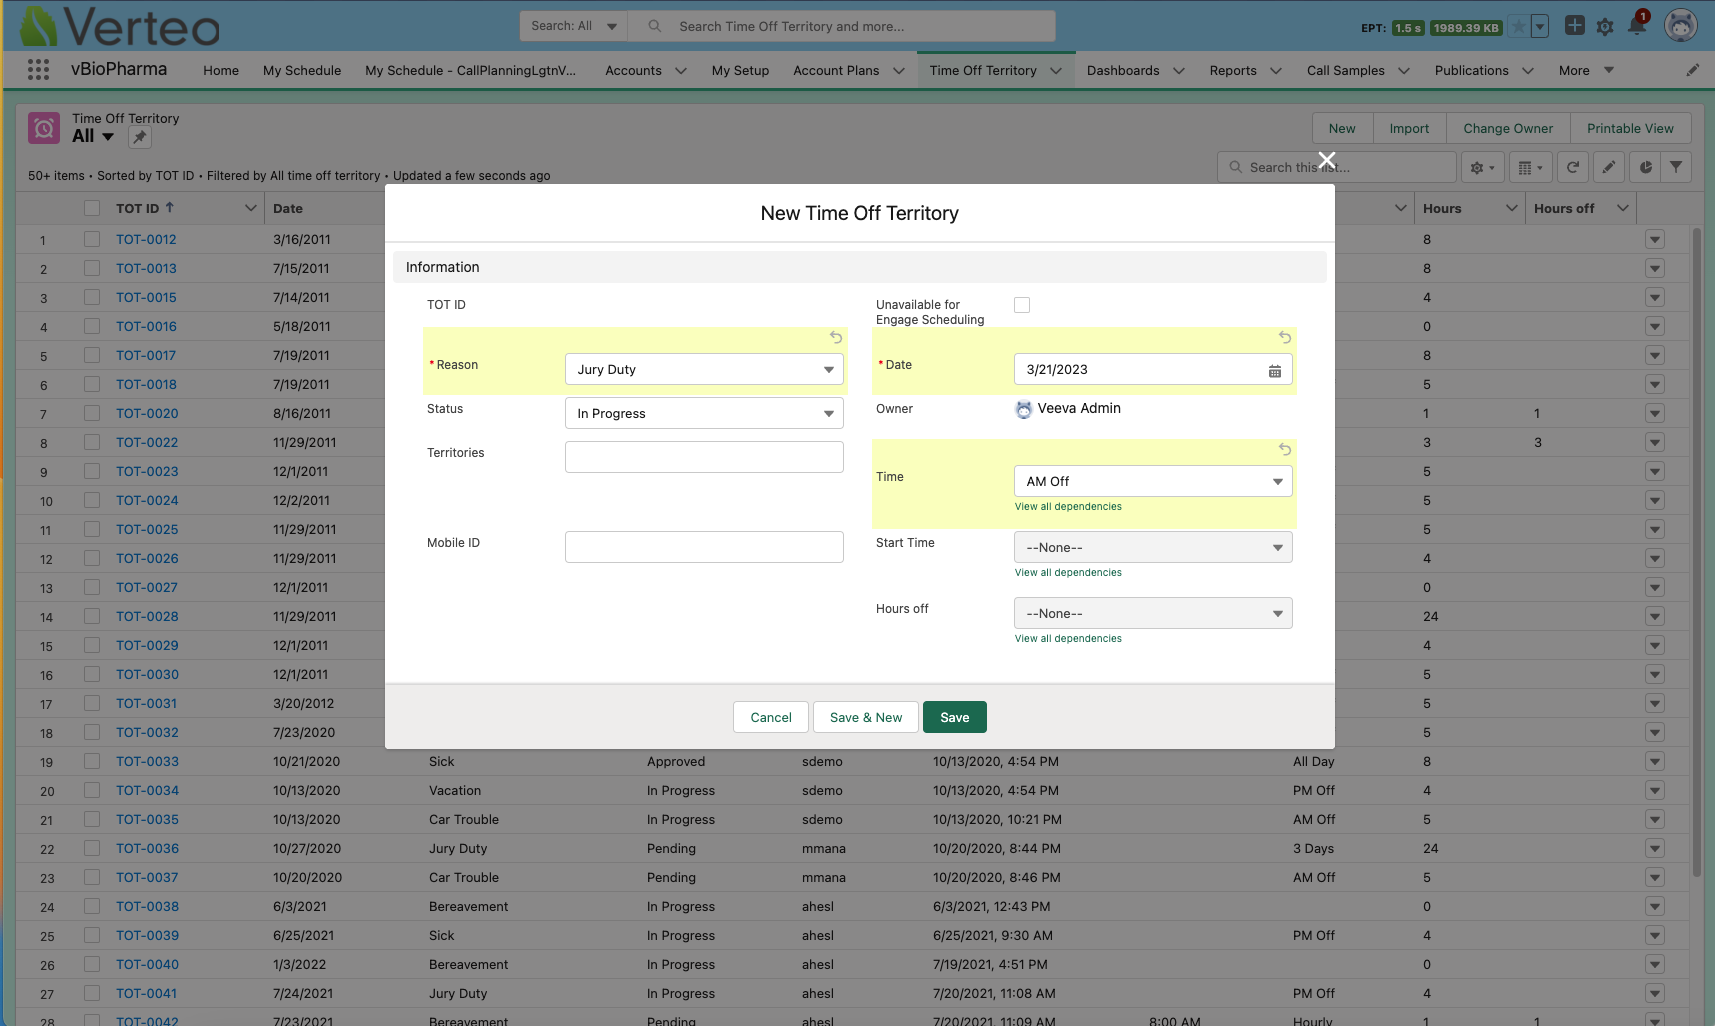
- Complete the appropriate fields and save the record.
Deleting Calls, Calendar Entries, or Time Off Territory
To delete calls, calendar entries, or Time Off Territory records:
- Select the More Details link from the entry popover.
- Select the Delete button on the record detail page that displays.

Rescheduling Calls or Calendar Entries
To reschedule calls or calendar entries without the drag-and-drop functionality:
- Select the Edit button from the call or calendar entry popover. Calendar entries display in a modal over My Schedule. Call reports open in a new browser tab.
- Edit the date or datetime and save the record.
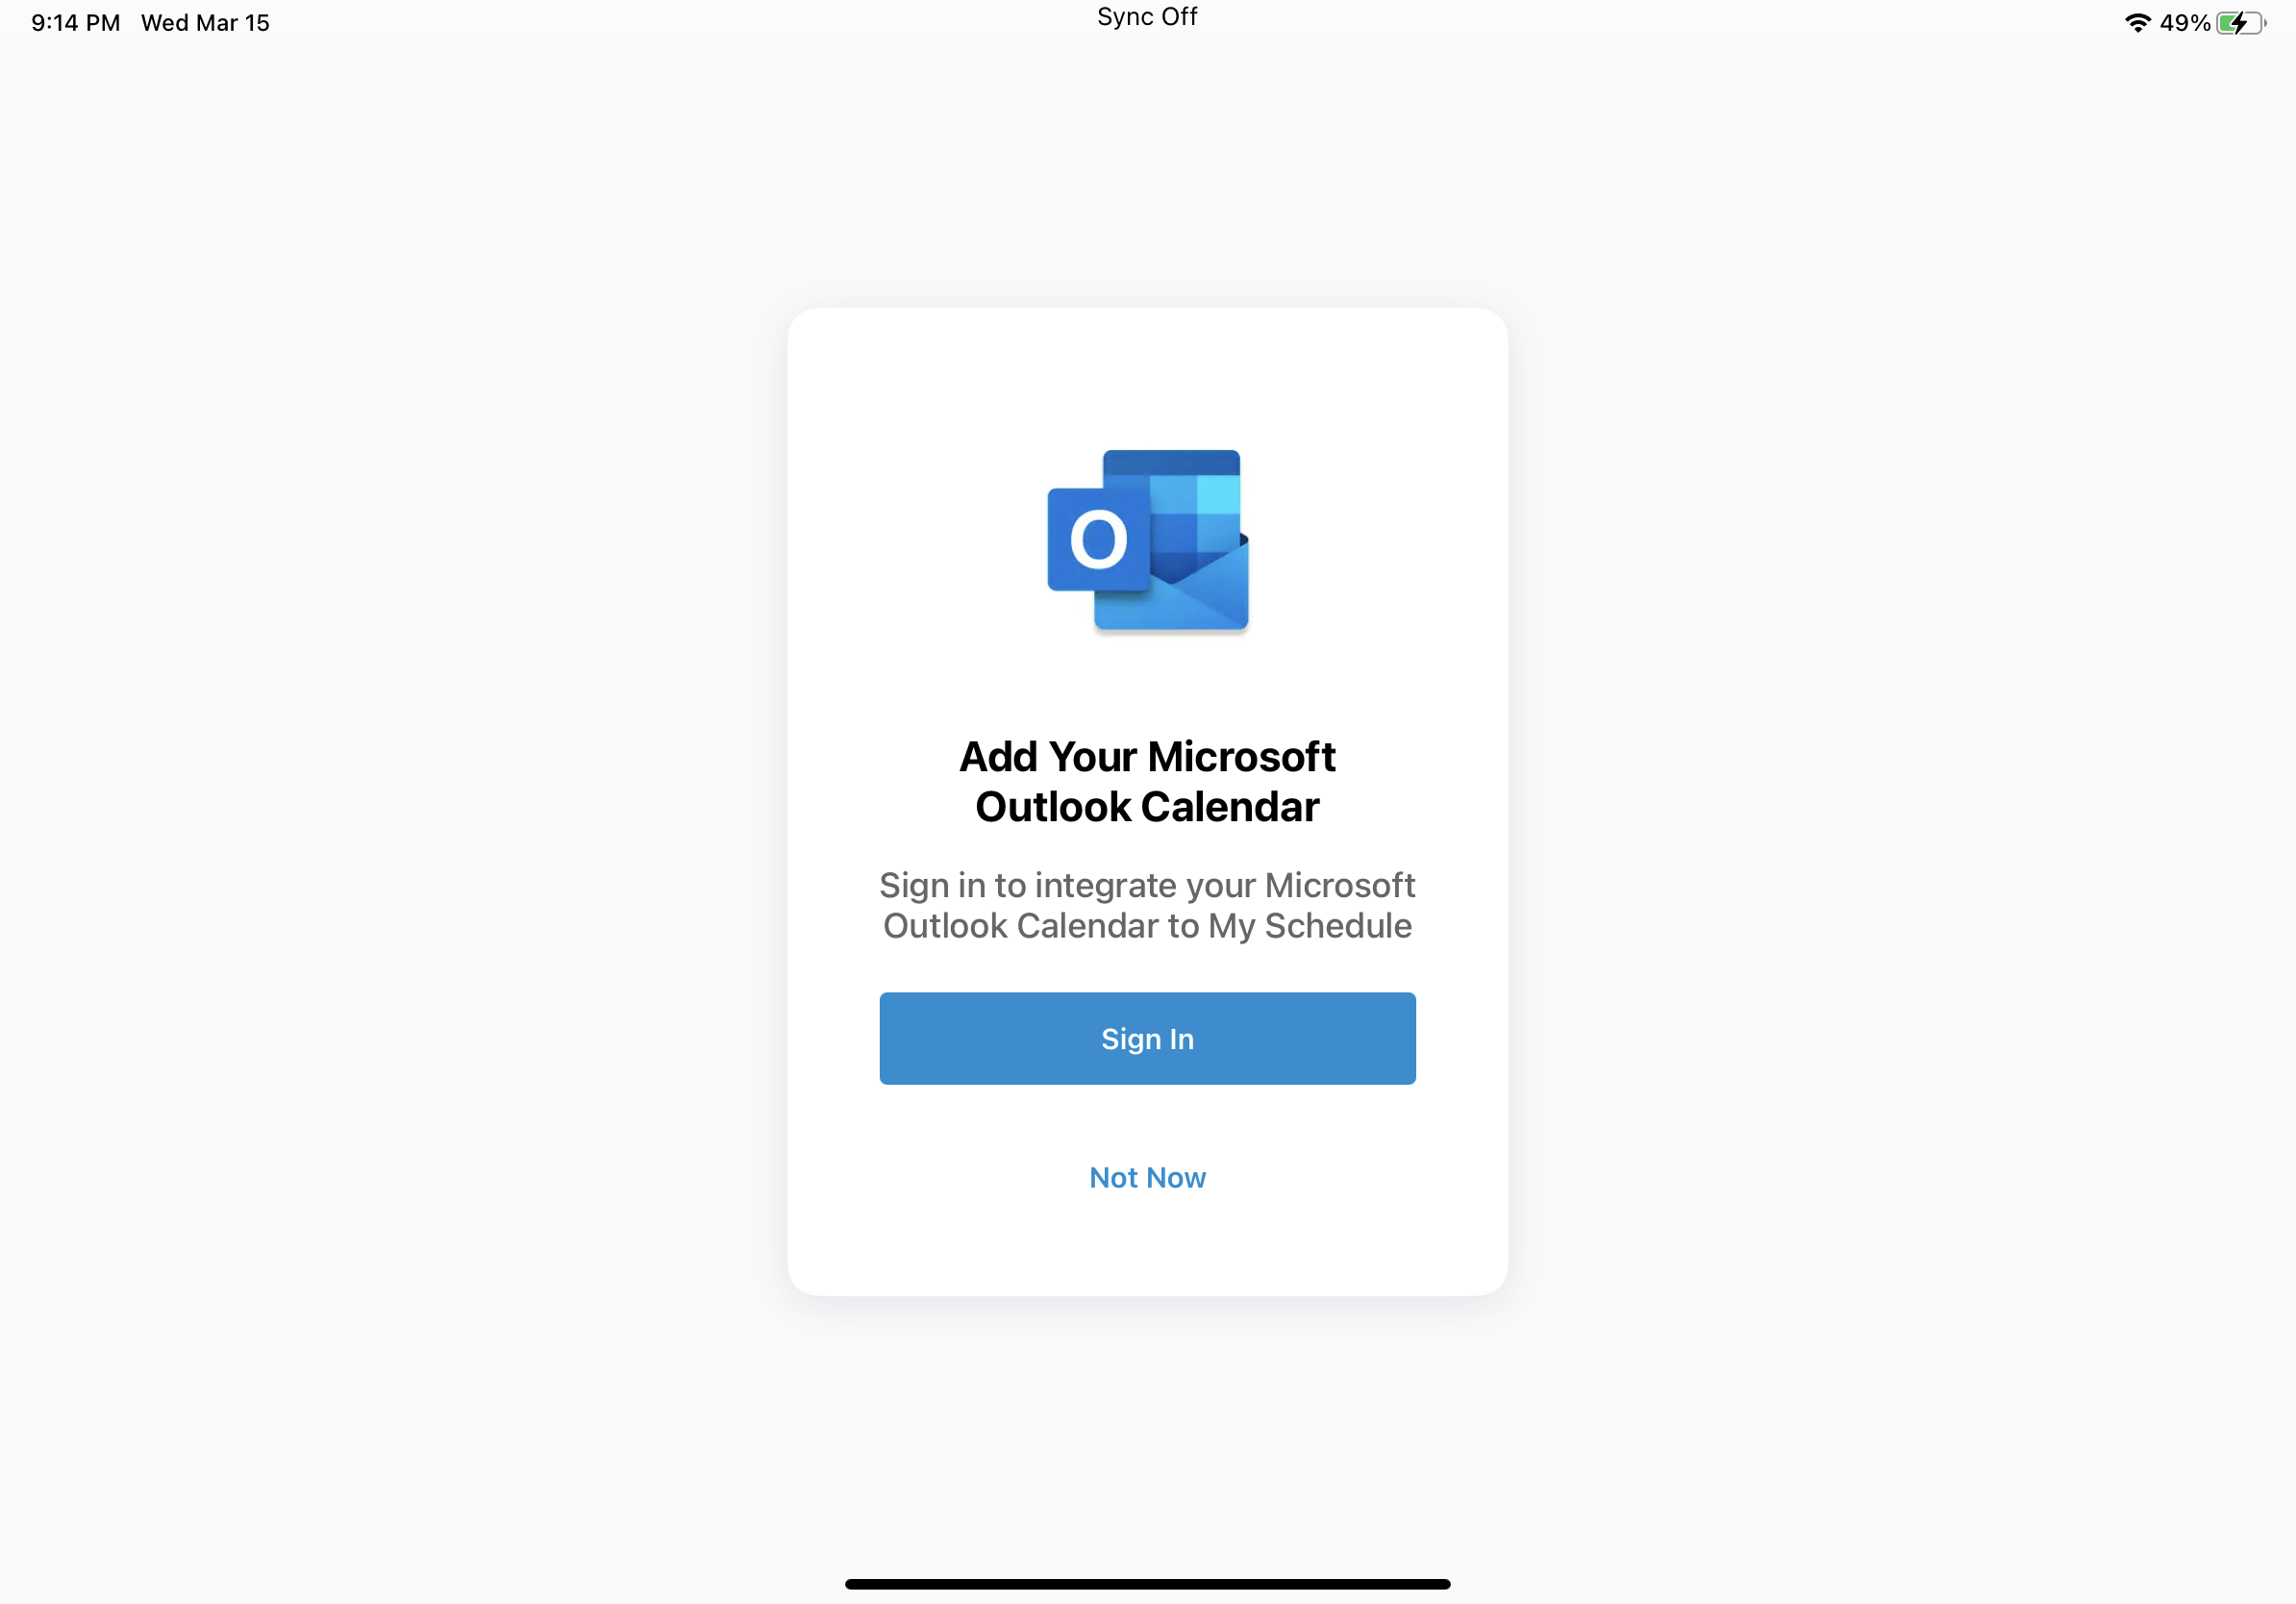
Integrating My Schedule and Microsoft Outlook Calendars
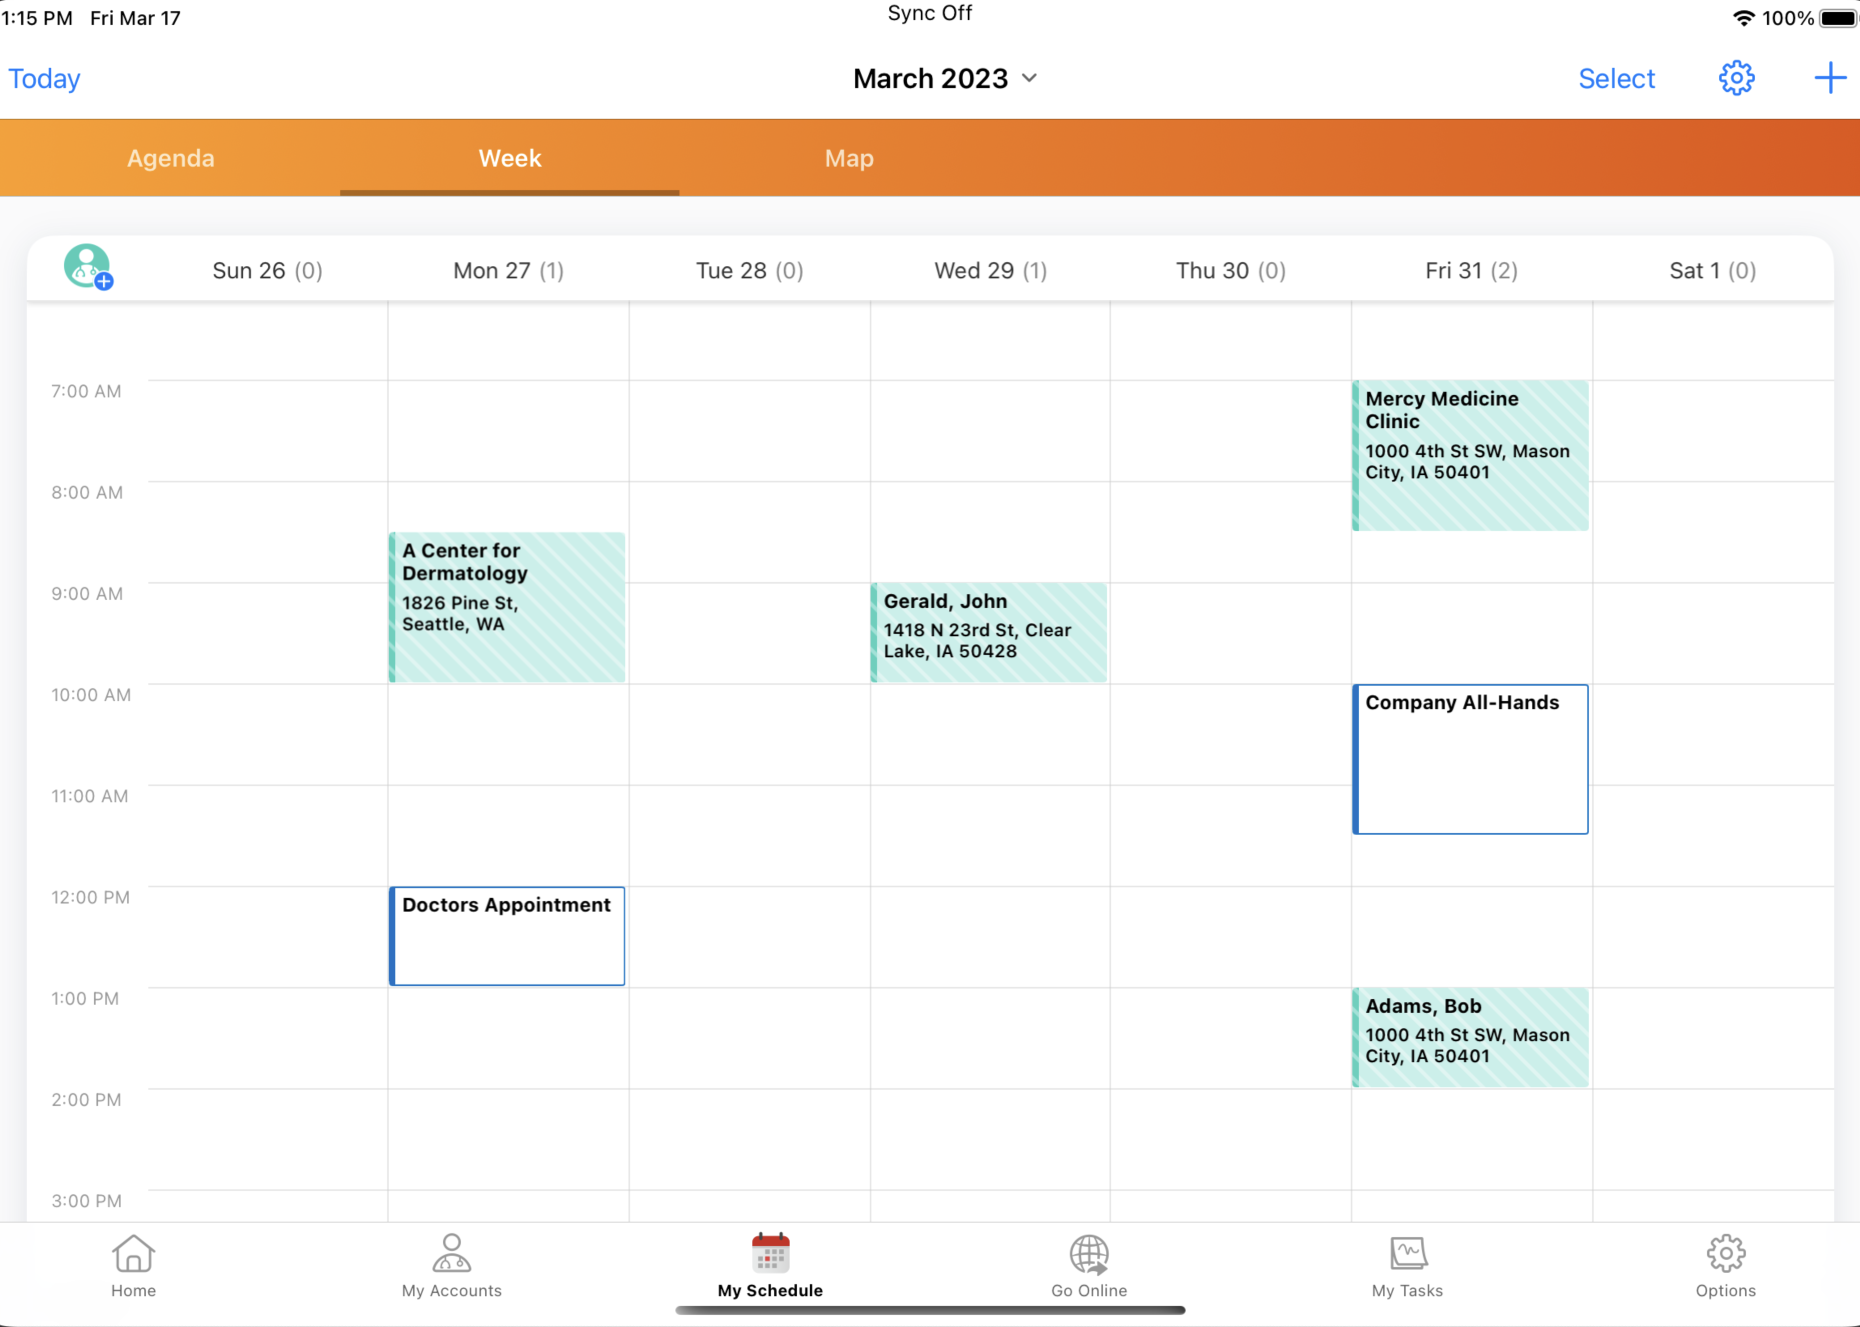
To make scheduling more efficient for users, admins can integrate My Schedule and Microsoft Outlook calendars into one view, enabling users to view all their appointments in one place. Users can view My Schedule entries in their Microsoft Outlook calendar, or vice versa.
For example, Sarah Jones needs to schedule a call with Dr. Ackerman for next Wednesday. In My Schedule, she sees there is a quarterly sales meeting scheduled on her Microsoft Outlook calendar from 12 PM to 2 PM on Wednesday. To ensure she has time to complete the call with Dr. Ackerman and return to her office for the sales meeting, Sarah schedules the call with Dr. Ackerman for 10 AM.
Signing in to Microsoft Outlook on First Login
When iPad users first sign in to Veeva CRM after this feature is enabled, they are prompted to also sign in to Microsoft Outlook. Alternatively, users can sign in to Microsoft Outlook from My Schedule. If single sign-on or two-factor authentication are enabled in Microsoft Outlook, users are redirected to the single sign-on or two-factor authentication page after entering their credentials.
If the organization uses a Salesforce custom domain or OAuth, users may not receive a prompt to sign in to Microsoft Outlook when they open the Veeva CRM app. To trigger the prompt, ask users to log out of Veeva CRM.
To sign in to Microsoft Outlook from Veeva CRM:
- Select Sign In from the Microsoft Outlook prompt. If users select Not Now, they can sign in later from My Schedule.
-
Enter your Microsoft company credentials (for example, first.last@verteo.com) and complete the Microsoft Outlook authentication dialogue. Only one email credential can be used per org.
Once credentials are added, they cannot be removed. To remove a Microsoft Outlook account from My Schedule, your organization's admin must log a support ticket with Veeva CRM.
To view Microsoft Outlook entries in My Schedule, users must sync. If users navigate to My Schedule without syncing, they are prompted to sync.
Signing in to Microsoft Outlook from My Schedule
Alternatively, users can sign in to Microsoft Outlook from My Schedule.
To sign in from the Browser platform:
-
Clear Microsoft cookies if you have both a company-provided Microsoft Outlook account and a personal Microsoft Outlook account.
If you do not clear Microsoft cookies before signing in, your personal Microsoft Outlook account is linked to My Schedule. To remove your personal Microsoft Outlook account from My Schedule, your organization's admin must log a support ticket with Veeva CRM and clear Microsoft cookies.
- Select the Add Calendar button under the calendar panel in My Schedule.
-
Complete the Microsoft Outlook authentication dialogue that displays in a popup window. Ensure you use your Microsoft company credentials to sign in (for example, first.last@verteo.com). Only one email credential can be used per org.
Once credentials are added, they cannot be removed. To remove a Microsoft Outlook account from My Schedule, your organization's admin must log a support ticket with Veeva CRM.
To sign in from the iPad platform:
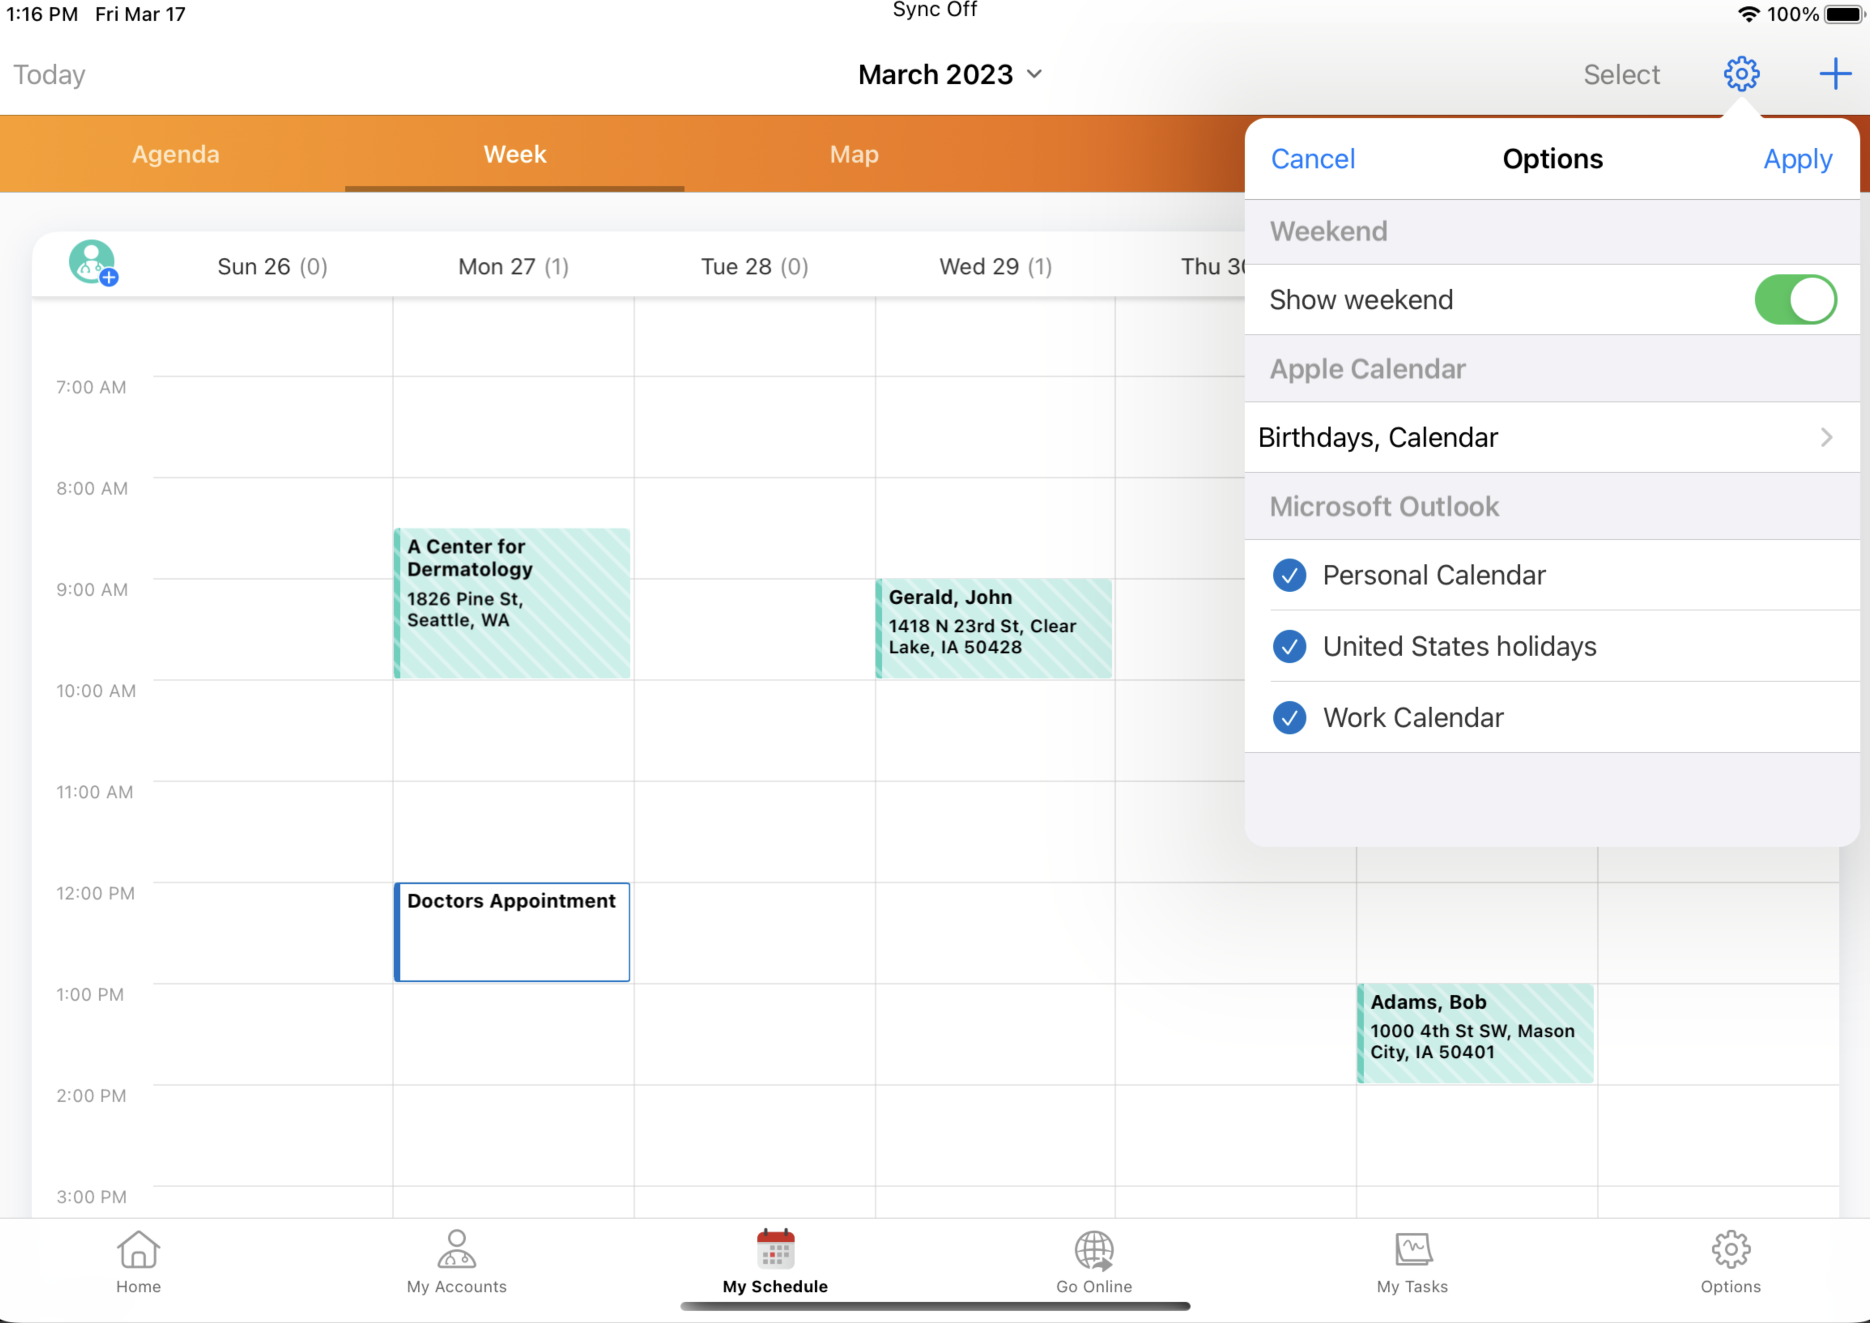
- Select the gear icon in the My Schedule header.
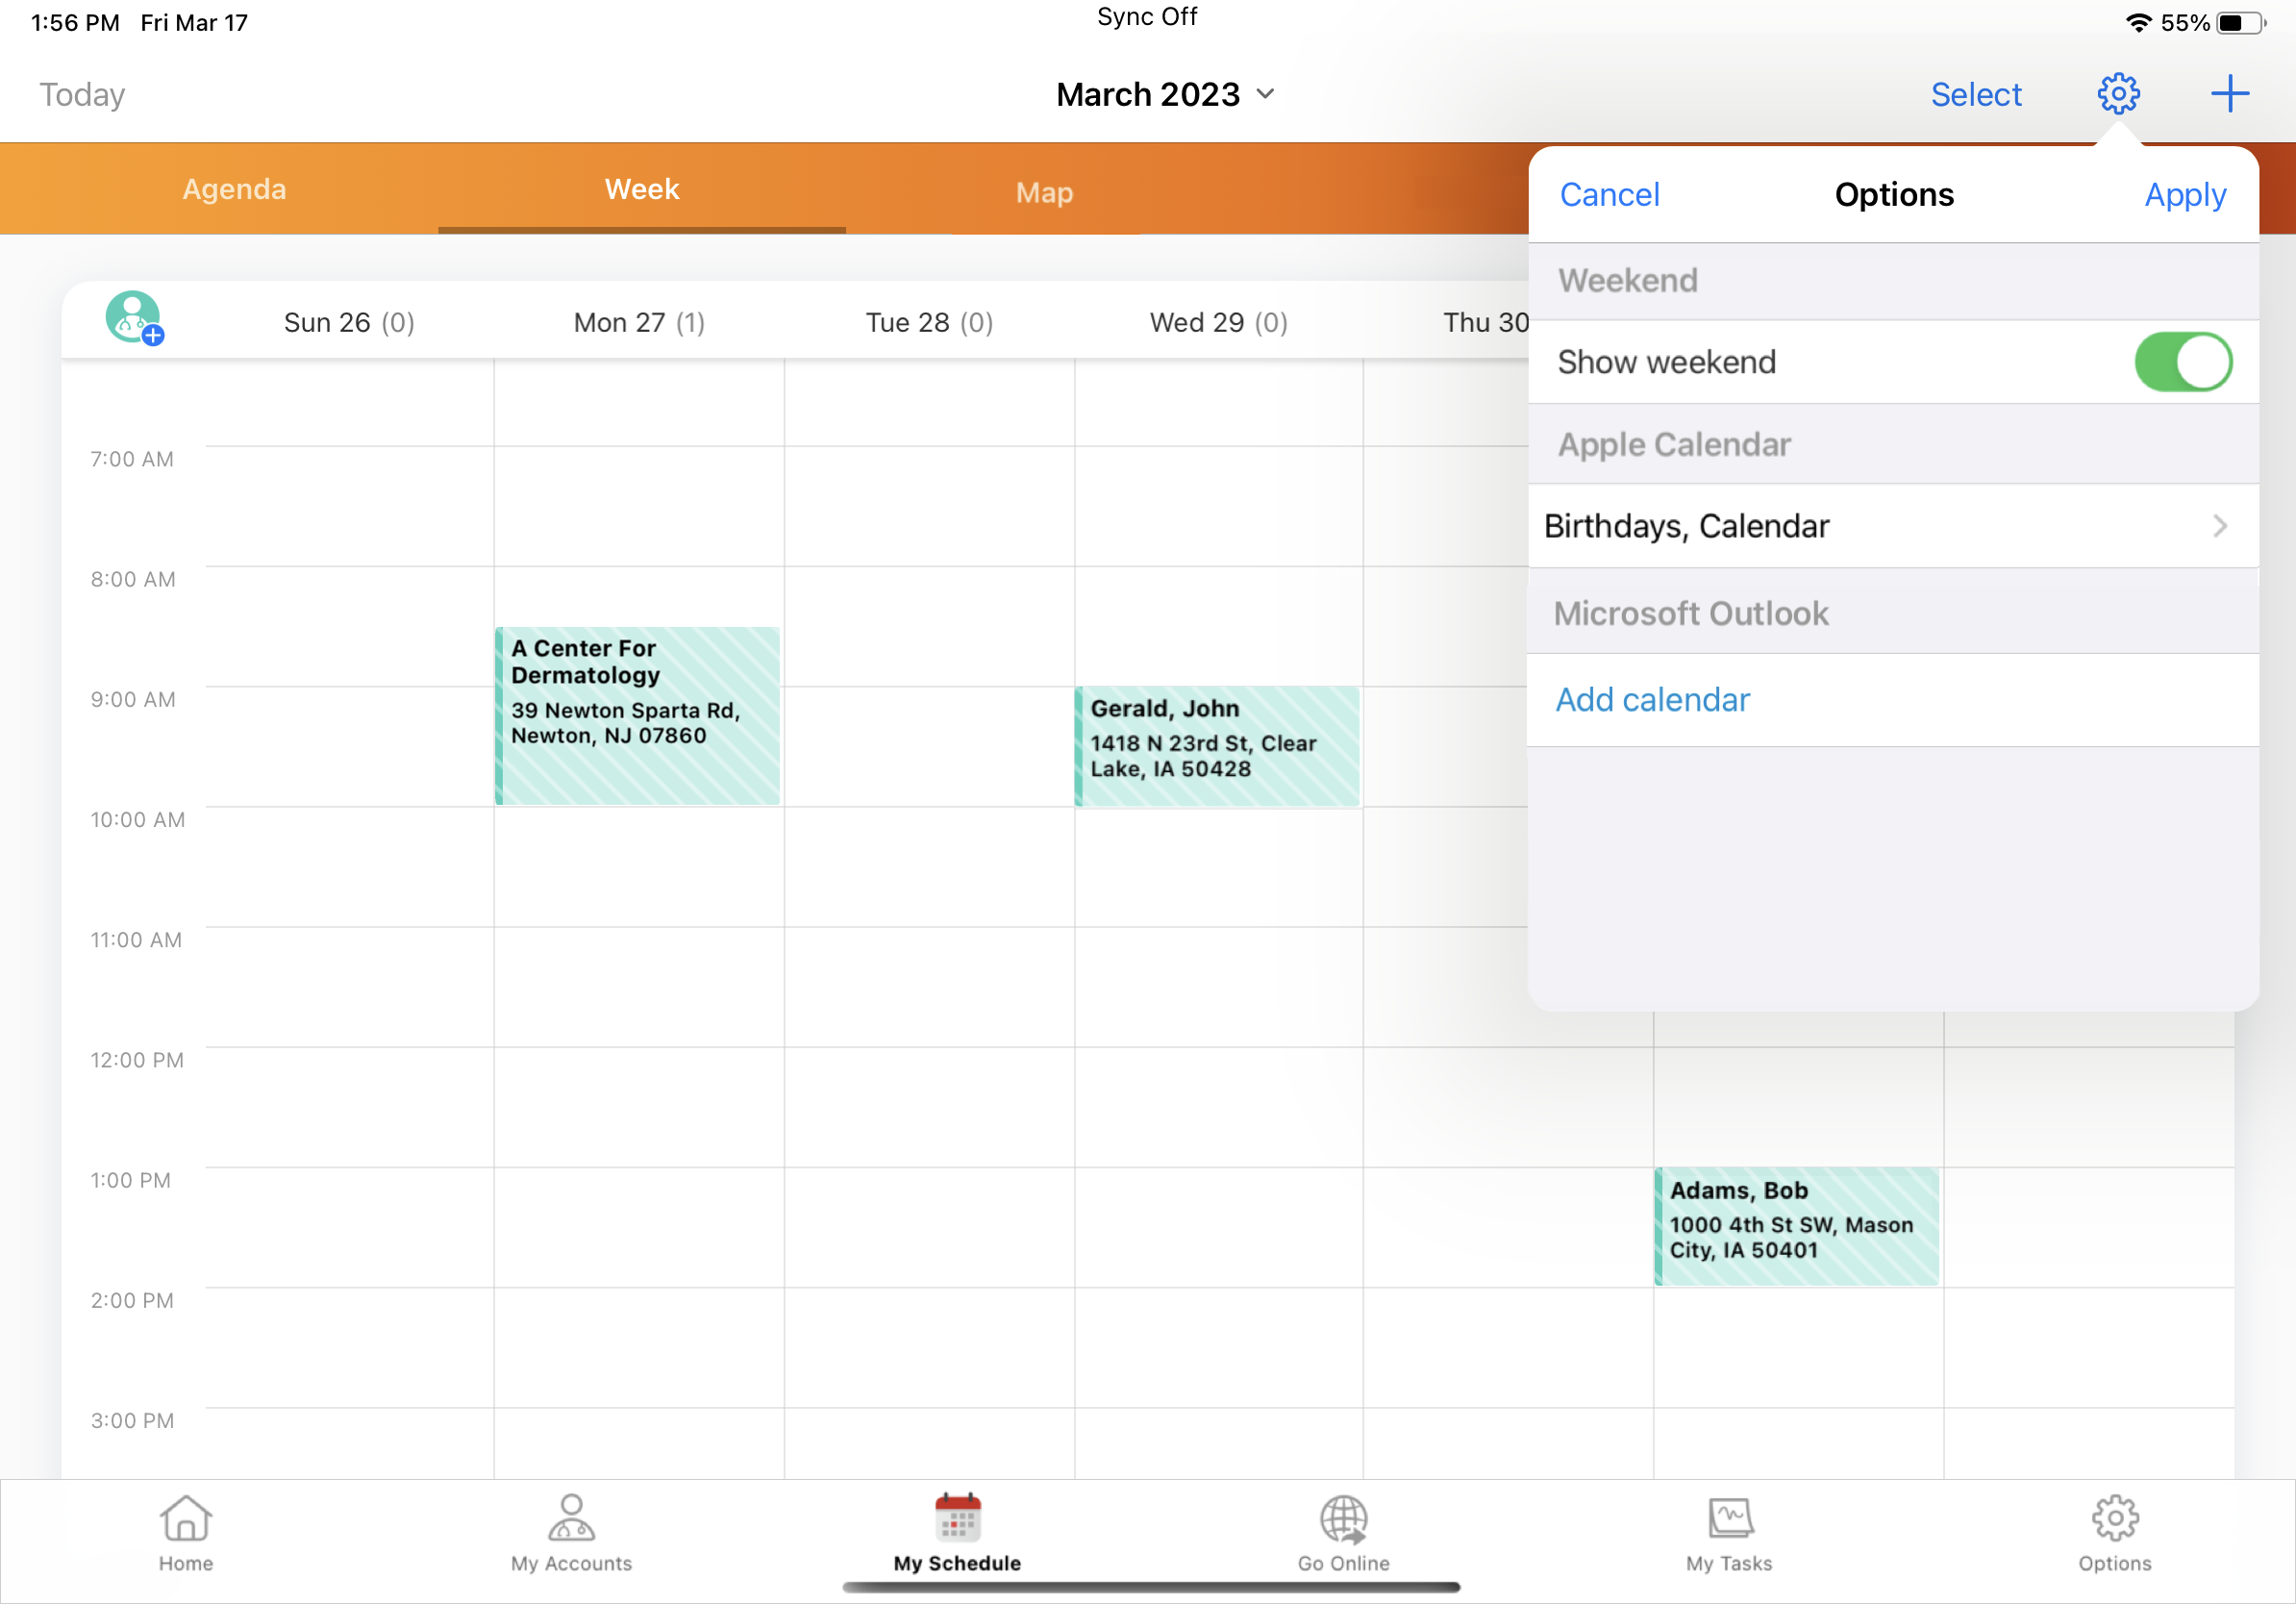
- Select the Add Calendar button in the Outlook section of the Options menu.
-
Enter your Microsoft company credentials (for example, first.last@verteo.com) and complete the Microsoft Outlook authentication dialogue. Only one email credential can be used per org.
Once credentials are added, they cannot be removed. To remove a Microsoft Outlook account from My Schedule, your organization's admin must log a support ticket with Veeva CRM.
Viewing Microsoft Outlook Calendar Entries in My Schedule
Once users successfully sign in to Microsoft Outlook from Veeva CRM, newly created, updated, or deleted Microsoft Outlook calendar entries are reflected in Veeva CRM in real time. Users can view Microsoft Outlook calendars they own, as well as any delegate or shared calendars. To view recent updates, mobile device users must sync their devices.
When users create new calendars in Microsoft Outlook after the initial pull, the newly created calendar is reflected in Veeva CRM in one hour. Real-time updates to entries from the new calendar are available within 24 hours. When users delete a calendar in Microsoft Outlook, the deleted Microsoft Outlook calendar is not removed from Veeva CRM.
The initial sync includes Microsoft Outlook events from Sunday of the current week up to 90 days after the current date. In order for a Microsoft Outlook calendar to display in Veeva CRM, there must be at least one event on the calendar within the next 90 days. After the initial sync, events are synced from the current date up to 90 days after the current date. Past Microsoft Outlook events continue to display in My Schedule, but they are not updated or deleted.
Microsoft Outlook events display in My Schedule if the current user is the entry owner or an attendee on the Outlook event. When users create, edit, or delete future Outlook entries in their Microsoft Outlook calendars, the corresponding entry is updated in My Schedule. If the attendee declines the Microsoft Outlook event, the entry is removed from My Schedule with the next sync. Microsoft Outlook event data is stamped to the External_Calendar_vod and External_Calendar_Event_vod objects for storage in the Salesforce org.
Entries from the users’ selected Microsoft Outlook calendars display with a colored outline to differentiate them from calls and activities created in Veeva CRM. The outline color for Microsoft Outlook entries in My Schedule is based on the entry color in Microsoft Outlook. The color is pulled from Microsoft's hexColor field to the Hex_Color_vod field on the External_Calendar_vod object in Veeva CRM. If a color is not set for the entry in Microsoft Outlook, the entry displays in blue by default.
Microsoft Outlook calendar entries are read-only in My Schedule. To view a popover with more information about an Microsoft Outlook calendar entry, select the entry.
Selecting Additional Microsoft Outlook Calendars
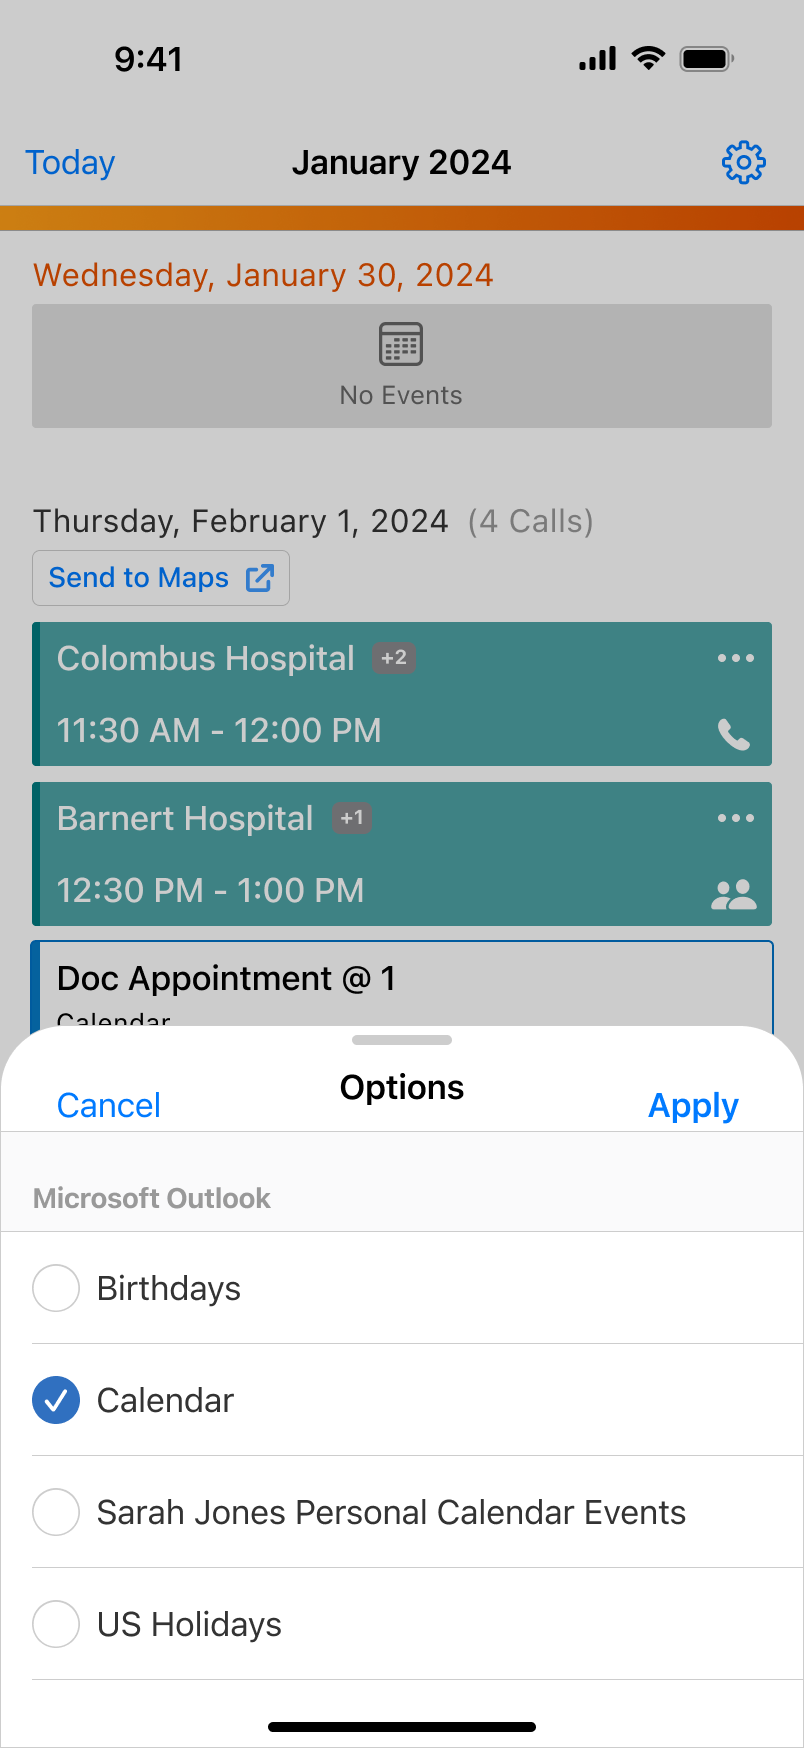
If users have multiple Microsoft Outlook calendars, they can choose which of their Microsoft Outlook calendars display in My Schedule. To modify which calendars display, select or deselect the appropriate calendars. For iPad users, additional calendars display under the Outlook section of the Options menu.
On the iPhone platform, users can view Microsoft Outlook entries in My Schedule after signing in to Microsoft Outlook from the iPad or Browser platforms and syncing their devices. To view Microsoft Outlook entries, select the appropriate calendar from the Options menu.
In Lightning for My Schedule, additional calendars display on the calendar panel.
If the DISPLAY_EXTERNAL_CALENDARS_TO_MANAGERS_vod Veeva Setting is populated with the number 1, managers can view their reports' external calendar events in Lightning for My Schedule on the Browser platform. For more information on this functionality, see Viewing Users' Calendars with Manager View.
Viewing My Schedule Entries in Microsoft Outlook Calendars
In Microsoft Outlook, Veeva CRM displays under the My Calendars section. When new users connect their Microsoft Outlook accounts to Veeva CRM, there must be at least one entry in My Schedule in the next 90 days in order for the Veeva CRM calendar option to display in Microsoft Outlook. The initial sync includes My Schedule entries from the current week up to 90 days in the future. After the initial sync, events are synced from the current date up to 90 days after the current date. Past My Schedule events continue to display in Microsoft Outlook, but they are not updated or deleted. When records are pushed from Veeva CRM to Microsoft Outlook, a maximum of 10,000 records per user are pushed in each sync.
Editing My Schedule entries from the Microsoft Outlook calendar is not supported. Changes made to My Schedule entries in Microsoft Outlook are not reflected in Veeva CRM.
The Veeva CRM calendar label in Microsoft Outlook includes the user’s name. If the User_Identifier_vod field on the User_vod object is populated, the user identifier is also included. For example, Veeva CRM - Sarah Jones (sjonesUserIdentifier). Calendar labels are only pushed from Veeva CRM in the initial sync.
Veeva recommends users do not change Veeva calendar names in Microsoft Outlook.
The following types of My Schedule entries display in the Microsoft Outlook calendar:
Meeting requests are not supported in the Microsoft Outlook integration, and unassigned presentations and unavailable time slots do not display in Microsoft Outlook calendars.
Edits and deletions for entries are updated hourly. If users create, edit, or delete My Schedule entries while they are offline, entries are updated in the Microsoft Outlook calendar after the device is online again.
When My Schedule entries are pushed to Microsoft Outlook, the subject, start datetime, and content properties are populated with the following field values:
|
Outlook Property |
My Schedule Entry Type | |||
|---|---|---|---|---|
|
Call2_vod |
Event |
Medical_Event_vod |
Time_Off_Territory_vod |
|
|
subject |
Formatted_Name_vod* |
Subject |
Name |
Reason_vod |
|
start datetime |
Call_Datetime_vod (if Call_Datetime_vod is not populated, Date_vod is used instead) |
StartDateTime |
Start_Time_vod |
Time_vod |
|
content |
Translated picklist value from the Call_Channel_vod field |
n/a |
||
* When child accounts are enabled, the Parent_Child_Name_vod field value from the Child_Account_vod object is used instead
Creating Unavailable Time Slots from Time Off Territory
To ensure Time Off Territory is automatically reflected on the Engage Scheduling Site, users can mark Time Off Territory as unavailable for scheduling. When a Time Off Territory entry is marked as unavailable in My Schedule, an unavailable time slot for the same time period is automatically blocked off on the Engage Scheduling Site to prevent HCPs from sending a meeting request. If users edit or delete a Time Off Territory entry after marking it as unavailable, their availability is updated on the Engage Scheduling Site.
For example, Sarah Jones is going on vacation from January 5th through January 10th. She creates a Time Off Territory entry for her vacation days and marks the Time Off Territory as unavailable. An unavailable time slot is automatically created when she saves the Time Off Territory entry. When Dr. Ackerman opens Sarah’s scheduling link, he sees Sarah is unavailable between January 5th and January 10th. Dr. Ackerman requests a meeting for January 11th.
Creating Unavailable Time from Time Off Territory
To create unavailable time from Time Off Territory, select the Unavailable for Scheduling check box.

When users save the Time_Off_Territory_vod record, an Unavailable_Time_vod record is automatically created for the times selected on the Time_Off_Territory_vod record. Only the Time Off Territory calendar entry displays in My Schedule. From the calendar entry and the popover, users can easily see the Time Off Territory is marked unavailable.
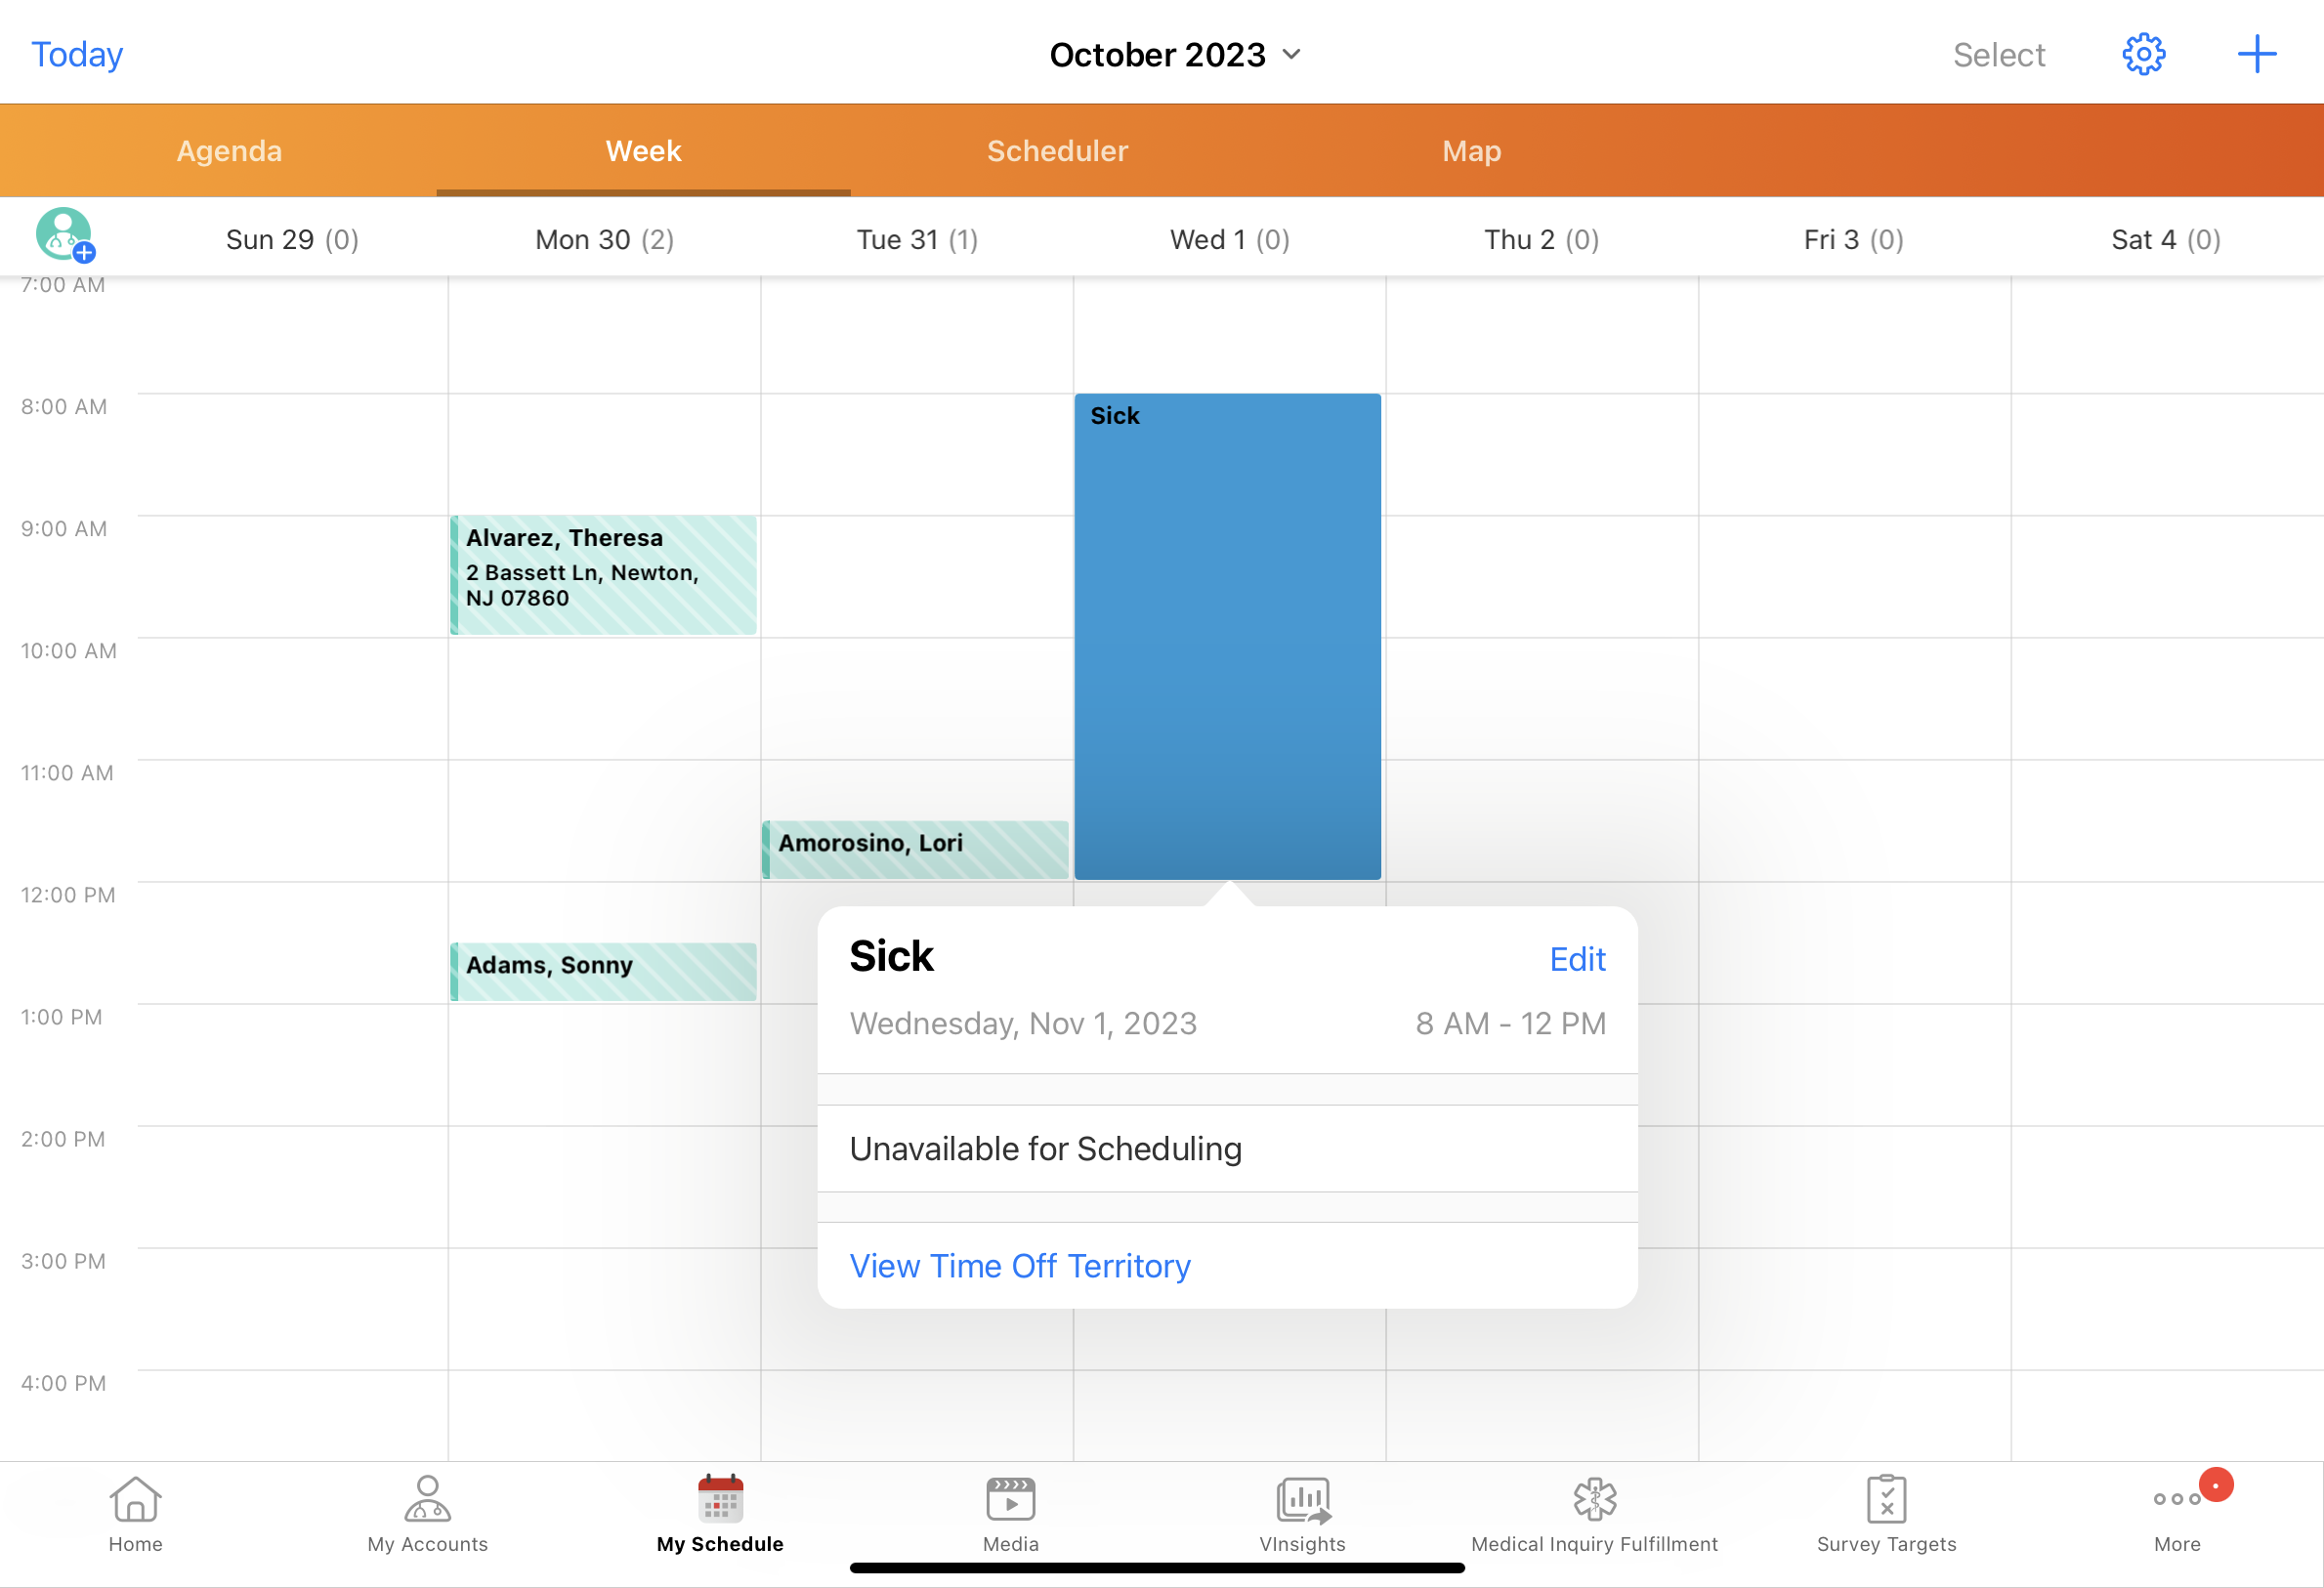
The unavailable time slot displays on the Engage Scheduling Site. If users edit the Time Off Territory entry, the corresponding unavailable time slot is updated on the Engage Scheduling Site. If users delete the Time Off Territory entry, the corresponding unavailable time slot is removed from the Engage Scheduling Site.
If a user's time zone changes, unavailable time slots automatically adjust for the time difference but the original Time Off Territory entries do not change.
Creating Unavailable Time from Time Off Territory over Weekends
When the DISABLE_TOT_WEEKENDS_vod Veeva Setting is not selected and users create Time Off Territory over a weekend, weekend days are marked as unavailable and the total unavailable time slot is extended by two days. For example, if a user creates a Time_Off_Territory_vod record for two days starting on Friday, the unavailable time slot includes Friday, Saturday, Sunday, and Monday.
If the DISABLE_TOT_WEEKENDS_vod Veeva Setting is selected, weekend days are included as working days in the calculation for the unavailable time slot. For example, if a Time_Off_Territory_vod record is scheduled for two days starting on a Friday, the unavailable time slot only includes Friday and Saturday. For more information on using the DISABLE_TOT_WEEKENDS_vod Veeva Setting, see Including Weekend Days in Time Off Territory.
Displaying Events in My Schedule for Event Team Members
To enable collaboration and coordination between Event Team Members, team members can view events in My Schedule. When users are added to the event team or are part of an Event Team Member group, the event displays in their My Schedule calendar and in the Events I’m Attending view on the Events homepage. If team member events should not display in My Schedule for certain types of users, admins can exclude specific roles.
For example, you are organizing a regional Cholecap speaker webcast. You add a colleague as an Event Team Member to help with recruitment for a local satellite program. In My Schedule, your colleague sees the event on her calendar and plans her upcoming calls and appointments around the webcast.
Only user and group Event Team Members are supported. The event does not display in My Schedule for write-in Event Team Members.
Viewing Events in My Schedule as an Event Team Member
When users are added to an event as a user or group Event Team Member, the event displays in their My Schedule calendar. Team member events do not display when the Status_vod field is set to Canceled_vod.
Team member events do not display in the Multichannel Calendar or Microsoft Outlook calendars. Events only display for the event owner.
On the iPhone platform, Events Management events are view-only in My Schedule. Events Management functionality is only supported on iPad.

For more information on events in My Schedule, see Displaying Events in My Schedule.
Field Mapping for Event Team Member and Event Attendee Records
To ensure team member data is available offline, Event_Attendee_vod stub records are automatically generated when users create EM_Event_Team_Member_vod records. Event_Attendee_vod stubs are created for all types of EM_Event_Team_Member_vod records: user, group, and write-in.
When an Event_Attendee_vod stub record is generated, the following fields are mapped from the EM_Event_Team_Member_vod record to the Event_Attendee_vod record:
|
EM_Event_Team_Member_vod |
Event_Attendee_vod |
|---|---|
|
First_Name_vod |
First_Name_vod |
|
Group_Name_vod |
Group_Name_vod |
|
Last_Name_vod |
Last_Name_vod |
|
Name |
Attendee_vod |
|
Role_vod |
Role_vod |
|
RecordTypeID |
RecordTypeID |
|
Event_vod |
Medical_Event_vod |
|
ID |
EM_Event_Team_Member_vod |
|
Stub_Mobile_Id_vod |
Mobile_ID_vod |
|
Team_Member_vod |
User_vod |
When users update a mapped field on an EM_Event_Team_Member_vod record, the corresponding field on the Event_Attendee_vod record is updated. If the original EM_Event_Team_Member_vod record is deleted, the related Event_Attendee_vod record is also deleted.
For more information on disconnected offline iPad data for Events Management, see disconnected records.
Call Reporting
High Performance Call Report
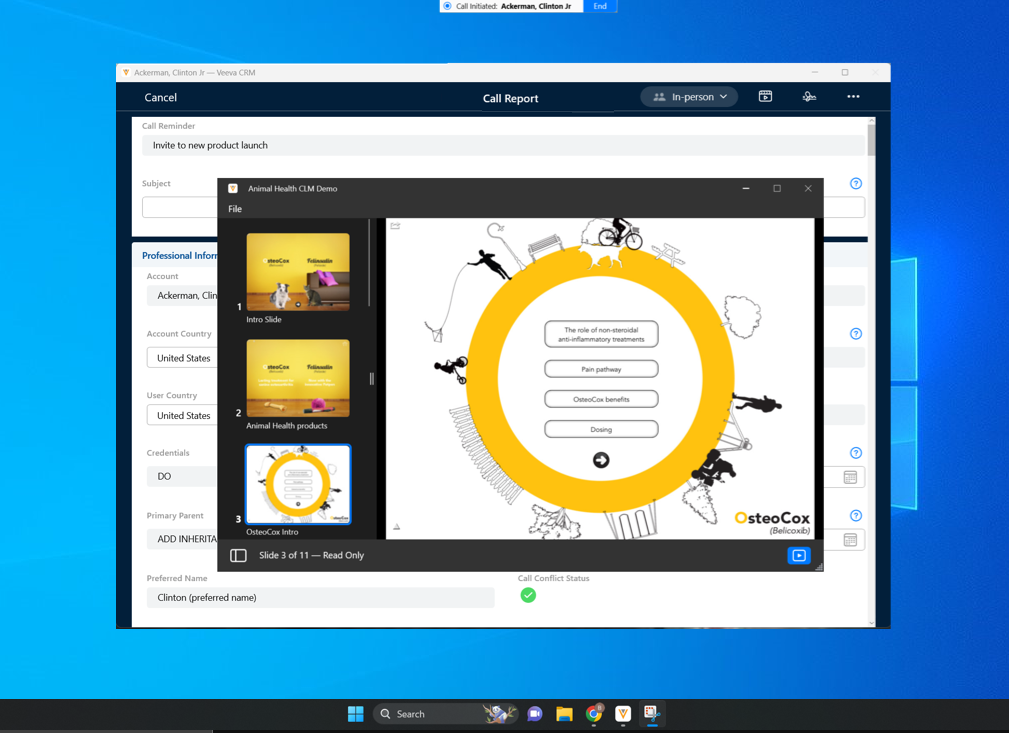
High performance call report is now available on the CRM Desktop (Windows) app, providing a better Veeva CRM Desktop Experience for users, including improved performance. When users edit or create a call report from their online browser, the call report displays as a new window in the CRM Desktop app. Feature availability differs depending on your configuration. For more information, see Supported Call Report Functionality on CRM Desktop (Windows).
For example, Larry Lakes, an MSL at Verteo BioPharma, connects to the internet from his laptop and creates a call report for his upcoming visit to Dr. Ackerman. The high performance call report opens quickly. Larry enters the necessary details for his visit and saves the call report. Later that day, Larry completes the call report with more information about his visit to Dr. Ackerman and submits the call report.
Using the High Performance Call Report
When the high performance call report is enabled, Veeva does not recommend using My Schedule to create same-day calls. If users schedule or edit a call for the same day in My Schedule and then try to open the call report without syncing first, the CRM Desktop app cannot open the call report.
When users create or edit a call from the Browser platform, the call report opens as a high performance call report in the CRM Desktop app. Once enabled, the call report is view-only on the Browser platform.
If users do not have the CRM Desktop app installed, the install process automatically occurs. After the app installs, the user must open the call report again from the browser.
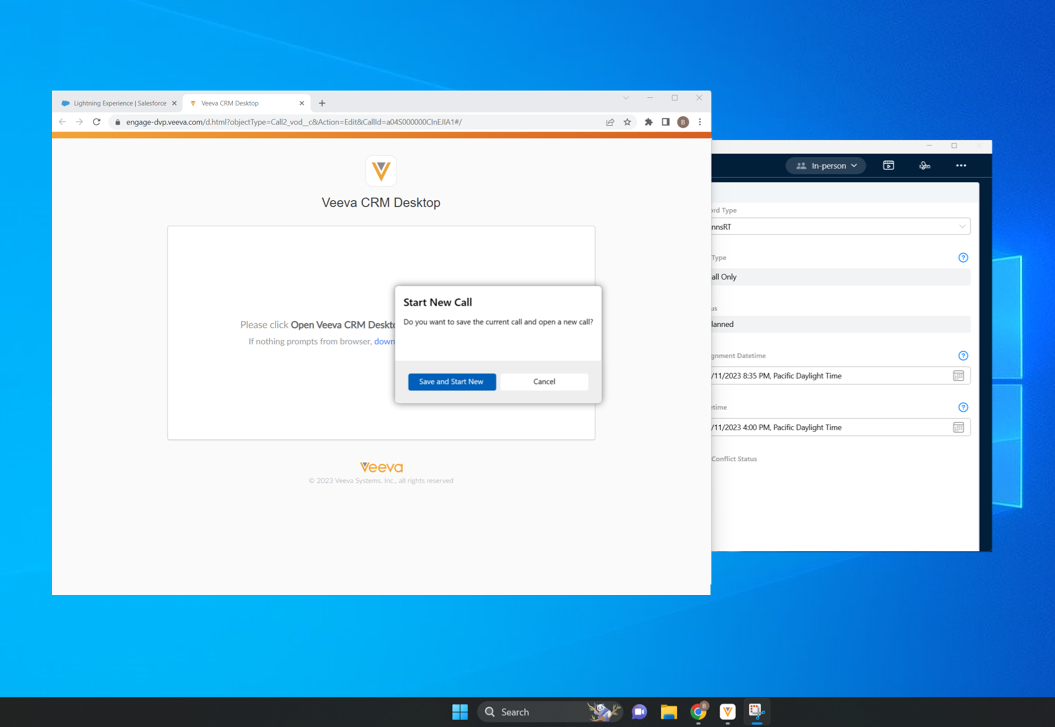
Only one call report can be open at a time. If a call report is already open in the CRM Desktop app and users attempt to create or edit a new call report, a warning displays. Select Start New Call to save and close the existing call, and open the new call report.
When a call report is open in both the CRM Desktop app and the user’s internet browser, users are instructed to use the call report in the CRM Desktop app when they attempt to do any of the following from the call in their browser:
- Launch media for CLM
- Start a previously scheduled Engage meeting
- Start an Engage meeting with Meet Now
- Schedule an Engage meeting
The call report is focused in the CRM Desktop app and any overlays on the call report remain open.
If the CRM Desktop app is already in call mode—for example, the user was presenting CLM through the CRM Desktop app—and users attempt to create or edit a new call report, a warning displays. Select Save and Start New to save and close the existing call and create or edit a new call report.
When users save or submit a call report, the Last_Device_vod field on the Call2_vod object is stamped with CRM_Desktop_Windows_vod for Windows users or CRM_Desktop_MacOS_vod for Mac users.
If high performance call report is enabled and VMOCs restrict calls from syncing past a certain number of days, users cannot go online to edit calls past the timeframe specified in the VMOCs. For example, if calls older than 45 days are excluded from the applicable Call2_vod VMOC, users cannot go online to edit calls created more than 45 days ago.
Launching CLM from High Performance Call Reports
When users launch CLM from a call report on CRM Desktop, the call report is saved locally and the Media Library window displays. If the save is unsuccessful, the Media Library window does not open and an error message displays.
When users launch a CLM presentation from the CRM Desktop app and an overlay is open on the high performance call report—for example, a Medical Inquiry, Key Medical Insight, or Order created from the call report—the overlay remains open and the call remains unsaved. When call mode ends, CLM Key Messages are automatically added to the call, regardless of whether the user first ends call mode or closes the overlay.
Users cannot edit the following media-sensitive fields and sections while presenting CLM:
- Restricted Products
- Allowed Products
- Account Attendees (users can still add user attendees)
- Account Segmentations
- Signature capture for product detailing (--sd section signal)
CLM slide tracking activity is updated on the call report in real time. For more information, see Supported CLM Functionality on CRM Desktop (Windows).
Syncing Call Data
When users log in to the CRM Desktop app for the first time, call data from the online database syncs to the CRM Desktop app in the background. Users cannot create or edit calls during this initial sync. If users attempt to open a call report while the app is syncing, an error displays and they are prevented from opening the call report.
Call data automatically syncs to the CRM Desktop app daily, as long as the CRM Desktop app is running. If the app cannot complete the daily sync on the initial attempt, the sync automatically begins as soon as possible afterward.
If users schedule a call for the same day and then try to open it before call data is synced, the CRM Desktop app cannot open the call report. Users can select Sync to manually initiate a sync, or the CRM Desktop app will attempt to sync again as soon as possible after users attempt to open a call. Users may need to wait a few minutes before trying to open the call report again.
When users save or submit a call report, call data immediately begins syncing to the CRM online database.
When users cancel a call report, call data may have already been saved through an implicit save. If users cancel a call where an implicit save already occurred, data up to and including the last implicit save is synced. Data captured after the last implicit save is discarded.
Manually Syncing Call Data
Changes to CRM configuration or records are not reflected until users sync, similar to the sync behavior on the iPad platform. To receive changes to CRM configuration or records between automatic daily syncs, users can manually sync the CRM Desktop app.
To initiate a manual sync, select Sync from any of the following locations:
- From the File menu of the Media Library
- From sync notifications on the CRM Desktop app
- Select the CRM Desktop app icon in the device’s status tray, then select Sync from the menu that displays
Resolving Sync Errors
Sync errors only display when users do not have any call reports open. Select the record listed in the error window to display more information about the error. If users open a call report when the sync error modal is open, the sync error modal is hidden until they close the call report.
Considerations
- For meeting hosts on the CRM Desktop (Windows) platform, enabling Creating Sample Transactions on Save in combination with Engage meeting and the high performance call report is not supported
- When users display CLM as part of a high performance unique activities group call, the CLM is associated with all accounts on the call. Users cannot select a specific account for the CLM.
Engage
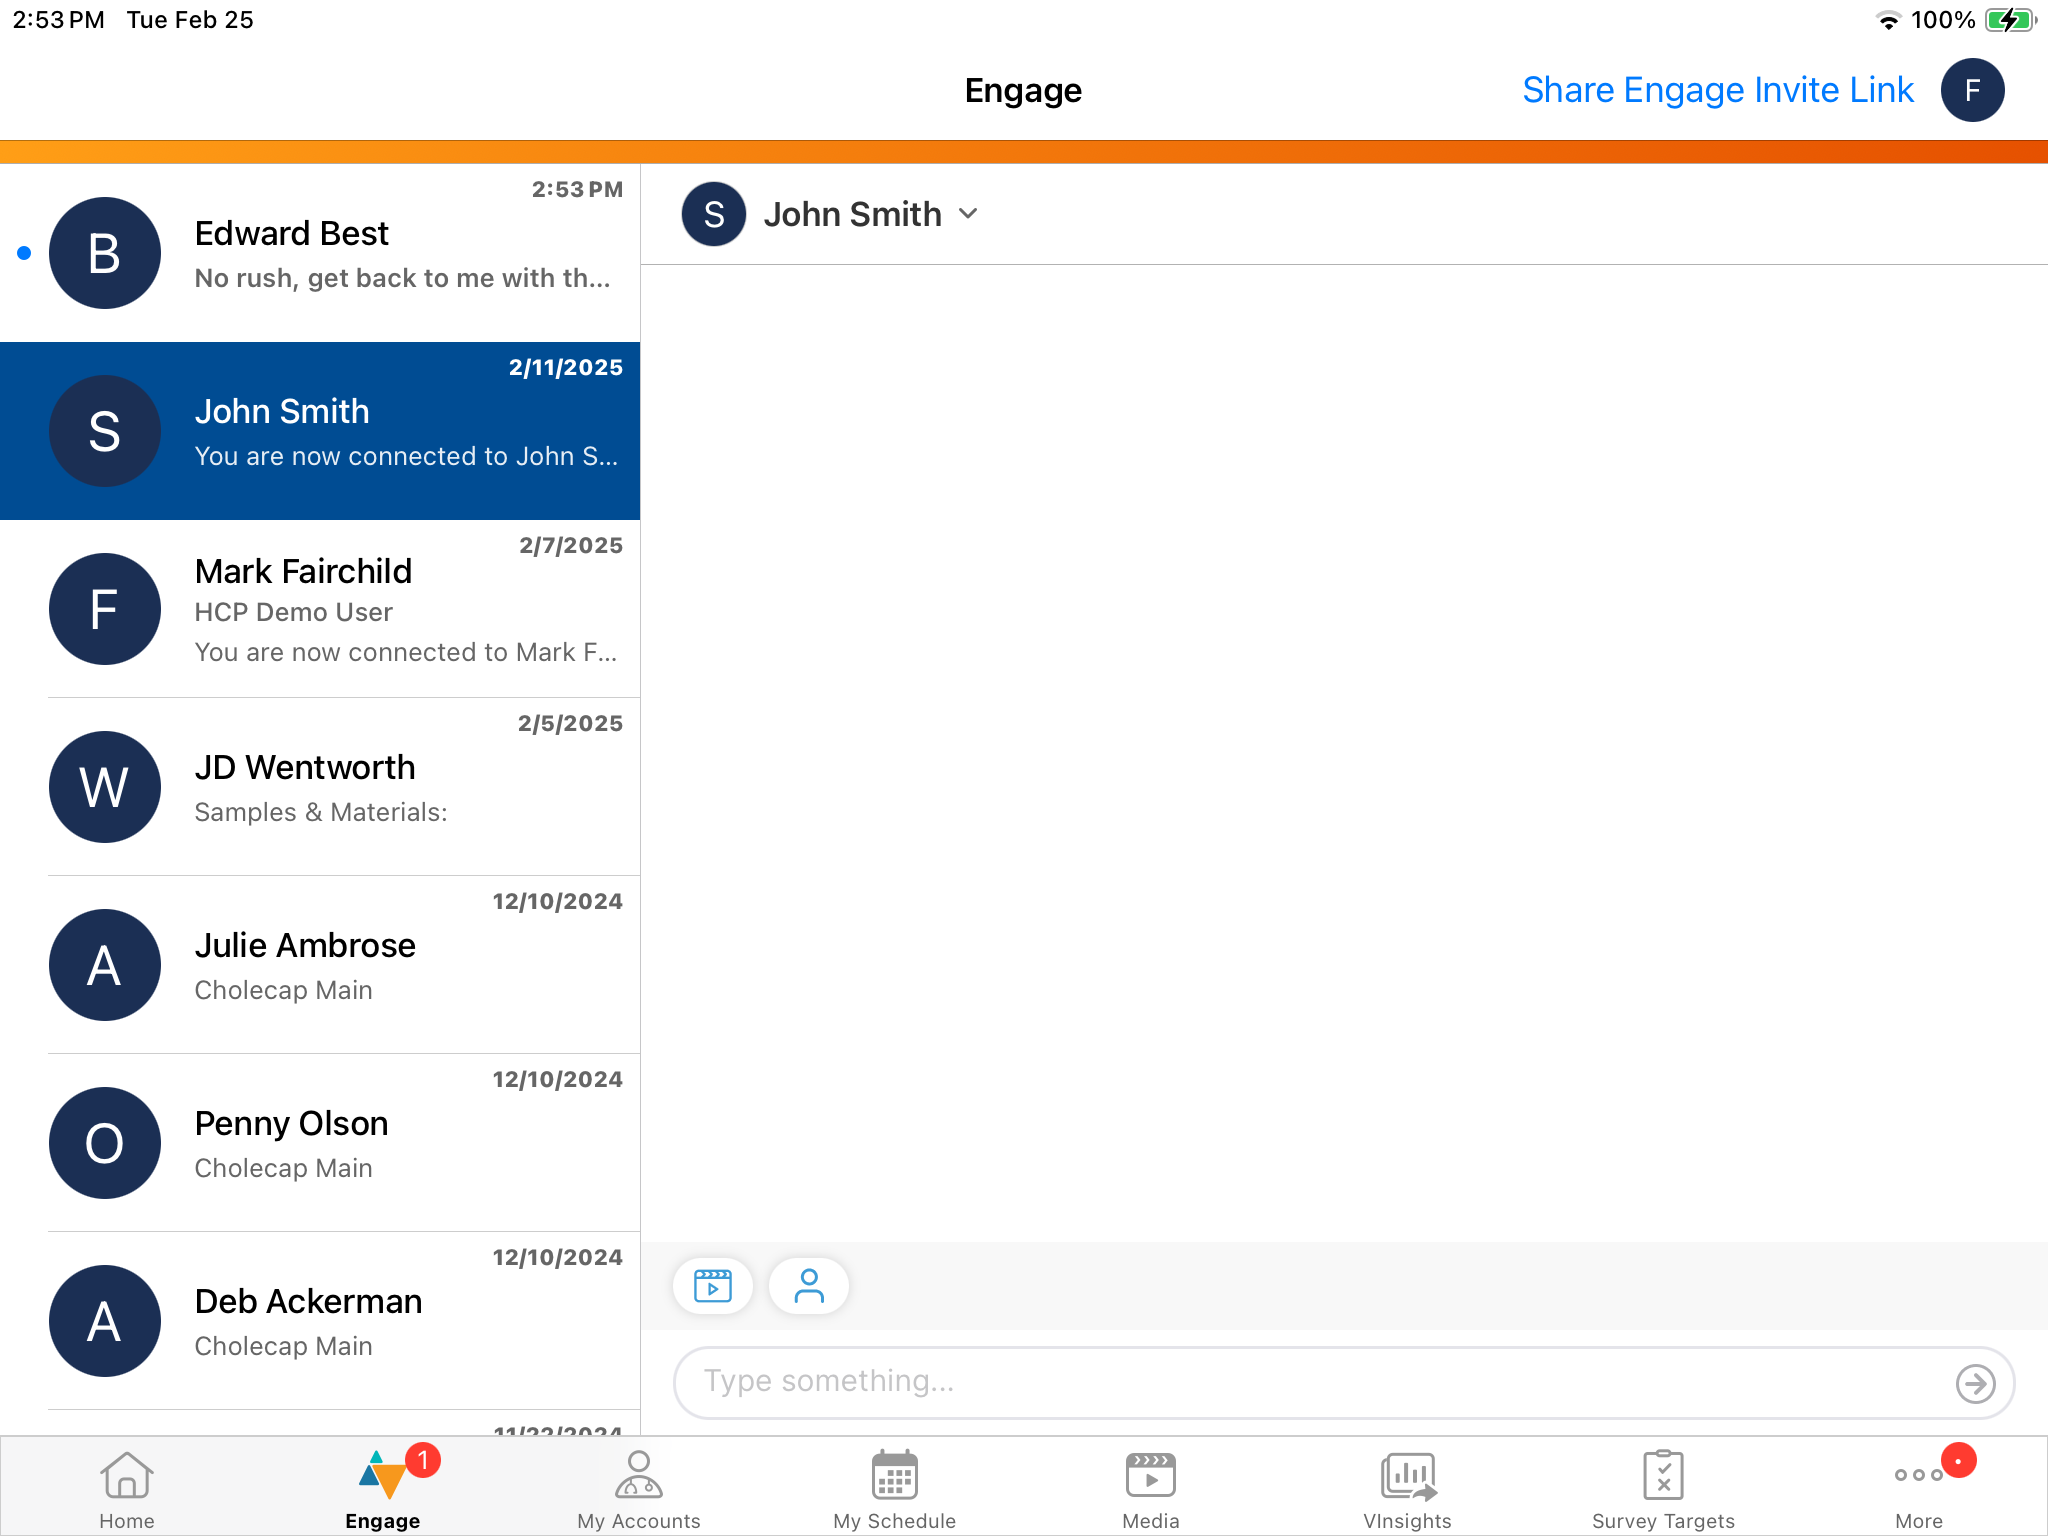
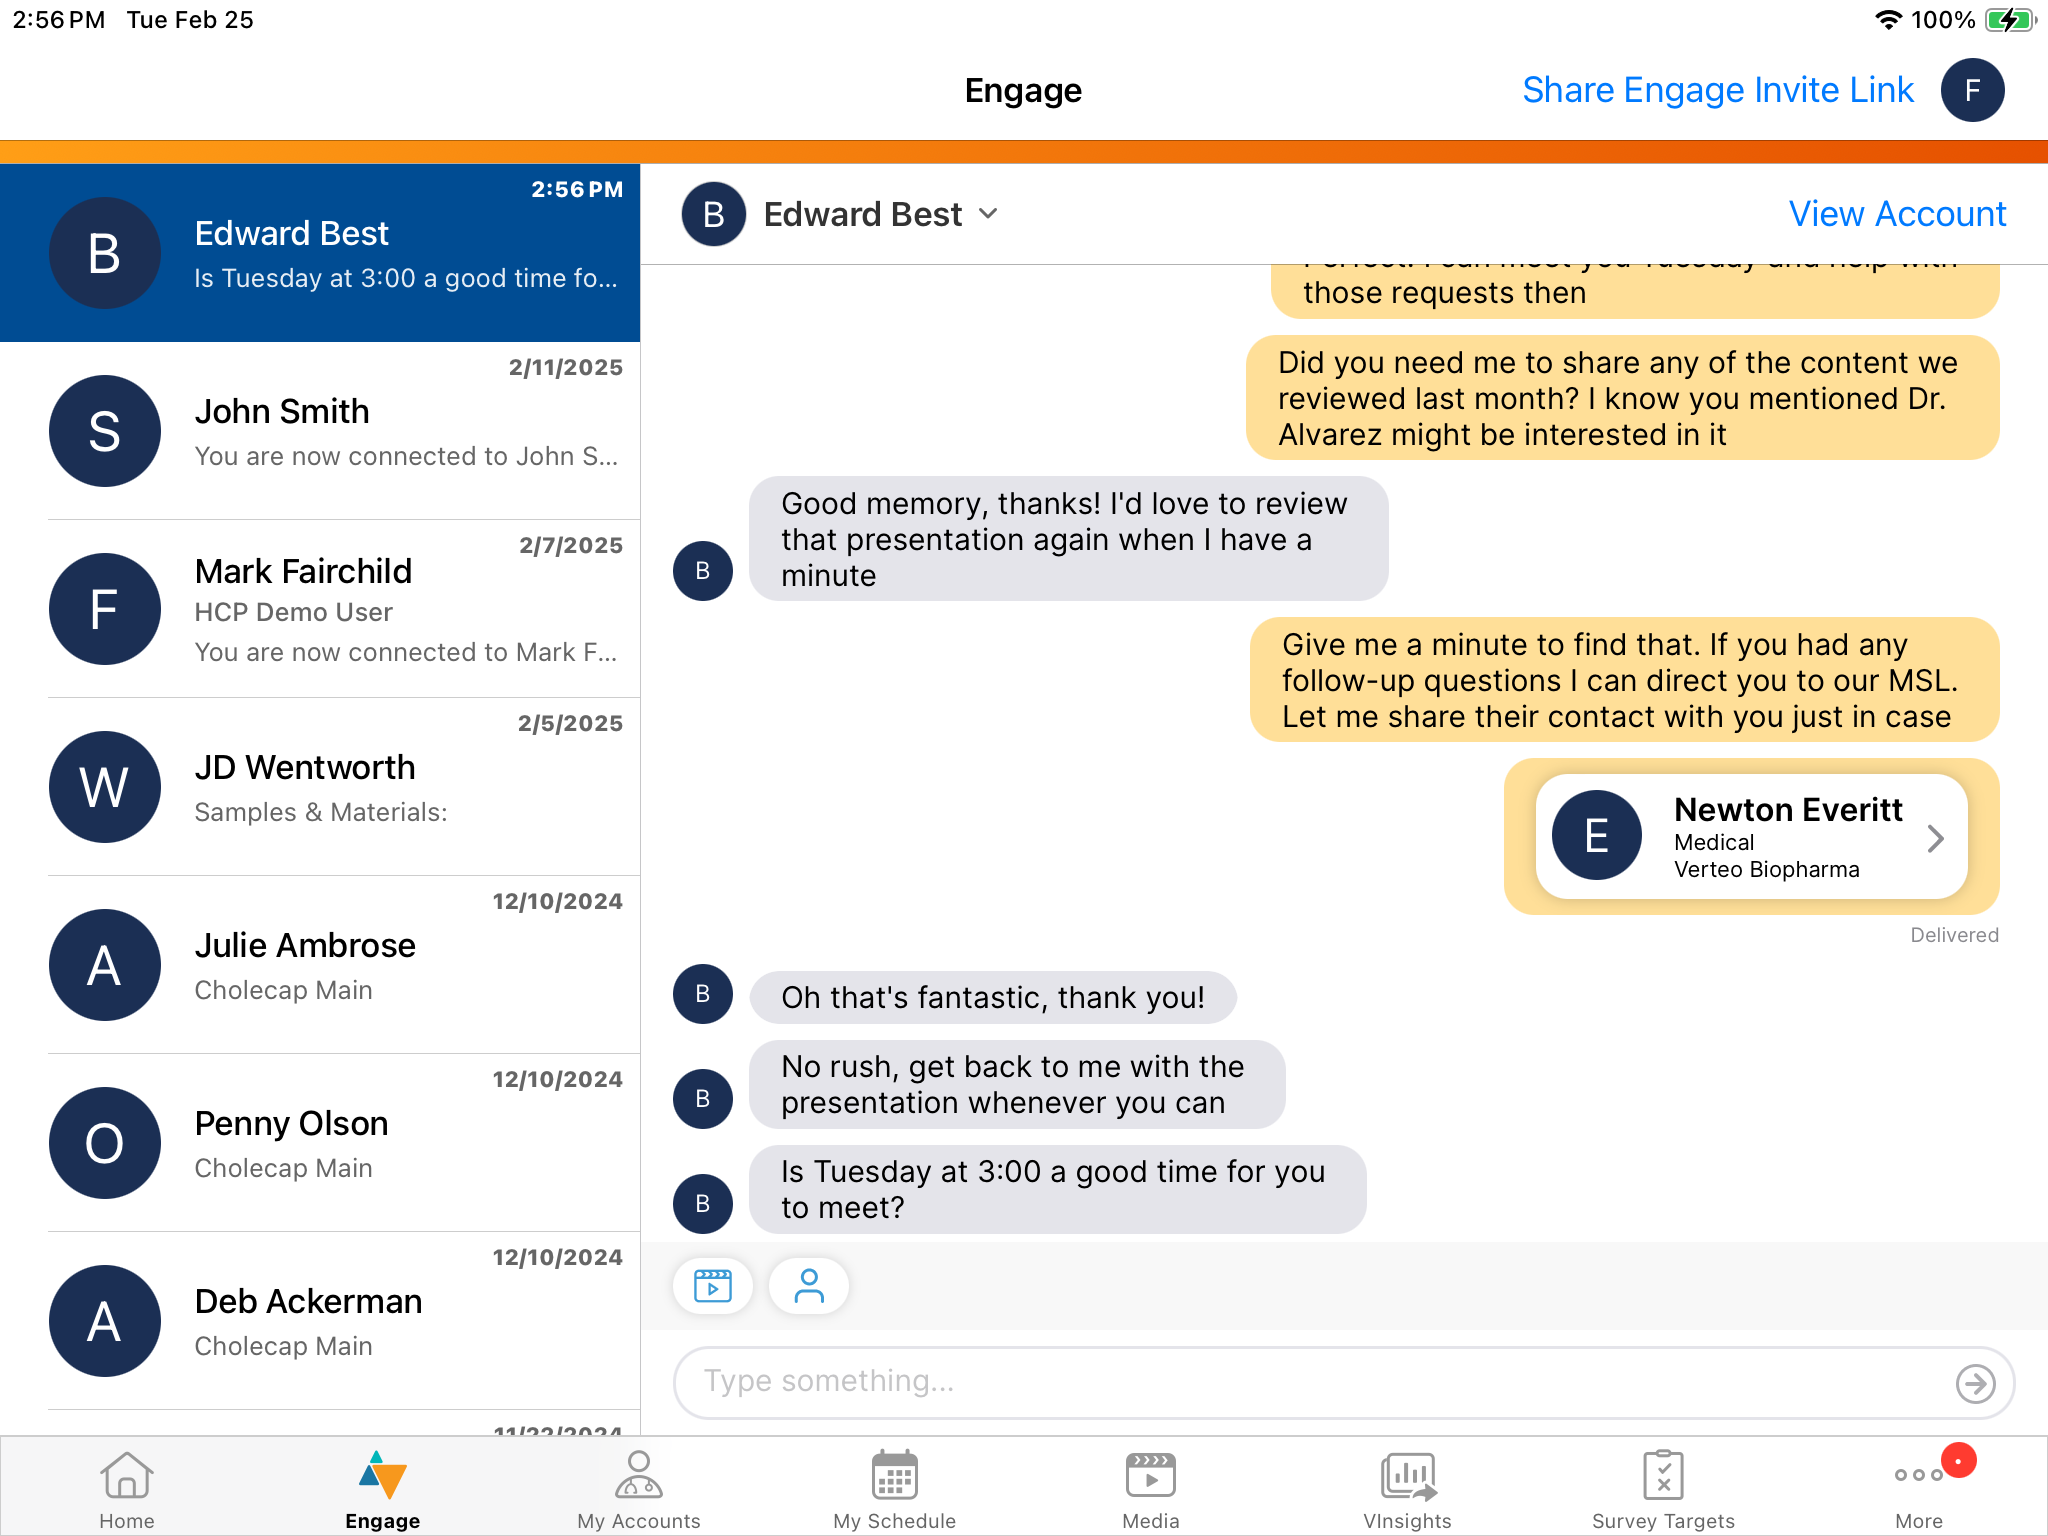
Copying and Forwarding Chat Messages
CRM users and HCPs can copy or forward chat messages within Engage Connect and in the Engage tab in Veeva CRM as a quick way to share more information. Additionally, forwarded messages are tracked and the data can be used in reporting, allowing customers to gain insight on how their users communicate with forwarded messages.
Configuration is not needed for this feature.
Using Message Actions
Users can copy or forward messages from the action menu. To display the action menu for a message, press and hold the message on a mobile device or hover over the message in the browser. Users can also forward messages they receive using the Forward button. The Forward button is not available for sent messages.
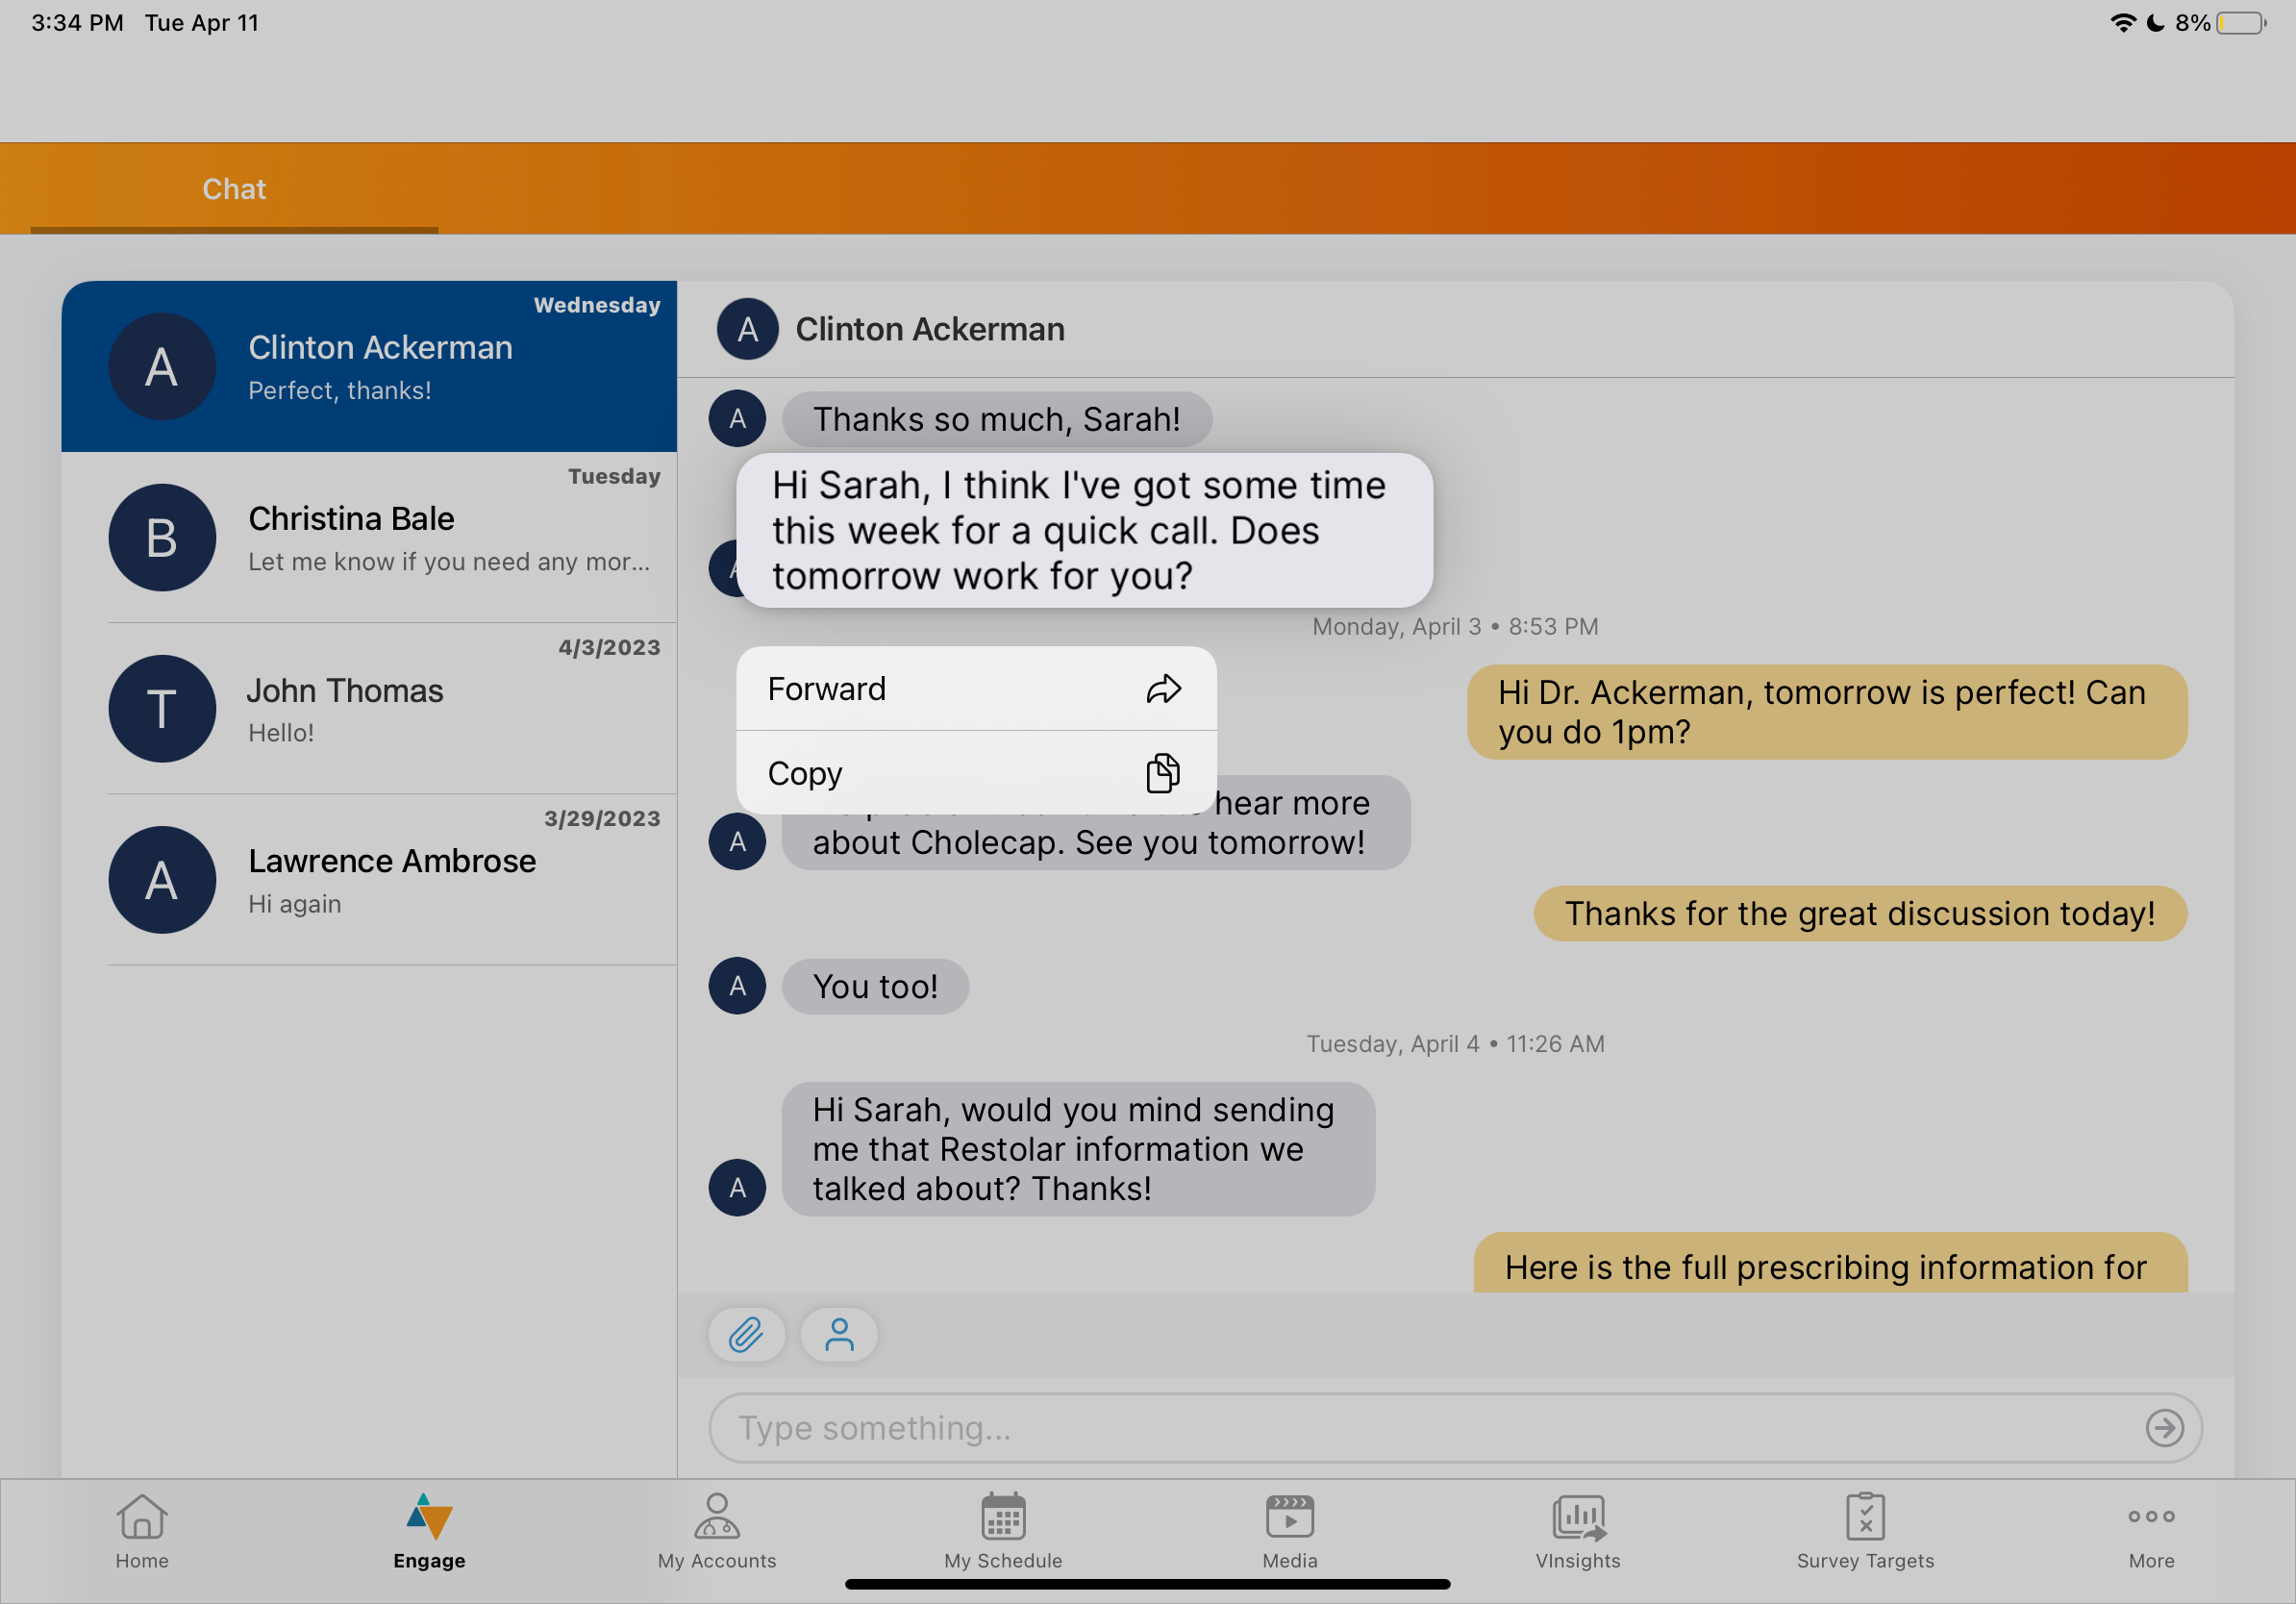
The action menu only displays if the Copy or Forward actions are available for the message and the users in the chat thread are connected.
If the chat thread is active, Copy and Forward are available actions for the following message types:
|
Message Type |
Copy? |
Forward? |
|---|---|---|
|
Free text (including emojis, URLs, plain text) |
|
The Forward button is only available for free text messages including URLs. |
|
Shared Contact card |
|
|
|
Approved Content |
|
|
|
Web link for websites |
|
|
|
Web link for auto-published content |
|
|
|
Web link for binders and slides |
|
|
|
Web link for custom presentations |
|
|
|
Remote CLM link |
|
|
|
Samples and Materials request |
|
|
|
Brand profile resource |
|
|
Copying Chat Messages
To copy a chat message, open the action menu and select Copy to save the text to the clipboard.
Forwarding Chat Messages
Users can forward messages to CRM users and HCPs. To forward a chat message:
- Select the Forward button, or open the action menu and select Forward to display the Forward Message modal.
- Select the recipient from the list of possible recipient connections, or enter the recipient’s email address and select the button below Send via Email.
- Enter a message to accompany the forwarded message, if desired.
- Select Send.
Users cannot forward a message whose author is inactive or deleted. Users cannot forward a message from a CRM user at one company to a CRM user at a different company.
Additionally, users cannot forward a message when the optional text matches restricted phrases. See Using Restricted Phrase Rules in Engage Chat for more information.
Tracking Forward Messages
Forwarded messages sent to and from CRM users are included in the Chat Message, Chat Detail, and Chat Activity reports. Additionally, the Forwarded Messages report is available. See Forwarded Messages Report for more information.
To allow customers to continue importing Engage Connect chat logs into CRM as chat messages for chat monitoring, ensure admins and integration users have FLS edit permission to the following fields on the Chat_Message_vod object:
- Forwarded_Comment_vod
- Original_Author_Name_vod
- Original_Author_Ext_Id_vod
- Original_Message_External_Id_vod
Forwarded messages in chat threads between CRM users and HCPs can be monitored via Approved Notes. See Approved Notes for more information.
Integrating Engage Profiles into CRM
To allow customers to view Engage profile information within CRM and understand the connections between Engage profiles and accounts, admins can sync Engage profile data to CRM using the Engage Connect Profile Sync of the Engage Meeting Reporting Processes. Additionally, integrating Engage profiles is necessary to display the Engage profile indicator on accounts. See Displaying the Engage Profile Indicator on Accounts for more information.
For example, Verteo BioPharma wants their users to be able to identify if an account in CRM has corresponding Engage profiles. Alice Adams, an admin, syncs the Engage profile data via the Engage Connect Profile Sync. Now, when Sarah Jones navigates to Dr. Clinton Ackerman’s account, she sees that his account is linked to his Engage profile as well as Marilyn Martin’s Engage profile, because she is the PA for Dr. Ackerman.
Syncing Engage Profile Data
The Engage Connect Profile Sync runs as part of the Engage Meeting Reporting Processes in the Process Scheduler. Each automatic sync is incremental, unless there were not any successful syncs within the last 90 days or the last 10 syncs failed. Each sync includes all changes to Engage Profiles since the last successful sync.
Admins can also select Full Sync in the Engage Profile Integration Sync History section of the Engage Meeting Process Admin tab to manually perform a full sync. The sync history displays the last 10 syncs.
Syncs must be at least 60 minutes apart for updates in Engage Connect to be pushed to CRM. The Engage Profile Integration Sync cannot run if an Engage Post-Processing job is in progress.
When a sync completes, one of the following messages displays in the sync history table:
- Success – all records were successfully created or updated
- Success with errors – at least one record was successfully created or updated, and at least one record failed to be created or updated
- Failure – all records failed to be created or updated, or one of the following is true:
- The system could not connect to Engage Connect
- The system could not connect to Salesforce
- The integration user is not correctly configured
- The integration user credentials are invalid
Admins can download and view the success and error logs for each sync for more information.
If a sync fails to create or update the appropriate records, the next sync tries to create or update those records again. Admins can view error messages for sync failures in the Engage Profile Integration Sync History table. A failed record is retried until it fails ten consecutive syncs, after which it is not retried until its next update in Engage. Failures due to configuration issues, for example, invalid credentials for the integration user, can be retried more than ten times.
An Engage profile for an account syncs to CRM if one of the following is true:
- The Engage profile is connected to a CRM user in the org
- The Engage profile is associated with an Account ID in the org and is connected to a CRM user in the company
The sync process searches for Engage_Profile_vod records corresponding to Engage profiles. If a record exists, the sync updates the fields with the changes from Engage. If a record does not exist, the sync creates the record and populates it appropriately.
Do not manually attach profile photos with the CRM_Content_type field set to Engage_Profile_Photo_vod because they are overridden in the next sync.
An Engage_Connection_vod record is created for each connection to a CRM user in the org. If a CRM user or an HCP disconnects from a connection in Engage, the corresponding Engage_Connection_vod record is deactivated in the next sync but not deleted. The same record is reactivated if the CRM user or HCP reconnects to the user or HCP in Engage.
Do not manually update Engage_Profile_vod or Engage_Connection_vod records created by the Engage Connect Profile Sync. Doing so prevents future syncs from appropriately updating the records.
If an HCP deletes their Engage profile, the following updates to the corresponding Engage_Profile_vod record occur in the next sync:
- The name is set to Deleted User
- The Connection_Status_vod field is set to Deleted
- The Connection_Status_Update_Datetime_vod field is set to the current date
- All other fields are cleared
- All associated Engage_Connection_vod records are deactivated
If an Engage profile is merged with another profile, the merged profile is treated as a deleted profile.
Enabling Engage Chat in CRM
Users chat with HCPs directly from Veeva CRM in the Engage tab. Engage chat is a convenient, secure, and compliant communication channel for users to interact and share information with HCPs outside of calls.
The Engage tab is only available in the Veeva CRM app available from the App Store either by direct download or managed through an MDM. See Installing CRM via the App Store for more information.
Using the Engage Tab
The Engage tab always displays as the second tab, to the right of the Home tab, and cannot be reordered. See Managing Tab Visibility and Display Order for more information about the tabs on the navigation bar.
When users navigate to the Engage tab for the first time, a modal about push notifications displays. Users can select Allow Notifications to receive push notifications about new chat messages, or No Thanks to dismiss the modal.
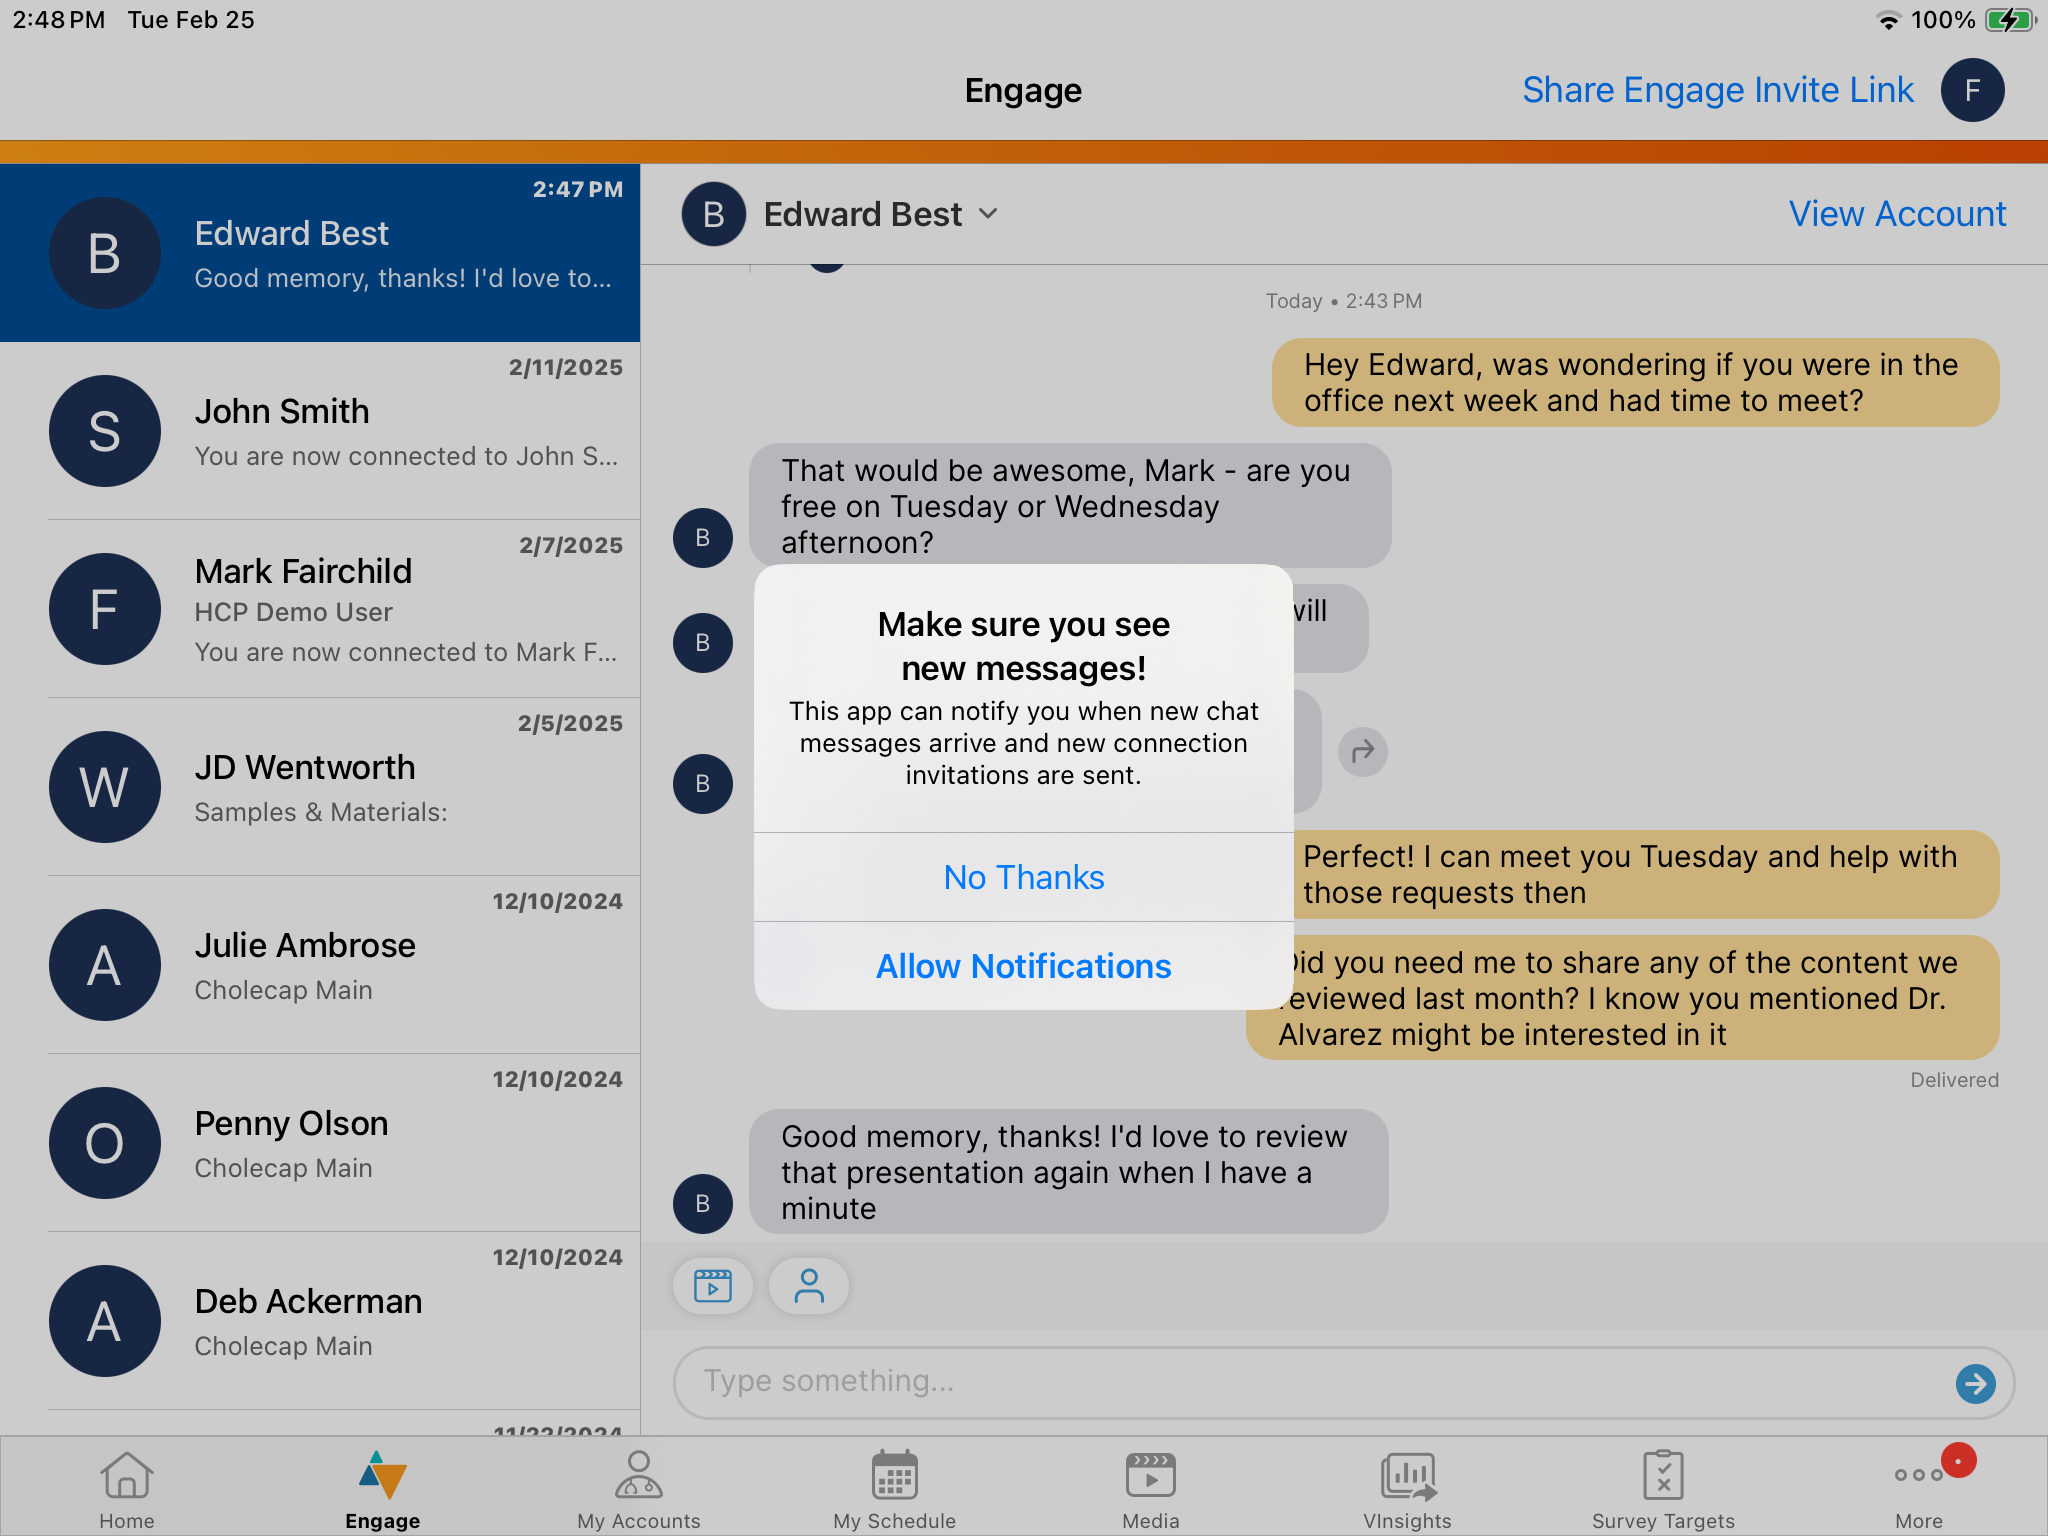
Users can manage push notifications for Veeva CRM by launching the Settings app on their devices and navigating to Veeva CRM > Notifications.
You can only register for push applications for one Veeva application per device. If you have Veeva CRM, Engage, and Engage Connect installed on the same device, you receive push notifications for whichever app you are logged in to and most recently opened.
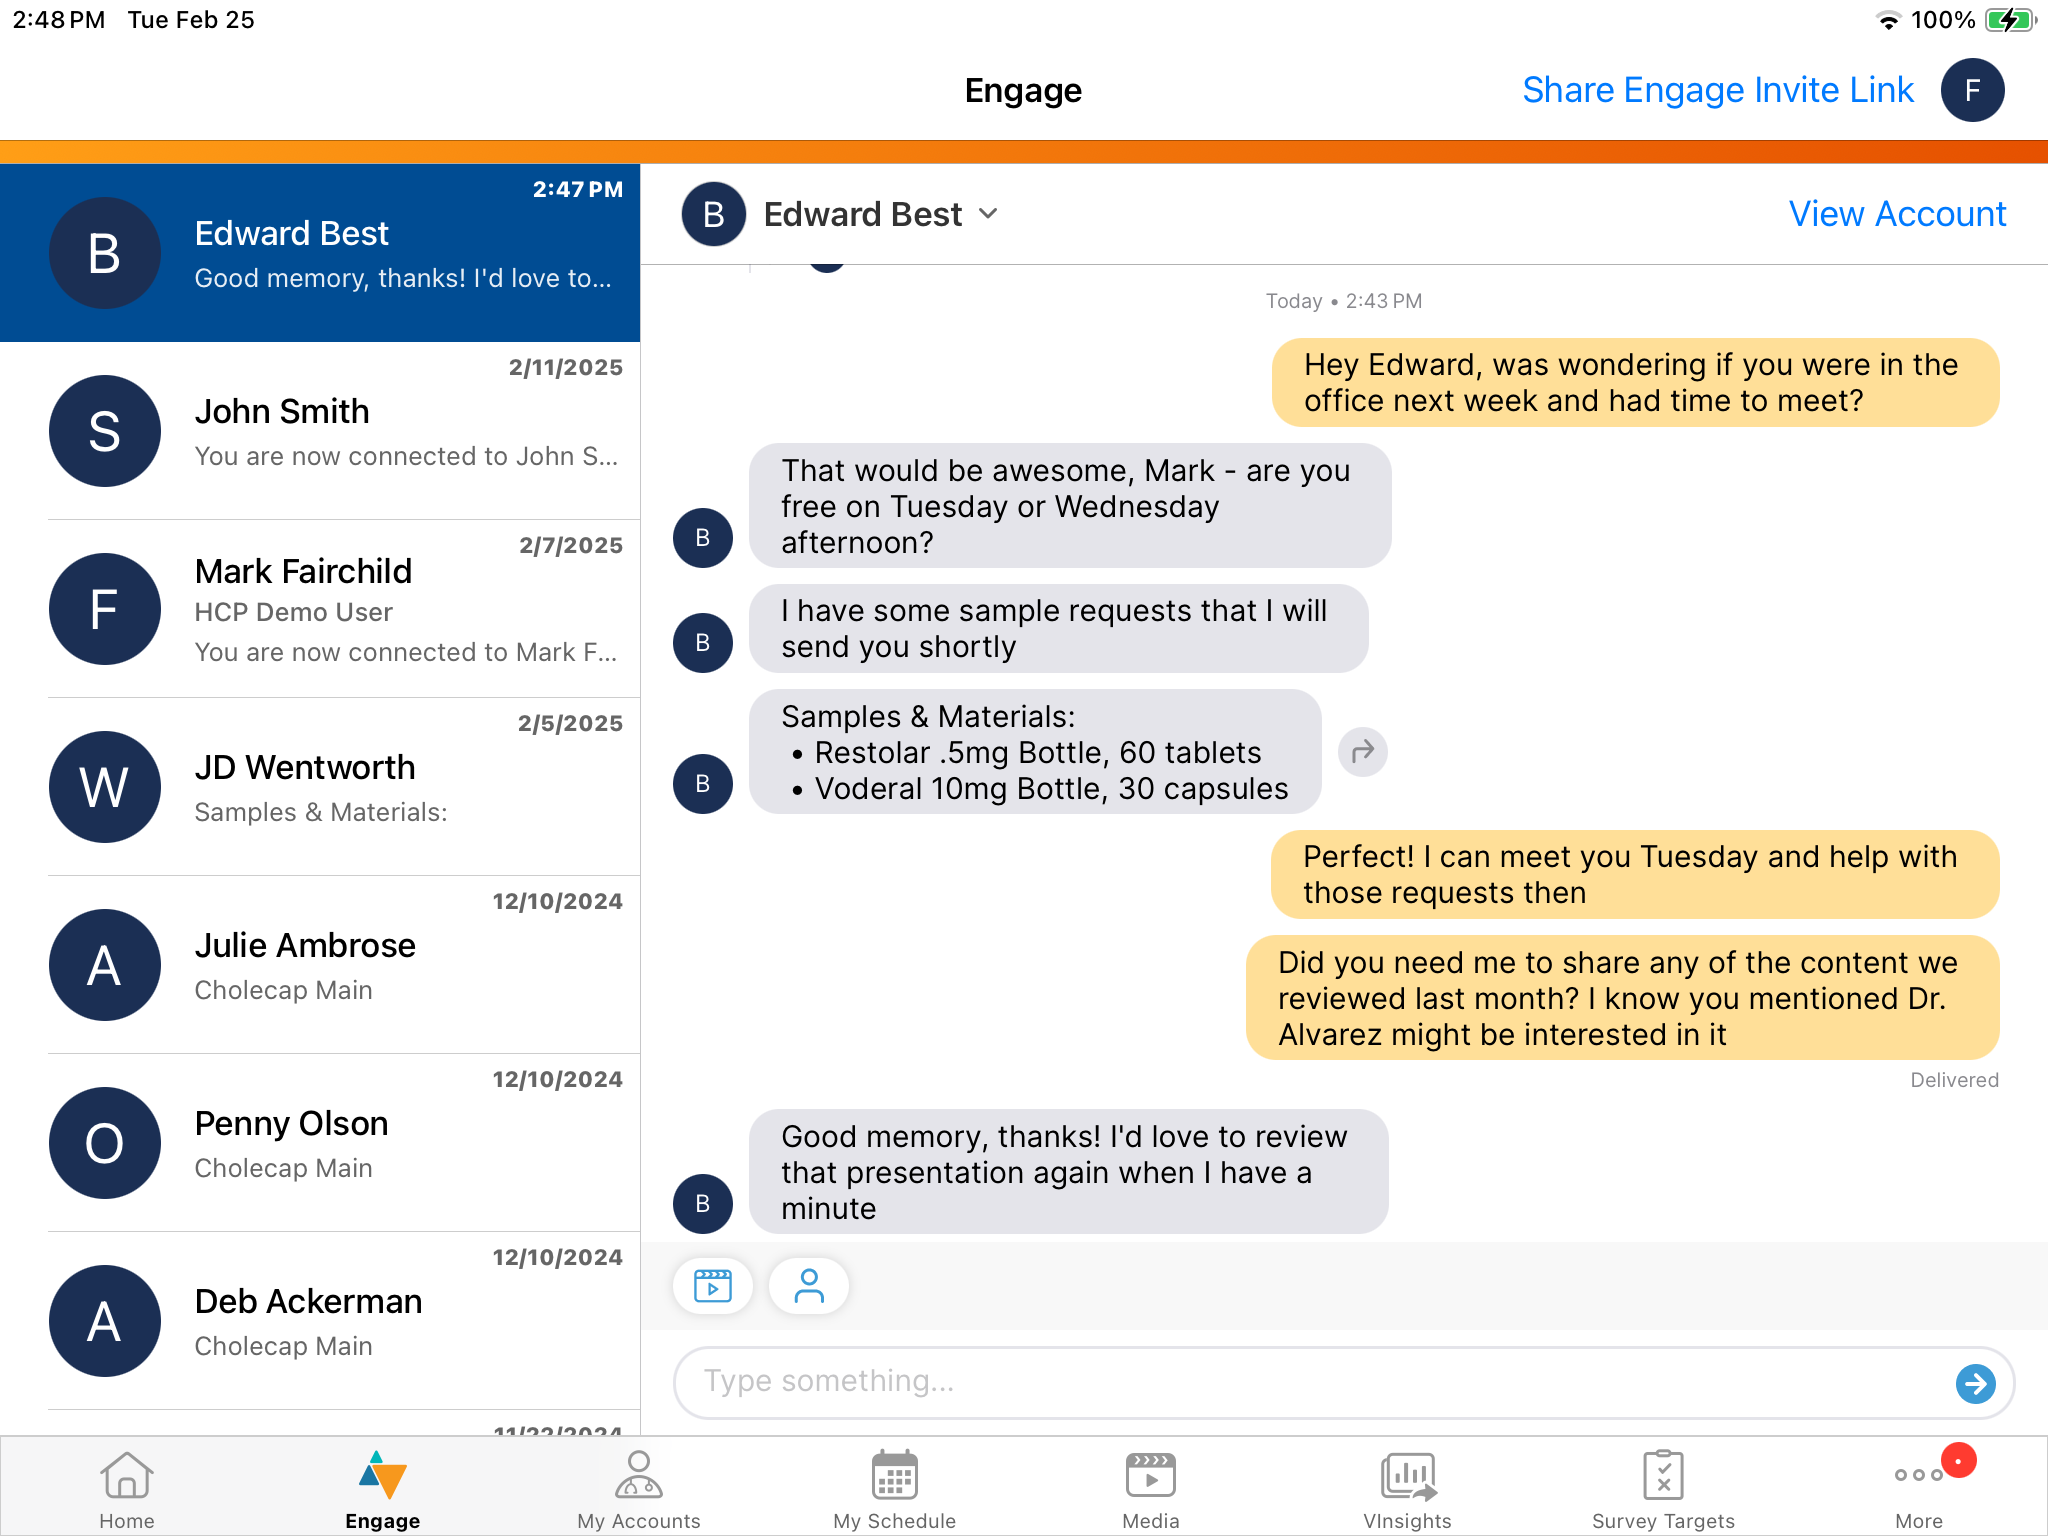
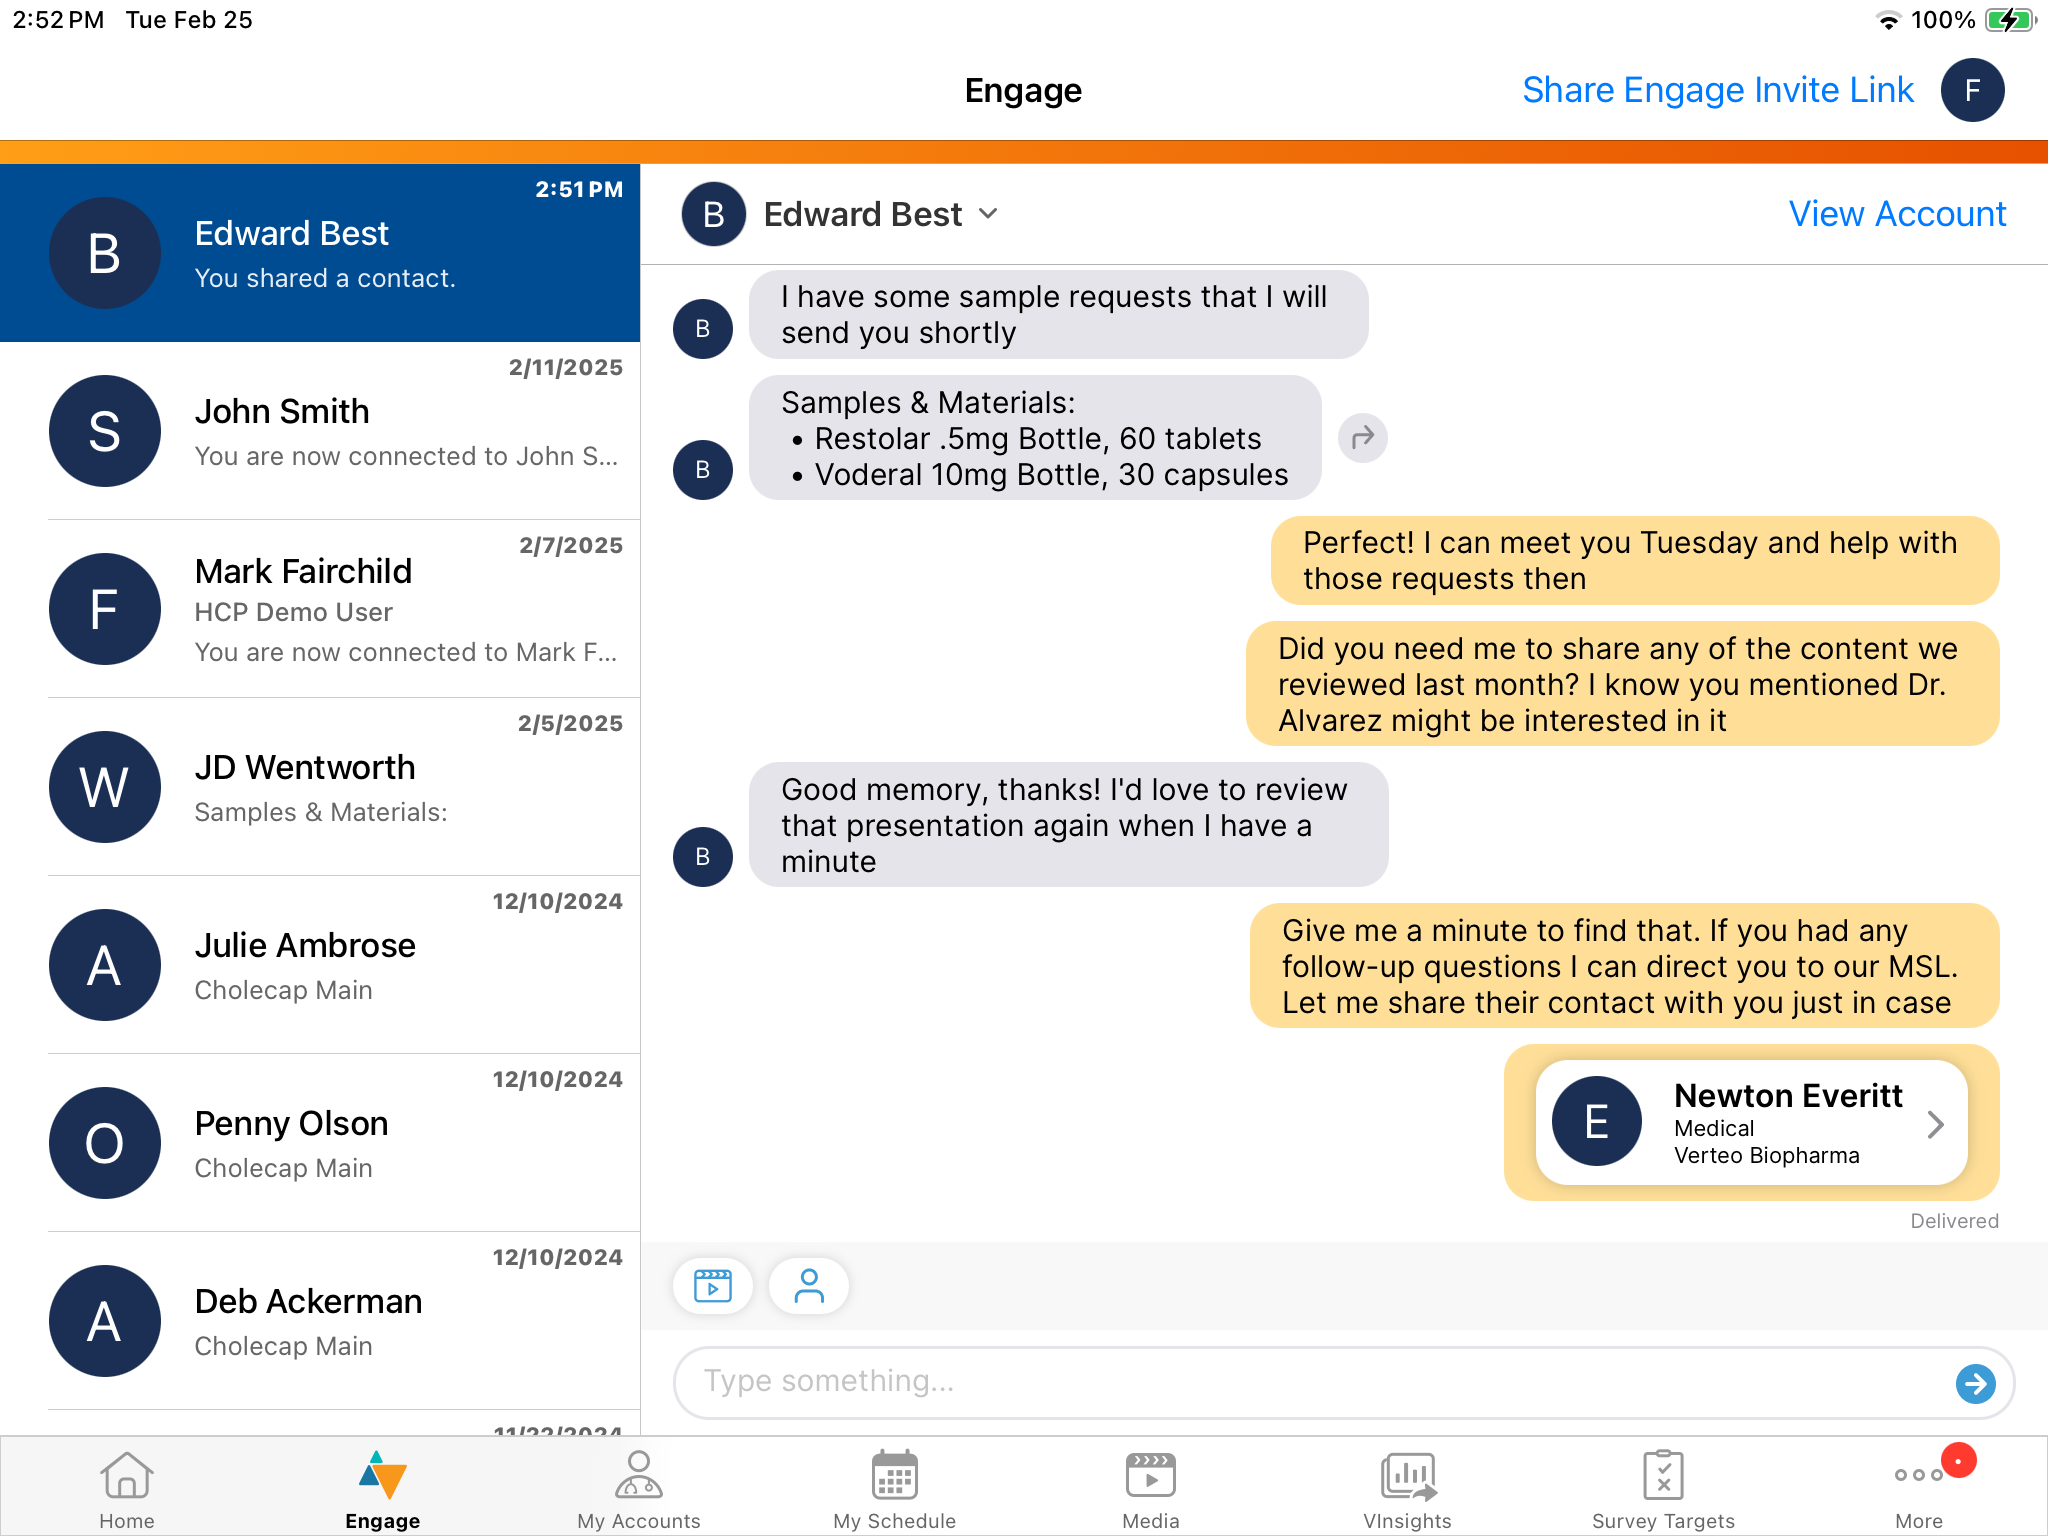
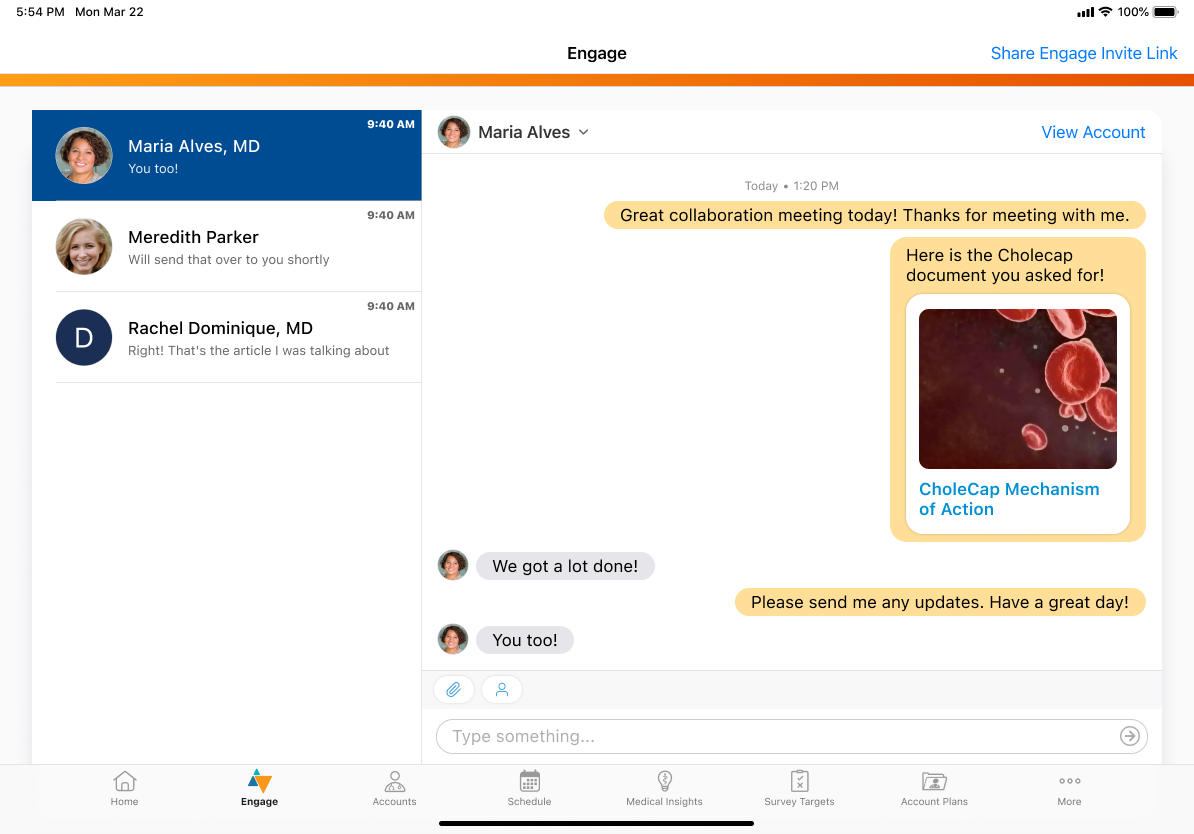
In the Engage tab, users can view their Engage chat threads, and chat with connected CRM users and HCPs directly from CRM. Users must have an active internet connection to load chat threads, and to send and receive chat messages. In a chat thread, users can:
- Share contacts
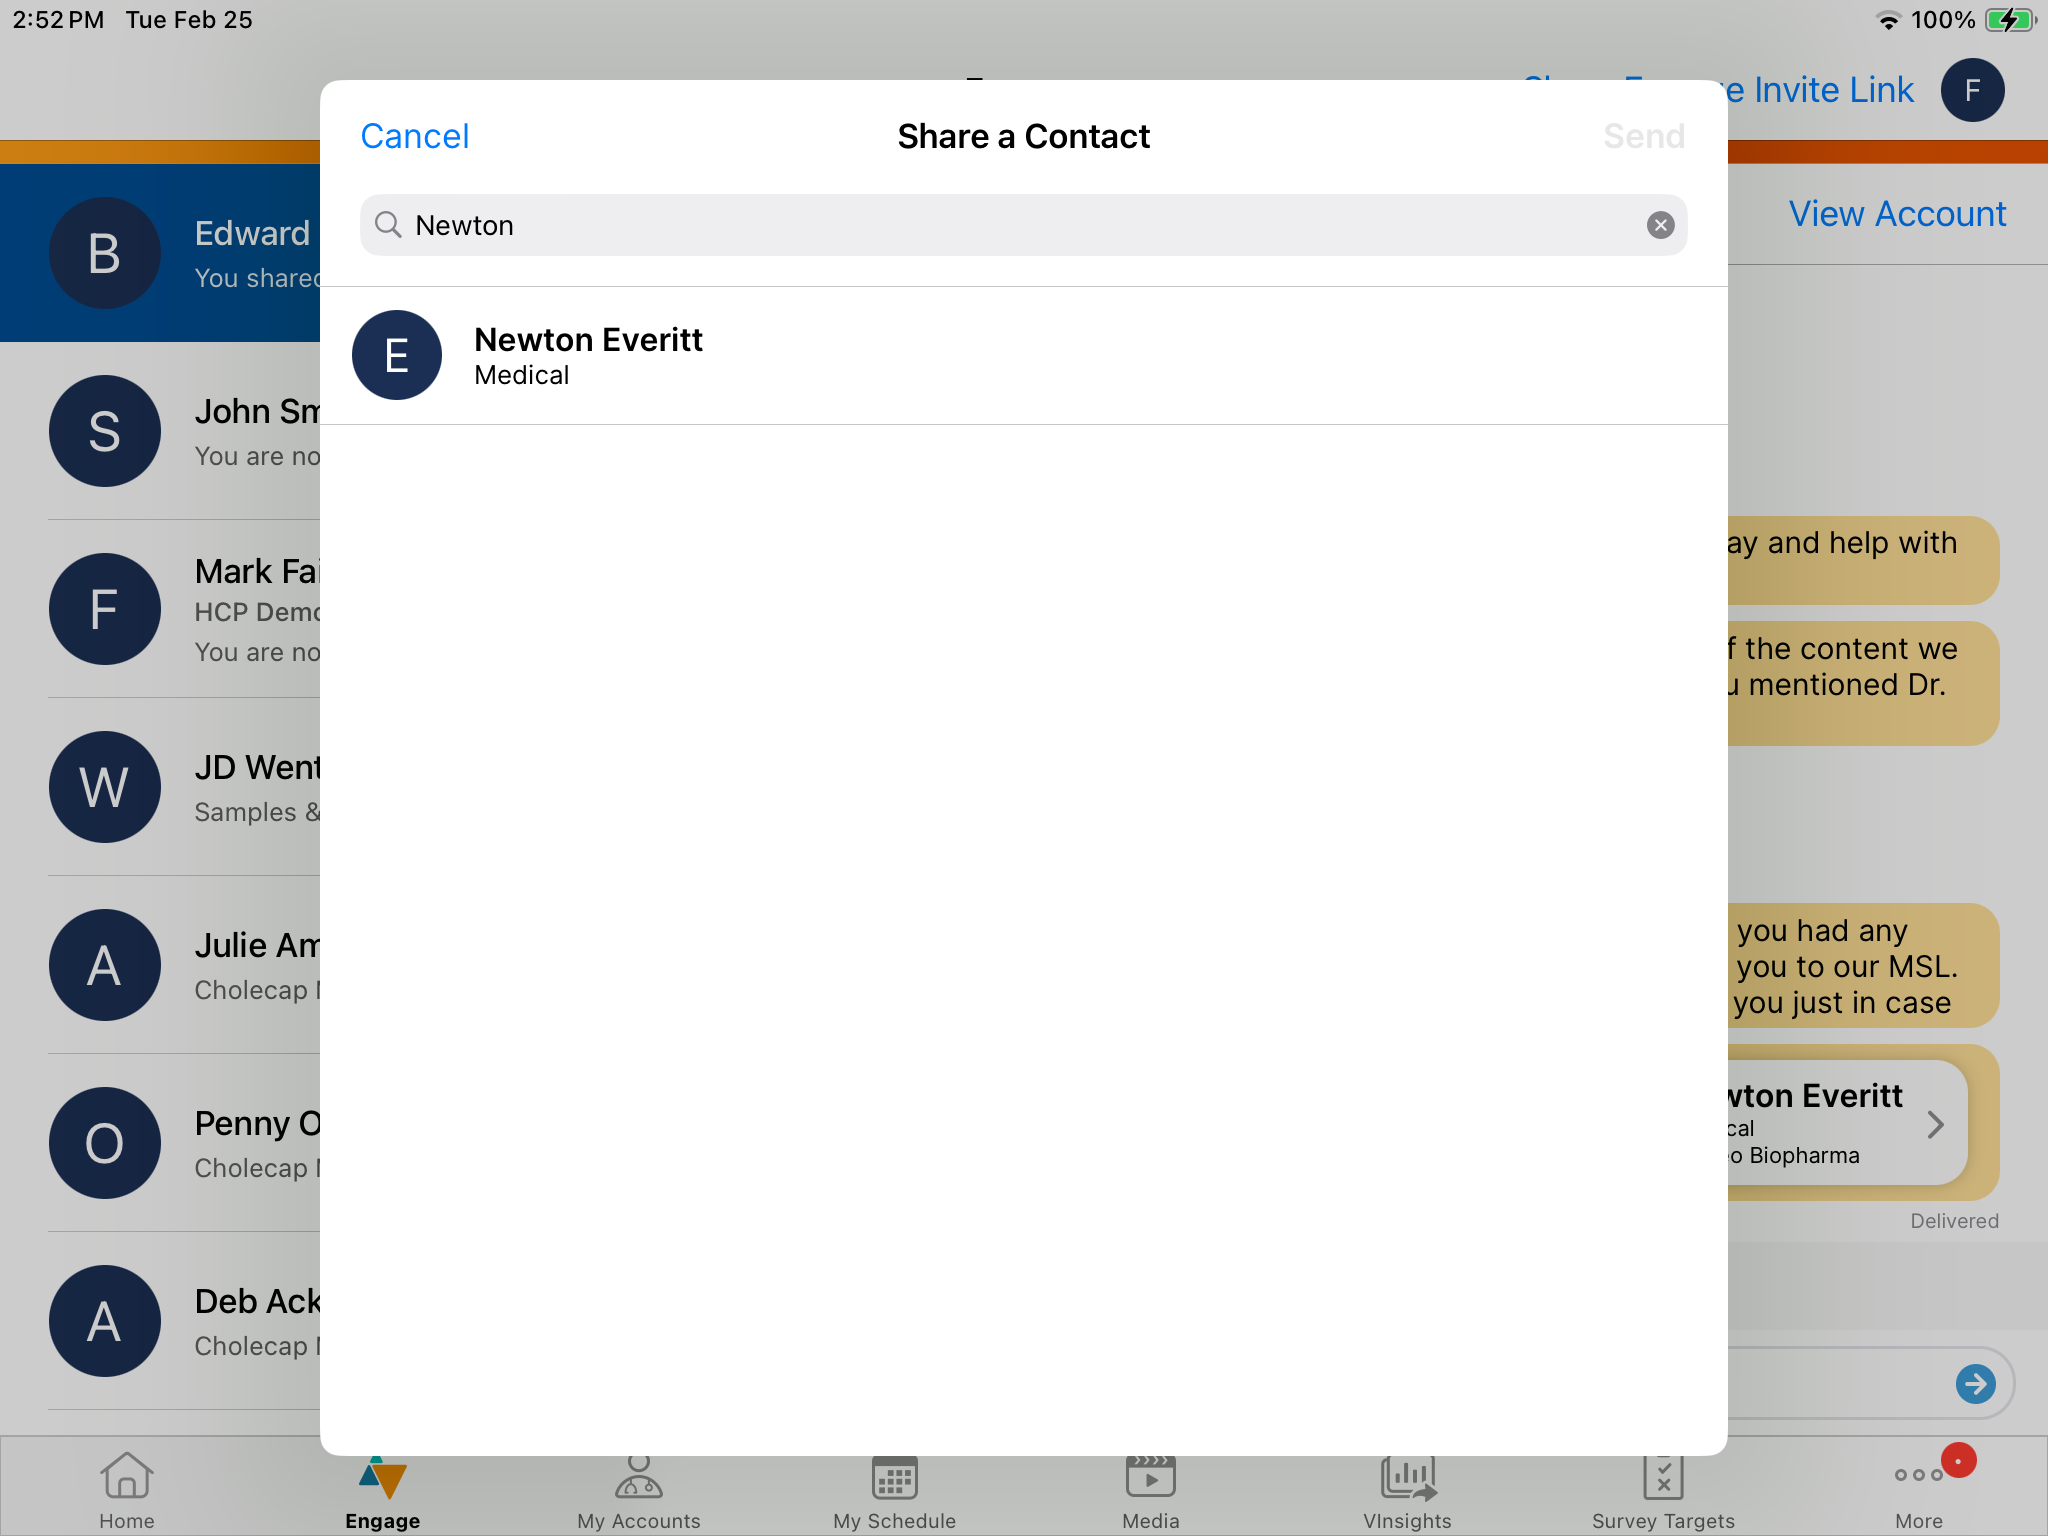
- Send approved content

- Send web links for content. See Sending Auto-Published CLM Content via Web Link or QR Code® and Sending Websites via Web Link or QR Code® for more information.
- Receive requests for samples and materials
- Forward messages. See Copying and Forwarding Chat Messages in Engage Connect for more information.
- Select View Account to display the account record associated with the HCP connection . The View Account button does not display if an account record associated with the HCP connection does not exist.
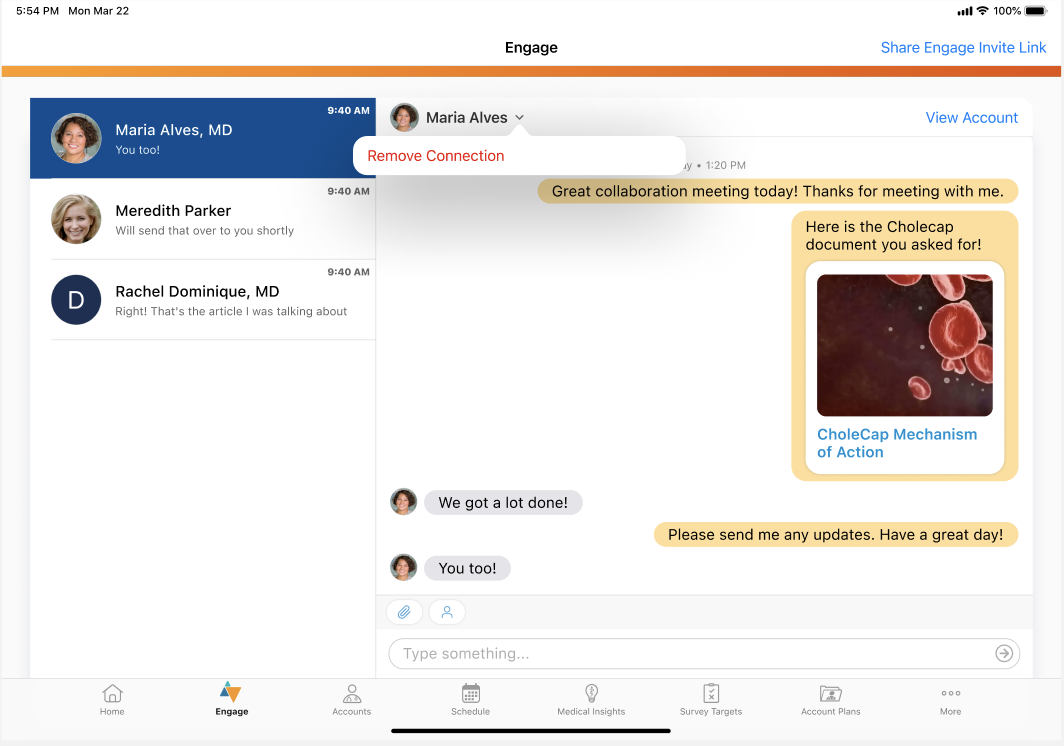
- To disconnect from an HCP connection, select the HCP's name from the chat thread header and select Remove Connection. The chat thread becomes inactive. To reconnect after removing a connection, select the HCP's name from the chat thread header and select Connect. The HCP receives an in-app notification and an email notification informing them of the connection invite.
A badge counter displays on the Engage tab when users receive new chat messages.
If users have push notifications enabled, they also receive a push notification for each new message.
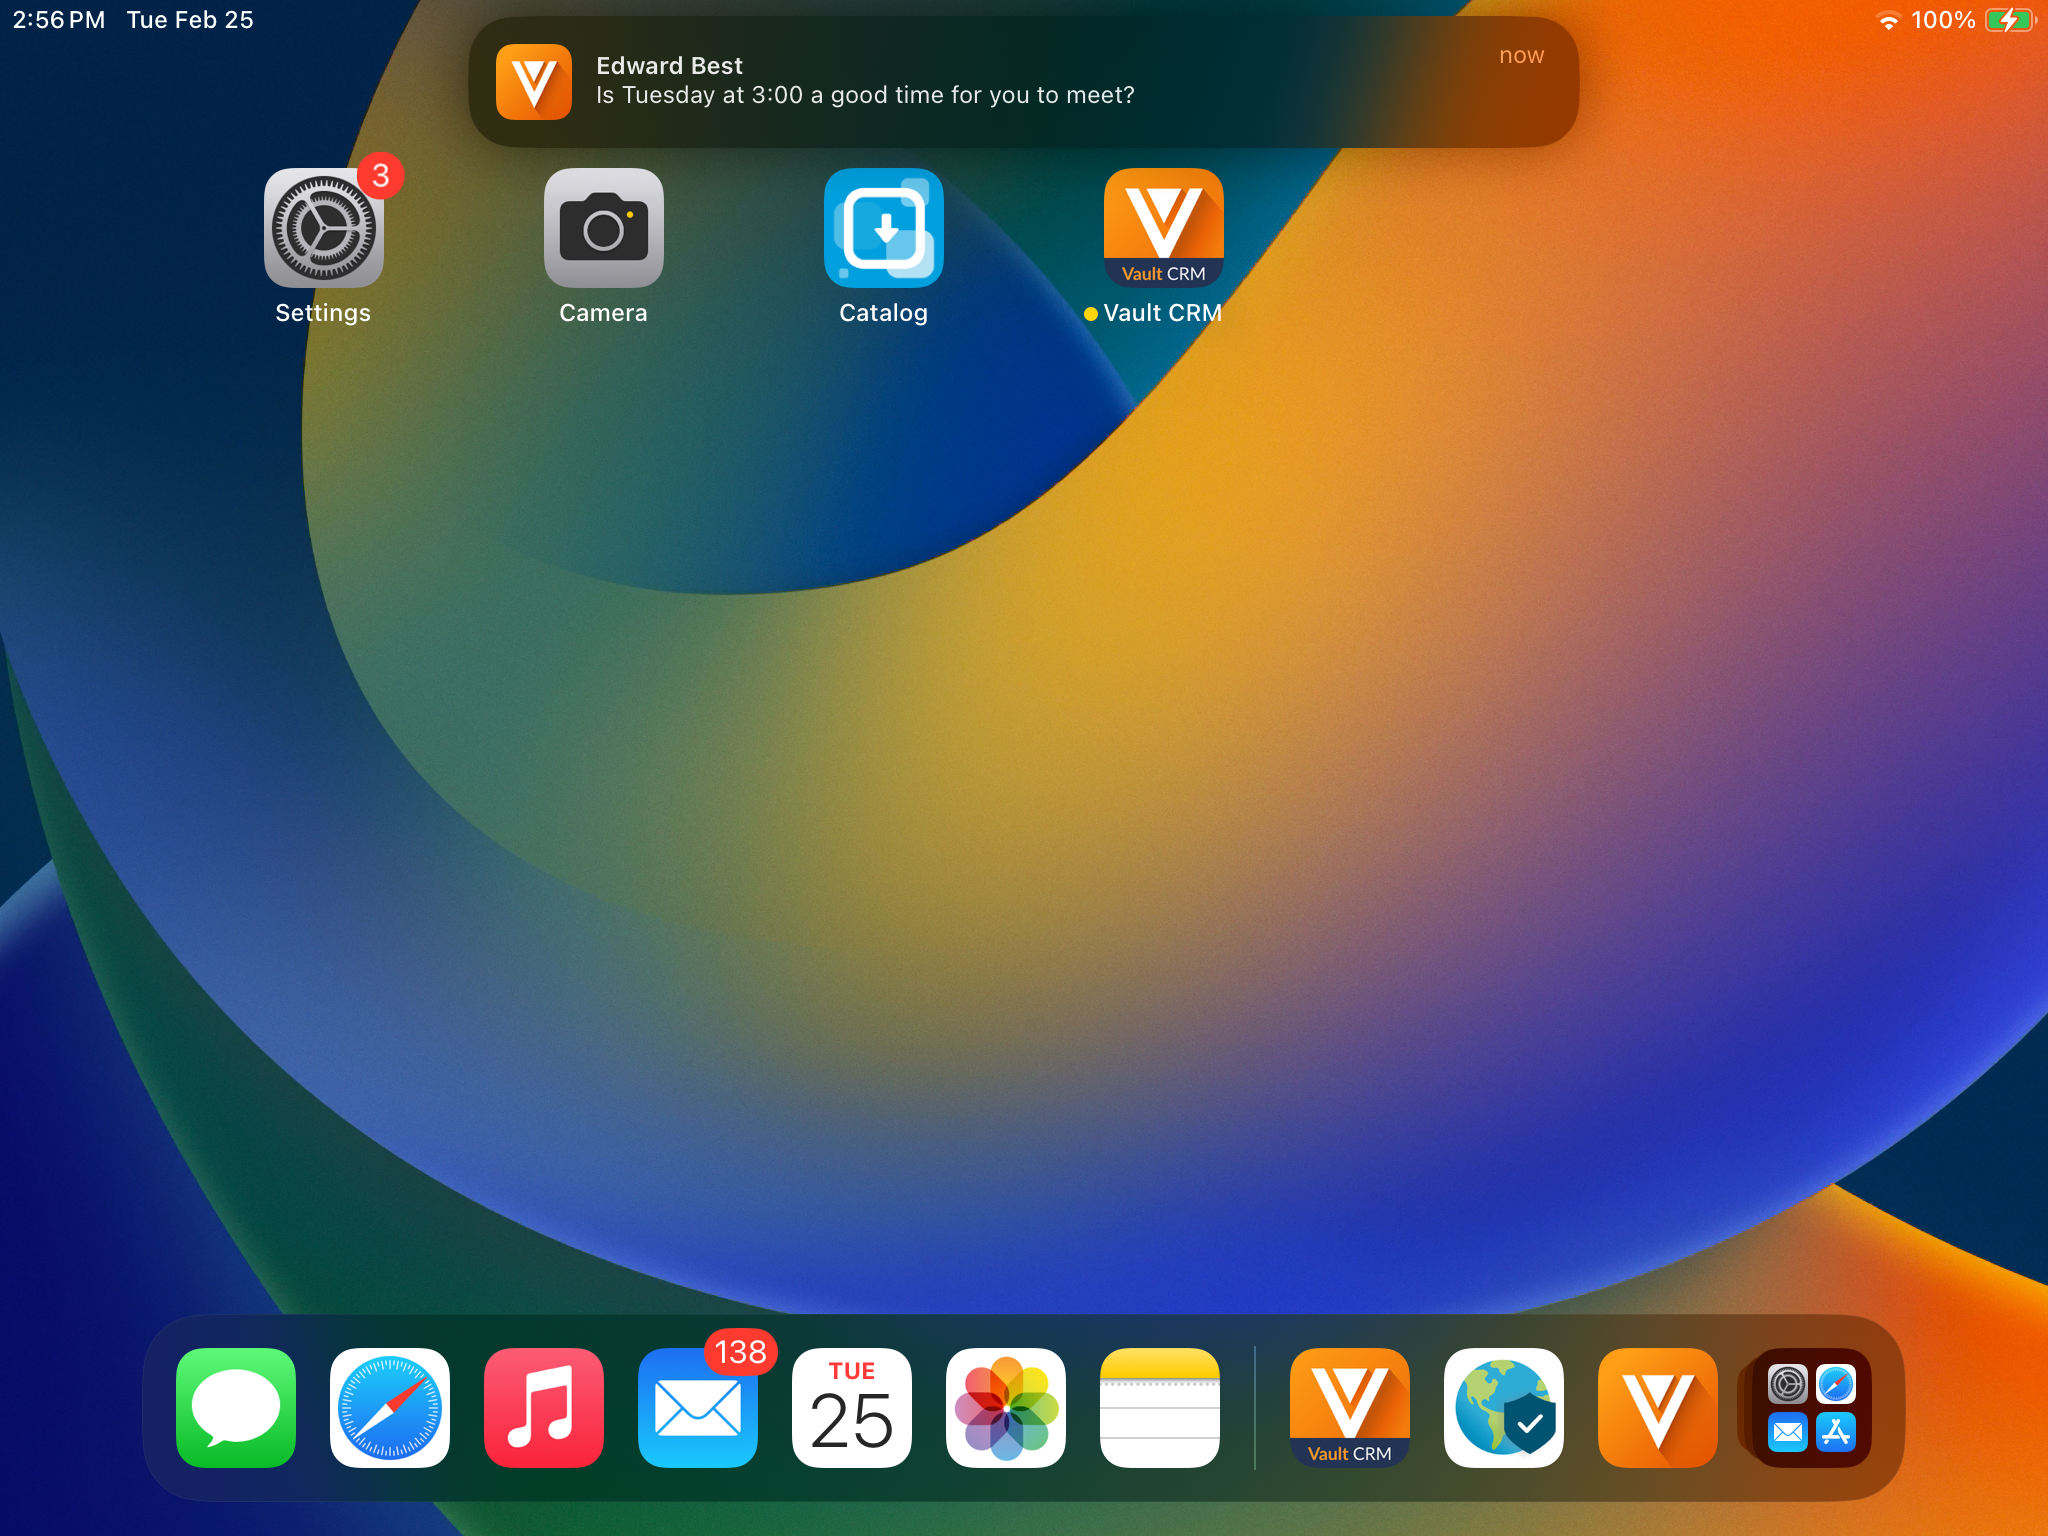
Selecting a push notification displays the chat thread for the new message.
Users can also navigate to a specific chat thread from the Engage profile indicator on an account. See Displaying the Engage Profile Indicator on Accounts for more information.
Customers can use Approved Notes to monitor these chat messages. See Importing Engage Connect Chat Logs into CRM as Chat Messages for more information.
Integrating My Schedule and Microsoft Outlook Calendars
To make scheduling more efficient for users, admins can integrate My Schedule and Microsoft Outlook calendars into one view, enabling users to view all their appointments in one place. Users can view My Schedule entries in their Microsoft Outlook calendar, or vice versa.
For example, Sarah Jones needs to schedule a call with Dr. Ackerman for next Wednesday. In My Schedule, she sees there is a quarterly sales meeting scheduled on her Microsoft Outlook calendar from 12 PM to 2 PM on Wednesday. To ensure she has time to complete the call with Dr. Ackerman and return to her office for the sales meeting, Sarah schedules the call with Dr. Ackerman for 10 AM.
Signing in to Microsoft Outlook on First Login
When iPad users first sign in to Veeva CRM after this feature is enabled, they are prompted to also sign in to Microsoft Outlook. Alternatively, users can sign in to Microsoft Outlook from My Schedule. If single sign-on or two-factor authentication are enabled in Microsoft Outlook, users are redirected to the single sign-on or two-factor authentication page after entering their credentials.
If the organization uses a Salesforce custom domain or OAuth, users may not receive a prompt to sign in to Microsoft Outlook when they open the Veeva CRM app. To trigger the prompt, ask users to log out of Veeva CRM.
To sign in to Microsoft Outlook from Veeva CRM:
- Select Sign In from the Microsoft Outlook prompt. If users select Not Now, they can sign in later from My Schedule.
-
Enter your Microsoft company credentials (for example, first.last@verteo.com) and complete the Microsoft Outlook authentication dialogue. Only one email credential can be used per org.
Once credentials are added, they cannot be removed. To remove a Microsoft Outlook account from My Schedule, your organization's admin must log a support ticket with Veeva CRM.
To view Microsoft Outlook entries in My Schedule, users must sync. If users navigate to My Schedule without syncing, they are prompted to sync.
Signing in to Microsoft Outlook from My Schedule
Alternatively, users can sign in to Microsoft Outlook from My Schedule.
To sign in from the Browser platform:
-
Clear Microsoft cookies if you have both a company-provided Microsoft Outlook account and a personal Microsoft Outlook account.
If you do not clear Microsoft cookies before signing in, your personal Microsoft Outlook account is linked to My Schedule. To remove your personal Microsoft Outlook account from My Schedule, your organization's admin must log a support ticket with Veeva CRM and clear Microsoft cookies.
- Select the Add Calendar button under the calendar panel in My Schedule.
-
Complete the Microsoft Outlook authentication dialogue that displays in a popup window. Ensure you use your Microsoft company credentials to sign in (for example, first.last@verteo.com). Only one email credential can be used per org.
Once credentials are added, they cannot be removed. To remove a Microsoft Outlook account from My Schedule, your organization's admin must log a support ticket with Veeva CRM.
To sign in from the iPad platform:
- Select the gear icon in the My Schedule header.
- Select the Add Calendar button in the Outlook section of the Options menu.
-
Enter your Microsoft company credentials (for example, first.last@verteo.com) and complete the Microsoft Outlook authentication dialogue. Only one email credential can be used per org.
Once credentials are added, they cannot be removed. To remove a Microsoft Outlook account from My Schedule, your organization's admin must log a support ticket with Veeva CRM.
Viewing Microsoft Outlook Calendar Entries in My Schedule
Once users successfully sign in to Microsoft Outlook from Veeva CRM, newly created, updated, or deleted Microsoft Outlook calendar entries are reflected in Veeva CRM in real time. Users can view Microsoft Outlook calendars they own, as well as any delegate or shared calendars. To view recent updates, mobile device users must sync their devices.
When users create new calendars in Microsoft Outlook after the initial pull, the newly created calendar is reflected in Veeva CRM in one hour. Real-time updates to entries from the new calendar are available within 24 hours. When users delete a calendar in Microsoft Outlook, the deleted Microsoft Outlook calendar is not removed from Veeva CRM.
The initial sync includes Microsoft Outlook events from Sunday of the current week up to 90 days after the current date. In order for a Microsoft Outlook calendar to display in Veeva CRM, there must be at least one event on the calendar within the next 90 days. After the initial sync, events are synced from the current date up to 90 days after the current date. Past Microsoft Outlook events continue to display in My Schedule, but they are not updated or deleted.
Microsoft Outlook events display in My Schedule if the current user is the entry owner or an attendee on the Outlook event. When users create, edit, or delete future Outlook entries in their Microsoft Outlook calendars, the corresponding entry is updated in My Schedule. If the attendee declines the Microsoft Outlook event, the entry is removed from My Schedule with the next sync. Microsoft Outlook event data is stamped to the External_Calendar_vod and External_Calendar_Event_vod objects for storage in the Salesforce org.
Entries from the users’ selected Microsoft Outlook calendars display with a colored outline to differentiate them from calls and activities created in Veeva CRM. The outline color for Microsoft Outlook entries in My Schedule is based on the entry color in Microsoft Outlook. The color is pulled from Microsoft's hexColor field to the Hex_Color_vod field on the External_Calendar_vod object in Veeva CRM. If a color is not set for the entry in Microsoft Outlook, the entry displays in blue by default.
Microsoft Outlook calendar entries are read-only in My Schedule. To view a popover with more information about an Microsoft Outlook calendar entry, select the entry.
Selecting Additional Microsoft Outlook Calendars
If users have multiple Microsoft Outlook calendars, they can choose which of their Microsoft Outlook calendars display in My Schedule. To modify which calendars display, select or deselect the appropriate calendars. For iPad users, additional calendars display under the Outlook section of the Options menu.
On the iPhone platform, users can view Microsoft Outlook entries in My Schedule after signing in to Microsoft Outlook from the iPad or Browser platforms and syncing their devices. To view Microsoft Outlook entries, select the appropriate calendar from the Options menu.
In Lightning for My Schedule, additional calendars display on the calendar panel.
If the DISPLAY_EXTERNAL_CALENDARS_TO_MANAGERS_vod Veeva Setting is populated with the number 1, managers can view their reports' external calendar events in Lightning for My Schedule on the Browser platform. For more information on this functionality, see Viewing Users' Calendars with Manager View.
Viewing My Schedule Entries in Microsoft Outlook Calendars
In Microsoft Outlook, Veeva CRM displays under the My Calendars section. When new users connect their Microsoft Outlook accounts to Veeva CRM, there must be at least one entry in My Schedule in the next 90 days in order for the Veeva CRM calendar option to display in Microsoft Outlook. The initial sync includes My Schedule entries from the current week up to 90 days in the future. After the initial sync, events are synced from the current date up to 90 days after the current date. Past My Schedule events continue to display in Microsoft Outlook, but they are not updated or deleted. When records are pushed from Veeva CRM to Microsoft Outlook, a maximum of 10,000 records per user are pushed in each sync.
Editing My Schedule entries from the Microsoft Outlook calendar is not supported. Changes made to My Schedule entries in Microsoft Outlook are not reflected in Veeva CRM.
The Veeva CRM calendar label in Microsoft Outlook includes the user’s name. If the User_Identifier_vod field on the User_vod object is populated, the user identifier is also included. For example, Veeva CRM - Sarah Jones (sjonesUserIdentifier). Calendar labels are only pushed from Veeva CRM in the initial sync.
Veeva recommends users do not change Veeva calendar names in Microsoft Outlook.
The following types of My Schedule entries display in the Microsoft Outlook calendar:
Meeting requests are not supported in the Microsoft Outlook integration, and unassigned presentations and unavailable time slots do not display in Microsoft Outlook calendars.
Edits and deletions for entries are updated hourly. If users create, edit, or delete My Schedule entries while they are offline, entries are updated in the Microsoft Outlook calendar after the device is online again.
When My Schedule entries are pushed to Microsoft Outlook, the subject, start datetime, and content properties are populated with the following field values:
|
Outlook Property |
My Schedule Entry Type | |||
|---|---|---|---|---|
|
Call2_vod |
Event |
Medical_Event_vod |
Time_Off_Territory_vod |
|
|
subject |
Formatted_Name_vod* |
Subject |
Name |
Reason_vod |
|
start datetime |
Call_Datetime_vod (if Call_Datetime_vod is not populated, Date_vod is used instead) |
StartDateTime |
Start_Time_vod |
Time_vod |
|
content |
Translated picklist value from the Call_Channel_vod field |
n/a |
||
* When child accounts are enabled, the Parent_Child_Name_vod field value from the Child_Account_vod object is used instead
Creating Unavailable Time Slots from Time Off Territory
To ensure Time Off Territory is automatically reflected on the Engage Scheduling Site, users can mark Time Off Territory as unavailable for scheduling. When a Time Off Territory entry is marked as unavailable in My Schedule, an unavailable time slot for the same time period is automatically blocked off on the Engage Scheduling Site to prevent HCPs from sending a meeting request. If users edit or delete a Time Off Territory entry after marking it as unavailable, their availability is updated on the Engage Scheduling Site.
For example, Sarah Jones is going on vacation from January 5th through January 10th. She creates a Time Off Territory entry for her vacation days and marks the Time Off Territory as unavailable. An unavailable time slot is automatically created when she saves the Time Off Territory entry. When Dr. Ackerman opens Sarah’s scheduling link, he sees Sarah is unavailable between January 5th and January 10th. Dr. Ackerman requests a meeting for January 11th.
Creating Unavailable Time from Time Off Territory
To create unavailable time from Time Off Territory, select the Unavailable for Scheduling check box.
When users save the Time_Off_Territory_vod record, an Unavailable_Time_vod record is automatically created for the times selected on the Time_Off_Territory_vod record. Only the Time Off Territory calendar entry displays in My Schedule. From the calendar entry and the popover, users can easily see the Time Off Territory is marked unavailable.
The unavailable time slot displays on the Engage Scheduling Site. If users edit the Time Off Territory entry, the corresponding unavailable time slot is updated on the Engage Scheduling Site. If users delete the Time Off Territory entry, the corresponding unavailable time slot is removed from the Engage Scheduling Site.
If a user's time zone changes, unavailable time slots automatically adjust for the time difference but the original Time Off Territory entries do not change.
Creating Unavailable Time from Time Off Territory over Weekends
When the DISABLE_TOT_WEEKENDS_vod Veeva Setting is not selected and users create Time Off Territory over a weekend, weekend days are marked as unavailable and the total unavailable time slot is extended by two days. For example, if a user creates a Time_Off_Territory_vod record for two days starting on Friday, the unavailable time slot includes Friday, Saturday, Sunday, and Monday.
If the DISABLE_TOT_WEEKENDS_vod Veeva Setting is selected, weekend days are included as working days in the calculation for the unavailable time slot. For example, if a Time_Off_Territory_vod record is scheduled for two days starting on a Friday, the unavailable time slot only includes Friday and Saturday. For more information on using the DISABLE_TOT_WEEKENDS_vod Veeva Setting, see Including Weekend Days in Time Off Territory.
Capturing Remote Signatures Asynchronously for BRC Samples (Sign Later)
Asynchronously capturing signatures for BRC samples provides the flexibility of paper-based sampling with the speed, accuracy, and accountability of remote signature capture, while also letting the HCP sign at their convenience.
For example, an HCP's office lets you know the HCP is out of product samples. To provide the HCP with more product before your next meeting, send an asynchronous signature request to the HCP for BRC sampling. After the HCP signs, review and accept the signature and submit the call report. The BRCs are sent via sample fulfillment vendor.
When asynchronous signature capture is enabled, the existing Share Link remote signature capture functionality is replaced on the iPad and iPhone platforms. On the Browser platform, users cannot capture signatures using Share Link when asynchronous signature capture is enabled.
To capture Share Link signatures immediately, users on the iPad and iPhone platforms can create a signature request using the asynchronous Share Link method, then select the Check for Signatures button without syncing. If the HCP provided a signature, users can review and accept the signature as usual.
Asynchronous remote signature capture is only supported for BRC products on person account calls or unique activities child calls.
Using Remote Signature Capture Asynchronously for BRC Samples
To capture a remote signature asynchronously, CRM users:
- Create a call report with BRC samples. If any other sample or promotional product is on the call report, the Share Link signature capture option is not available.
Signature capture must be required in order to use asynchronous remote signature capture. Asynchronous remote signature capture is not supported on calls where signature capture is optional or disabled—for example, it is not supported on calls where the --nslns or --npdma section signals are in use.
- Select the Sign button.
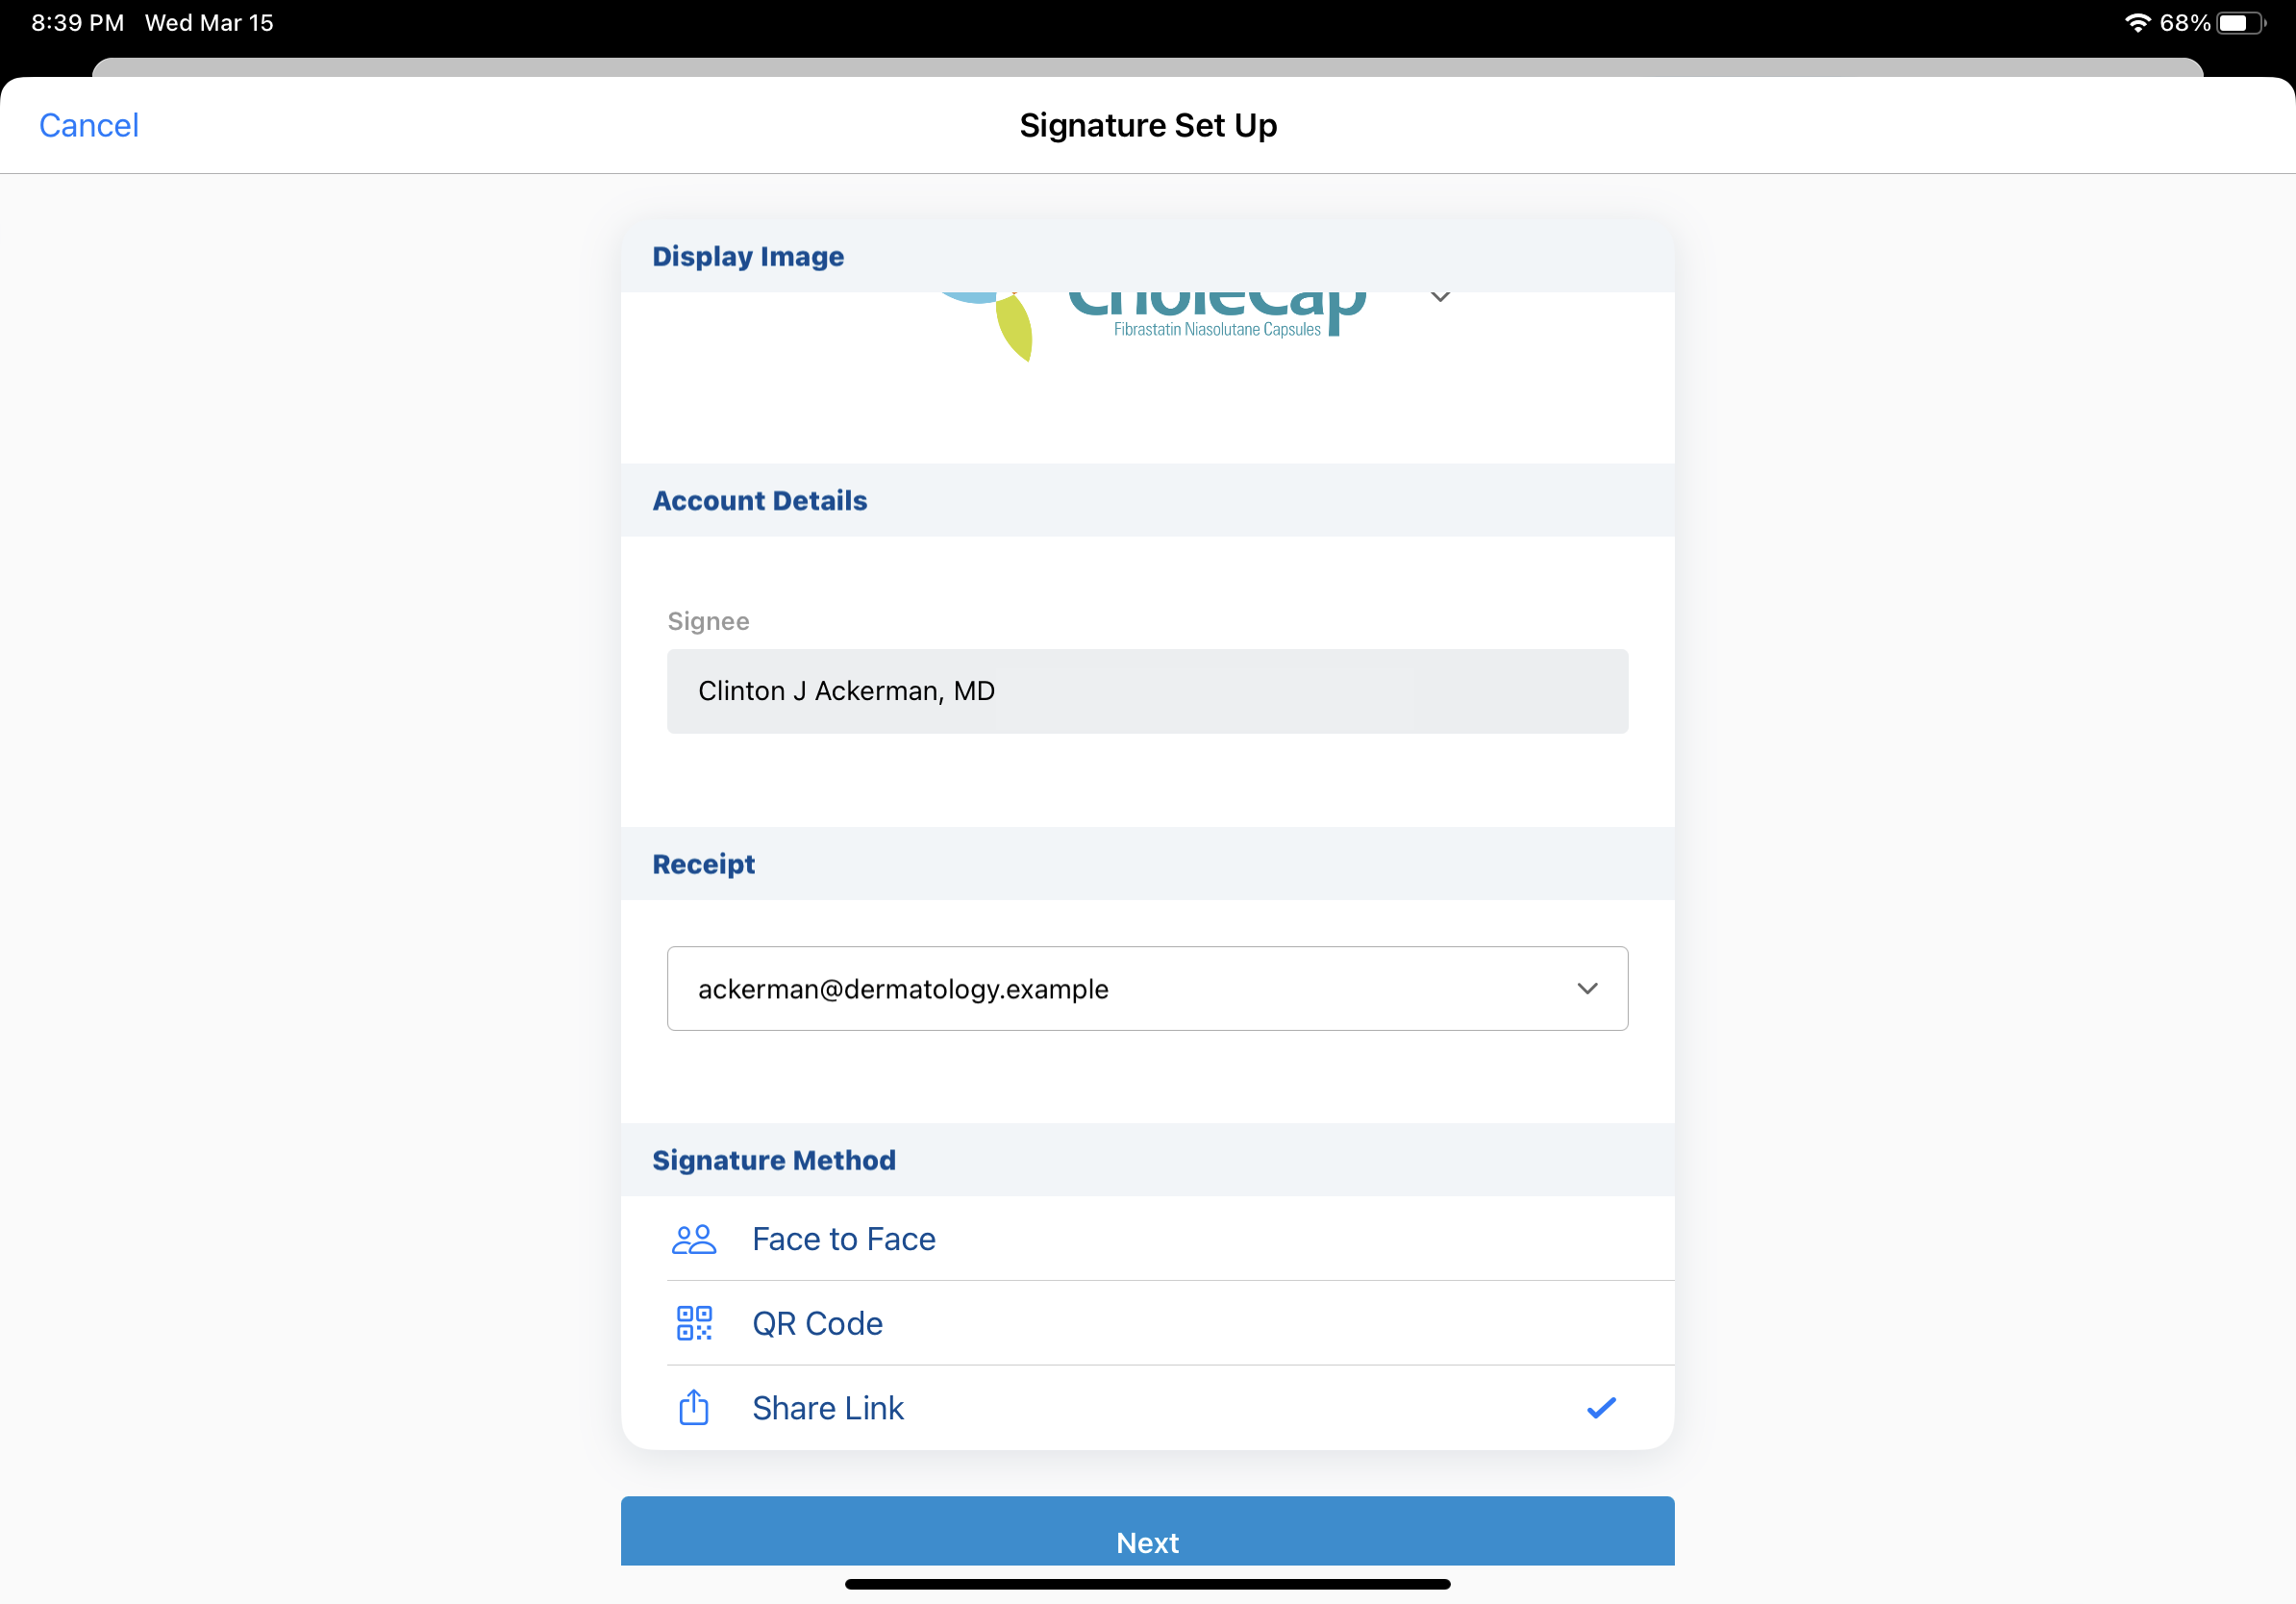
- Select the disclaimer text language. This step is only available if Displaying Country-Specific Disclaimers is enabled.
- Select the email address the receipt should be sent to using the Receipt picklist, if the HCP wants to receive a receipt (optional). This step is only available if Approved Email Receipts for Signature Transactions is enabled.
- Select Share Link for the Signature Method.
- Select Next.
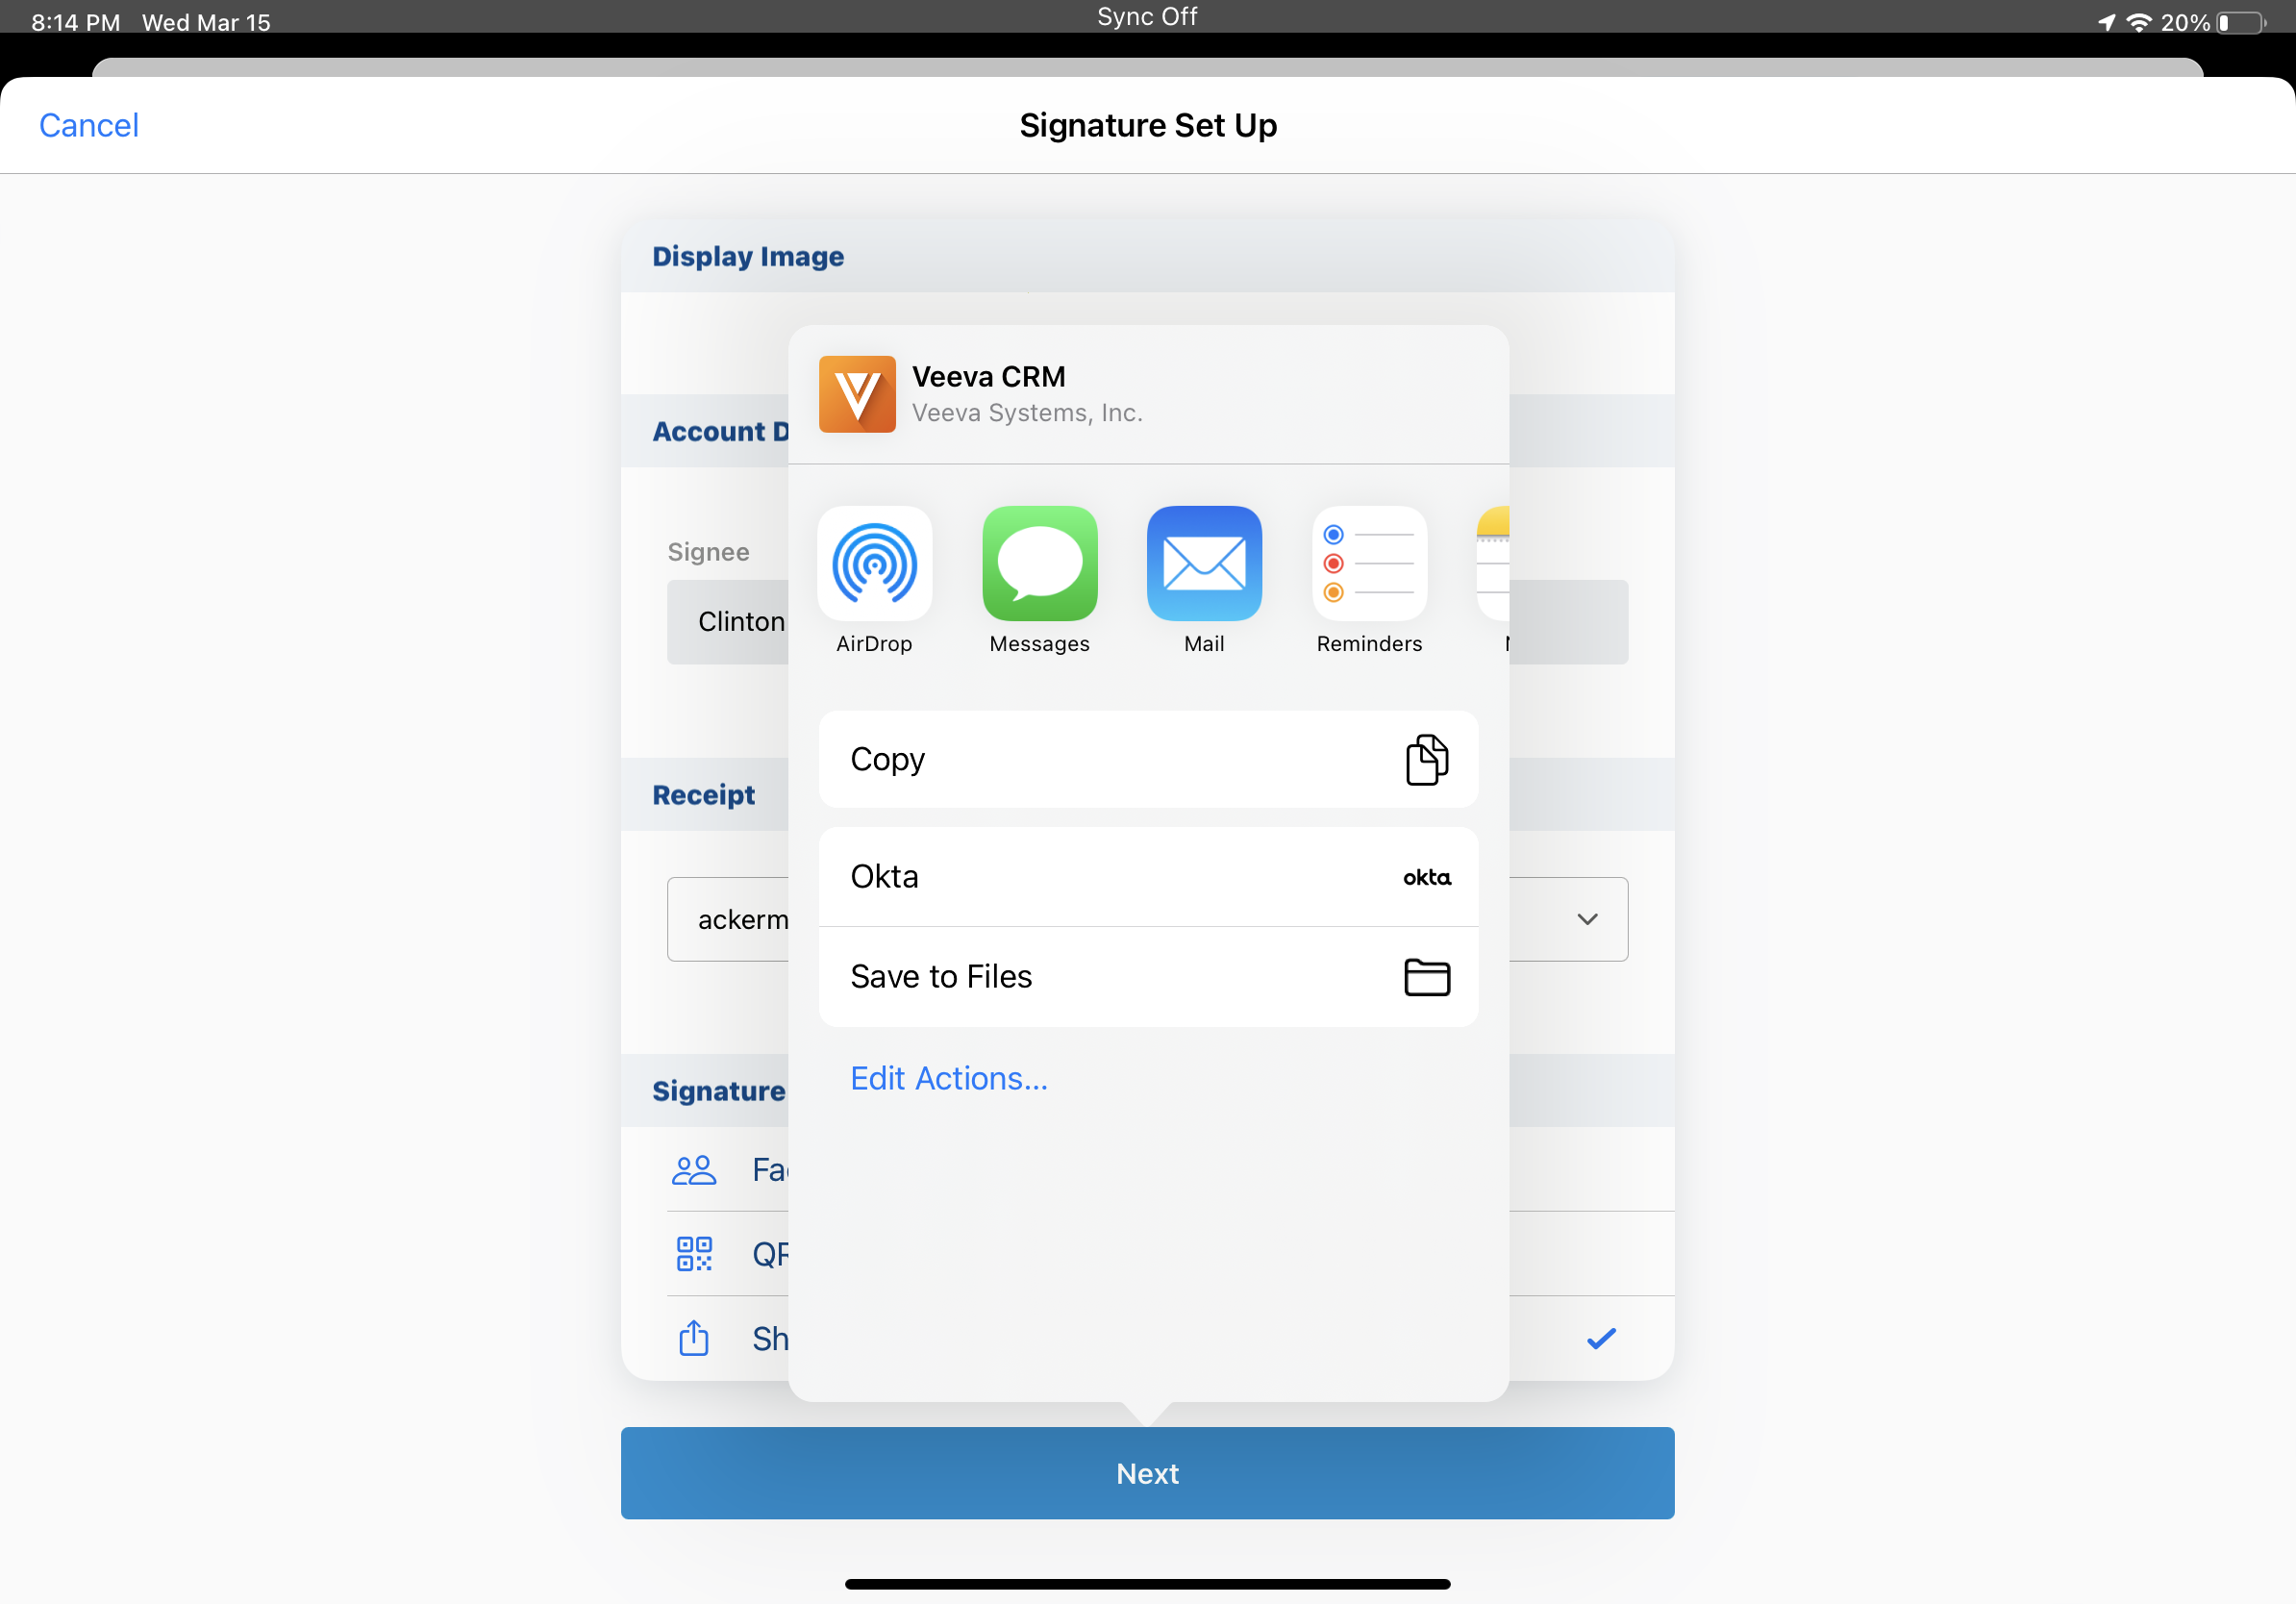
- Select the appropriate application to share the generated link with the HCP. If an acceptable application is not available, select Copy Link to copy the link to the device’s clipboard.
For CRM Desktop (Windows) users, the Copy Link and QR Code® options are available after selecting the Share Link Method. To share a link for asynchronous remote signature using QR Code®, select the QR Code® option, then ask the HCP to scan the QR Code®.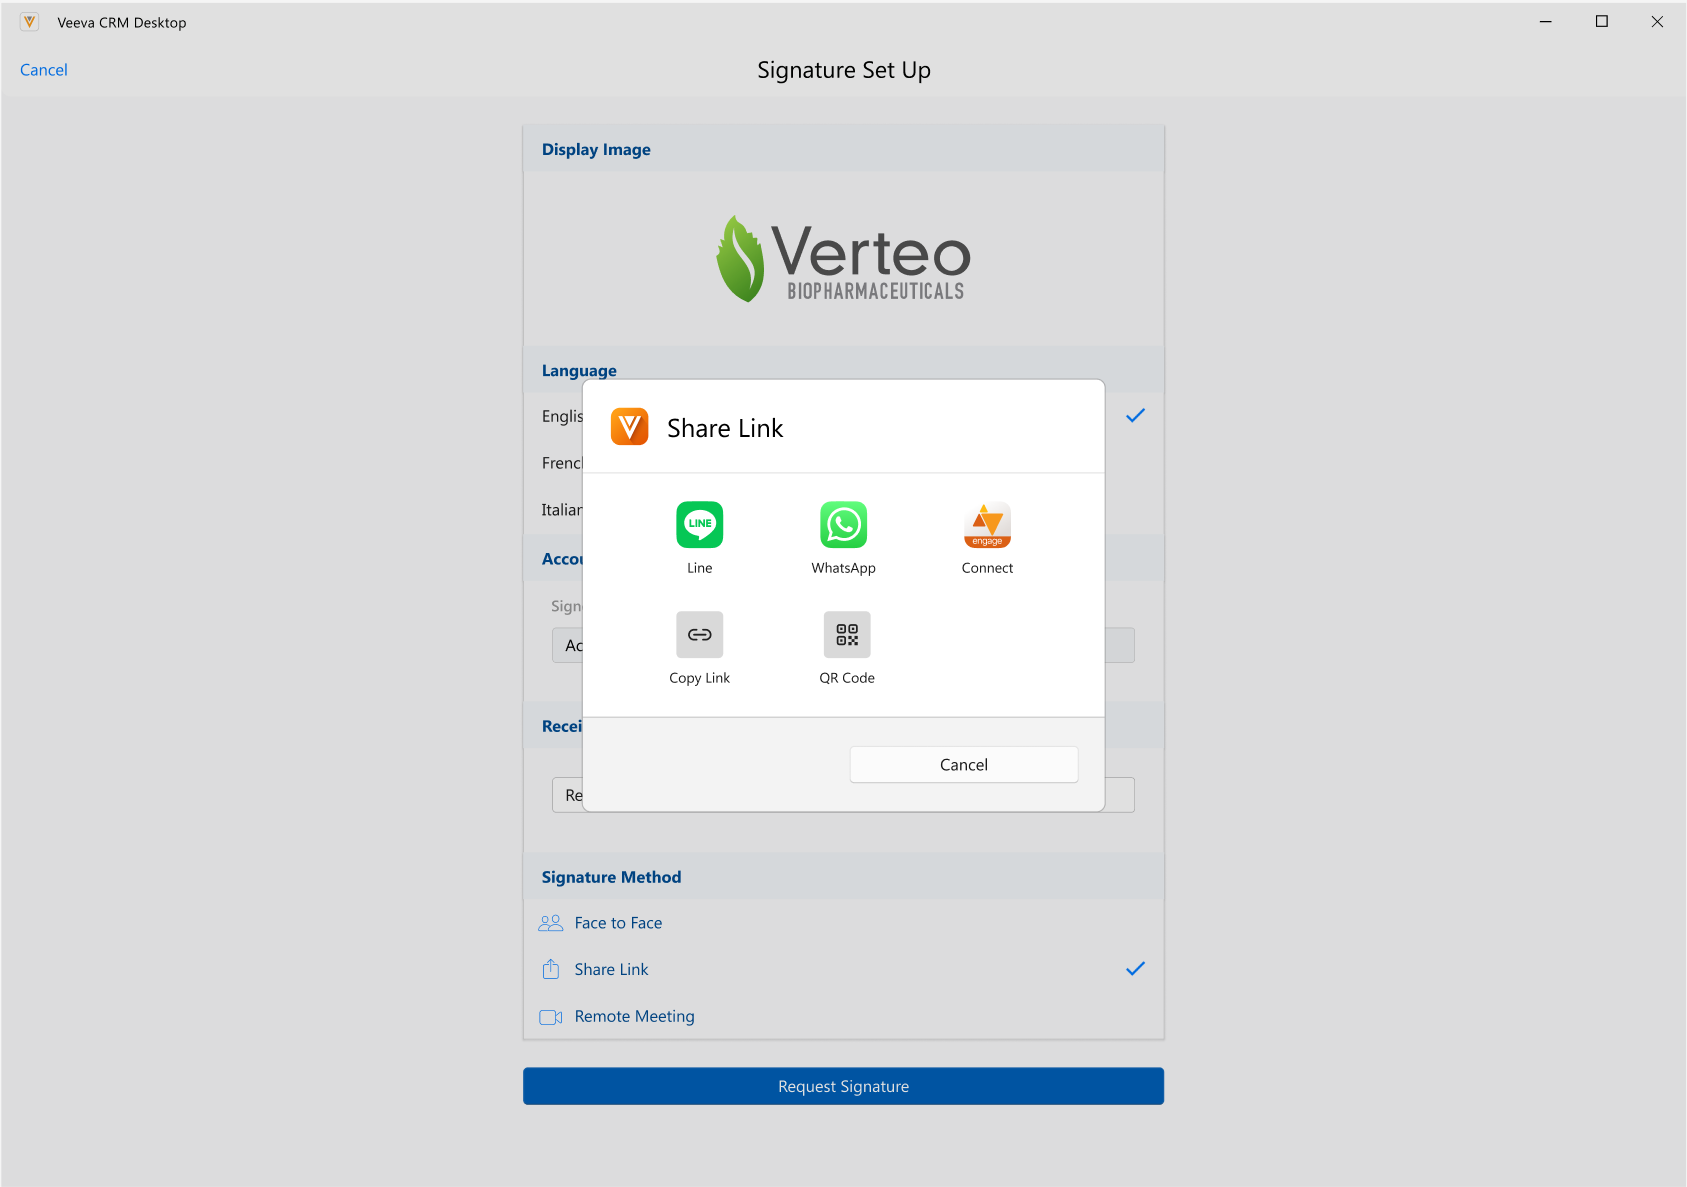
Once users share the link, the call report displays. Users do not need to remain in the Veeva CRM application while waiting to capture the signature.
Viewing Pending Signature Requests
A yellow banner displays on the Sample and Promotional Items section of the call report to highlight pending signature requests. To check whether the HCP has submitted a signature, select the Check for Signature link from the blue banner.
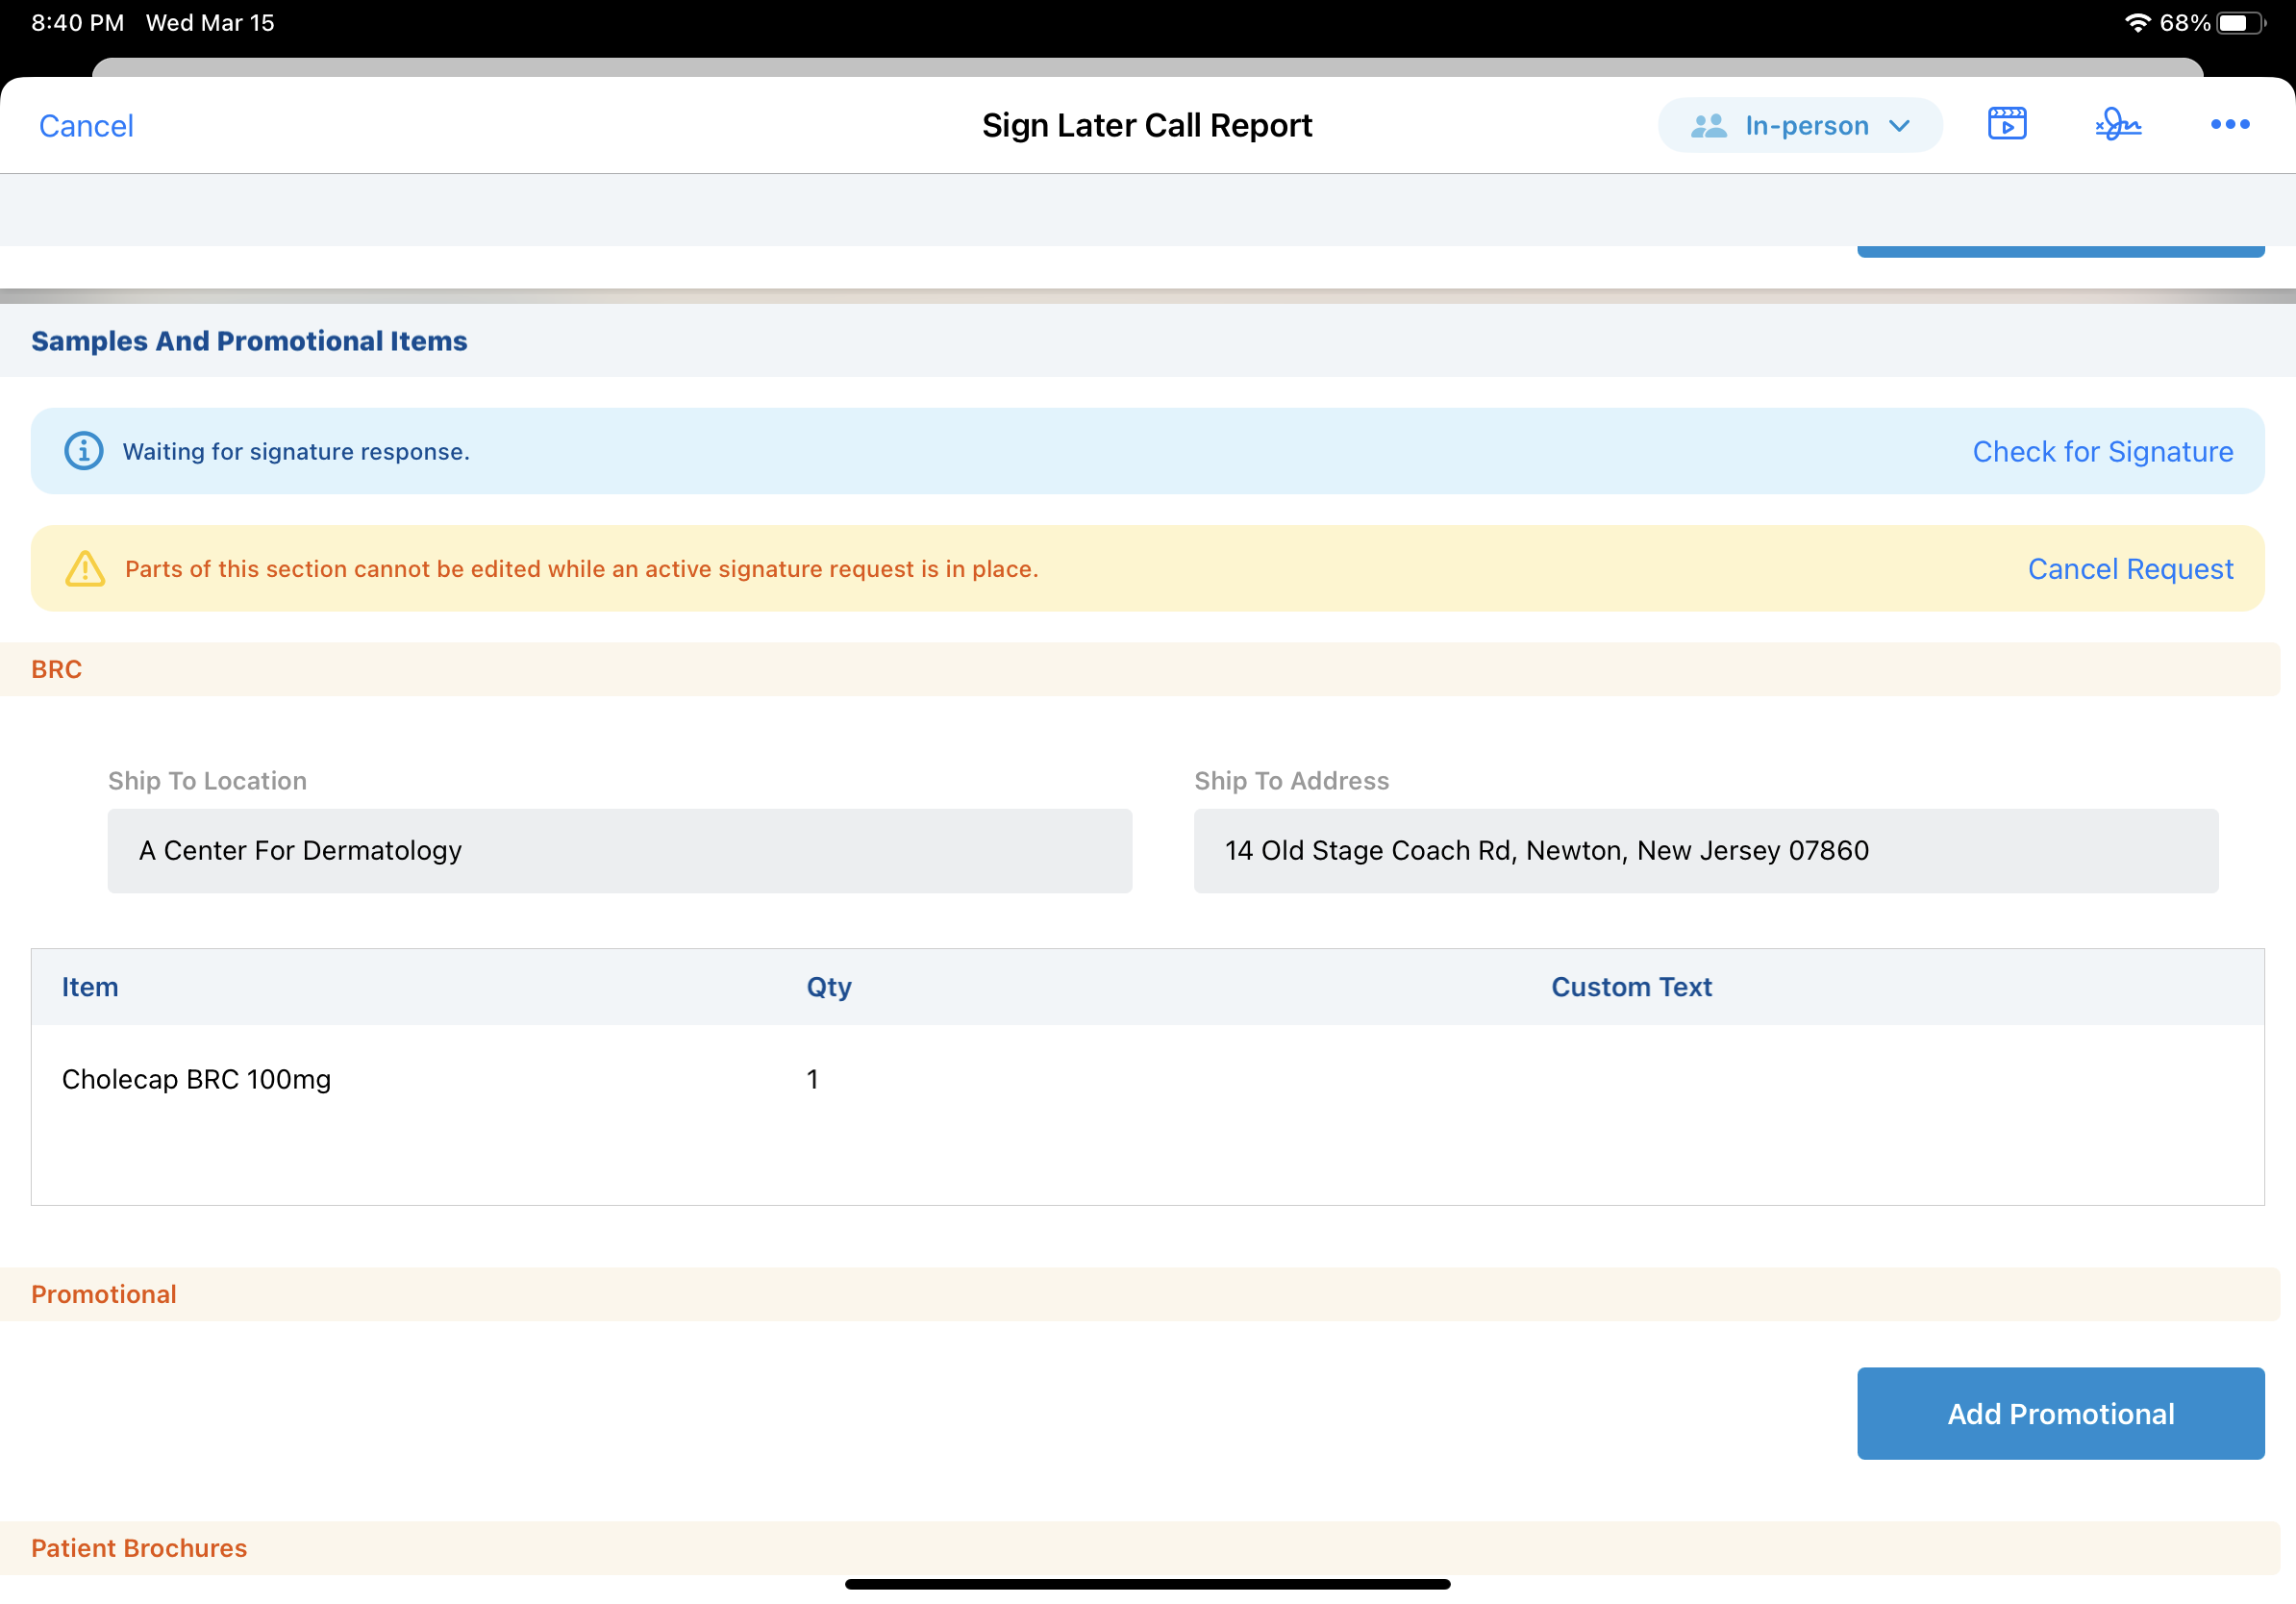
For call reports with pending signature requests, users cannot:
- Submit the call report, unless the CALL_SUBMIT_PENDING_SIG_REQ_vod Engage Setting is enabled
- Delete the call report
- Capture another signature for the same call using a different method—for example, QR Code® signature request
- Edit fields related to sampling and BRCs, or fields placed in the sample and promotional items section. When there is a pending signature request, fields related to signature capture and sampling are read-only.
Users cannot delete unique activities group calls where one or more of the child calls have a pending request. They also cannot submit unique activities group calls where one or more of the child calls have a pending request, unless the CALL_SUBMIT_PENDING_SIG_REQ_vod Engage Setting is enabled. Signature request status displays in the attendee section for each attendee.
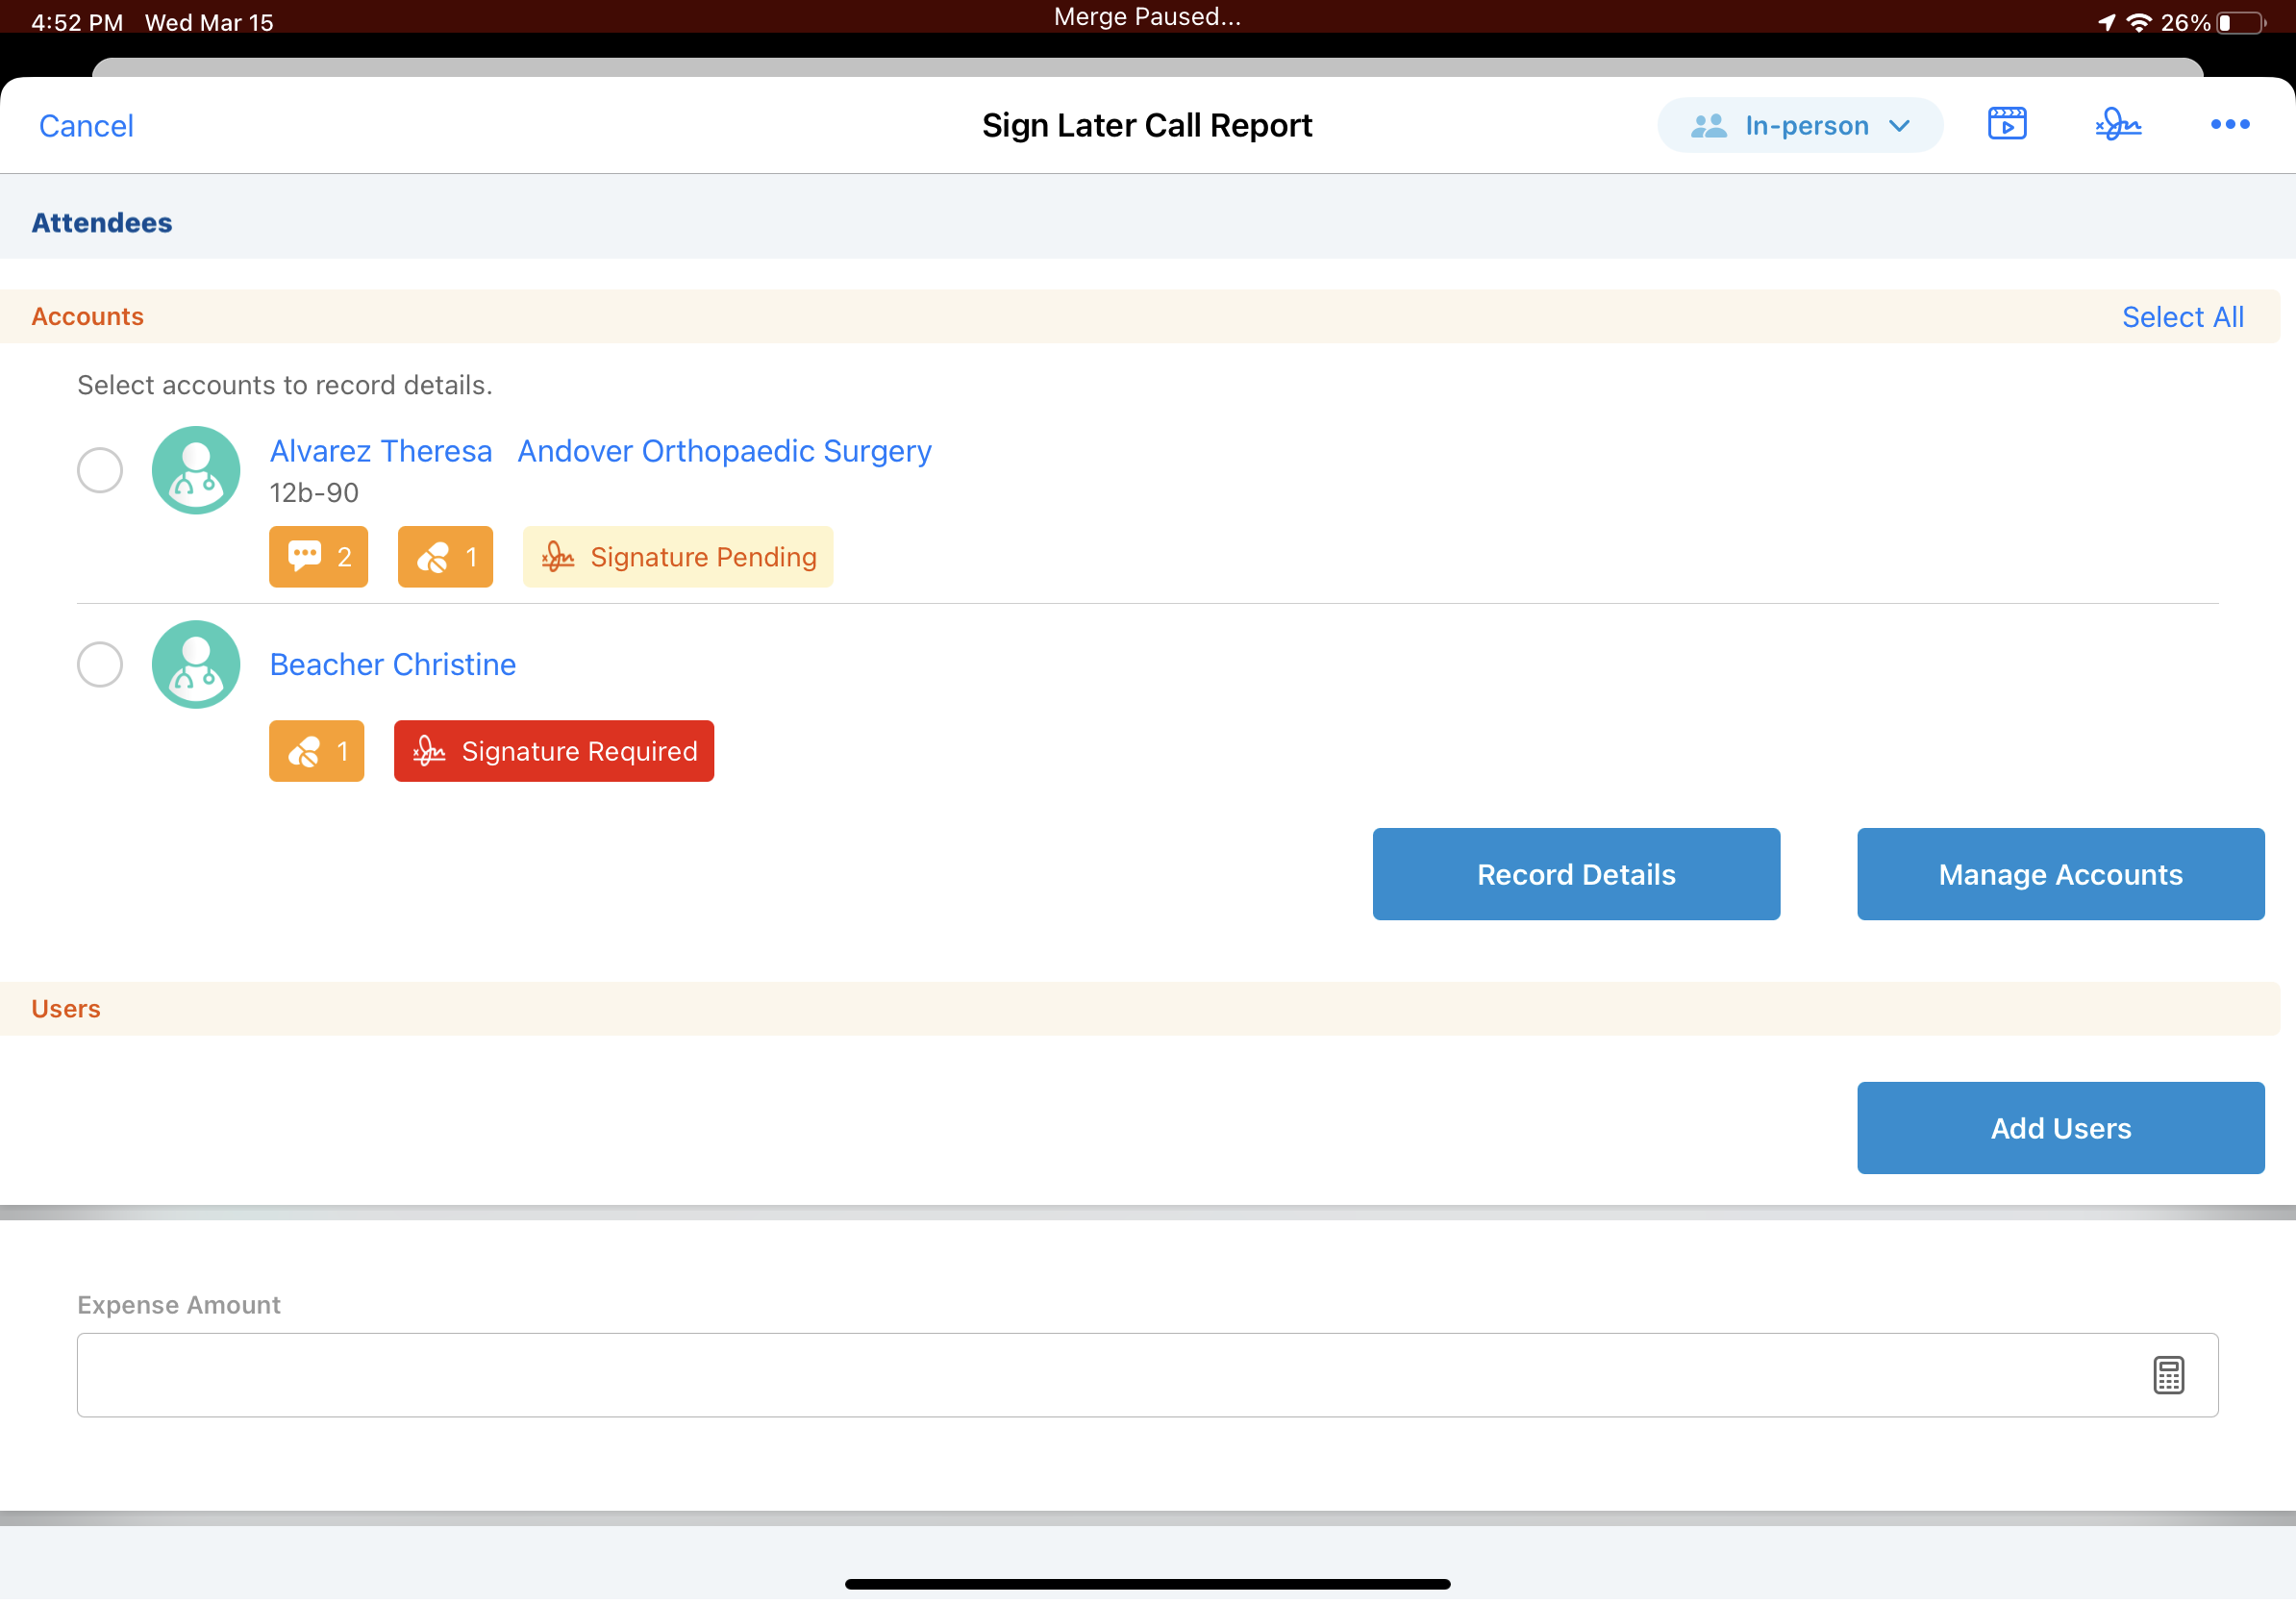
When swapping signees on the call report, users cannot swap signees to accounts with signatures pending or signatures ready for review. If users select an account with an outstanding signature request, an error displays and users are prevented from swapping the signee to the account.
Canceling Pending Signature Requests
Users can cancel pending signature requests until the HCP provides a signature. To cancel a pending request, select Cancel Request from the yellow signature request banner and confirm the cancellation.

Providing Remote Signatures Asynchronously
HCPs receive the remote signature request link through the application the end user selected. Selecting the link opens an internet browser, where the signer can review the BRC details and submit their signature. The Signature_Captured_Datetime_vod field on the Signature_Request_vod object is set to the date and time when the HCP selects the Accept button on the signature capture screen.
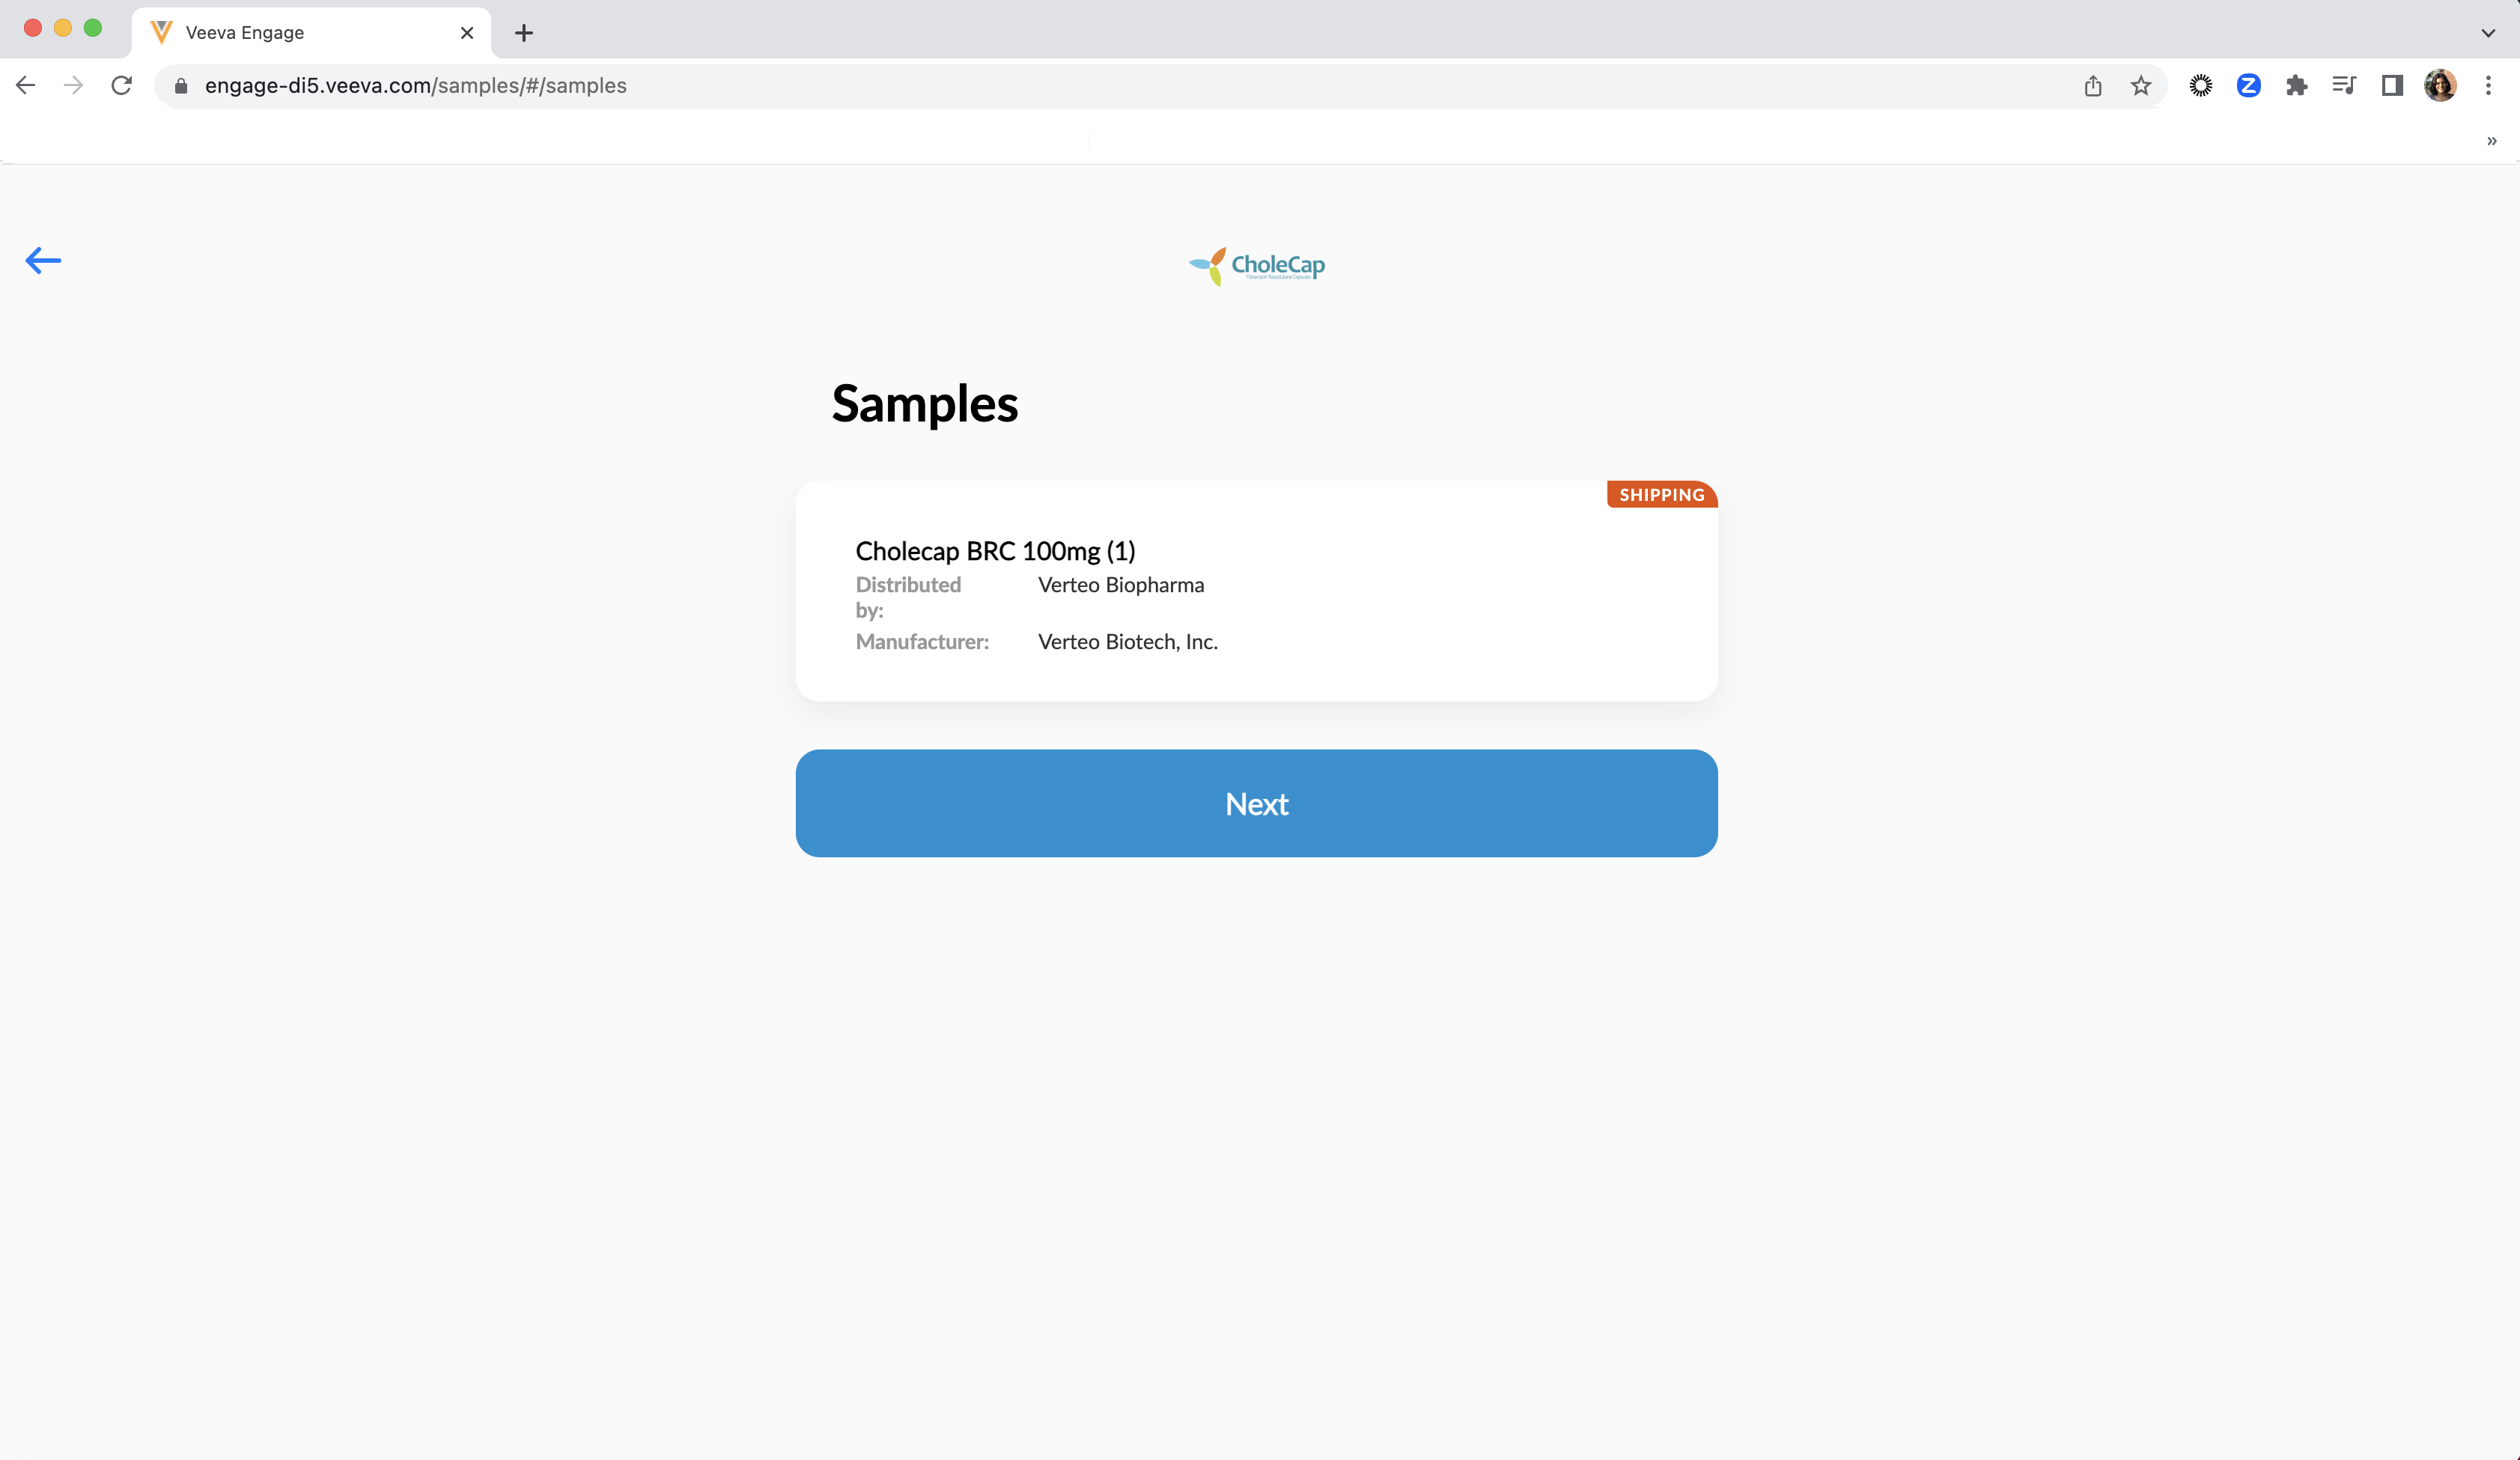

Reviewing HCP Signatures
When HCPs submit their signatures, users receive an email that notifying them a signature is ready for review. There is no time limit for accepting a signature. Users can accept the signature at any time after the HCP provides it.
To review and accept HCP signatures:
- Navigate to the call report.
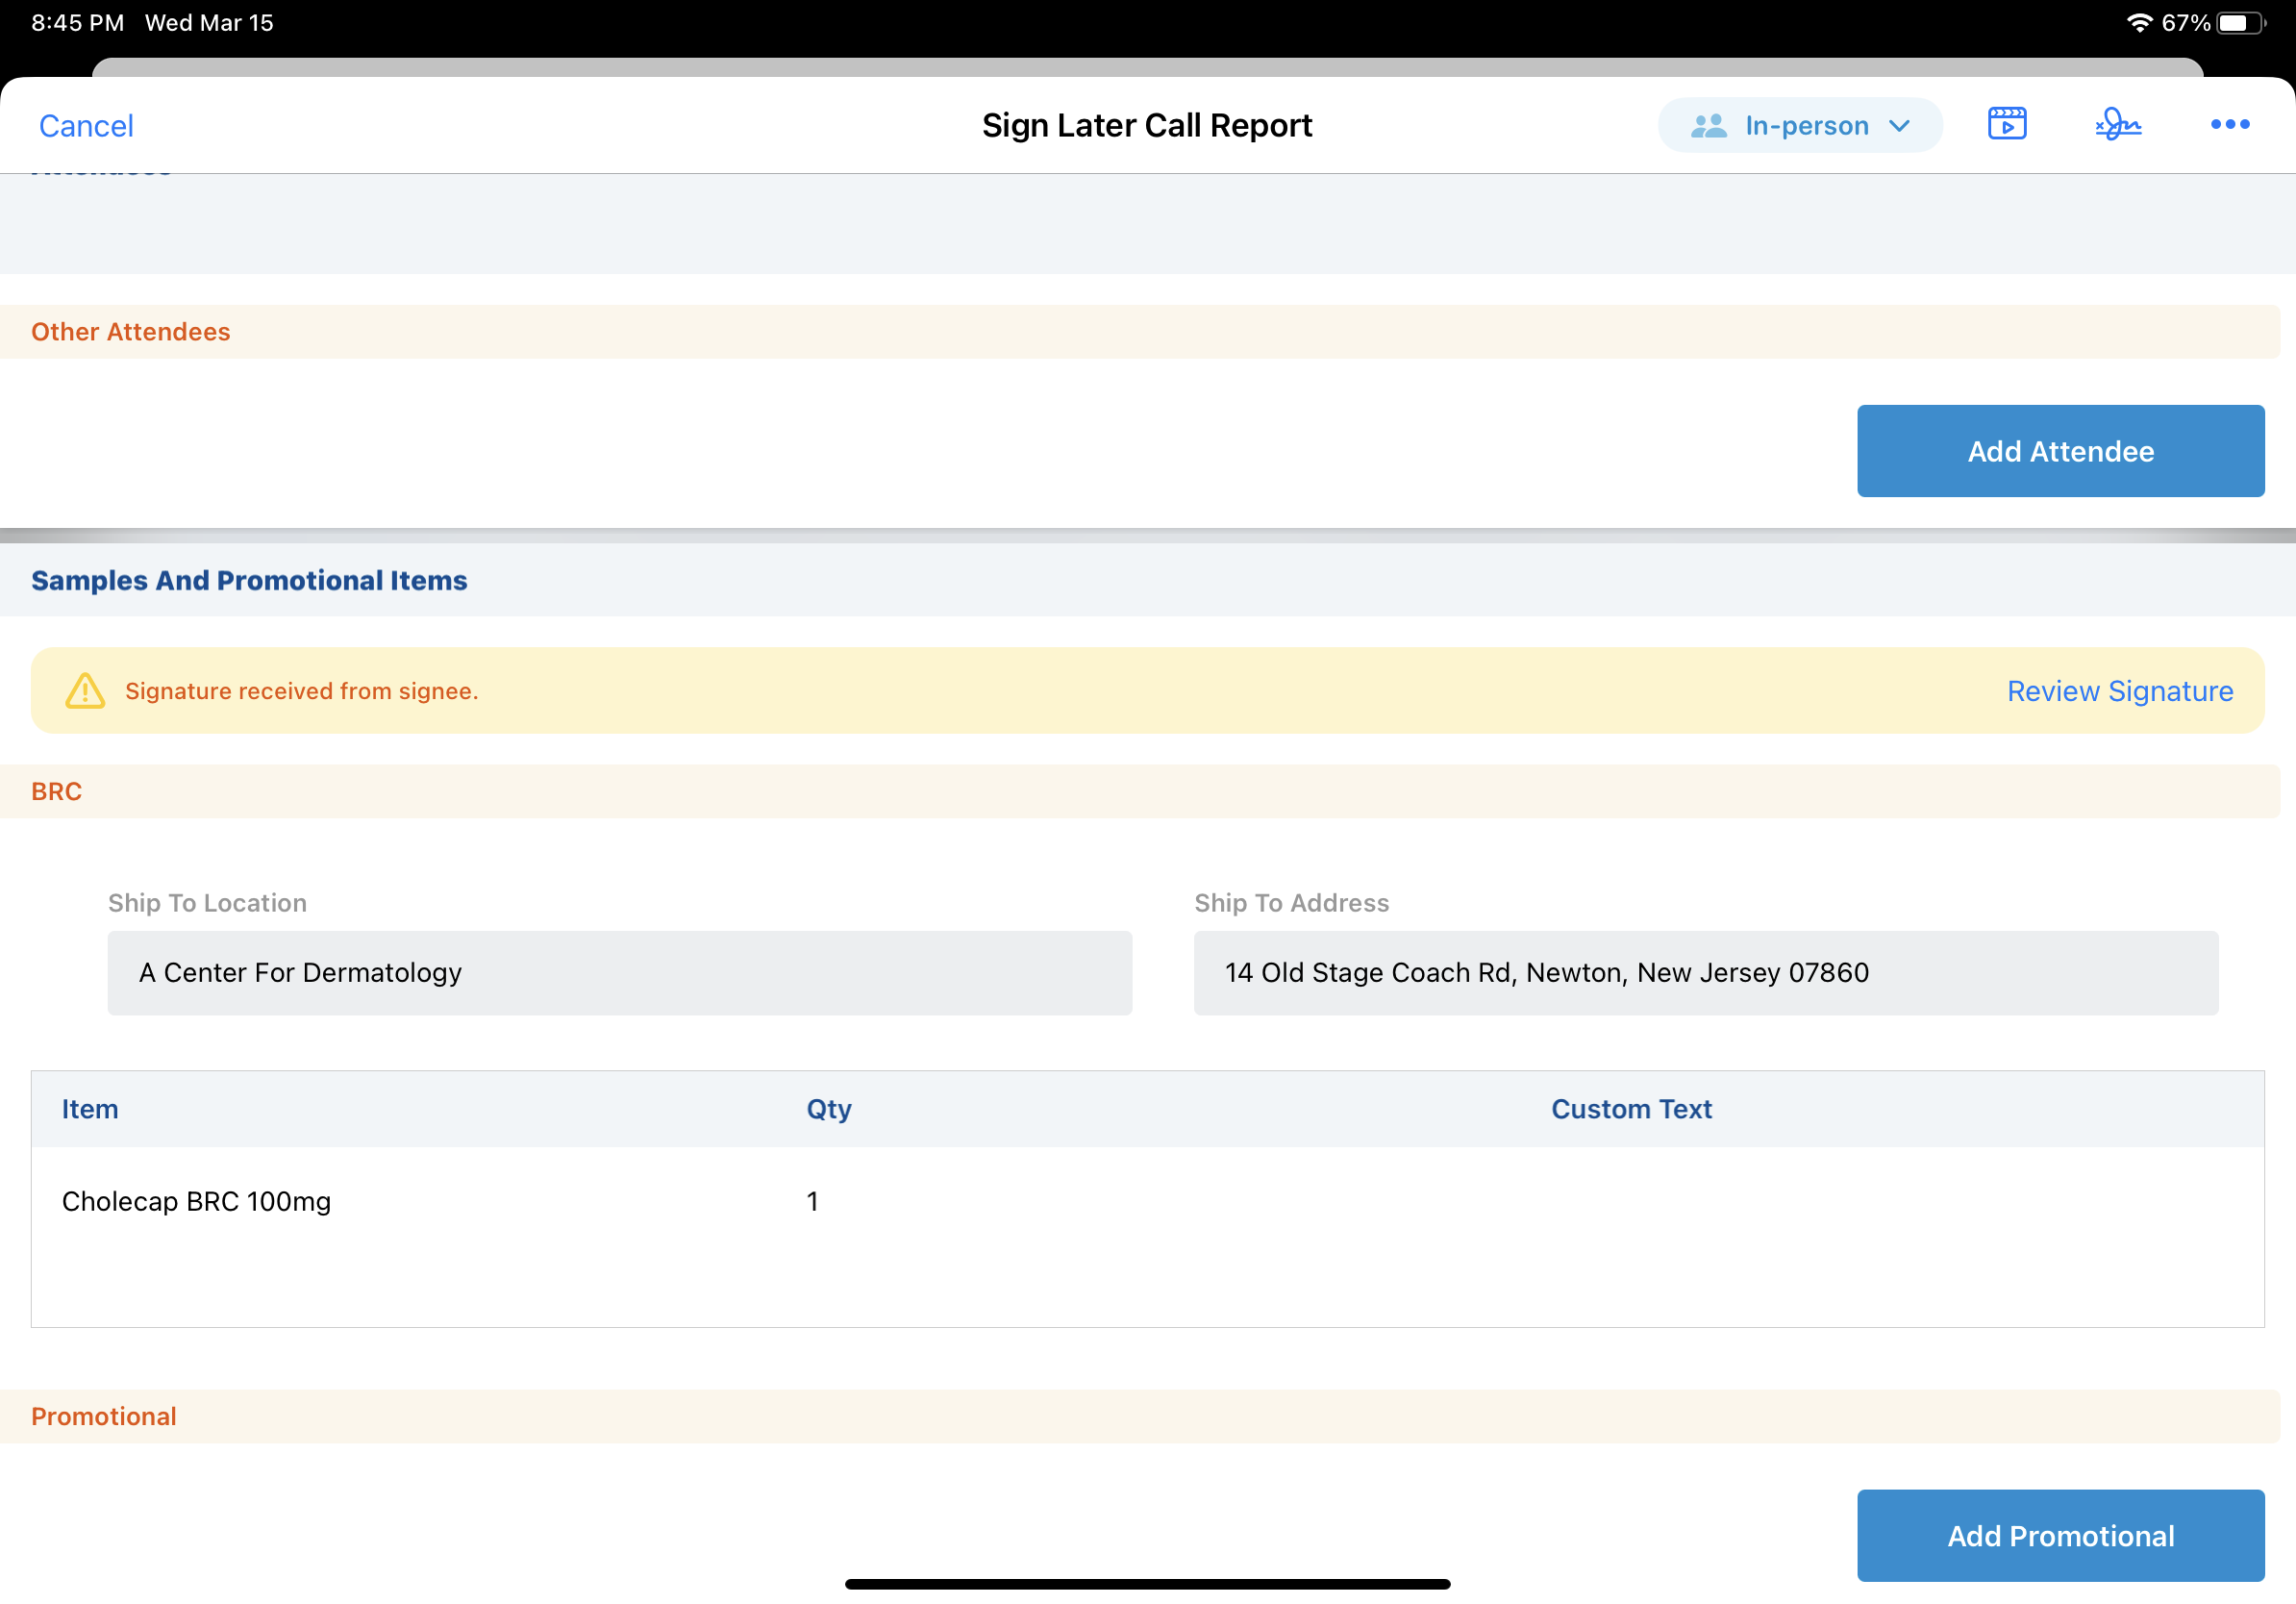
- Select Review Signature. The signature review screen displays.
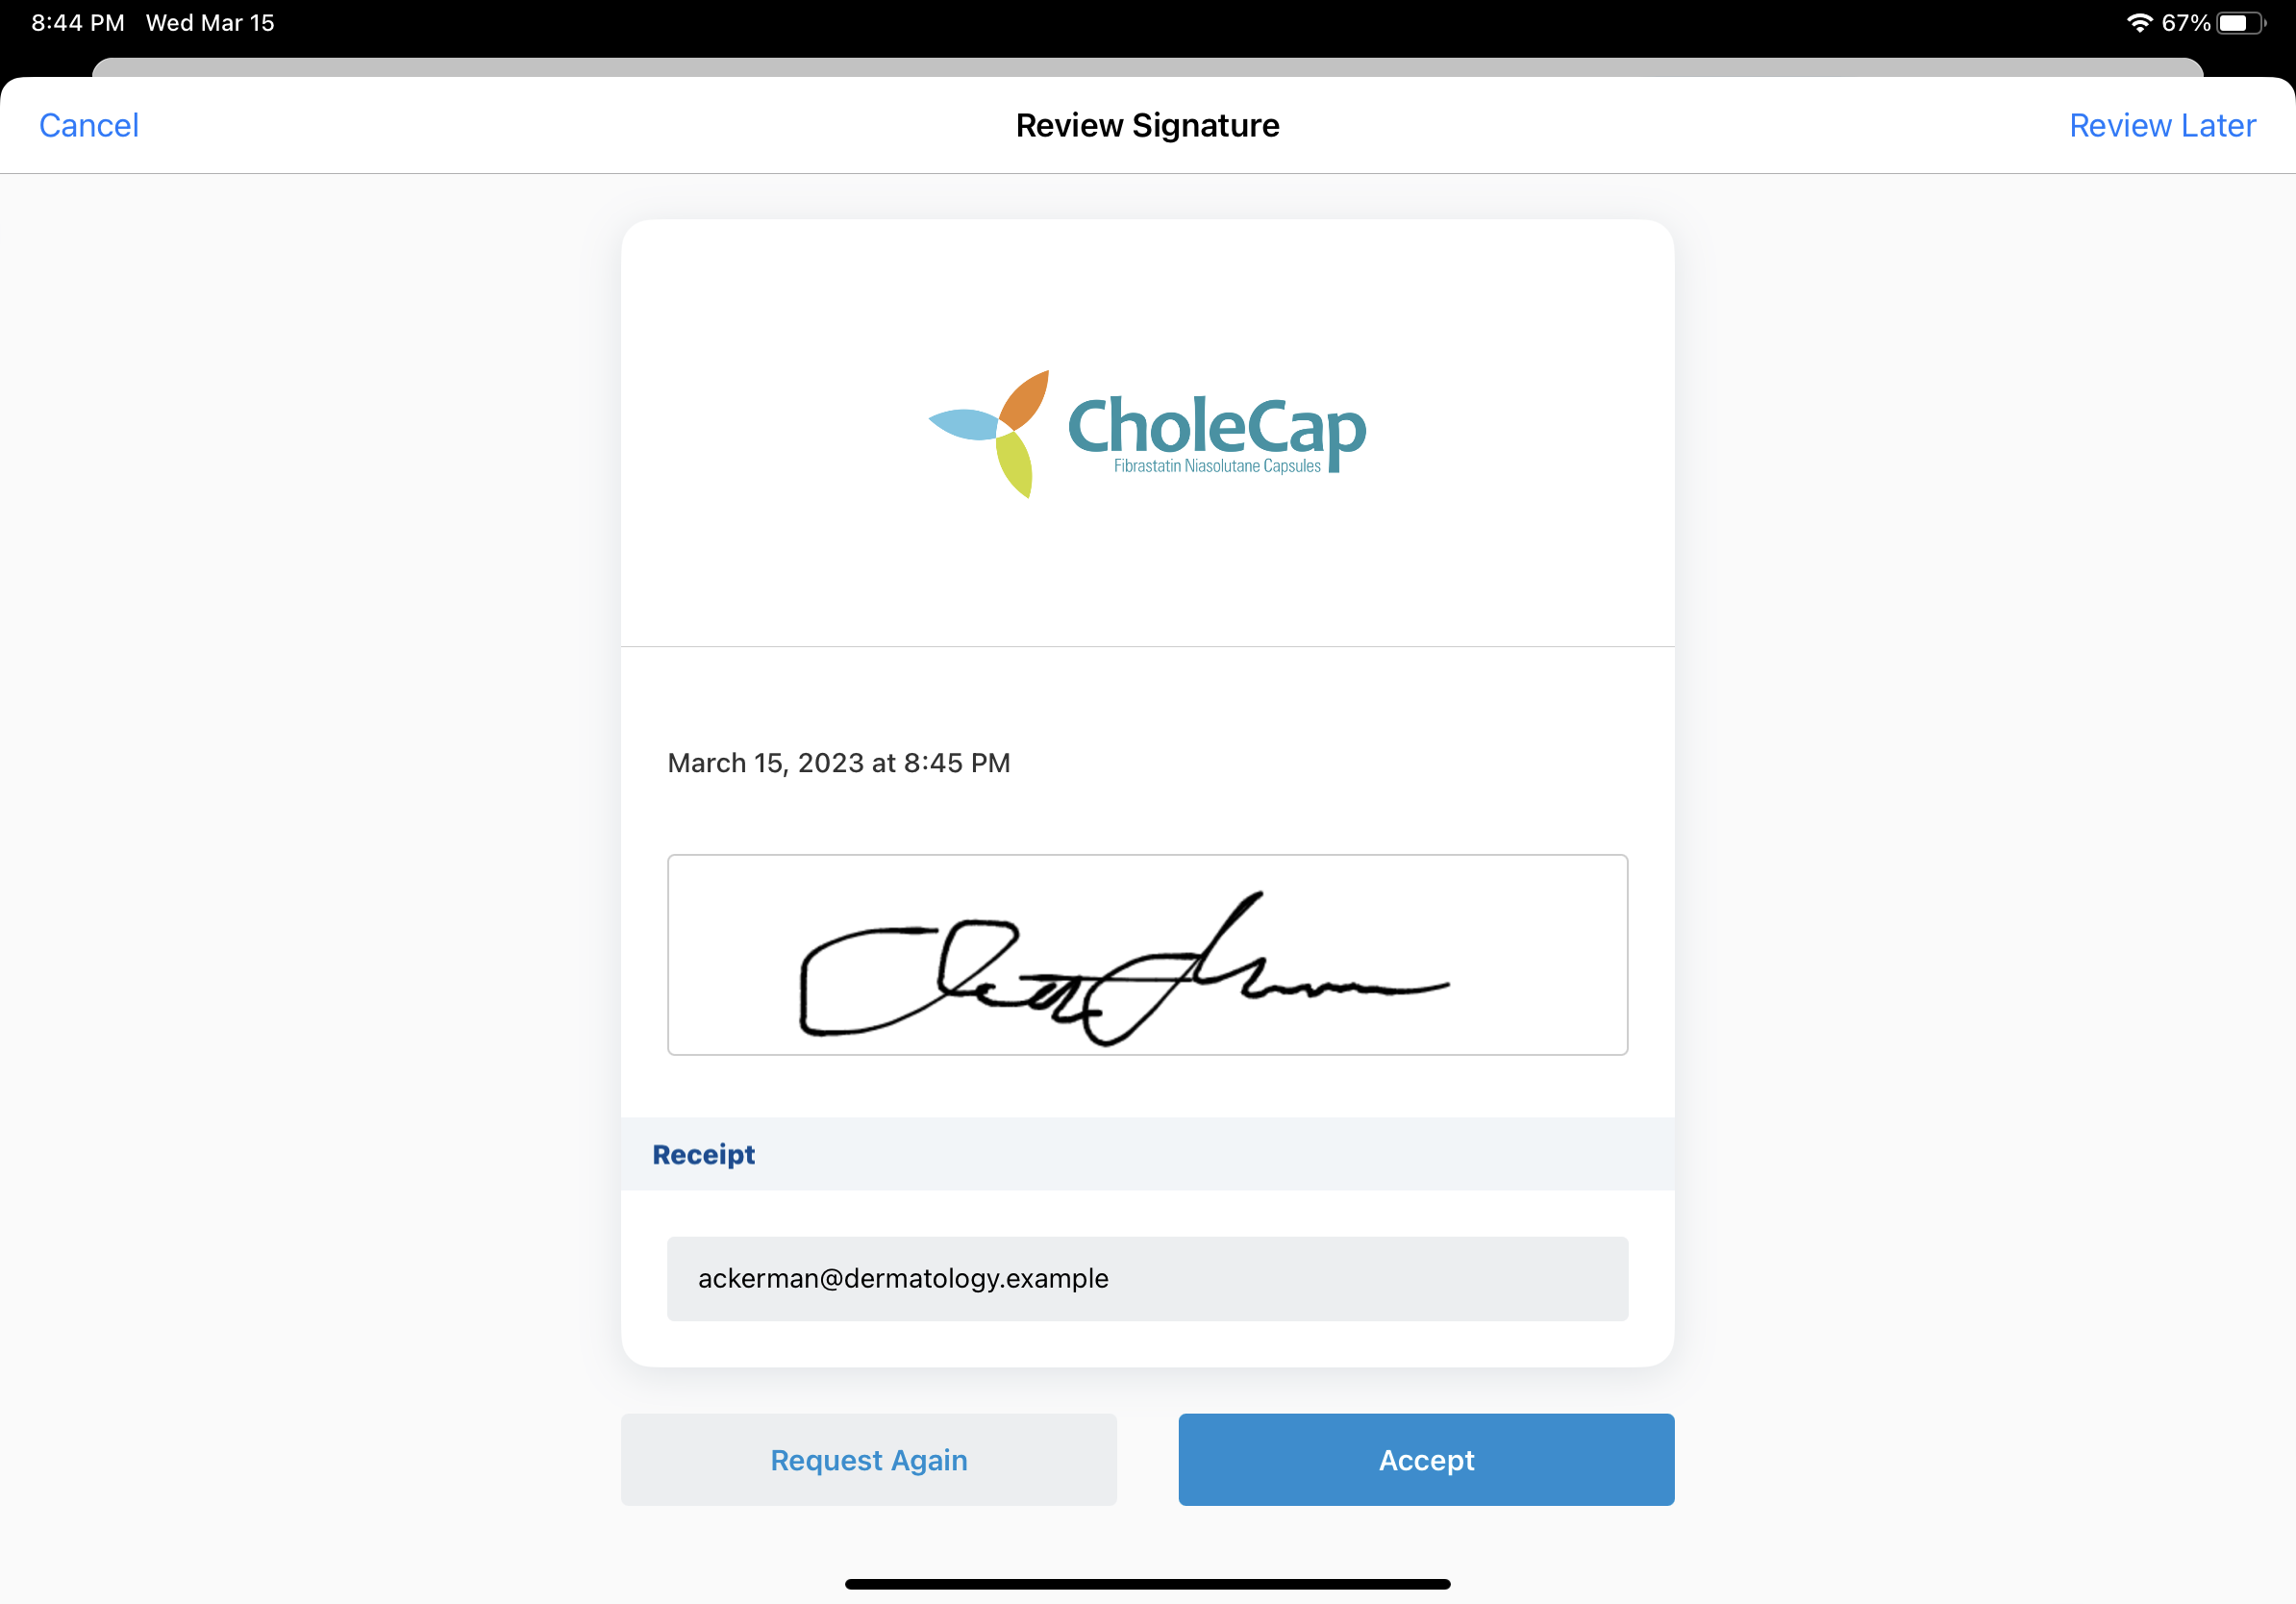
- Select Accept.
To ensure accurate, compliant signature capture data, the following occurs when a signature is accepted:
- The Signature_Request_vod record is updated to a Signature Accepted status
- The Signature Accepted Datetime field is populated with the current date and time
- Signature capture information is locked on the Call2_vod record
- The Signature_Captured_Share_Link_vod field is stamped on Call2_vod, Sample_Order_Transaction_vod, and Sample_Order_Transaction_Audit_vod records. For more information on Signature_Captured_Share_Link_vod, see Reviewing Remote Signatures.
For asynchronous signature capture, sample and product limits are recalculated when users accept the HCP’s signature. When Creating Sample Transactions on Sign Save is enabled and users save the call report, the lot quantity, sample and product limits, and sample transaction records are only updated if there is a captured signature on the call report.
If users do not want to accept the submitted signature, the following options are available:
- Cancel - Cancels the submitted signature. The HCP’s signature is not saved to the call report. To capture the HCP’s signature, the user must generate a new signature request link. For example, Dr. Ackerman contacts Sarah Jones after he submits his signature and asks her to send fewer Cholecap BRCs than he signed for. Sarah cancels the submitted signature and creates a new signature request with Dr. Ackerman’s preferred quantity of BRCs.
- Review Later - Return to the call report without canceling or accepting the signature. The HCP signature remains available for the user to review and accept.
- Request Again - Generates a new signature request link for the user to share
Events Management
Managing Related Lists in Lightning for Events Management
To improve managing an event’s related records, for example, attendees, child events, and event speakers, organizers can view and sort each related list in their event. They can also edit certain fields of related records directly from the event.
For example, Sarah Jones hosts a large event with a large number of related records. She learns that one of her attendees, Bob Adams, recently updated his address. Sarah navigates to the Attendees related list of her event, sorts the list of records to locate Bob Adams’s account, then edits and saves his address directly from the Attendee related list view of the EM_Event_vod record.
Viewing and Sorting Related Records
Each related list on an EM_Event_vod record displays as a tab on the record.
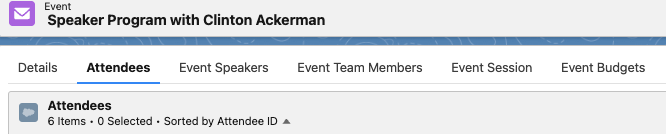
Selecting the tab displays a table of all appropriate related records. The table header displays how many total records are in the related list, as well as how many records are currently selected via the check box in each row of the table.
Users can sort the related list by selecting the appropriate column to sort by.
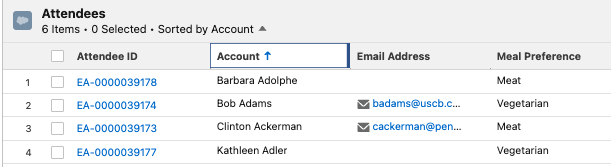
You cannot sort by multi-select picklist, rich text area, or long text area fields.
Editing Related Records Inline
Users can directly edit certain fields on certain EM_Event_vod related records using inline editing. The following types of related records are supported:
- EM_Event_vod
- EM_Attendee_vod
- EM_Event_Speaker_vod
- EM_Event_Team_Member_vod
- EM_Event_Material_vod
- EM_Event_Budget_vod
- EM_Event_Session_vod
Users can inline edit fields on these related records if the following conditions are met:
- The users has FLS edit permission to the field on the related object
- The field is be marked as editable on the appropriate page layout
- The field is not a multi-select picklist or one of the unsupported fields for that related object
To edit fields of these related records inline:
- Navigate to the EM_Event_vod record.
- Navigate to the appropriate related list.
-
Select the Pencil icon in the field to edit.

-
Edit the field’s value.

- Select Save.
Unsupported Fields for Inline Editing
Multi-select picklists cannot be edited inline, regardless of object. In addition to multi-select picklists, the following fields on the following objects cannot be edited inline:
|
Object |
Fields |
|---|---|
|
EM_Event_vod |
|
|
EM_Attendee_vod |
|
|
EM_Event_Speaker_vod |
|
|
EM_Event_Team_Member_vod |
|
|
EM_Event_Material_vod |
|
|
EM_Event_Budget_vod |
|
|
EM_Event_Session_vod |
|
Integrating Events Management with Veeva Vault
To better manage the various types of event materials used for an event, admins can integrate Events Management with Veeva Vault. This integration uses customizable field mappings between the EM_Catalog_vod object in CRM and the Document object in Vault to leverage Vault’s document management capabilities to deliver approved and compliant event materials to an event.
For example, Sarah Jones creates a speaker program about Cholecap’s efficacy for diabetes control. Before the integration job runs, three document records in Verteo BioPharma’s Vault instance are approved by the company’s compliance team:
- A presentation deck for speaker programs about diabetes control
- A printed sign-in sheet for events about Cholecap
- A brochure designed to be printed and distributed at events about Cholecap’s efficacy for diabetes control
These Vault documents import into CRM as Events Management Catalog records that are made available to the appropriate new and existing events via Event Rule and Topic Material records also created during the integration process. Since all of the created catalogs are relevant to Sarah’s account, they are made available for her to use in her event.
Defining the Events Management Integration User
You need to define an integration user to update CRM records via the integration with Vault. To define the integration user:
- Navigate to the Events Management Integration Administration tab.
- Navigate to the Vault section.
- Select New in the Integration User section.
-
Enter the following information:
- Username
- Password
- Is this a Sandbox? – Select this check box if the CRM org is a sandbox
- Select Save to validate the entered credentials.
Integrating with a Vault Instance
Once the Events Management integration user is defined, admins can connect one or more PromoMats or Vault Medical instances to the CRM org:
-
Navigate to the Connections section of the Events Management Integration Administration tab.

-
Select New.

-
Enter the following information:
- Vault URL – The URL of the Vault instance
- Vault User – The user name of the integration user in Vault
- Password – The password of the integration user in Vault
-
Sync Settings – Determines whether content should be downloaded from the Vault or uploaded to the Vault. Available values are:
If this feature was enabled prior to the 23R1.3 release, existing Connection_vod records must be updated to populate this field.
- Download from Vault Content
-
Upload to Vault Content
Upload to Vault Content is not supported at this time.
- WHERE Clause – Restricts which types of documents are synced to CRM
- Select Save.
- Select Validate Credentials from the More Actions menu for the new connection to validate the Connection’s credentials.
Saved connections can be edited or deleted via the More Actions menu in the Connections section.
Deleting a connection also expires all EM_Catalog_vod records created by the connection. Additionally, all associated Salesforce Files, EM_Topic_Material_vod, and EM_Event_Rule_vod records are deleted. EM_Event_Material_vod records are not deleted. See Properties of Synced and Related Records for more information.
Managing Field Mappings
After integrating with an instance of Vault, admins can then view, edit, or create mappings between the Document object in Vault and the EM_Catalog_vod object in CRM.
Default Field Mappings
When a Vault connection is validated, a set of default field mappings are automatically created.
|
EM_Catalog_vod Field |
Vault Document Field |
|---|---|
|
Description_vod |
title__v |
|
Name_vod |
name__v |
|
RecordType |
crm_em_catalog_type__v |
|
Status_vod |
status__v |
|
Vault_Document_Version_ID_vod |
version_id |
These system field mappings cannot be deleted or modified, but can be deactivated via the More Actions menu.
Creating Custom Field Mappings
In addition to the default field mappings, admins can create custom field mappings. The following field types in CRM can be mapped to the following field types in Vault:
|
CRM Field Type |
Supported Vault Field Types |
|---|---|
|
|
|
|
String |
|
Percent |
Number |
|
Phone |
|
|
Date |
Date |
|
Date/Time |
Date/Time |
|
Number |
Number |
|
Picklist (Multi-Select)* |
Picklist (Multi) |
|
|
|
URL |
|
* These CRM field types require additionally mapping specific values to values in Vault.
To create custom field mappings:
-
Select the appropriate connection.
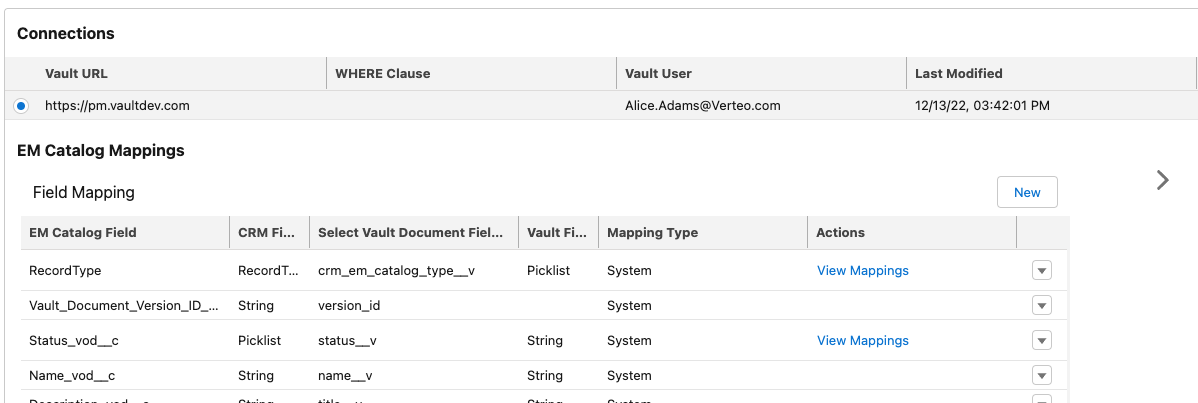
-
Select New in the EM Catalog Mappings section.
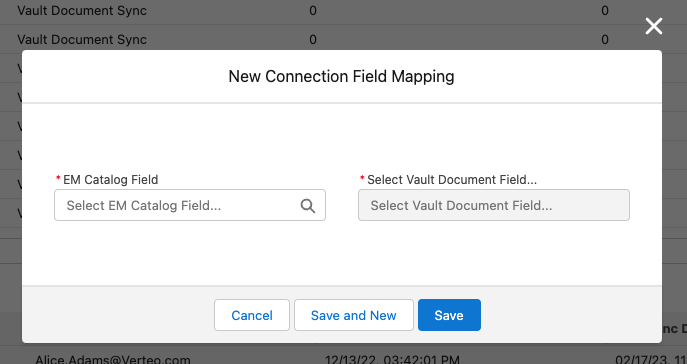
-
Use the EM Catalog Field search box to select the appropriate EM_Catalog_vod field.
The ID and Connection_vod fields cannot be mapped.
- Use the Vault Document Field search box to select a compatible Document field to map.
- Select either Save or Save and New.
Only active fields can be mapped. Fields cannot be mapped multiple times in the same connection.
Mapping Field Values Between CRM and Vault
Admins must also map individual values of the following CRM field types to individual values of the mapped field in Vault:
- RecordType
- Boolean
- Picklist (Single select)
- Picklist (Multi select)
The following system fields have default value mappings created by Veeva:
|
EM_Catalog_vod Field |
Vault Document Field |
EM_Catalog_vod Field Value |
Vault Document Field Value |
|---|---|---|---|
|
Status_vod |
status__v |
Staged_vod |
|
|
Approved_vod |
|
||
|
RecordType |
crm_em_catalog_type__v |
Speaker_Presentation_vod |
speaker_presentation_vod__v |
|
Print_Sign_In_Template_vod |
print_sign_in_template_vod__v |
||
|
Print_Invitation_Template_vod |
print_invitation_template_vod__v |
||
|
Contract_vod |
contract_vod__v |
Admins should review default mappings to determine which additional value mappings for these fields may be needed.
To create mappings between values of CRM fields and Vault fields:
- Navigate to the appropriate row in the EM Catalog Mappings table.
-
Select View Mappings in the Actions column.

-
Select New.
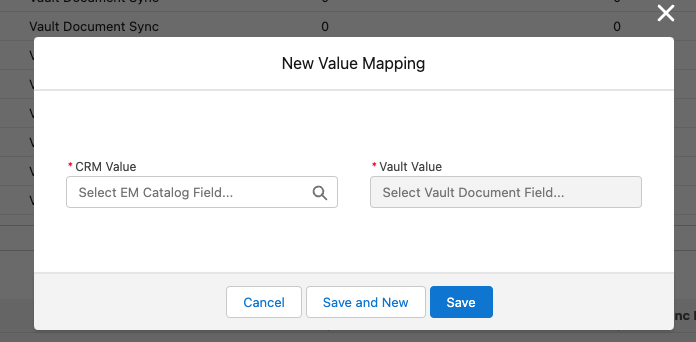
- Use the CRM Value and Vault Value picklists to select the appropriate values to map.
- Select either Save or Save and New.
When adding value mappings between the Status_vod field and status__v field, all status__v values from every Vault Document Lifecycle display as available for mapping, including values from Document Types not mapped to CRM. Because of this, admins should ensure to only map status__v values from Vault Document Lifecycles of Vault Document Types mapped by the integration.
Validating Field and Value Mappings
Select Validate Mappings from the More Actions for the menu for that Vault connection to validate field and value mappings.

Once the validation is complete, select Download Report from the results modal to download a CSV file containing detailed results of all successfully and unsuccessfully validated mappings.
Using Data-Loading to Integrate Events Management with Vault in Production Orgs
Veeva highly recommends using the UI in the Events Management Integration tab when initially configuring the integration between Vault and CRM in sandbox orgs. However, admins can use the data-loader to export integration records from the sandbox org, then import those records to the appropriate production org.
Use the data-loader to export records of the following objects involved with the integration:
-
Connection_vod – Represents a connection with a Vault instance
Before upserting these records into production orgs, admins should clear the Last_Sync_Date_vod and Last_Sync_Status_vod fields. This ensures that the initial sync in the production org also validates the field mappings.
- Connection_Field_Mapping_vod – Each record represents a mapping between an EM_Catalog_vod field and a Document field
- Connection_Value_Mapping_vod – Each record represents a mapping between a specific value of an EM_Catalog_vod field and a specific value of a Document field
Creating Vault Documents for the Integration
In order to sync Document records in Vault to CRM as EM_Catalog_vod records, populate the following fields for each record in Vault:
- name__v
- crm_org__v – Specifies the CRM org the record will sync to. This picklist can contain multiple values if the Vault instance is integrated with more than one CRM org.
- status__v – The status of the Document record. Depending on the configured field value mappings, this determines if the record is synced to the CRM org.
- crm_em_catalog_type__v – Determines the record type of the EM_Catalog_vod record in CRM.
- Any other mapped fields defined by the admin
In addition to these required fields, populate the following fields to specify the created EM_Catalog_vod record’s availability in CRM:
- crm_em_event_configuration__v – Determines which type of events the record should be made available to in CRM. See Event Rule Records for more information.
- country__v – Determines which countries the record should be made available to. See Event Rule Records for more information.
- crm_product__v – Determines which products the record is associated with. See Topic and Product Material Records for more information.
- crm_em_event_topic__v – Determines which event topics the record is associated with. See Topic and Product Material Records for more information.
Speaker Presentation Decks in Vault
PowerPoint Document records in Vault can be configured to import into CRM as a read-only file. This is useful for providing external event speakers with approved presentation decks that cannot be edited by the speaker.
To specify if a PowerPoint Document should import into CRM as read-only, populate the crm_em_presentation_type__v field. The following values are available:
- Locked – When the integration process occurs, the .pptx file attaches to the EM_Catalog_vod record as a read-only Powerpoint Show (.ppsx) file
- Unlocked or blank – The .pptx file is attached to the EM_Catalog_vod record and can be downloaded and edited freely
The crm_em_presentation_type__v field does not need to be mapped to a field in CRM.
Scheduling the Integration Between Vault and CRM
Admins can automate the sync between Vault and CRM via the Veeva Process Scheduler:
- Navigate to the Veeva Process Scheduler tab.
-
Select Edit next to the Events Management Vault Integration process.
- Select the appropriate interval the process should run.
- Select the Schedule will be active check box.
- Select Save.
Syncing Between Vault and CRM
After field mappings and field value mappings are defined and validated, manually sync Vault and CRM or schedule the integration job between CRM and Vault via the Veeva Process Scheduler.
To manually sync between Vault and CRM, select the Sync button in the Integration History table in the Events Management Integration Administration tab.
The Sync Process
When a sync is initiated between a Vault instance and a CRM org, the following process occurs:
- A Precheck stage validates the connection’s field mappings and field value mappings.
-
EM_Catalog_vod records mapped to the Staged status in CRM are created or updated. All appropriate related records are also created or updated for each EM_Catalog_vod record. See Properties of Synced and Related Records for more information.
This step only occurs if the CRM org is a sandbox.
- EM_Catalog_vod records mapped to the Approved status in CRM are created or updated. All appropriate related records are also created or updated for each EM_Catalog_vod record.
- All EM_Catalog_vod records not mapped to a Staged or Approved status are expired. The following types of records related to the expired EM_Catalog_vod record are deleted:
- The Salesforce File
- EM_Event_Rule_vod
- EM_Topic_Material_vod
Using the Integration History Table
View the history of syncs between Vault instances and CRM via the Integration History table in the Events Management Integration Administration tab.
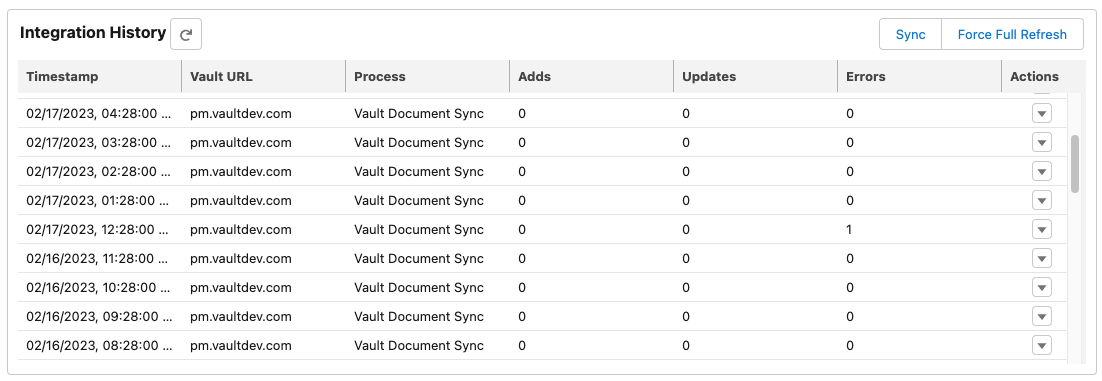
Each row in the table represents a sync between a Vault instance and a CRM org. View the total number of adds, updates, and errors that occurred during the sync. Admins can also view all individual records affected by the sync by selecting Download Log in the More Actions menu to download a spreadsheet with the record details.
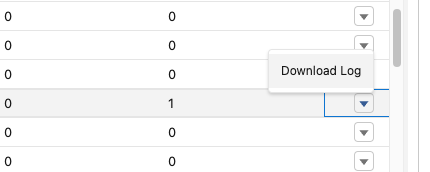
Properties of Synced and Related Records
EM_Catalog_vod records created in CRM via syncing with Vault have the following properties:
- Connection_vod – References the Connection_vod record representing the Vault instance the record originated from
- All mapped fields with the Vault instance, including the following fields:
- Name_vod
- Status_vod
- Description_vod
- The Vault Document Version File attached as a Salesforce File
Additionally, the following related records are also created based on the corresponding Document record in Vault and its related records:
Topic and Product Material Records
These two types of EM_Topic_Material_vod records link a material to an event’s topic or product. The following types of EM_Topic_Material_vod records are created:
- Topic_Material_vod type records – Created based on the crm_em_event_topic__v records in Vault associated with the Document record. The following fields automatically populate:
- Material_Type_vod – The record type of the associated EM_Catalog_vod record
- Topic_vod – References the created EM_Catalog_vod record
- Material_vod – References the created EM_Catalog_vod record
- Product_Material_vod type records – Created based on the crm_product__v field on the associated Document record in Vault. The following fields automatically populate:
- Material_Type_vod – The record type of the associated EM_Catalog_vod record
- Product_vod – Populates with the value of the Document record’s crm_product__v field
- Material_vod – References the created EM_Catalog_vod record
Event Rule Records
EM_Event_Rule_vod records link an event material to EM_Event_Configuration_vod and EM_Event_Configuration_Country_vod records. Whenever an EM_Event_vod record is created, the EM_Event_Configuration_vod record and the EM_Event_Configuration_Country_vod record, if enabled, associated with the event are used to automatically add associated materials to the event.
Material_vod type EM_Event_Rule_vod records are created or updated in CRM based on the value of the country__v multi-select picklist on the Document record, as well as whether the Document record has associated crm_em_event_configuration__v records:
|
Blank country__v picklist |
One or more countries selected in country__v |
|
|---|---|---|
|
No associated crm_em_event_configuration__v records |
No event rules are created. |
Event rules are created or updated on all event configurations with an associated Event_Configuration_Country_vod record matching one of the Document’s defined countries. |
|
One or more associated crm_em_event_configuration__v records |
Event rules are created or updated on all associated event configurations. |
Event rules are created or updated if an associated event configuration also has an associated Event_Configuration_Country_vod record that matches one of the Document’s defined countries. |
Event Material Records
When an EM_Catalog_vod record is created or updated by the integration process, EM_Event_Material_vod records are automatically created for existing EM_Event_vod records that match the material’s requirements from EM_Event_Rule_vod and EM_Topic_Material_vod records. This ensures the material from Vault is made available to the appropriate new and existing events.
Records are created so long as the associated EM_Event_vod records is not locked, Canceled, or Closed.
Unlike EM_Event_Rule_vod and EM_Topic_Material_vod records, EM_Event_Material_vod records are not deleted when their associated EM_Catalog_vod records are expired. Instead, the Salesforce File attached to the EM_Event_Material_vod record is deleted to prevent end-users from accessing the expired content.
