

22R2.0 Functionality Guide
The Functionality Guide is intended for Sales Operations, Business Administrators, System Integrators, and others responsible for making decisions about what features are needed for end users to be successful and deciding which features work together with existing customer configurations.
Account Management
Improved Account Picker
To enable customers to easily find accounts, Veeva CRM includes an improved, consistent search experience across many entry points.
The improved account picker is available from the following entry points:
- Sphere of Influence
- Approved Email
- Media
- Survey Targets
Child Account support is not available in the account picker from the Survey Targets entry point.
- Detail Pages
- Call Attendees
Child Account support is not available in the account picker from the Call Attendees entry point.
For example, Sarah Jones is leaving Chilton Memorial Hospital and meets Dr. Meghan Chambler in the hallway with her associates Dr. Clinton Ackerman and Dr Tyler Chase. Sarah takes the opportunity to present a slide about Cholecap. When the presentation is complete, Sarah searches the list of available accounts to add to the Call Report she created, where she quickly finds and adds Dr. Chambler. Later, when she completes the call report, she is able to locate Dr. Ackerman and Dr. Chase by entering part of their last names in the search field. The detailed presentation of results allows Sarah to feel confident she has selected the correct accounts to add to the call report.
This feature does not require configuration.
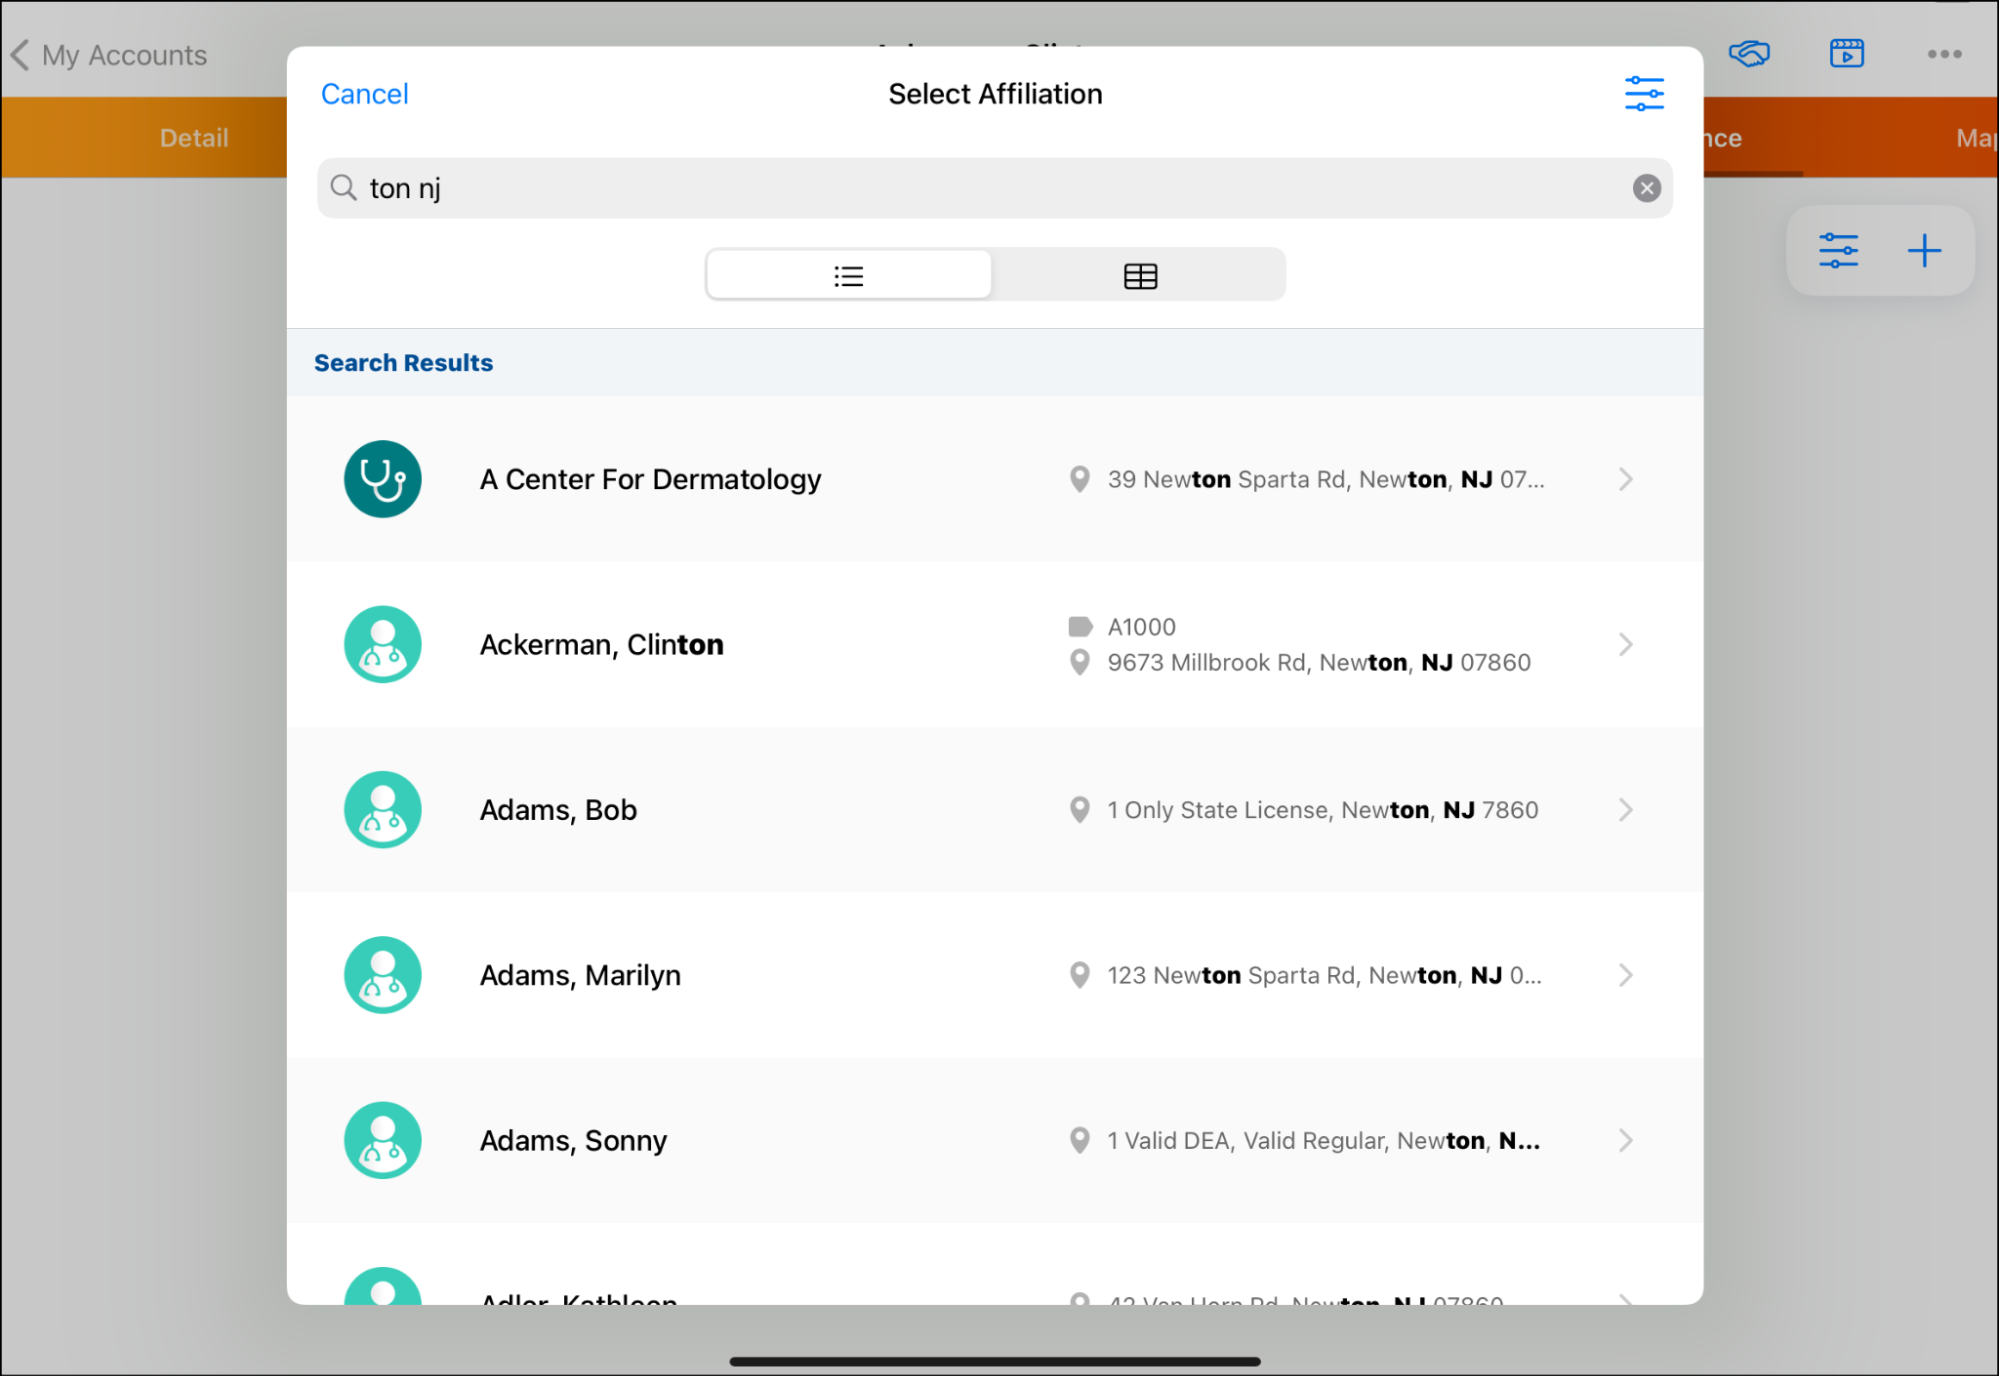
Using the Improved Account Picker
The user interface and search functionality is the same for every entry point, and includes standard and custom fields related to each account. When users enter text in the Search field, the results display any matching accounts, and the account/s is highlighted. An icon displays next to each account in the results indicating whether it is an HCP or an office.
Child accounts are not included in the search results.
The improved account picker functions differently from Advanced Account Search, and instead searches the following fields:
- Account
- Formatted_Name_vod__c
- Account_Identifier_vod__c
- Furigana_vod__c
- NPI_vod__c
- Account_Search_FirstLast_vod__c
- Account_Search_LastFirst_vod__c
- Address_vod (searches across all addresses)
- Name
- Address_Line_2_vod__c
- City_vod__c
- State_vod__c
- Zip_vod__c
- Phone_vod__c
- License_vod__c
When only one search value is entered, the results display all accounts where one of the fields on the account contains a string matching the entered value. When multiple values are entered and separated by spaces, the search uses implicit AND logic to search for all of those values.
The search field does not support parenthesis or boolean searches (AND, OR, NOT).
All search values are highlighted in the results. If the match occurs in multiple fields at the same time, or multiple times in the same word, every matching instance is highlighted.
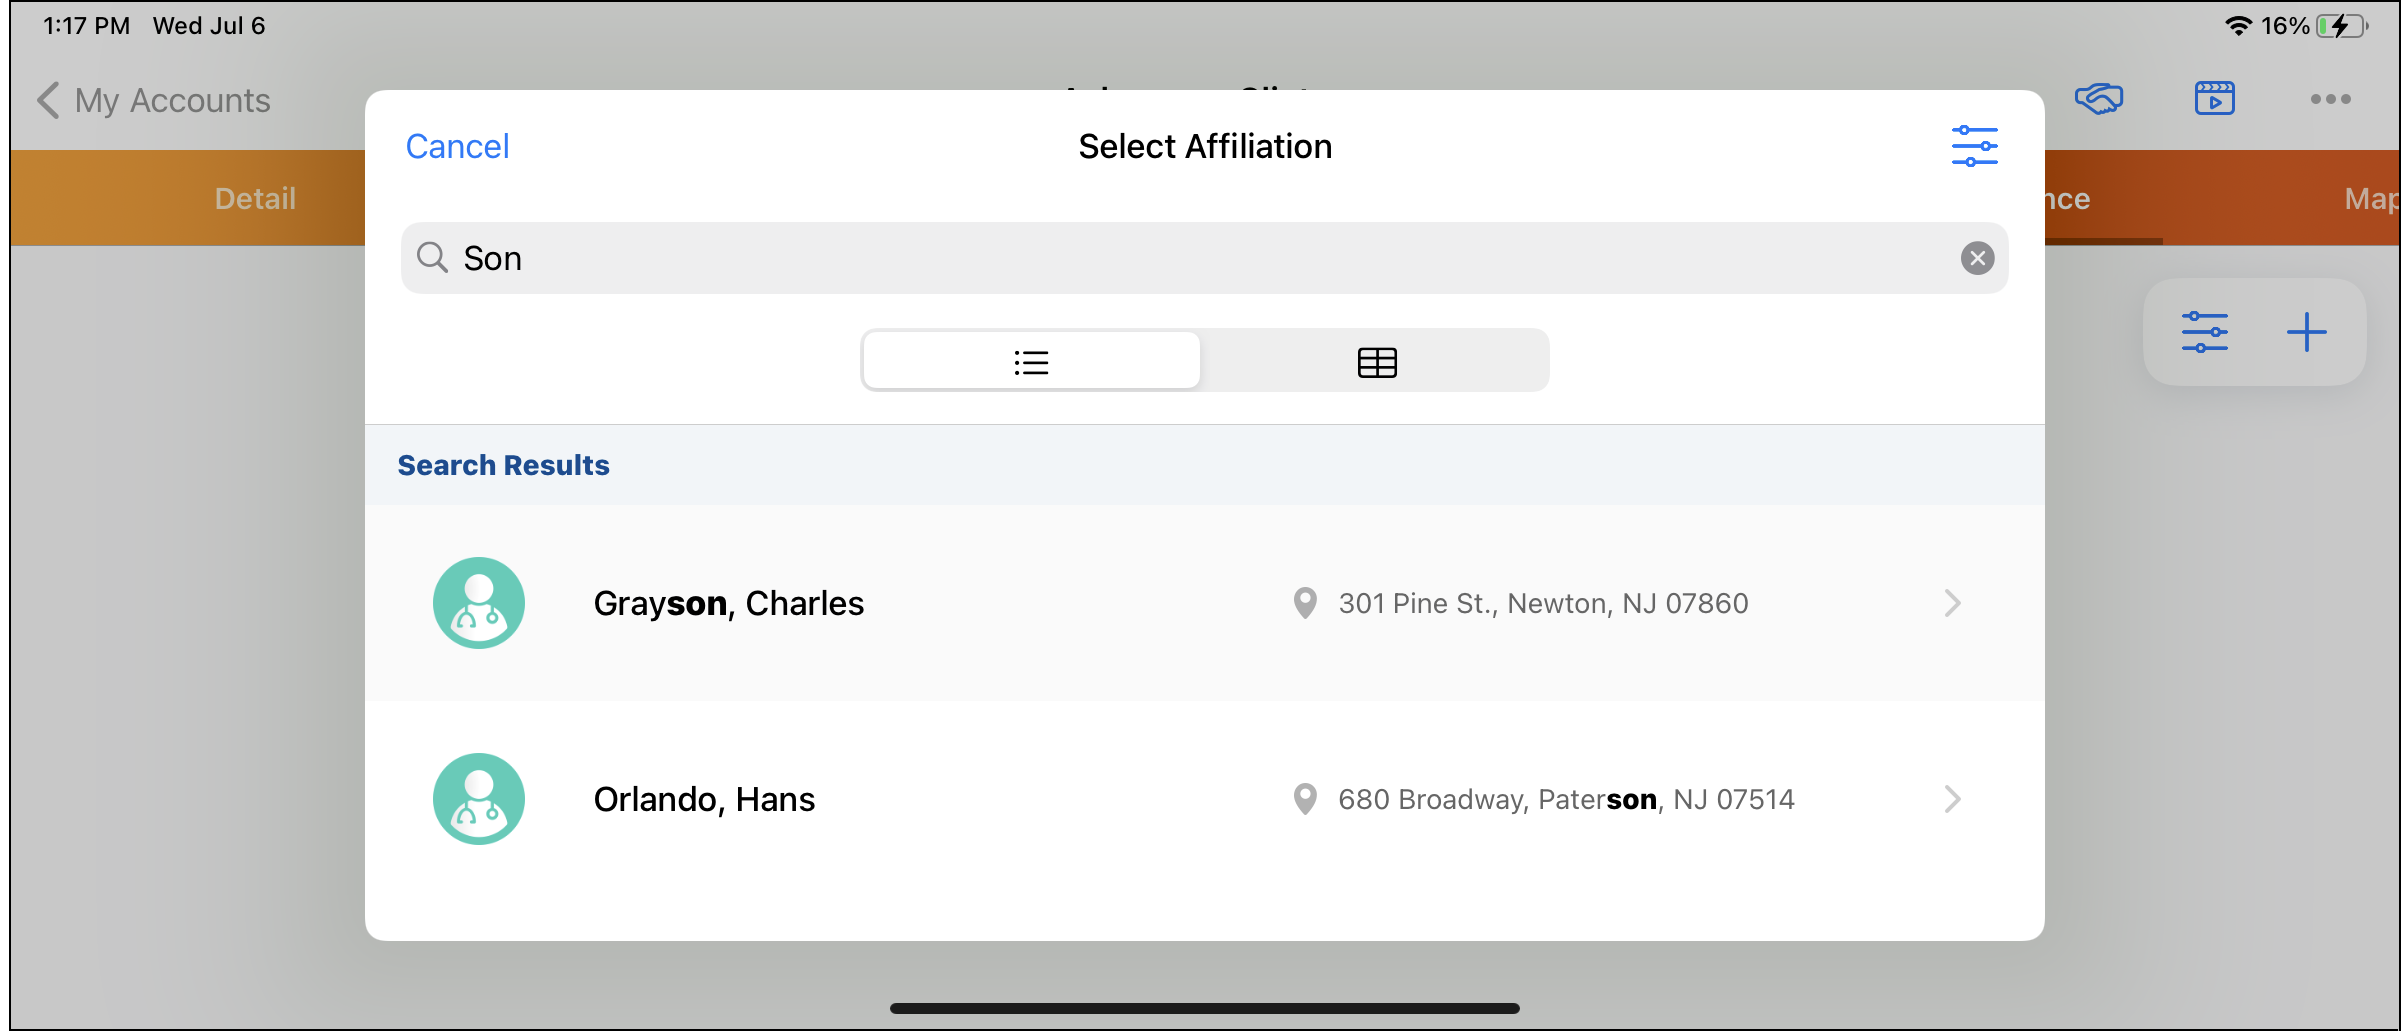
Using List View and Table View
Users can view accounts in either list view or table view.
List view displays the account names along with important details, for example, the practice each account is associated with, the type of practice, and address information.
If a user searches for text not displayed in List View, such as a customizable field, the user can switch to Table View to see the highlighted match. The search results are preserved when the user switches views.
To switch to table view, select the table tab at the top of the list. Select a column name to sort by the column. Table view displays similar information, but includes both standard and customizable fields and the ability to sort the table.
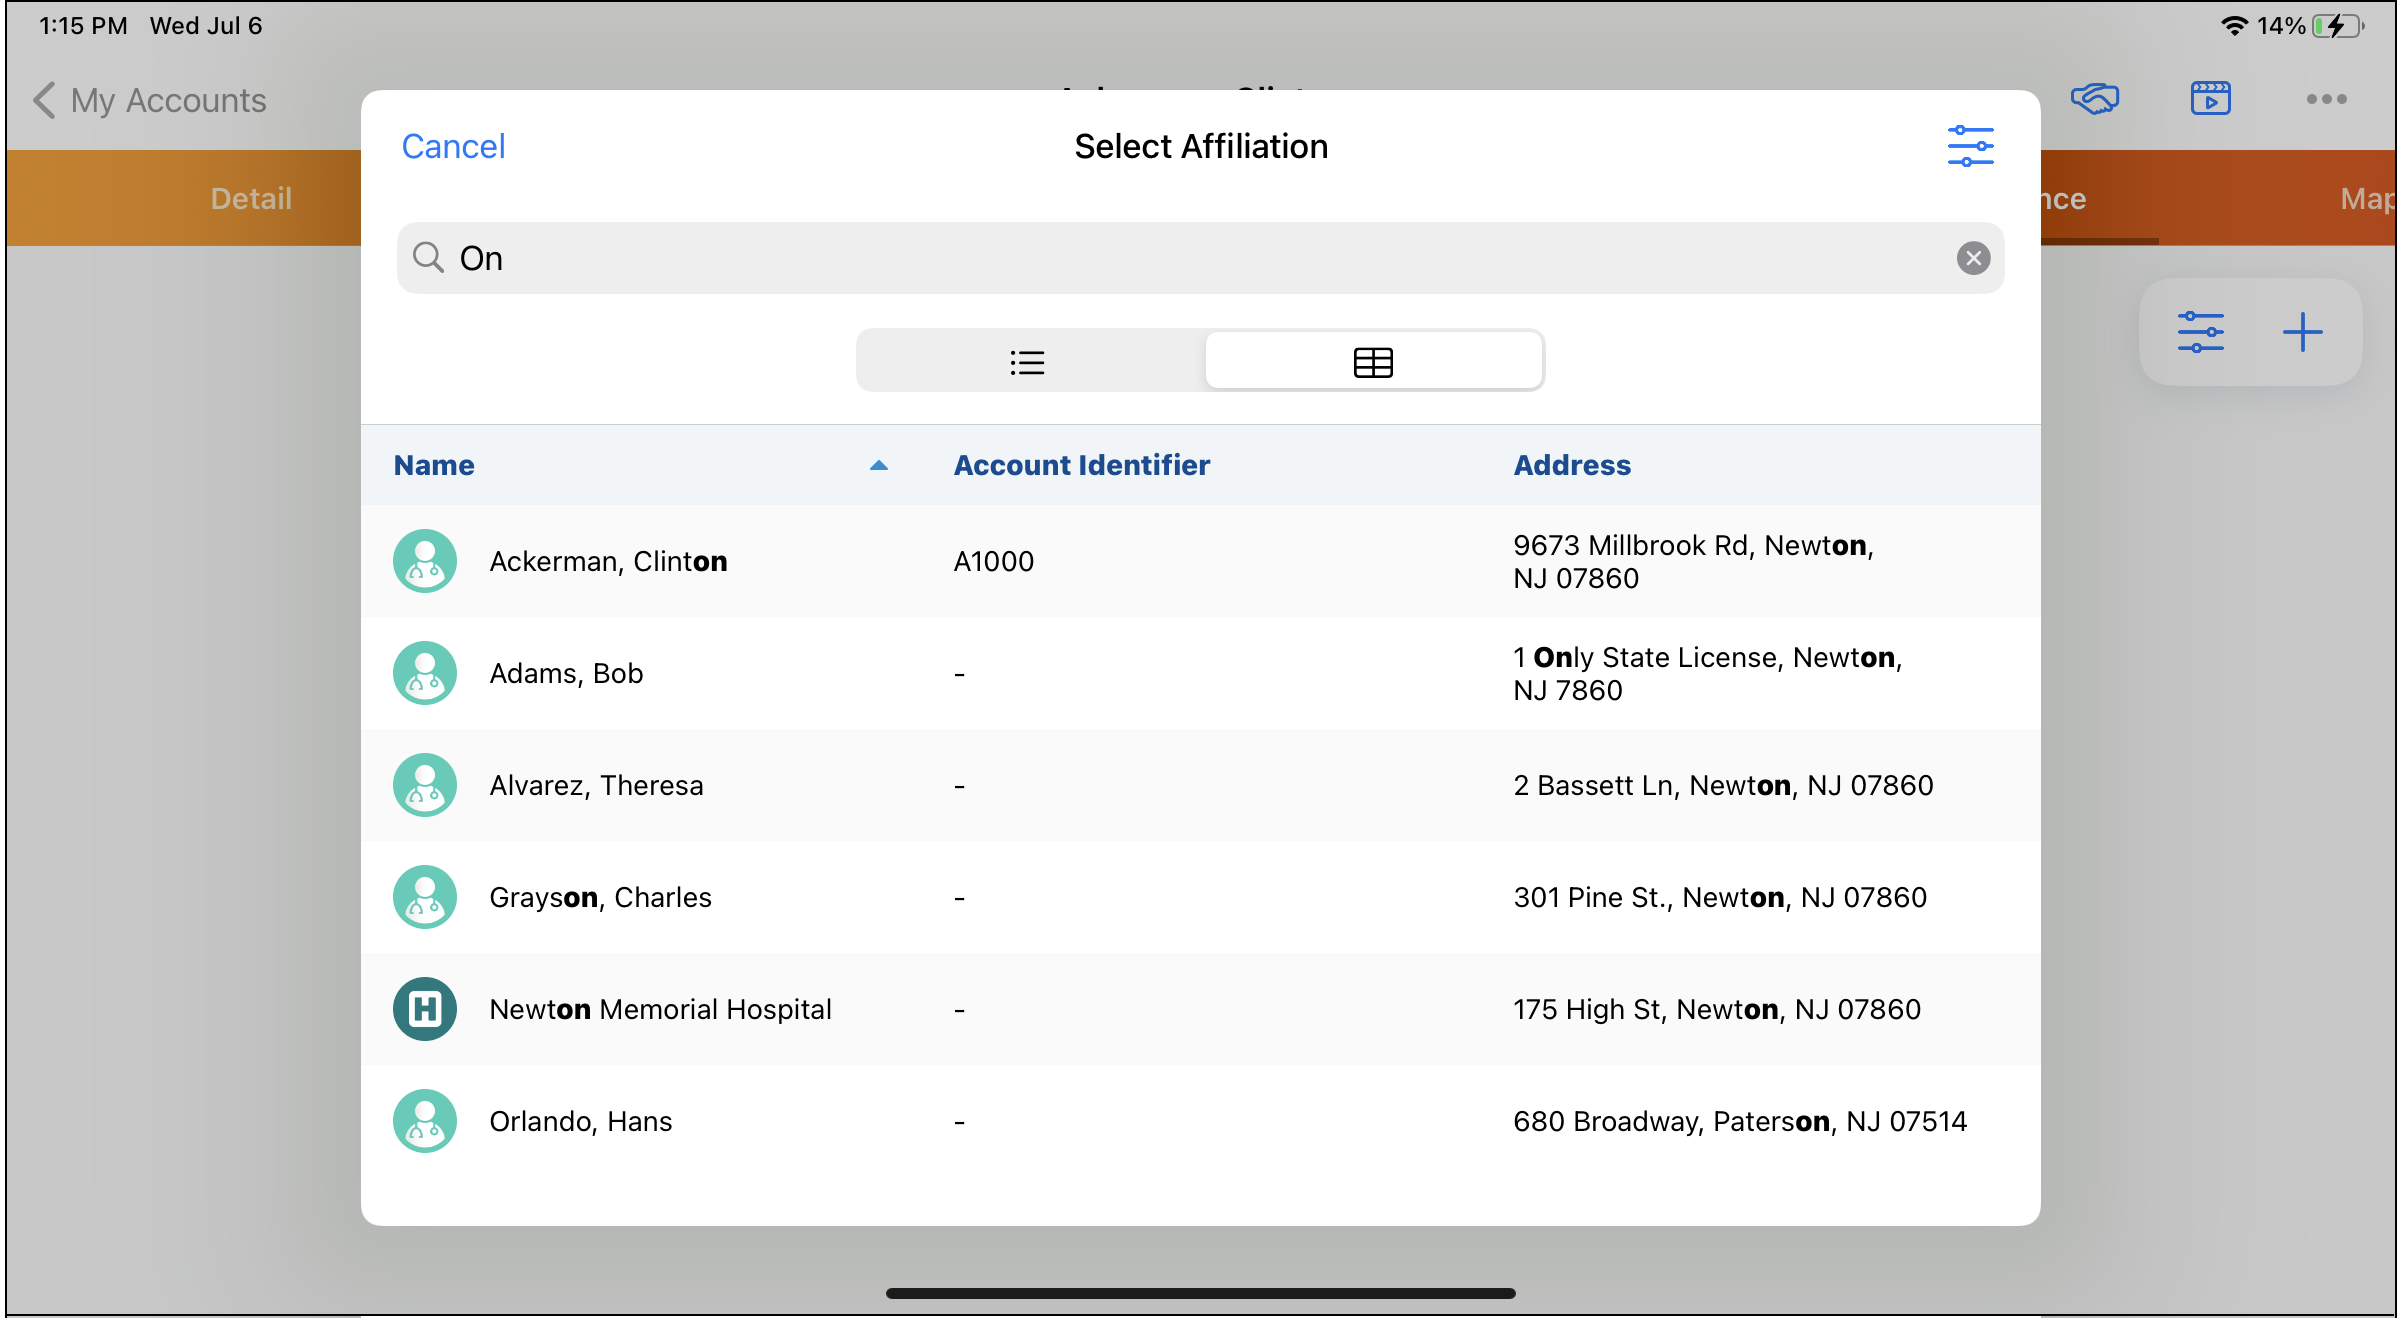
If a customer defined search layout fields for the account object and the user has FLS for those fields, the fields display in the table view.
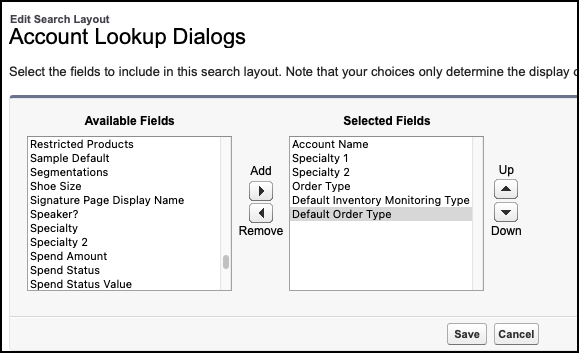
Using Custom Columns and Search Layouts
The account picker supports configurable search layouts. If there are any supported custom columns defined in Search Layouts, the system searches and displays these custom columns, disregarding the value of the Enable Enhanced Lookups Veeva Setting.
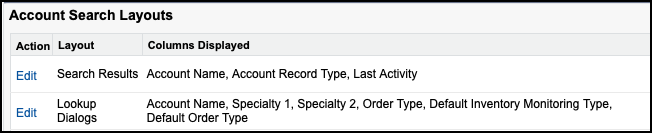
Any changes the customer may have made in the past to the Account Search Layouts and Lookup Dialogs are automatically reflected in the Improved Account Picker. The following procedure is only necessary if admins prefer to change which columns are displayed.
To select custom columns to include in the search layout:
- Switch to Salesforce Classic.
- Navigate to the Account object.
- Select Customize layout of fields on search results and lookup dialogs.
- Select the Edit link for Lookup Dialogs.
- Select the custom fields to include them in the search layout.
- Select Save.
- Access the Metadata Cache Manager tab.
- Select Refresh Metadata. This process can take several minutes to complete.
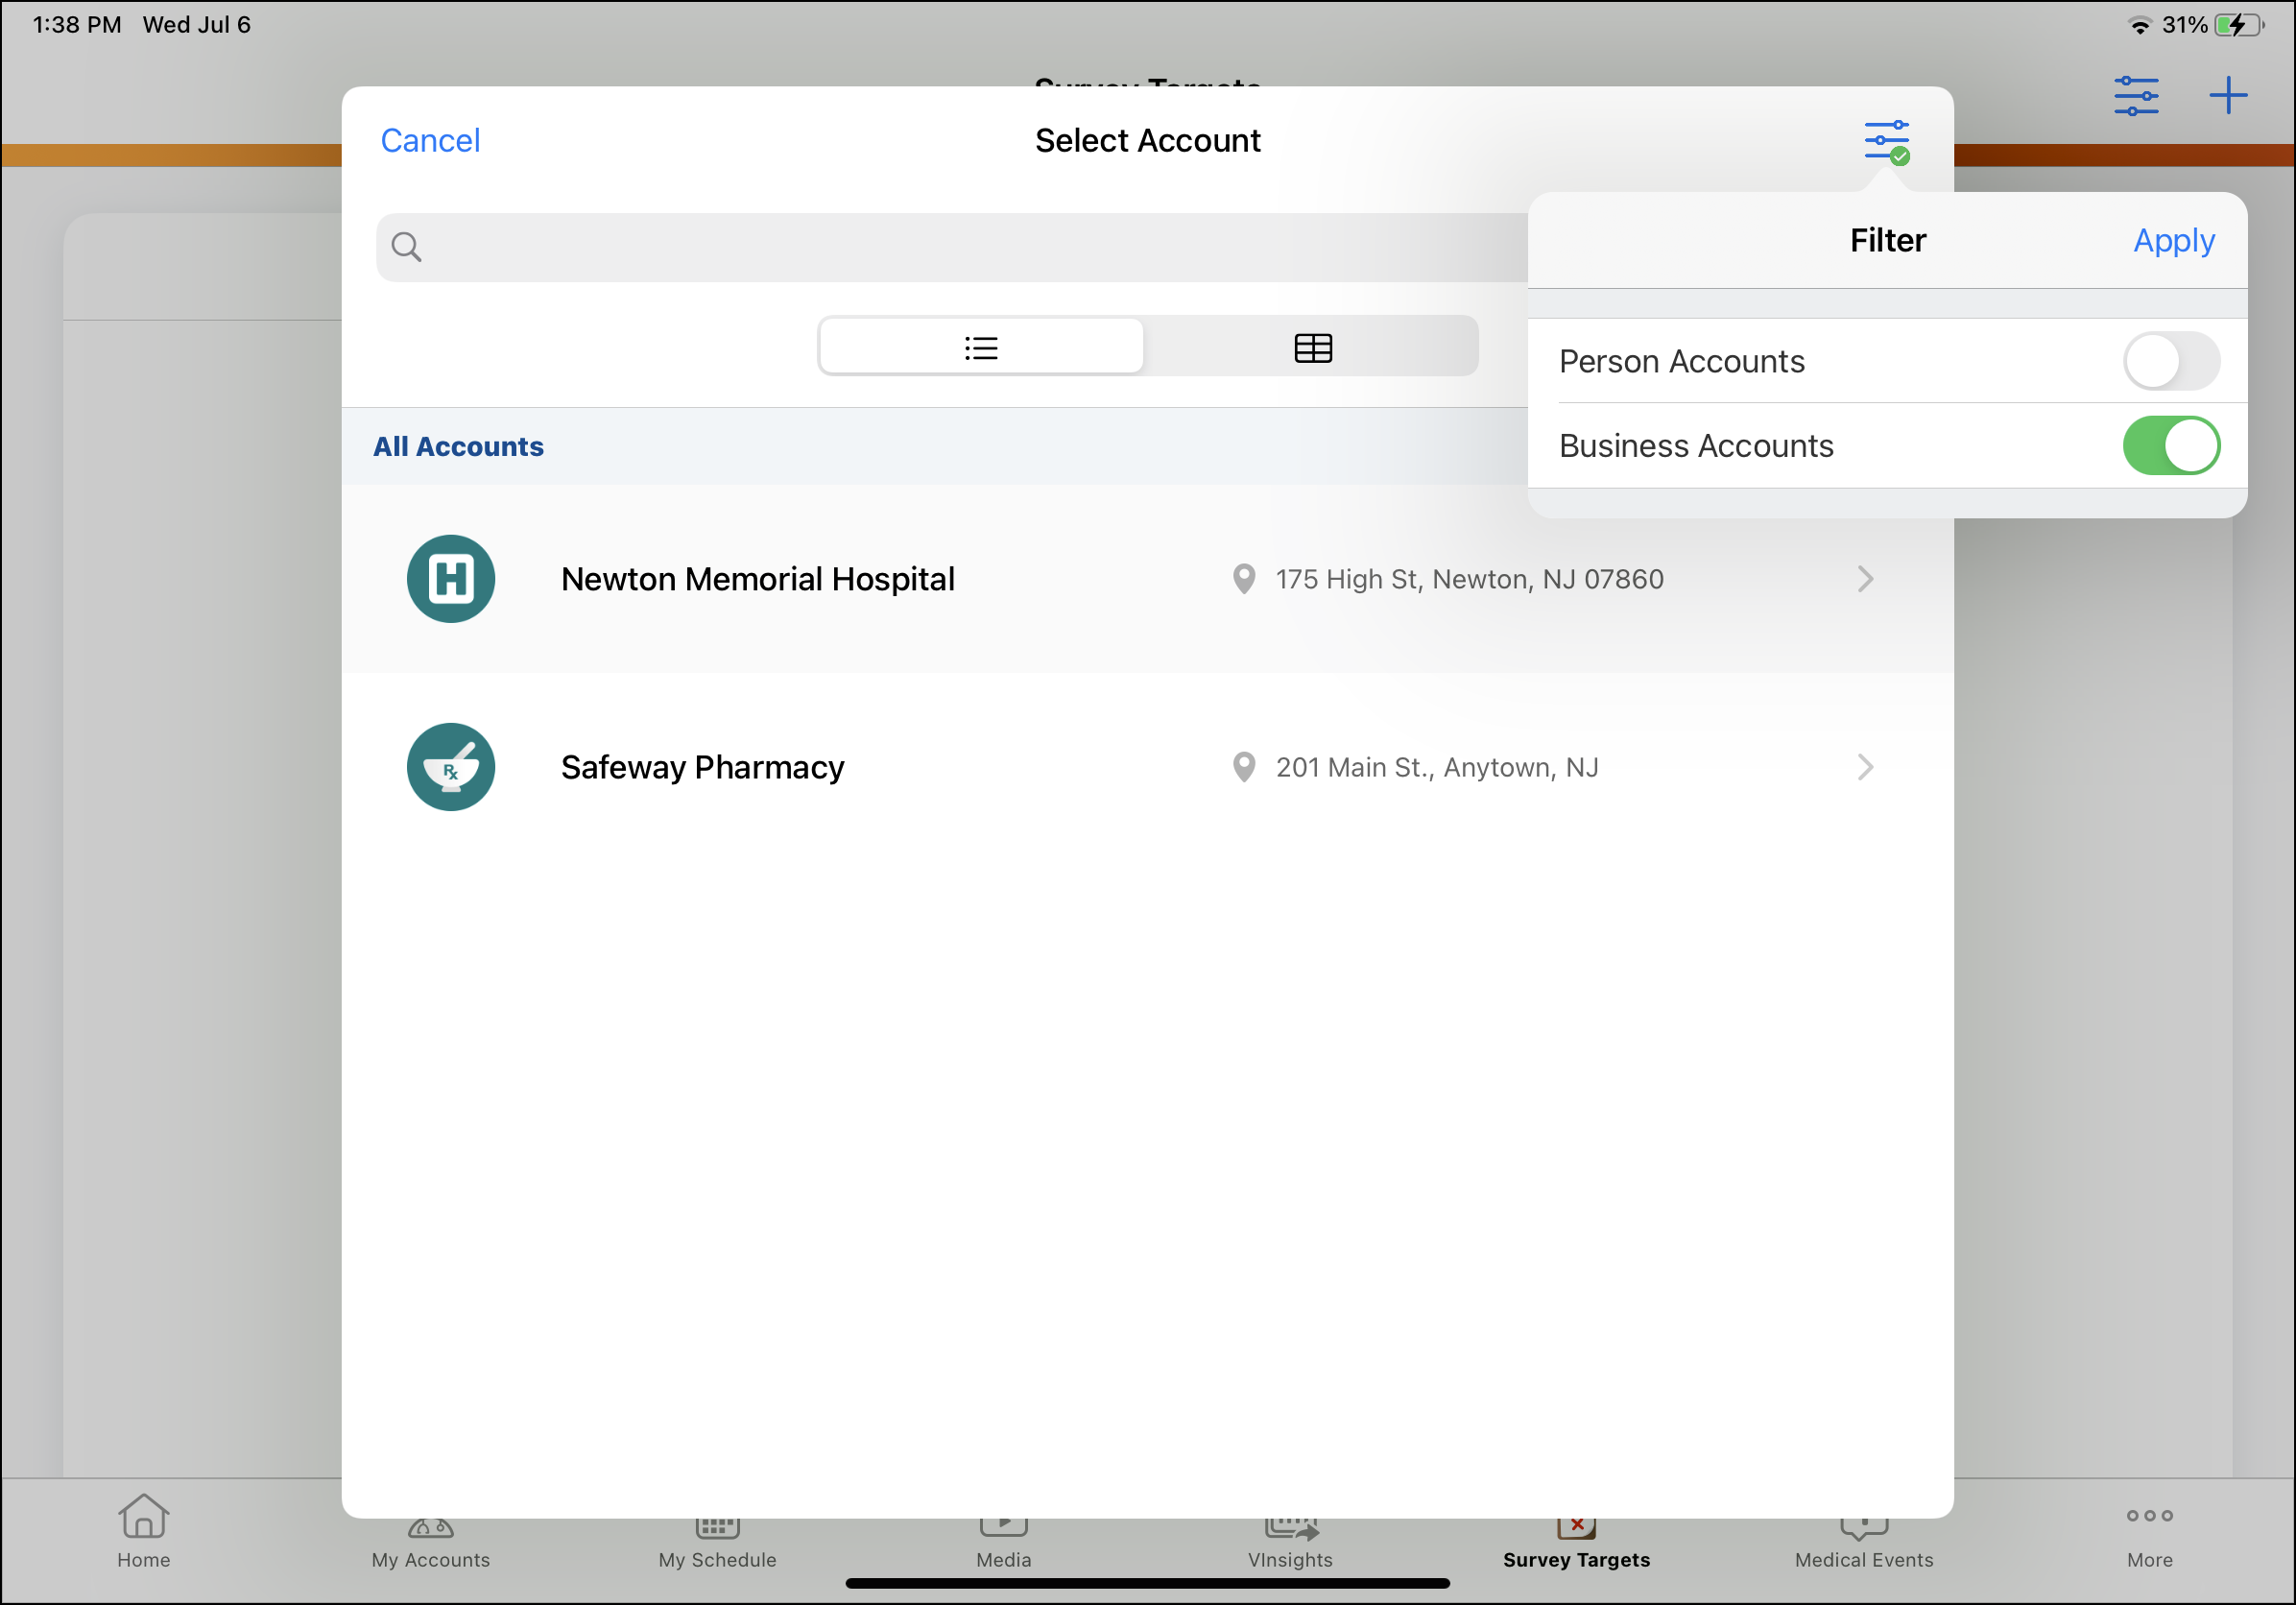
Filtering Accounts
The Improved Account Picker allows users to filter by Business or Person accounts.
To filter by accounts:
- Select the Filter button in the upper right corner of the account picker.
- Select a filter to apply to the results.
- Select the Apply button.
Managing Affiliations in Stakeholder Navigator
To easily manage affiliations between accounts in their territories, users can create, modify, and delete account affiliations from Stakeholder Navigator.
Stakeholder Navigator makes it easy for Key Account Managers to review account relationships, including adding new affiliations or managing existing affiliations. From the menu in the panel for an account, they can select Add Affiliation, select a related account, and fill in information describing the relationship. Lines on the Stakeholder Navigator hierarchy clearly show the related accounts and identify the type of relationship.
Using Affiliation Management in Stakeholder Navigator
Select an account in Stakeholder Navigator to manage existing affiliations for that account, or select Add Affiliation from the account menu to create a new affiliation.
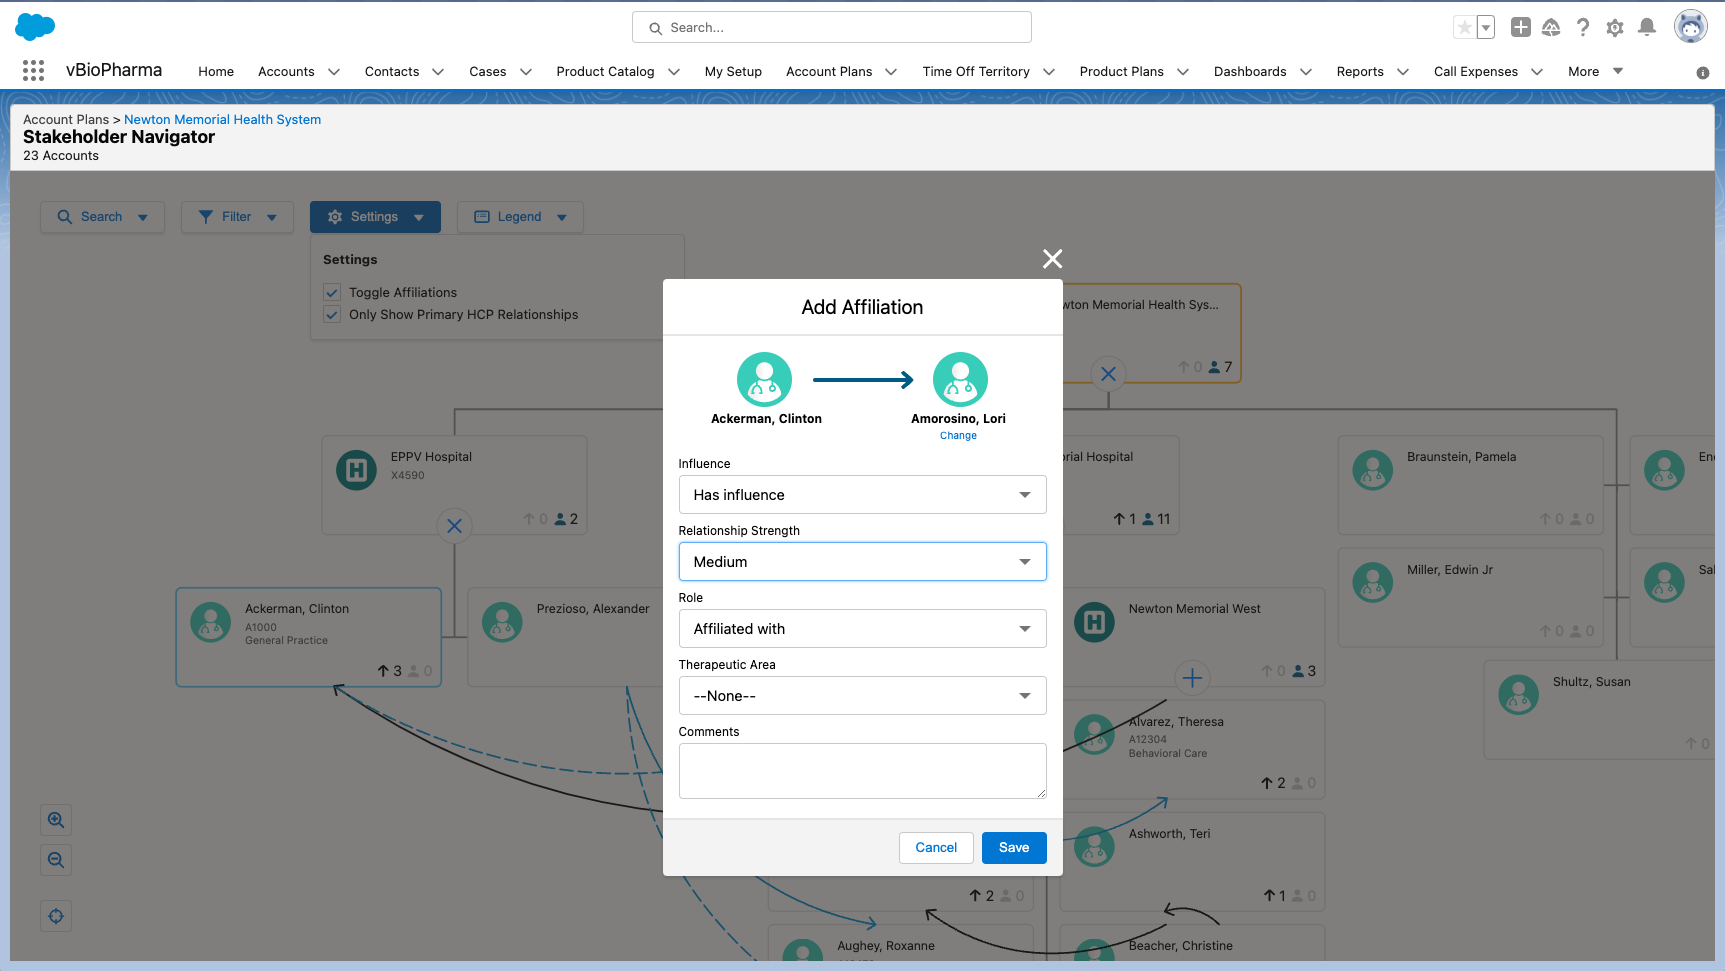
Adding Affiliations
To add an affiliation between two accounts:
- Select the menu button on one of the accounts you wish to affiliate, and select Add Affiliation. A message displays at the top of the screen to Select an account to add.
- Select the account you want to affiliate with the first account. Only in-territory accounts are available for selection.
- Enter the information for the affiliation in the Add Affiliation modal, or select Change to choose a different account.
- Select Save to create the affiliation.
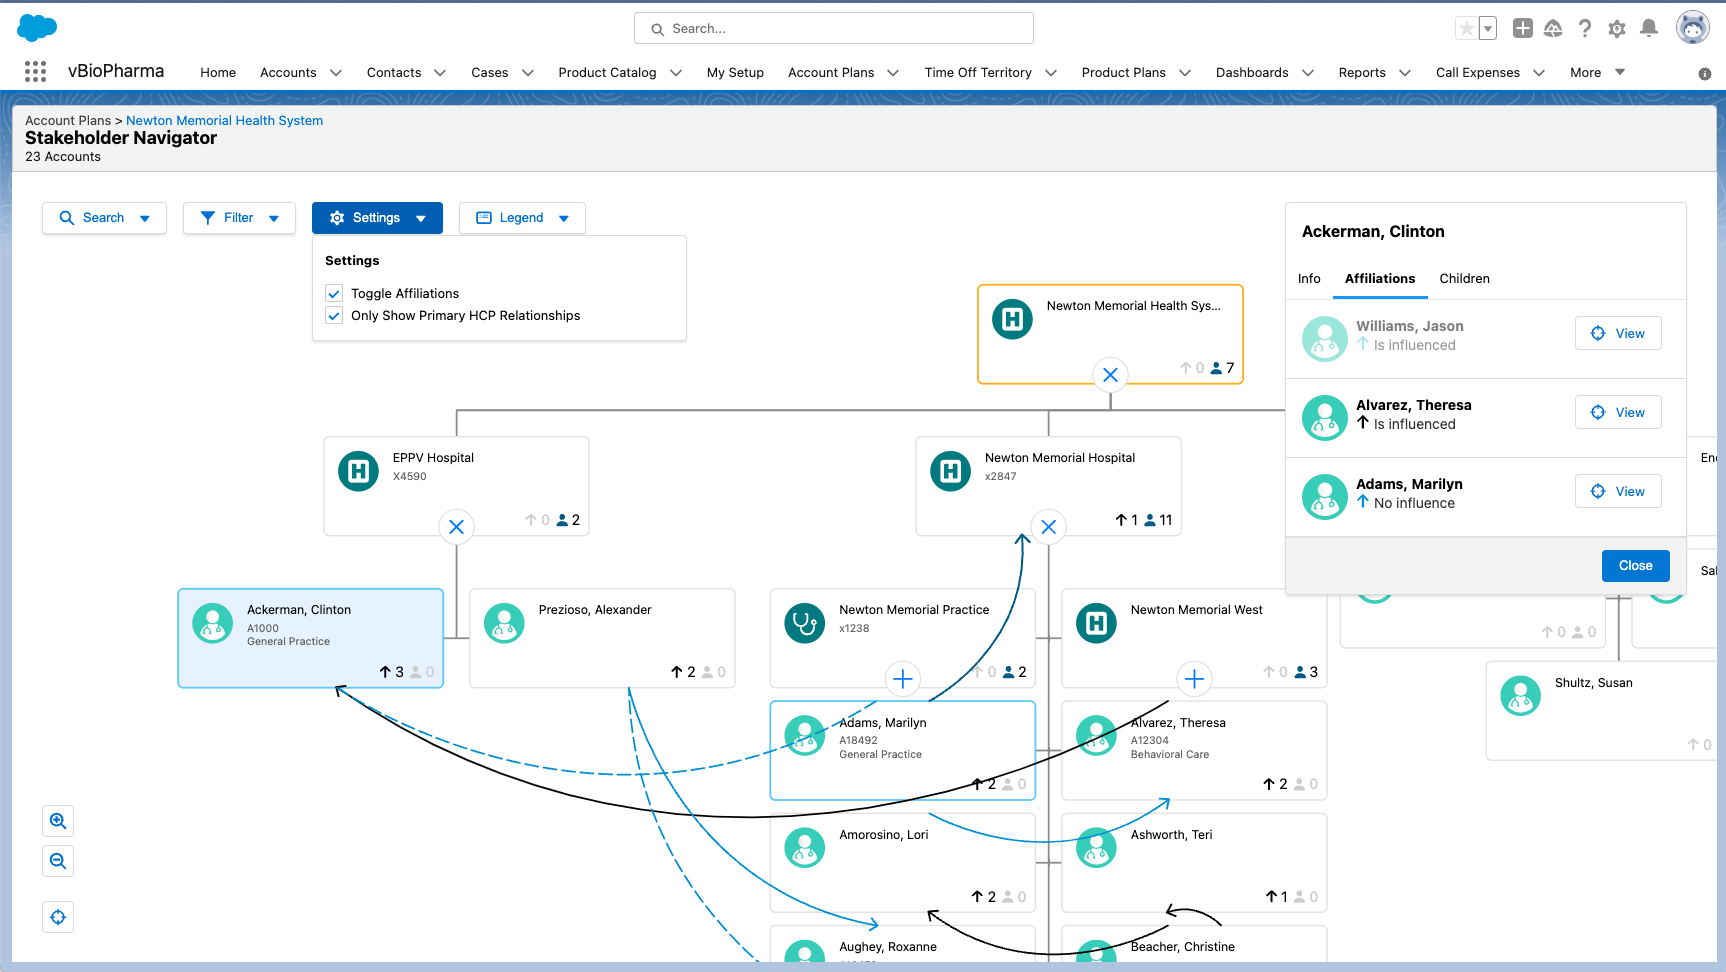
Deleting Affiliations
To delete an existing affiliation:
- Select an account with an affiliation and select the Affiliations tab on the detail modal.
- Select an affiliation from the list.
- Select the Delete button and select OK to confirm the deletion of the affiliation.
Users on the iPad platform are not able to edit or delete an affiliation if either of the accounts in the affiliation is an out-of-territory account.
Modifying Affiliations
To modify an existing affiliation:
- Select an account with an affiliation and select the Affiliations tab on the detail modal.
- Select an affiliation from the list.
- Select the Edit button. The Edit Affiliation modal displays.
- Modify the fields in the Edit Affiliation modal. Changes to the Influence and Relationship Strength fields are reflected in the affiliation line at the top of the modal.
- Select Save.
Users on the iPad platform are not able to edit or delete an affiliation if either of the accounts in the affiliation is an out-of-territory account.
Approved Email
Email Tab
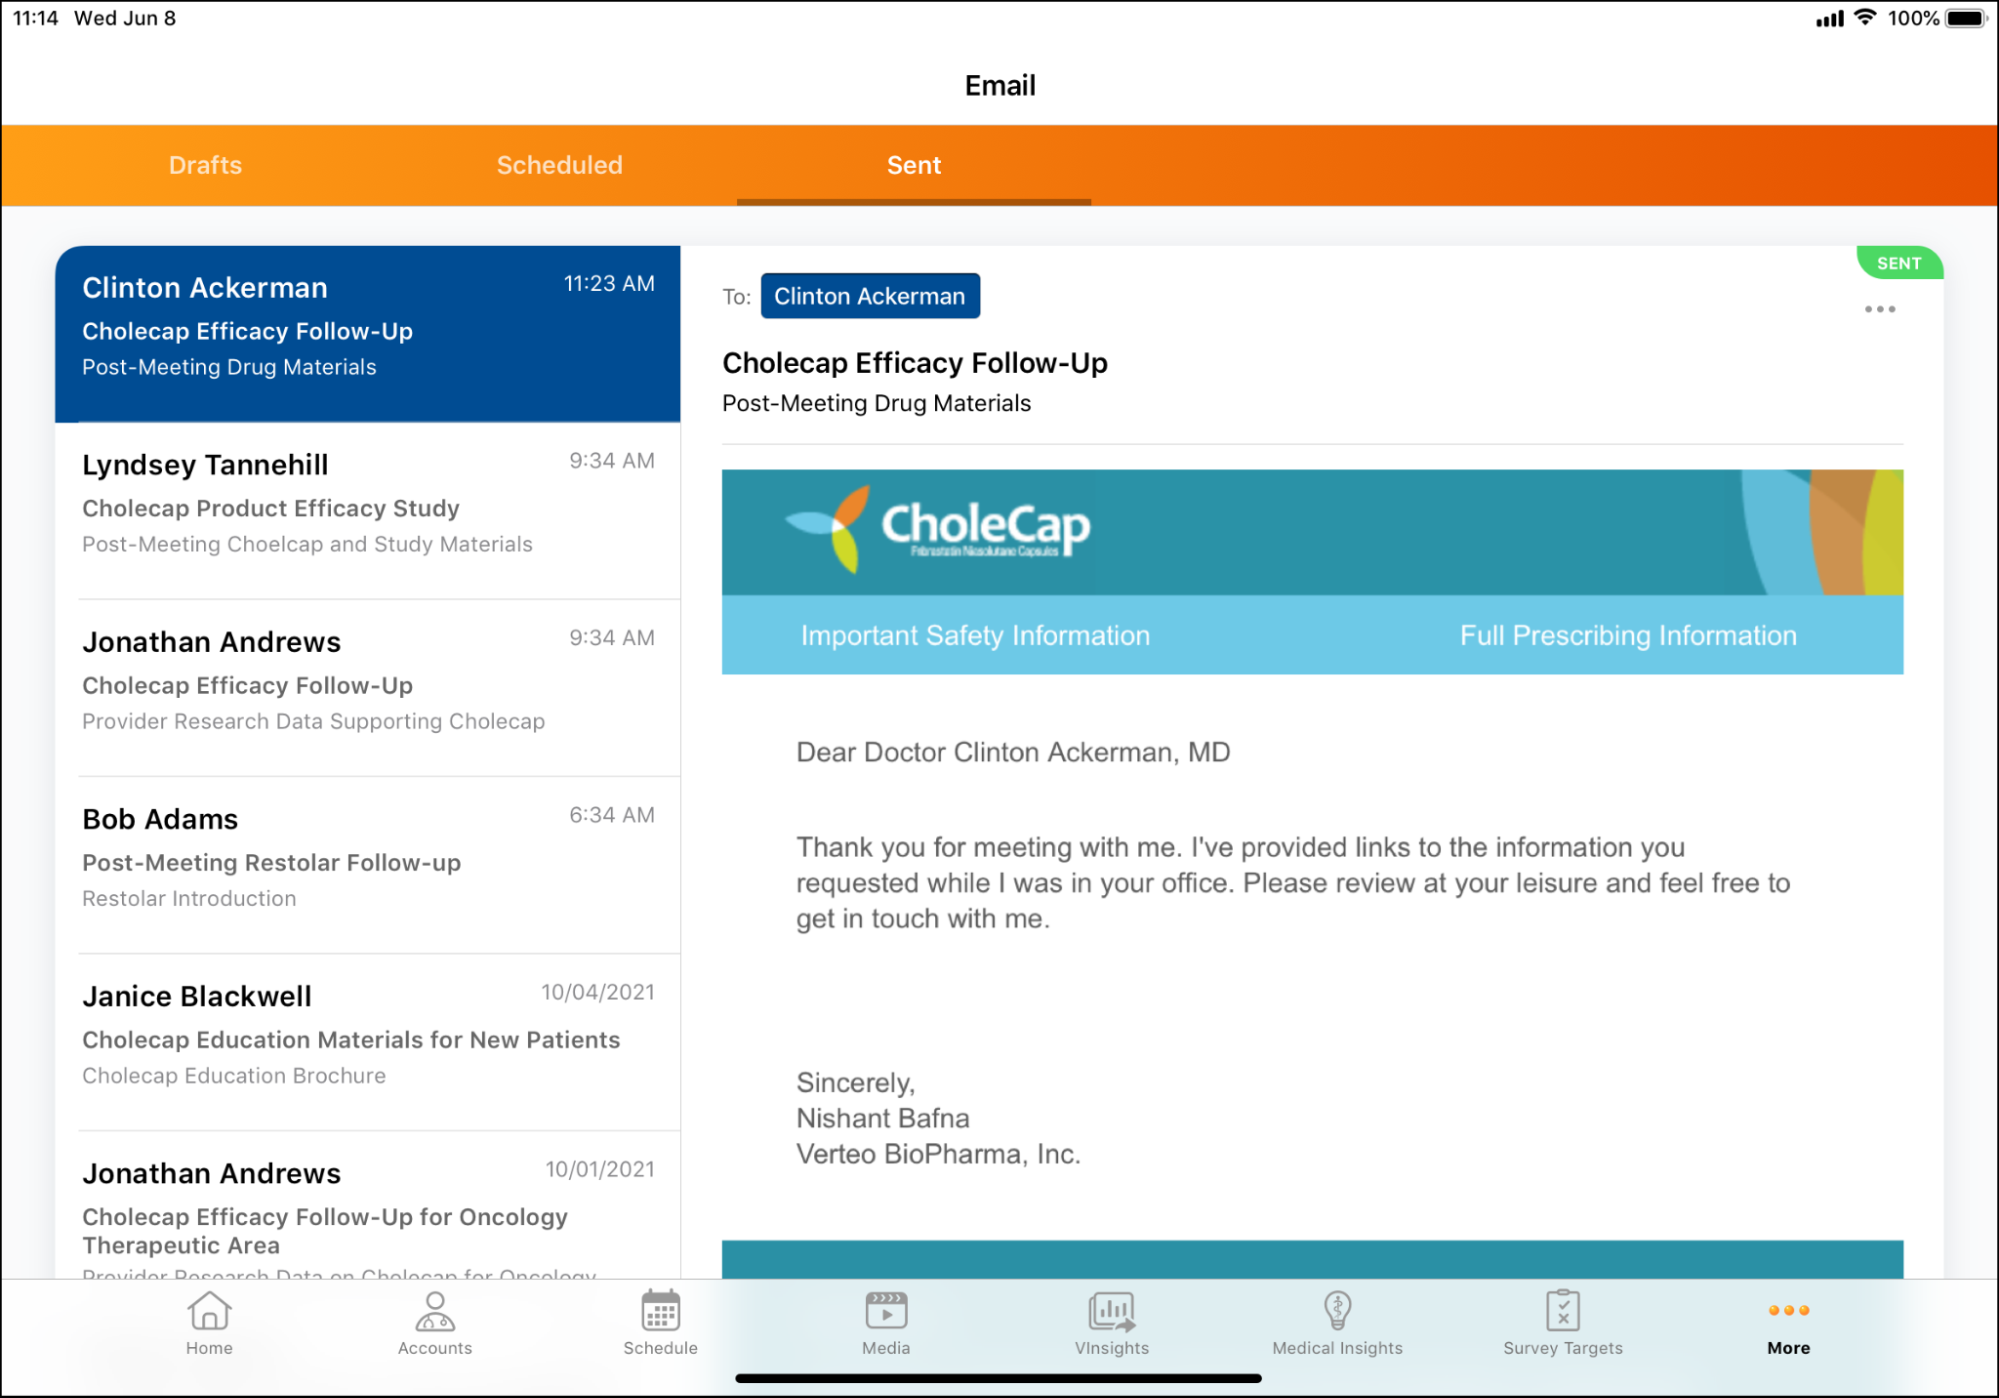
The Email tab provides a centralized location where users can easily access Approved Email functionality. The Email tab is accessed from the CRM menu and includes folders for Draft, Scheduled, and Sent emails.
For example, Sarah Jones begins composing an Approved Email to Dr. Clinton Ackerman. She enters a detailed response in the Free Text field of the email. To verify the accuracy of information in her response, she saves the email as a draft and navigates to Dr. Ackerman’s account. After verifying the information from the account, she accesses the saved draft, finishes editing her response, and sends the finalized email to Dr. Ackerman. She navigates to the Sent folder, where she sees the sent email to Dr. Ackerman and other emails she has sent.
All Approved Emails display in the Email tab, except emails for:
- Consent capture receipts
- Signature transaction receipts
- Consent confirmation
- Events management
Viewing Emails
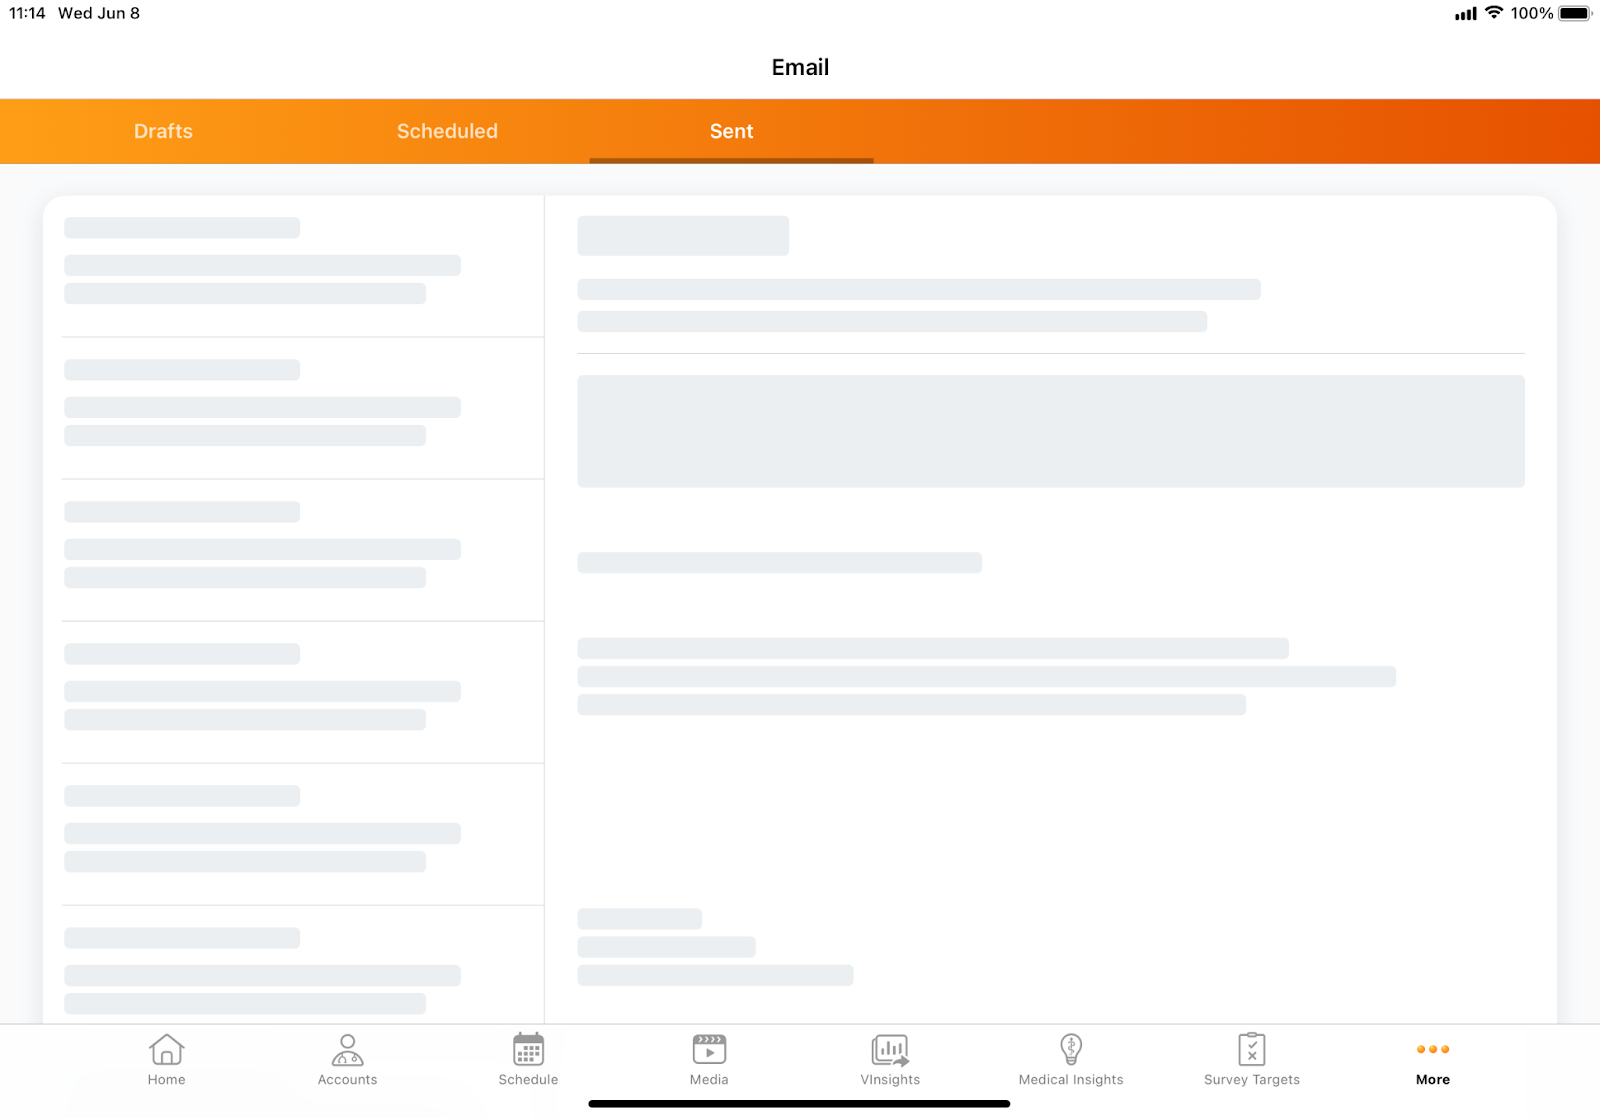
The Email tab displays loading indicators in the List and Preview panes to show that data is still loading. The amount of time the indicator displays depends on how much email data you have.
To view an email, select the row for the email in the side panel. The selected email displays in the Preview window.
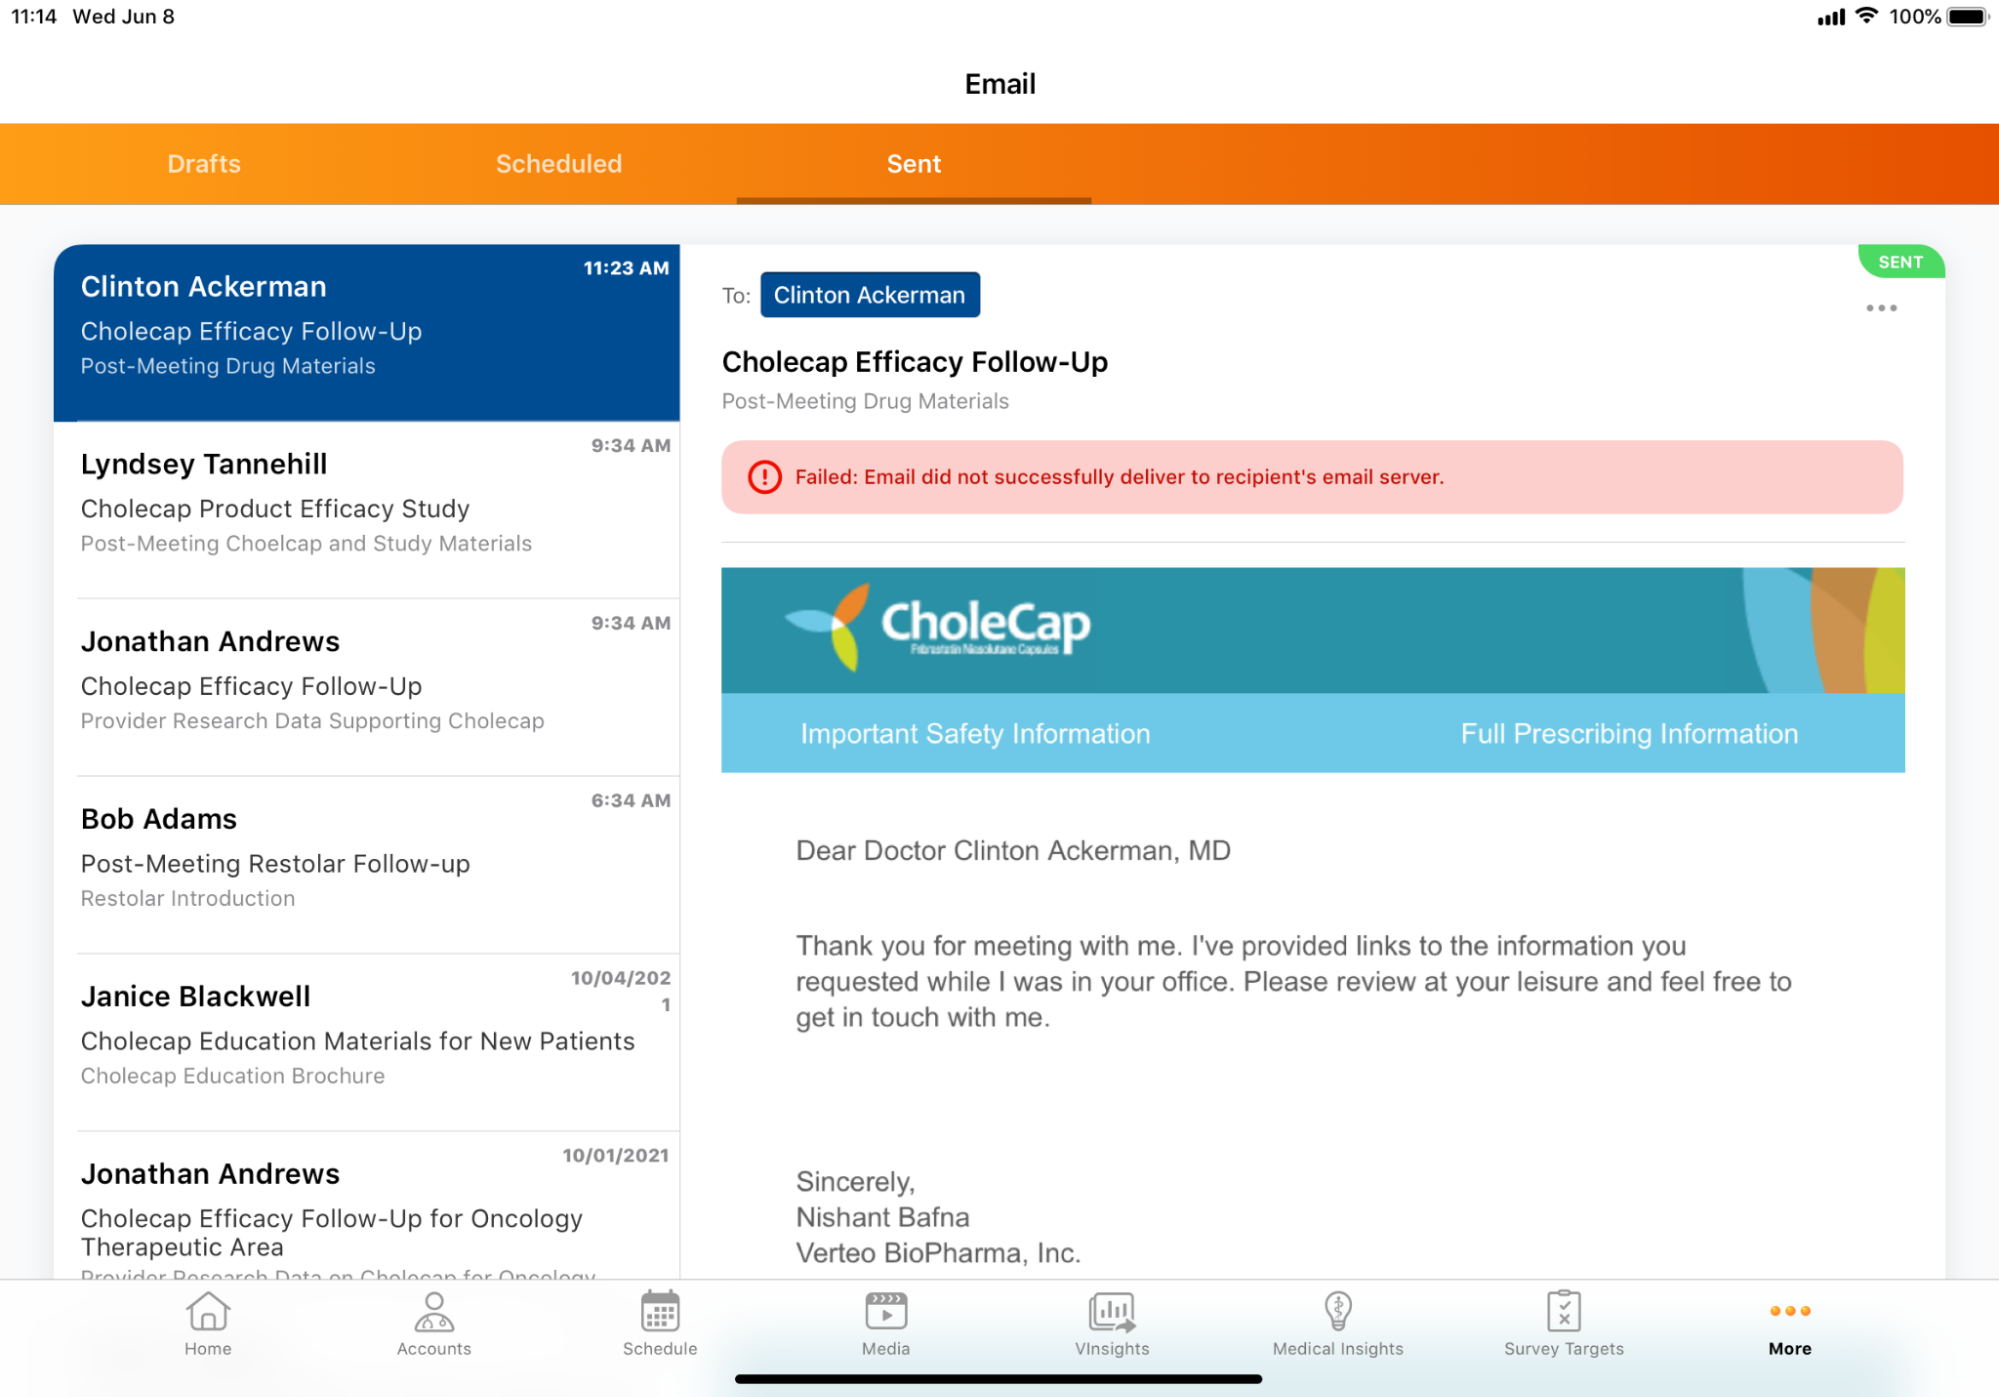
The Sent folder displays each individual recipient as a single row in the side panel. The Preview also displays status messages, for example sent email errors. Error messages display for sent emails with Bounced, Failed, and Rejected statuses.
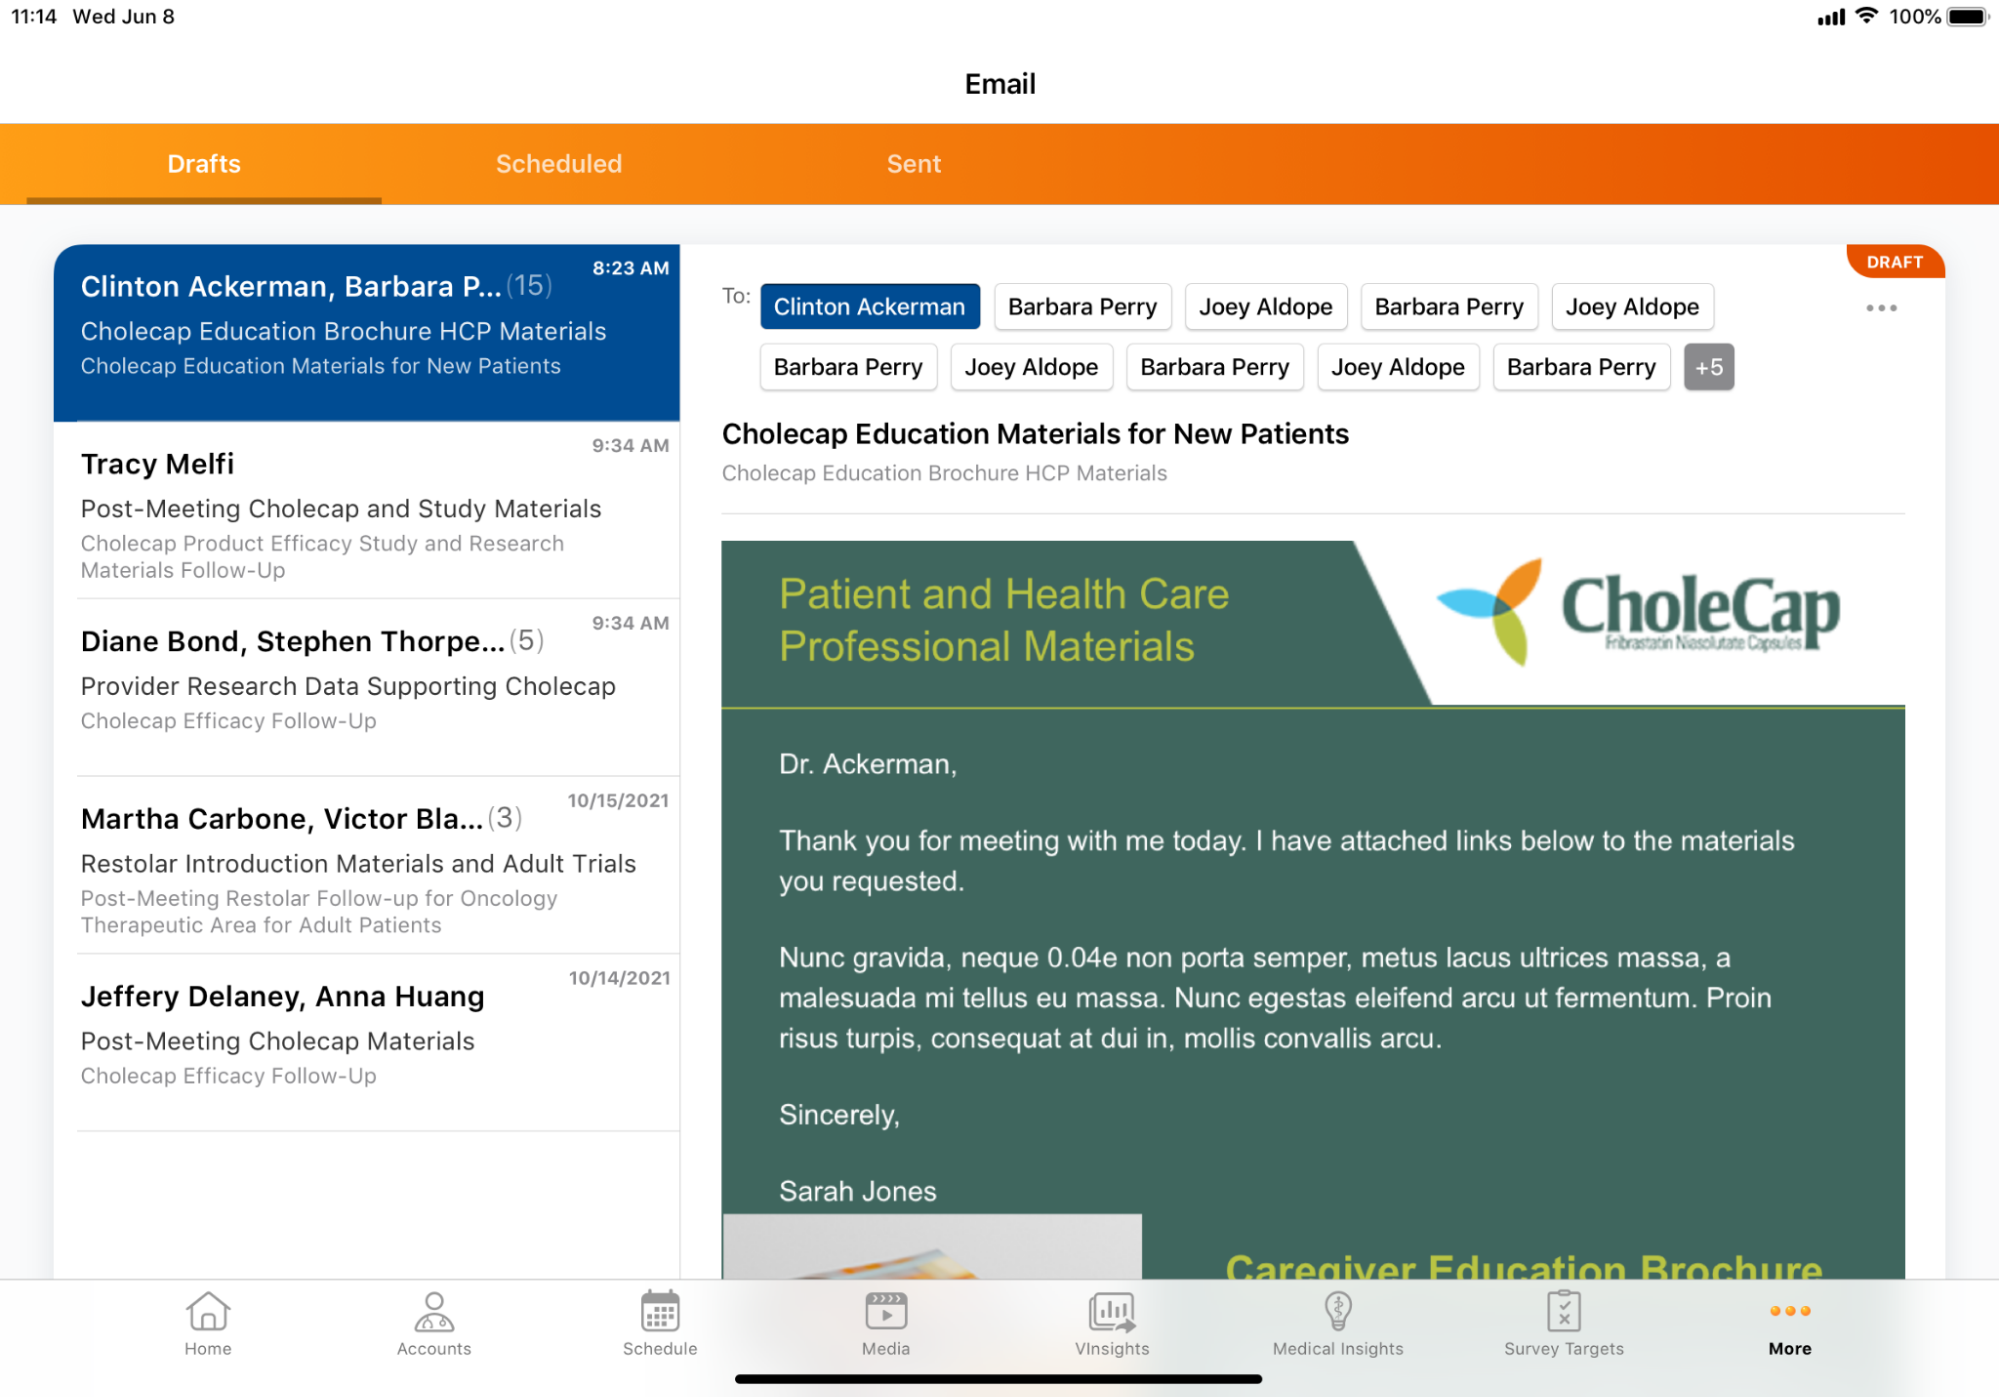
If an email has multiple recipients, the Drafts and Scheduled folders display the recipients as a single row in the side panel. The Scheduled folder also displays the time a message will be sent.
| Drafts Folder | Scheduled Folder |
|---|---|
|
|
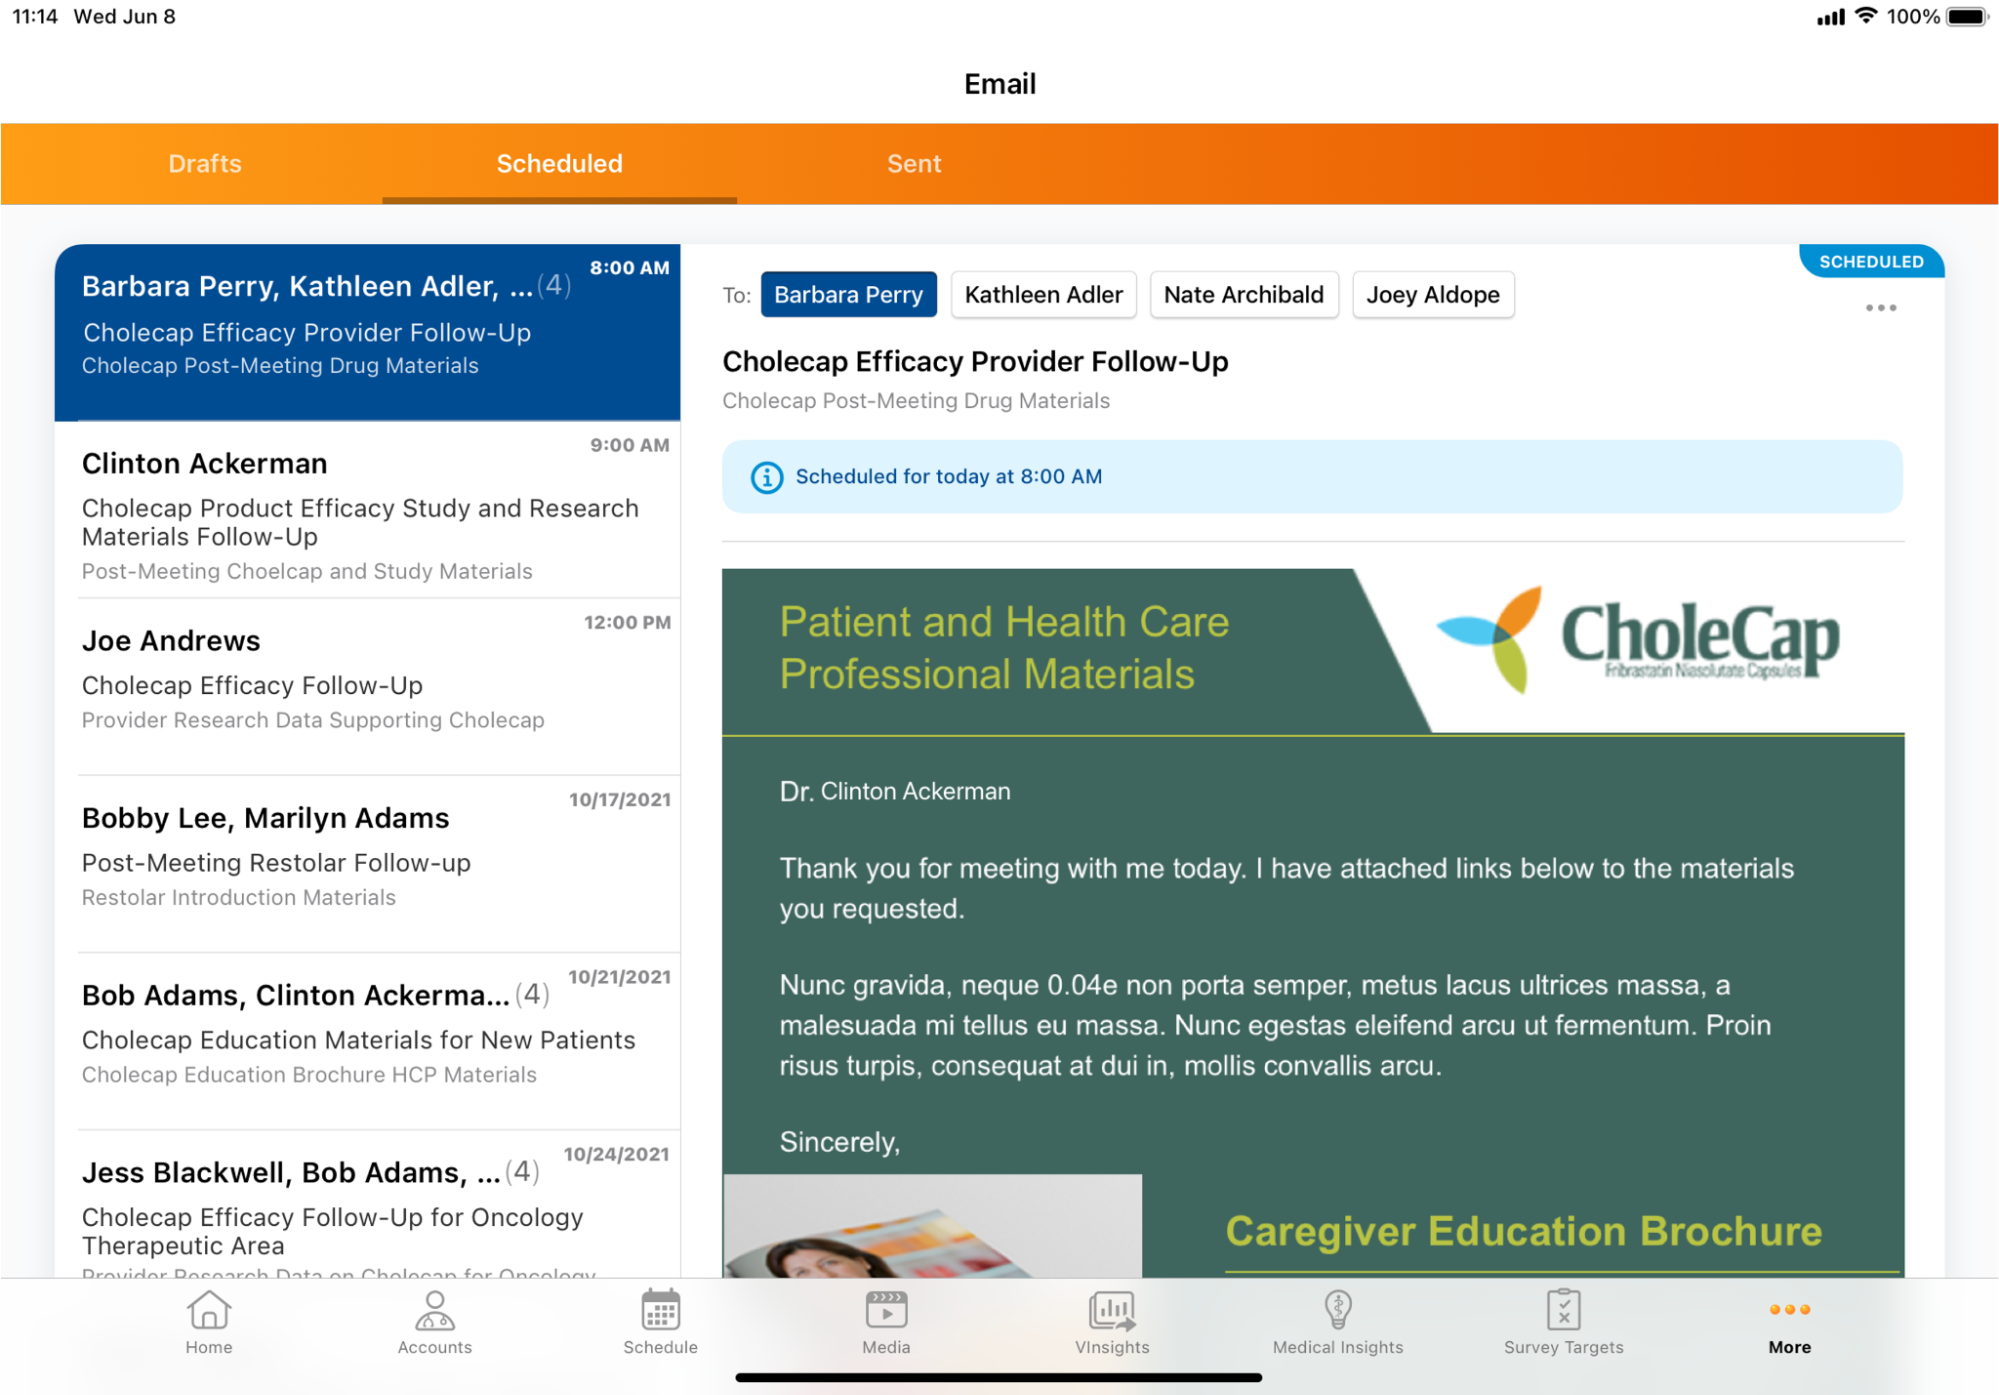
If an email has multiple recipients that exceed the width of the list window, the number of recipients displays in place of the truncated list of names. Select the count indicator to view the hidden recipient names. To view how an email displays for a specific recipient, select the recipient's name in the Preview window.
Editing Drafts or Scheduled Emails
Users are prevented from sending a draft or saving edits to a scheduled email if any errors are present. For details, see Composing Approved Emails. Approved Email performs validation of consent/content based on the latest information any time the user accesses an existing email. Within the Send Email screen, alerts continue to display for applicable errors, for example:
- Consent
- Invalid recipient fields (for example, missing email addresses)
- Allowed/restricted products
- Restricted words
- Required tokens
If a recipient is removed, their respective Sent_Email_vod record is moved to Discarded_vod status. During the sync process, a trigger automatically deletes records found in Discarded_vod status.
To edit a draft or scheduled email:
- Select the row for the email in the side panel. The Preview displays on the right.
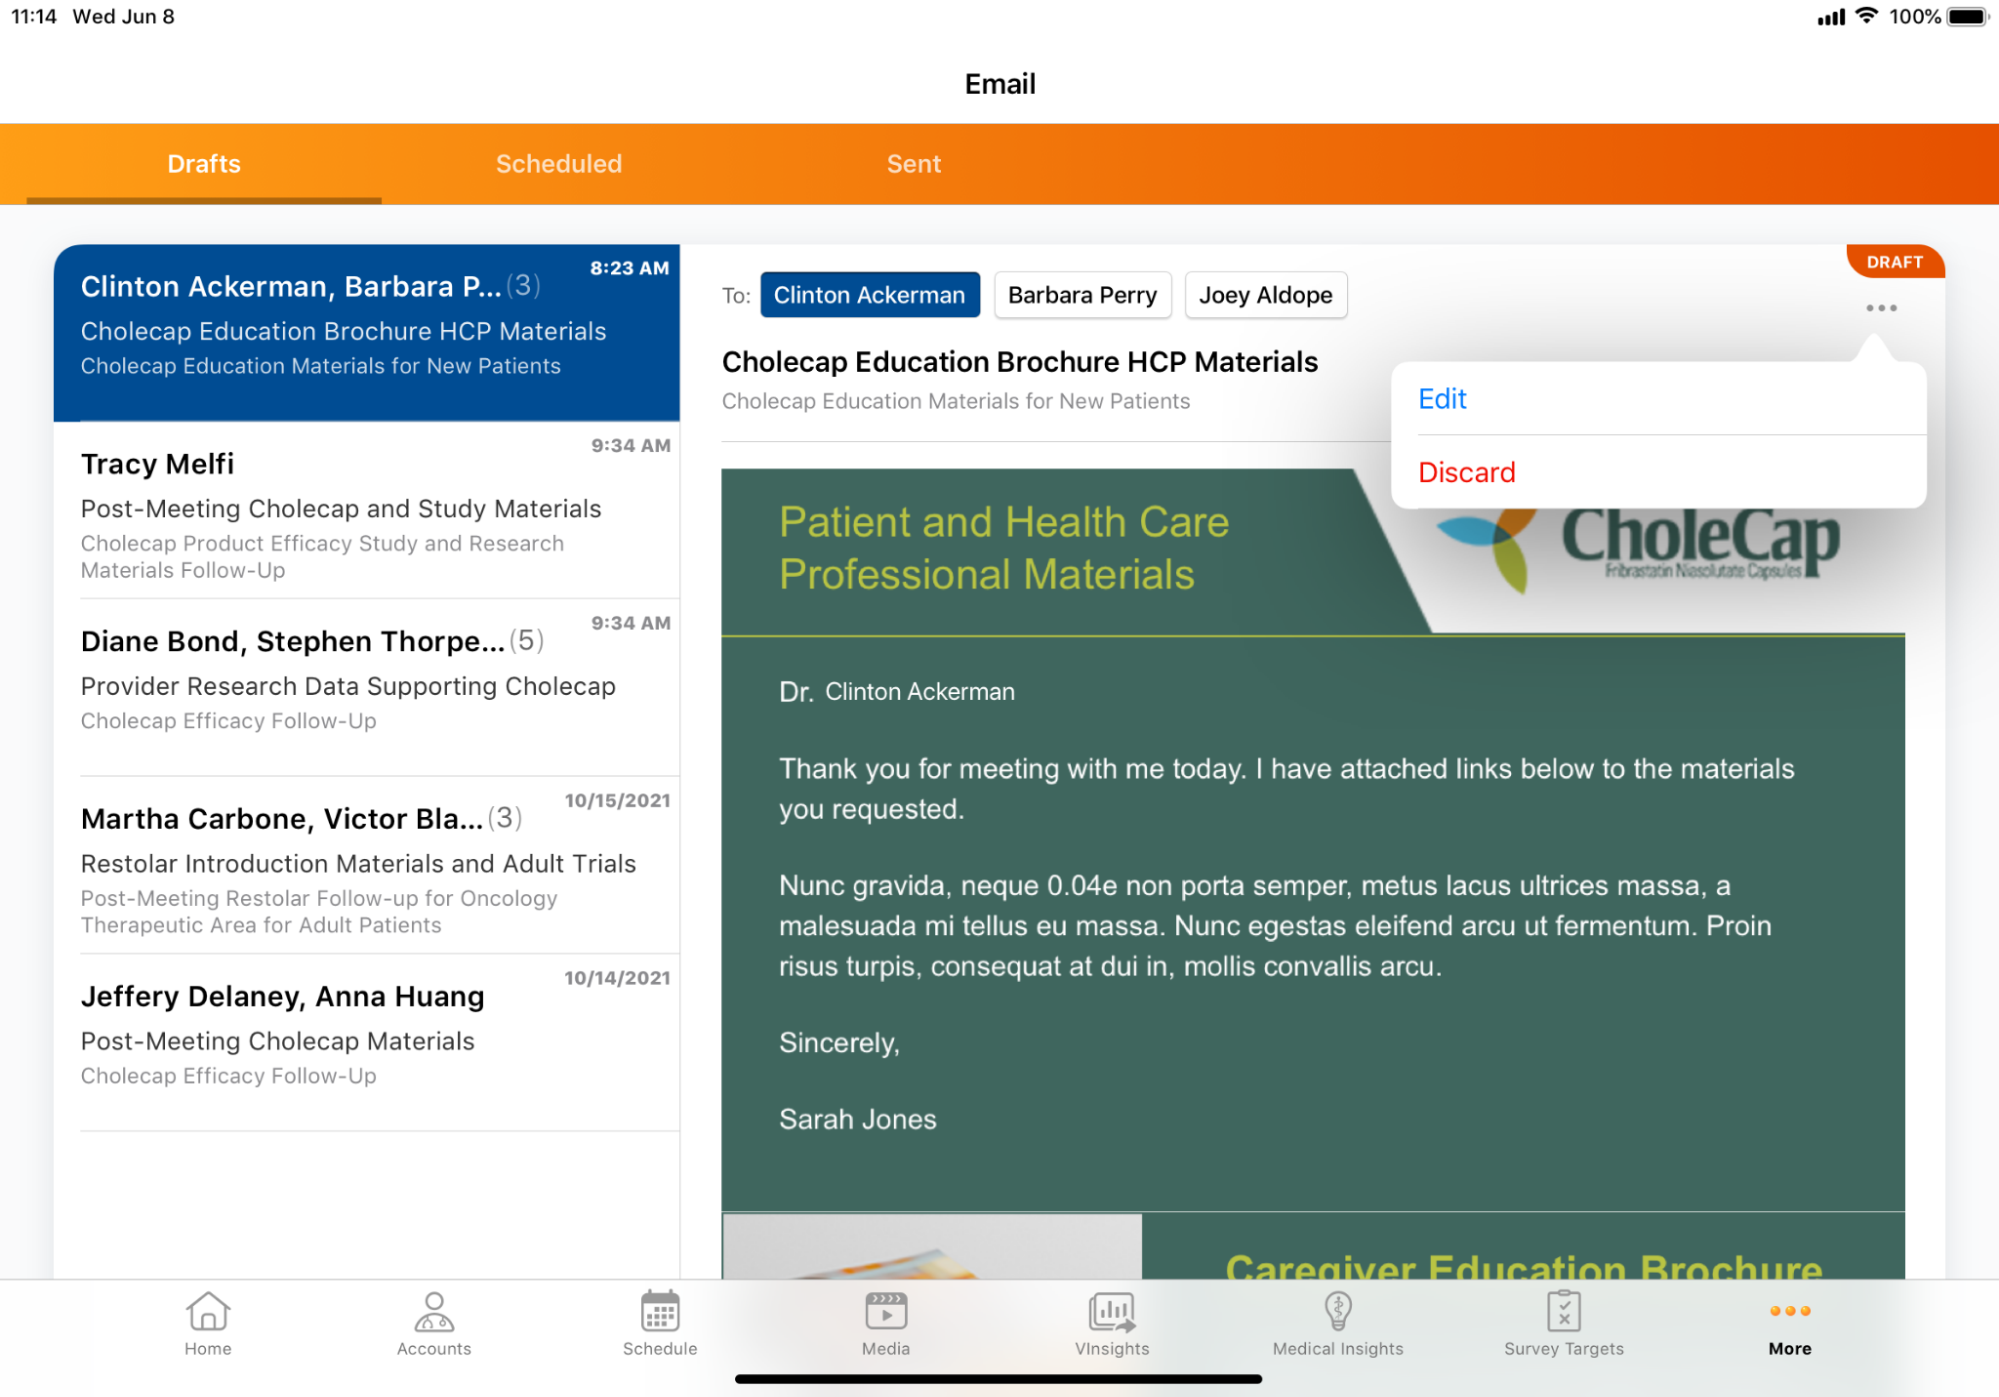
- Select the More Actions button.
- Select Edit to open the email within the Send Email screen.
- Make the appropriate edits.
To save changes made to a draft:
- Select either the Close button or ‘X’ on the individual template tab.
- Select Save Draft.
To save changes made to a scheduled email, perform the Slide to Send action.
The Edit option is not available for scheduled emails created before the 22R2 release.
Discarding Drafts or Scheduled Emails
To discard a draft or scheduled email:
- Select the row for the email in the side panel. The preview displays.
- Select the More Actions button.
- Select Discard.
- Select Discard to discard the message, or Cancel to retain the message.
Discarding an email moves all recipient Sent_Email_vod records to Discarded_vod Status. During the sync process, a trigger automatically deletes records found in Discarded_vod status.
If a user attempts to sync a change to a scheduled email that was sent Online, they are prevented from making the update and a sync error displays.
The Discard option is not available for scheduled emails created before the 22R2 release.
Displaying Errors for Unavailable Content
When a user no longer has access to the email fragments contained in drafts or scheduled emails, Approved Email displays an alert to notify the user.
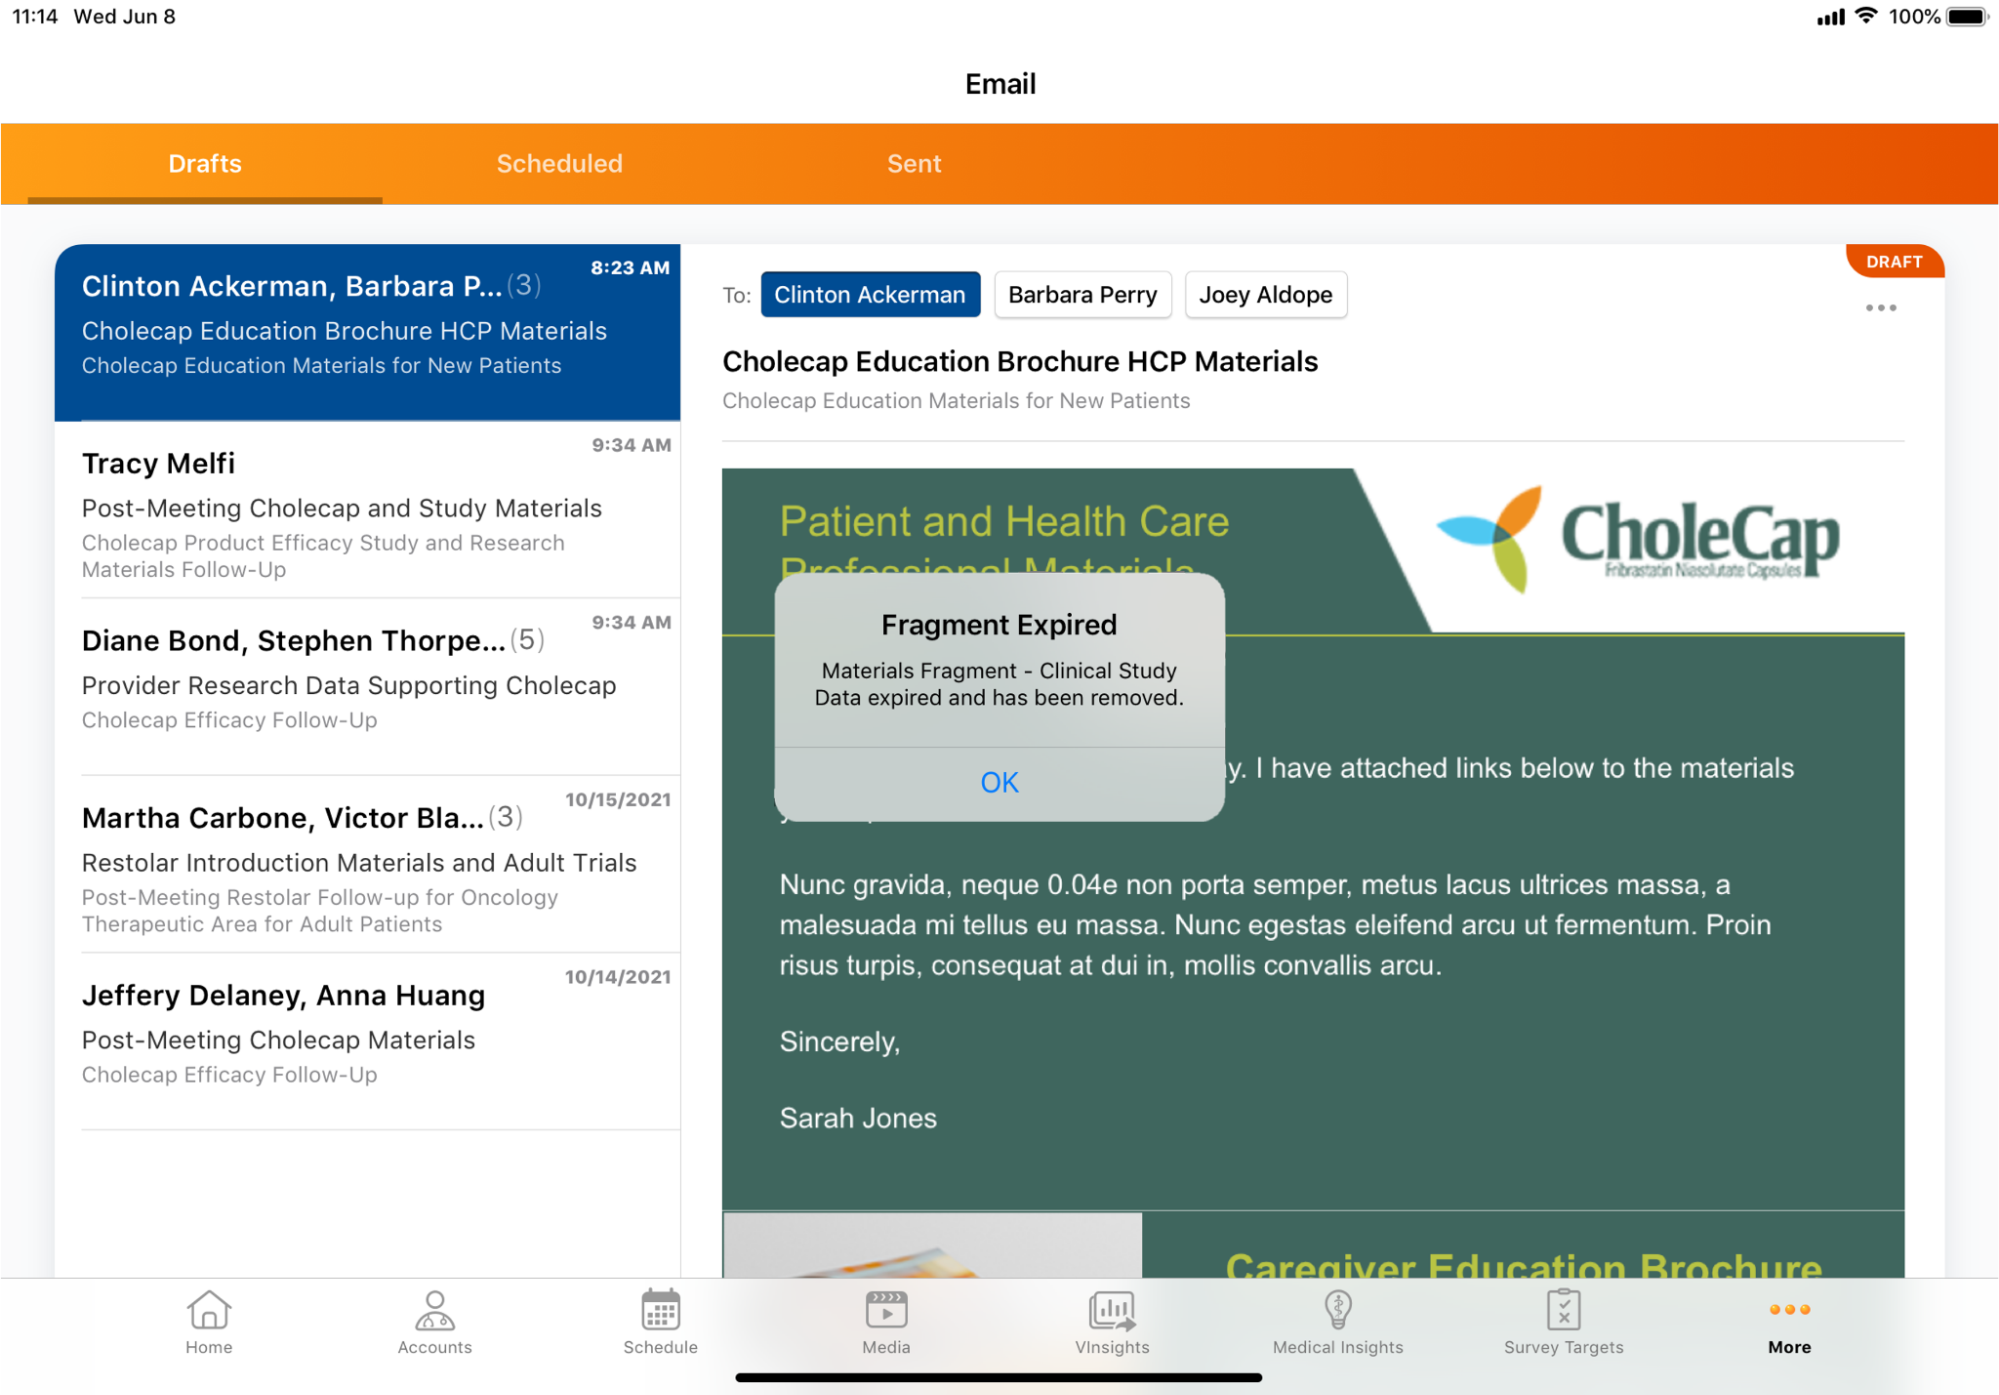
For example, Sarah Jones scheduled an email last month but since then, the email fragment for cholecap efficacy expired. After selecting the More Actions button to edit the email, a warning message displays. Sarah selects Ok to display the Send Email screen and can see the fragment no longer displays.
| Scenario | Behavior |
Alert |
|---|---|---|
| Email Template expires and a new version is not available |
The preview window displays the Email template expired message. The More Actions button only displays the Discard option; editing is not available. |
|
|
Email Fragment record expires |
After selecting Edit from the More Actions button, the user is alerted that the email fragment is expired. Select OK to display the Send Email screen. The Fragment is removed. |
|
|
Email fragment record is restricted |
||
|
User no longer has access to the email template |
An Email template unavailable message displays in the Preview window. The More Actions button only displays the Discard option; editing is not available. |
|
|
User no longer has access to the related entry point record (for example, the Call record) |


Saving Emails as Drafts
Users can save drafts of emails and navigate to other areas of the application without losing their work. This allows users to finish composing email messages at a later date, or leave the page to verify information included in the email message. Users can access saved drafts through the Email Tab Drafts folder.
For example, Sarah Jones begins composing an Approved Email to Dr. Clinton Ackerman. She enters a detailed response in the Free Text field of the email. To verify the accuracy of information in her response, she saves the email as a draft and navigates to Dr. Ackerman’s account. After verifying the information from the account, she accesses the saved draft, finishes editing her response, and sends the finalized email to Dr. Ackerman.
For information on configuring this feature, see the Email Tab.
For information on configuring drafts, see Email Tab.
Saving Drafts
Drafts retain the following information from the email message:
- Any selection made for documents or fragments to be inserted in the email
- Any selection made for picklist values
- Any text entered in Free / Rich Text fields
- Any BCC email addresses entered
Users can save drafts for any email they begin composing from within the Send Email screen. The Save as Draft option is available in the modal opened when selecting the Close button or the X button on an individual template.
- Selecting the Close button provides the option to save drafts for all templates currently open
- Selecting the X button on an individual template provides the option to save a draft for that specific template

Users are permitted to save drafts that have Approved Email validation errors. These existing Approved Email validations (for example, validations for recipient consent, restricted words, and required tokens) do not apply when saving drafts, with the exception of Offline Validation Rules. This allows users to quickly navigate away from Approved Email without losing their work on the composed email.
To return to your saved drafts, select the Email tab.
Drafts display in the Sent related list for the account, but are not actionable. To edit or send drafts, select them from the Email tab.
Considerations
The ability to save and access drafts is not supported for:
Unscheduling Scheduled Emails
Users can reschedule emails that are scheduled for delivery but have not yet been sent. This is available through the Scheduled Email folder from the Email Tab.
For example, Sarah Jones schedules an email to Dr. Ackerman containing information about Cholecap. She schedules the email to be sent the day before her upcoming call with Dr. Ackerman. Due to unforeseen circumstances, Sarah is unable to meet as planned, and schedules the call for a later date. She opens the scheduled email from the Email tab, selects the  button, selects a later date, and selects Save.
For information on configuring this feature, see the Email Tab.
Unscheduling Emails
To reschedule a scheduled email:
- Navigate to the Email Tab and select the row for the email in the side panel. The preview displays.
- Select the More Actions button.
- Select Edit.
- Select the button.
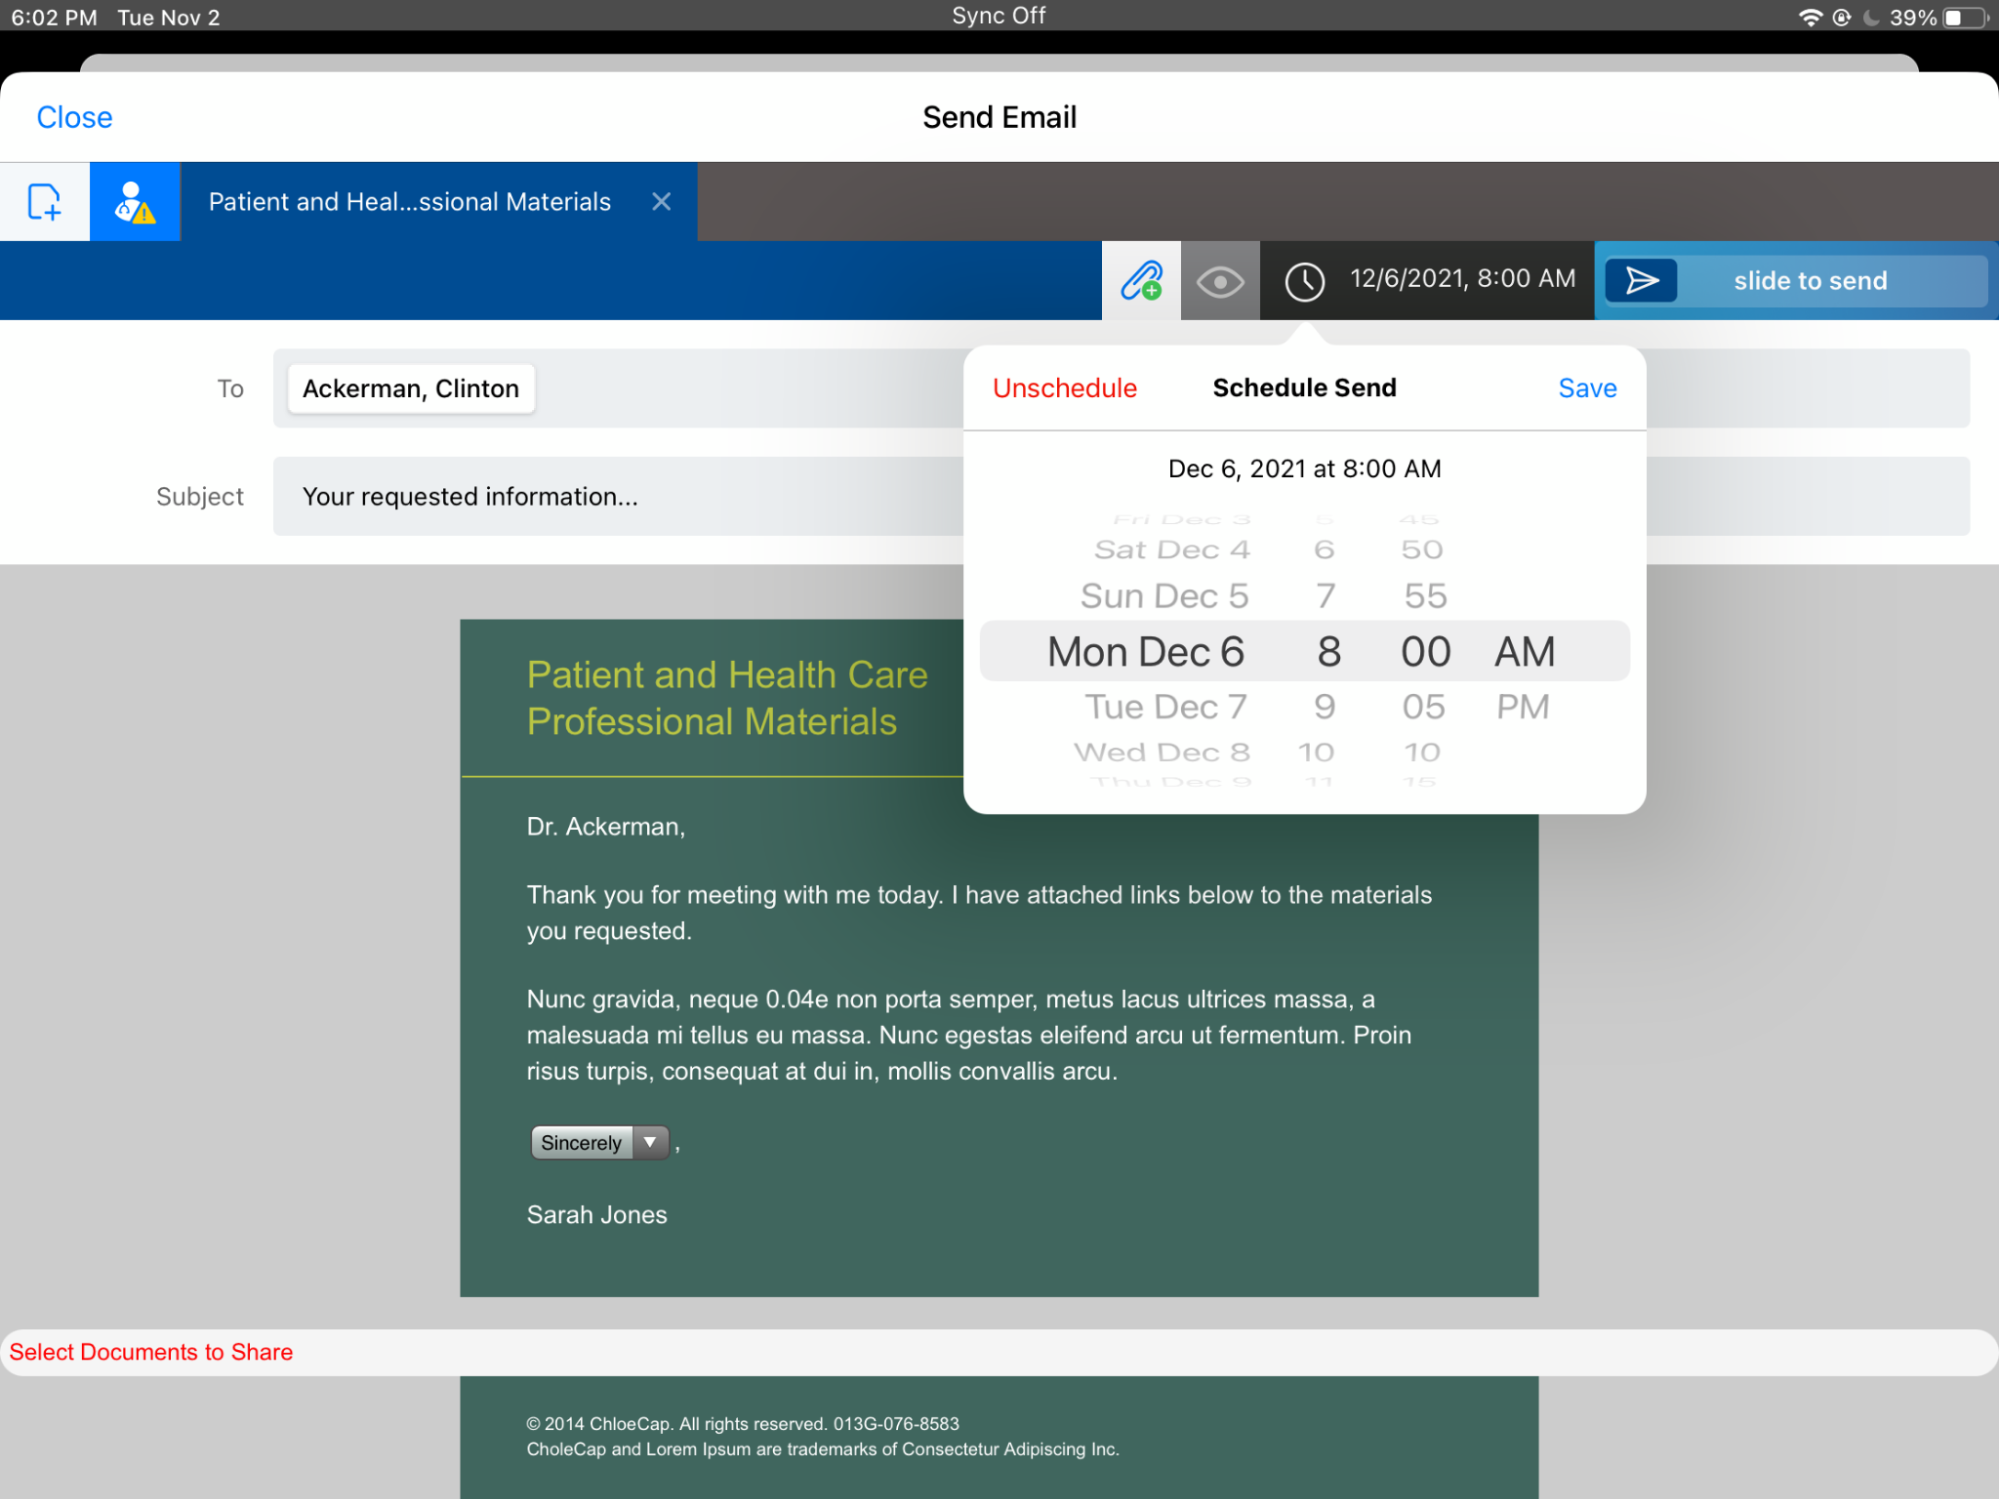
- Select a new date and time for the scheduled email and select Save, or select Unschedule to prevent sending of the email.
The Unschedule action moves the corresponding scheduled email records to Discarded_vod status. During the sync process, a trigger automatically deletes records found in Discarded_vod status.
Formatting Tokens to Display Date and Time
Content creators can edit Approved Email tokens that reference dates and times to specify their own datetime format. This expands flexibility when creating content that may reference dates and times in multiple ways.
For example, Alice Adams is a content creator who creates an Approved Email Template to serve as an invitation to events. She wants the invitation to display the date and day of the week that the event takes place on. She adds the {{EM_Event_vod__c.Start_Time_vod__c(eeee MMMM dd, yyyy)}} token to the template, which specifies the appropriate date and time format. Later, when Sarah Jones uses this template to serve as invitations to her upcoming event, she previews the invitation and sees the Start_Time_vod field render in the format Alice specified.

Specifying the Format of a Date or Time Token
The following Approved Email tokens are supported in Approved Email Templates, Fragments, and Template Fragments:
- {{ObjectAPIName.FieldAPIName}}
- {{ObjectAPIName.RelationshipName.FieldAPIName}}
-
{{Object1APIName.FieldAPIName;;Object2APNIName.FieldAPIName}}
The field to formatting must be listed last in the list of tokens.
- {{parentCallDatetime}}
- {{insertCallSample}}
- {{insertMedicalInquiry}}
- {{insertOrderLine}}
- {{customText[##mergeToken1##|##ObjectAPIName.FieldAPIName##]}}
Formatting tokens to display date and time are not supported in Event Materials print invitation templates.
To specify the format for a rendered date or time:
- Add the (FORMAT) placeholder parameter to the appropriate token. For example, {{parentCallDatetime}} becomes {{parentCallDatetime(FORMAT)}}.
-
Replace the FORMAT placeholder with the appropriate format. Supported format elements include:
Element
Supported Field Types
Format
Description
Example Token
Example Output
Year
DateDate/Time yyyy
Full year
{{parentCallDatetime(MMMM d, yyyy)}}
April 1, 2022
Month
DateDate/Time M
Numeric month
{{parentCallDatetime(M d, yyyy)}}
4 1, 2022
MM
Numeric month with padded 0 if the value is less than 10
{{parentCallDatetime(MM d, yyyy)}}
04 1, 2022
MMM
Translated shortened month name
{{parentCallDatetime(MMM d, yyyy)}}
Apr 1, 2022
MMMM
Translated month name
{{parentCallDatetime(MMMM d, yyyy)}}
April 1, 2022
Day
DateDate/Time d
Numeric day
{{parentCallDatetime(MMMM d, yyyy)}}
April 1, 2022
dd
Numeric day with padded 0 if the value is less than 10
{{parentCallDatetime(MMMM dd, yyyy)}}
April 01, 2022
Weekday
DateDate/Time eee
Translated shortened day of the week
{{parentCallDatetime(eee, MM/dd)}}
Fri, 04/01
eeee
Translated day of the week
{{parentCallDatetime(eeee, MM/dd)}}
Friday, 04/01
Hour
Date/TimeTime h
Hour (12-hour time)
{{parentCallDatetime(eee, h:mm a)}}
Fri, 2:00 pm
hh
Hour (12-hour time) with padded 0 if the value is less than 10
{{parentCallDatetime(eee, hh:mm a)}}
Fri, 02:00 pm
H
Hour (24-hour time)
{{parentCallDatetime(eee, H:mm)}}
Fri, 14:00
HH
Hour (24-hour time) with padded 0 if the value is less than 10
{{parentCallDatetime(eee, HH:mm)}}
Thur 08:00
Minute
Date/TimeTime mm
Minute
{{parentCallDatetime(eee, h:mm a)}}
Fri, 2:00 pm
AM/PM
Date/TimeTime a
Use with 12-hour time elements to designate AM vs PM
{{parentCallDatetime(eee, h:mm a)}}
Fri, 2:00 pm
Additionally, content creators can add spaces, non-breaking spaces ( ), or any of the following single character symbols to separate format elements:
- Grave `
- Up caret ^
- Underscore _
- Dash -
- Colon :
- Question mark ?
- Period .
- Plus +
- Equals =
- At symbol @
- Asterisk *
- Forward-slash /
- Back-slash \
- Ampersand &
- Tilde ~
- Dollar sign $
- Comma ,
- Semi-colon ;
For example, {{parentCallDatetime(eeee, MMMM d yyyy @ h:mm a)}} renders as:
Friday, April 1 2022 @ 12:30 pm
Brackets [ ], Curly brackets {}, and the # character are not supported for separating format elements.
Considerations
- Content creators should thoroughly test all content that formats dates and times via this feature
- Months and days of the week automatically translate based on the sender’s language
- Formatting is not supported with the {{customContent}} token used to query Approved Email data
- Tokens without any datetime formatting will render in Salesforce’s default MM/dd/yyyy for dates and yyyy-MM-ddThh:mm:ss for datetimes
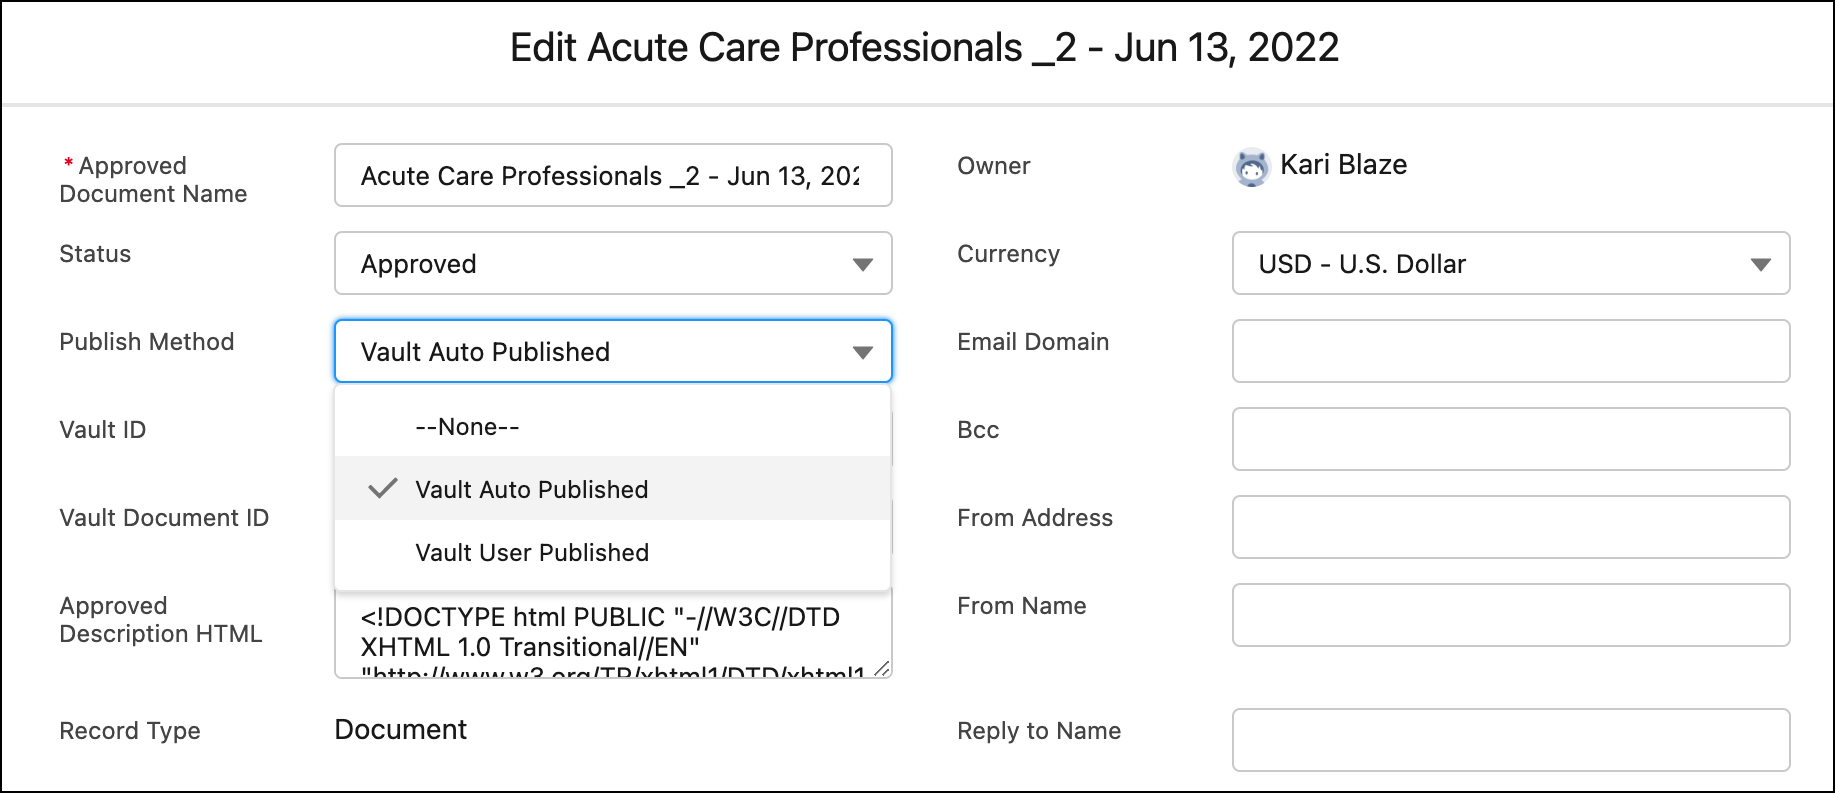
Publishing Method for Email Fragments
To understand the distribution of manually uploaded and auto-published email fragments synced from Vault, CRM Admin users can view the publish method, which displays how email fragments were created. Users can auto-publish Approved Email fragments in bulk from Veeva Vault. In CRM, admins can view the publish method of email fragments in Approved Documents.
To distinguish between the auto-published and user-generated Email Fragments in CRM, open the Approved Documents in the browser and view the Publish Method value.
Publish Method values:
- Vault Auto Published - Email Fragments that are auto published in Vault and then synced to CRM
- Vault User Published - Email Fragments that are user generated in Vault and then synced to CRM, Email Templates synced from Vault
- CRM Auto Published - Email Fragments that are uploaded directly to CRM
For example, Verteo Biopharma decides to make all of their content in Vault available to send via Approved Email. John Howard, a Vault Admin, uses a bulk process to select which documents are available for Approved Email, and a Vault process automatically creates email fragments based on pre-set rules. When the email fragments get synced to Veeva CRM via AE sync, Sarah Jones is able to see those email fragments in Approved Email, with a Publish Method set to Vault Auto Published.
CLM
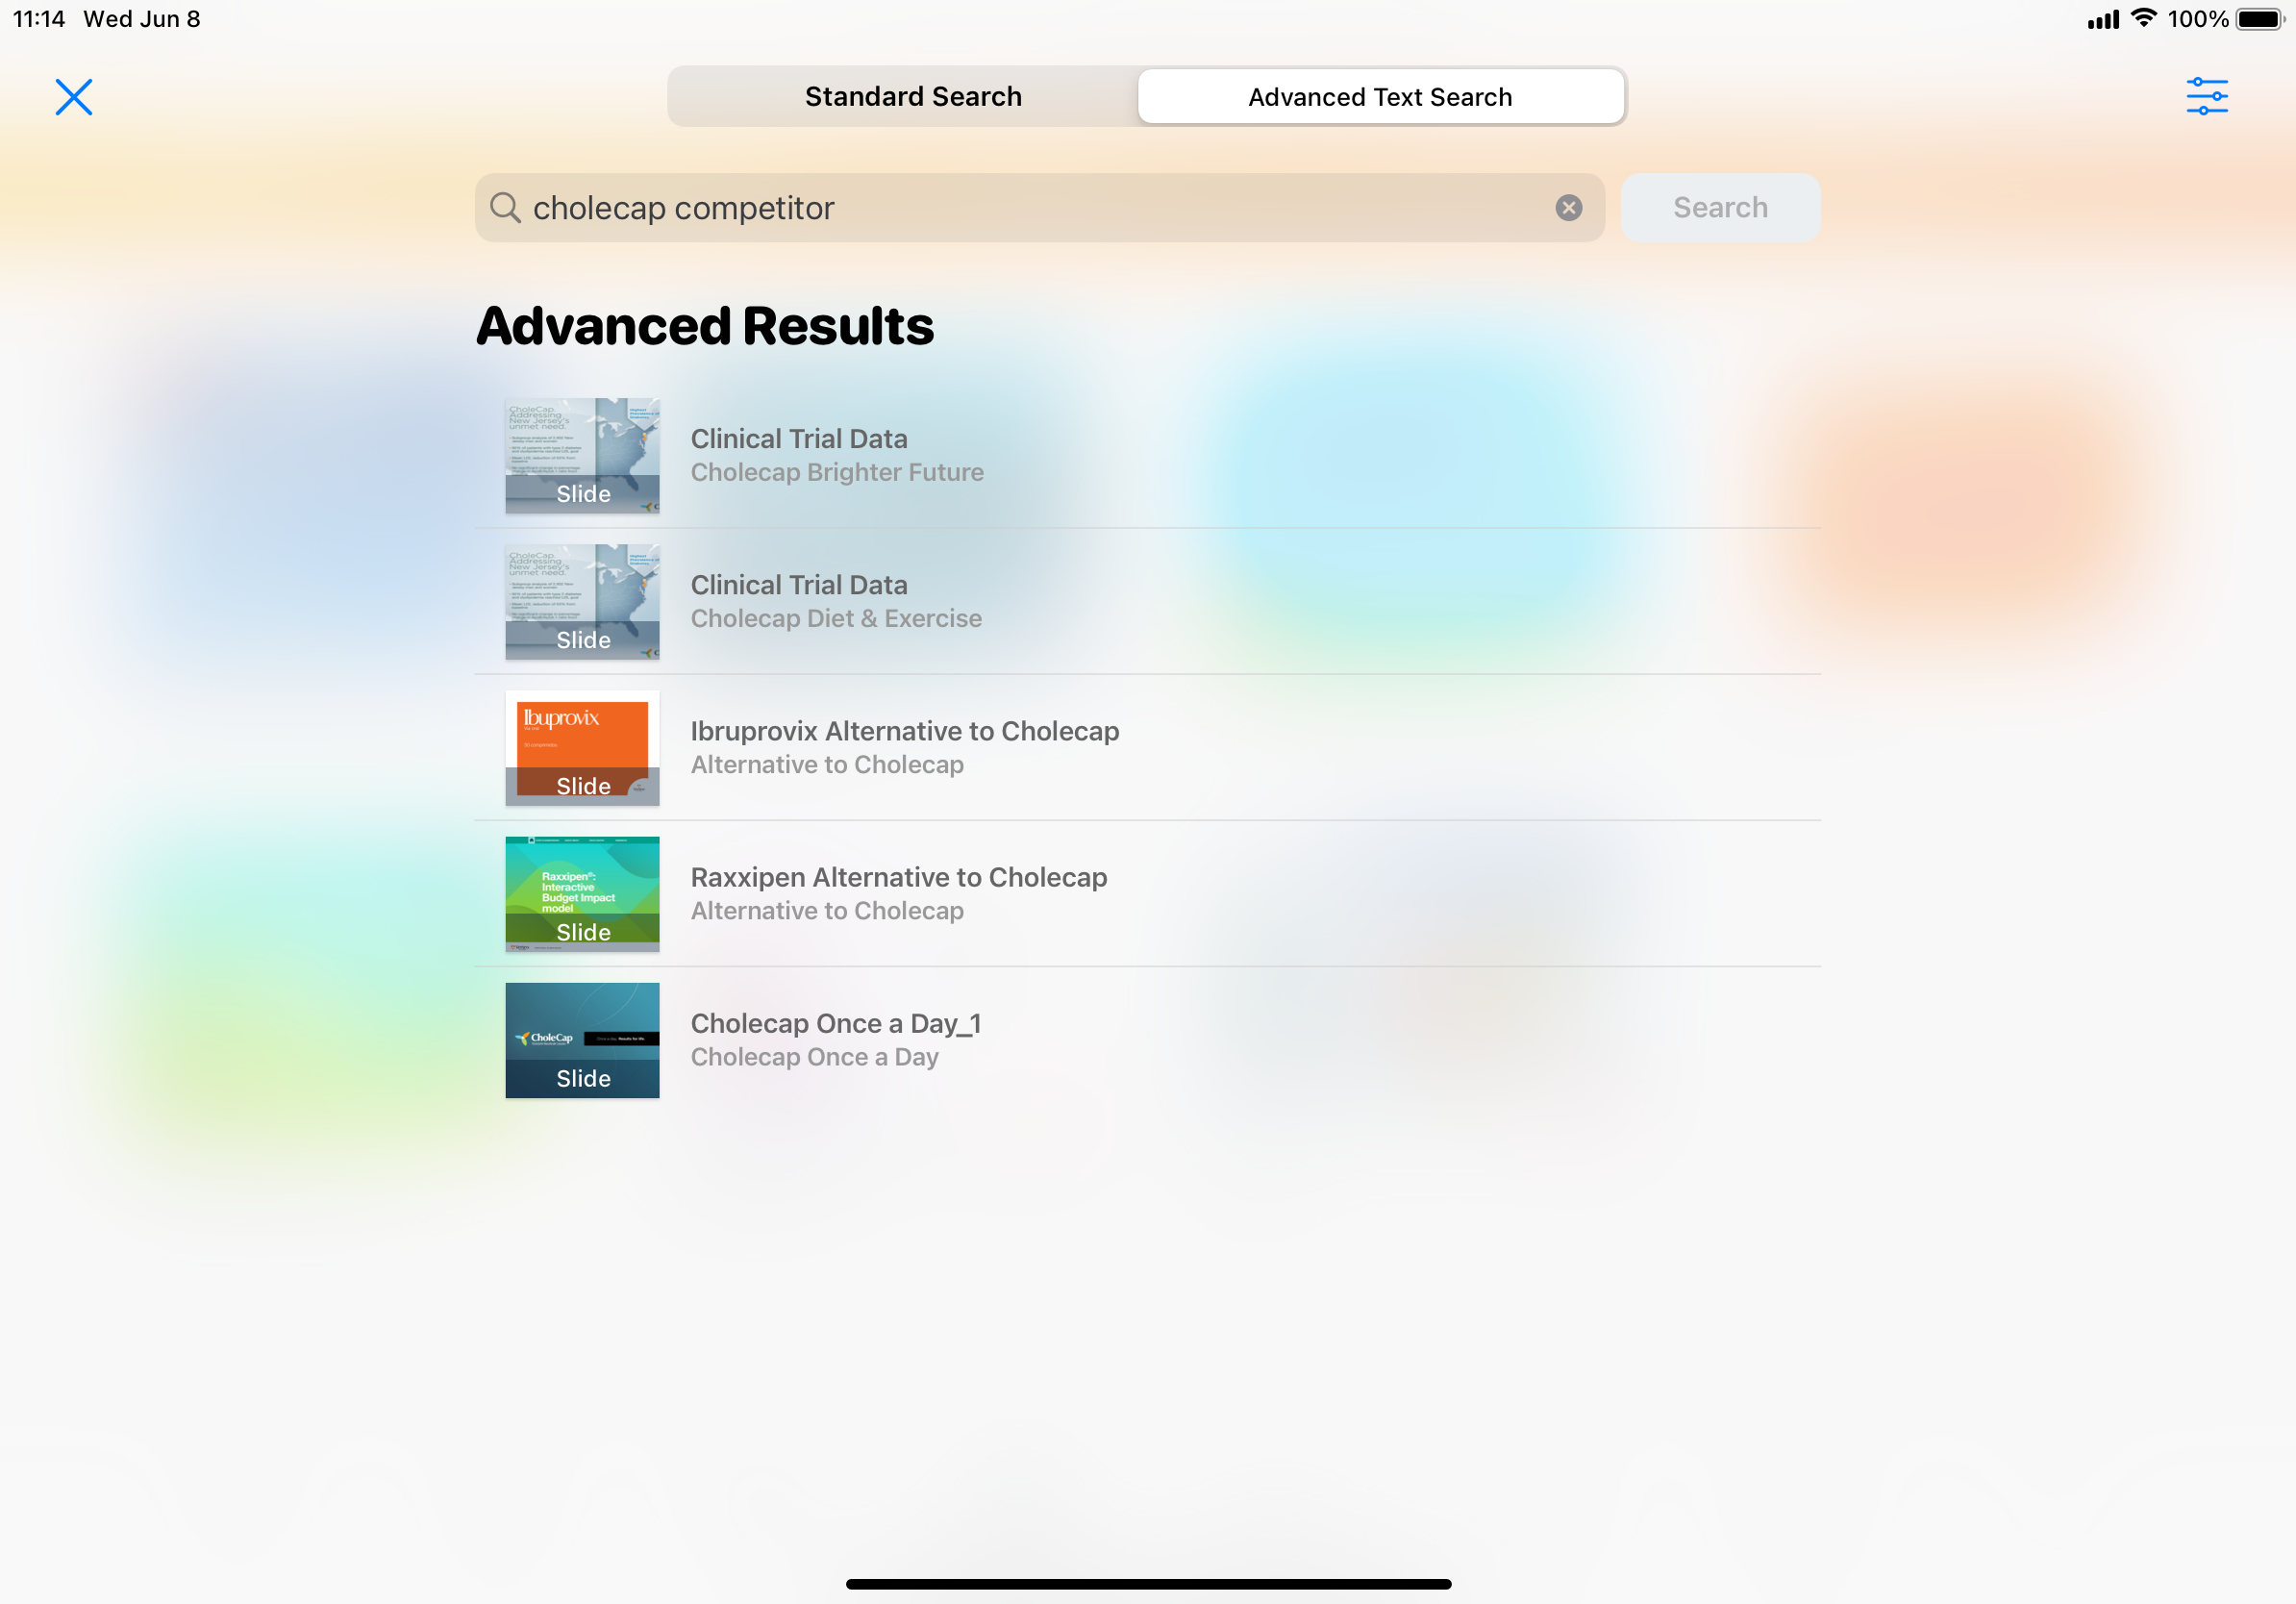
Using Advanced Text Search in the Media Library
When searching for CLM content in the media library, users can use advanced text search to easily locate the presentation slide containing the searched text and navigate directly to the slide. Users can also filter the search results using the configured filters. This allows users with large media libraries to quickly find presentations by using search terms related to the content and narrowing down long lists of search results with filters.Advanced text search only supports approved content.
The following CLM content types are supported:
- PowerPoint
Text in images in PowerPoint presentations is not supported.
- PDF
Protected PDF renditions in Vault are not supported.
- HTML
When manually uploading a distribution package for HTML content to Vault, ensure a high resolution (more than 300 DPI) poster.png image is included in the package. This allows HTML content to display in advanced text search results. See Manually Uploaded Distribution Packages for more information.
- Images
Using Advanced Text Search in the Media Library
Advanced text search behaves as follows:
- It is not case sensitive
- It searches the text within presentation slides
- It is not a type-ahead search. Users must enter the search terms and select Search or select the Enter key to start the search.
- At least two characters must be entered to start a search
- Search results include partial matches to search terms using a Starts With condition. For example, search results for chole* includes presentations mentioning Cholecap
- Search results include matches for multiple word search terms, for example, search results for Cholecap Restolar includes presentations mentioning both Cholecap and Restolar
A list of presentation slides displays in the search results, restricted by the user’s visibility to the presentations in the media library. When searching for presentations during a call, restricted products, allowed products, and segmentations are all respected and only display what is available for the account.
Emojis larger than 4 bytes cannot be searched.
To apply filters to the search results, select the filter icon and select the appropriate filters. See Using Presentation Attributes to Filter Presentations for more information about configuring and using filters.
Search results and filters do not reset when navigating between standard search and advanced text search.
Users can easily navigate between standard search and advanced text search in the search bar. Standard search is selected by default. See Searching the Media Library for more information about using standard search.
If the search results do not display the expected results, users with large media libraries should include multiple words in their search terms.

Users must have an active internet connection to use advanced text search.
On the iPad platform, users can select the search icon to display the search screen and select the Advanced Text Search tab.
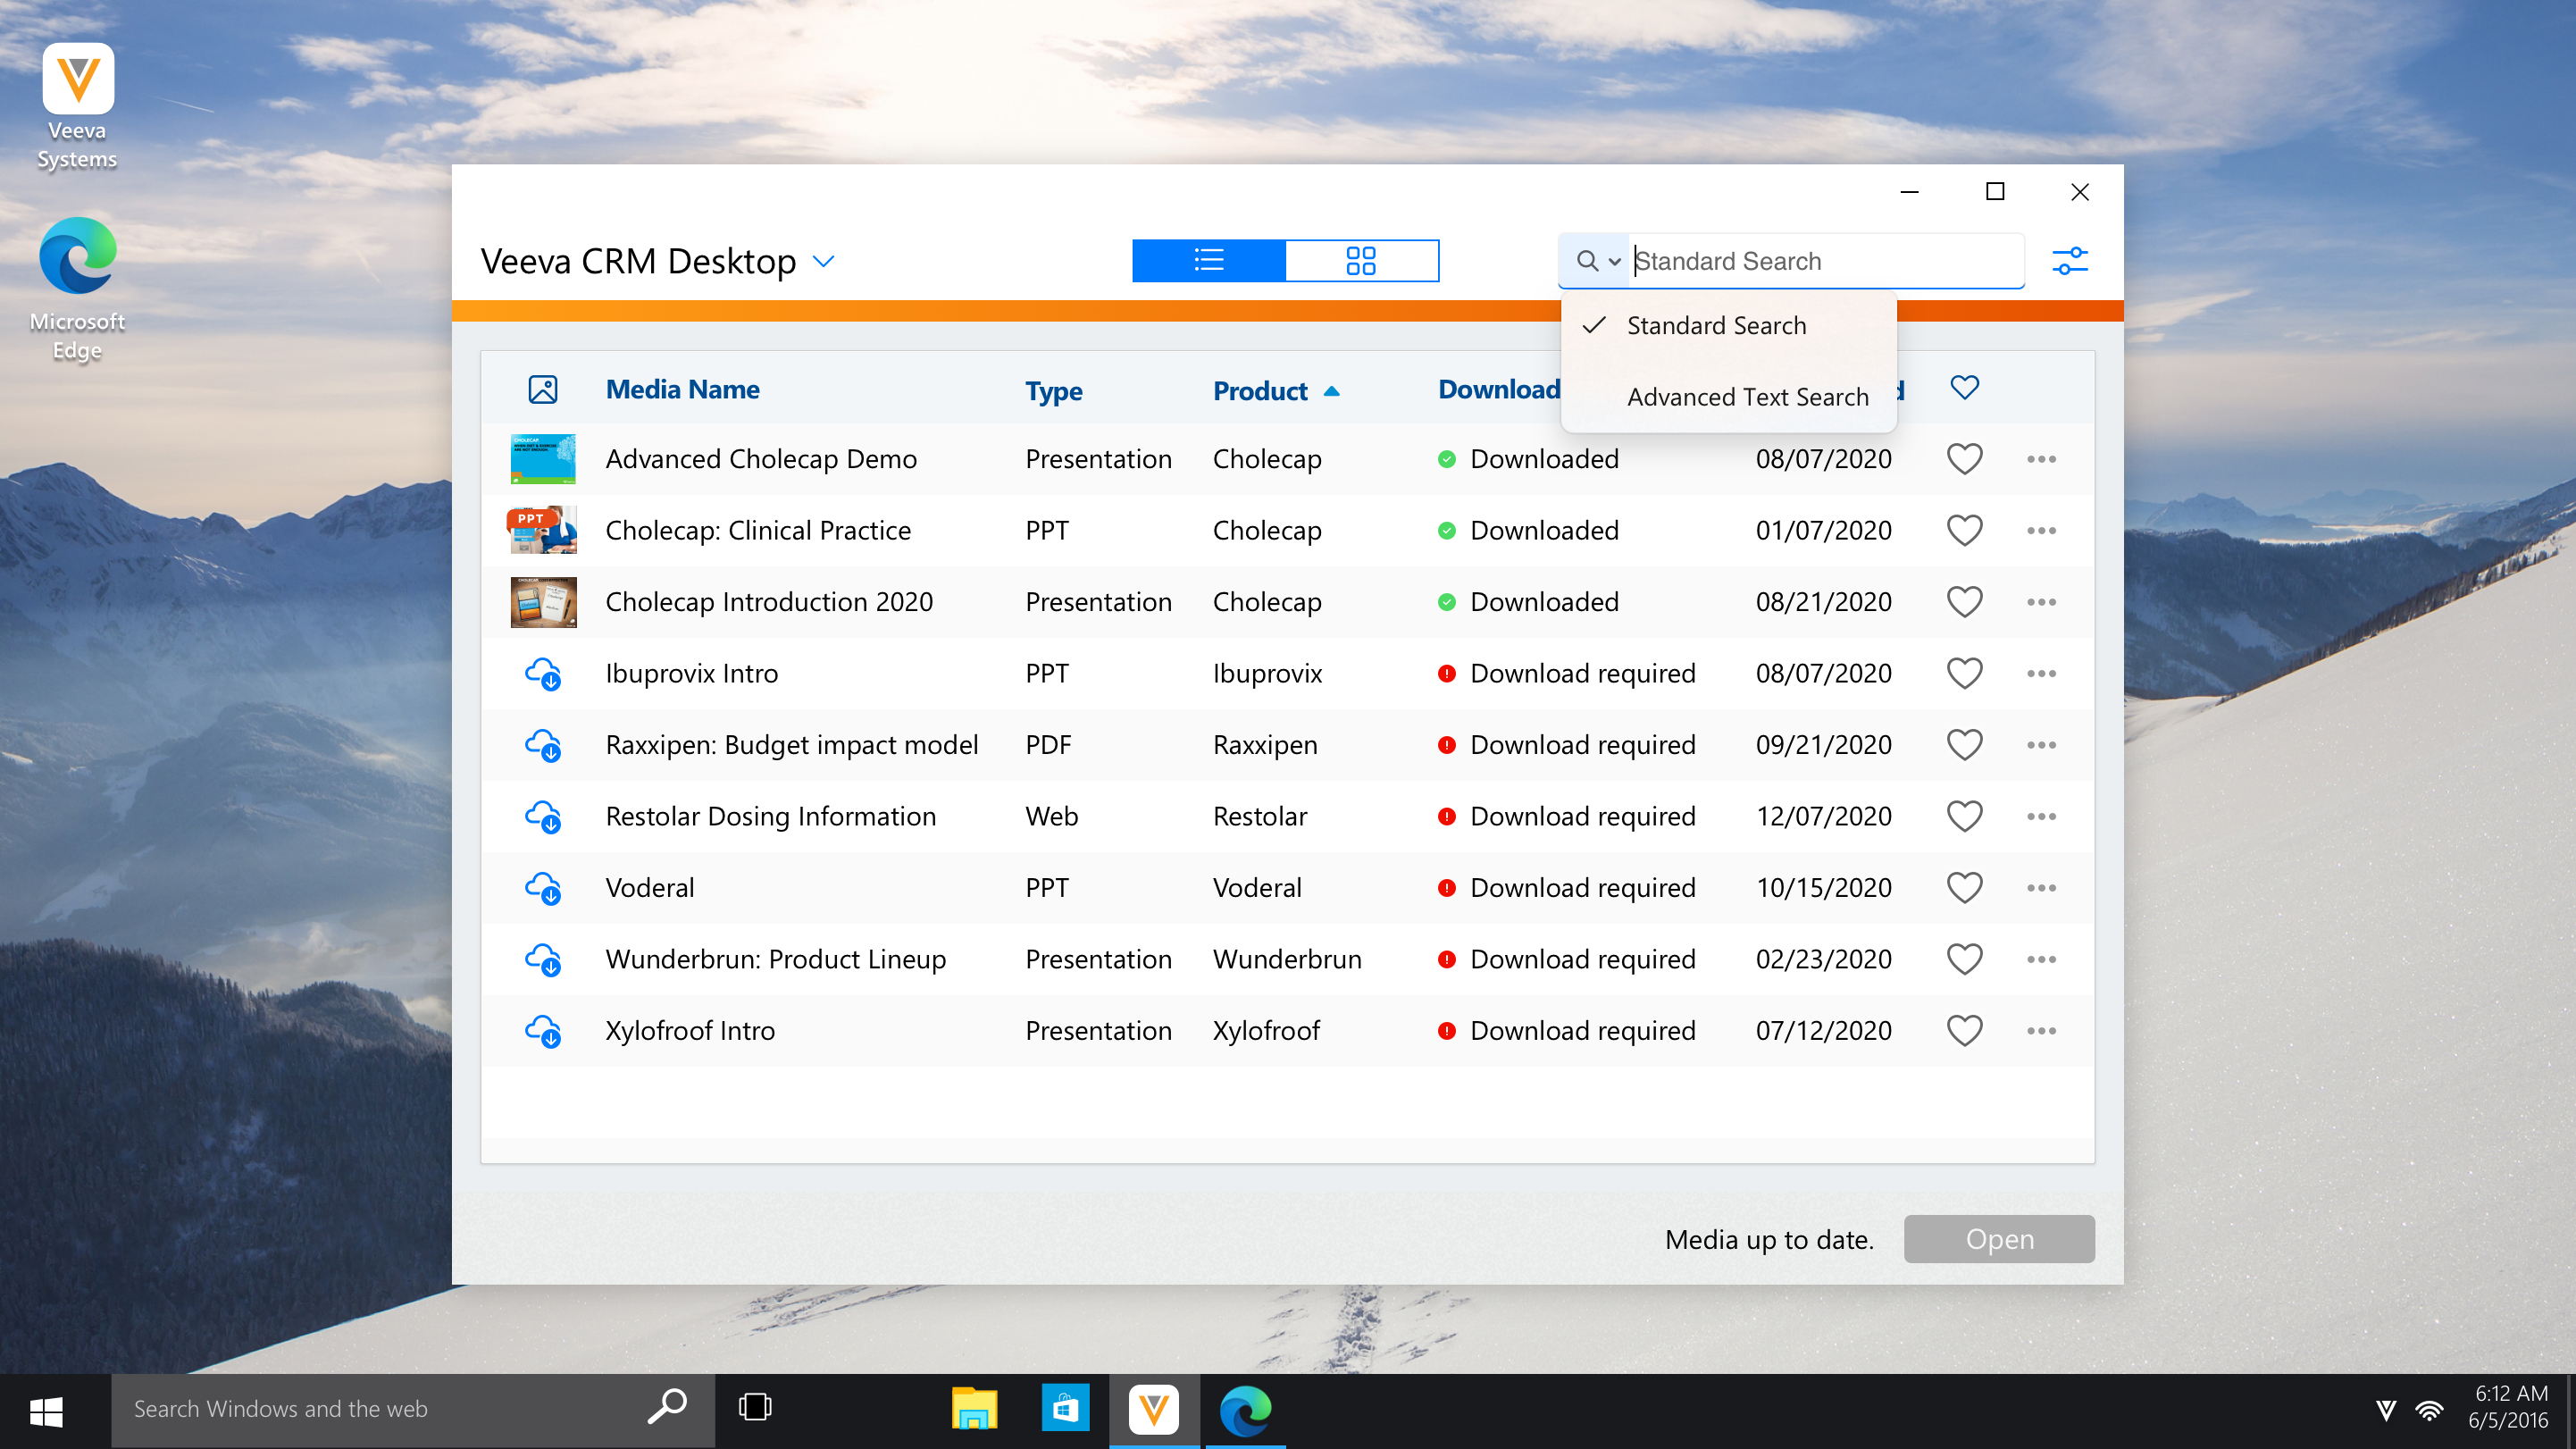
On the CRM Desktop platforms, users can select the search icon to display the drop-down menu and select Advanced Text Search.
CRM Desktop
Tracking CLM Preview Activity on the Veeva CRM Desktop App
When users display CLM presentations in Presentation View outside of call mode, the displayed slides are tracked to Multichannel Activity and Multichannel Activity Lines. This additional CLM tracking allows customers to report on usage of CLM outside of call mode to better understand the full utilization of CLM.
Users do not need an active internet connection to track preview activity. Any activity tracked offline automatically syncs when the user connects to the internet.
Tracking preview activity stamps the following information on Multichannel_Activity_vod records:
- Media_Preview_vod = True
- Saved_for_Later_vod = False
See Tracking CLM Key Messages for more information about the conditions to track CLM activity.
For example, Sarah Jones does not have any upcoming calls about Cholecap but wants to be prepared to discuss the product at any time. To review information about the product, she launches a Cholecap presentation from the media library and displays it in Presentation View without a call. The app immediately begins tracking the CLM preview activity.
Tracking Save for Later CLM Activity in the Veeva CRM Desktop App
Users can quickly start tracking CLM presentation activity without the dependency of starting it from the online call report. Users can start call mode directly in Veeva CRM on Desktop, which tracks the slides presented in Presentation View and when call mode is ended, the tracked CLM activity syncs online, where users can reconcile it to a call later.
Users do not need an active internet connection to track Save for Later activity. Any activity tracked offline automatically syncs when the user connects to the internet.
Users can view unassigned presentations and associate calls with the activity at a later time. See Associating Accounts with Tracked CLM Activity for more information.
For example, Sarah Jones meets Dr. Clinton Ackerman during a visit to Newton Memorial Hospital and begins discussing Cholecap. She launches a presentation from the media library and displays it in Presentation View. The app initiates Save for Later call mode and begins tracking the activity. When the discussion is over, Sarah ends call mode and the activity syncs online. Later, Sarah navigates to the Multichannel Activities tab in Lightning and selects the Multichannel_Activity_vod record for the Save for Later call. She converts the record to a call for Dr. Ackerman, which creates the appropriate call records and associates a call report with the activity.
Tracking Save for Later CLM Activity
When a user displays a presentation in Presentation View directly from the media library instead of a call report, Save for Later call mode is initiated, meaning the CLM activity is tracked on Multichannel_Activity_vod and Multichannel_Activity_Line_vod records and is not associated with a Call2_vod record. See Tracking CLM Key Messages for more information about the conditions to track CLM activity.
Tracking Save for Later activity stamps the following information on Multichannel_Activity_vod and Multichannel_Activity_Line_vod records:
- Multichannel_Activity_vod:
- Media_Preview_vod = False
- Saved_for_Later_vod = True
- Multichannel_Activity_Line_vod:
- Share_Channel_vod = Face_to_Face_vod
The Share_Channel_vod field is not stamped for Save for Later calls created on the iPad platform.
Tracking CLM Preview Activity
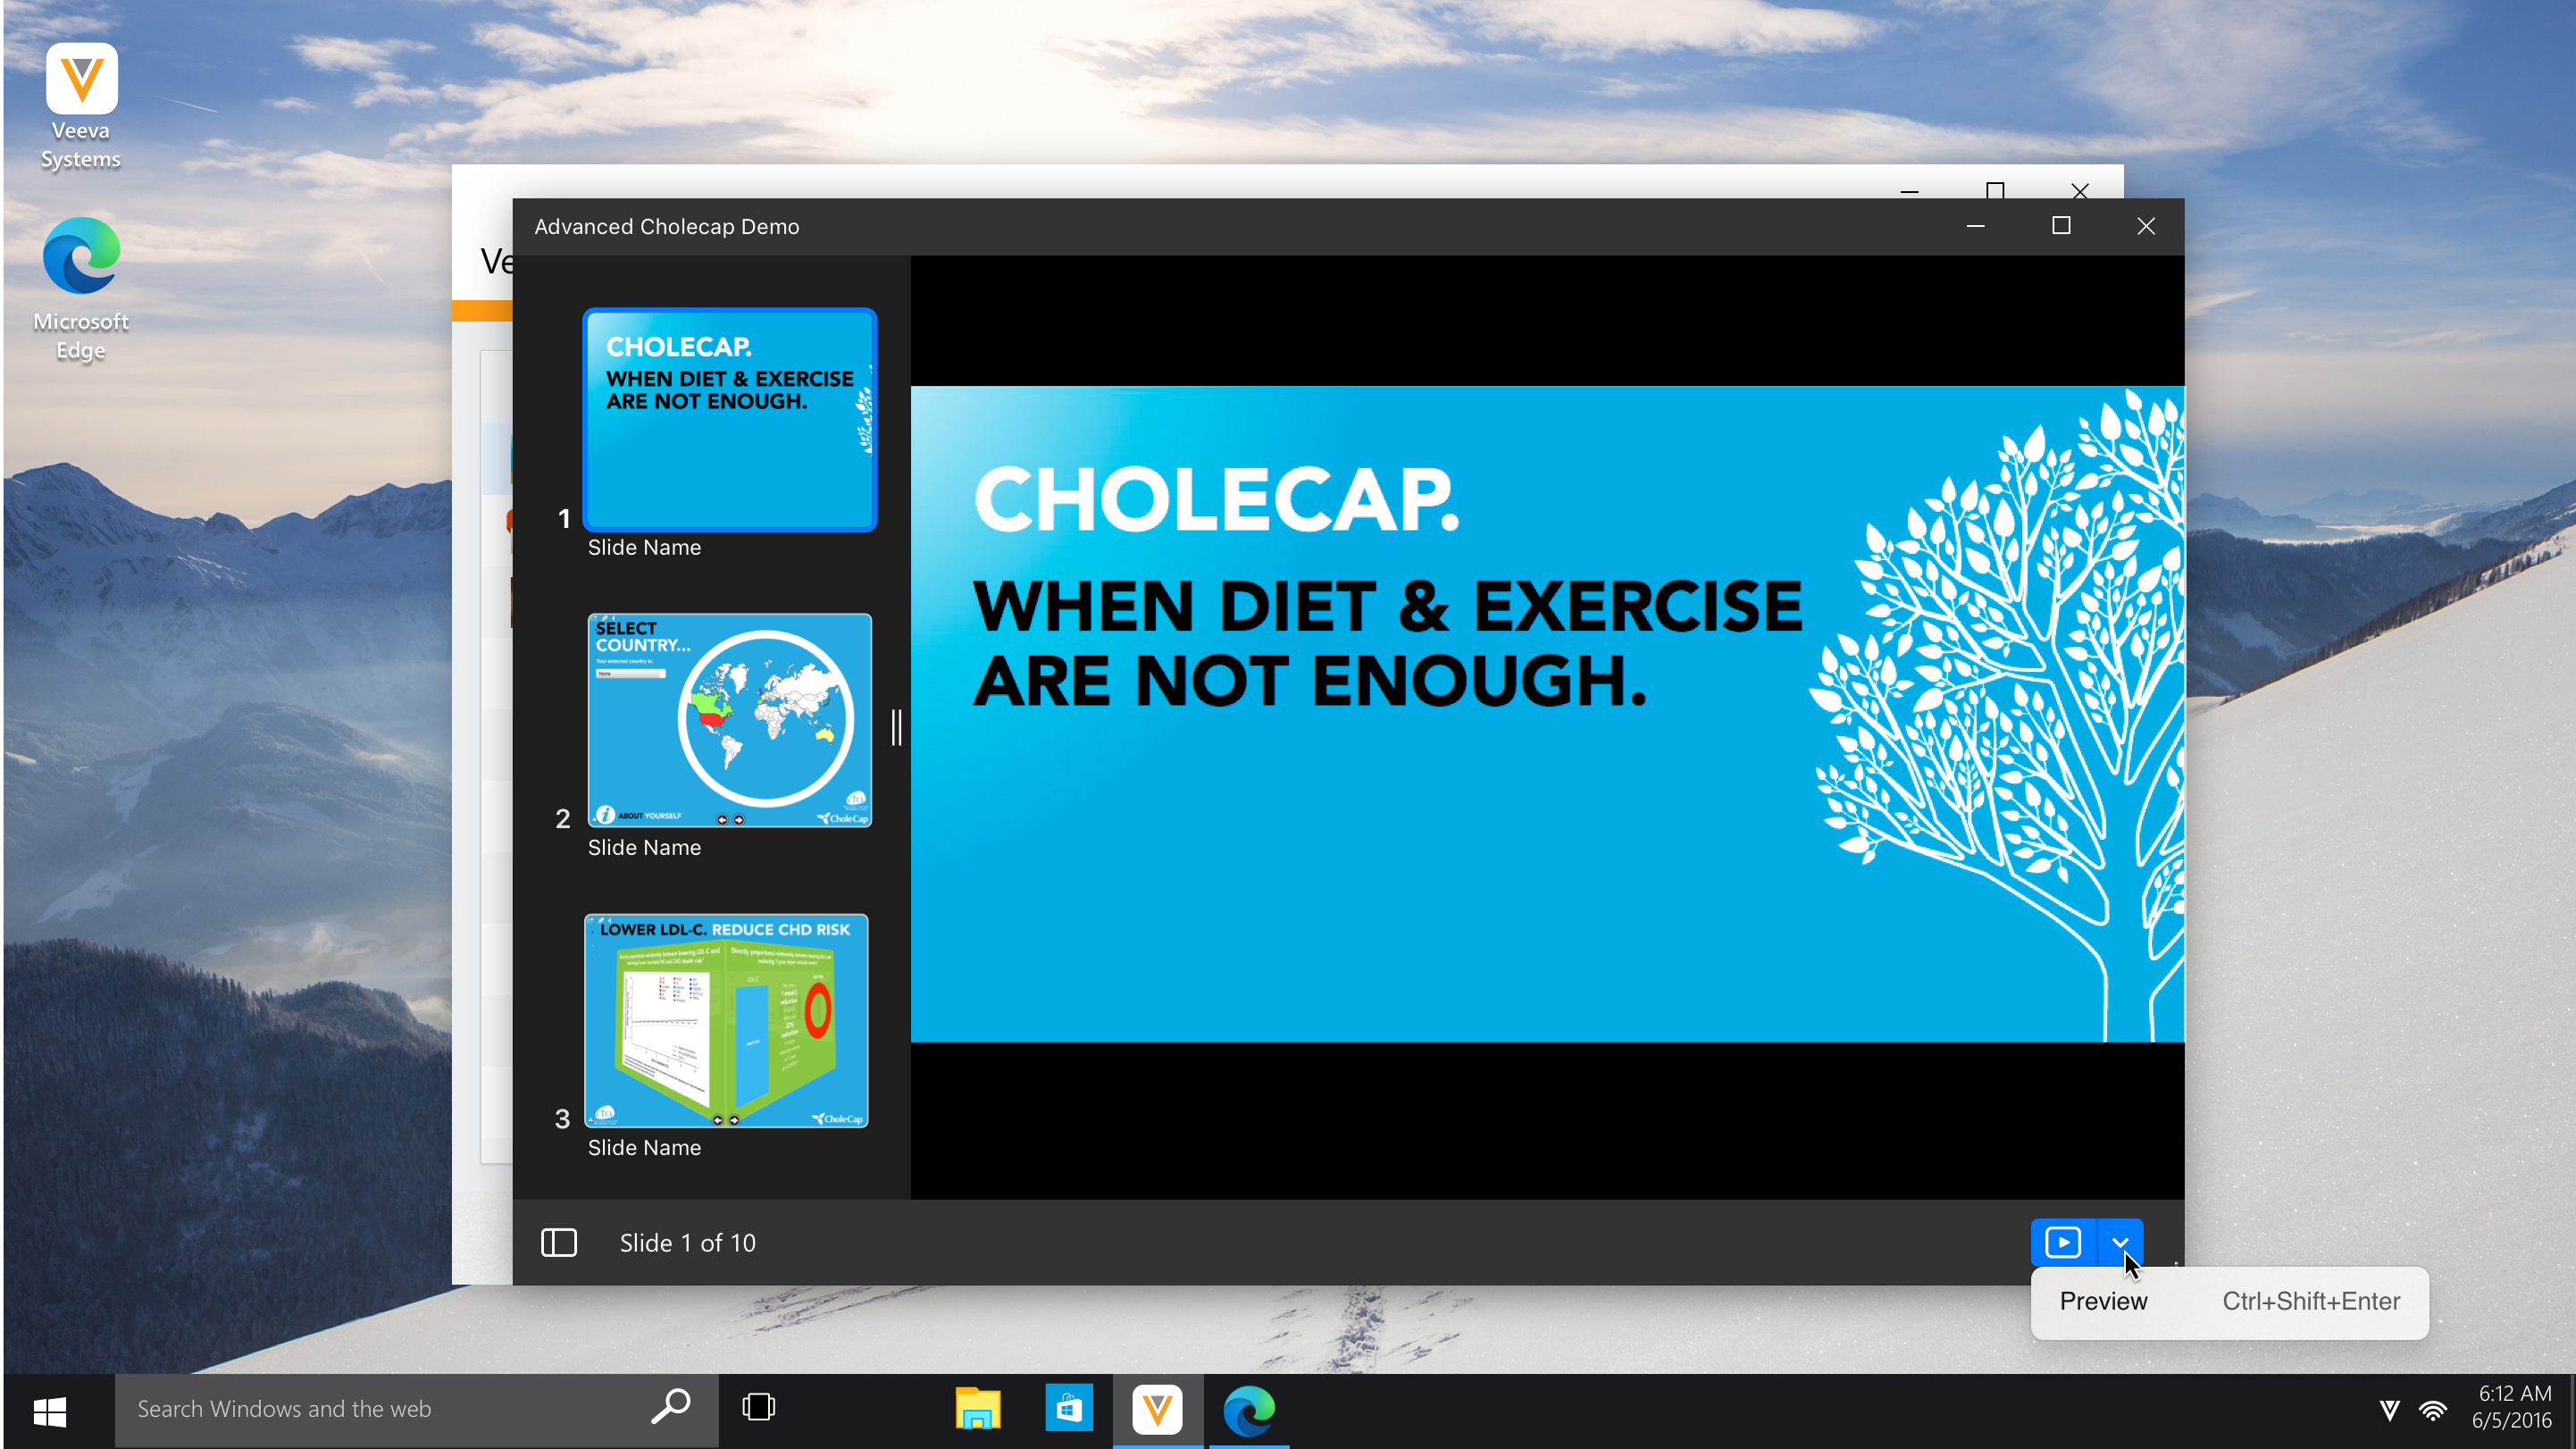
Enabling Save for Later CLM activity tracking overrides CLM preview tracking as the default tracking in Presentation View, but users can still track CLM preview activity by selecting Preview from the Start Slideshow drop-down button in the presentation window.
Tracking preview activity stamps the following information on Multichannel_Activity_vod records:
- Media_Preview_vod = True
- Saved_for_Later_vod = False
Preview tracking ends when the user starts any type of call.
Engage
Integrated Scheduling: Accepting and Declining Meeting Requests in My Schedule
When CRM users receive meeting requests from HCPs via the Engage Scheduling Site or data loaded Meeting_Request_vod records, they can accept or decline the request directly in My Schedule in CRM. This enables users to respond to requests for a meeting.
For example, Sarah Jones receives an email notification indicating Clinton Ackerman wants to meet with her via video. The meeting request displays in the My Schedule tab in CRM. After ensuring she does not have any scheduling conflicts, Sarah selects the meeting request in her schedule and selects Accept. This creates a planned call report that Sarah then uses to schedule an Engage meeting with Clinton Ackerman.
Prerequisites
Data Loading Meeting Requests
Meeting requests can be added to CRM via the data loader, rather than via the Engage Scheduling Site. This enables meeting requests made in external systems to be added and responded to in CRM.
The following fields are required when data loading Meeting_Request_vod records:
- Record Type – Must be a custom Meeting_Request_vod record type. It is recommended that the name of the custom record type reflect the source of the meeting request.
- Invitee_Display_Name_vod
- Assignee_vod
- Duration_vod
- Start_DateTime_vod
- Status_vod
The following fields are optional, but enable users to more easily respond to meeting requests in My Schedule:
- Account_vod
- Meeting_Type_vod
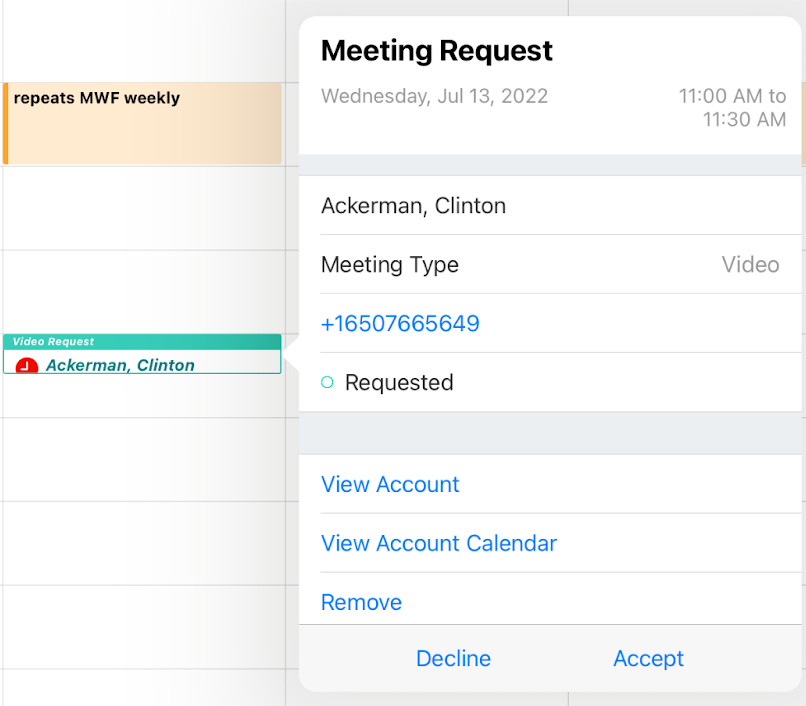
Viewing Requested Meeting Requests
Requested meetings submitted by accounts display in either the Week, Map, or Agenda views of the My Schedule tab.
If the account specified a preferred channel for the requested meeting, it displays in the meeting request’s header.
Meeting requests that have not yet been accepted or decline display with a red clock icon to indicate action is required.

If the requested time and date is in the past, the meeting request displays in red.
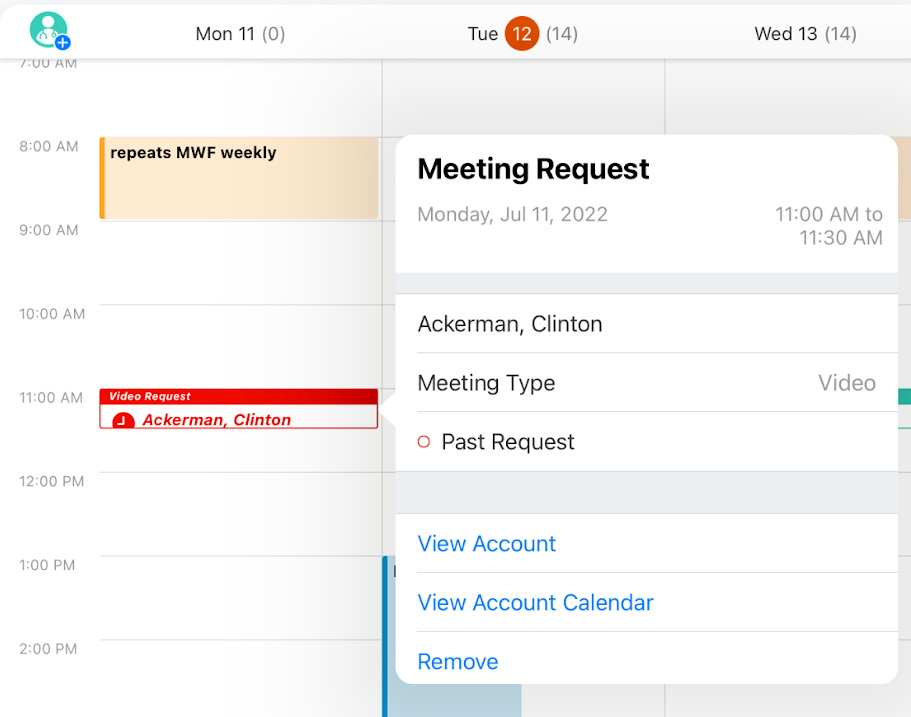
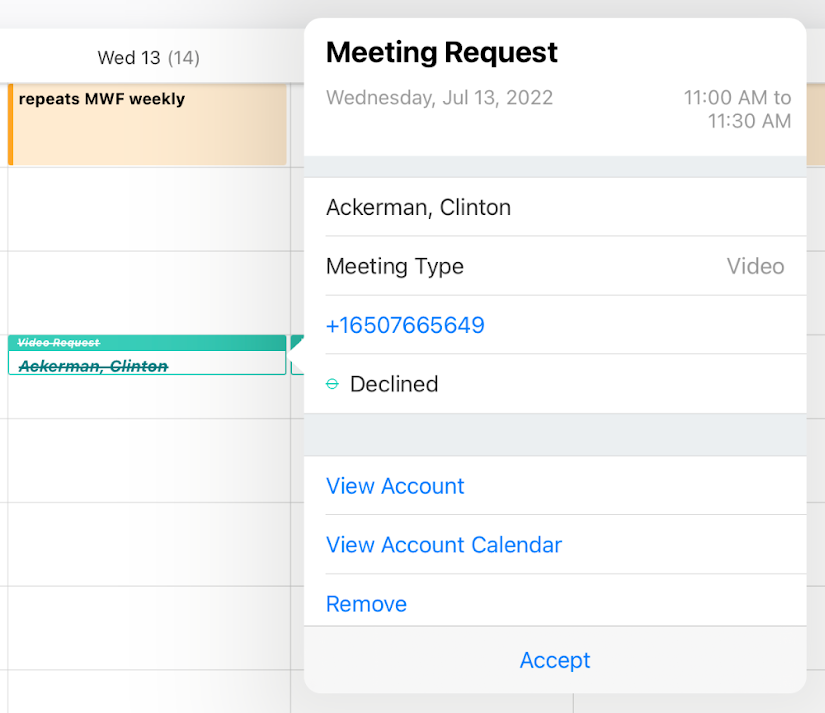
Responding to a Meeting Request
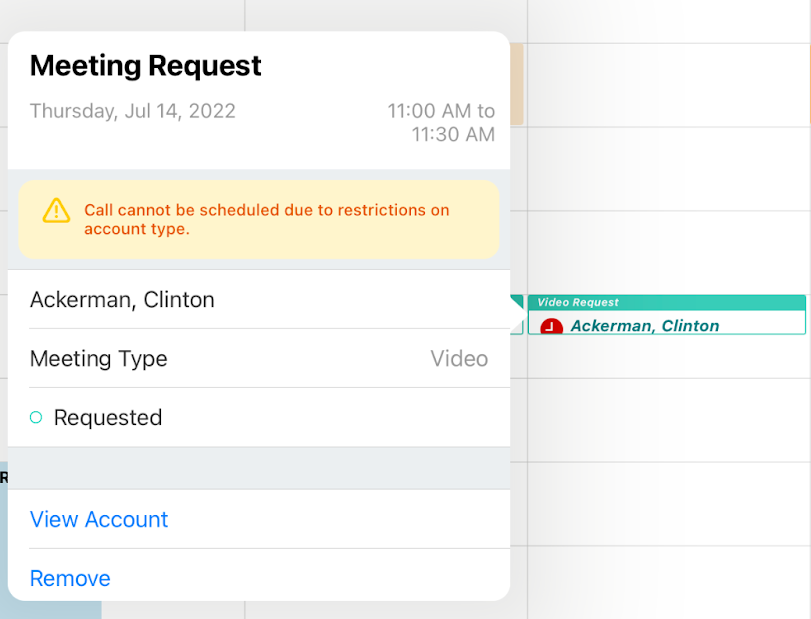
Select the meeting request to display the details. After reviewing the meeting request’s time and date, the user can decide to accept, decline, or remove the request.
A warning displays in the popover if the associated account has a call restriction, for example, if Do Not Call is enabled.
Accepting Meeting Requests
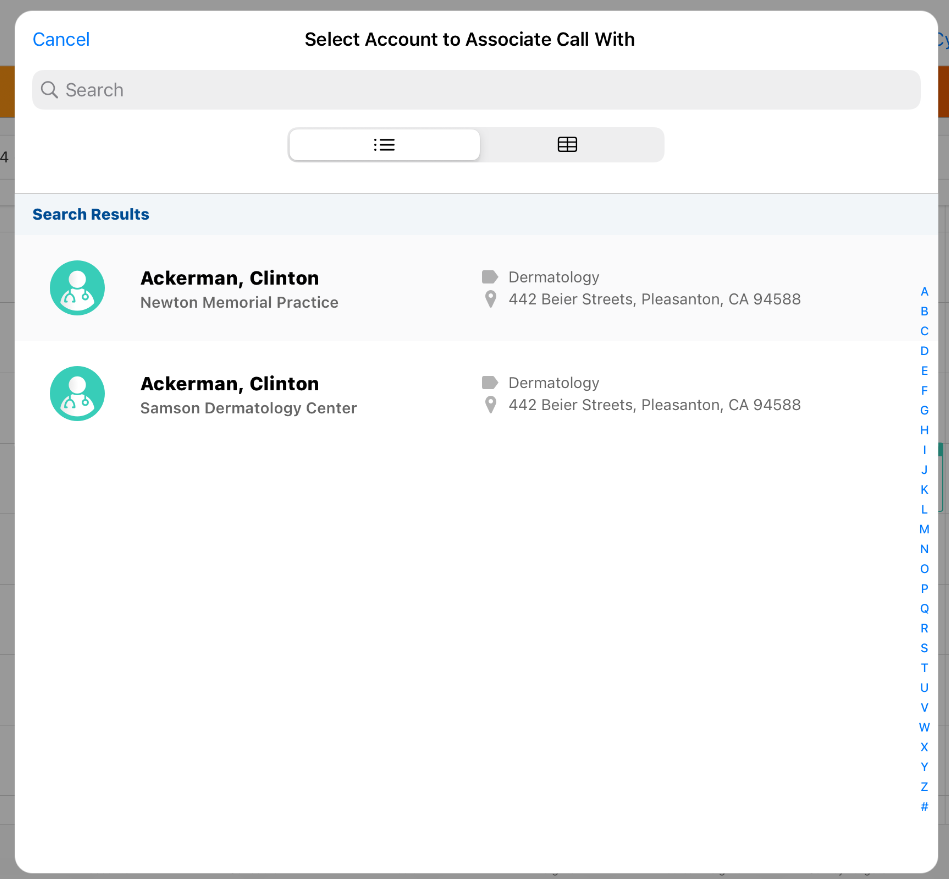
When a meeting request is accepted, a Call2_vod record is created referencing the meeting request. Key values from the meeting request, for example the Account_vod and Start_DateTime_vod fields, automatically populate in the Call2_vod record. The Call_Channel_vod field is automatically populated based on the meeting type the HCP selects on the Engage Scheduling Site.
Data loaded meeting requests may not have an associated account. If the user accepts a meeting request without an associated account, the user must search for an account to associate to the Call2_vod record.
Declining Meeting Requests
To decline a meeting request from the meeting request popover in My Schedule:
- Select Decline.
-
Select the appropriate reason for declining the request. This step is optional and can be skipped by selecting Skip.
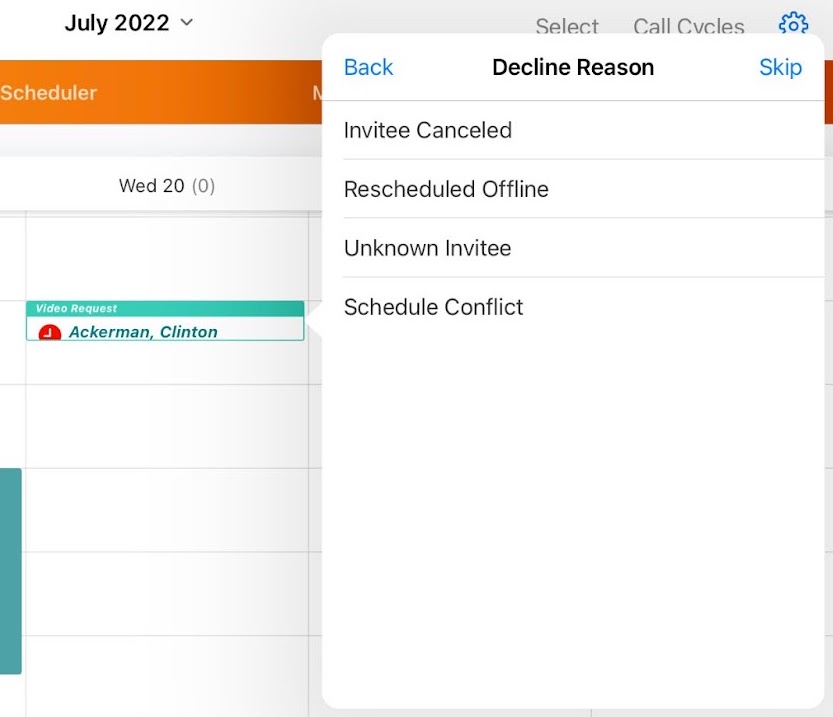
Admins can disable the ability to skip by removing the No_Reason_Provided_vod picklist value form the list of available values on the Decline_Reason_vod picklist for the appropriate Meeting_Request_vod record type.
Users can also select and accept a declined meeting request.
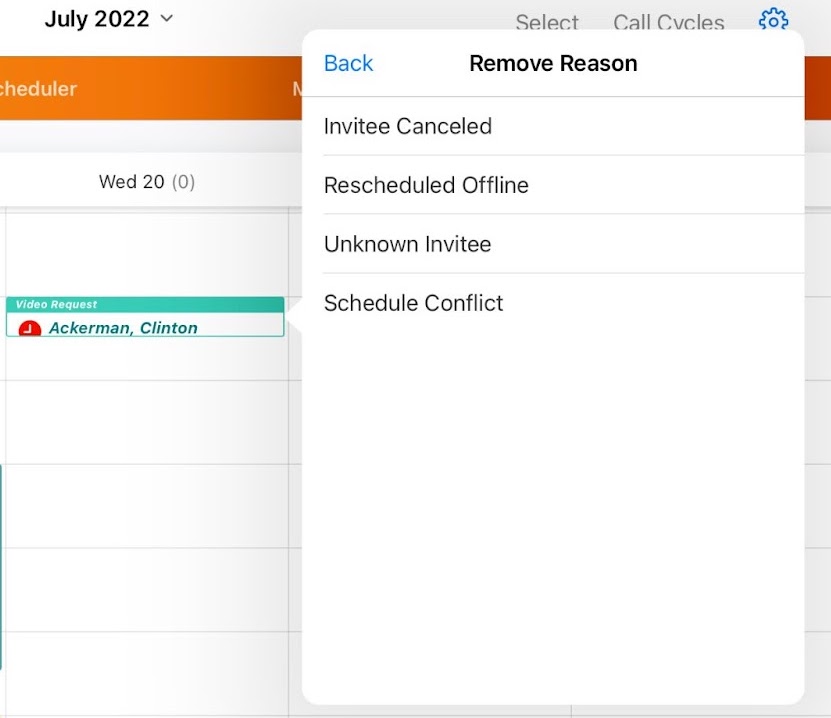
Removing Meeting Requests from My Schedule
Users can remove declined or requested meeting requests from their schedule:
- Select the Remove button.
-
Select the appropriate reason for the removal.
Viewing Remote CLM
Presenting CLM content remotely allows HCPs to view CLM content on their own devices during calls without being in a meeting. Details about the session, including the link, are shared with the HCPs using social messaging apps, verbally, or with a QR Code®. Selecting the link allows the HCP to view the CLM content in their browser without installing an app.
Users cannot present website content remotely.
CLM content for remote CLM respects the restricted calls, restricted products, allowed products, and segmentations for the attendee account, but does not respect any disabled touch gestures defined on associated Key_Message_vod records.
Enabling Remote CLM Content in Vault
To allow a CLM presentation synced from Vault to be shared via remote CLM, content admins in Vault must ensure the Publish to CRM (Remote CLM) (publish_for_veeva_crm_remote_clm__v) field is selected on the presentation. This field maps to the Allow_Remote_CLM_vod field on the CLM_Presentation_vod object in CRM, which determines whether the button to start remote CLM for the presentation displays to users.
Content admins must republish existing auto-published content by selecting No for the Publish to Veeva CRM (CLM) field, saving, then selecting Yes again. For content with manually generated distribution packages before 22R2, admins must perform the following steps to republish each piece of content:
- Select No for the Publish for Veeva CRM (CLM) field and save.
- Download the distribution package.
- Delete the distribution package from Vault.
- Upload the distribution package back into Vault.
- Select Yes for the Publish for Veeva CRM (CLM) field and save.
Supported CLM Content for Remote CLM
Only content published from Vault is supported, including auto-published content, binders and slides, and content created via Create Presentation. The following content packaging formats are supported:
- Images
- Videos
- HTML
If HTML content uses a third-party JavaScript library impacting click event coordinates, then the content will not display as expected during remote CLM.
- PDF, including PDF files and PDF slides in presentations
- goToSlide
The following content packaging formats and assets are not supported:
- PowerPoint
- AR
- Shared resources
- External links
When a user selects an external link and launches the browser, the browser window is not displayed to the attendee
- Embedded videos
- Embedded overlays
Starting Remote CLM
Users can select Present Remotely from the More Actions button of a presentation in the following entry points:
- Presentation thumbnail in the media library
- Presentation slide library
- Specific slide in a presentation
- Presentation displayed in standard search results. Advanced text search is not supported.
Users must have an active internet connection to start presenting remotely.
To start presenting CLM content remotely:
- Select the More Actions button.
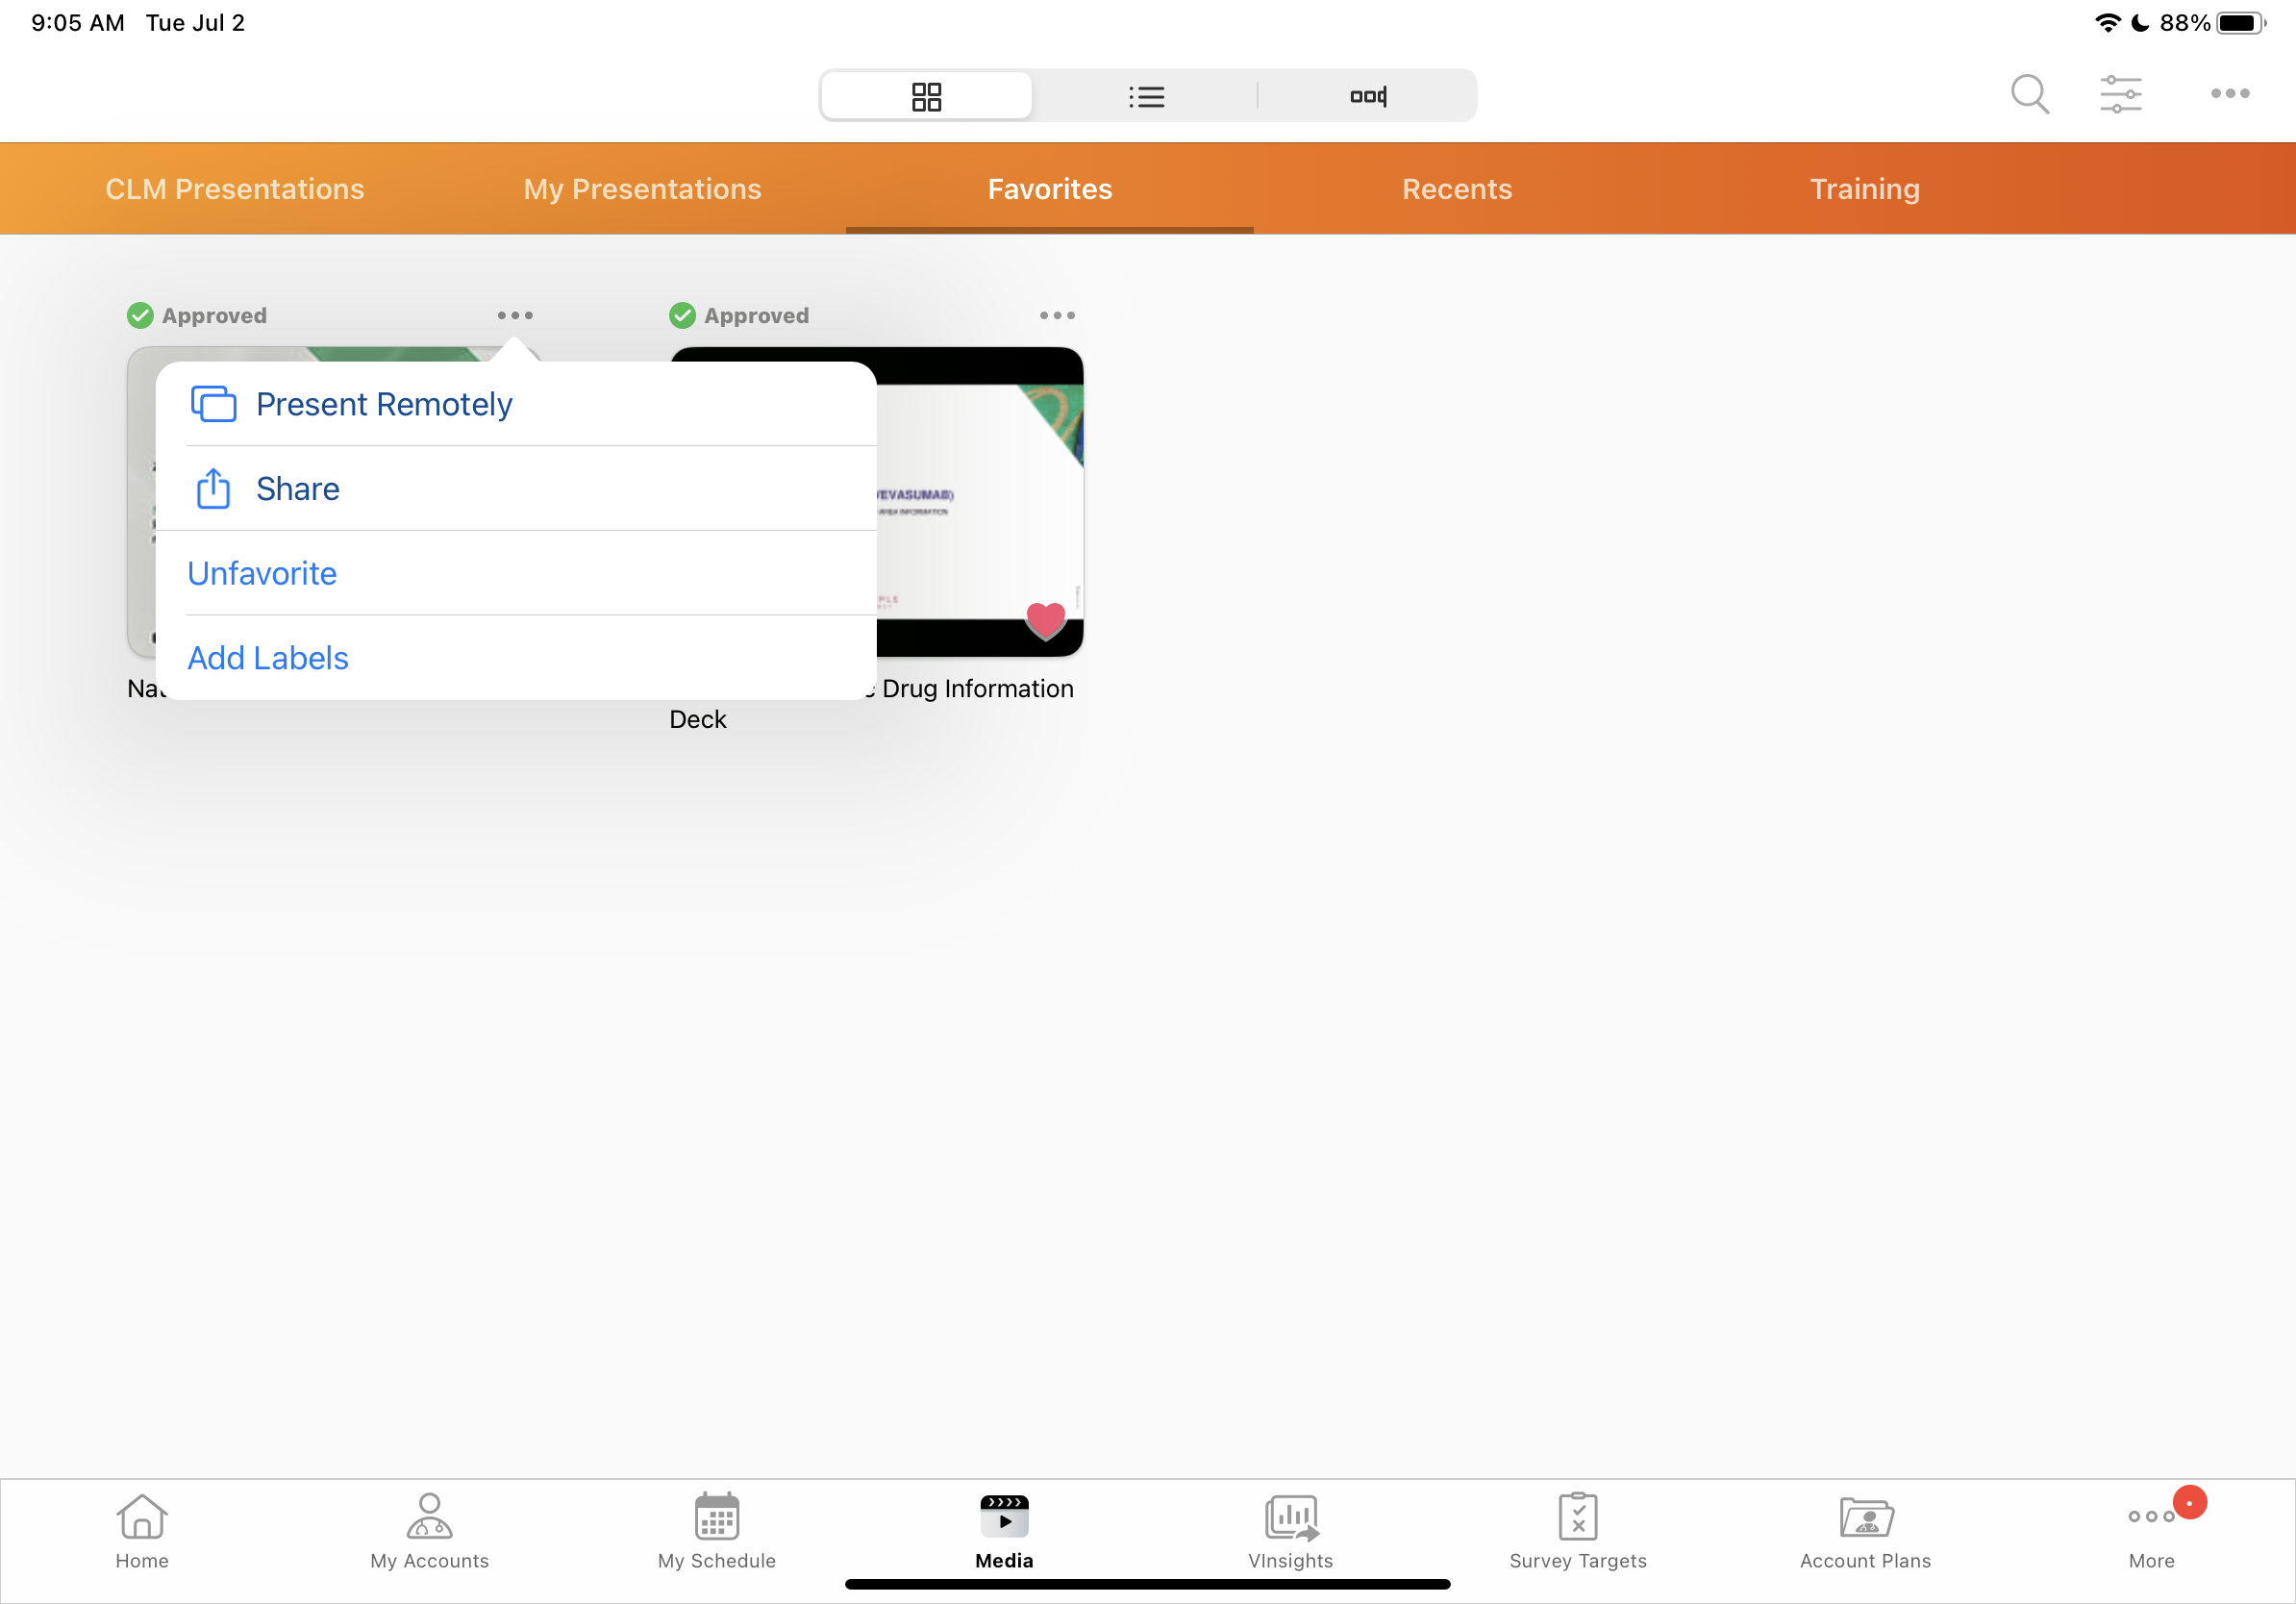
- Select Present Remotely.
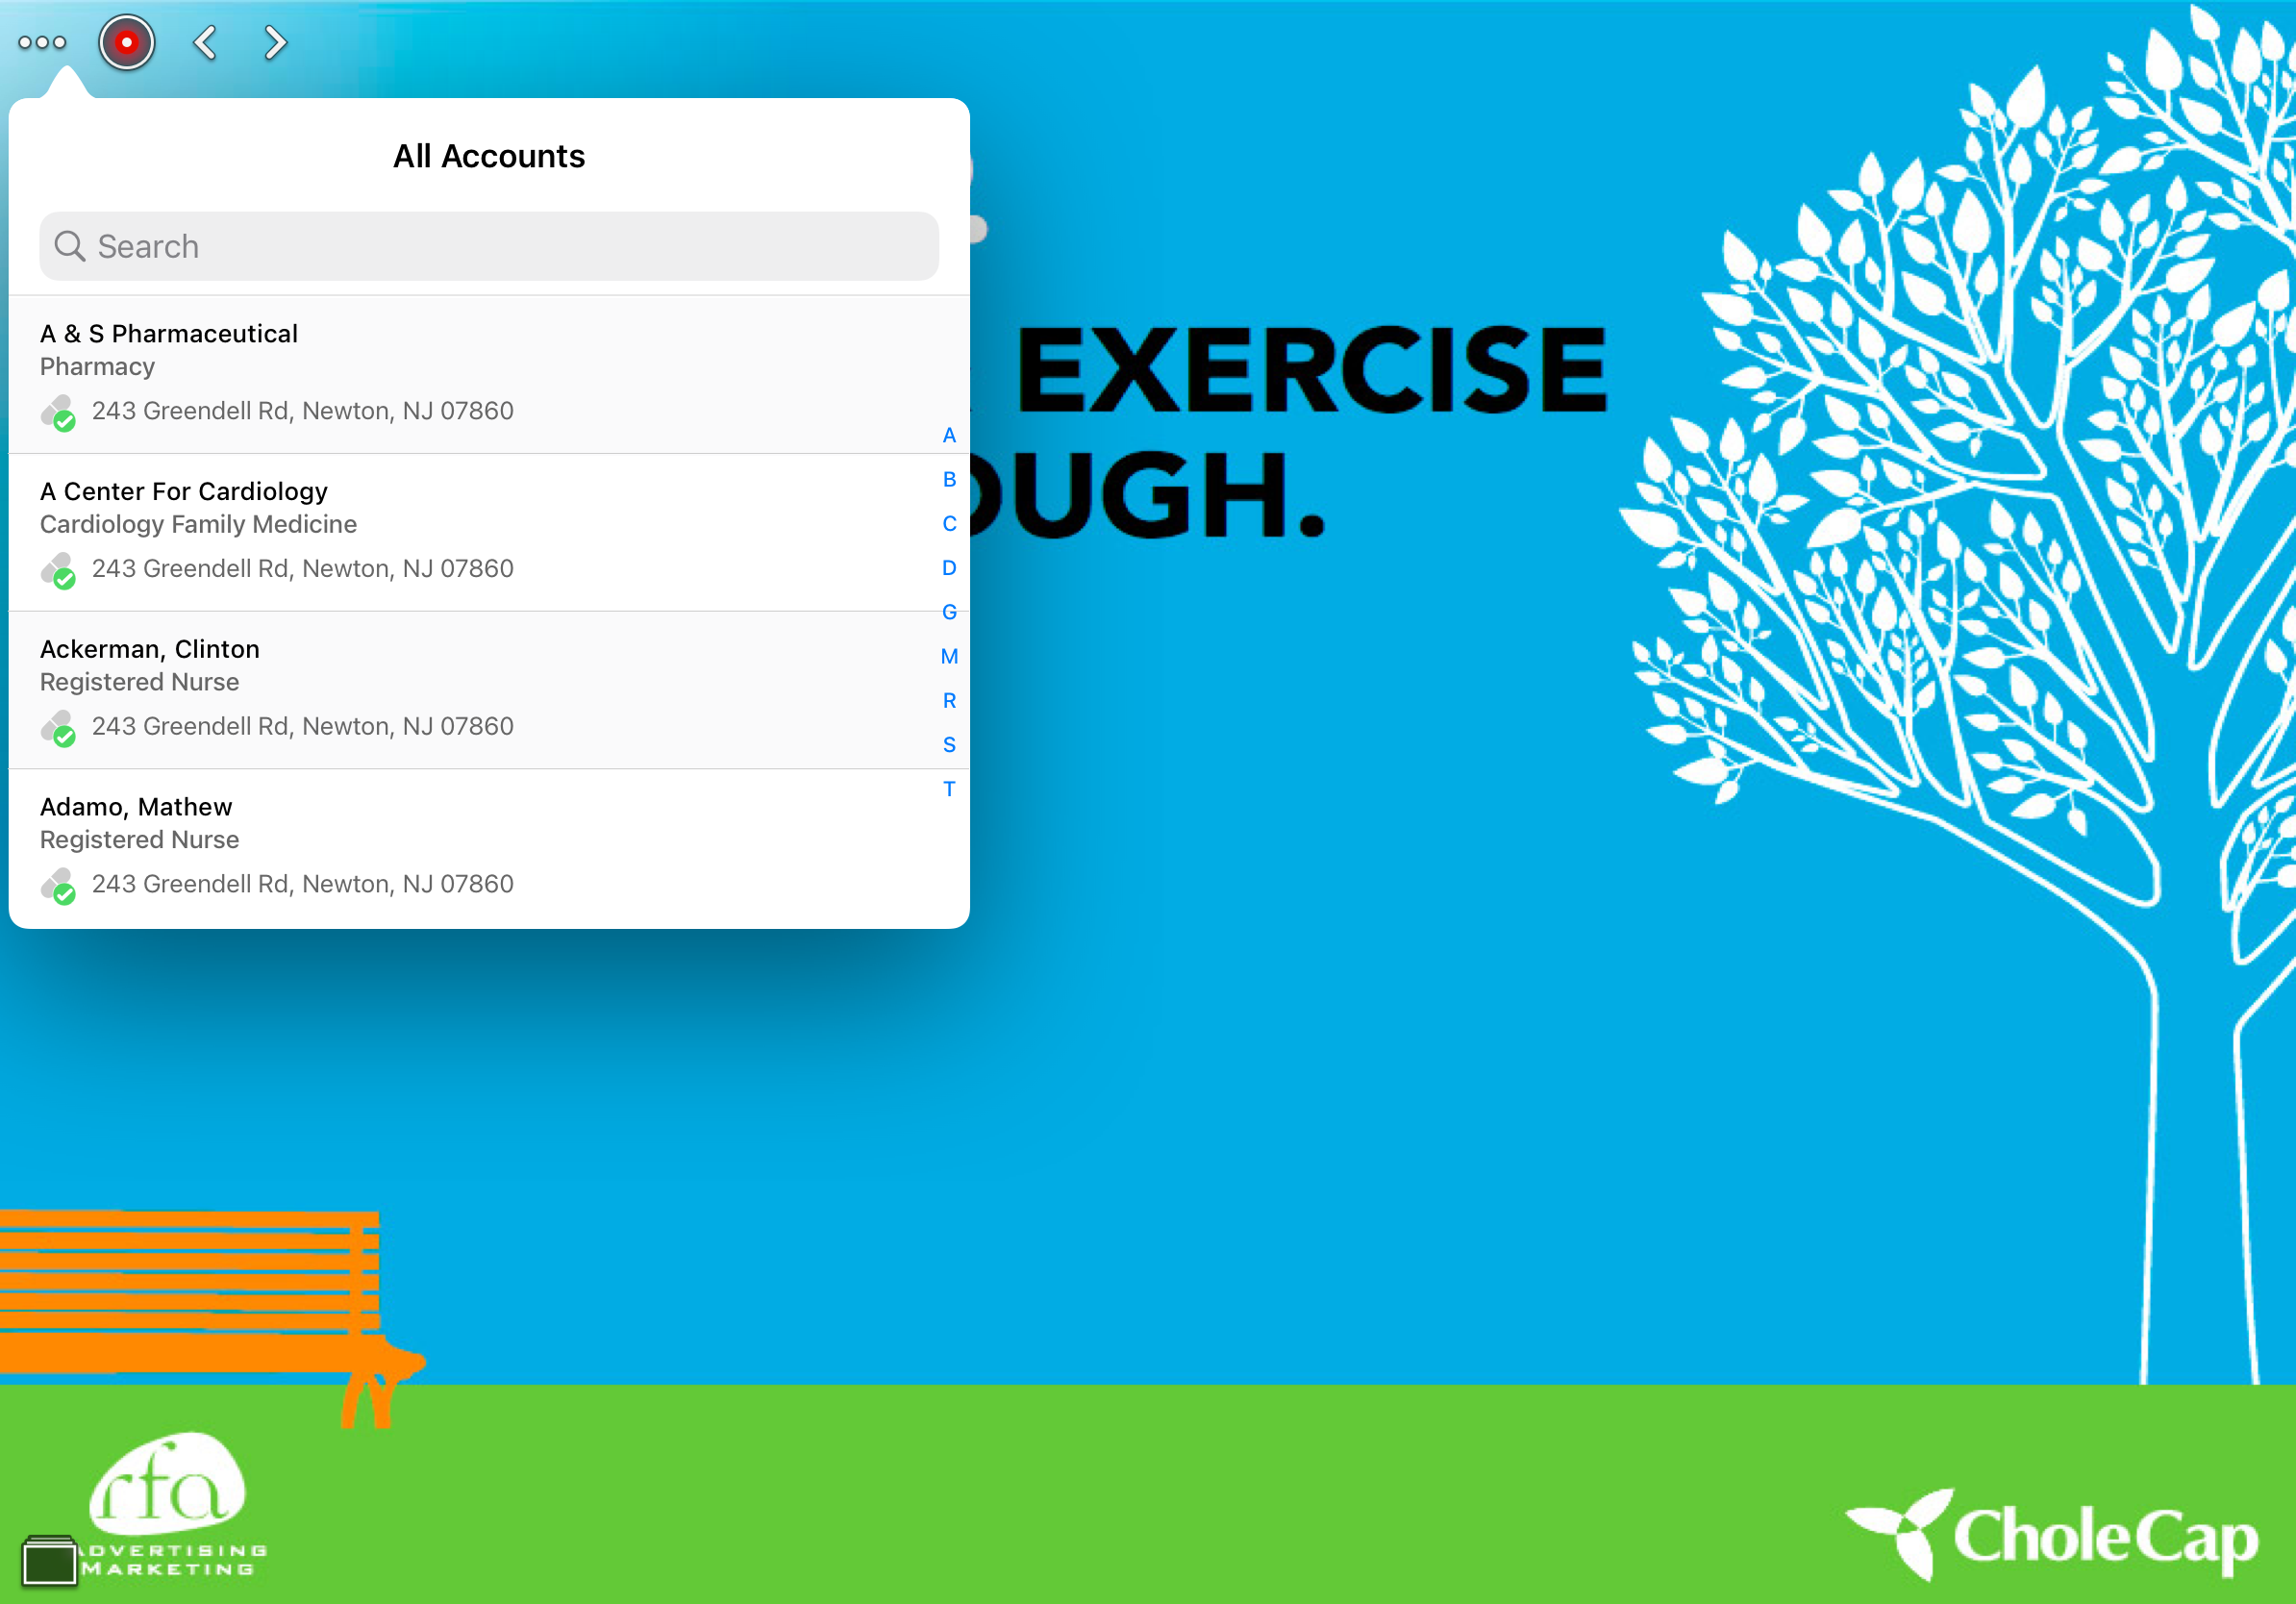
- Select the appropriate attendee account, if applicable.
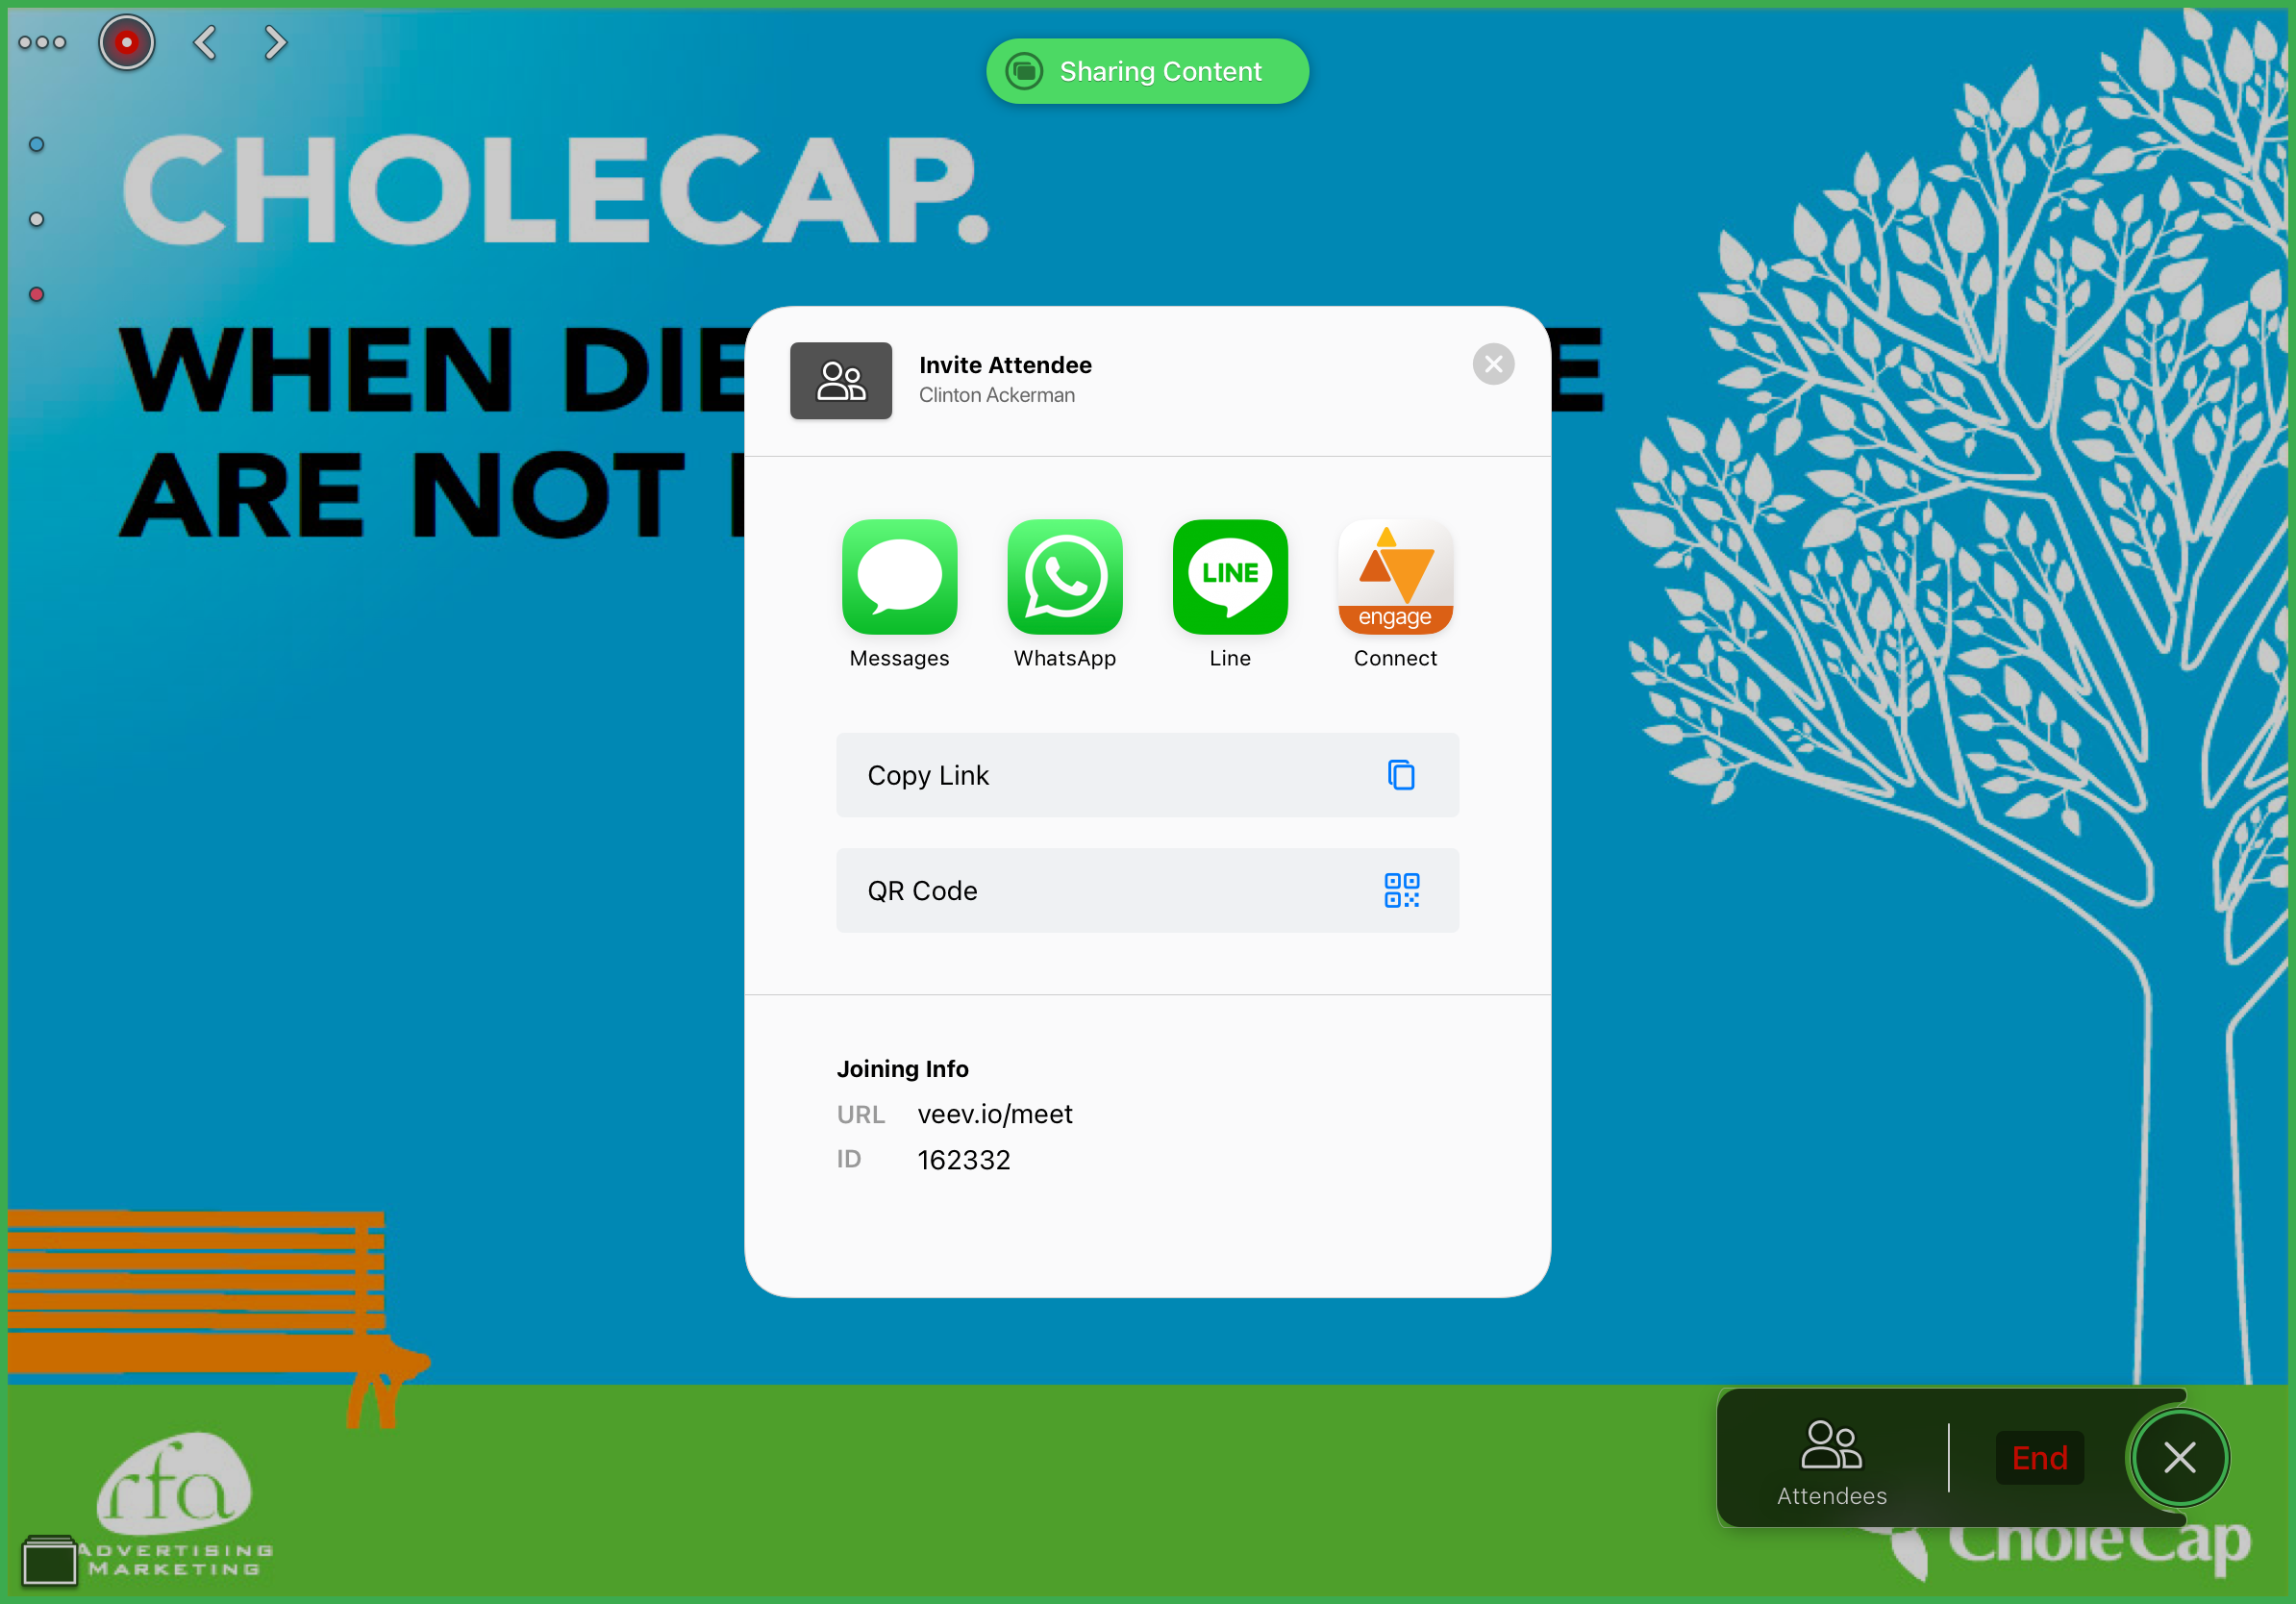
- Select the appropriate sharing option or verbally share the link details, including the ID, with the attendee to allow them to start viewing the CLM presentation.
The user can only share the link details with one attendee at a time.
Users cannot present CLM content remotely during an Engage meeting.

Sharing begins once the first slide loads and pauses when the user views the slide library for the presentation.
When sharing a video slide, users must select the pop-up message to play the video.
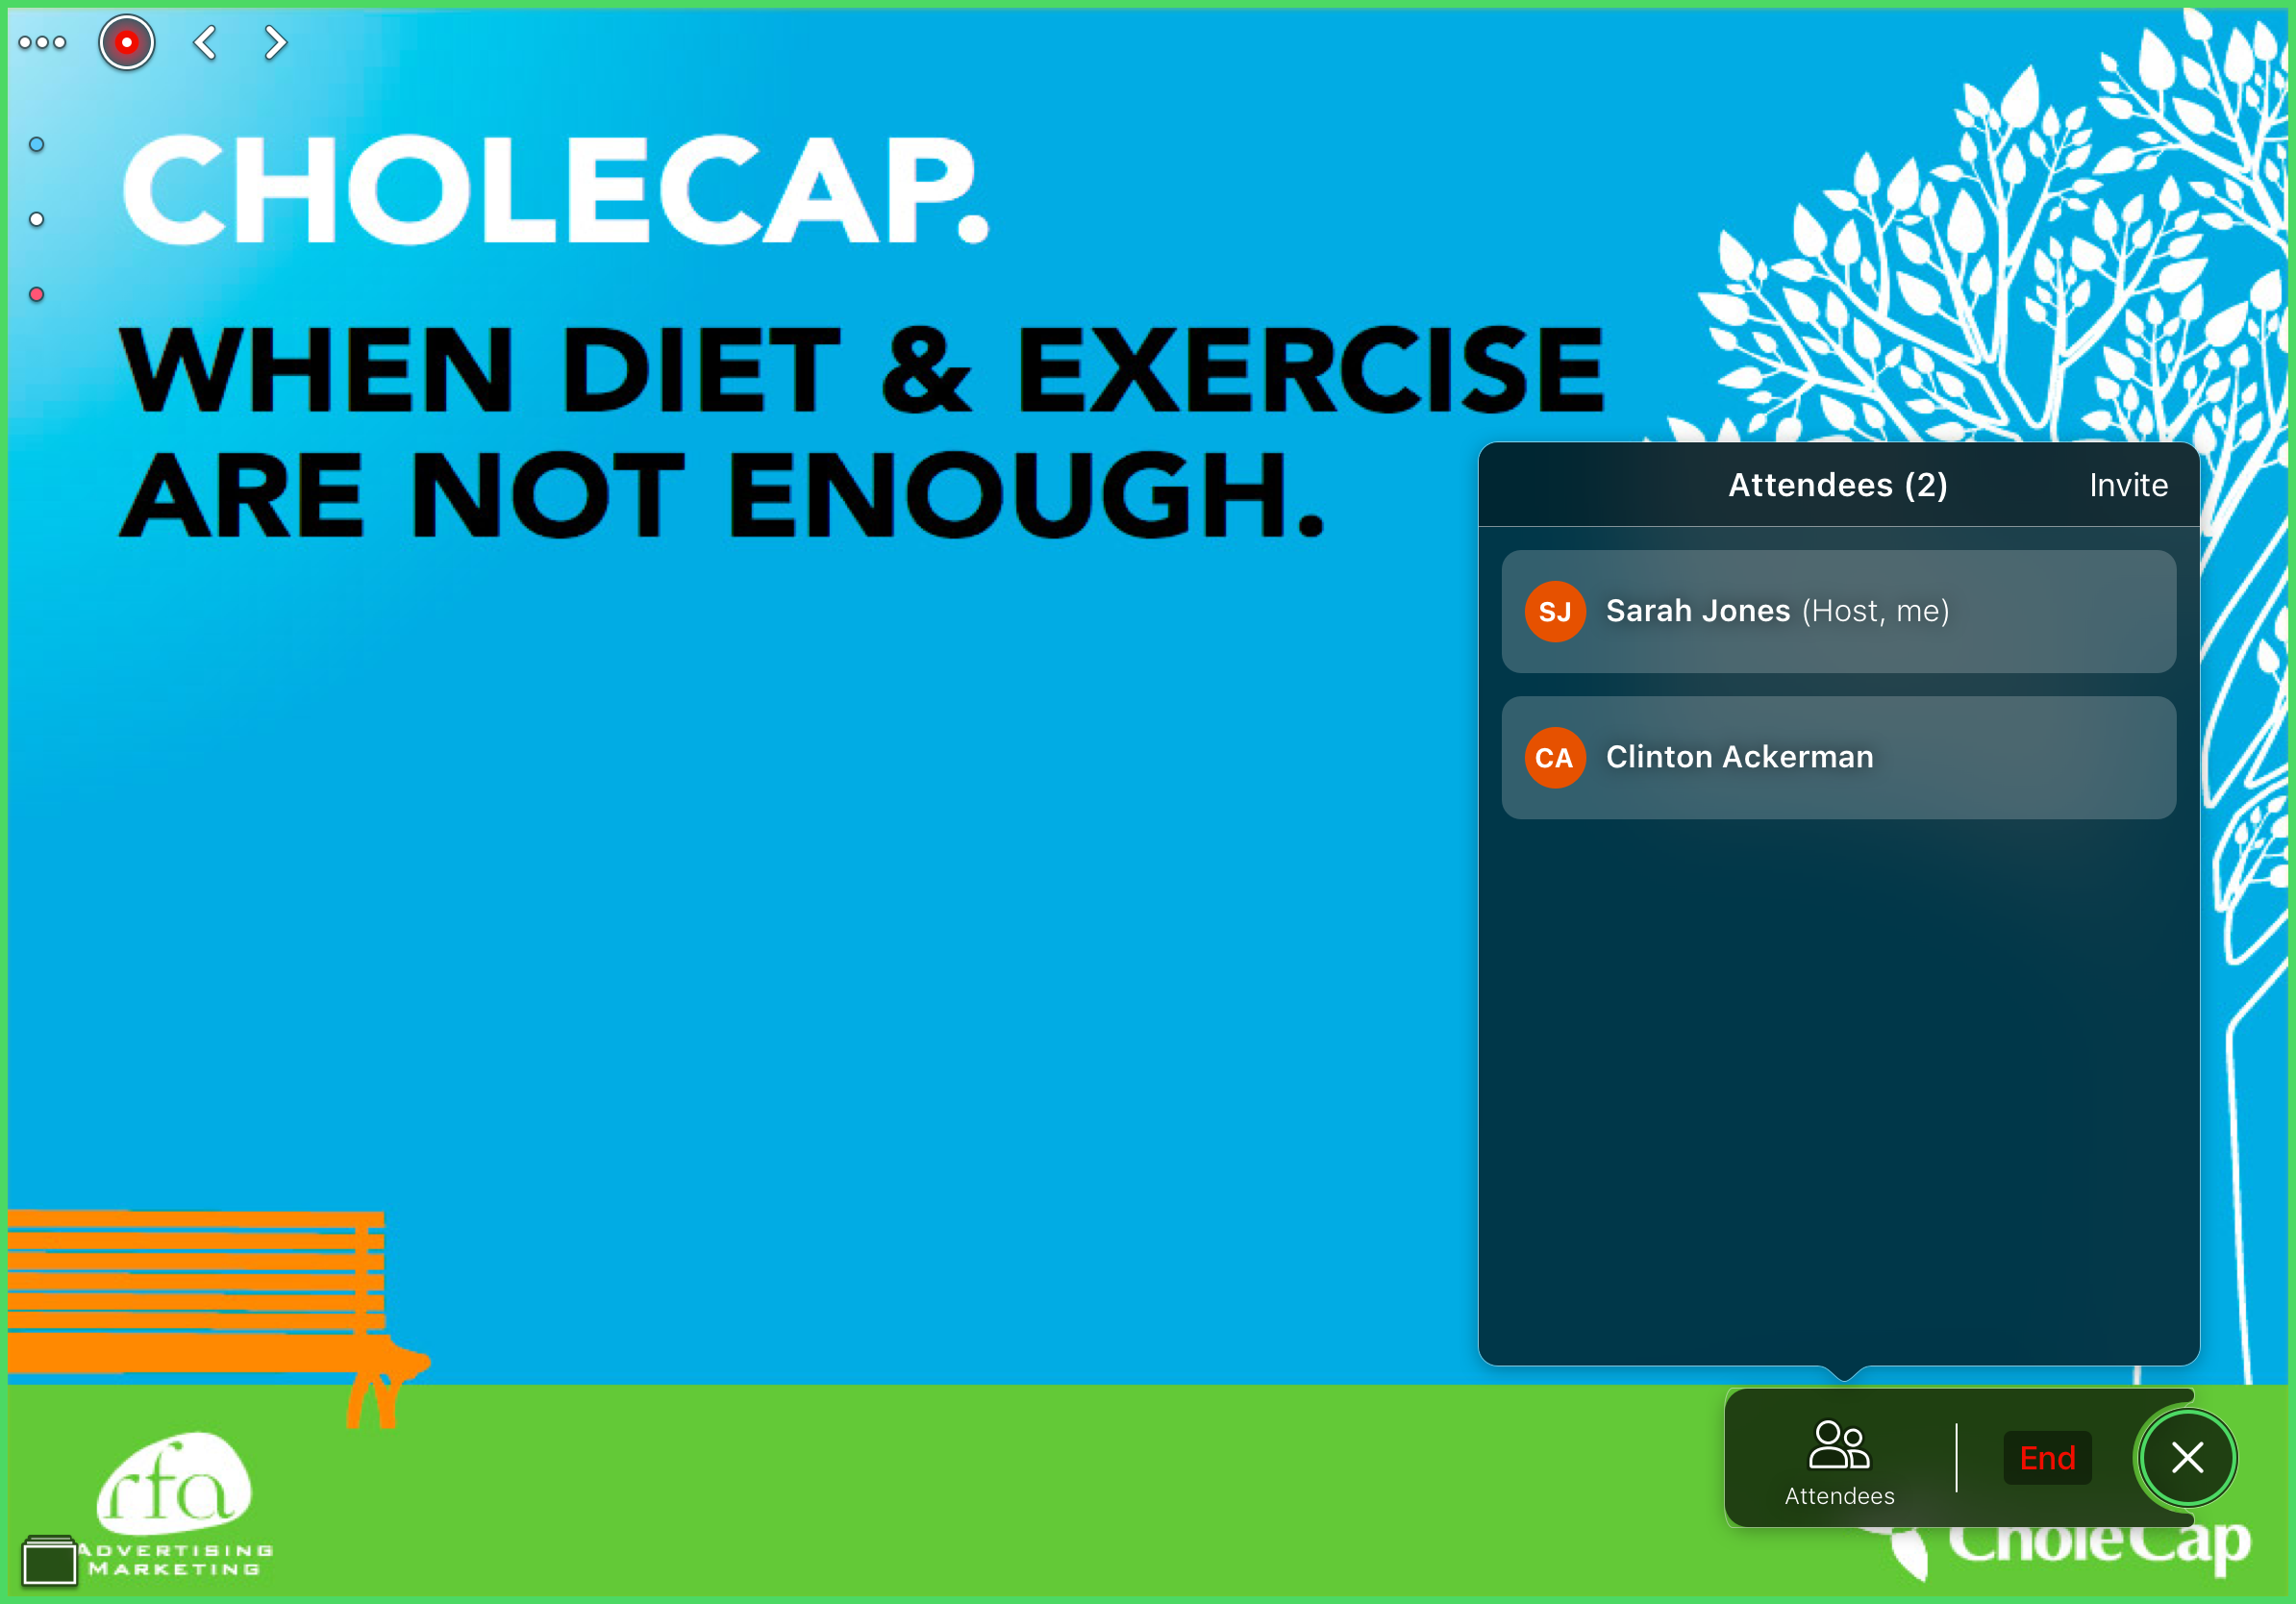
Select the Attendees button in the meeting ribbon to view the attendees, including the user. Select Invite to invite another attendee to view the presentation.

A notification displays when an attendee joins or leaves remote CLM.
To switch presentations while presenting remotely:
- Select the slide sorter button.
- Select Find Presentation to display the media library.
- Find or search for the appropriate presentation.
- Select the presentation to share.
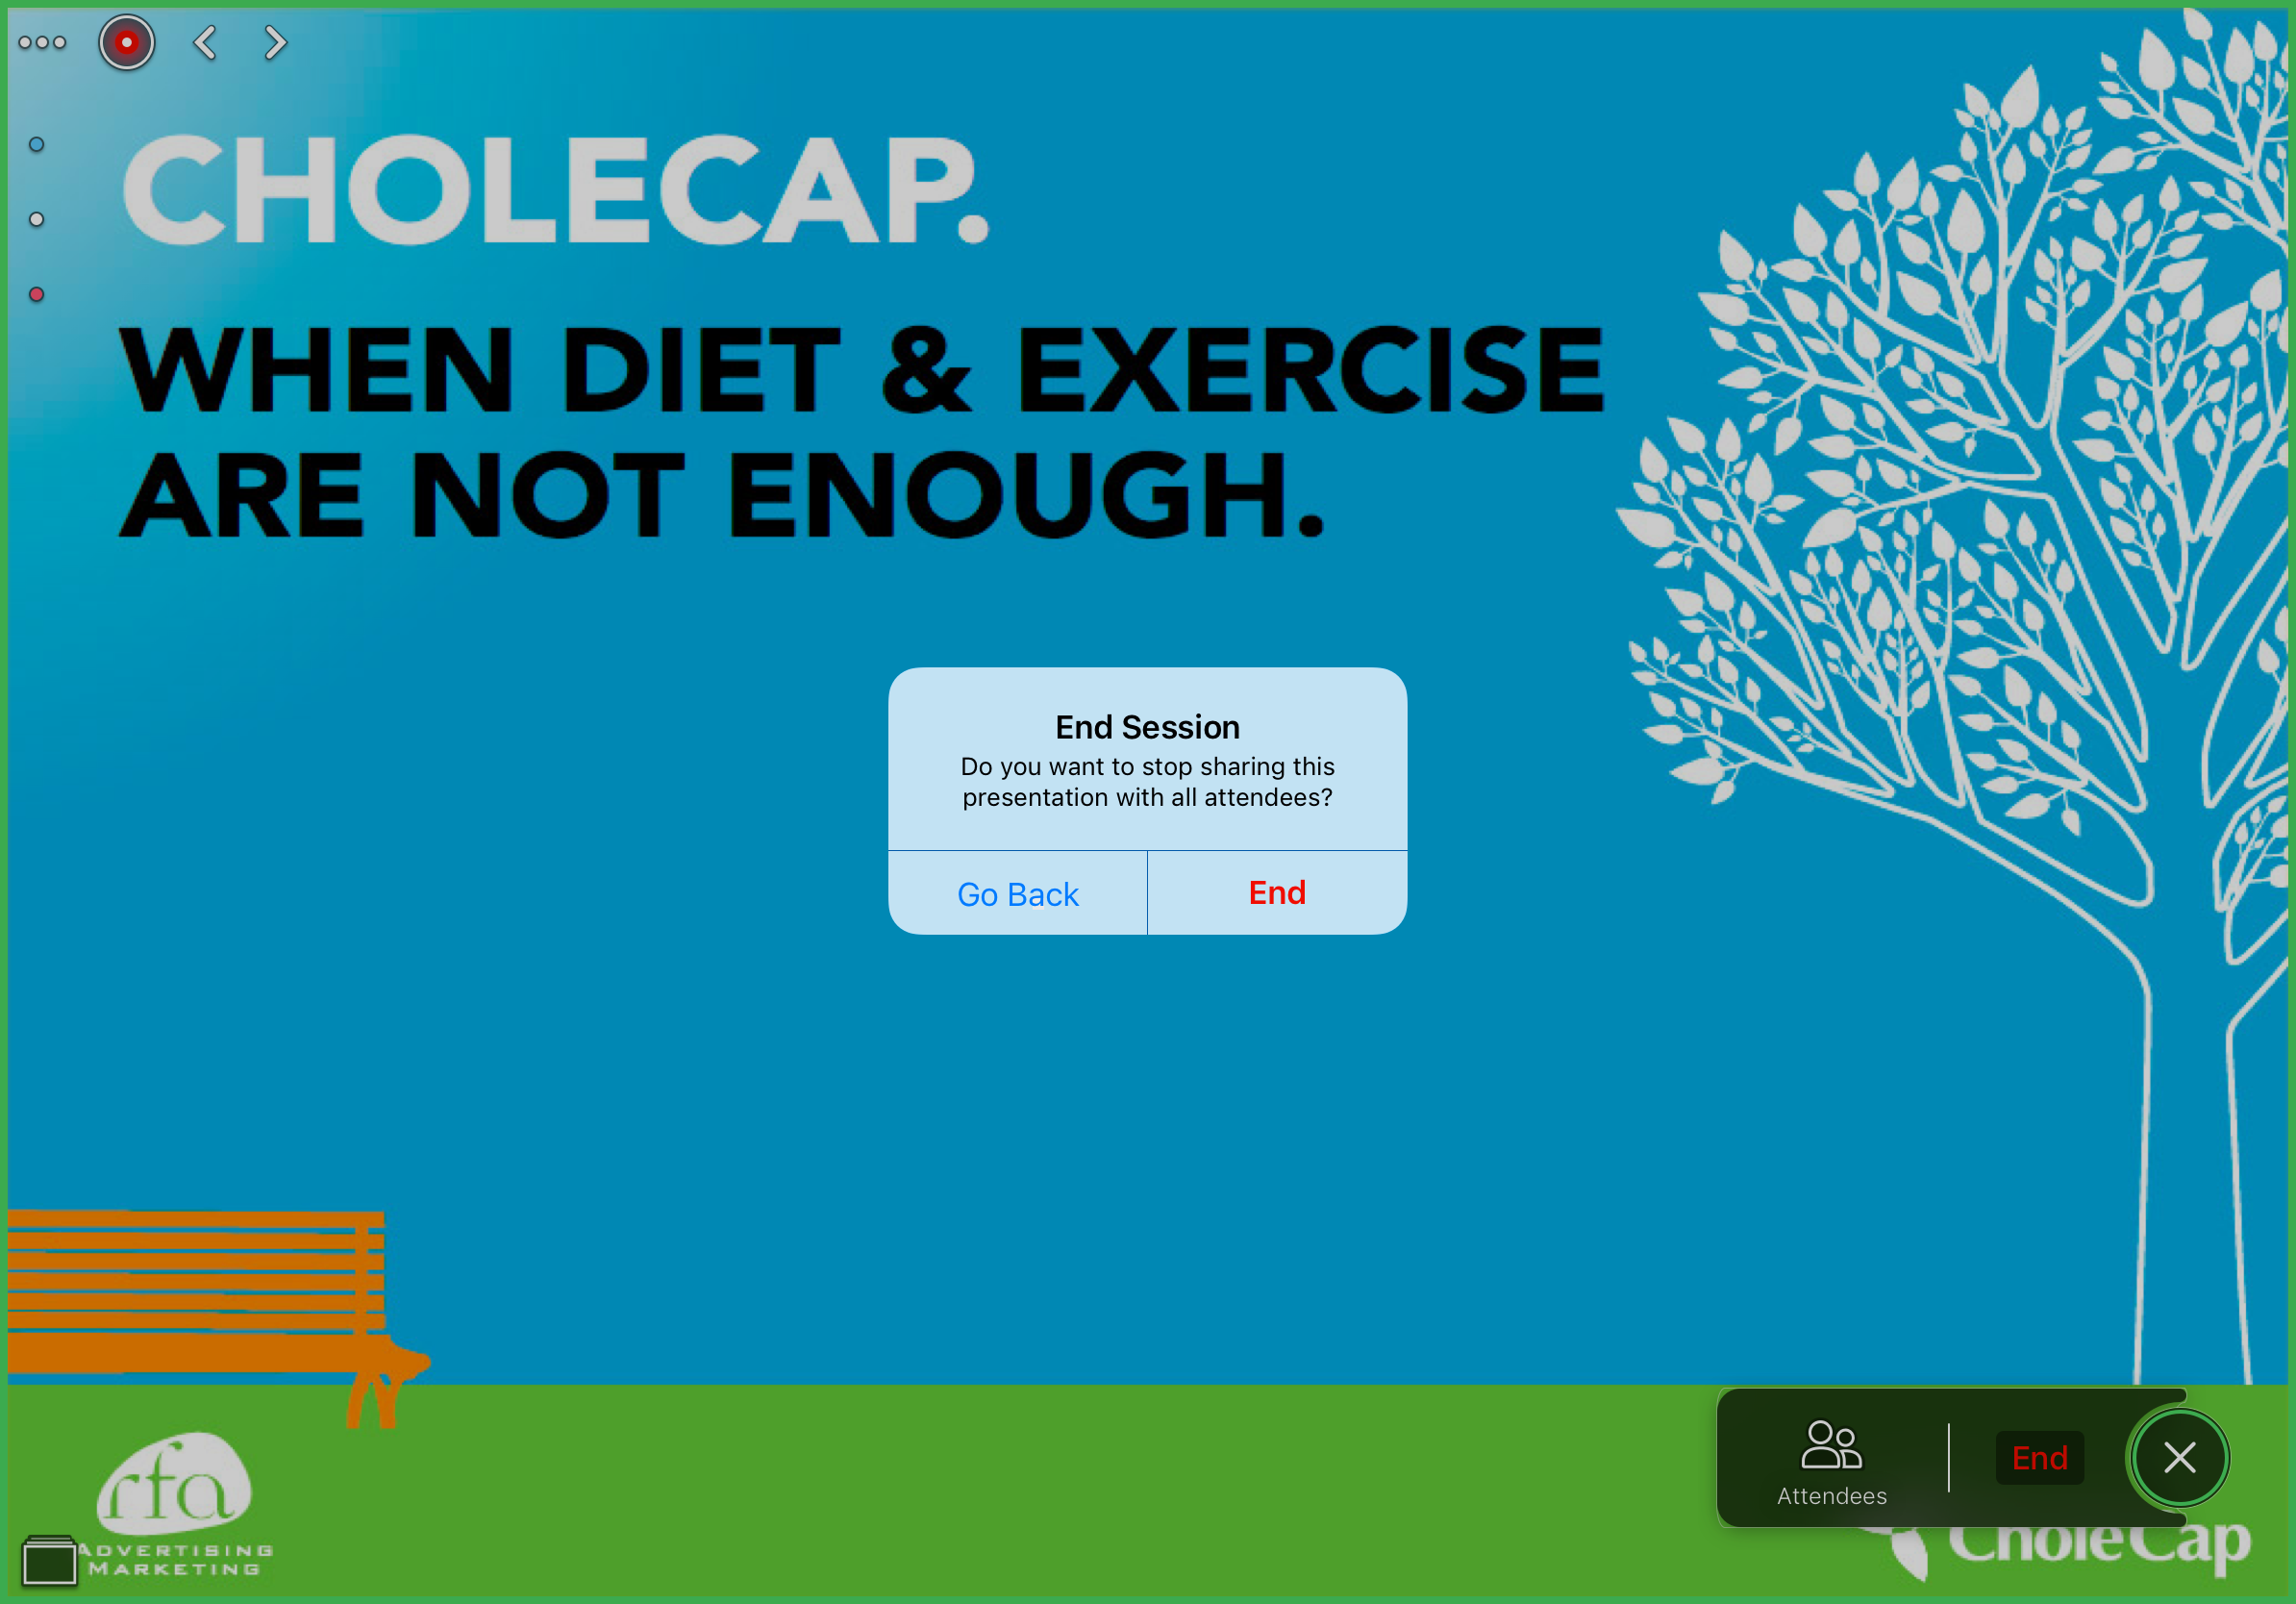
Users can stop sharing CLM content by selecting the End button in the meeting ribbon, then selecting End in the confirmation popup, or by selecting Done in the More Actions menu.
Presenting remotely automatically ends if there is no user interaction with the device screen for 5 minutes. A confirmation popup to stop displaying content displays and users have 60 seconds to be active again before it ends.
Ending remote CLM does not expire the link, which means users can share CLM content with the HCP again with the same link details. Users must launch the media library from the call report associated with the previous remote CLM activity, then start remote CLM for the appropriate presentation. The link expires two hours after the most recently ended remote CLM activity.
Users are prompted to select an account with which to associate the tracked remote CLM activity if one was not selected before sharing the presentation.
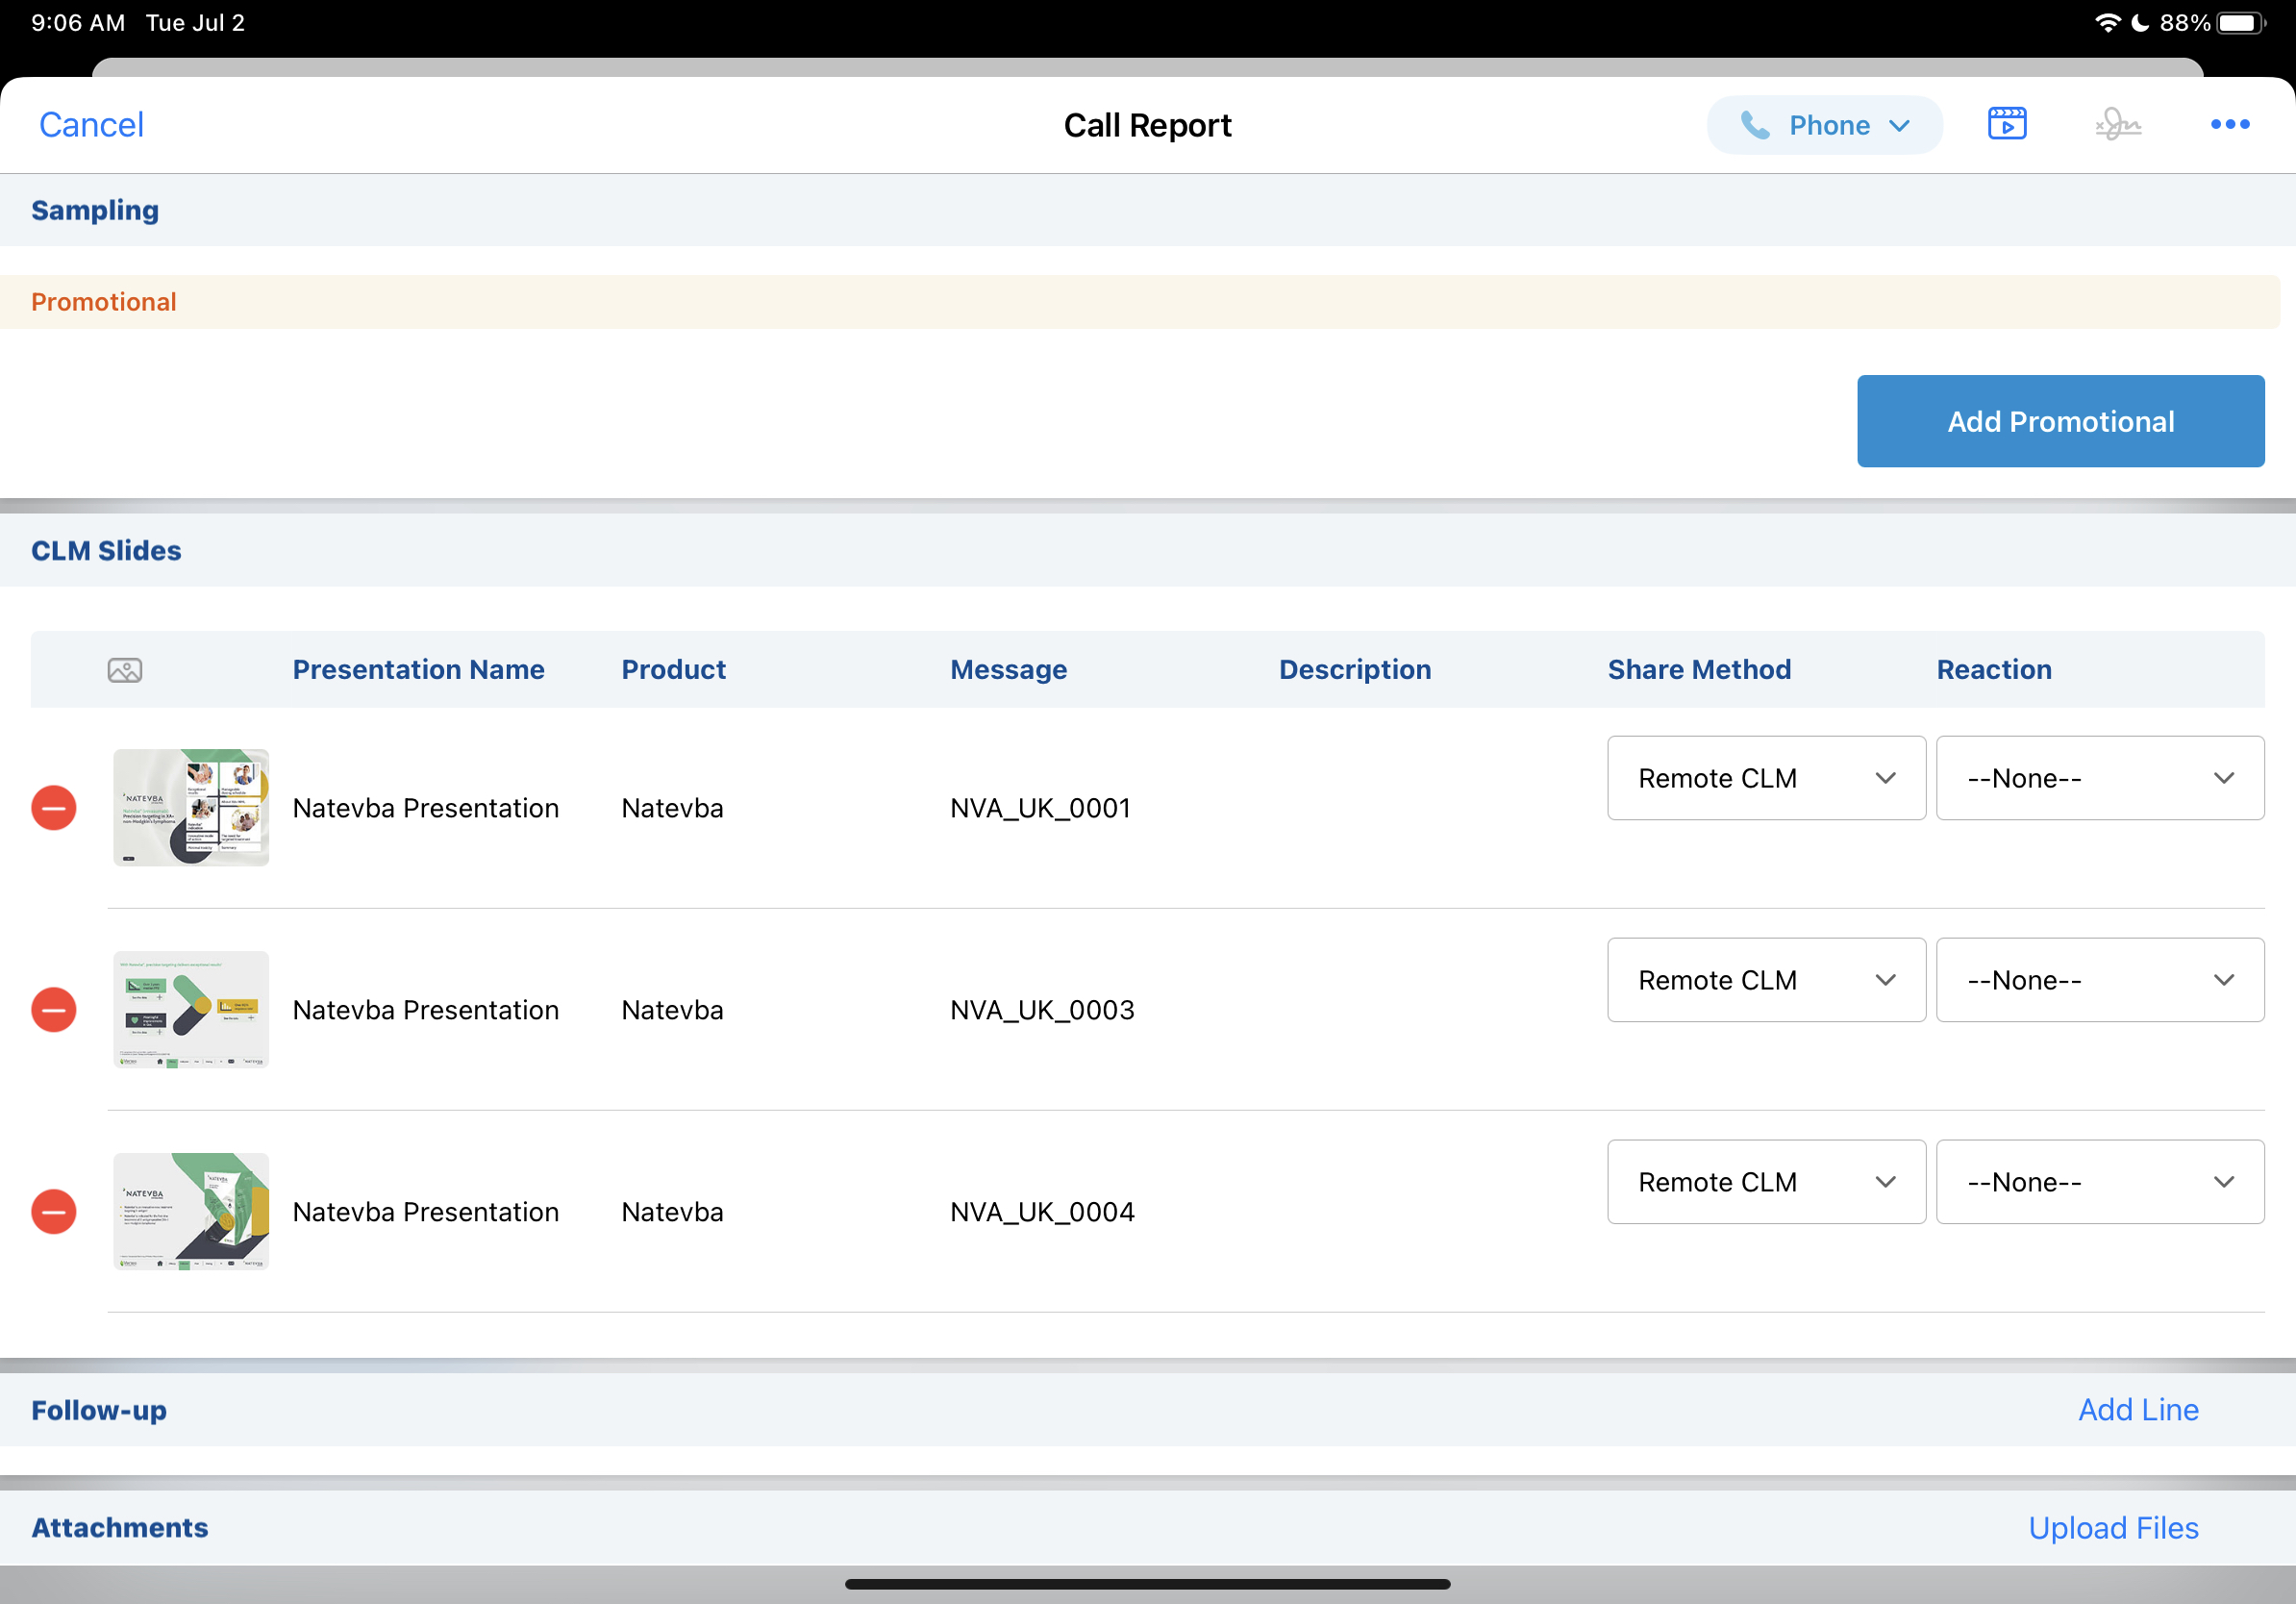
After creating a call and confirming the end of remote CLM, the CLM Details section of the call report displays, allowing users to review the activity. The Share_Channel_vod field for each tracked call key message is stamped with Remote_CLM_vod.
Ending Remote CLM
Users can stop sharing CLM content by selecting the End button in the meeting ribbon, then selecting End in the confirmation popup, or by selecting Done in the More Actions menu.
Remote CLM automatically ends if there is no user interaction with the device screen for 5 minutes. A confirmation popup to stop displaying content displays and users have 60 seconds to be active again before it ends.
Ending remote CLM does not expire the link, which means users can share CLM content with the HCP again with the same link details. Users must launch the media library from the call report associated with the previous remote CLM activity, then start remote CLM for the appropriate presentation. The link expires two hours after the most recently ended remote CLM activity.
Users are prompted to select an account with which to associate the tracked remote CLM activity if one was not selected before sharing the presentation.
After creating a call and confirming the end of remote CLM, the CLM Details section of the call report displays, allowing users to review the activity. The Share_Channel_vod field for each tracked call key message is stamped with Remote_CLM_vod.
Tracking Remote CLM
When a user selects a sharing option to send remote CLM details with an attendee, a Sent_Message_vod record is created and stamped with the following information:
|
Field |
Value |
|---|---|
|
Record Type |
Content_vod |
|
Account |
Lookup to the attendee account |
|
User |
Lookup to the user who sent the session details |
|
Engage Link |
Participant URL. If there is a Call2_vod record associated with the session, this link is also stamped in the Remote_CLM_Participant_URL_vod field on the record. |
|
Shortened Engage Link |
The shortened Participant URL |
|
Capture Datetime |
Datetime at which the user selected the sharing option |
|
Sent from Platform |
iPad_CRM_vod |
|
Shared Via |
The app used to send the session details:
|
|
Transaction Type |
Remote_CLM_Link_vod |
|
Call |
The associated Call2_vod record |
|
Mobile Id |
System-generated Id |
|
VExternal Id |
The unique identifier of the shortened Participant URL |
Events Management
Using the Data Loader to Generate Participant URLs for Virtual Events
Event organizers can generate attendee and speaker participant URLs for all child events linked to a parent virtual event when using Event Templates in conjunction with virtual events. When used in conjunction with an automated Data Loader process, this enables easier planning and execution of large virtual events, as it enables teams to share and invite child virtual event attendees to a single virtual session.
For example, Sarah Jones organizes a large virtual event. After she creates the EM_Event_vod record in CRM, an automated process creates attendees associated with her event, then adds them to CRM via data loading. All of the event’s attendees are automatically assigned participant URLs. Sarah sends her participants their respective URLs via an Approved Email invitation, which her attendees later use to join Sarah’s virtual event.
This feature does not require configuration.
This feature is supported in Lightning for Events Management.
Using the Data Loader to Generate Participant URLs
When EM_Attendee_vod or EM_Event_Speaker_vod records are data loaded into CRM to associate them with a virtual event, a participant URL is automatically generated and stamped onto the Webinar_Participant_URL_vod or Webinar_Panelist_URL_vod fields, respectively.
Attendees and speakers added to an event via data loading do not have to be associated with an existing User, Contact, or Account in CRM.
Using the Provisioning Status Picklist
The Engage_Provisioning_Status_vod picklist on both the EM_Attendee_vod or EM_Event_Speaker_vod objects indicates the status of the Participant URL generation. If the URL generation is successful, the Engage_Provisioning_Status_vod picklist automatically updates to Success_vod.
The Engage_Provisioning_Status_vod picklist also has the following values to help organizers determine any errors that occur during the generation process:
- Missing_Name_vod – An error occurred due to the record not having a defined first or last name
- Request_Failed_vod – The server could not generate a Participant URL
To retry an unsuccessful URL generation after addressing any errors, update the Engage_Provisioning_Status_vod picklist to Retry_Request_vod.
If attendees or speakers are deleted or removed from an event via the data loader, their associated Participant URLs are cleared.
Creating Speaker Agreements
Speaker Agreements are contracts for speakers specifying rates for contracted services over a defined period of time, called a Series Contract. This enables customers to establish a defined agreement of rates and services with speakers for a specified period of time.
For example, Alice Admin creates a contract template for a Series Contract allowing users at Verteo BioPharma to use one contract for a speaker to speak at several events over a twelve month period. The contract template contains all appropriate contract lines specifying services and rates, as well as a print template to generate the PDF version of the contract for signing.
Later, Sarah Jones decides she wants to contract one of her accounts, Dr. Ackerman, to speak at several of her events over the next year. Using the contract template created by Alice, Sarah creates a new contract for Dr. Ackerman. She edits each quantity and rate for each contract line, then generates a PDF version of the completed contract. Sarah sends the PDF contract to Dr. Ackerman for the appropriate signatures. Later, Sarah uploads the signed copy of the contract, activating the contract.
Creating the Print Template
If the contract is planned to be activated via uploading a signed copy of the contract, users must first create a .docx Print Template used to generate the agreement signed by the speaker.
Supported Tokens
The following tokens are supported when creating print templates for Series Contracts:
-
All SFDC and Veeva-provided Contract_vod, Contract_Line_vod, and Contract_Partner_vod fields via the {{ObjectAPIName.FieldAPIName}} format
Custom fields are not supported.
- The CurrencyISOCode value of Contract_vod and Contract_Line_vod records via the {{ObjectAPIName.CurrencyISOCode}} format
-
Contract_vod and Contract_Partner_vod lookup fields via the {{ObjectAPIName.RelationshipName.FieldAPIName}} format
Up to two levels of relationship lookups are supported.
- The {{timeZone}} token
- The {{currentDate}} token – Renders as the current date and time when the contract is generated
Tokens are considered required unless marked as optional with the <O> modifier. For example, {{Contract_vod__c.Name<O>}}. If a non-optional token cannot be resolved when the user generates the contract, the generation fails.
Contract_Line_vod tokens resolve as a list of all Contract_Line_vod records associated with the Contract_vod record. If the token is added as a row of a table in the .docx print template, the token resolves with each Contract_Line_vod record as an individual row of the table.
For example, if the following table was included in the .docx print template:
|
Program Type |
Compensation |
|---|---|
|
{{Contract_Line_vod__c.Service_Name_vod__c}} |
{{Contract_Line_vod__c.EM_Total_Payment_vod__c}} |
The rendered contract would include rows for each associated service name:
|
Program Type |
Compensation |
|---|---|
|
Group In-Person Training |
$500.00 |
|
Pre-recorded Web Training |
$700.00 |
|
Local Travel (Two Way) |
$1,000.00 |
Filtering Contract Lines
To grant greater specificity in rendered Contract_Line_vod records, tokens inserting Contract_Line_vod picklists can be filtered to only display matching values by adding the <ObjectAPIName.FieldAPIName=PicklistValueAPIName> modifier to the token.
For example, the {{Contract_Line_vod__c.Service_Name_vod__c<Contract_Line_vod__c.Service_Type_vod__c=Program_vod__c>}} token filters the list to only display Contract Lines with a Service_Type_vod field of Program_vod.
Sorting Contract Lines
By default, the list of Contract Lines in the generated Print Template sort based on the SFID of the Contract_Line_vod records. Organizers can define the sort order of Contract Lines by adding the <Sort=ObjectName.FieldAPIName SortOrder> modifier to the token.
For example, {{Contract_Line_vod__c.Service_Name_vod__c<Sort=Contract_Line_vod__c.EM_Total_Payment_vod__c desc>}} sorts the list based on the EM_Total_Payment_vod field in descending order.
The filtering and sorting modifiers can be used together to create even greater specificity.
Associating Print Templates to an EM_Catalog_vod Record
After completing the .docx template, admins can make print templates available by uploading the document to an Contract_vod type EM_Catalog_vod record.
Creating a Series Contract Template
Once the print template is complete and attached to an EM_Catalog_vod record, the Series Contract template can be created:
- Navigate to the Contracts tab.
- Select New.
- Select Series Contract for the record type.
-
Populate the appropriate fields:
- Name – Required
- Description_vod
- Start_Date_vod and End_Date_vod – Required
- EM_Catalog_vod – Select the appropriate EM_Catalog_vod record with the attached Print Template
- Template_vod – Select this check box to designate the Contract_vod record as a template
- Language_vod
- EM_Tier_vod – The tier of the contract
- Corporate_Contract_vod – Select this check box to designate the template as being for corporate contracts, not individual contracts
- Contracted_Product_vod – Select the appropriate Product record
- Contracted_Event_Type_vod – Select the appropriate EM_Event_Configuration_vod record to define the type of event the contract applies to
- Minimum_Programs_vod and Maximum_Programs_vod – Defines the minimum and maximum number of programs the contracted speaker can speak at
- Period_Type_vod – Defines the type of Series Contract. The period type determines which additional fields must be populated before creating the contract. Available values are:
- Calendar – The contract expires on a specific day and month. For example, the contract could be marked as expiring on December 31, 2024, regardless of when the contract is signed.
- Rolling – The contract expires based on a set number of months after signing. For example, the contract could be marked as expiring six months after whenever the contract is signed.
- None – The contract has no period
-
Populate the following additional fields based on the selected Period_Type_vod:
Period_Type_vod
Additional Fields
Calendar
- Contract_Length_vod
- First_Expiration_Date_vod
- Minimum_Contract_Length_vod – Optional
Rolling
Contract_Length_vod No additional fields are required for contracts with a Period_Type_vod of None.
- Select Save.
Creating Contract Lines for Series Contract Templates
After creating the Series Contract template, individual Contract_Line_vod records can be created from the Contract_vod detail page:
- Navigate to the Contract Lines related list.
- Select New Contract Line.
-
Populate the following fields:
- Service_vod – Speaker Service defined by the associated EM_Catalog record
- EM_Rate_Type_vod – The rate type for the contract line. Available values are:
- Hour
- Day
- Event
- EM_Service_Quantity_Min_vod and EM_Service_Quantity_Max_vod – The minimum and maximum allowed quantities
- EM_Service_Quantity_vod – The fixed allowed quantity. This field is optional and should not be used together with the EM_Service_Quantity_Min_vod and EM_Service_Quantity_Max_vod fields.
- EM_Rate_Min_vod and EM_Rate_Max_vod – The minimum and maximum allowed rates
- EM_Rate_vod – The fixed allowed rate. This field is optional and should not be used together with the EM_Rate_Min_vod and EM_Rate_Max_vod fields.
- Select Save or Save and New.
Activating Series Contract Templates
Once all appropriate Contract_Line_vod records are created, the contract template can be activated by either updating the Status_vod field to Activated_vod or by selecting the Activate button.
New Contract_Line_vod records cannot be created when a Contract Template is activated.
Generating a Series Contract for a Speaker
To generate a Series Contract for a Speaker:
- Navigate to the appropriate EM_Speaker_vod record.
- Select Manage Contracts.
- Select New.
-
Select the appropriate Contract Template from the list of available templates.
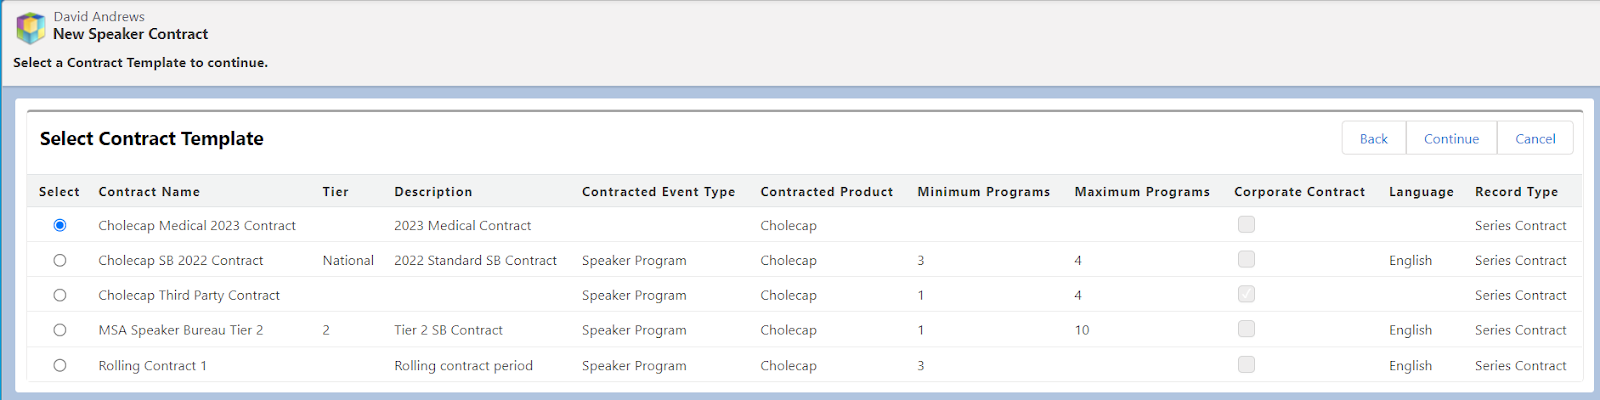
- Select Continue.
-
Edit the Rate and Service Quantity for the appropriate Contract Lines, if applicable.
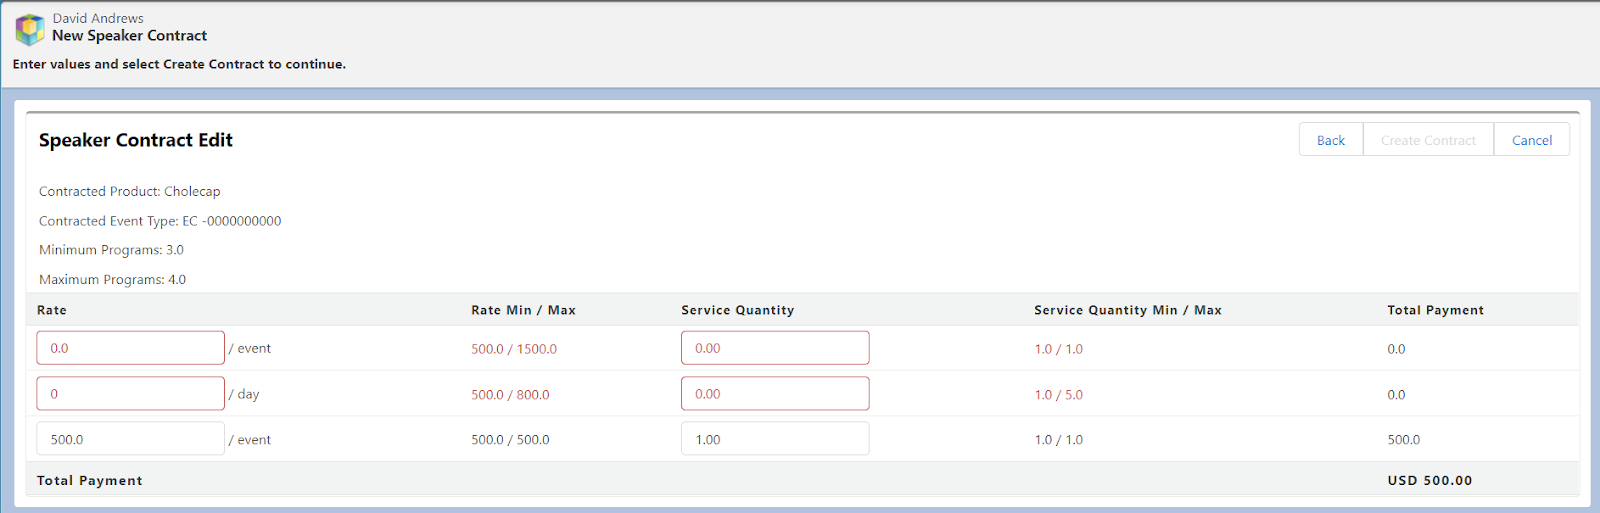
-
Select Create Contract.
-
If the Series Contract template used to generate the contract had an associated EM_Catalog_vod record with a print template, a PDF contract based on the associated print template is generated and added to the Notes and Attachments related list of the EM_Speaker_vod record.
If an error prevents the PDF from being generated, a .txt file containing details about the error is automatically added to the Notes and Attachments related list of the EM_Speaker_vod record.
- If no EM_Catalog_vod record is associated with the Series Contract template, the user is redirected to the EM_Speaker_vod detail record page
The currency of the generated PDF contract is based on the currency of the Contract Template, not the user generating the contract.
-
Updating Generated Contracts
After generating the PDF, users can update an existing contract:
- Navigate to the appropriate EM_Speaker_vod record.
- Select Manage Contracts.
- Select the appropriate contract.
- Select Update.
- Update the appropriate contract lines.
- Select Update Contract. This generates a new PDF contract.
Signing and Activating Series Contracts
After the contract has been generated, the user can activate the contract via one of the following methods.
Upload a Signed Contract
If the contract was signed via a PDF version of the contract generated via print template, users can upload the signed version of the PDF contract to activate the contract:
- Navigate to the appropriate EM_Speaker_vod record.
- Select Manage Contracts.
- Select the appropriate contract.
- Select Activate.
- Enter the appropriate signature datetime.
- Select Attach File.
-
Select Choose File.

- Select Attach File.
- Select Done.
Sign via External Integration
Customers can build custom external integrations with Veeva CRM to capture the appropriate signatures for a contract. Custom integrations must perform the following edits to the appropriate Contract_Partner_vod records in CRM in order to enable users to activate the signed contract:
- Populate the Signature_Datetime_vod field with the appropriate datetime
- Update the Status_vod field to Signed_vod
Once the integration updates the appropriate Contract_Partner_vod records, the user can activate the contract:
- Navigate to the appropriate EM_Speaker_vod record.
- Select Manage Contracts.
- Select the appropriate contract.
- Select Activate.
- Select OK.
Activate Contract Without Signatures
Users can activate a contract without signatures if the following fields are not on the Contract_Partner_vod object page layout:
- Acceptance_ID_vod
- Signature_Datetime_vod
To activate a contract without a signature:
- Navigate to the appropriate EM_Speaker_vod record.
- Select Manage Contracts.
- Select the appropriate contract.
- Select Activate.
- Select OK.
Linking Contracts to Events and Event Speakers
After the contract is activated, users can link the contract to the appropriate EM_Event_Speaker_vod record, enabling events to begin counting against the contracted number of events the speaker is added to:
- Navigate to the Event Speakers related list of the appropriate event.
- Select the appropriate EM_Event_Speaker_vod record.
- Select Link Contract.
-
Select the appropriate contract from the list. Contracts display in the list if it matches all of the following criteria:
- The contract is an activated Series_Contract_vod type contract
- The contract’s EM_Speaker_vod field matches the event speaker’s Speaker_vod field
- The contract’s Contracted_Event_Type_vod field is either empty, or matches the EM_Event_Configuration_vod record used to generate the corresponding event
- The contract’s Contracted_Product_vod field is either empty, or matches the Product_vod field of the corresponding event
- Select Link Contract.
The Completed_Programs_vod field on Contract_vod records automatically populates with the number of contracted events completed by the speaker.
Medical Events
Supporting Medical Event Attendees in Lightning
Lightning-enabled orgs have access to a dedicated experience on the Browser (Lightning) platform, enabling the use of Salesforce’s enhanced Lightning UI. Admins in orgs that use the Lightning UI with Medical Events must enable additional overrides and Apex classes to enable editing Medical_Event_vod and Event_Attendee_vod records.
MyInsights
Translating MyInsights Tab Names
Users in countries with multiple languages can view visualizations in their native language. Admins create the translations for the visualization names displayed as tabs in the Sunrise bar. Translated names display based on the user’s defined language.
For example, Verteo BioPharma users in Canada include French and English speakers. Amy Adams, an admin for Verteo BioPharma, creates a French translation for the name of a MyInsights visualization used by French-speaking users. When an English speaker views the visualization, the tab name displays in English. When a French speaker views the same visualization, the tab name displays in French.
Creating MyInsights Tab Translations
Admins must create a Veeva Message with the translated tab name for each applicable language. To create a translation:
- Navigate to the Veeva Messages tab.
- Select New.
- Populate the following fields:
- Name – The name of the Veeva Message. The name must be the same for all translations for a single visualization.
- Category – The category of the Veeva Message. The category must be the same for all translations for a single visualization. Veeva recommends creating a custom Veeva Message category specific to the customer used for all MyInsights tab translations.
- Language – The language of the translated tab name. When users view a tab name, the correct translation is selected by matching the language of the Veeva Message to the user’s language.
- Text – The translation of the tab name
- Ensure Active is selected.
- Select Save.
To update a visualization to use the tab translations:
- Navigate to the appropriate HTML_Report_vod record.
- Populate the Name field with the appropriate Veeva Message, using the format Name_of_Veeva_Message;;Category_of_Veeva_Message.
Admins must also create a Veeva Message for English. If a Veeva Message that matches the user’s language does not exist, the tab name defaults to English.
Using Tab Translations
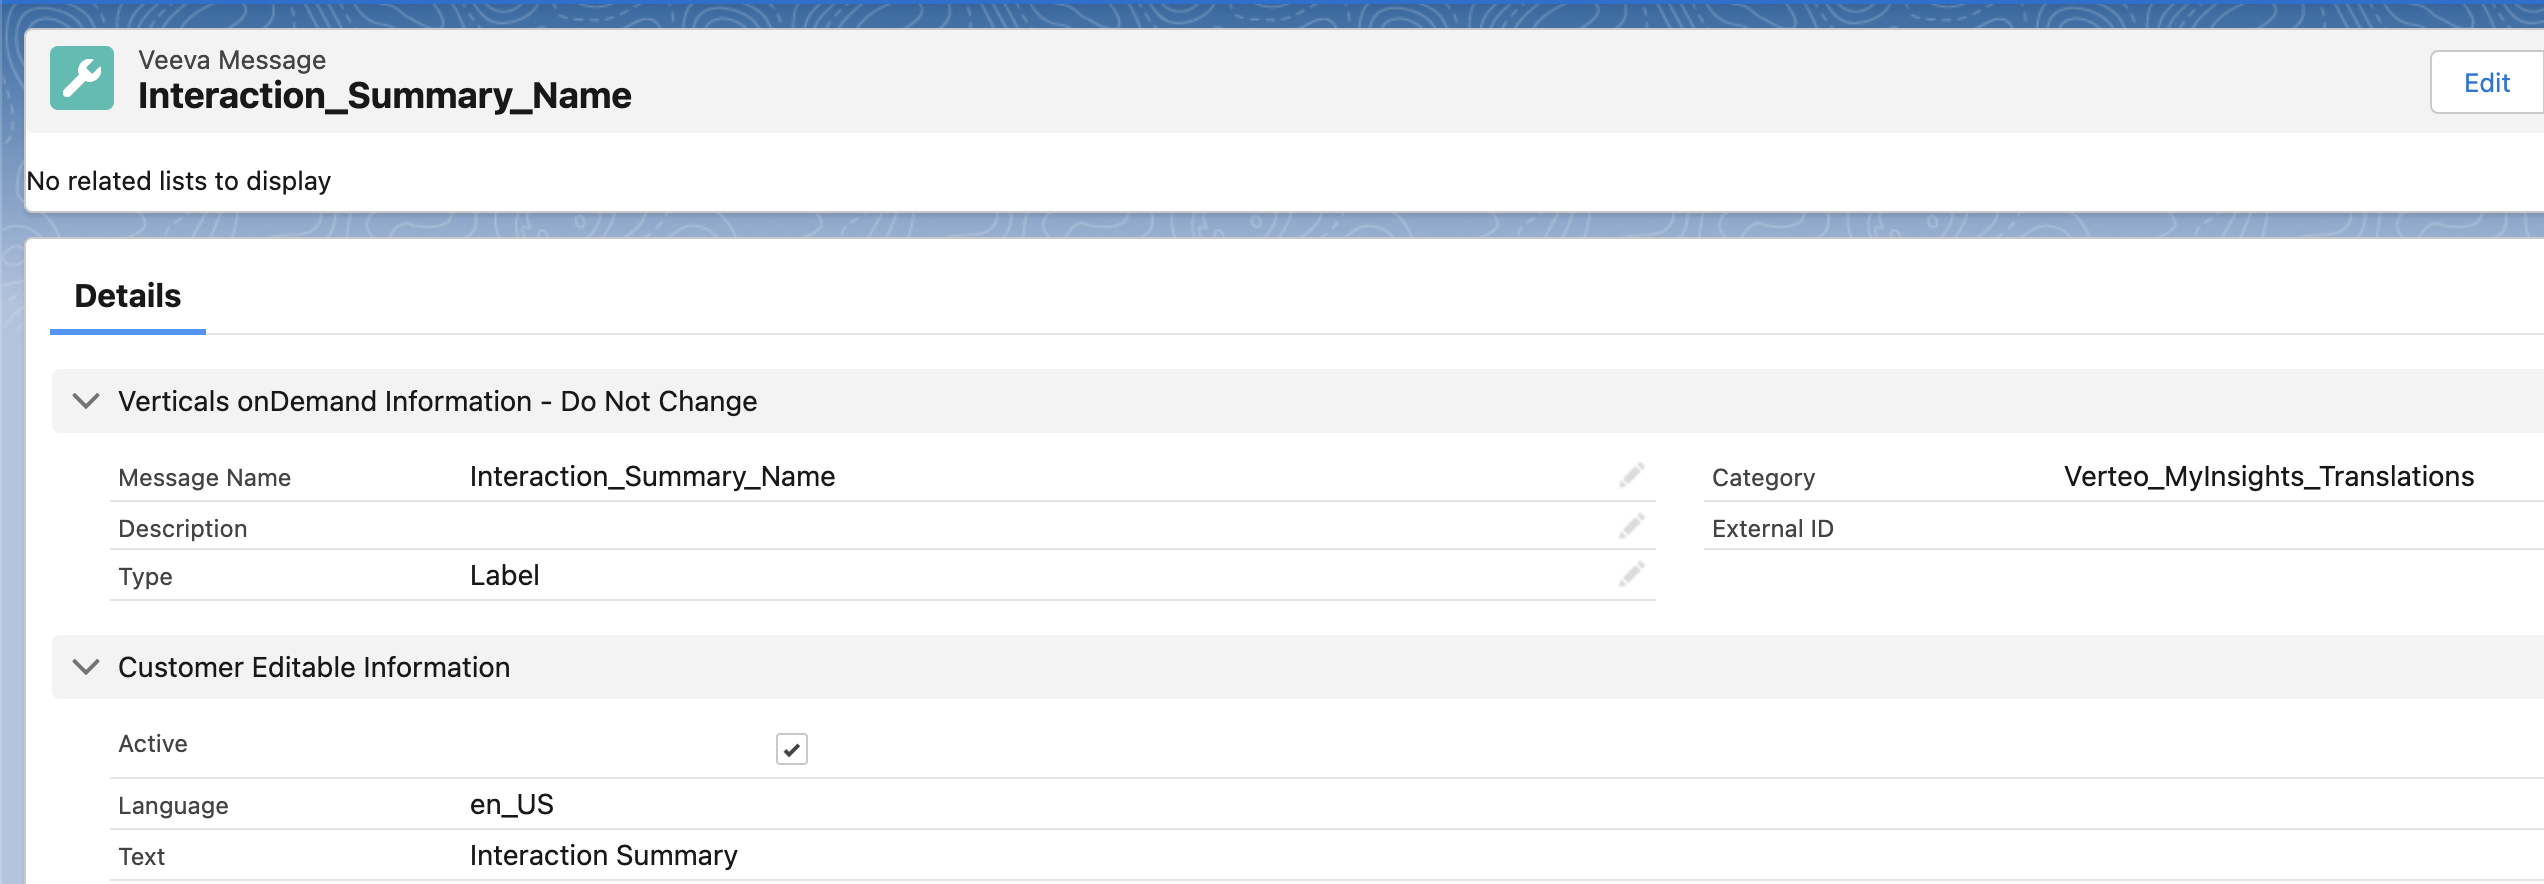
For example, an interaction summary visualization viewed by English, French, and Spanish speakers needs translations for French and Spanish, as well as the default English name. An admin creates 3 Veeva Messages:
- Interaction_Summary_Name;;Verteo_MyInsights_Translations
- Language = English
- Text = The name of the interaction summary visualization
- Interaction_Summary_Name;;Verteo_MyInsights_Translations
- Language = French
- Text = French translation of the name of the interaction summary visualization

- Interaction_Summary_Name;;Verteo_MyInsights_Translations
- Language = Spanish
- Text = Spanish translation of the name of the interaction summary visualization

The Name field of the HTML_Report_vod record for the interaction summary visualization is Interaction_Summary_Name;;Verteo_MyInsights_Translations.
![]()
Network
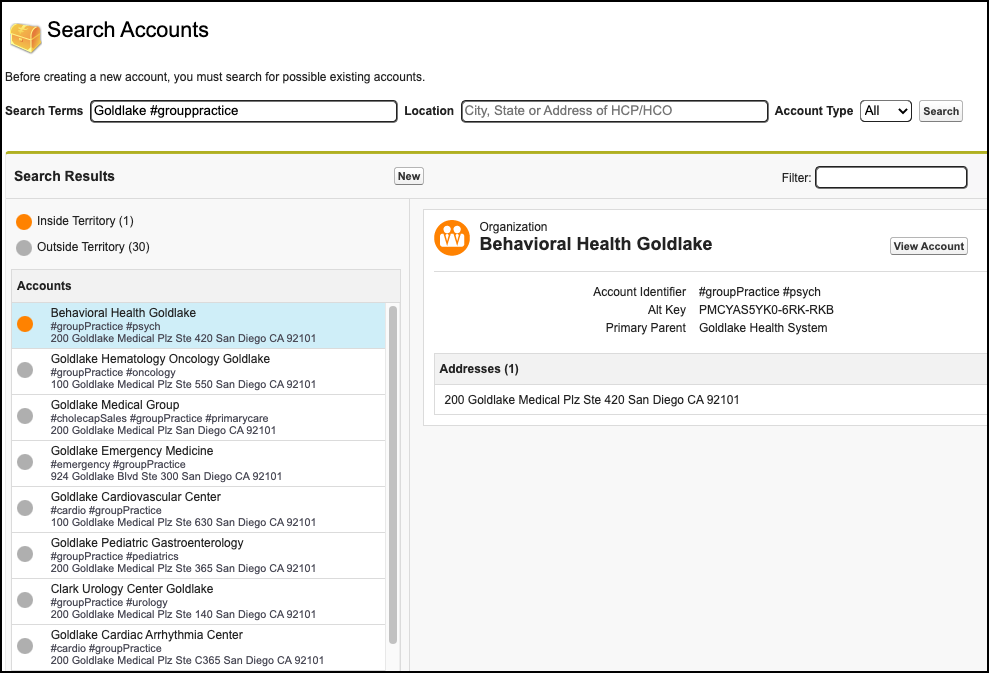
Network Hashtags in CRM
Network hashtags display on record profiles and in search results to summarize important details, and allow users to find correct records faster. For example, hashtags help with the following:
- Summarize a profile so you can identify HCPs and HCOs with similar names
- View more accurate search results when hashtags are applied
- Identify HCPs and HCOs marked as key targets from market flags
- Help find the HCOs with sales data associated to it
- Prevent add requests from being created for duplicate records because it's difficult to find existing accounts
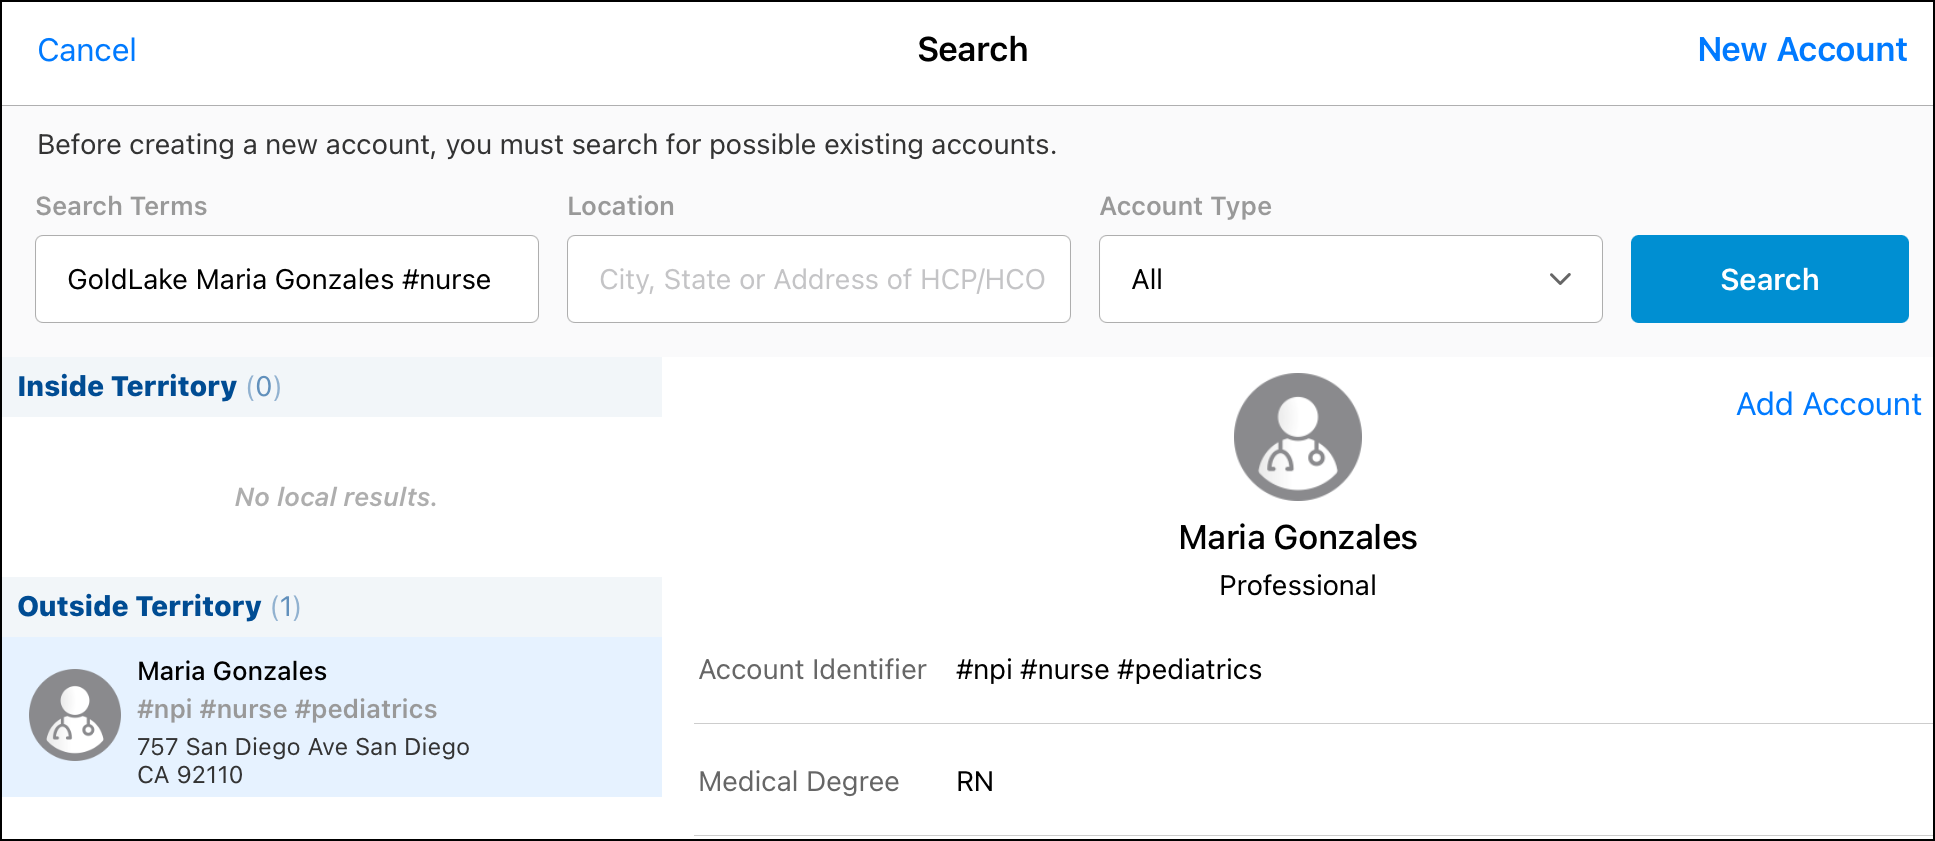
Network hashtags display for each out-of-territory account on the NAS result page. For in-territory accounts, the Account Identifier value displays. Network provides a set of predefined hashtags and administrators can create hashtags for their specific business purposes.
For example, Sarah Jones needs to add Maria Gonzales to one of her territories in NAS. She enters Gonzales into the Search Terms field in NAS, but there are several accounts with the last name Gonzales. Sarah enters the hashtag #nurse to further limit the list of results, and verifies she is selecting the correct account by looking at the hashtags displayed in the results and the preview pane.
Using Network Hashtags in CRM
If the Network Managed Account Identifier setting is populated with 2, Network Hashtags are imported into Veeva CRM during the Network Account Search and Data Subscription process. This allows Network Hashtags to be displayed in the following areas:
- Accounts - Network Account Search, Account lists, Account details, and more
- Calls - Group Calls, Call Reports, Call Location, Attendee Search
- My Schedule - Agenda, Week, Scheduler, Map View
- Events Management - Add Attendee, Attendee Details, Outside Territory Search
- Stakeholder Navigator - HCP and HCO accounts
When a user selects an outside territory record to download using NAS, the Network Hashtags for the account are stored in CRM in the Account Identifier field for use even when users are not connected to Veeva Network.
Hashtags are not imported during the DCR import process.
To search by network hashtags, enter the hashtag including the # sign, as well as any other search terms, in the Search Terms field on the NAS screen. The results include any matches against the entered hashtag and search terms.
Order Management
Adding Recommended Order Quantities
To help users meet their sales goals, they can view recommended order quantities and a recommendation reason for each product on the order form. This helps in the negotiation process where they can quickly add quantities to an order. The recommended quantity represents the quantity users should be selling to their customers. These numbers are loaded into CRM along with the recommendation reason.
For example, Sarah Jones negotiates an order with the pharmacist at Verteo Pharmacy. On the order form, several products have a recommended quantity and recommended reason listed. The recommended quantity for Cholecap 10mg is 40. Sarah suggests this amount to the pharmacist and he agrees. Sarah selects the “Accept 40” link to add the product and recommended quantity to the order form.
This feature is not supported for Multiple Recipient orders, Bundle Packs, or Product Kit items.
Prerequisites
Ensure initial configuration is complete before enabling this functionality.
Using Recommended Order Quantity
When users create an order using Mass Add Products or Direct Quantity Order Entry, a recommended quantity displays for each product, if available. When users select the recommended quantity, the quantity is added to the order and the Recommendation Used? check box is selected. This information can be used for further analysis.
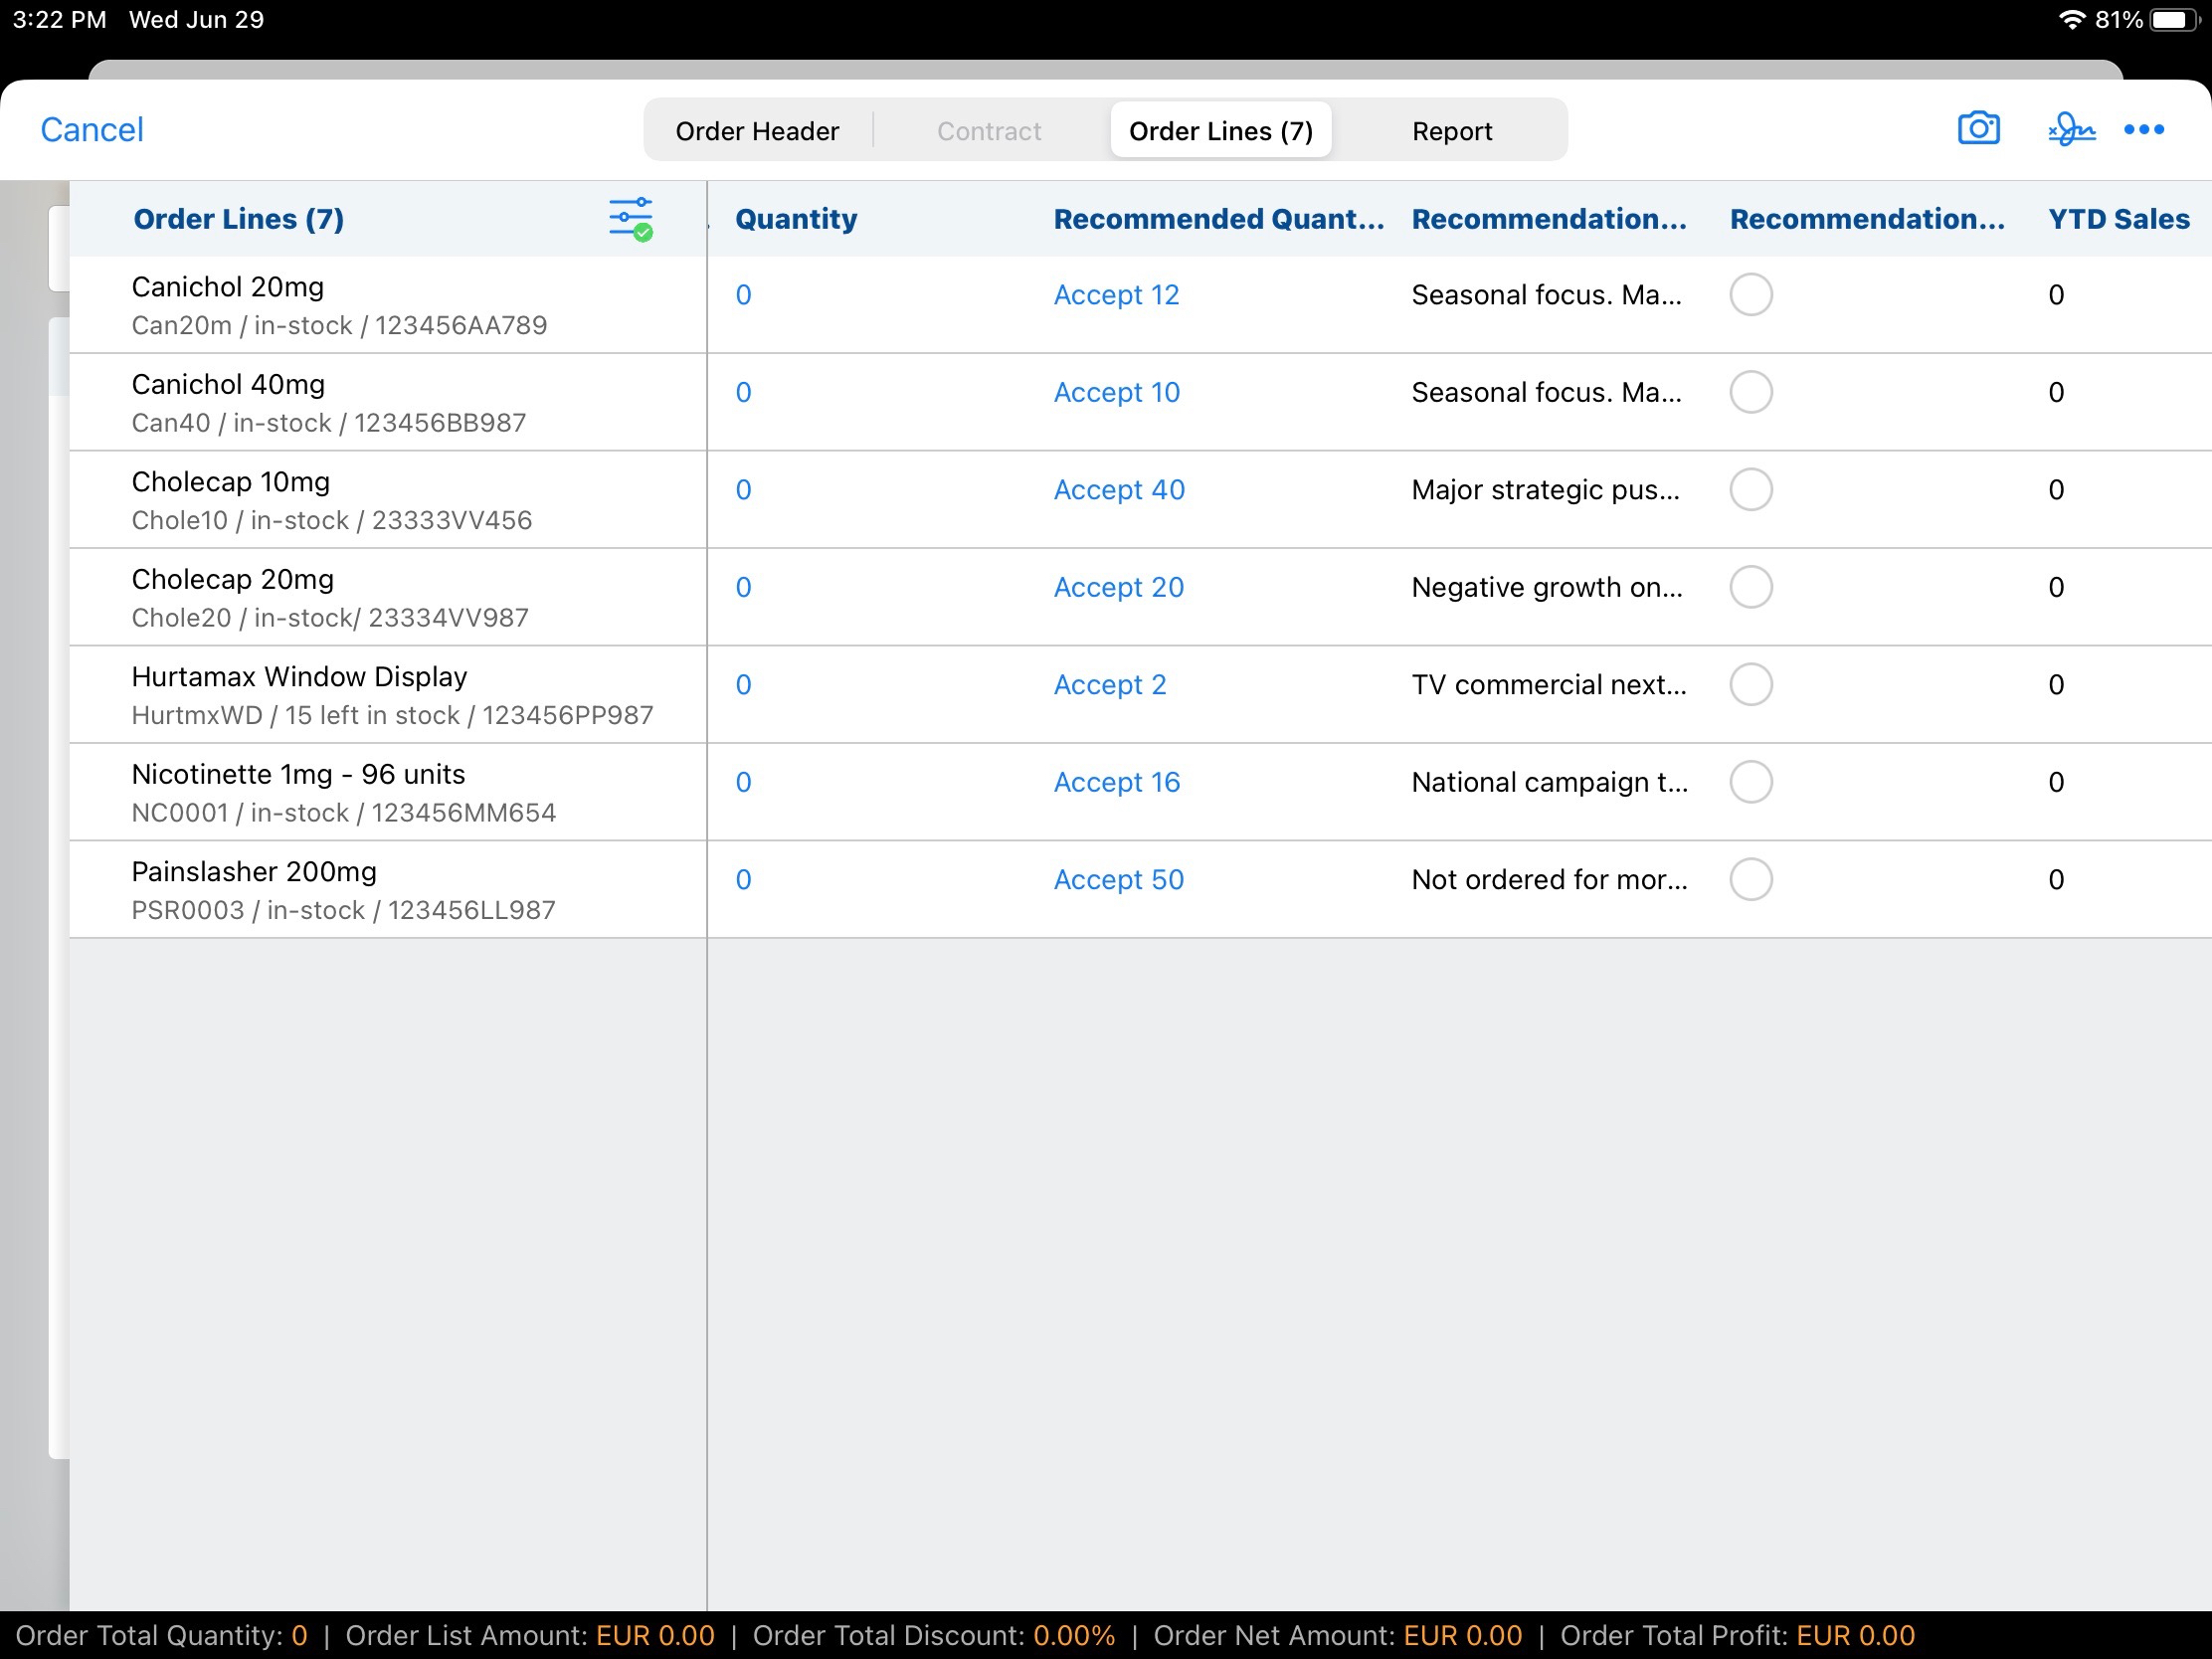
Recommended quantities are generated using a company’s preferred analytics solution. This number and an accompanying Recommendation Reason are loaded into the Recommended_Quantity_vod and Recommended_Quantity_Reason_vod fields, respectively, on the Product_Information_vod object. Once loaded, this information displays in the appropriate fields on the Order_vod page layout. If a recommended quantity is not available for a product, the Recommended Quantity field is empty.
Users can override a recommended quantity by entering a different value using the keypad. The value entered is added to the order. Users can override a recommended quantity they previously accepted by entering a different value using the keypad. If a user overrides a recommended quantity they previously accepted, the Recommendation Used? check box remains selected. Users can undo accepting a recommended quantity by deleting the order line and re-adding the product.
The Recommended Quantity does not change for Delivery Orders if the master order is split.
If an order is cloned, the Recommended Quantity is not copied to the new order.
