

22R1.0 Functionality Guide
The Functionality Guide is intended for Sales Operations, Business Administrators, System Integrators, and others responsible for making decisions about what features are needed for end users to be successful and deciding which features work together with existing customer configurations.
Accounts
Global Account Search
Global Account Search is a tool to search for and add accounts currently outside a user’s territory, making it easier to interact with these accounts. Global Account Search also helps reduce the creation of unnecessary accounts, as users can first check if an account already exists outside of their territory before creating a new account.
For example, Sarah Jones visits Dr. Ackerman, who introduces her to Dr. Bob Adams, a doctor who has recently moved into Sarah’s territory. Sarah searches for Bob Adams in CRM and sees that her org already has an account for him, currently outside her territory. Sarah is able to add Dr. Adams to her territory, enabling her to schedule calls with him.
Implicit Filters for Global Account Search
Implicit filters are admin-defined filters based on defined fields that include or exclude sets of accounts from Global Account Search results, reducing the number of potentially unnecessary results and granting greater control over the results displaying to users.
Defining Available Fields for Implicit Filters
Standard or custom fields on the Account and Address_vod objects can be defined as fields available in implicit filters. The following field types are not supported:
- Long text
- Text Area
- URL
- Date
- Date/Time
- Geolocation
- Phone
To define the fields available for filtering:
- Navigate to Global Account Search settings.
- Populate the GAS_Implicit_Filters_vod setting with the appropriate Veeva Message. The default message is GAS_IMPLICIT_FILTERS;;Global Account Search.
-
Populate the Veeva Message defined in the setting with a semicolon-delimited list of the fields to make available to implicit filters. Use the following format:
ObjectAPIName.Field1APIName; ObjectAPIName.Field2APIName;
For example, Account.RecordTypeId;Address_vod__c.State_vod__c;Account.Specialty_vod__c
Creating Implicit Filters
To create an implicit filter:
- Navigate to the Global Account Search Configuration tab.
- Select New in the Implicit Filters section.
-
Populate the following fields:
-
Location_vod – Defines the scope of the implicit filter. If multiple implicit filters apply to a user, the implicit filter most specific to the user is applied to their search.
Select one of the following options:
- Organization-Wide Default
- Profile
- Territory – Applies if the user is assigned to either a territory matching an implicit filter or any territory below a matching territory in the hierarchy
- Applies_To_vod – Defines which specific group the implicit filter applies to. The value of this field depends on the selection of the Location_vod field:
- If Organization-Wide Default was selected, this field is disabled
- If Profile was selected, this serves as a single-select picklist with all profiles in the org
- If Territory was selected, this field serves as a single-select picklist with all territories in the org
- Inclusion_vod – Defines whether the filter is an inclusive or an exclusive filter:
- If this field is selected, the filter is inclusive and accounts must meet the implicit filter criteria in order for them to display as results. This is the default option.
- If this field is not selected, the filter is exclusive and the accounts cannot meet the implicit filter criteria in order for them to display as results
- Record Type – A multi-select picklist that defines the account record types either included or excluded based on the filter
-
-
Populate all appropriate fields in the Filter section based on the defined available fields.
- Select Save.
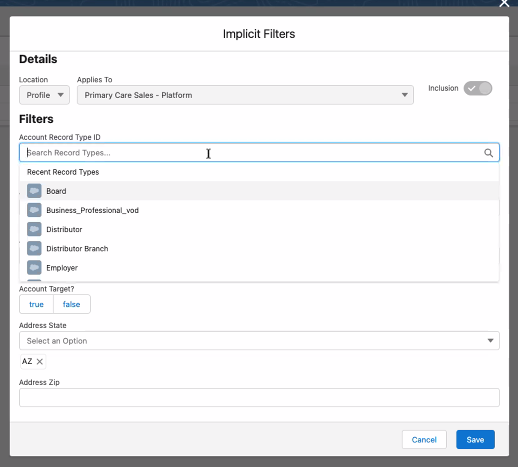
For example, the admin creates the following Implicit_Filter_vod record with the following values:
- Location_vod – Profile
- Applies_To_vod – Primary Care Sales Platform
- Inclusion_vod – Selected
- Record Type – Professional_vod, KOL_vod, Hospital_vod
- Address State – AZ
Sarah Jones is a Primary Care Sales - Platform user who searches for “Bob” in Global Account Search. Bob Adams is an account with a record type of Professional_vod located in Arizona, so he displays as a result. Bob Richards is an account with a record type of Practice_vod, so he does not display as a result.
Using Global Account Search in the Browser
Users can access Global Account Search via the dedicated Global Account Search tab.
Before selecting Search, users can define the following search parameters:
- Account Type – Filters results based on the type of account:
- HCP – Filters results to only Person Accounts
- HCO – Filters results to only Business Accounts
- All – Does not filter results
- Search Terms – Creates a fuzzy match search against text fields on the Account object
- Location – Searches for matches against text fields on the Address_vod object.
Global Account Search uses Location to prioritize account results that match the entered criteria. Accounts are still returned if they don't match the entered Location, but they are sorted below all accounts that match both Account and Location.
The search may return up to 100 results. Users can select the Filter button to further refine the list of results by specialty and credentials.
Results display as a table with the information about each result’s record type, name, specialty, and address.
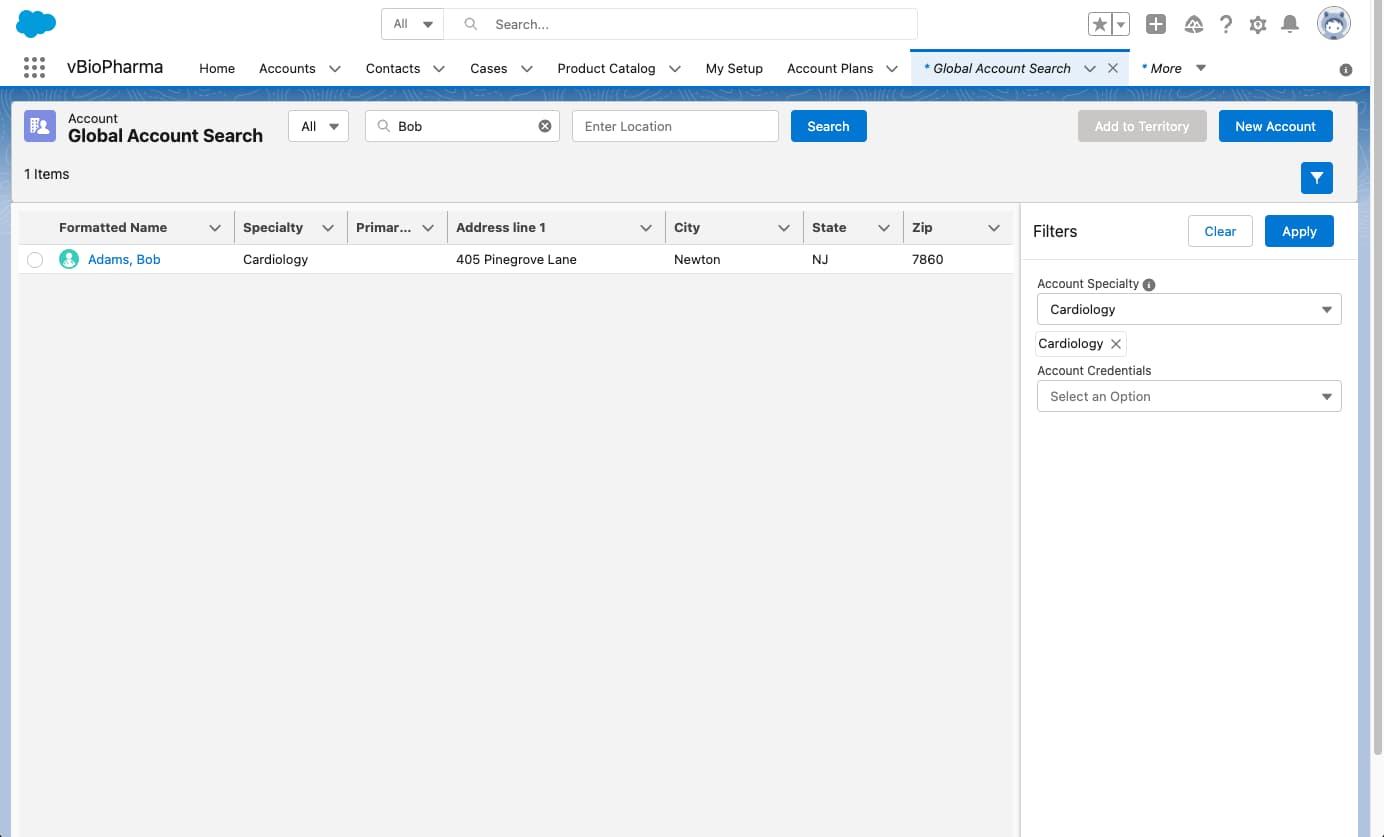
Each of these columns can be sorted for further accuracy.
If the desired account does not display in results, users can select the New Account button to launch the New Account Wizard. If the user’s organization is configured for Decoupled DCRs, the New Account Button displays even if the user does not have OLS on the Account object, and launches a version of the wizard that creates a DCR for the new account.
Adding an Account From Outside a User’s Territory
Users can also add accounts from outside of their territory from the Global Account Search page:
- Search for the appropriate account.
- Select the check box in the results table for the appropriate out of territory account.
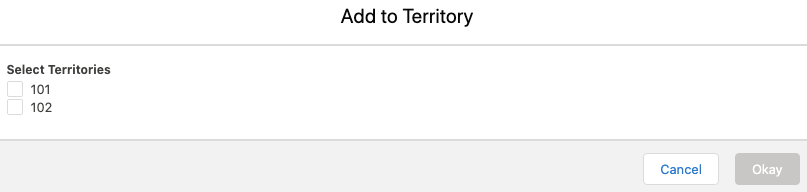
- Select Add to Territory.
-
Select the appropriate parent accounts to also add to the territory. This step is optional and only displays if the account is a child account.

-
Select the appropriate territory to assign the account. This step only applies to users assigned to multiple territories.
The Add to Territory process leverages ATL functionality for territory assignment.
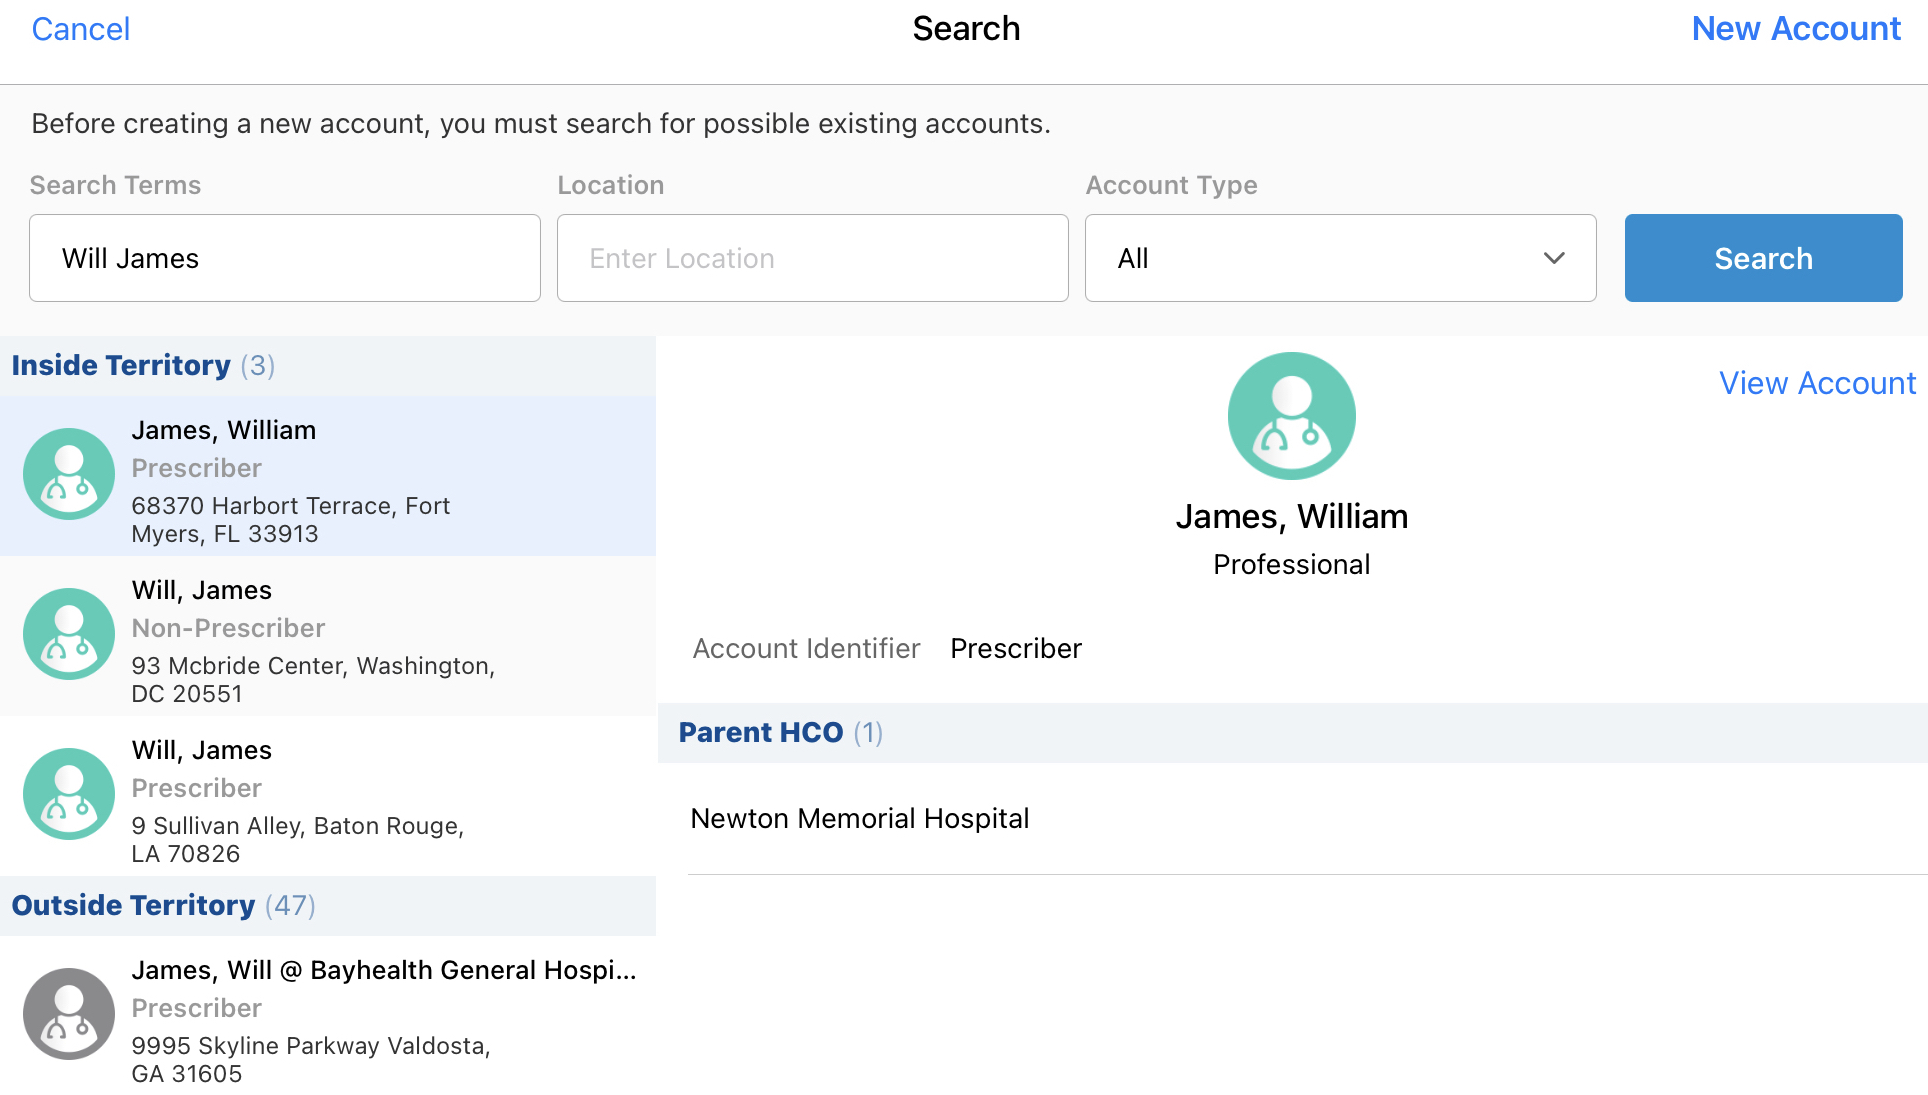
Using Global Account Search on the iPad
Users can access Global Account Search by selecting the + button on the My Accounts tab. When Global Account Search is enabled, iPad users must first search for an existing account before they can create a new account.

Before selecting Search, users can define the following search parameters:
- Account Type – Filters results based on the type of account:
- HCP – Filters results to only Person Accounts
- HCO – Filters results to only Business Accounts
- All – Does not filter results
- Search Terms – Creates a fuzzy match search against text fields on the Account object
- Location – Searches for matches against text fields on the Address_vod object.
Global Account Search uses Location to prioritize account results that match the entered criteria. Accounts are still returned if they don't match the entered Location, but they are sorted below all accounts that match both Account and Location.
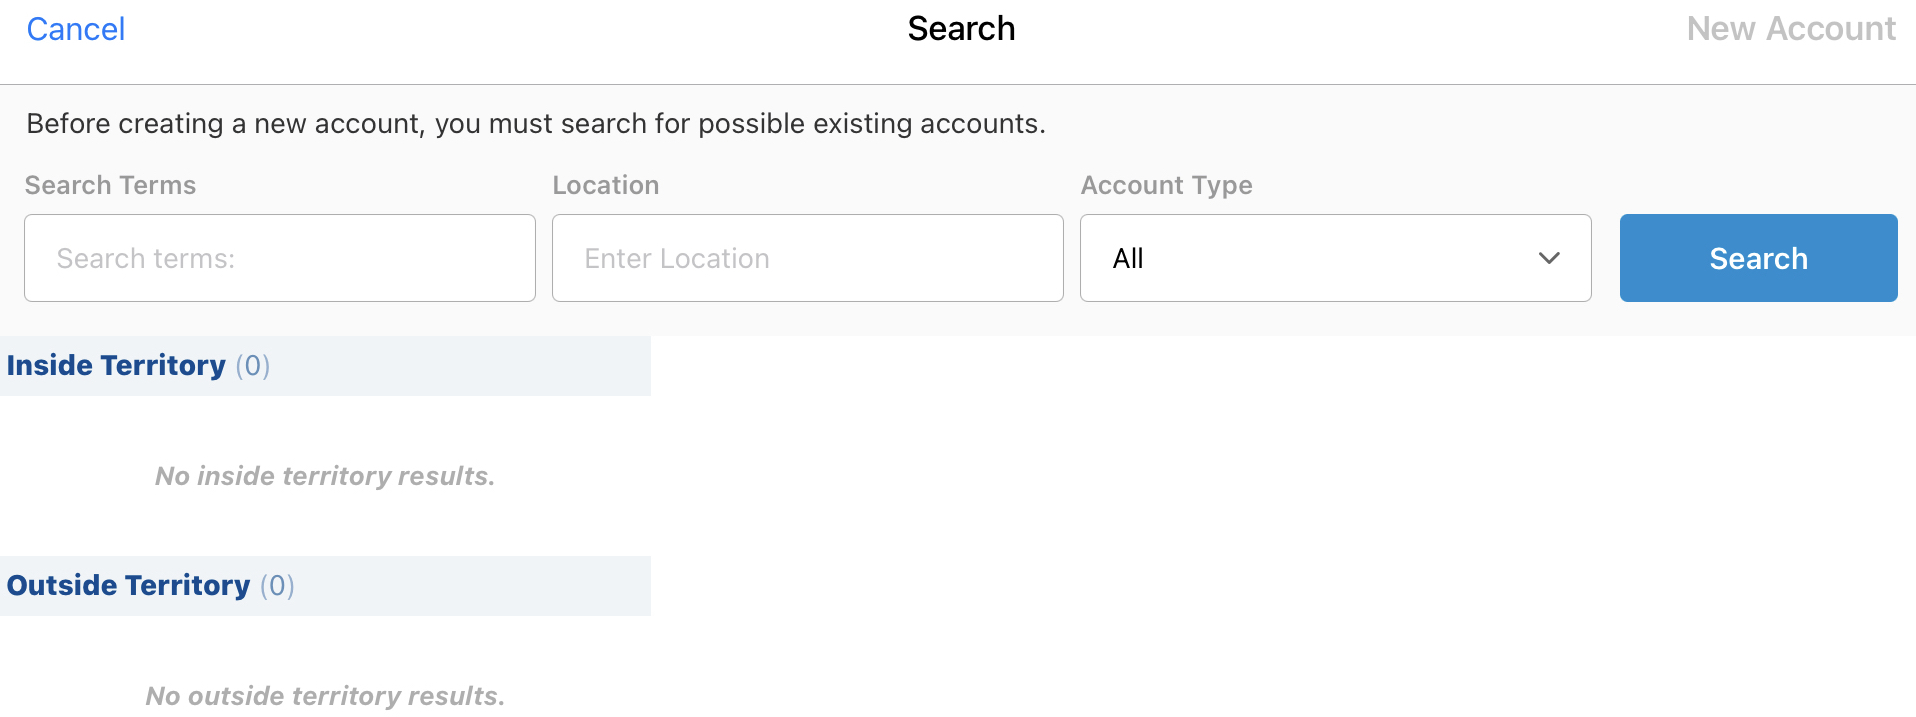
The search may return up to 70 results on the iPad, depending on whether the device is connected to the internet. The results are divided into two categories:
- Inside Territory – The account is currently assigned to the same territory as the user
- Outside Territory – The account is currently not assigned to the same territory as the user
If the user is using an iPad not connected to the internet at the time the search occurs, results still display, but are limited to only accounts currently synced to the device. Up to 20 synced accounts can return based on the search criteria when only searching synced accounts. If the iPad is connected to the internet, up to 50 additional in-territory accounts may be returned.
Users can preview results by selecting the account in the results panel to display the account’s name, identifier, and any parent accounts.
Users can view the previewed account by selecting the View Account button.
If the desired account does not display in results, users can select the New Account button to launch the New Account Wizard. If the user’s organization is configured for Decoupled DCRs, the New Account Button displays even if the user does not have OLS on the Account object, and launches a version of the wizard that creates a DCR for the new account.
Adding an Account From Outside a User’s Territory on the iPad
Users can also add accounts from outside of their territory from the Global Account Search page:
- Search for the appropriate account.
- Select the appropriate result to preview the out of territory account.
- Select Add Account.
- Select the appropriate parent accounts to also add to the territory. This step is optional and only displays if the account is a child account.
- Select the appropriate territory to assign the account or accounts. This step only applies to users assigned to multiple territories.
The Add to Territory process leverages ATL functionality for territory assignment.
When users of CRM on iPad add an account to their territory from Global Account Search, a Mini Sync retrieves the account-related records, including records needed to comply with sampling rules. This helps users keep their mobile devices up-to-date and reduces the need to perform manual refreshes or Incremental Syncs after taking certain actions like adding a new account. The following objects are included in the Mini Sync:
- Account_vod
- Address_vod
- Affiliation_vod
- Child_Account_vod
- TSF_vod
- Sample_Limit_vod
- Sample_Limit_Transaction_vod
- Account_Authorization_vod
Adding Accounts from the Hierarchy on the iPad
Users with Account Hierarchies enabled can also add out of territory accounts directly from an account’s hierarchy.
- Navigate to the View Hierarchy tab on the appropriate account. Accounts in the hierarchy outside of the user’s territory display with a gray background.
-
Select the + button for the appropriate account.
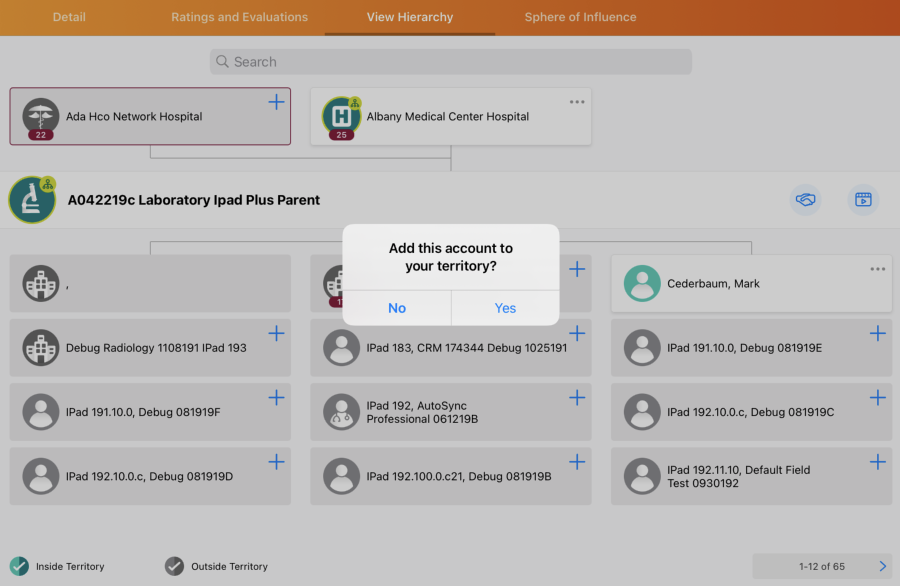
- Select Yes.
This functionality is mutually exclusive with Adding Parent HCOs to Territories in Network.
Redirecting the New Account Button to Global Account Search
Admins can configure Global Account Search to override the New Account button in My Accounts, forcing the user to search for an account outside of their territory before they can create a new account. This reduces the chance that users accidentally create duplicate accounts.
For example, Sarah Jones searches for Clinton Ackerman in her org. When she cannot find his account, Sarah selects New Account in order to create an account for Dr. Ackerman. Instead, Global Account Search displays and Sarah is prompted to first search for Dr. Ackerman outside of her territory. She sees that an account already exists for Dr. Ackerman, so instead of creating a new account, Sarah adds the existing account to her territory.
Considerations
This feature overrides any other redirection behavior surrounding the New Account button, for example, the New Account Wizard and the New Account DCR Process
Authentication
Signing In with MFA and Custom Domain
Customers can enforce multi-factor authentication and enable a wide range of single sign-on (SSO) solutions without using MDM, including OAuth 2.0 and SAML. iPad and iPhone users can also sign in to Veeva CRM using a custom domain. This ensures a familiar and consistent signin experience for users across platforms.
For example, Verteo BioPharma uses SSO with Ping and wants to enforce MFA for their users. An admin configures MFA for Ping and requires users to sign in with the Use Custom Domain link. Sarah Jones, a user for Verteo BioPharma, launches Veeva CRM and selects the Use Custom Domain link. She enters the Salesforce signin URL and signs in with her SSO credentials. The MFA challenge displays. Once she completes the challenge and verifies her identity, the home page displays.
Alternately, Sarah Jones launches Veeva CRM and selects the Use Custom Domain link. She enters Verteo BioPharma’s My Domain name in the custom domain field and selects Next. The My Domain login page with the Verteo BioPharma logo displays in the embedded browser. Sarah enters her credentials and signs in.
Considerations
- Users must have an active internet connection
- For users who are capturing consent, the lock icon on the Consent Capture page does not display
Managing User Profiles for Custom Domain Signin
The Use Custom Domain link always displays on the login page. Any user can view and select the link. However, customers may only want to allow specific user profiles to be able to sign in with the Use Custom Domain link.
To only allow specific user profiles to sign in from the Use Custom Domain link:
- Navigate to Setup > Apps > Connected Apps > Manage Connected Apps in Lightning or Setup > Administration Setup > Manage Apps > Connected Apps in Salesforce Classic.
- Select Edit for Veeva CRM Apps.
- Select the Admin approved users are pre-authorized option for the Permitted Users field in the OAuth Policies section.
- Select Save.
- Select Manage Profiles in the Profiles section.
- Select the appropriate profiles.
- Select Save.
If a user who does not have permission attempts to sign in from the link, the authentication fails and the Use Custom Domain screen displays.
Defining the Refresh Token Policy
When users sign in with the Use Custom Domain link and start an active Salesforce session, the session stays active forever. However, admins can define how long a session stays active to prevent sessions from staying active indefinitely. When a user signs in, the app receives a valid refresh token and an active session starts. When the session ends, if the refresh token is still valid, a new session starts automatically and a new refresh token is retrieved. As long as there is a valid refresh token, the user can launch and use the app without needing to sign in again. By default, refresh tokens never expire when users sign in from the Use Custom Domain link.
To define the refresh token policy:
- Navigate to Setup > Apps > Connected Apps > Manage Connected Apps.
- Select Edit for Veeva CRM Apps.
- Select the appropriate picklist option for Refresh Token Policy in the OAuth Policies section. The following options are available:
- Refresh token is valid until revoked – Selected by default. The refresh token is valid indefinitely, unless it is specifically revoked by an admin. Revoke tokens on a user’s detail page under OAuth Connected Apps or on the OAuth Connected Apps Usage Setup page.
- Immediately expire refresh token – The refresh token expires immediately after the user signs in. The current session is active, but after exiting the app and launching it again, the user must sign in again.
- Expire refresh token if not used for n time – The refresh token expires if it is not used to start a session within the specified amount of time. For example, if refresh tokens are set to expire after 7 days of inactivity, the user must use the app for at least one full session within seven 7 of signing in and retrieving a refresh token. This ensures the refresh token is used to start a new session and then exchanged for a new token. The new token is valid for another 7 days. The monitoring period of session inactivity also resets.
- Expire refresh token after n time – The refresh token is valid for a fixed amount of time. For example, if refresh tokens are set to expire after 24 hours, the user can maintain an active session only for 24 hours
Enforcing Multi-Factor Authentication
Customers can set up MFA through Salesforce or through their own identity provider (IDP) and enable it for the appropriate user profiles or permission sets. Once MFA is enabled, users must complete an MFA challenge when signing in. The MFA challenge is a secondary method of verification to provide an extra layer of protection. Customers who want to enforce MFA on iPad and iPhone devices must require users to sign in with the Use Custom Domain link.
Field Users
To configure Salesforce MFA for standard Salesforce authentication:
- Navigate to Setup > Users > Profiles.
- Select the appropriate user profile.
- Select System Permissions in the System section.
- Select Edit.
- Select the Multi-Factor Authentication for API Logins and Multi-Factor Authentication for User Interface Logins check boxes.
Enabling the Multi-Factor Authentication for API Logins option prevents users from signing in using the existing authentication method.
- Select Save.
- Navigate back to the profile overview page.
- Select Session Settings in the System section.
- Select Edit.
- Set Session Security Level Required at Login to None.
- Select Save.
If the Enhanced Profile User Interface User Management Setting is not enabled, the System Permissions and Session Settings for user profiles display on the same page and can be edited at the same time. See Salesforce documentation about the original profile interface for more information.
Customers who want to enforce MFA for SSO with an IDP must configure MFA separately in their IDP. Even after MFA is configured, users can skip the MFA challenge by signing in with their Salesforce credentials. To ensure users complete the MFA challenge, admins must prevent users from signing in with their Salesforce credentials:
- Navigate to Setup > Identity > Single Sign-On Settings.
- Select Edit.
- Select the Disable login with Salesforce credentials check box.
- Navigate to Setup > Users > Profiles.
- Select the appropriate user profile.
- Select System Permissions in the System section.
- Select Edit.
- Select the Is Single Sign-On Enabled check box.
- Select Save.
- Navigate back to the profile overview page.
- Select Session Settings in the System section.
- Select Edit.
- Set Session Security Level Required at Login to None.
- Select Save.
Using Profiles to configure Salesforce MFA for SSO users:
- Navigate to Setup > Users > Profiles.
- Select the appropriate user profile.
- Select Edit.
- Navigate to the General User Permissions section.
- Select the Multi-Factor Authentication for User Interface Logins check box.
- Navigate to the Session Settings section.
- Set Session Security Level Required at Login to None.
- Select Save.
System Admins
Ensure system admins are not integration users. Integration users must be able to sign in through API, which this configuration prevents.
To configure Salesforce MFA for standard Salesforce authentication:
- Navigate to Setup > Users > Profiles.
- Select the appropriate user profile.
- Select Session Settings in the System section.
- Select Edit.
- Set Session Security Level Required at Login to High Assurance.
- Select Save.
Integration Users
To configure MFA for standard Salesforce authentication:
- Navigate to Setup > Users > Profiles.
- Select the appropriate user profile.
- Select System Permissions in the System section.
- Select Edit.
- Select the Multi-Factor Authentication for User Interface Logins check box.
- Select Save.
Signing In
Users can sign in to Veeva CRM using the following authentication methods:
- Existing authentication
- Use Custom Domain link, which supports:
- Standard Salesforce credentials
- Any SSO method supported by Salesforce. See Salesforce documentation for more information about SSO with Salesforce.
To sign in:
- Select Use Custom Domain on the login page.

- Populate the Custom Domain field with the full custom domain URL of the org. Do not included https://.
If the user previously signed in with a custom domain, this screen is skipped and the My Domain login page automatically displays in the embedded browser.
- Select Next.
- Enter the appropriate credentials in the embedded browser.
- Select Log In.
- Complete the MFA challenge, if applicable.
- Select Allow to allow access to the app. This step is only required the first time a user signs in with a specific set of credentials.
Once a user successfully signs in, an active Salesforce session starts. While the session is active, the user remains signed in, even if the app is closed. Users must sign out to end the session or wait until the refresh token expires. See Defining the Refresh Token Policy for more information.
Approved Notes
Using Product-Specific Monitoring Rules
To reduce false-positive violations, compliance users can designate monitoring rules to only run against a defined combination of products, detail groups, and detail topics based on My Setup assignments. This also enables greater control over which rules run for a user's calls, as some monitored phrases may be appropriate for some users and not others.
Product-Specific Monitoring Rules link monitoring rules to any user assigned that product via My Setup. When a rule is linked to the user, the rule runs on all of the user's calls, not only the calls discussing the associated product.
For example, a compliance user at Verteo BioPharma creates the following product-specific monitoring rules:
- The phrase “RA” should not be mentioned when referring to Cholecap
- The phrase “A1C” should not be mentioned when referring to Labrinone
Sarah Jones is a user assigned in My Setup to Cholecap, but not Labrinone. She speaks with Dr. Ackerman about Cholecap and records the following in her post-call notes:
Explained that Cholecap can help lower A1C levels in diabetes patients and is a potentially promising treatment for RA.
When the post-call notes are processed by Approved Notes, only the Cholecap monitoring rule is applied to Sarah’s note, since she is assigned to Cholecap and not Labrinone. When the compliance user reviews violations, only RA displays as a violation on Sarah’s note, and not A1C.
Considerations
- This functionality can be combined with Creating Country-Specific Approved Notes Rules for even greater levels of specificity
- The Product_vod and Detail_Group_vod fields on the Monitored_Text_vod are available in the CSV download file of the Job History Table as long as the user has at least FLS read permission to the fields. These fields do not display if a user downloads the CSV file without FLS read access to the fields.
Prerequisites
Creating Product-Specific Monitoring Rules
To create a product-specific monitoring rule:
- Edit the appropriate Monitoring_Rule_vod record or create a new one.
-
Populate the appropriate fields:
- Product_vod – Enables users to select the appropriate product or detail topic
- Detail_Group_vod – Enables users to select the appropriate detail group
These two fields can be used independently or used together for further specificity.
- Select Save.
Call Sampling
Removing ASSMCA License Validation
Due to changes in Puerto Rico’s controlled substance sampling requirements, ASSMCA license numbers do not need to be populated for controlled substance sampling in Veeva CRM. ASSMCA and Ship-to ASSMCA fields no longer display on signature pages, and the fields are no longer validated. Additionally, admins can deactivate the validation rule for ASSMCA validation on Address records, simplifying account creation and address record maintenance.
For example, Sarah Jones disburses a sample of Narbrax, a controlled substance, to Dr. Teresa Alvarez at her address in Puerto Rico. When Sarah captures Dr. Alvarez’s signature, the ASSMCA_vod field does not display on the call signature page. Because Sarah’s admin deactivated the validation rule, she does not need to populate the ASSMCA_vod license number on Dr. Alvarez’s Address record.
Ensure initial configuration is complete to use this functionality.
Ending ASSMCA Validation and Stamping
The ASSMCA_vod and Ship_ASSMCA_vod fields on the following objects do not need to be populated, and are not validated or stamped with field values:
- Address_vod (when the DEA_Puerto_Rico_vod validation rule is deactivated)
- Call2_vod
- Content_Acknowledgement_vod
- Sample_Transaction_vod
- Sample_Transaction_Audit_vod
- Sample_Order_Transaction_vod
- Sample_Order_Transaction_Audit_vod
To preserve historical data, the ASSMCA_vod and Ship_ASSMCA_vod fields on the above objects continue to exist in Veeva CRM.
Removing ASSMCA Information from Signature Pages
By default, ASSMCA information and Ship-to ASSMCA information no longer displays on the following pages:
- Call signature pages for all existing sample signature types
- Call signature pages for BRC sampling
- Call signature pages for all existing call types:
- Individual call reports
- Standard group call reports
- Group calls with unique activities enabled
- Acknowledgement of Content signature pages
CLM
Displaying Website Content in the Media Library
Veeva CRM supports displaying website content in the media library. Content creators can create websites with approved content which users can share with HCPs during calls and Engage meetings, while ensuring the content is compliant.
Considerations
- Restricted products, allowed products, and segmentations for accounts are respected and control which websites users can display to each account
- The CLM_ENABLE_AUTO_LAUNCH_vod Veeva Setting is ignored to allow users to display websites in the embedded web browser
Creating Website Content
To create website content, create the following records with the following fields:
- CLM_Presentation_vod
- Description_vod
- Keywords_vod
- Status_vod – This field must be set to Approved for the website to display as available to end users
CLM_Presentation_vod records for websites are not supported as sub-presentations.
- Key_Message_vod
- Active_vod – This check box must be selected
- Description_vod
- URL_vod – The URL of the website. The Websites tab in the media library displays when users have visibility to this field. Tokens can be appended to the URL for activity tracking. See Adding Tracking Tokens to Website URLs for more information about supported tokens.
Key_Message_vod records for websites are not supported as shared resources or required slides.
- CLM_Presentation_Slide_vod
- CLM_Presentation_vod – Populate with the newly created CLM_Presentation_vod record
- Display_Order_vod
- Key_Message_vod – Populate with the newly created Key_Message_vod record
For a website, there must only be one Key_Message_vod and one CLM_Presentation_Slide_vod record per CLM_Presentation_vod record.
Content creators cannot use the gotoSlide or launchSelector functions in CLM content to launch websites from other presentations.
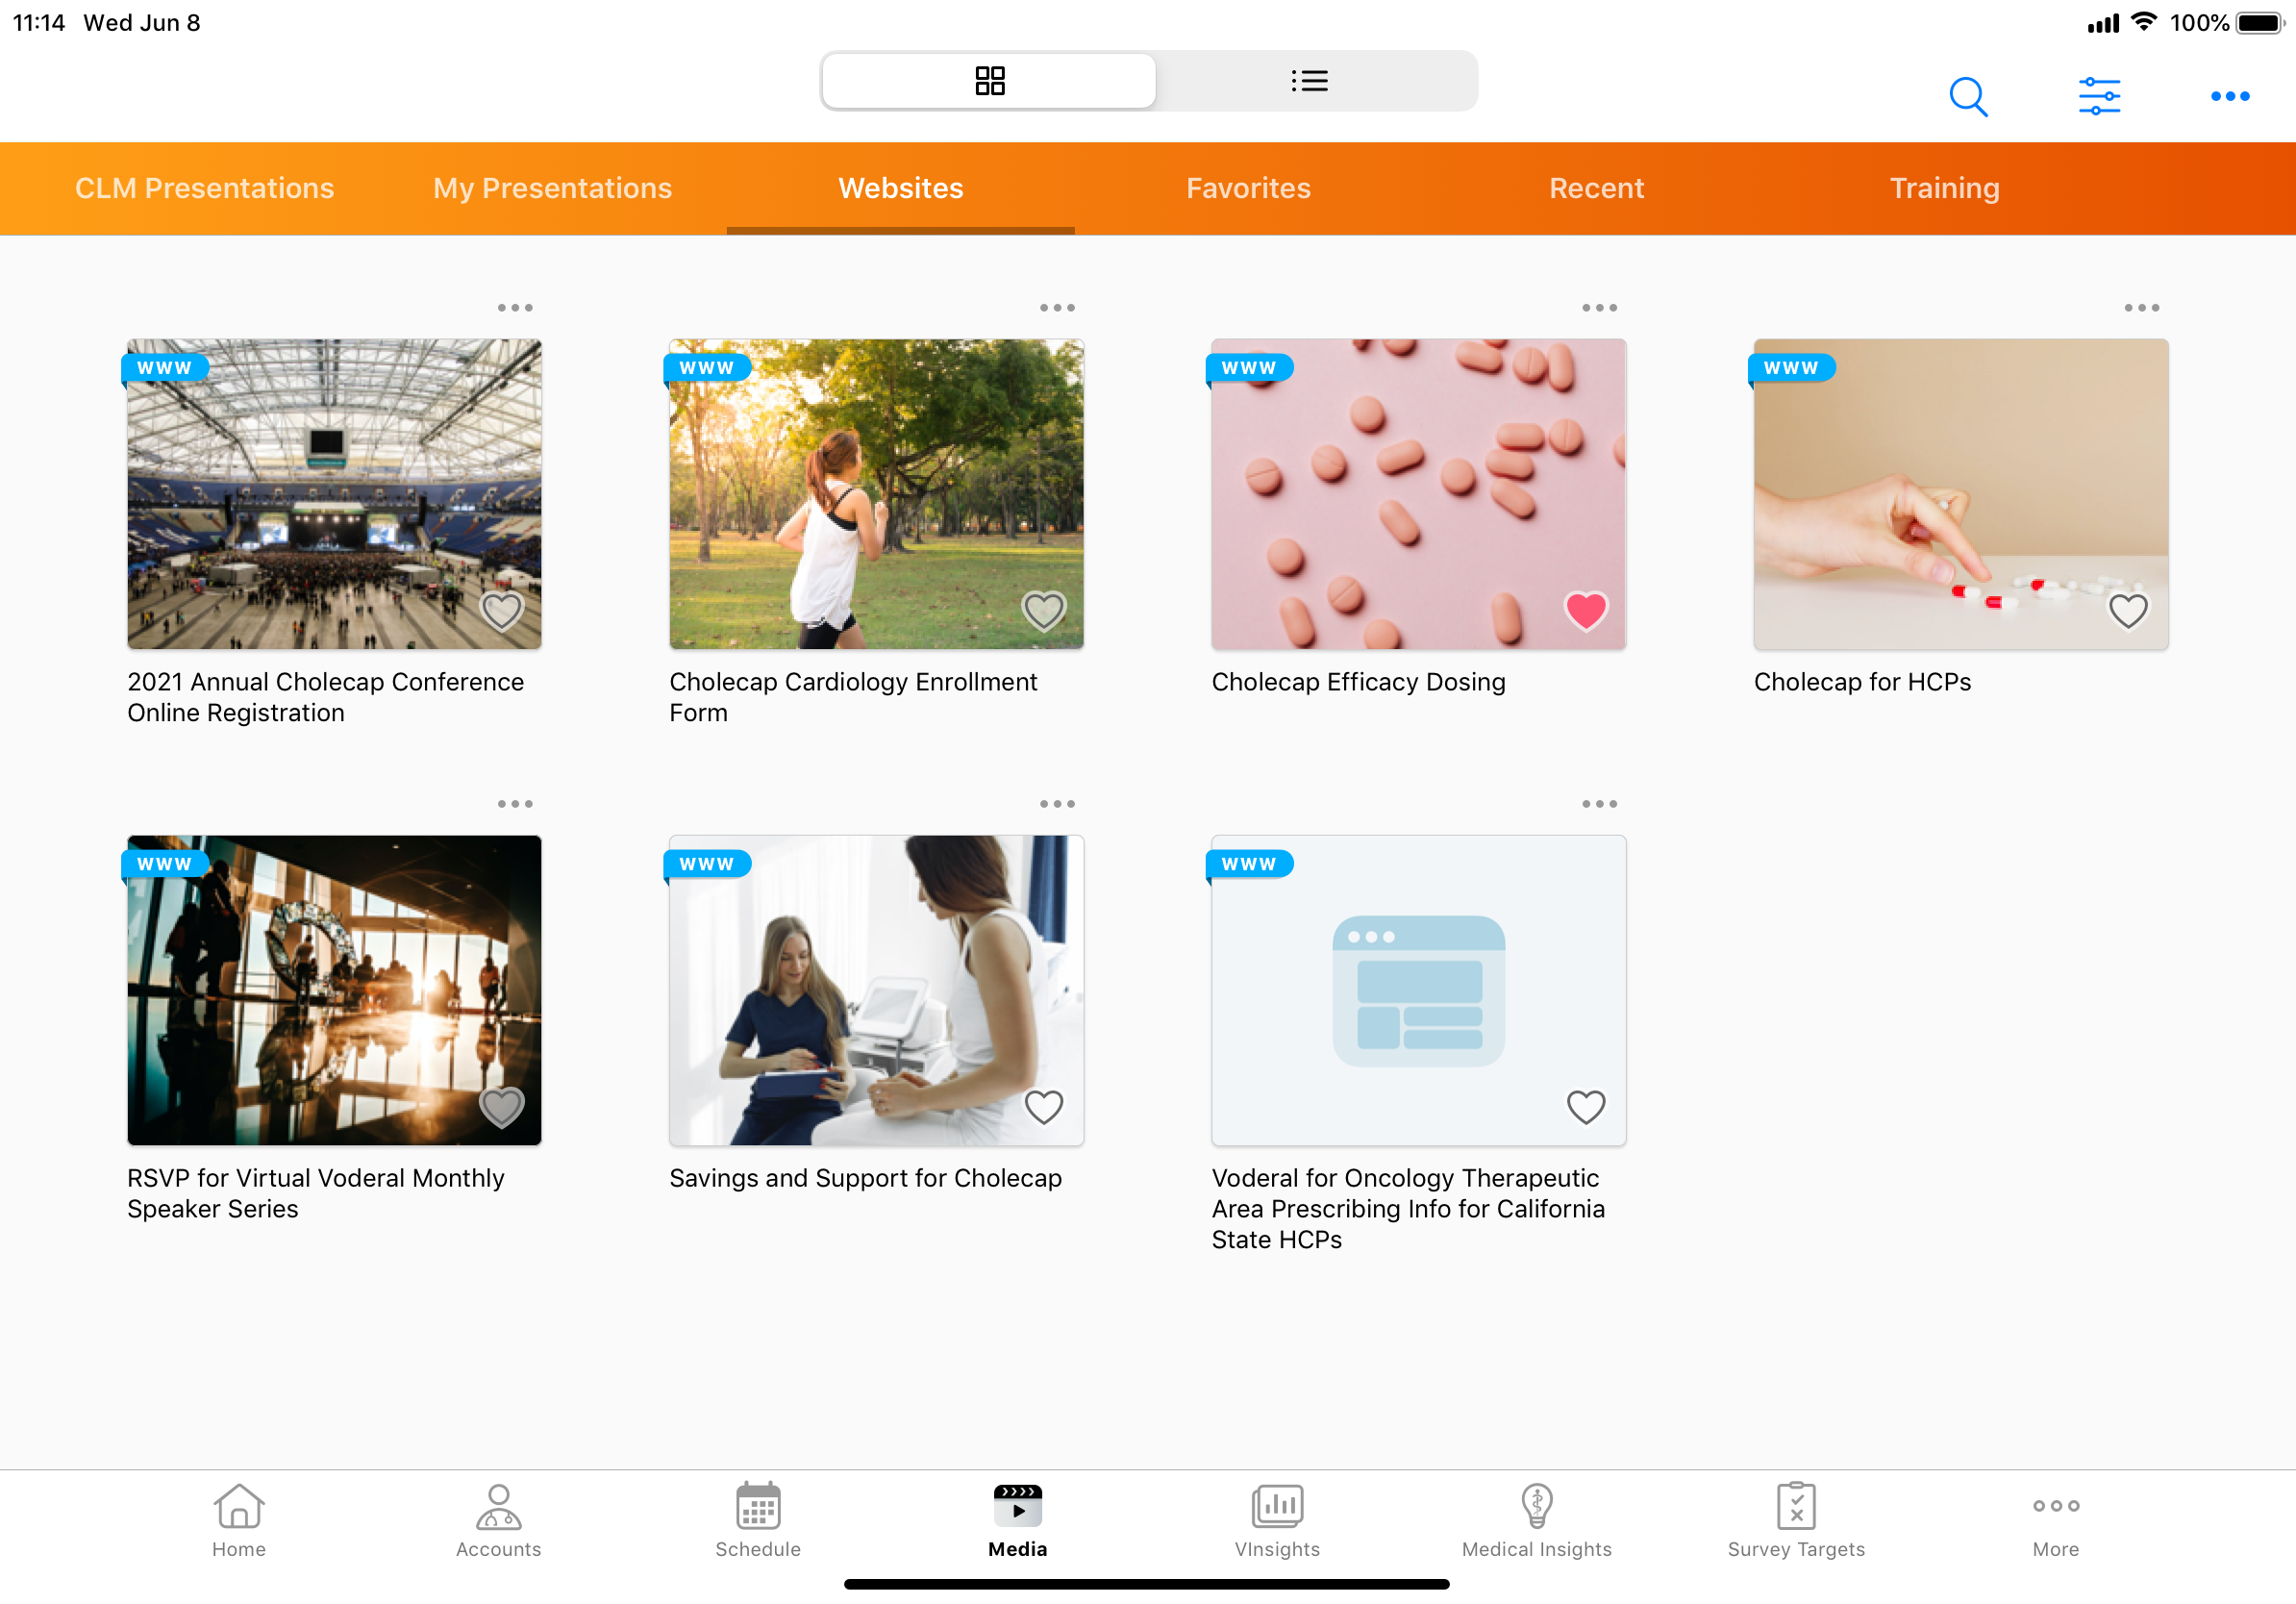
Defining Website Thumbnails
Admins can define website thumbnails for website content. The thumbnails display in the Websites tab of the media library.
- The WWW label displays on thumbnails to indicate the content is a website
- If a thumbnail is not defined for a website, the default thumbnail displays
- The default thumbnail cannot be changed
To define a thumbnail for a website to display in the media library:
- Create a folder containing only the following assets:
Type
Naming Convention
Resolution (in pixels)
Poster
<filename>-full.jpg
1024 x 768
Thumbnail
<filename>-thumb.jpg
200 x 150
- Ensure the name of the folder matches the filename in the thumbnail assets. For example, if the thumbnail is named Verteo-thumb.jpg, the zip file must be named Verteo.zip.
- Compress the folder into a zip file.
- Navigate to the appropriate Key_Message_vod record.
- Select Upload in the Media File section.
- Upload the zip file.
Alternatively, admins can upload the zip file using FTP. See Uploading CLM Content Using FTP for more information.
Displaying Websites in the Media Library
Websites display in the Websites tab in the media library.
To display a website, navigate to the Websites tab in the media library and select the appropriate website thumbnail. The website displays in the embedded browser. When displaying a website, users can navigate within the website or launch the website in Safari using the Safari button in the top right corner.
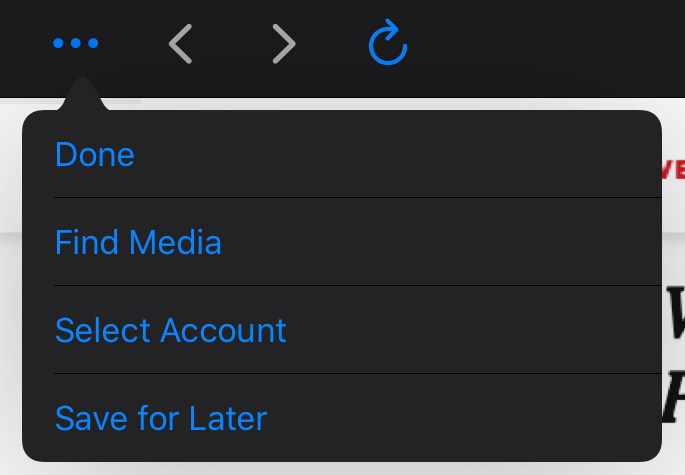
Users can also perform the following actions from the More Actions menu or when exiting the embedded browser:
- Done – Exit the embedded browser. Users can select an account to save the website activity for tracking, save the activity for later, or discard the activity.
Website activity only tracks how long the user displays a website in the browser. Navigation within the browser is not tracked.
- Find Media – Navigate to another website or a CLM presentation. The media library displays in an overlay. Select Close to exit the overlay.
- Select Account – Select an account to create a call and save the website activity for tracking. A list of available accounts displays. If the SELECT_CLM_CALL_RECORD_TYPE_vod Multichannel Setting is enabled, users must select the call record type after selecting the account.
- Save for Later – Save the website activity for tracking and exit the embedded browser without selecting an account. Users can associate the activity with an account later.
Displaying Websites During Calls and Engage Meetings
Users can display websites in the embedded browser during calls and Engage meetings.
To display a website during a call or an Engage meeting:
- Select the Media button on the call report.
- Navigate to the Websites tab.
- Select the appropriate website.
To share websites linked to PDF content during Engage meetings, admins must enable Host Screen Sharing on the iPad.
Websites displayed during calls or Engage meetings are tracked on the call report, similar to CLM presentations. See Tracking CLM Key Messages for more information.
Users cannot select reactions while displaying a website in the embedded browser. Users must exit the embedded browser, navigate to the Key Messages section of the call report, and select the appropriate value for the Reaction_vod field of the website key message. See Using Key Messages on the Call Report for more information.
Customers with Engage licenses can allow users to share website links with HCPs using social messaging apps. See Sharing Websites via Web Link or QR Code® for more information.
Engage
Sending Meeting Requests with Approved Email
To enable recipients to provide availability and channel preferences, users can send Approved Emails containing a link to the Engage Scheduling Site. This site is a dedicated website that recipients can use to request a meeting with CRM users based on their preferred time and call channel. This also allows users to avoid scheduling and rescheduling meetings without first knowing the recipients’ preferences.
For example, Sarah Jones sends an email containing a scheduling link to Dr. Clinton Ackerman to discuss Cholecap. Dr. Ackerman accesses the Engage Scheduling Site via the link in the email. He indicates he would like to meet remotely, then selects the date and time that works for him. Sarah receives an email indicating Dr. Ackerman’s request and responds promptly to schedule the remote meeting.
Prerequisites
Considerations
- Recipients can only select one requested date and time per link
- Requested meetings always have a duration of 30 minutes
- When users create unavailable time in My Schedule, their unavailable time slots are automatically reflected on the Engage Scheduling Site for HCPs. See Viewing Unavailable Time Slots on the Engage Scheduling Site for more information.
- Meeting times are automatically adjusted based on the viewer's internet browser time zone
- Admins can define a specific format to display HCP names on the Engage Scheduling Site. See Formatting HCP Display Names for more information.
Using the Engage Scheduling Site to Request a Meeting
When a recipient opens an Approved Email containing the {{schedulerLink}} token, the token renders as a link to the Engage Scheduling Site via Engage, enabling recipients using Engage to see and avoid potential scheduling conflicts when requesting a new meeting.
For example, Dr. Clinton Ackerman requests a meeting with Sarah Jones via the Engage Scheduling Site. Later that day, he receives another link to request a meeting with Ian Kehl. When Dr. Ackerman sees the available times to request a meeting, he sees the time he previously requested to meet with Sarah Jones. This helps Dr. Ackerman avoid accidentally creating a scheduling conflict when requesting a time with Ian Kehl.
To use the Engage Scheduling Site to schedule a meeting as a recipient:
-
Select the link rendered by the {{schedulerLink}} token. The browser site renders in the viewer’s browser language and is available in all Veeva supported languages. If the view is using a language that is not supported by Veeva, the browser language defaults to English.
If recipients select the link on a device with the iOS or Android Engage app installed, the app opens and the recipient creates the meeting request from within the application. Recipients without the app installed can continue via the browser to create the meeting request there.
-
Select one of the meeting types:
- In-person
- Video
- Phone
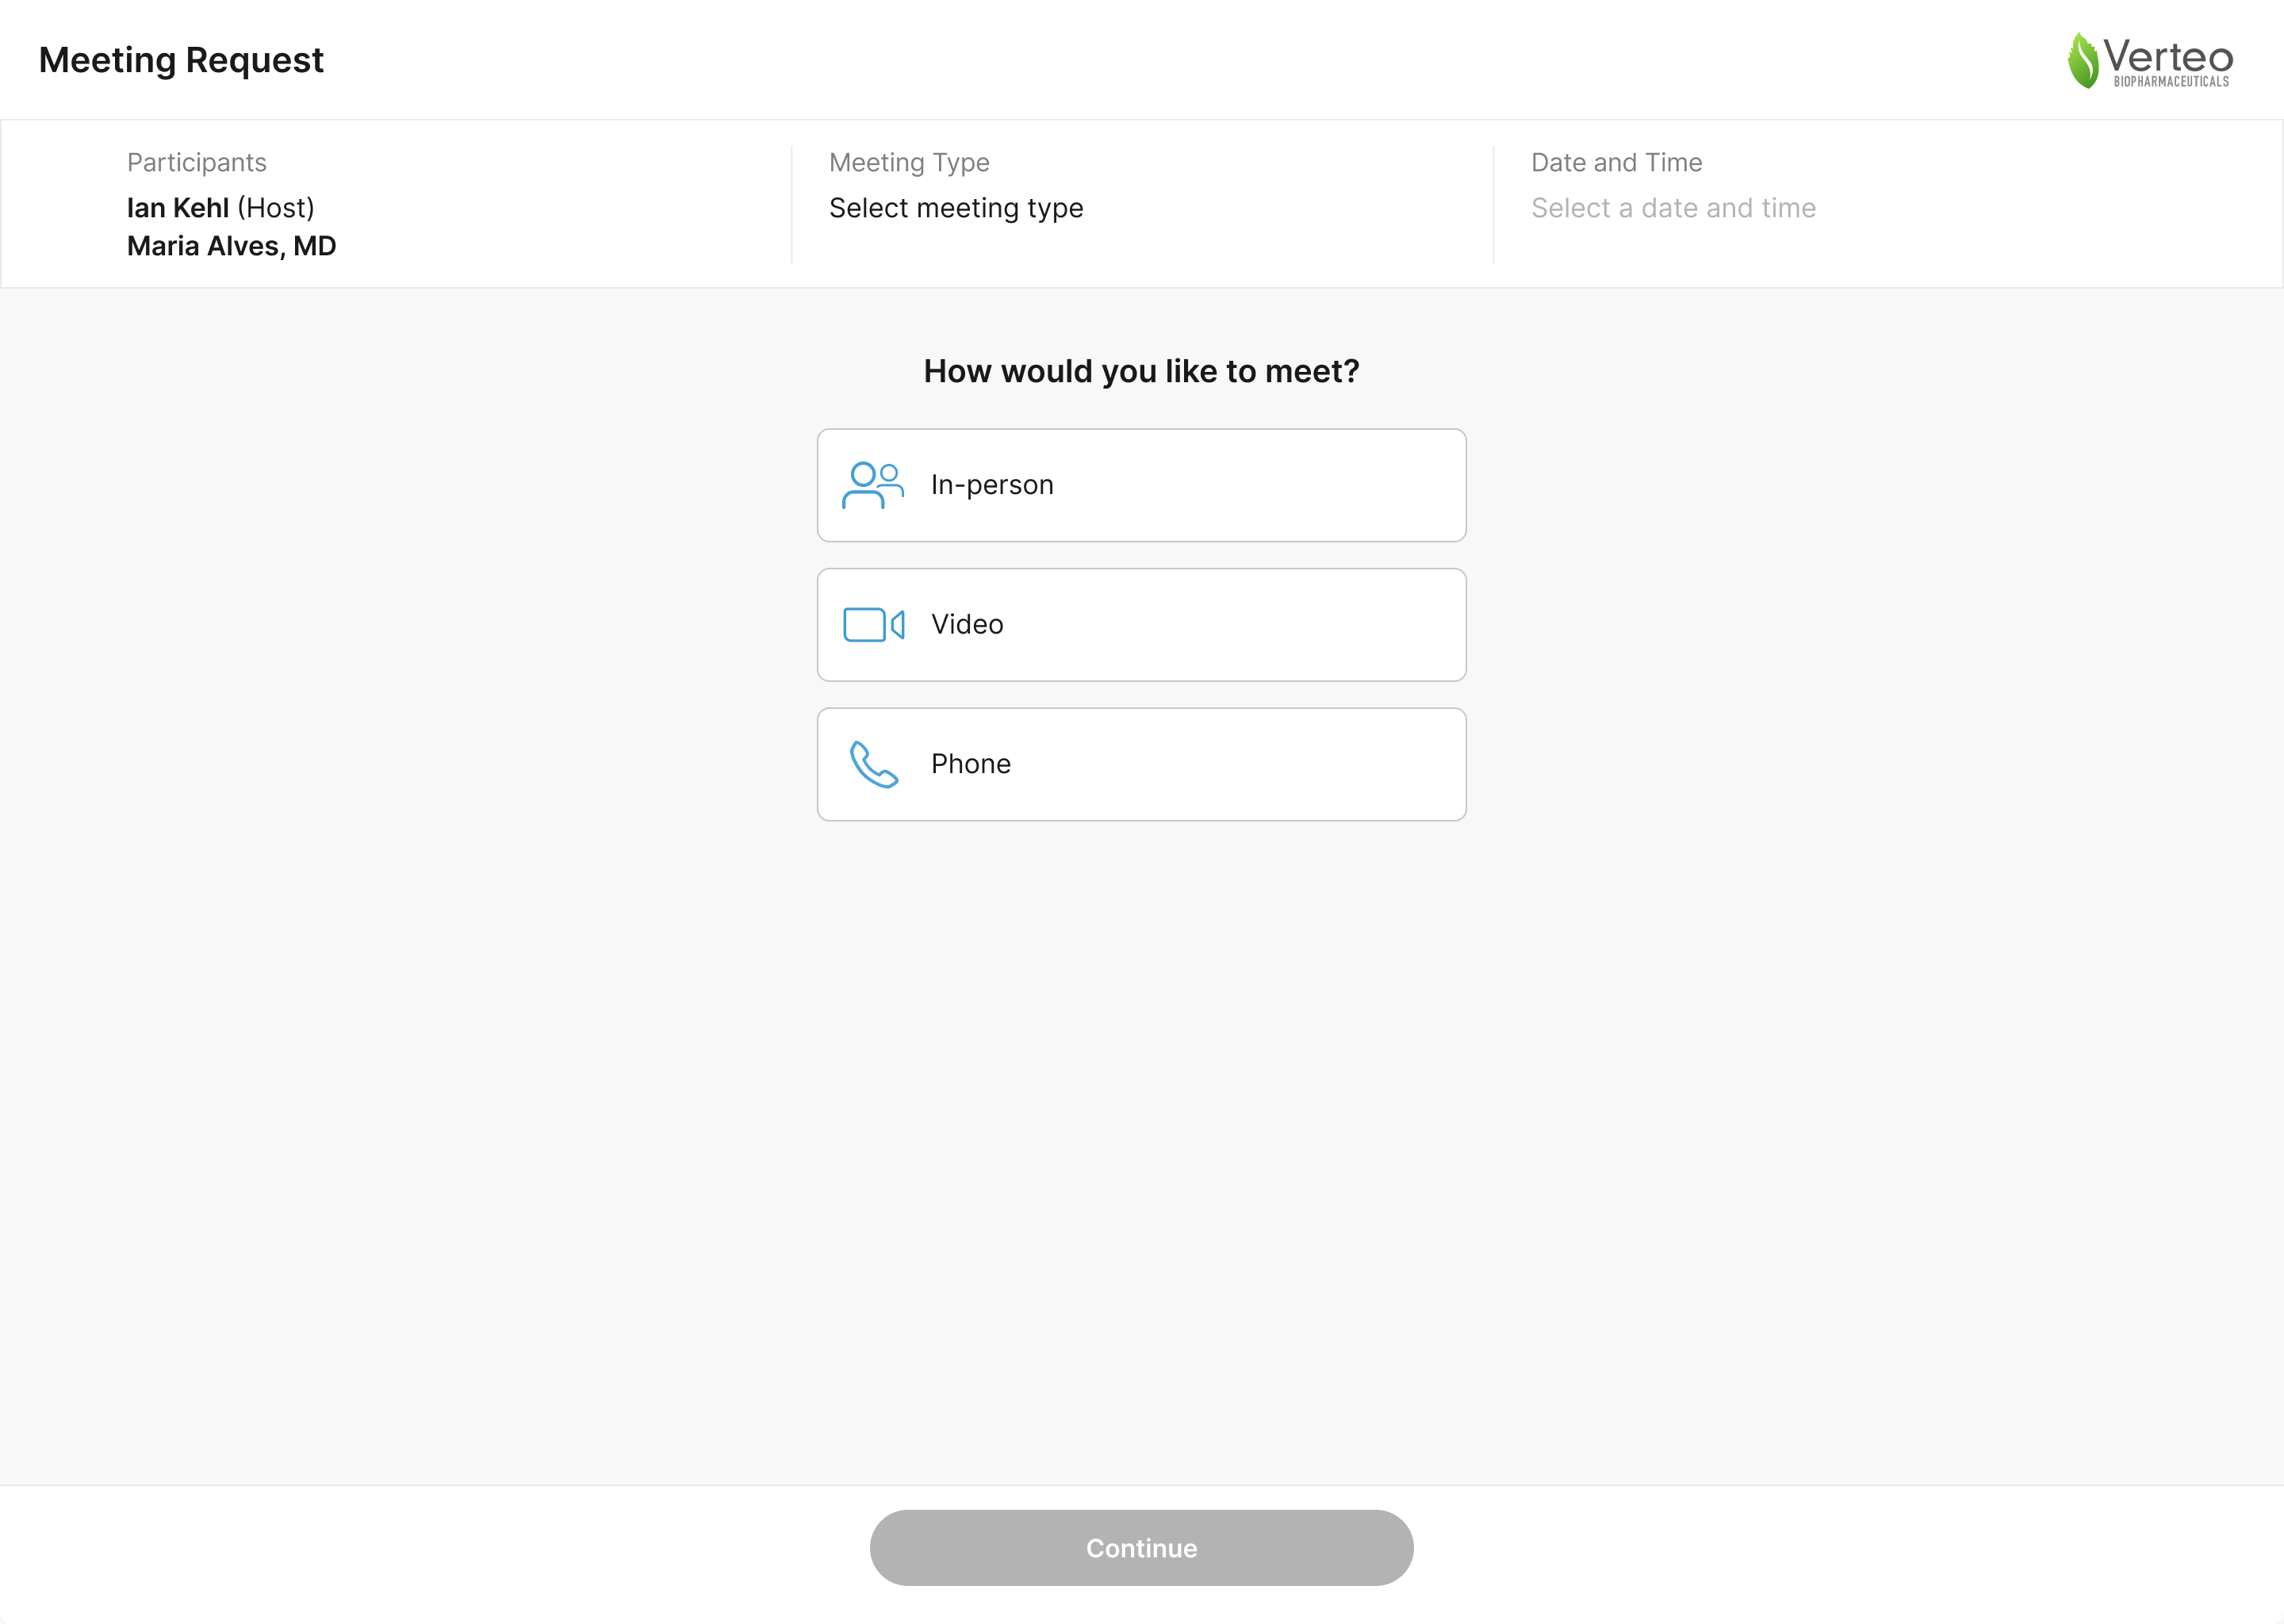
When users accept meeting requests, the Call_Channel_vod field is automatically populated based on the meeting type the HCP selects on the Engage Scheduling Site. The meeting type options are not configurable.
If the recipient selects In-person for the meeting type and has associated offices in Engage, they can optionally select an office to associate with the request.
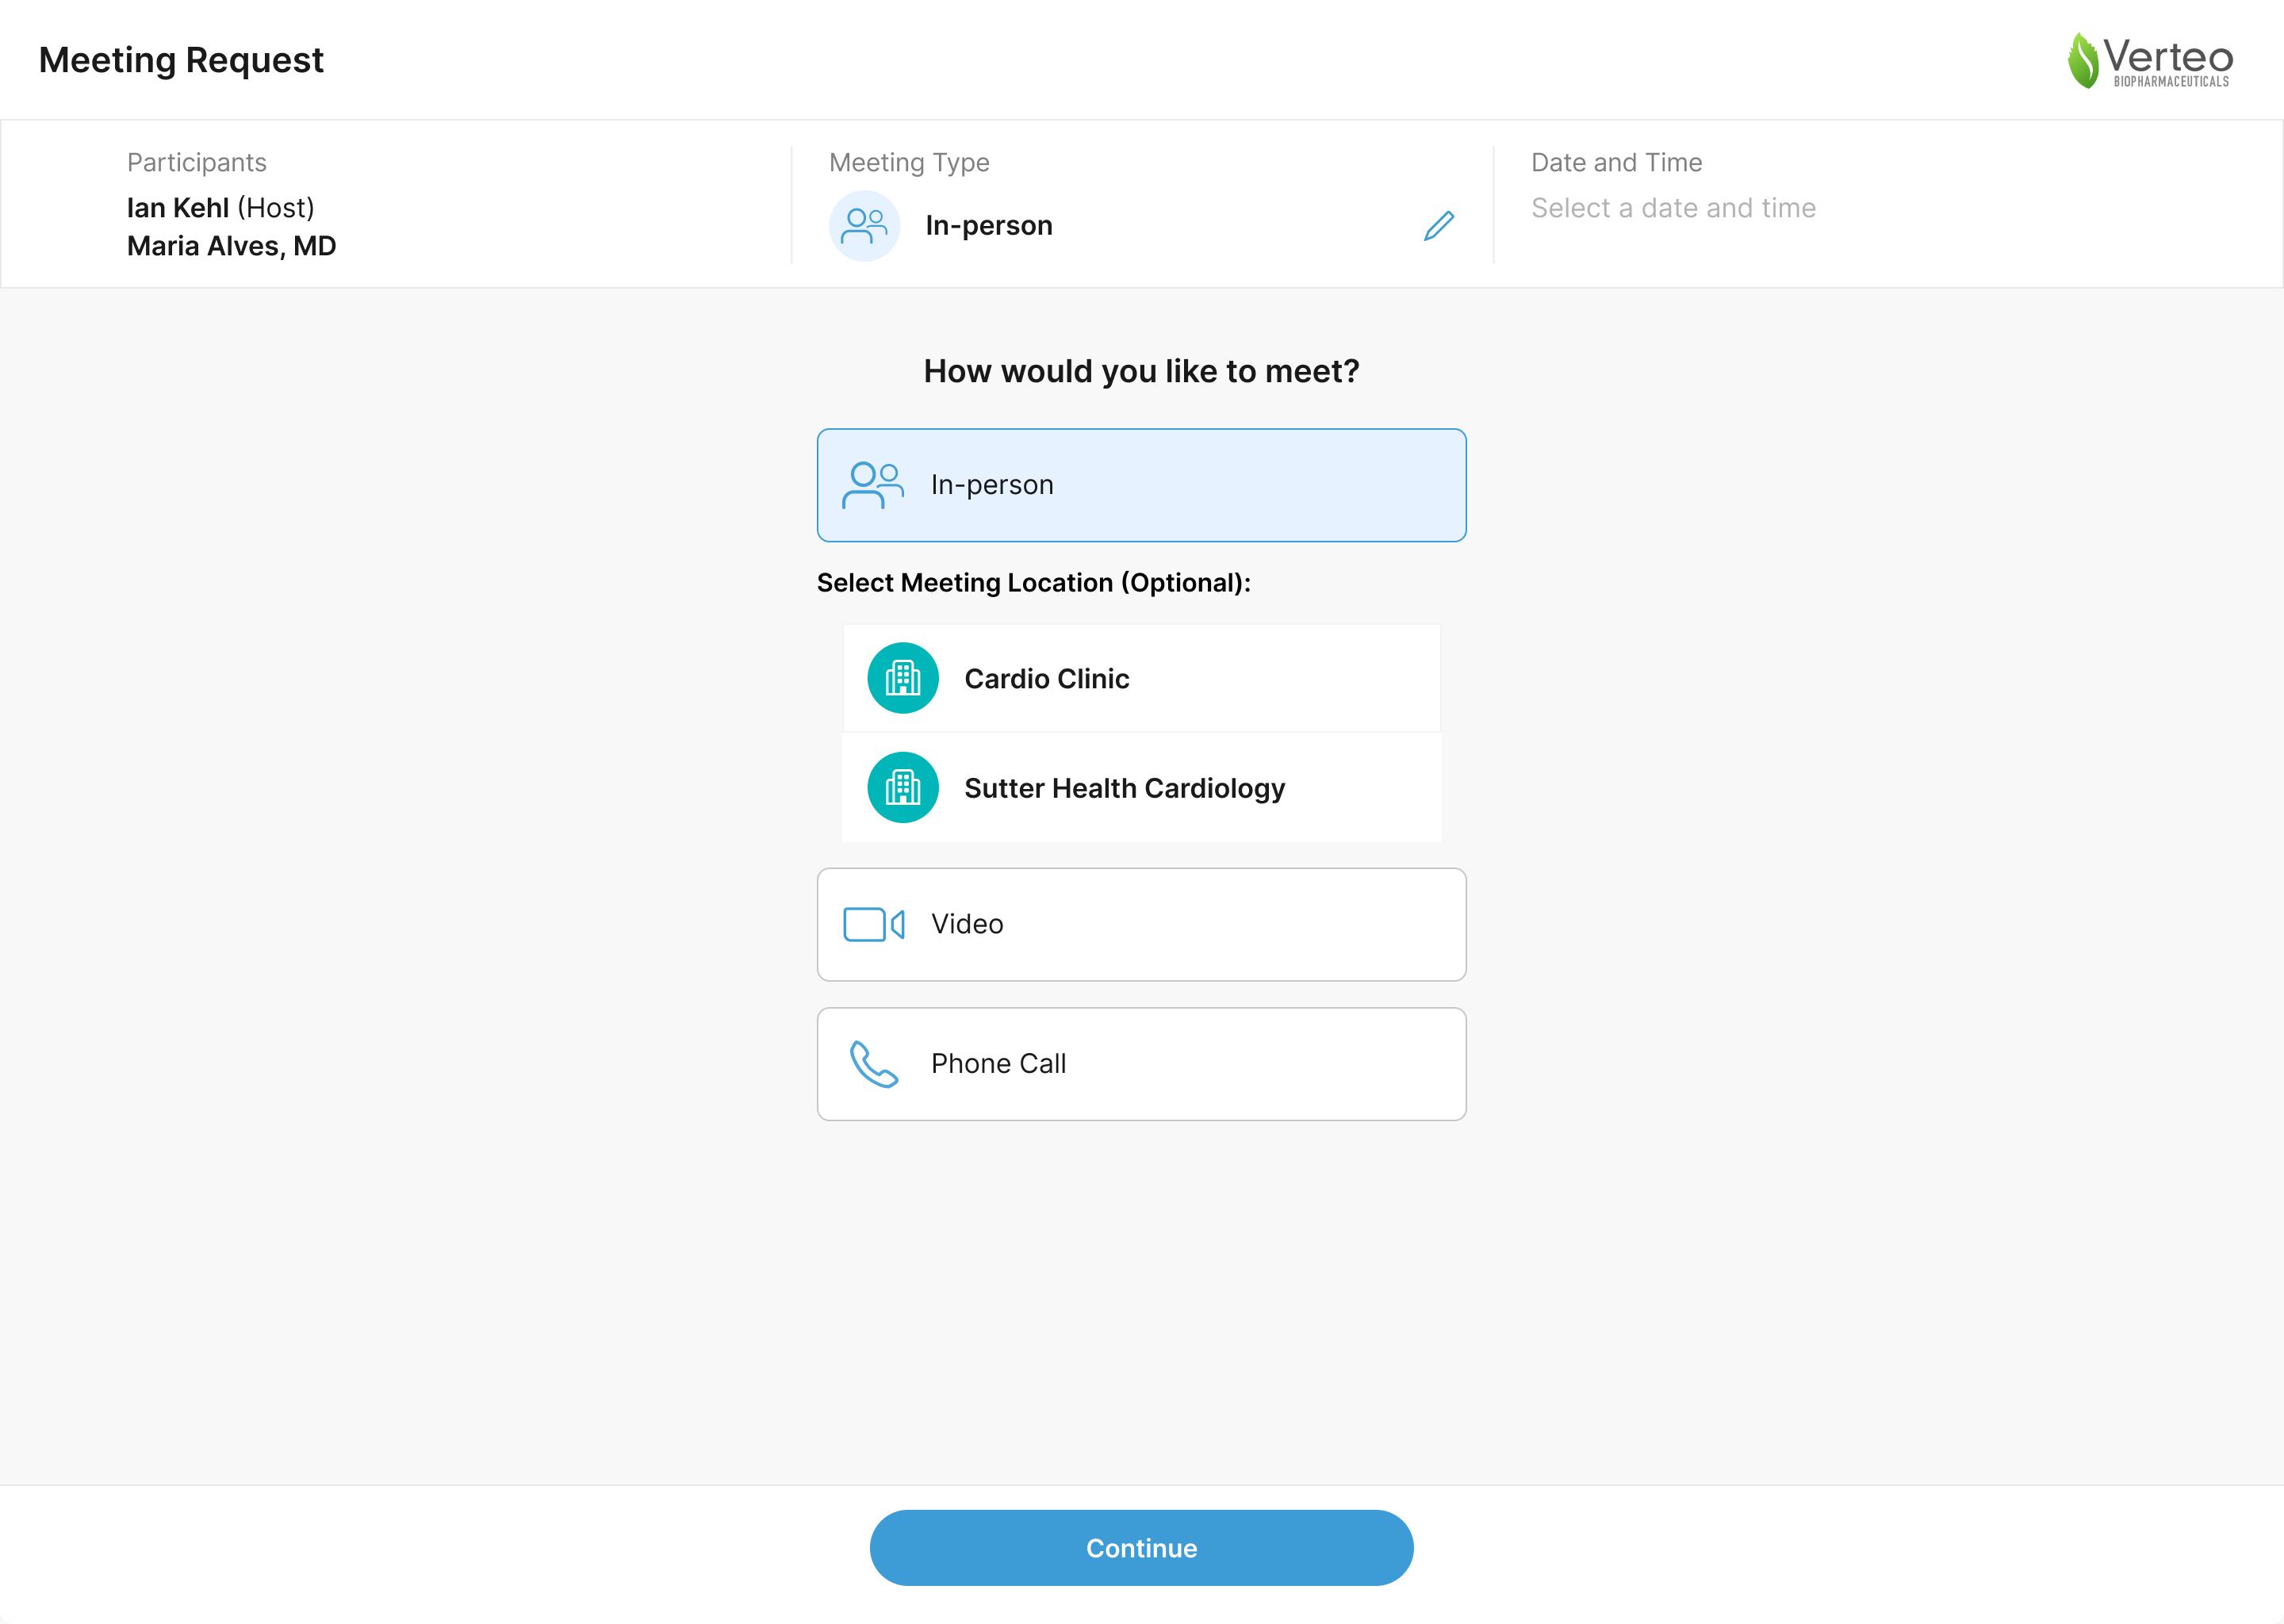
-
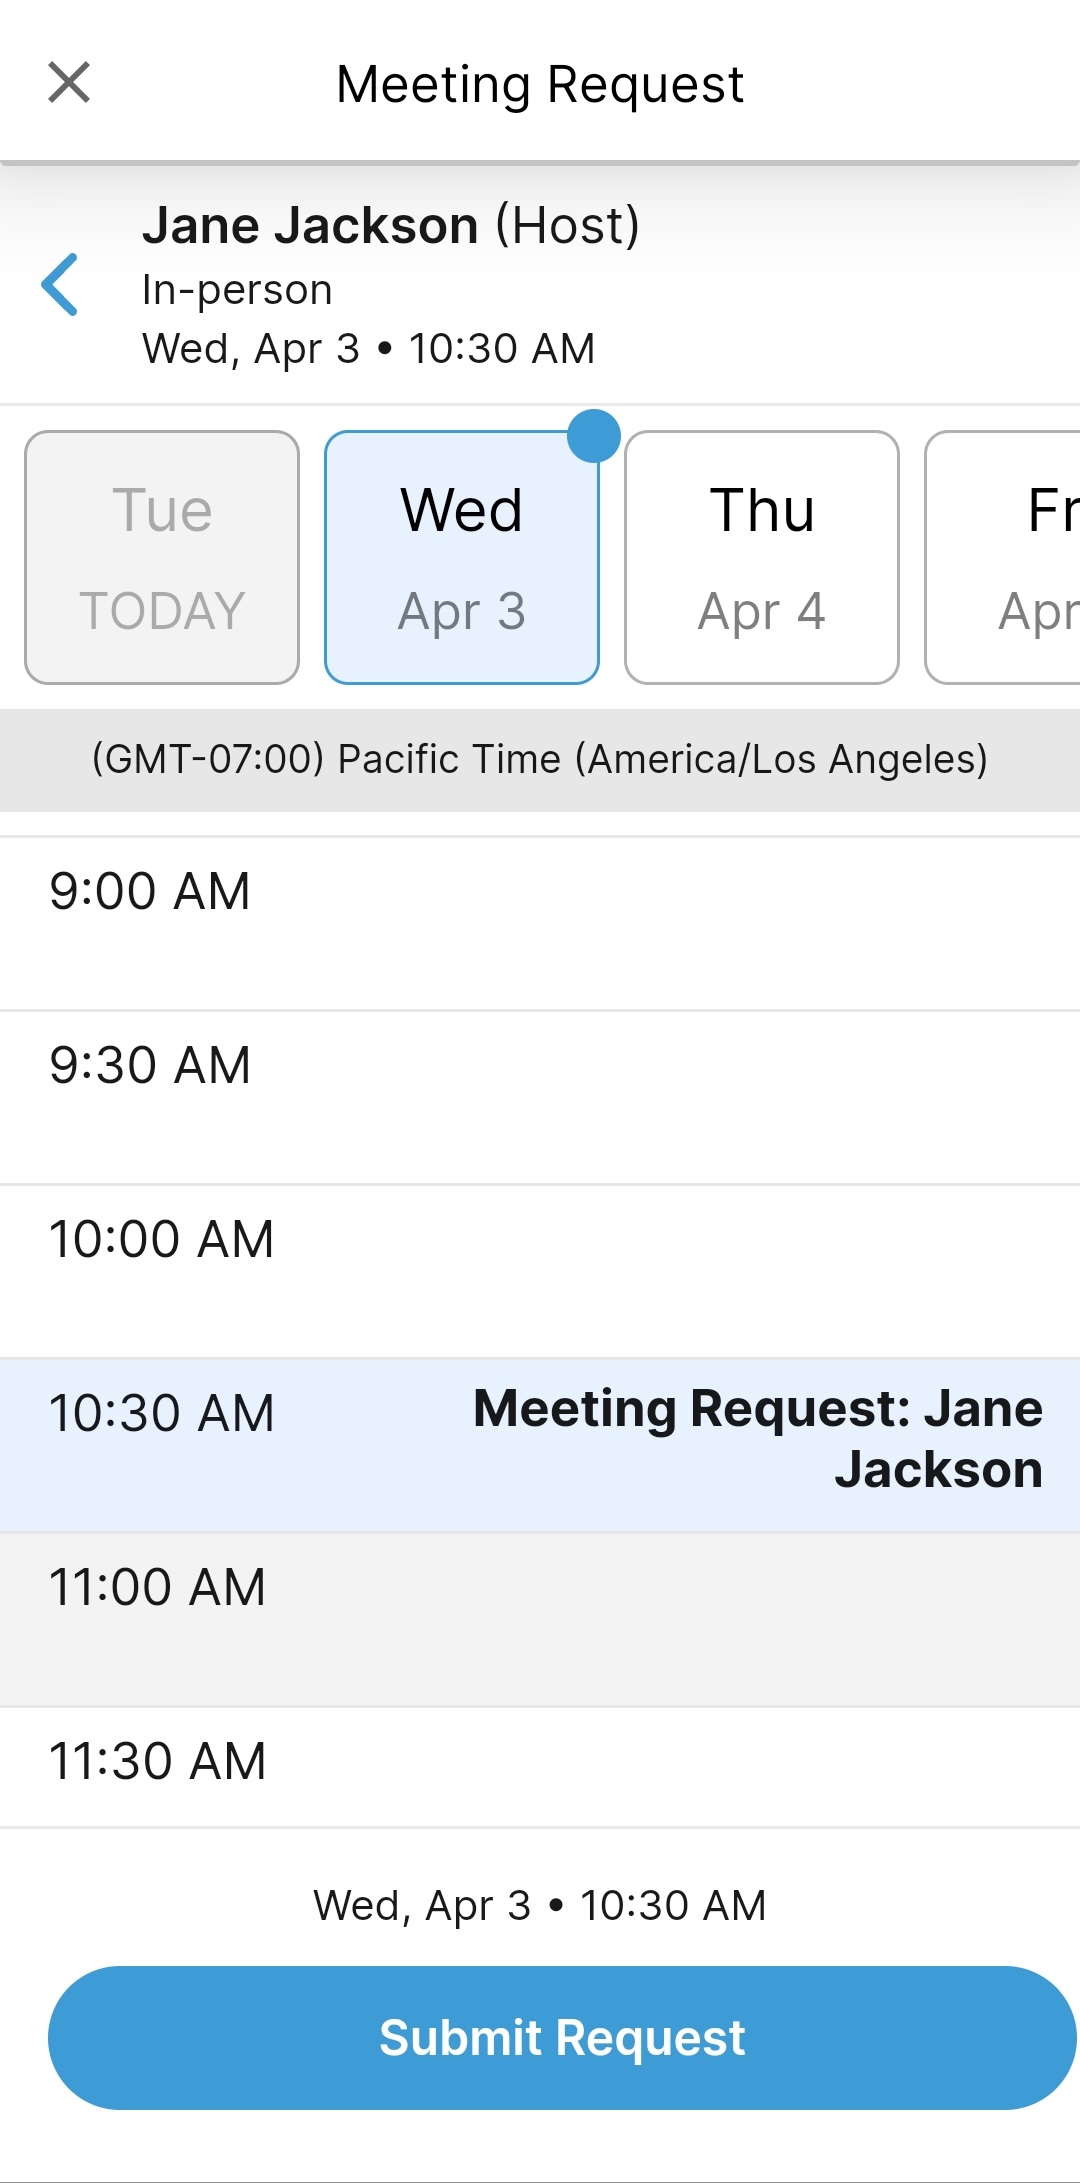
Select the desired time and date for the meeting. Recipients can request meetings up to 90 days in advance.
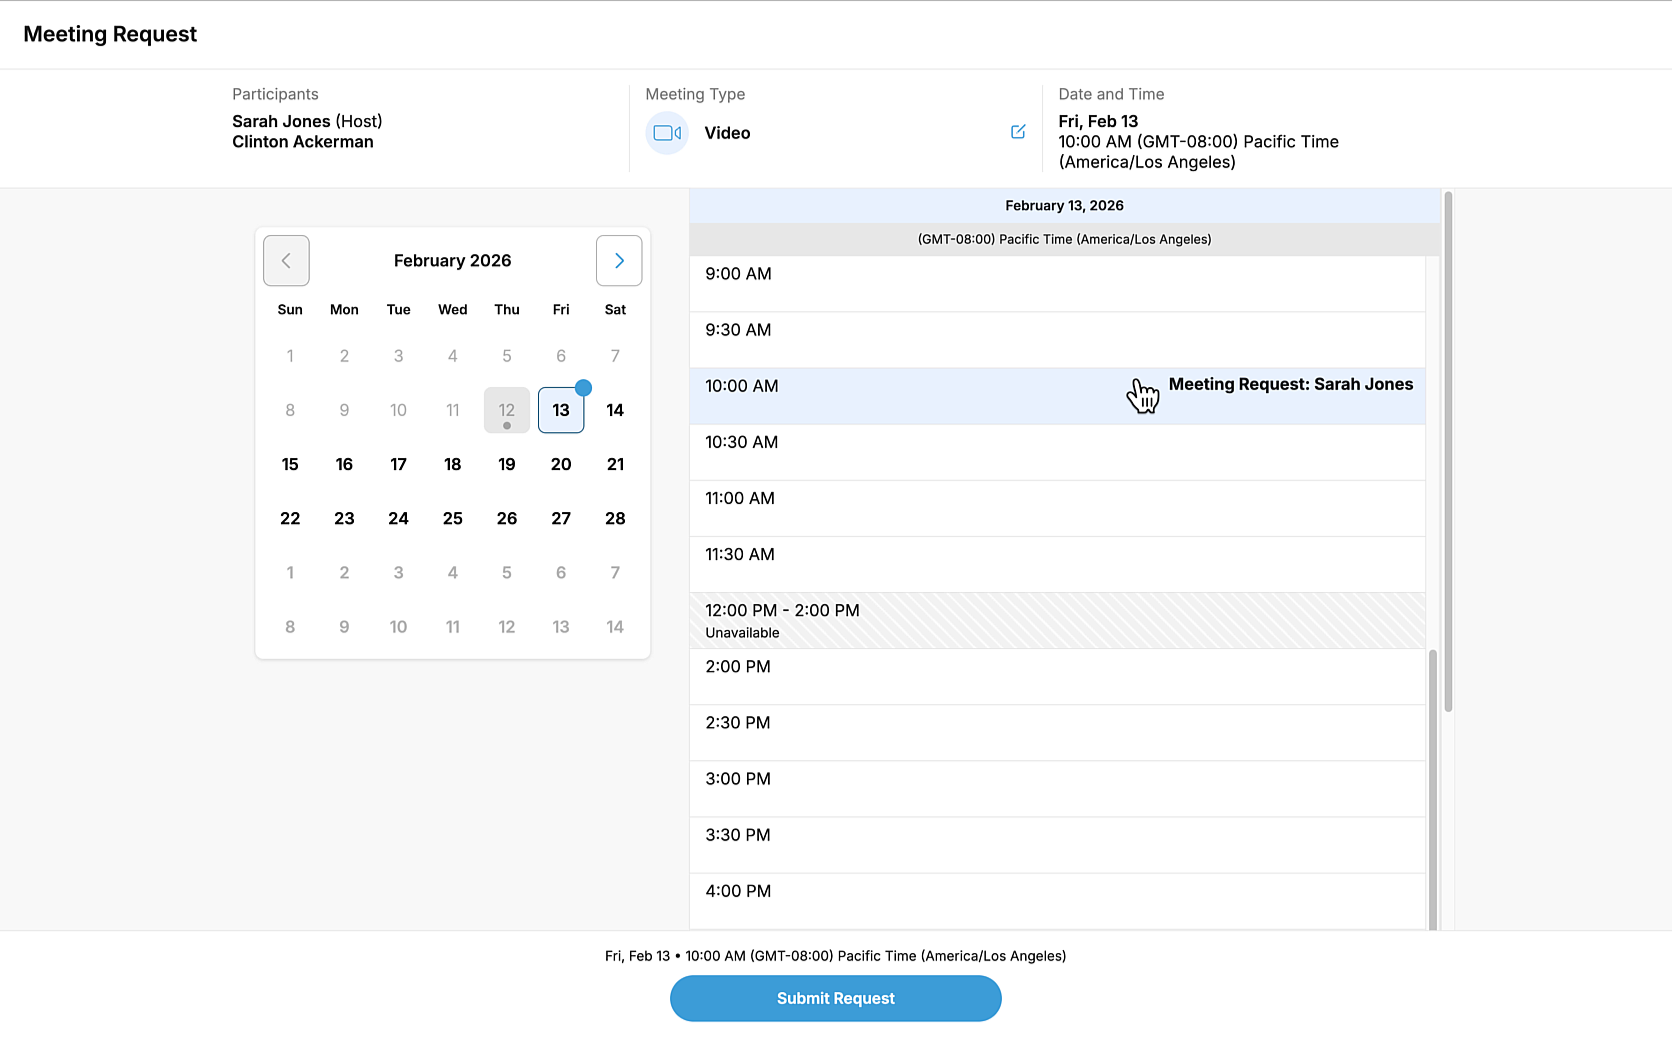
Recipients can change the requested meeting type at any point in the scheduling process. On mobile devices, select the back arrow in the header. On browser, select the pencil button next to the Meeting Type in the header.
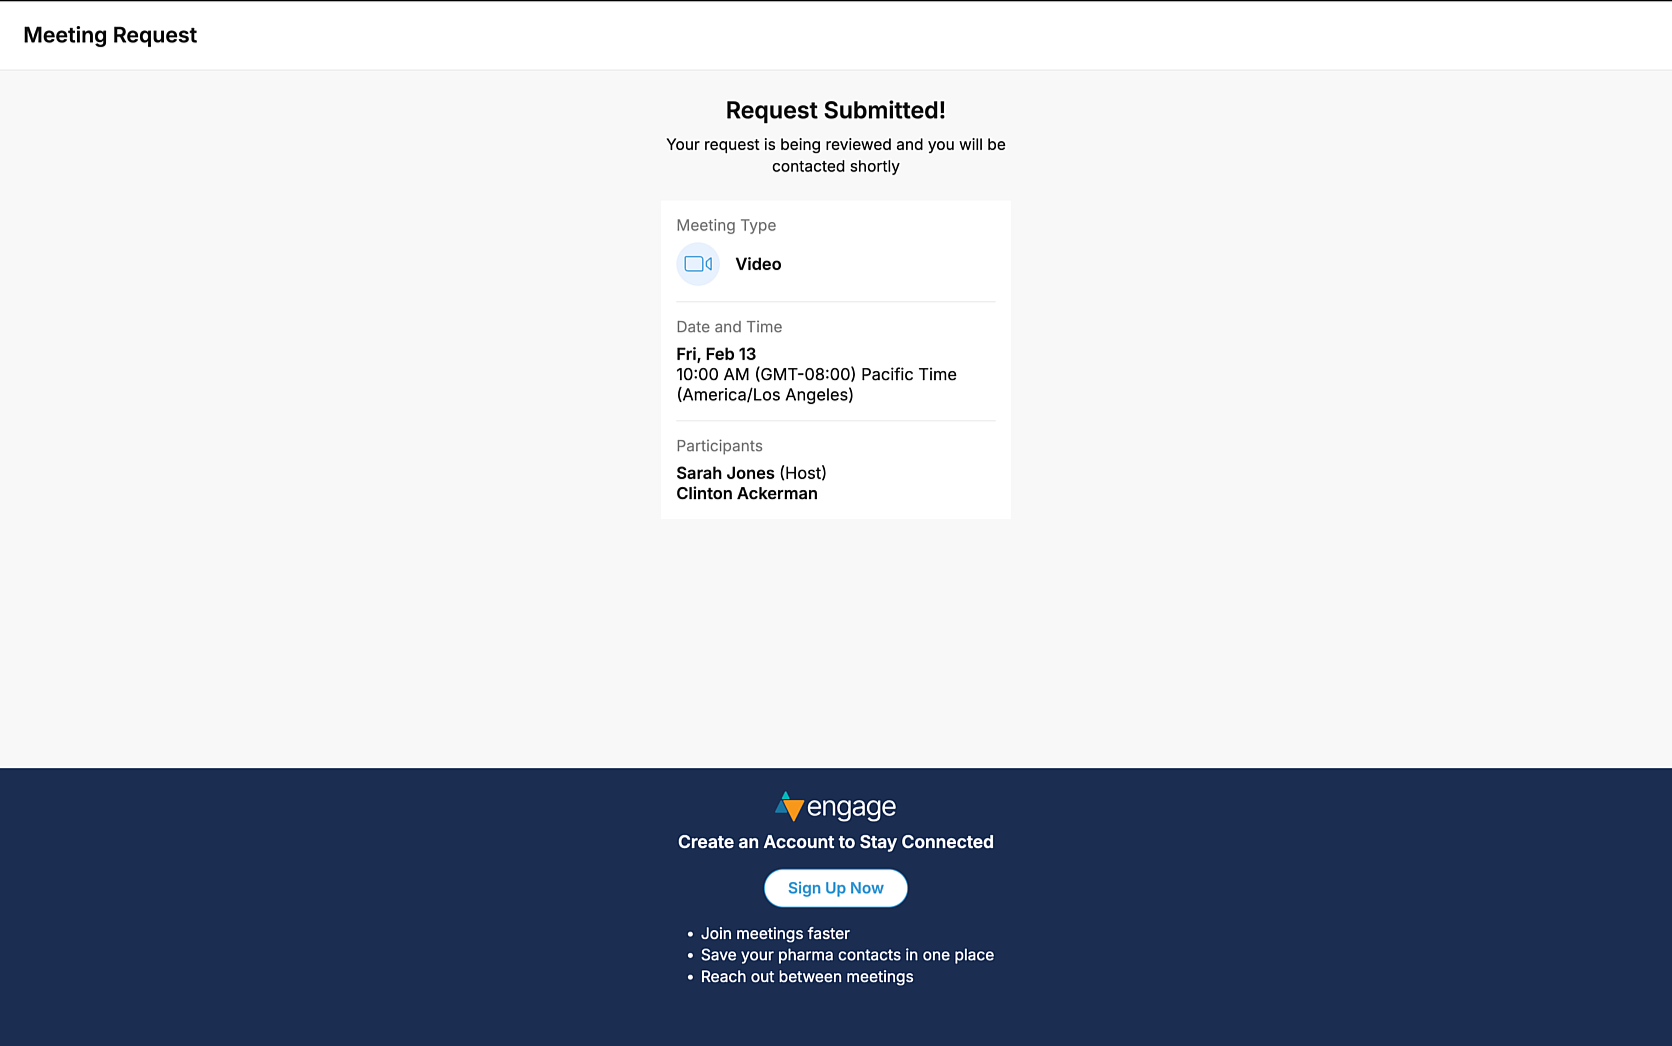
-
Select Confirm. A confirmation message displays containing the meeting request information.
Notifying Users About Meeting Requests
When a recipient requests a meeting using the Engage Scheduling Site, a Meeting_Request_vod record owned by the sender of the Approved Email is created in CRM with the following values:
- Assignee_vod – The user who sent the email containing the link to the Engage Scheduling Site
- Account_vod – The recipient of the Approved Email who requested the meeting
- Owner – The user who sent the email containing the link to the Engage Scheduling Site
- Invitee_Display_vod – The Formatted_Name_vod field of the recipient account
- Meeting_Type_vod – The recipient’s selected meeting type. May be one of the following possible values:
- In-Person
- Video
- Phone
- Status_vod – Always populates as Requested_vod
- Start_DateTime_vod – The date and time requested by the recipient
- Duration_vod – Always populates as 30
- Sent_Email_vod – The Sent_Email_vod record sent to the recipient containing the {{schedulerLink}} token
- Phone_vod – Populates if the recipient entered a phone number after selecting Phone as the meeting type
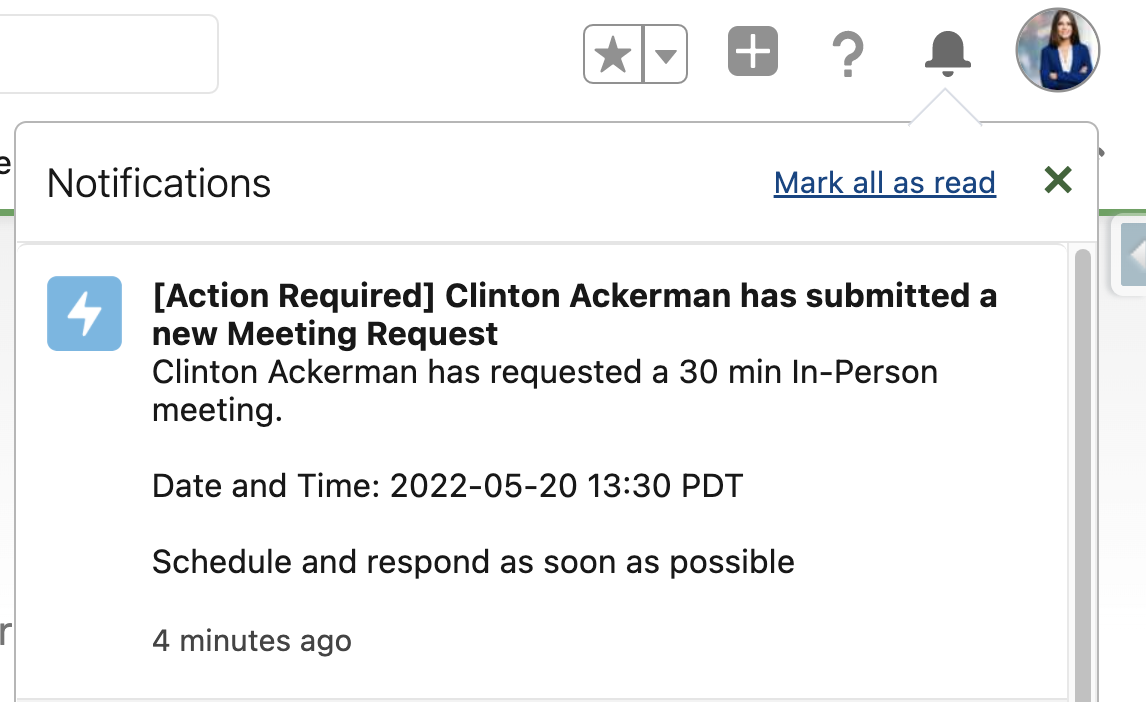
In addition to the created Meeting_Request_vod record, users receive an email from scheduling@veevacrm.com stating a recipient requested a meeting, along with a prompt to respond and schedule the meeting as soon as possible.
For example, when Dr. Ackerman requests an In-person meeting with Sarah Jones, she receives the following email:
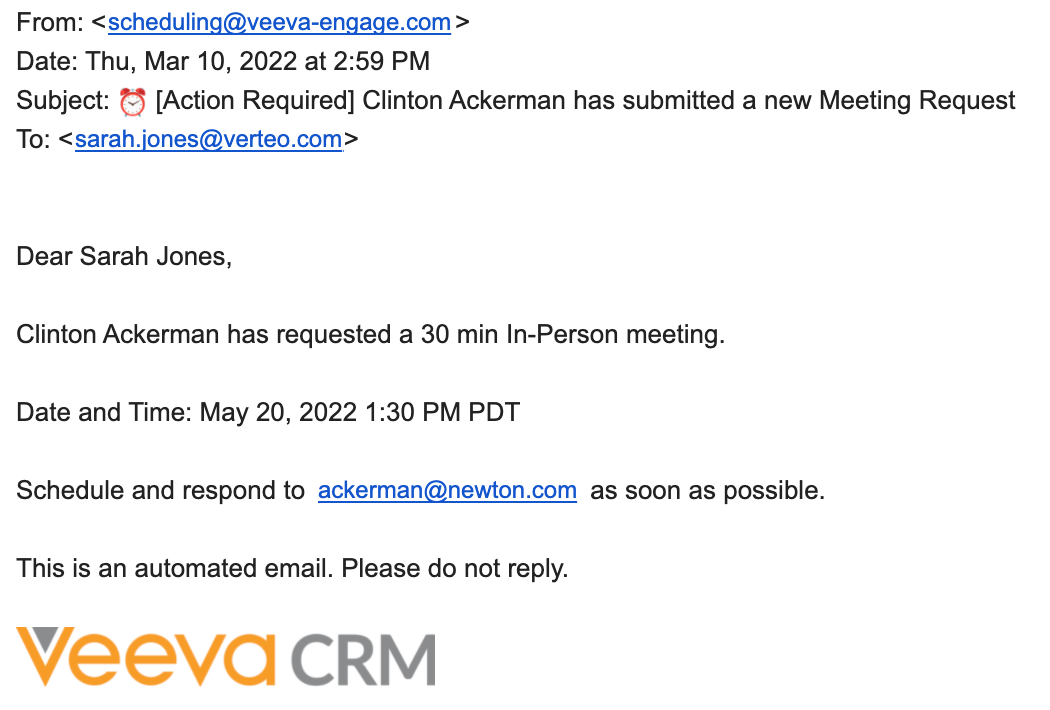
Users on the Browser platform also receive a notification when a new meeting request is created and assigned to them. If a user is not specified in the Assignee_vod field on the Meeting_Request_vod record, the notification goes to the record Owner instead.
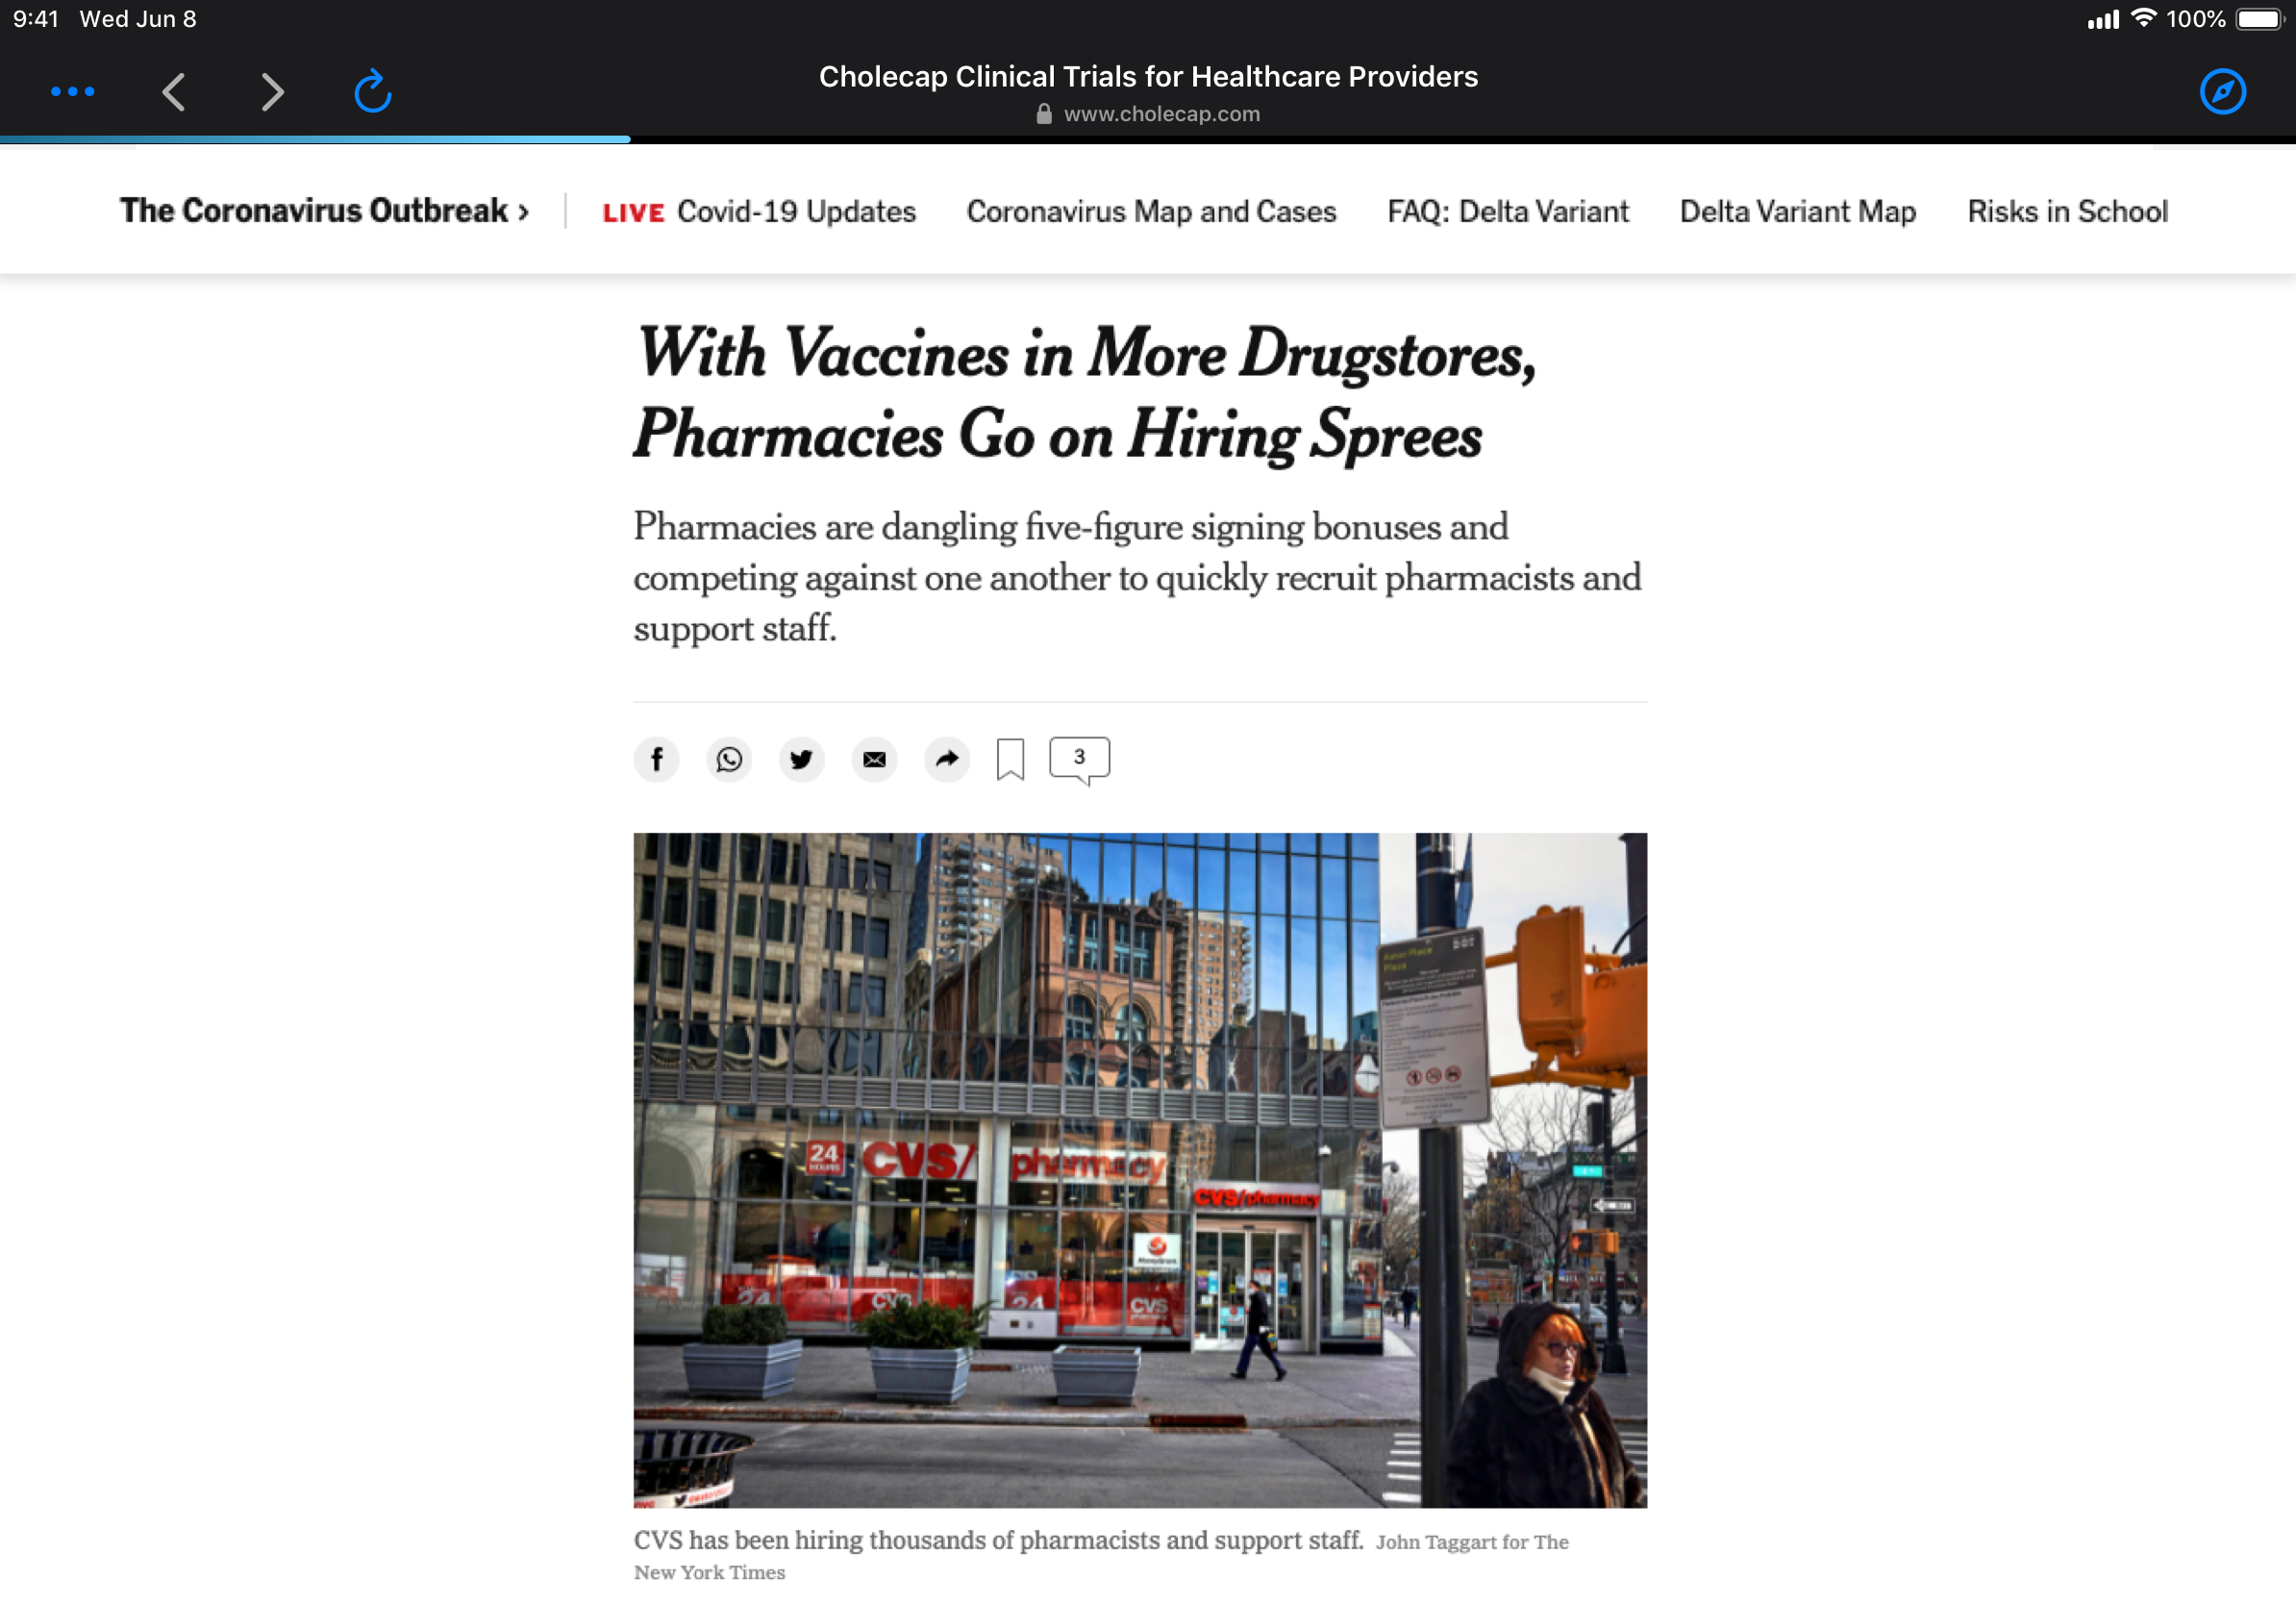
Sending Web Links for Website Content
To allow users to share approved website content to HCPs through non-email channels, users can share website links to HCPs using social messaging apps. Admins can add tracking tokens to website links to track visitor engagement with specific websites and identify where and when the link was sent. Sharing web links allows users to increase communication with HCPs and increase HCP engagement with website content.
For example, Sarah Jones uses SMS to communicate with Dr. Clinton Ackerman. Dr. Ackerman previously asked for more information about clinical trials for Cholecap. Sarah has a website in her media library containing approved messaging about clinical trials for Cholecap. She sends the link to Dr. Ackerman through the Messages app on her iPad. When Dr. Ackerman selects the link and views the website, the activity is tracked in Veeva CRM.
Considerations
- Customers must have Engage licenses for the users who can send website links
- Restricted products, allowed products, and segmentations for accounts are respected and control which websites users can send to each account
- Content marked as Training content cannot be sent from the media library. See Using Training Presentations for more information.
- Watermarks are not supported. See Adding Watermarks to Training Presentations for more information.
Defining SMS and WhatsApp Phone Numbers
Admins can optionally define the SMS and WhatsApp phone numbers for an account. This automatically populates the recipient phone number when users send website links to the account using Messages and WhatsApp.
On iPad, if a phone number is populated for an account, it is automatically populated in the messaging app, regardless of the ENGAGE_LINK_ACCOUNT_SELECTION_vod Engage Setting. If the phone number is not populated for an account, the ENGAGE_LINK_ACCOUNT_SELECTION_vod Engage Setting determines the account selection behavior.
To define the SMS/WhatsApp phone number for an account:
- Grant end users FLS read permission to the following fields on the Account object:
- SMS_vod
- WhatsApp_vod
Since WhatsApp does not have an iPad app, WhatsApp Web launches in the browser on the iPad platform. Veeva CRM does not control the behavior of WhatsApp Web.
- Navigate to the appropriate Account record.
- Select Edit.
- Populate the SMS_vod or WhatsApp_vod fields.
A phone number must be only digits (no symbols), including the country code, and must not contain any leading zeros, for example, 11234567890.
Adding Tracking Tokens to Website URLs
Tokens can be used by content creators to track information about which accounts visit the website. Tokens must be appended to the URL of the website by updating the URL_vod field of the appropriate Key_Message_vod record.
Tokens must be appended to the URL using the following format:
https://www.example.com?[[Parameter 1]]={{Token 1}}&[[Parameter 2]]={{Token 2}}
Admins can define the parameter names. The tokens resolve when viewed by users.
Add the {{linkTracker}} token to track information about how and when the user sent the link:
- Source – The location from where the users sent the link. When sent from Veeva CRM, the value is set to VeevaCRM.
- Device – The device used by the user to send the link. When sent from Veeva CRM on iPad, the value is set to iPad.
- Sent Datetime – The datetime when the user sent the link in ISO 8601 format
For example, Sarah Jones launches the following website from her iPad:
https://www.verteobiopharma.com?user={{userName}}&{{linkTracker}}
The tokens resolve to the following:
https://verteobiopharma.com?user=Sarah%20Jones&src=VeevaCRM&dvc=iPad&sentDateTime=2021-08-25T20:05:28Z
The following tokens are also supported for website tracking:
Tokens can reference fields from the Account and User objects. Other objects are not supported.
For example, when Sarah Jones send a website to Dr. Clinton Ackerman with the following URL:
https://www.verteobiopharma.com?user={{User.Name}}&acctFirst={{Account.FirstName}}&acctLast={{Account.LastName}}
The tokens resolve to the following:
https://www.verteobiopharma.com?user=Sarah%20Jones&acctFirst=Clinton&acctLast=Ackerman
If no account is selected, then the website resolves to:
https://www.verteobiopharma.com?user=Sarah%20Jones&acctFirst=&acctLast=
Sending Web Links
Users can share website links for websites to HCPs from the media library. Users can launch a supported messaging app directly from Veeva CRM or copy the URL to send using another communication channel. The available sharing options are configured in the ENGAGE_LINK_APPS_vod Engage Link Setting.
Websites marked as training content cannot be sent from the media library. See Using Training Presentations for more information. Watermarks are not supported for websites.
To send a link:
- Select the Media tab in Veeva CRM or the Media button on the call report for a call or Engage meeting to display the media library.
- Navigate to the Websites tab.
- Select the More Actions menu above the appropriate website thumbnail.
- Select Share to view the available sharing options.
If the ENGAGE_LINK_ACCOUNT_SELECTION_vod Engage Link Setting is set to 0, users are prompted to select an account before the sharing options display. Allowed products, restricted products, and segmentations are respected for selected accounts. If the setting is set to 1, users are never prompted to select an account.
- Select the appropriate sharing option.
If users select Engage Chat, the following steps are different. See Sharing Web Links via Engage Chat for more information.
- Select the recipient, if applicable and not already populated. The recipient field is automatically populated if the following are true:
- The user selected the account before selecting the sharing option
- The user navigated to the media library from a specific account
- The selected sharing option is Messages and the SMS_vod field for the account is populated
- The selected sharing option is WhatsApp and the WhatsApp_vod field for the account is populated
-
Select Send.
Sharing Website Links via Engage Chat
To share a link:
- Select the Media tab in Veeva CRM or the Media button on the call report for a call or Engage meeting to display the media library.
- Navigate to the Websites tab.
- Select the More Actions menu above the appropriate website thumbnail.
- Select Share to view the available sharing options.
If the ENGAGE_LINK_ACCOUNT_SELECTION_vod Engage Link Setting is set to 0, users are prompted to select an account before the sharing options display. Allowed products, restricted products, and segmentations are respected for selected accounts. If the setting is set to 1, users are never prompted to select an account.
- Select Engage Chat.
- Select the recipient, if applicable and not already populated. The recipient field is automatically populated if the selected account must only have one Engage profile you are connected to.
If the recipient is not automatically populated, the Select Connection modal displays. The list of available connections depends on whether you previously selected an account:
- You already selected an account and the selected account has more than one Engage profile you are connected to. The Select Connection modal displays with the list of available connections for the account.
- You already selected an account and the selected account does not have any Engage profiles you are connected to. The Select Connection modal displays with a list of all available connections. Selecting a connection automatically links the Engage profile to the account.
- You did not select an account, so the Select Connection modal displays with a list of all available connections
- Preview the message before sending.
- Select Send.
In addition to the More Actions menu, users can send web links via Engage Chat directly in a chat thread in the Engage tab. To send a web link in a chat thread:
- Navigate to the appropriate chat thread in the Engage tab.

- Select the media button in the action bar.
- Select the appropriate account using the account search.
If the ENGAGE_LINK_ACCOUNT_SELECTION_vod Engage Link Setting is set to 1, account selection is skipped.
- Select the appropriate website from the media library.
- Select Send.
A shortened version of the URL using the veev.io domain (for example, veev.io/sbn1pyrrix31) is generated and shared. This shortened URL never expires and is used to track click activity. If the shortened URL cannot be generated within five seconds, the full URL is shared. Activity cannot be tracked when the full URL is shared.
Tracking Web Links
Once a website link is sent, a Sent_Message_vod record is automatically created with the following fields populated:
If the full URL for a website is sent instead of the shortened URL, the reason is stamped in the Details_vod field on the Sent_Message_vod record.
|
Field |
Value |
|---|---|
|
Record Type |
Content_vod |
|
Account |
Lookup to the account, if selected |
|
User |
Lookup to the user who sent the website |
|
CLM Presentation |
Lookup to the CLM_Presentation_vod record |
|
Key Message |
Lookup to the Key_Message_vod record (associated with CLM_Presentation_Slide_vod record for the website) |
|
Engage Link |
The URL after all the tokens are resolved |
|
Shortened Engage Link |
The shortened URL |
|
Capture Datetime |
The datetime at which the sharing option was selected |
|
To |
The phone number or ID of the app to which the website was sent (populated only if a number or ID was available when the Send Website button was selected) |
|
Sent from Platform |
The platform from which the website was sent |
|
Sent Via |
The sharing option used to send the website |
|
Transaction Type |
Website Content |
|
Message Values |
JSON object containing the value stored in the URL_vod field of the Key_Message_vod record before any of the tokens are resolved and a list of the tokens with their real values. Includes values for the {{linkTracker}} token, if available in the URL. |
|
Call |
Lookup to the appropriate Call2_vod record, if the website was launched from a call and an attendee account was selected |
|
Product |
The product on the Key_Message_vod record |
|
Detail Group |
The detail group on the Key_Message_vod record |
|
Mobile Id |
System-generated Id |
|
VExternal Id |
The unique identifier of the shortened URL |
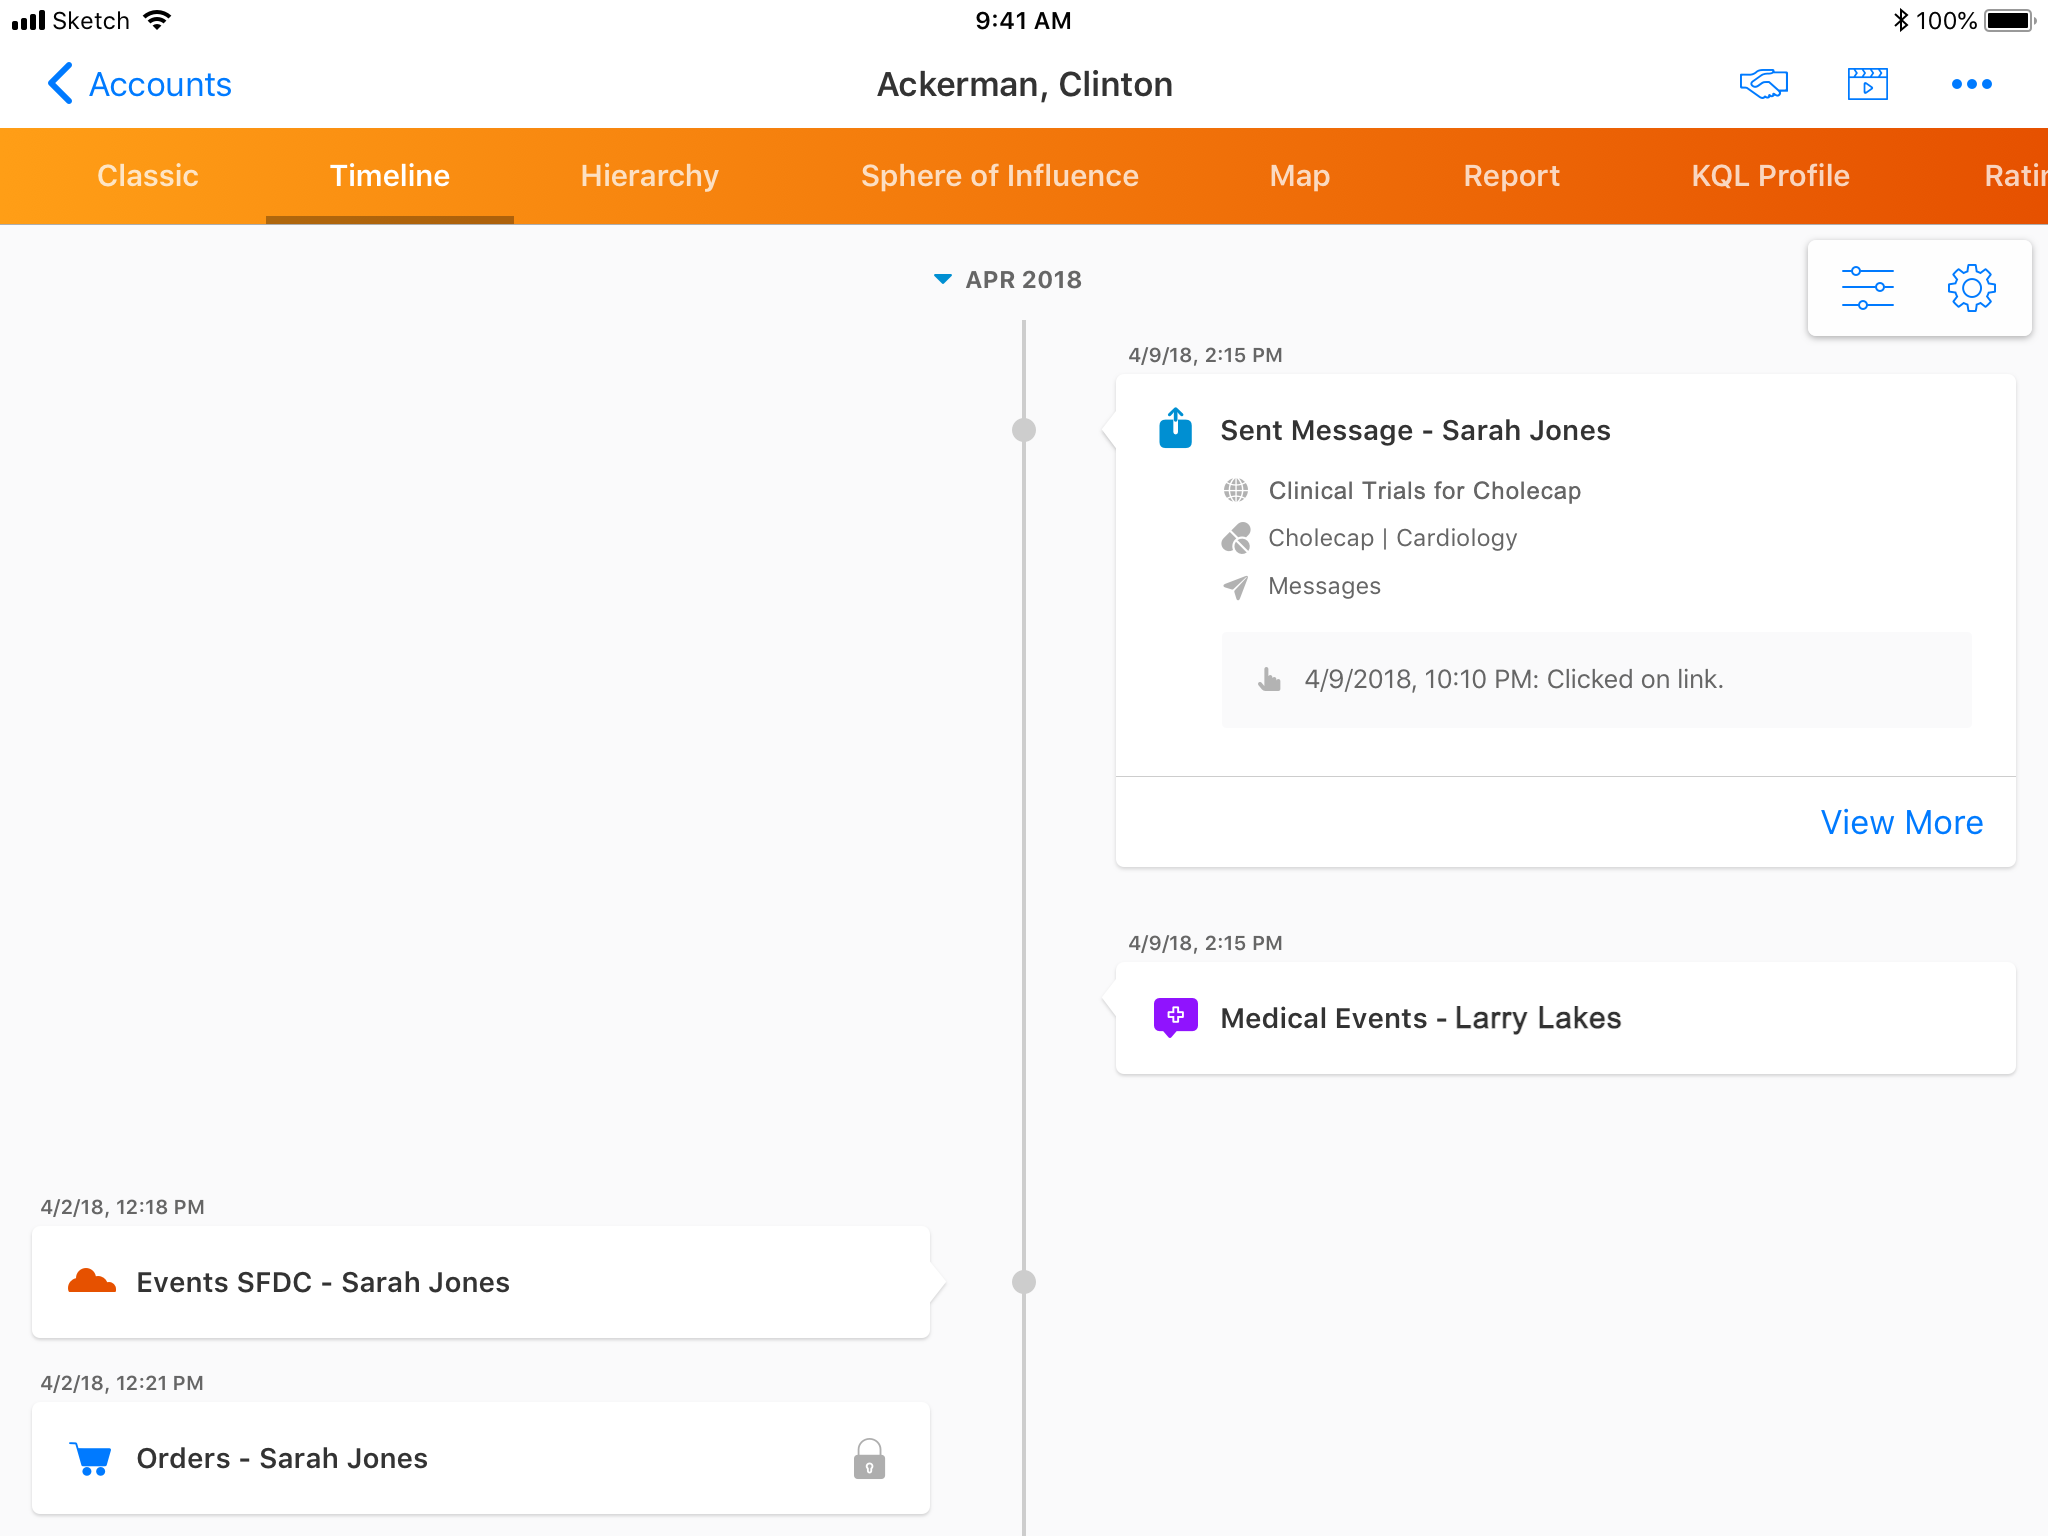
Users can view the sent message details, including the tracked activities of the sent message, for an account on the account timeline. Select View More to display the Sent_Message_vod record detail.
Sent messages in the account timeline can also be viewed on the Browser platform.
Each time a website is accessed from its shortened URL, a Message_Activity_vod record is created with the following fields populated:
Some social messaging apps generate link previews when users send links. The preview is generated by accessing the link, which creates a Message_Activity_vod record. Veeva CRM cannot prevent link previews from being generated.
|
Field |
Value |
|---|---|
|
Record Type |
Message_Activity_vod |
|
Activity |
Clicked |
|
Activity Datetime |
The datetime at which the activity occurred |
|
IP Address |
The IP address of the server/device which accessed the URL |
|
User Agent |
The User Agent details returned from the IP address |
|
Client Name |
The name of the client software |
|
Client OS |
The name of the OS family running the client software |
|
Client Type |
The type of software used to access the URL |
|
Client Device |
The type of device used to access the URL |
Web links sent via Engage Chat are tracked in the Engage Connect reports and can be forwarded. See Engage Connect Reports and Copying and Forwarding Chat Messages in Engage Connect for more information.
Engage Meeting
Engage Meeting License Management
The Engage group management process enables admins to control user assignment to Engage Groups via the User object, enabling assignment to be controlled via data-loading and user management integrations.
For example, Alice Adams, an admin at Verteo BioPharma, needs to add five users to an Engage group. Using the data loader, she enters the group name into the Engage Group Request field for each user. Once the users are successfully assigned, Alice can see that the process was successful on each User record, along with the name of the group stamped on the Engage Group field for confirmation.
Best Practices for Assigning and Removing Users via Data-Loading
Admins can assign or remove users in bulk via data-loading. Organizations who manage Engage group membership via data-loading should adhere to the following best practices:
- Data should only be upserted to the Engage_Group_Request_vod field
- Due to how Salesforce batches upsert requests, removing users from a group should be completed as a separate job before upserting new or updated assignments
Additionally, before deactivating a user in Salesforce, the user must be removed from the Engage Group to free the license and prevent errors if the Engage Group is deleted.
Assigning and Removing Users to Groups
To assign or remove an existing user from an Engage Group:
- Navigate to the appropriate User record.
-
Update the Engage_Group_Request_vod field to either the appropriate Engage Group name, if assigning, or to be blank, if removing.
To remove a user from an Engage Group when the Engage_Group_Request_vod field is already blank, update the Engage_Group_Provisioning_Status_vod field to Retry_Request_vod.
- Select Save.
The Engage_Group_Request_vod field must be populated by an active, valid admin user. Engage groups cannot be managed by users without valid session IDs.
After saving, the Engage_Group_Provisioning_Status_vod field indicates the status of the requested update as it is processed by the Engage Server:
- Request_Sent_vod – The request has not yet been processed by the Engage Server
- No_Licenses_Remaining_vod – The request failed due to a lack of available licenses
- Invalid_Group_Name_vod – The entered Engage Group name did not match a group name on the Engage Server
- Request_Failed_vod – The requested assignment failed
- Success_vod – The requested assignment succeeded
Once the assignment is successful, the following fields automatically update for the User record:
- Engage_Group_vod – Updates to match the Engage_Group_Request_vod field
- Engage_Group_Provisioning_Status_vod – Updates to Success_vod
- Remote_Meeting_Host_Id_vod
- Remote_Meeting_Host_Token_vod
If anything prevents the provisioning process from updating the Engage_Group_vod and Engage_Group_Provisioning_Status_vod fields, they may not reflect the information on the Engage Server. Admins can verify current server information from the Engage meeting Administration tab.
Retrying Provisioning Requests
If the provisioning request failed for any reason, for example, if the admin attempted to add a user when zero Engage licenses remained, admins can retry the request after making the appropriate correction by updating the Engage_Group_Provisioning_Status_vod field to Retry_Request_vod.
Retry_Request_vod is the only value of this picklist admins should manually select. All other values are set by the system and should not be selected.
Adding Dial-in Numbers to Engage Meeting Invitations
To make it easier for attendees to join the audio of an Engage meeting via dial-in, Engage hosts can add dial-in numbers to invitations sent to attendees. This can be their preferred or required method of joining the meeting’s audio.
For example, Sarah Jones schedules an Engage meeting with Dr. Clinton Ackerman and invites him via an Approved Email invitation. Dr. Ackerman receives the invitation, which contains information about the meeting and various ways to join. When the Engage meeting starts, Dr. Ackerman dials into the meeting’s audio using one of the dial-in numbers included in the invitation.
Considerations
- This feature is only compatible with invitations to virtual event attendees, not speakers
- Turkey is not a supported country
Adding Dial-in Numbers to Approved Email Templates
For dial-in numbers to display in invitations sent to attendees, content creators must add the {{insertZoomDialInNumbers[Language Code]}} token to the appropriate email templates.
The token’s [Language Code] parameter must be replaced with a supported language code, which determines the language of the rendered text.
Defining Dial-in Numbers Included in the Rendered Token
The dial-in numbers included in the rendered token are determined by the following fields:
- The Country_Code_vod field on the User record
- Any selected values in the Additional_Zoom_Dial_In_Countries_vod field on the User_Detail_vod record associated with the composer
For example, Sarah Jones is a user with a Country_Code_vod of USA. However, due to her geographic location, she frequently hosts Engage meeting calls with Canadian accounts. Sarah’s User_Detail_vod record has an Additional_Zoom_Dial_In_Countries_vod field with Canada as a selected value.
When Sarah sends an invitation to an Engage meeting as an Approved Email invitation containing the {{insertZoomDialInNumbers[en_US]}} token, the following information displays:
Phone Number(s):
+1 669 900 6833 (US San Jose)
+1 646 876 9923 (US New York)
+1 301 715 8592 (US Washington DC)
+1 312 626 6799 (US Chicago)
+1 778 907 2071 (Canada)
+1 204 272 7920 (Canada)
Meeting ID: 8613634421

When the {{insertZoomDialInNumbers[Language Code]}} and {{addToCalendar}} tokens are used together, the text generated by the {{insertZoomDialInNumbers[Language Code]}} token is included in the description of the .ICS file generated by the {{addToCalendar}} token.
In the BEE Editor, {{insertZoomDialInNumbers[Language Code]}} token can be found by navigating to Merge tags > Remote Meeting and Zoom Invite Links.
Events Management
Lightning for Events Management (Sandbox Beta)
Lightning-enabled orgs have access to a dedicated experience on the Browser (Lightning) platform, enabling the use of Salesforce’s enhanced Lightning UI with the capabilities of Events Management.
Once configured, the Lightning UI applies to the following Events Management functionality:
- Creating and Editing an Event – See Functionality Differences for updated functionality
- The Next Steps Section – See Functionality Differences for updated functionality
- Adding Event Team Members
- Adding Event Budgets to an Event
- Adding Speakers to an Event – See Functionality Differences for updated functionality
- Adding Event Materials to an Event
- Entering Expense Estimates into an Event
- Event Sessions
- Adding Attendees to an Event
- Searching for Out of Territory Attendees – See Functionality Differences for updated functionality
- Adding Walk-in Attendees – See Functionality Differences for updated functionality
- Reconciling Walk-in Attendees – See Functionality Differences for updated functionality
- Entering Expense Headers and Lines
- Using the Files, Attachments, and Notes related list in EM_Event_vod records
- Managing Related Lists in Lightning for Events Management
- Selecting Attendees in Hierarchies
- Adding Local Time and Time Zone to an Event
- Hosting a Virtual Event using Engage
- Generating Virtual Participant URLs in Child Events
- Alternative Hosts for Virtual Events
- Associating an Account with an Event
- Using Event Templates in Child Events
- SAP Concur Integration with Events Management
- Event Business Rules
- Event Tasks
- Using Notes in Lightning Experience
- Child Accounts in Events Management
- Searching for Child Account Attendees Outside a User’s Territory
- Viewing Expense Headers and Expense Lines in Lightning for Events Management
- Creating and Editing Expense Headers and Expense Lines – Includes creating split expenses
When defined on EM_Event_Layout_vod records, the following buttons display on events in Lightning for Events Management, enabling the following functionality:
These features are functionally equivalent to other platforms.
Unsupported Features on Lightning for Events Management
The following Events Management features are not currently available when using Lightning for Events Management, though support is planned in future releases:
Considerations
- The Lightning-specific functionality is only intended for testing in sandbox orgs
Functionality Differences
The flow of supported Events Management functionality is unchanged from the Browser (Classic) version of the module, with the following exceptions.
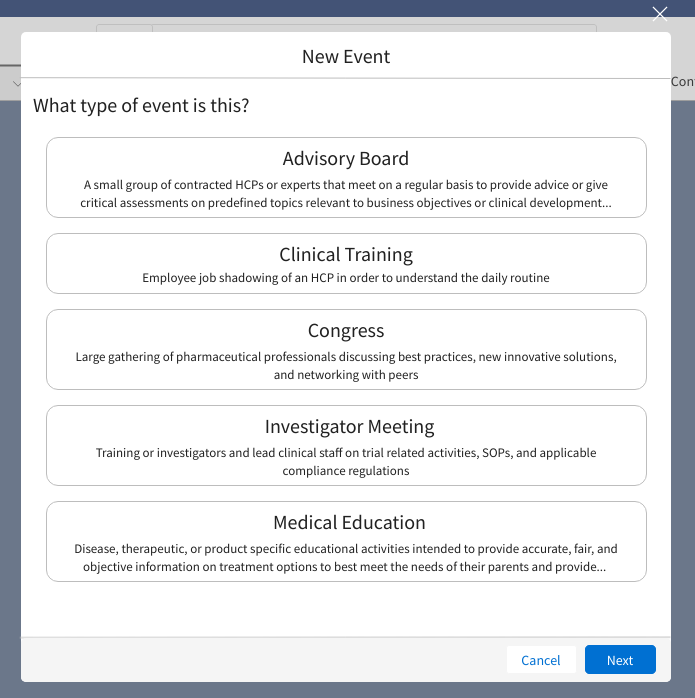
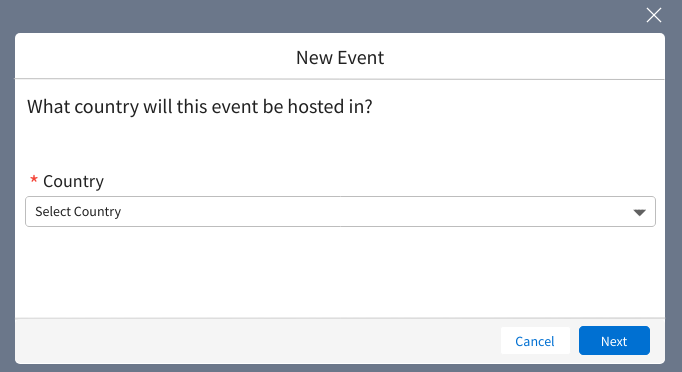
Creating Events in Lightning for Events Management
When creating an event, the record type selection page is overridden with a customized event creation flow including details for each defined event type, as well as country selection.
To enable organizers to begin planning events without knowing start and end times, the Start_Time_vod and End_Time_vod fields do not need to be populated initially to create the record.

Adding Speakers in Lightning for Events Management
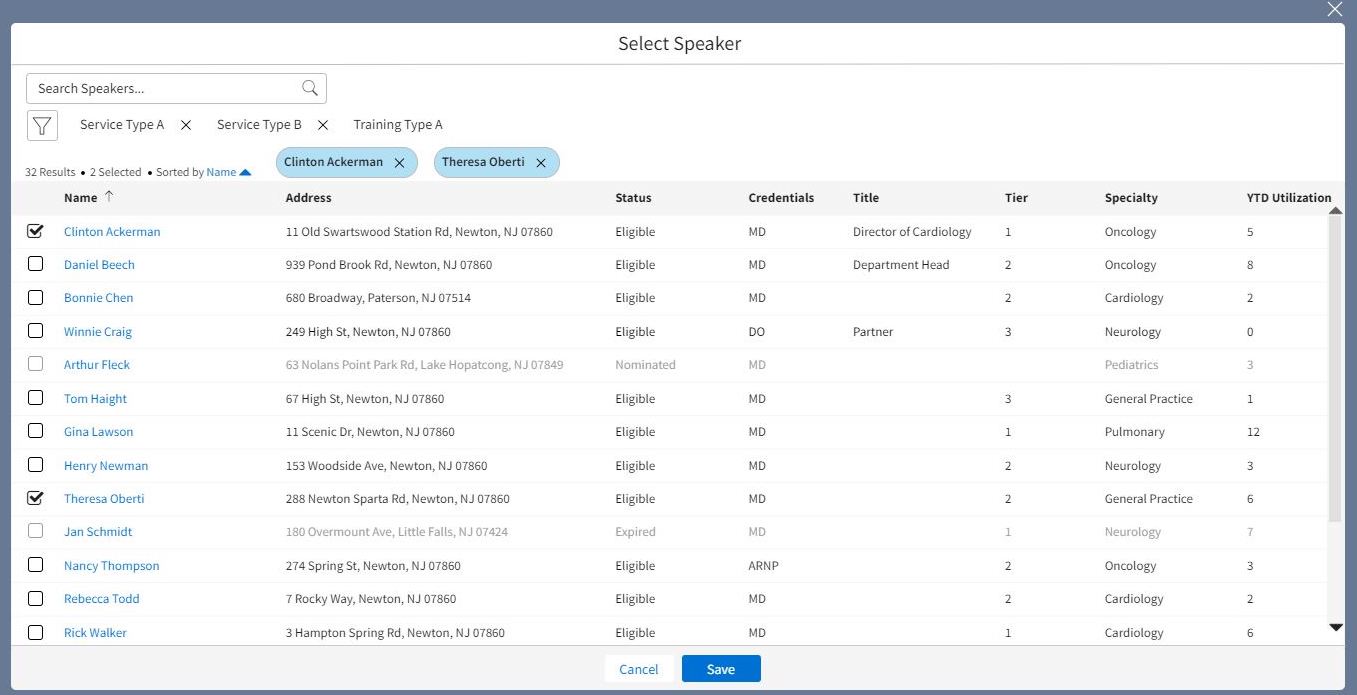
When adding speakers to an event, the Select Speaker displays as a modal over the event, rather than as a separate page.
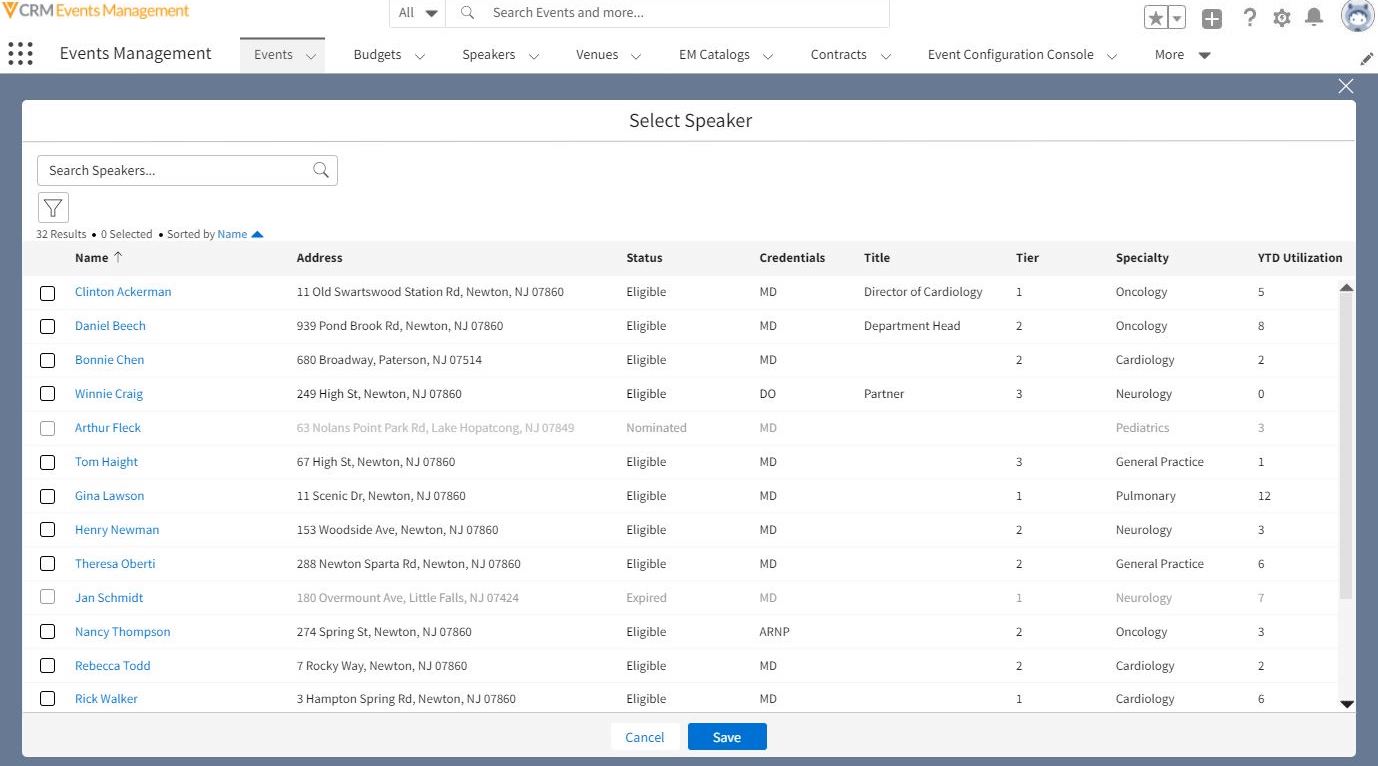
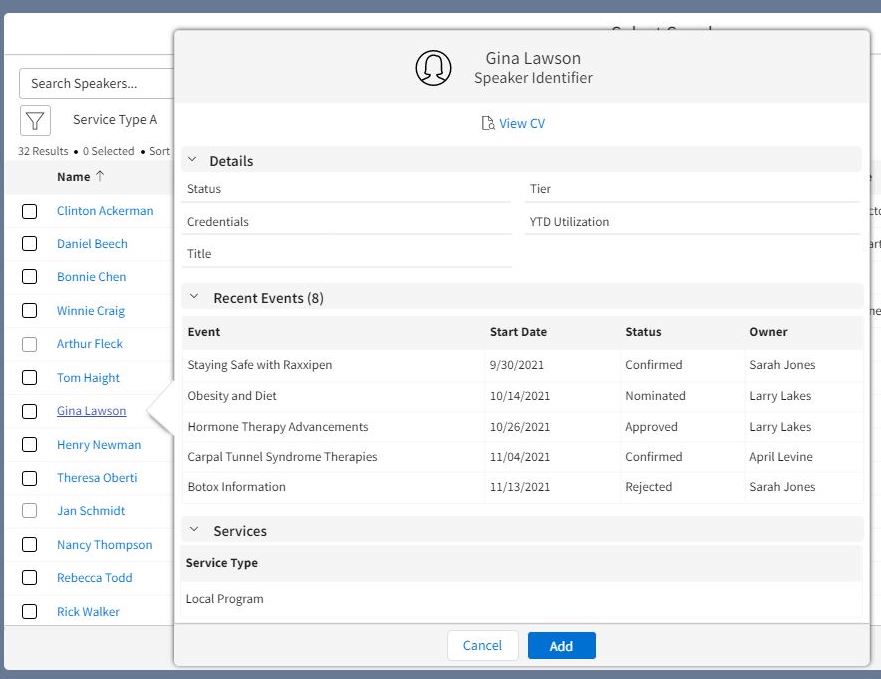
Selecting a speaker’s name in this modal displays details about the speaker, along with the option to add them to an event and download their CV file, if available.
In addition to adding speakers one at a time, users can also select multiple speakers to add at once using the check box column before selecting Save.
Searching for speakers searches across all fields that have been configured as Speaker fields.
Speaker Tab
To enable event organizers to easily decide which speaker to choose for an event, the Speaker tab displays a list of all speakers. The Speaker tab displays the availability and eligibility of speakers, as well as common profile attributes such as affiliation, credentials, and specialty.
For example, Alice Adams, an event organizer at Verteo BioPharma, wants to plan a symposium about Cholecap. She navigates to the Speaker tab and quickly searches for several speakers who are trained in the Cholecap topic. After narrowing her selection down to a few potential speakers, she reviews the profile for each to review their eligibility and availability for her event.
Connected Mode
Similar to other Events Management functionality, the Speaker tab uses an internet connection to run in connected mode and display the most up to date speaker information and availability. If an Internet connection is not available, a connection error message displays.
Navigating the Speaker Tab
The Speaker tab displays all speakers available to the user and includes the following components for each speaker:
- A status icon indicating the eligibility of the speaker
Icon Speaker Status 
Eligible_vod 
Expired_vod

Nominated_vod
- The speaker’s name, Speaker Identifier and Address display in the first column
- Configured columns in SPEAKER_TAB_COLUMNS_vod display on the right
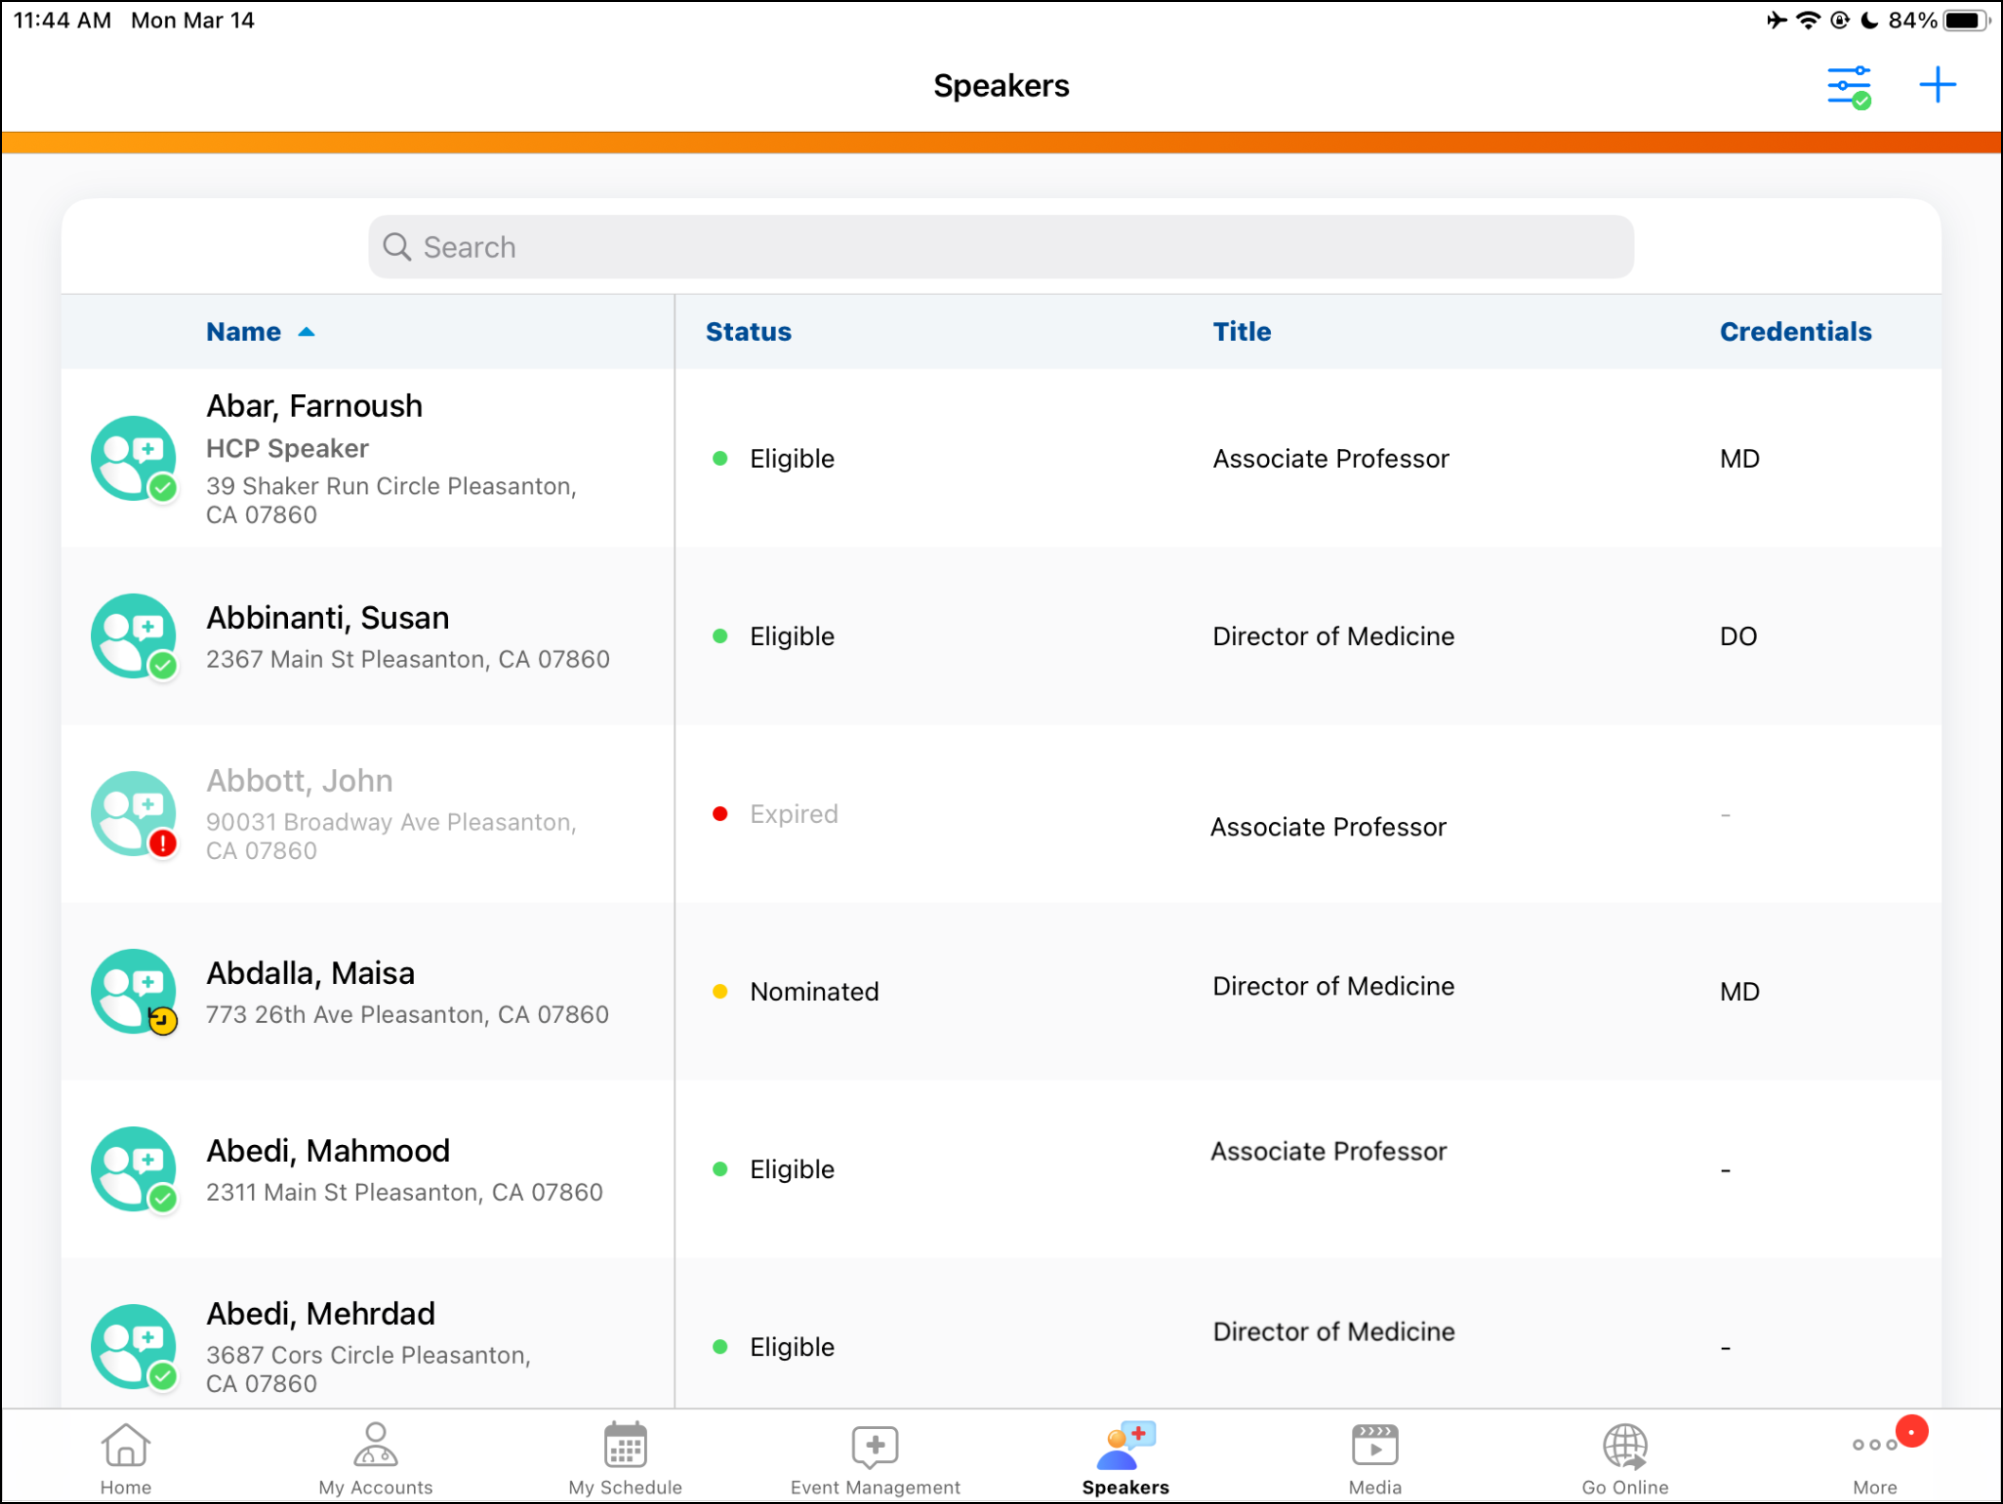
To find speakers, users can enter a search term in the Search field. The results list matches the search term against speaker data.
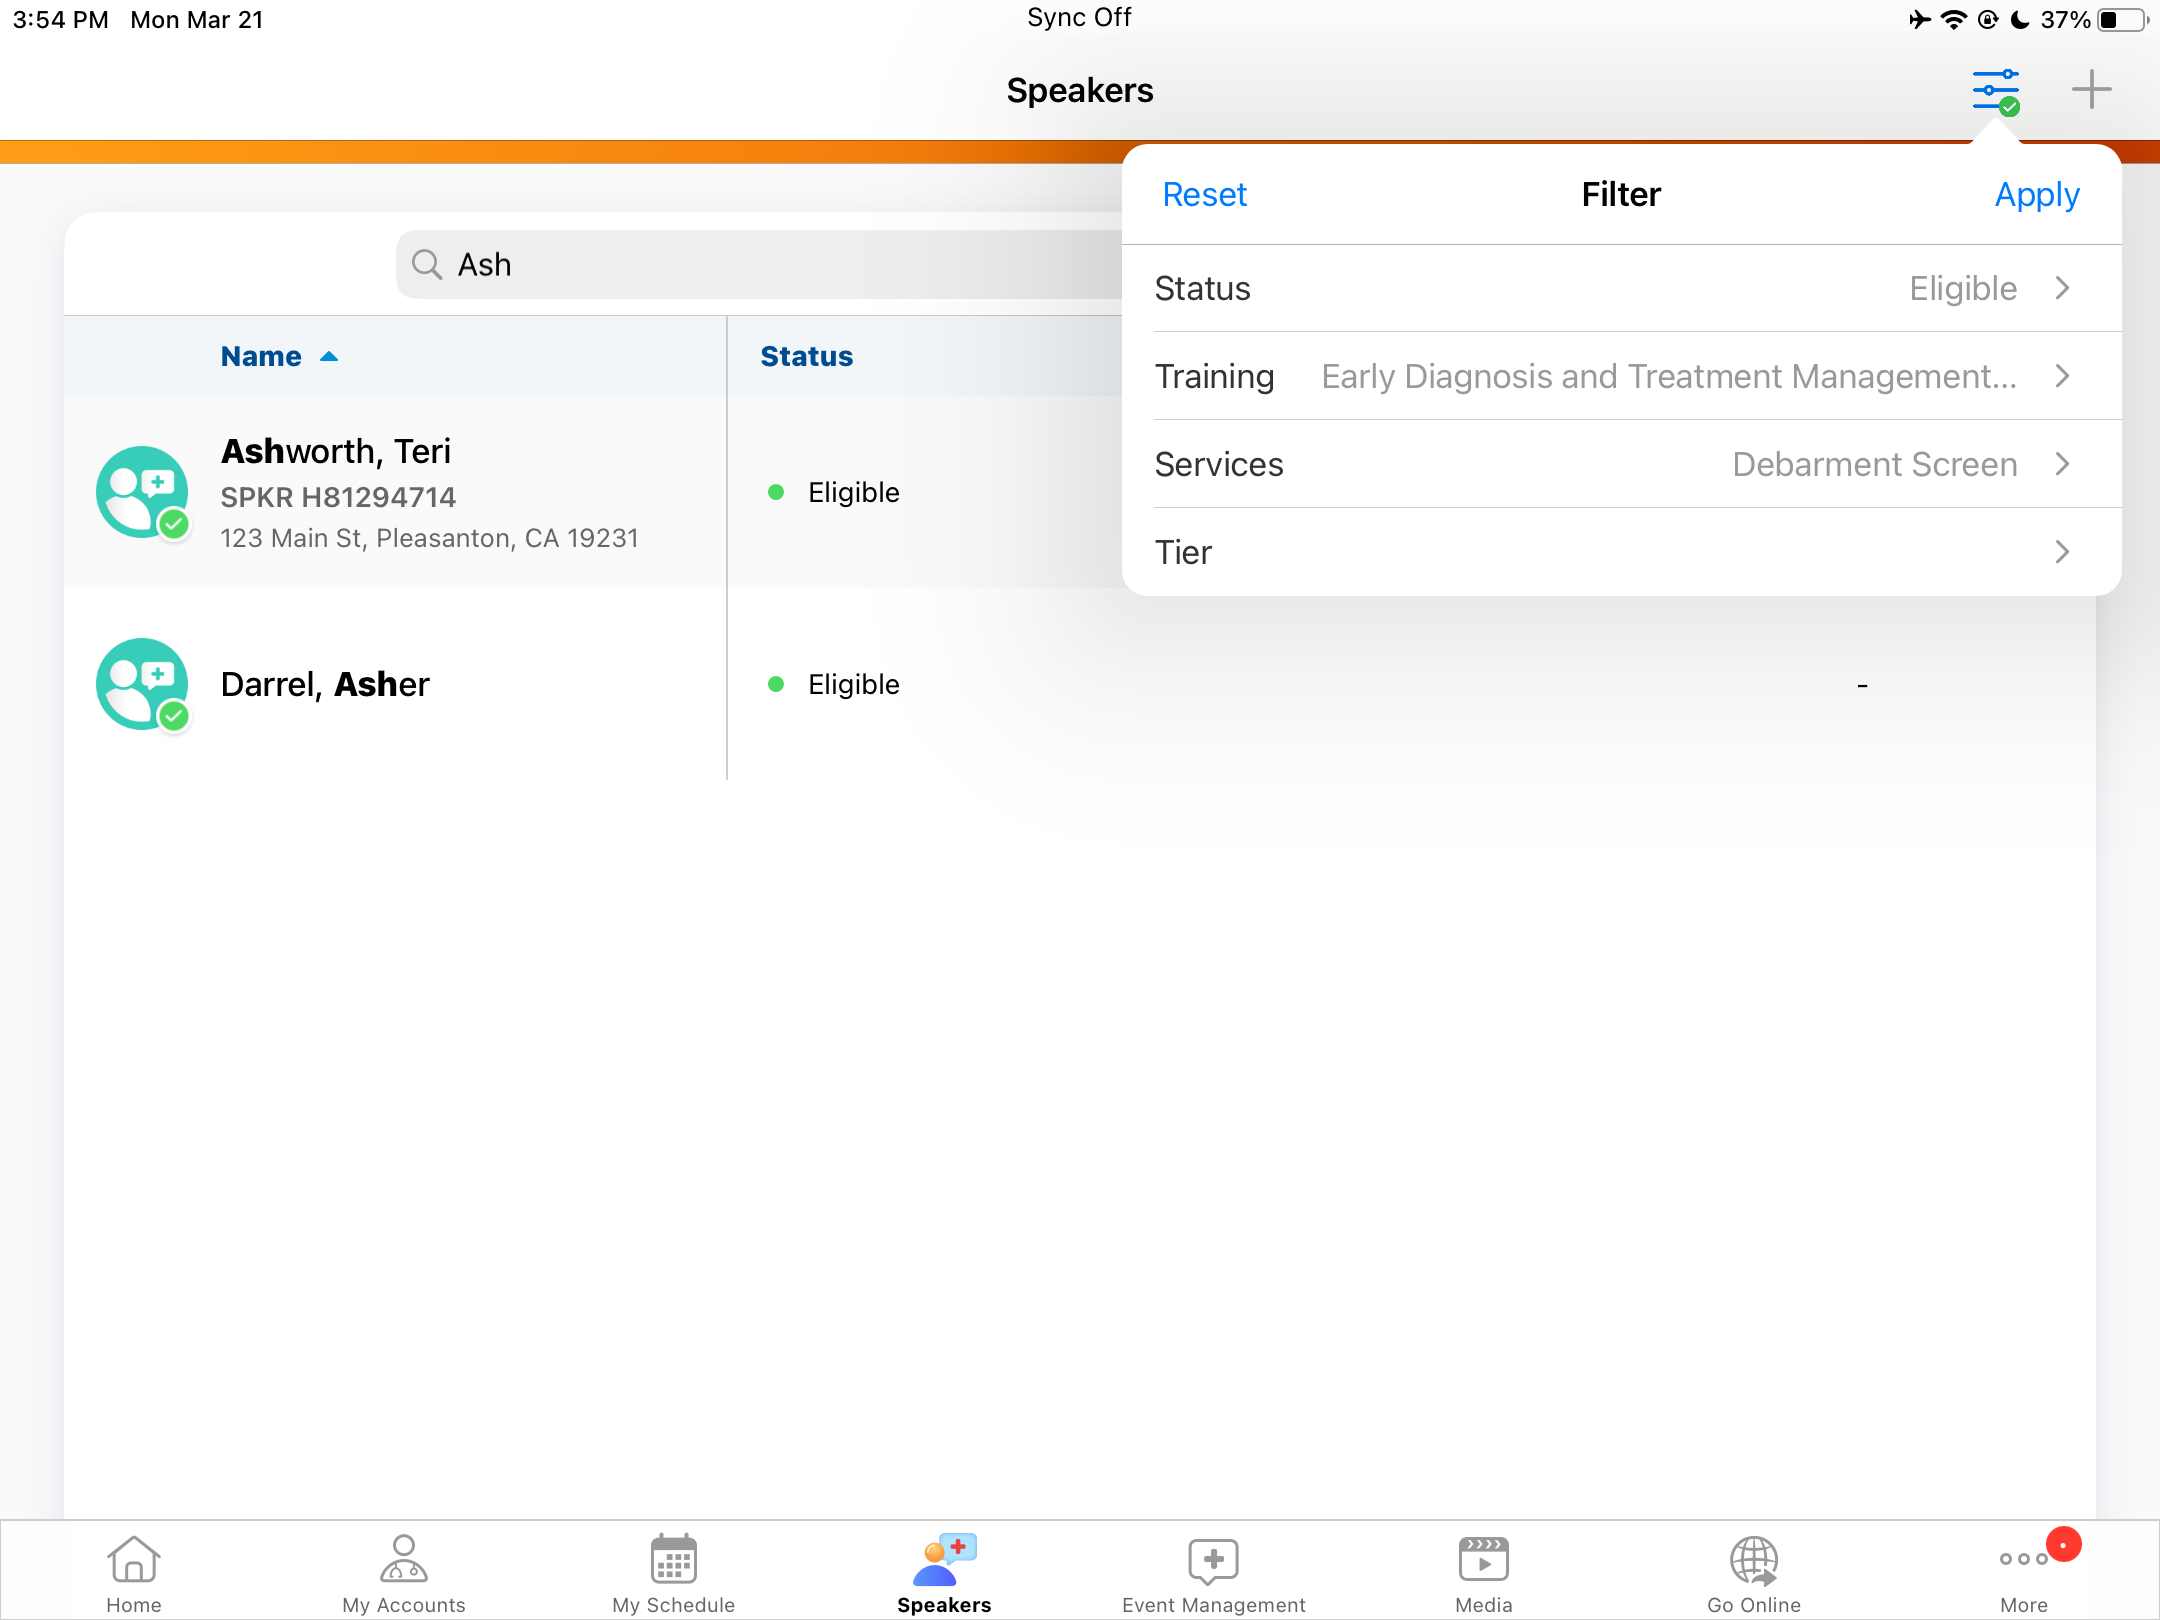
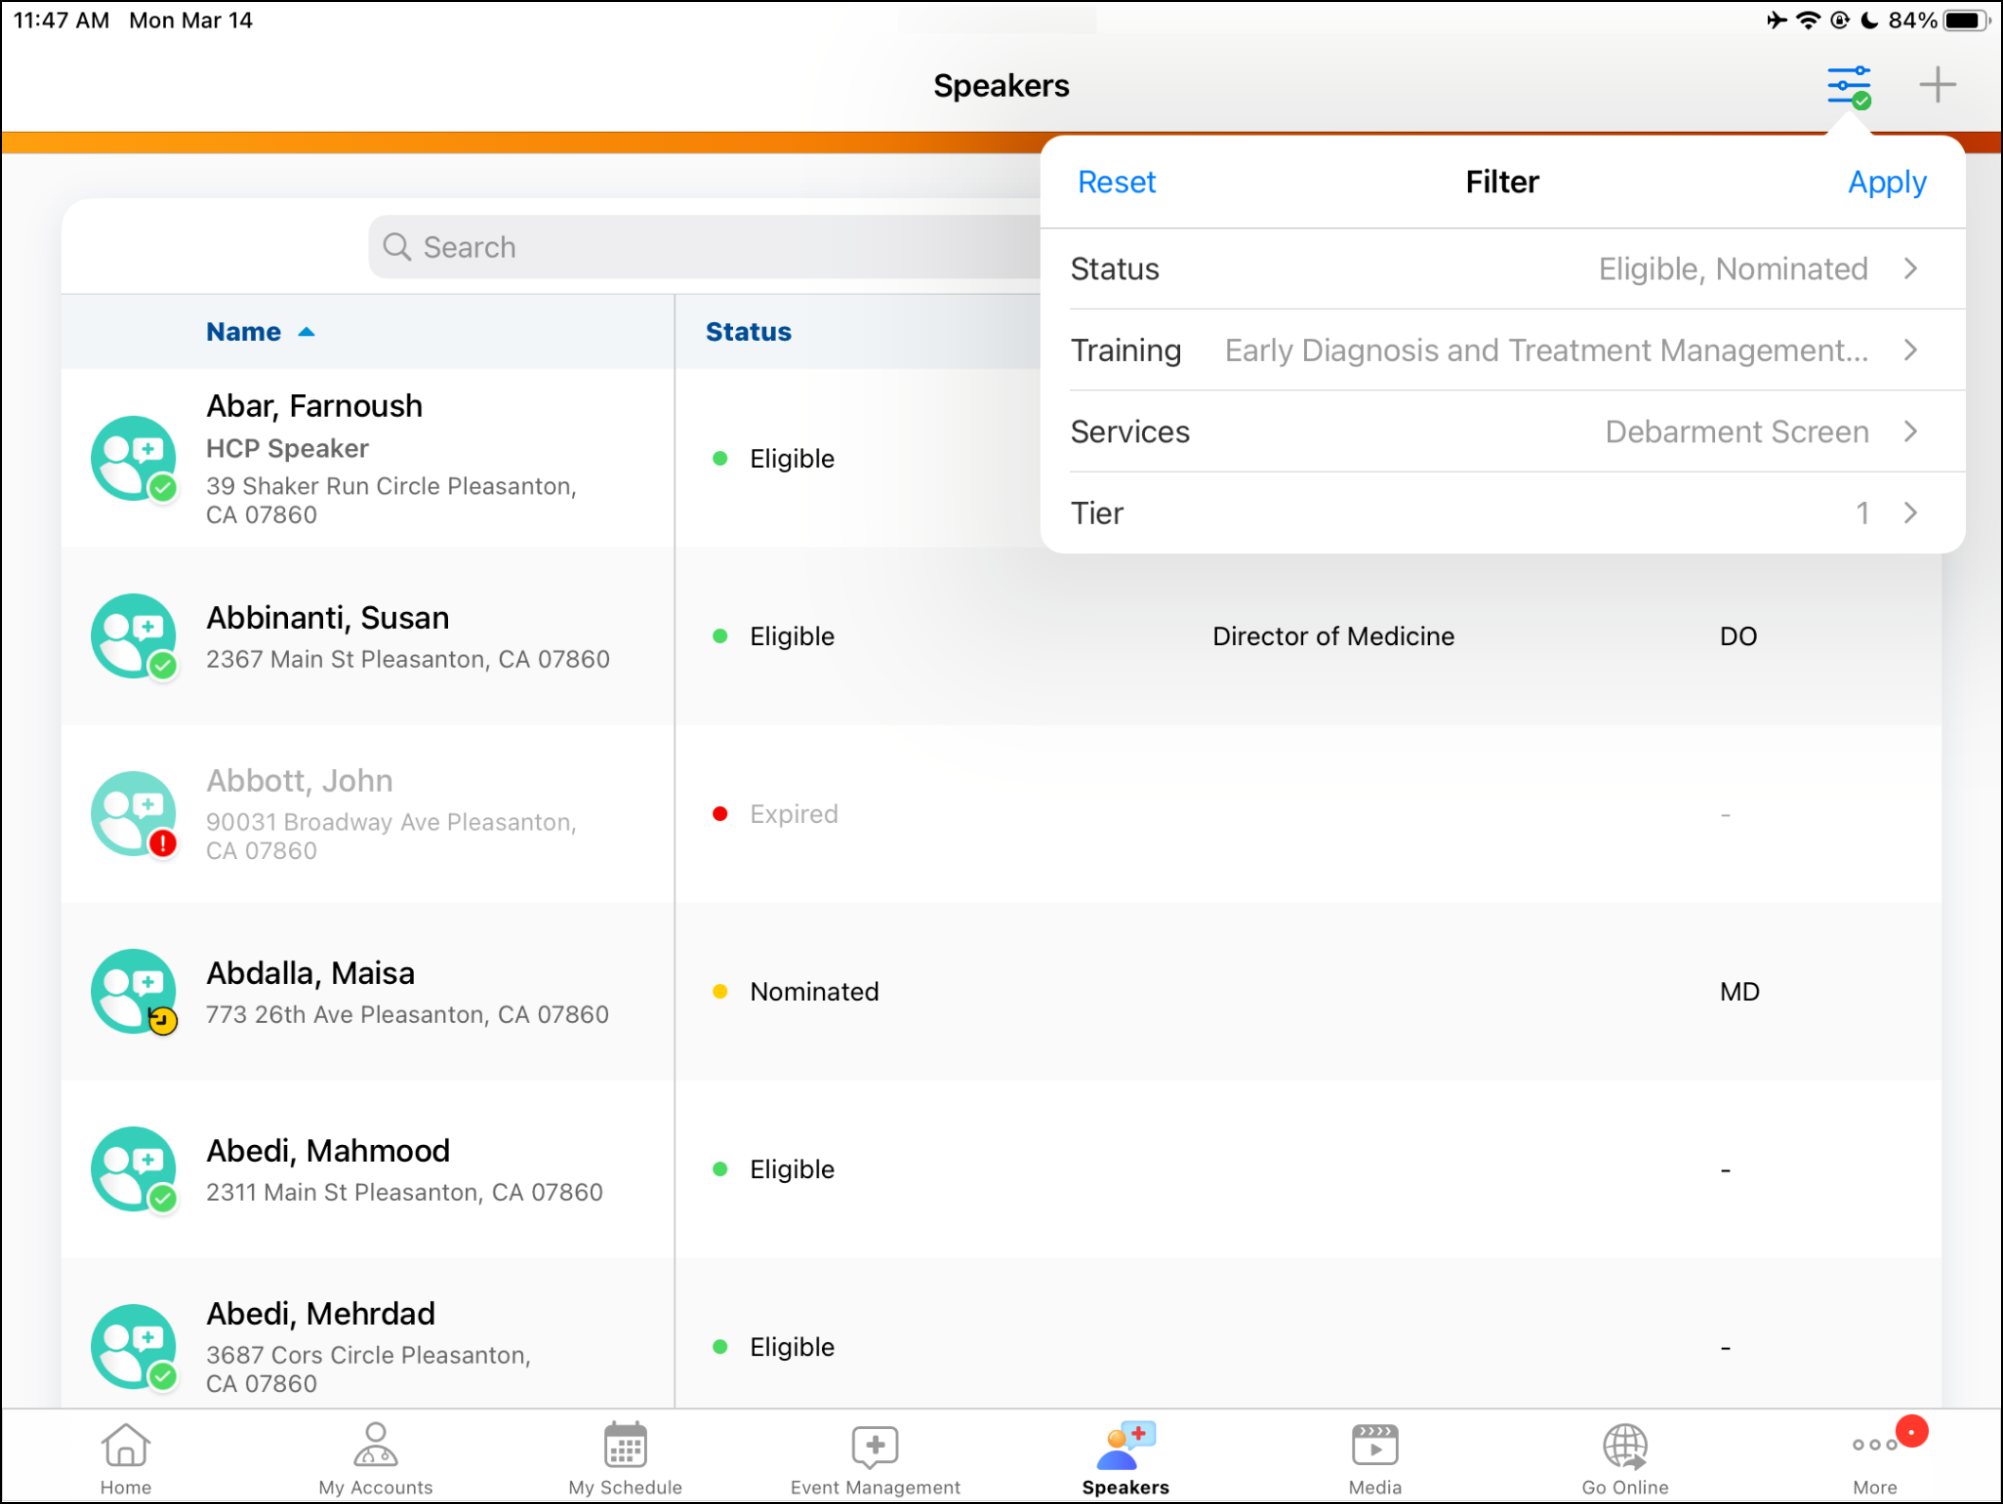
Filtering
Users can filter the list of speakers to further streamline their search. The filter applies OR logic when there are multiple filters within a group, and AND logic when there are multiple filters across groups.
There are four filter groups available:
Status - Allows users to filter for specific speaker statuses
Training - Displays EM Catalog Event_Topic_vod/General_Topic_vod records in Approved_vod status. When applied, Speakers with matching Speaker Qualification records will display. The end date of the qualification must be greater than the current date or blank to match.
Services - Displays EM Catalog Speaker_Service_vod records in Approved_vod status. When applied, Speakers with matching Speaker Qualification records will display.
Tier - Allows users to filter for specific speaker tiers based on Tier_vod__c values
Creating a New Speaker from the Speaker Tab
Users can create new speakers directly from the Speaker tab. To create a new speaker:
- Select the Add button in the upper right corner of the Speaker tab.
- Select a record type.
- Enter information in the required fields in the New Speaker screen.
- Select Save.
Viewing and Editing Details on the Speaker Profile
The Speaker Profile displays detailed information about the speaker, including upcoming events, speaker qualifications, and uploaded files, for example, CVs. Users can select a row to view the profile information.
From the Speaker Profile page, users can perform the following actions based on standard CRM configuration:
- Make changes to speaker information
- Access the speaker’s Account Detail page, if it is linked with an Account
- View and edit Speaker Qualifications
- View Event Speaker information, for example, any upcoming events scheduled or events completed in the past
- View and download files attached to the speaker record
- Upload new files to the speaker record
Platforms
Veeva CRM Desktop App for Windows
The Veeva CRM Desktop app is a dedicated and independent app enabling users to access their media libraries whenever they need. Users can launch CLM content from the app and share the content with HCPs during calls and Engage Meetings.
For example, Sarah Jones has an upcoming call with Dr. Clinton Ackerman. To prepare the CLM content she intends to present during the call, Sarah launches the Veeva CRM Desktop app from the desktop icon and signs in. An alert about a new version of the app displays, but the update is optional, so Sarah decides to update later and dismisses the alert. While she searches for the presentation and downloads it, the app checks for content updates and syncs in the background. Sarah selects Apply Updates to ensure her content is up-to-date. During the call, Sarah closes the app window and shares her content. After the call ends, Sarah reopens the app by double-selecting the app icon in the system tray and selects Update Now from the library menu to update the app.
Signing In to Veeva CRM Desktop
Users can launch the Veeva CRM Desktop app from the desktop icon and sign in with their Veeva CRM credentials. After signing in, the app remains running in the background and accessible from the app icon in the system tray even after ending a call or closing the window, and even if the user did not launch the app from a call. When the app window is closed, double-select the icon to reopen the app.
A one-time performance tuning process occurs after upgrading to Veeva CRM Desktop 22R1. The process occurs automatically after signing in to the upgraded app for the first time and can take a few minutes.
Using the Media Library Menu
The app automatically performs an incremental sync in the background when updates are detected online. Select the Veeva CRM Desktop library menu in the top left corner to manage app updates, content downloads, and manual syncs, as well as sign out or quit the app. When the background sync completes, select Apply Updates to update the content in the media library.
A maximum of 200000 CLM slides can be synced to the library.
The library menu is also available from the app icon in the system tray. Right-select the icon to display the menu.
Updating the App
The app checks for version updates every time it is launched, a user successfully signs in, and after every full sync. Full syncs occur:
- Daily
- When a user performs a manual sync
- When content updates are detected online
App updates can be optional or required.
When users are not in a call or an event, an update alert displays when there is an app version update. If the app window is minimized or closed when there is an update, the window automatically reopens and displays in the foreground.
When users are in a call or an event, app update alerts for optional and required app updates do not display until the call or event ends.
If the update is optional, users can:
- Initiate call mode or join a call to hide the alert until the call ends
- Select Update Now to update the app immediately. The app quits and automatically relaunches after the update completes. Users do not need to sign in again. Any unsynced CLM tracking data is saved and syncs after the app relaunches.
- Select Update Later to update the app at a later time. The Update Now button in the media library menu and tray icon menu becomes available. When users are ready to update the app, select Update from either menu.
If the app update is required, select Update Now to update the app immediately. The app quits and automatically relaunches after the update completes. Users do not need to sign in again. Any unsynced CLM tracking data is saved and syncs after the app relaunches.
Surveys
Linking Survey Targets to Calls
To help customers with reporting on survey quotas, Survey Targets created from a call are now stamped with the Call Id.
For example, Larry Lakes, an MSL, is on a call with Dr. Ackerman and wants to administer a Survey about how and when Dr. Ackerman prescribes Cholecap. He navigates to the Surveys section of the Call Report and selects Create to add Dr. Ackerman as a survey target. When Larry saves the call, the Call Id is automatically stamped to the Survey Target record.
Using Linking Survey Targets to Calls
When users create a new Survey Target or edit an existing Survey Target from the call report, and then select Save or Submit, the Survey Target is automatically stamped with the Call Id.
Survey Targets accessed from outside the call report, for example, from the Survey Target tab or the Account Related List, are not linked to a call.
Only the most recent call is linked to a Survey Target. If a user creates a new call and saves or submits the Survey Target, the previous Call Id is overwritten.
When users save or submit the Call, the Call Id stamped on the Survey Target record depends on the type of call:
- For a person account call, the Call Id created for the primary account is stamped
- For a group call, the Call Id created for the primary account is stamped
Survey Targets for the Location do not display the Call Report. The Call Id is only stamped for the person call.
- For a unique activity group call:
- If the Survey Target is created for the primary account, the Call Id for the primary account is stamped on the Survey Target record
- If the Survey Target is launched for an attendee, the Call Id for the selected attendees is stamped
- For a child account survey, the parent Call Id is stamped on the Survey Target record
The Call field is used to link the call to a survey target. The Call Id field is used for stamping and audit purposes, and is updated automatically when the user saves or submits the call.
Users can track survey quotas by running a report that audits the Call2_id_vod field on the Survey_Target_vod object.
