

23R3.0 Functionality Guide
The Functionality Guide is intended for Sales Operations, Business Administrators, System Integrators, and others responsible for making decisions about what features are needed for end users to be successful and deciding which features work together with existing customer configurations.
Account Management
Cross Hierarchy Affiliations in Stakeholder Navigator
Users can view their account’s affiliations even when those affiliations are in other organizations. This provides a view of who their accounts have relationships with to allow them to make more intelligent decisions when planning outreach to HCPs.
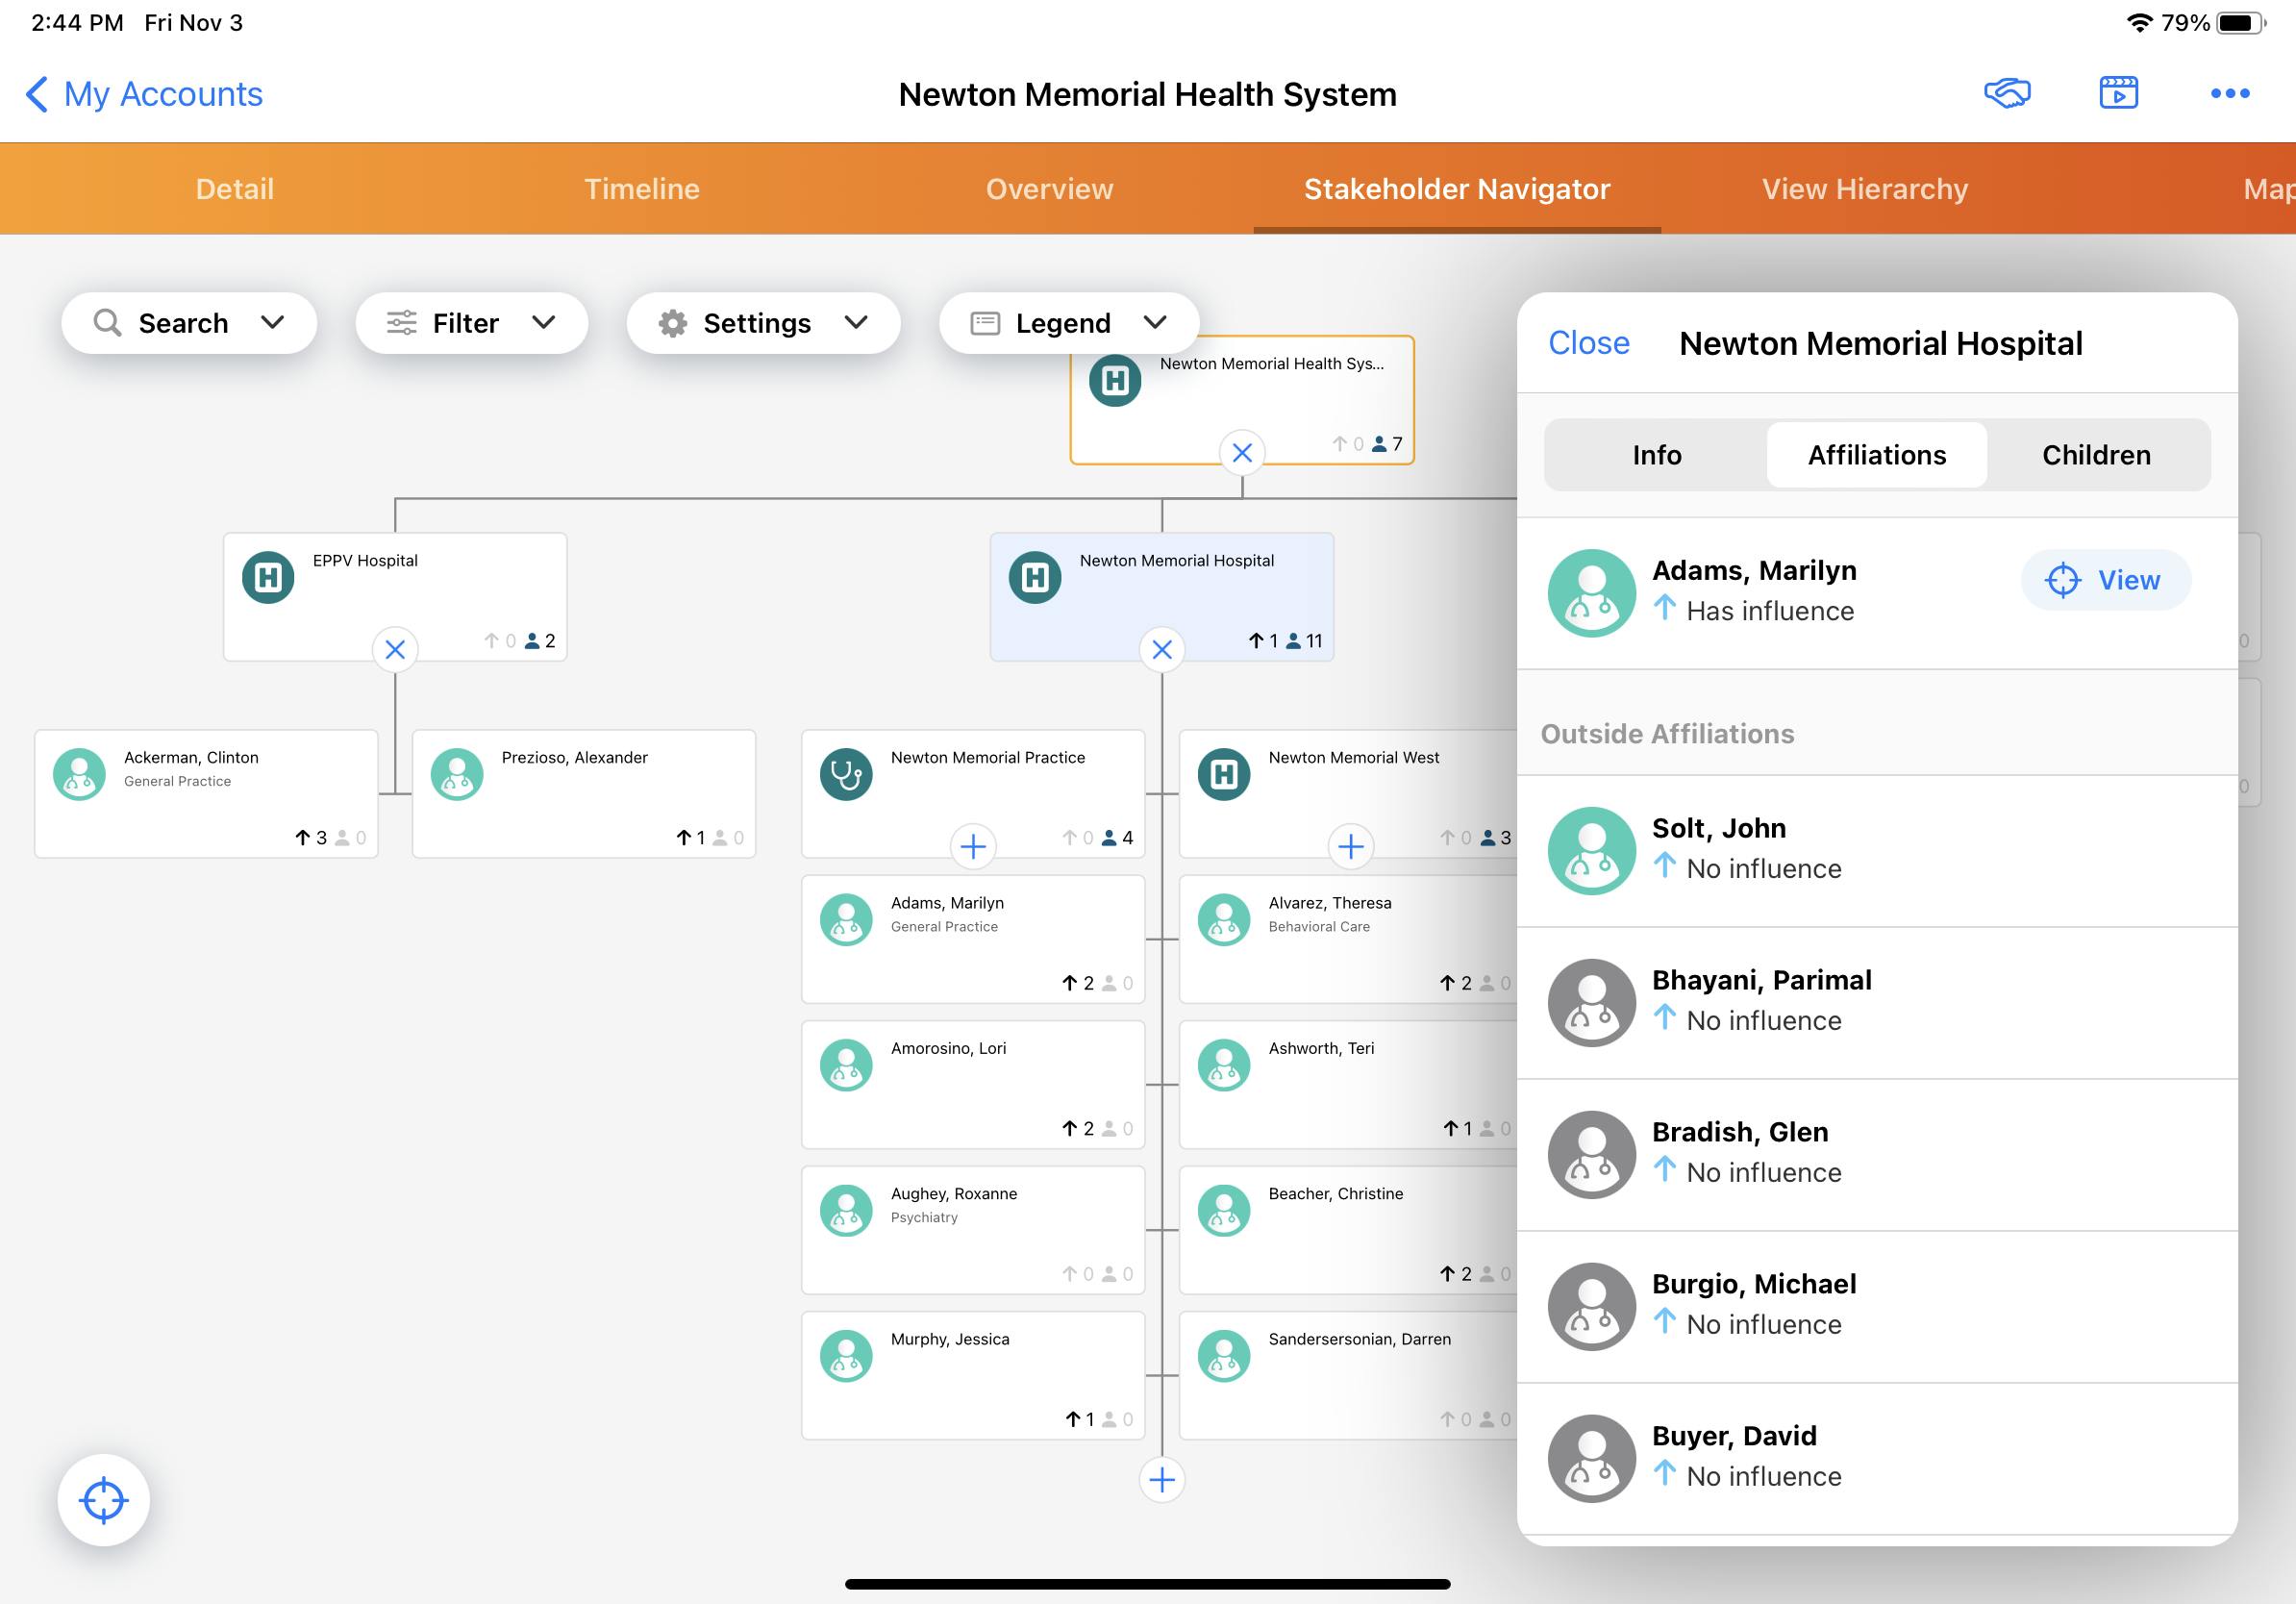
When a user selects an account in Stakeholder Navigator, the Affiliations tab lists all affiliations, including those between the HCP and providers in other organizations. The user can also open the All Affiliations view to see a visual representation of all affiliations, including those in other networks.
Viewing Cross Hierarchy Affiliations on the Affiliation Tab
To view cross hierarchy affiliation information on the Affiliation tab:
-
Select an account node in Stakeholder Navigator.
-
Select the Affiliation tab.
-
Scroll down to the Outside Affiliations section to view the affiliated accounts. This section displays below the in-hierarchy affiliations.
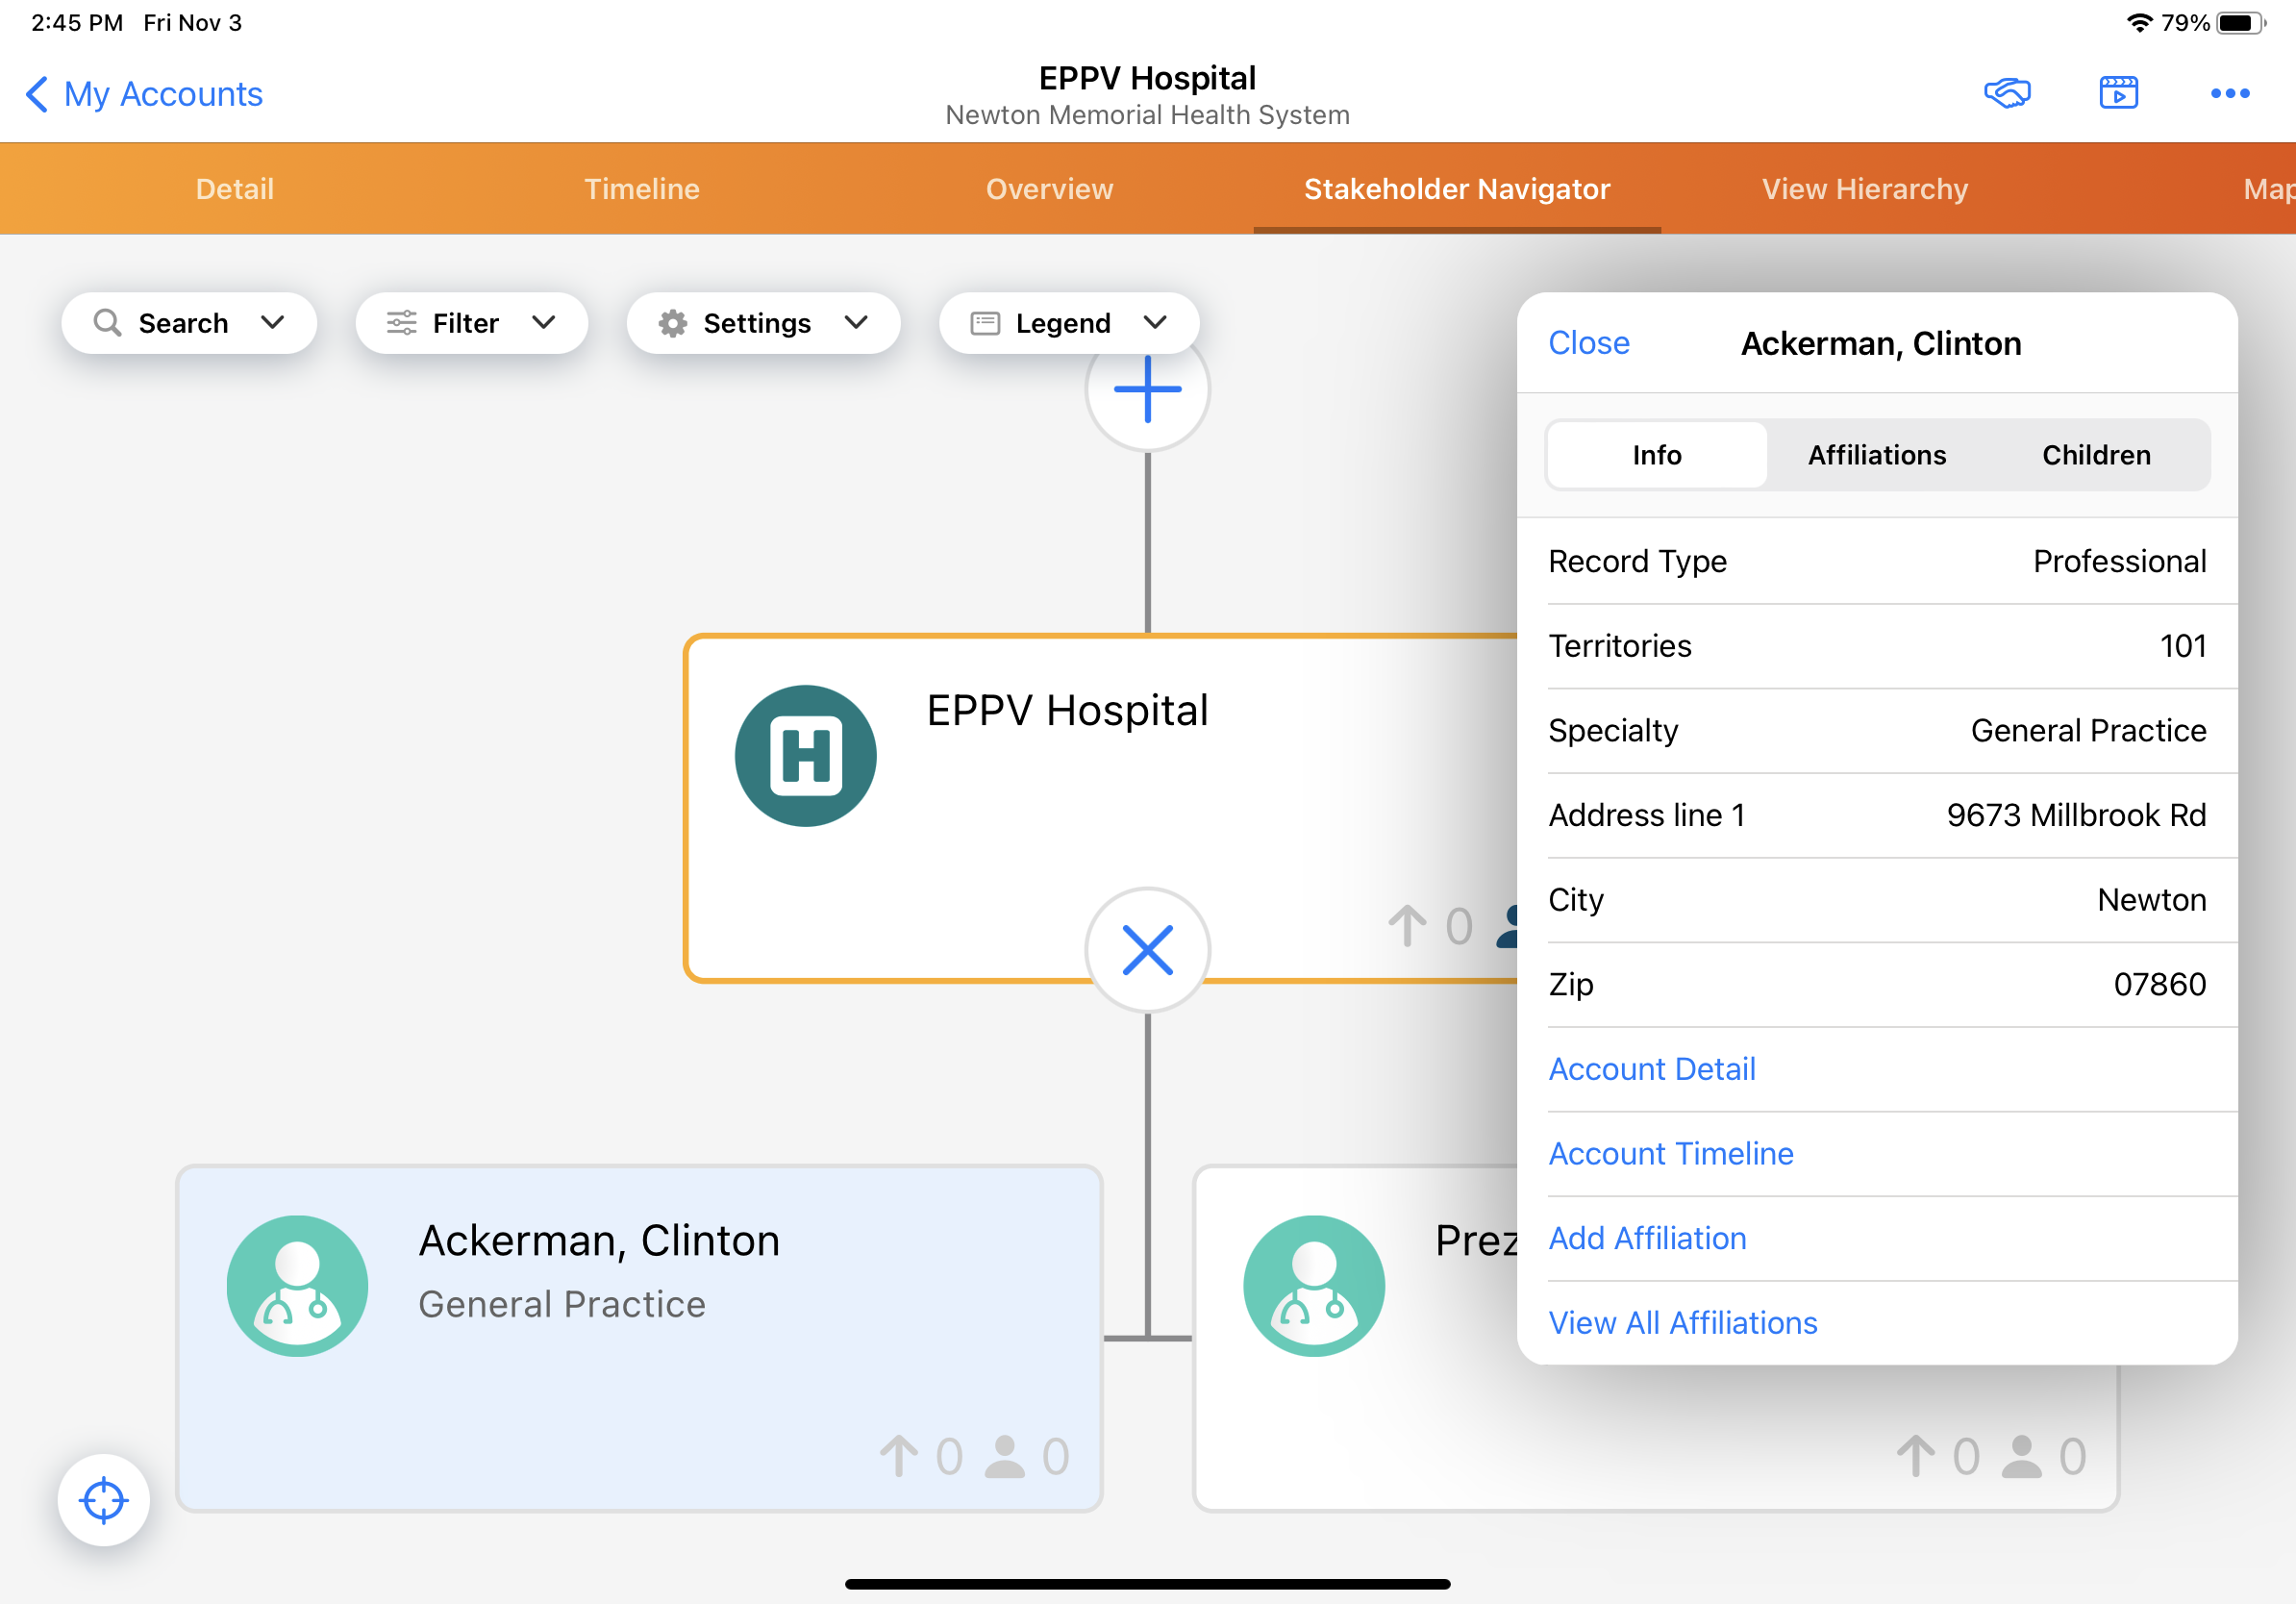
Displaying the All Affiliations View
To display a view of all affiliations, including cross hierarchy affiliations:
-
Select an account node in Stakeholder Navigator.
-
Select the Info tab.
-
Select the View All Affiliations link. (On iPad, this option only displays for in-territory accounts.)
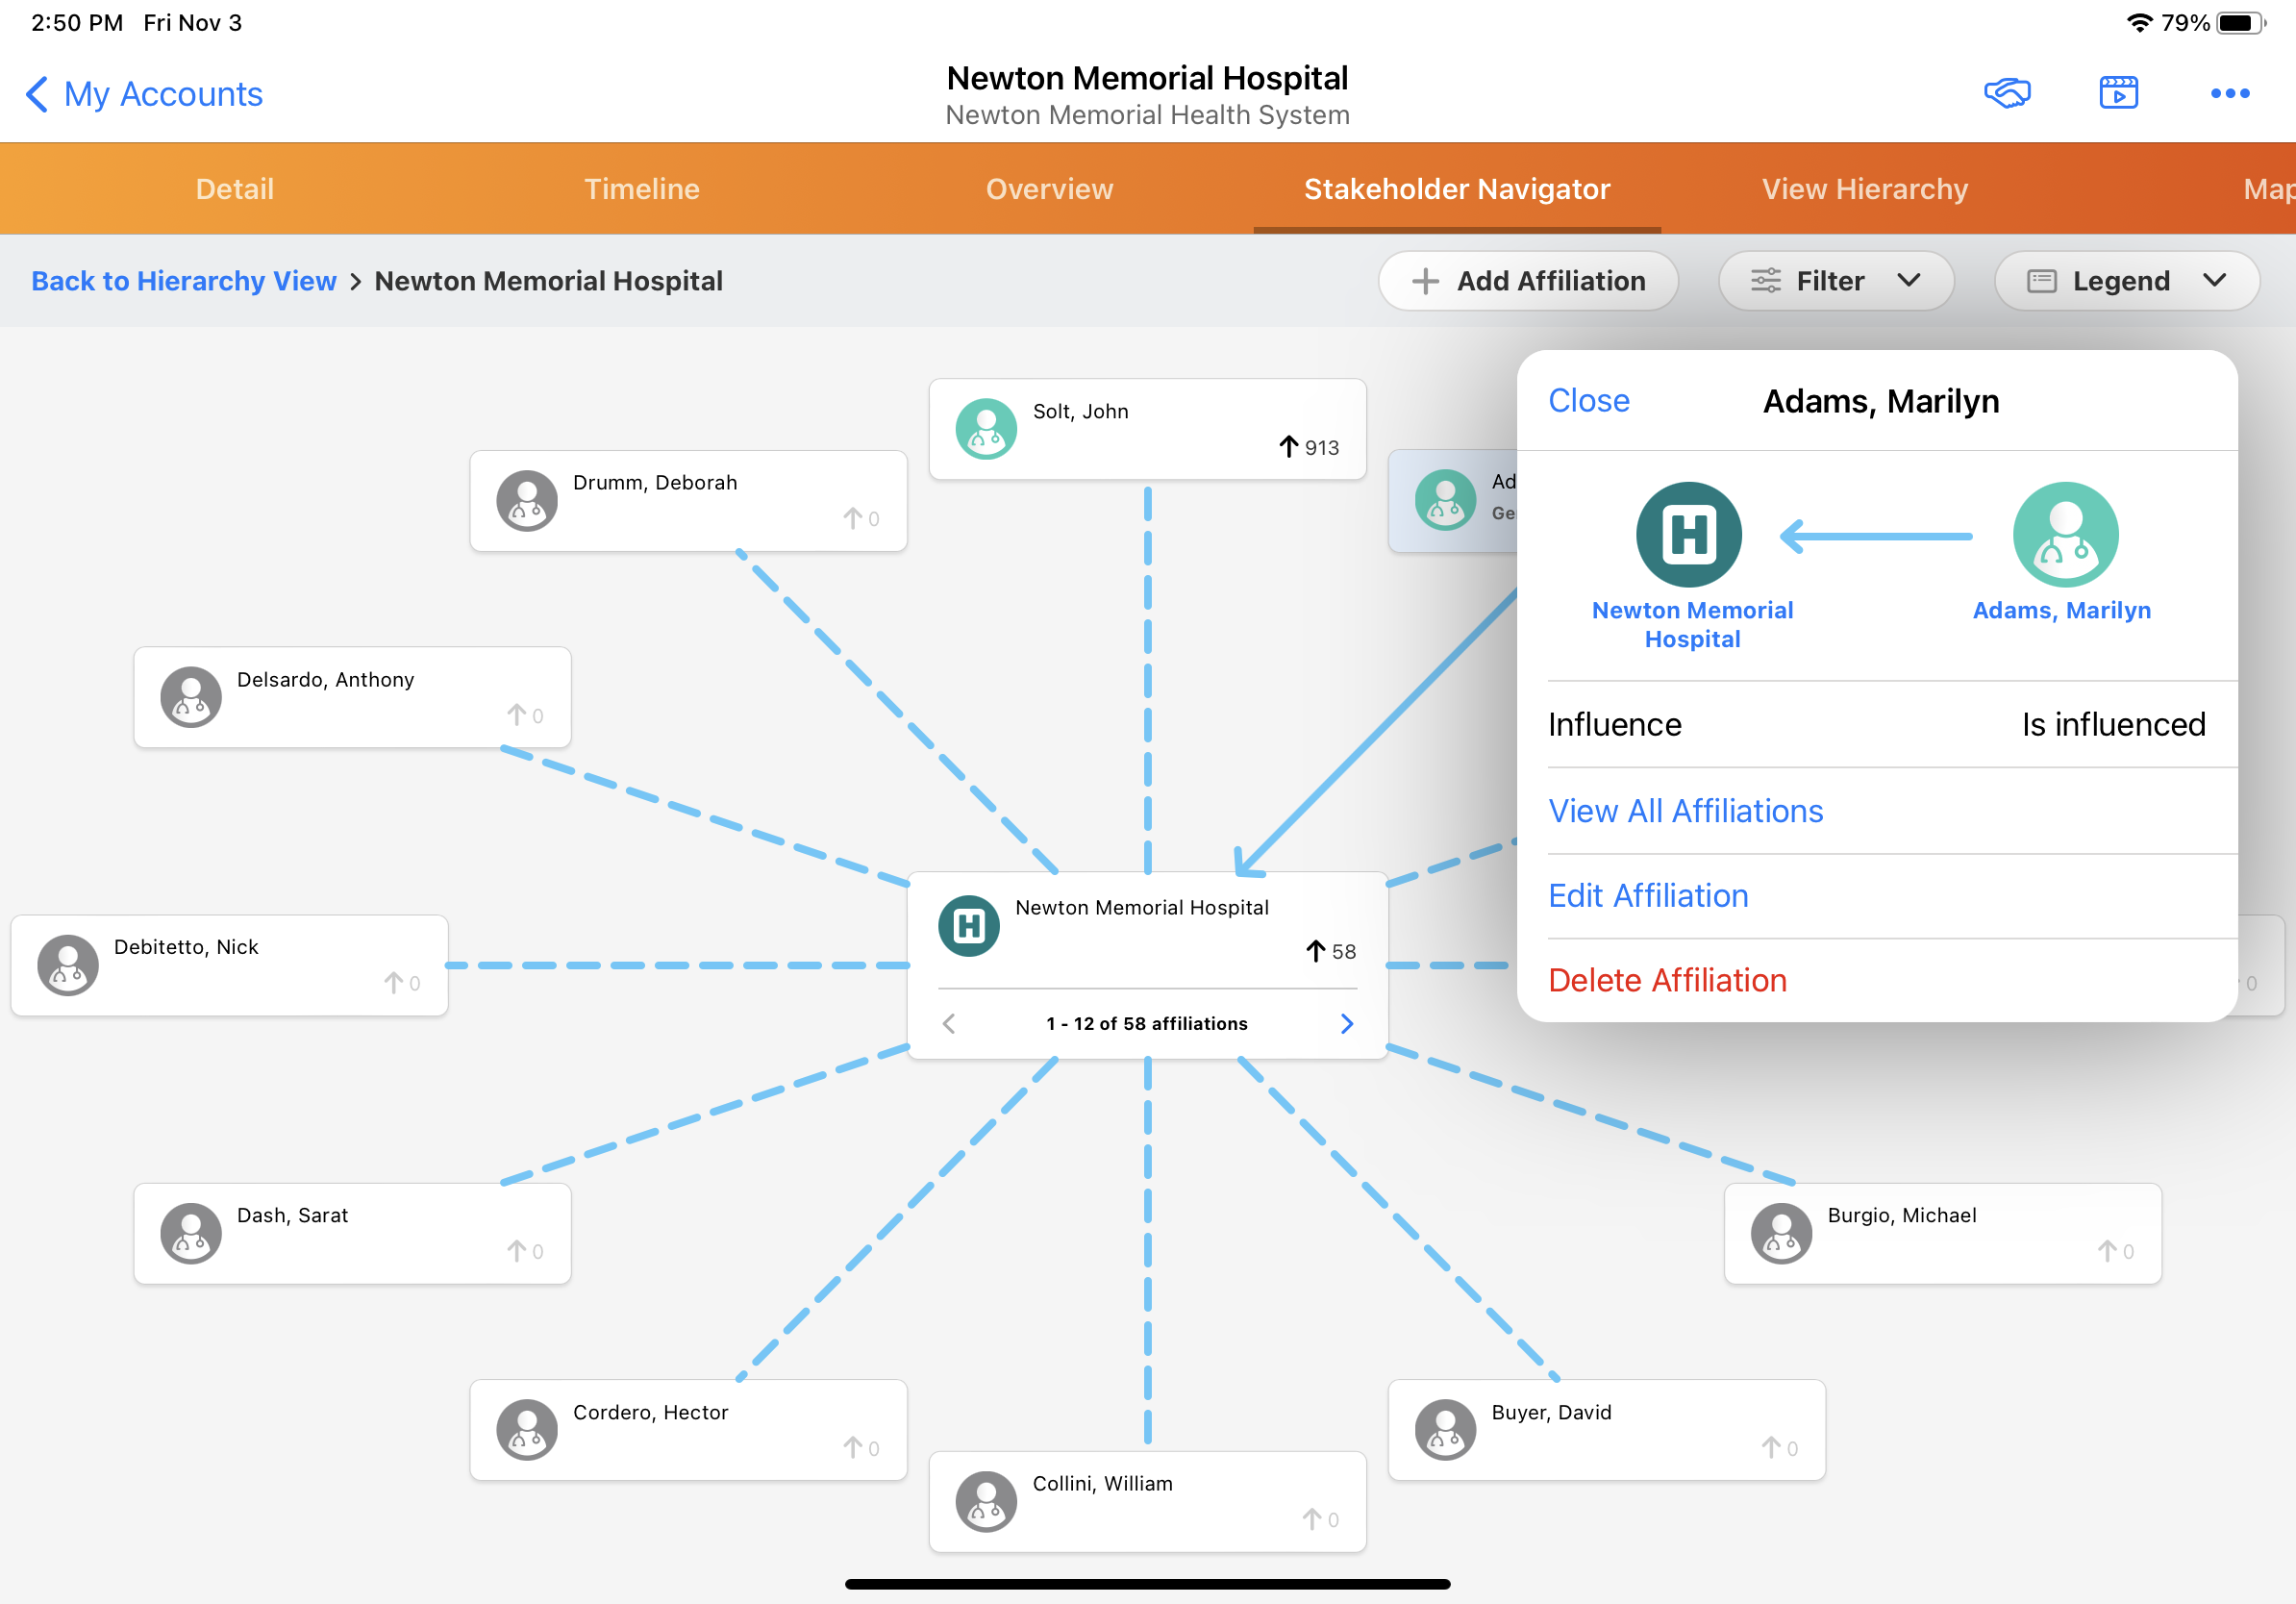
The All Affiliations view displays all account affiliations, including relationships across organizations.
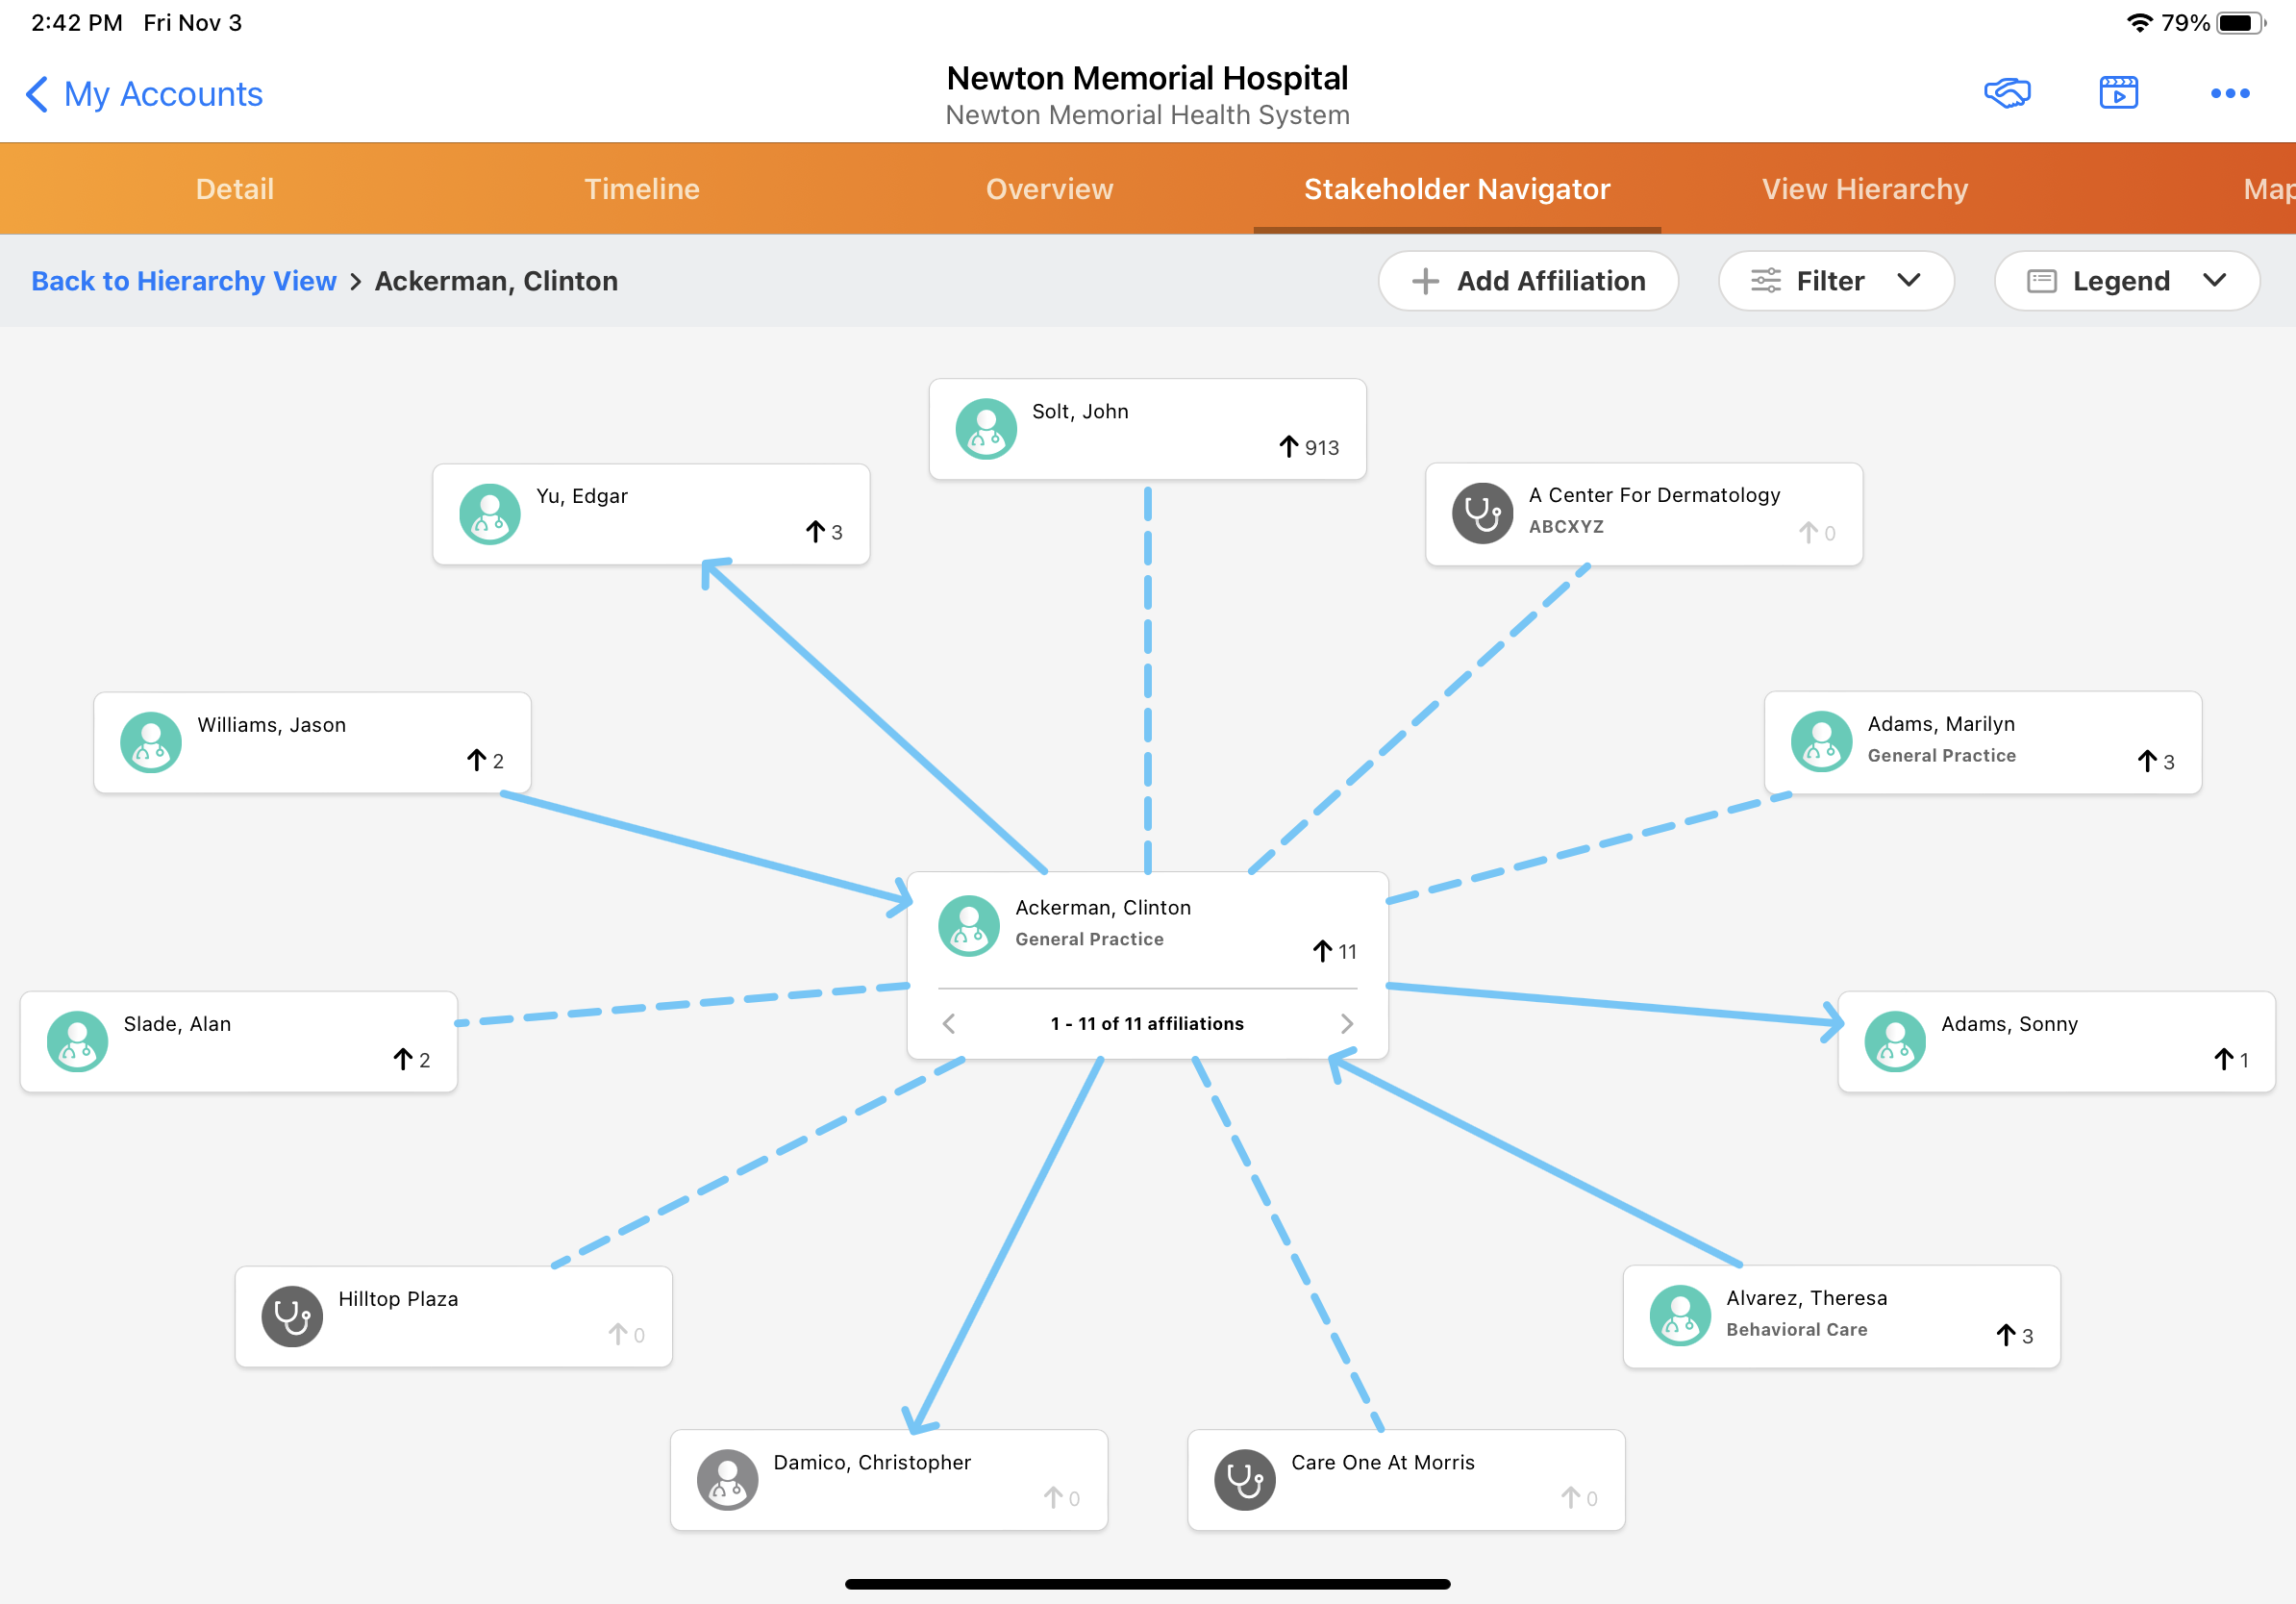
The target account displays as the center node in the All Affiliations view. Up to twelve affiliated accounts display at a time in a circle around the node. The same account may display multiple times if the account is affiliated with the target account in multiple ways.
If the target account has more than twelve affiliations, left and right arrows display on the account card. Users can select the arrows to navigate through multiple pages of affiliated accounts.
The All Affiliations view includes the following options:
- Breadcrumbs - Select a link to display affiliations for a previously viewed account
- Add Affiliations - Creates a new affiliation
- Filters - Limits the display to only account affiliations matching the filters. The All Affiliations view supports filtering by custom fields. When filters are applied, they remain applied even if you navigate in the All Affiliations view and select a different target account. An indicator displays that filters are applied.
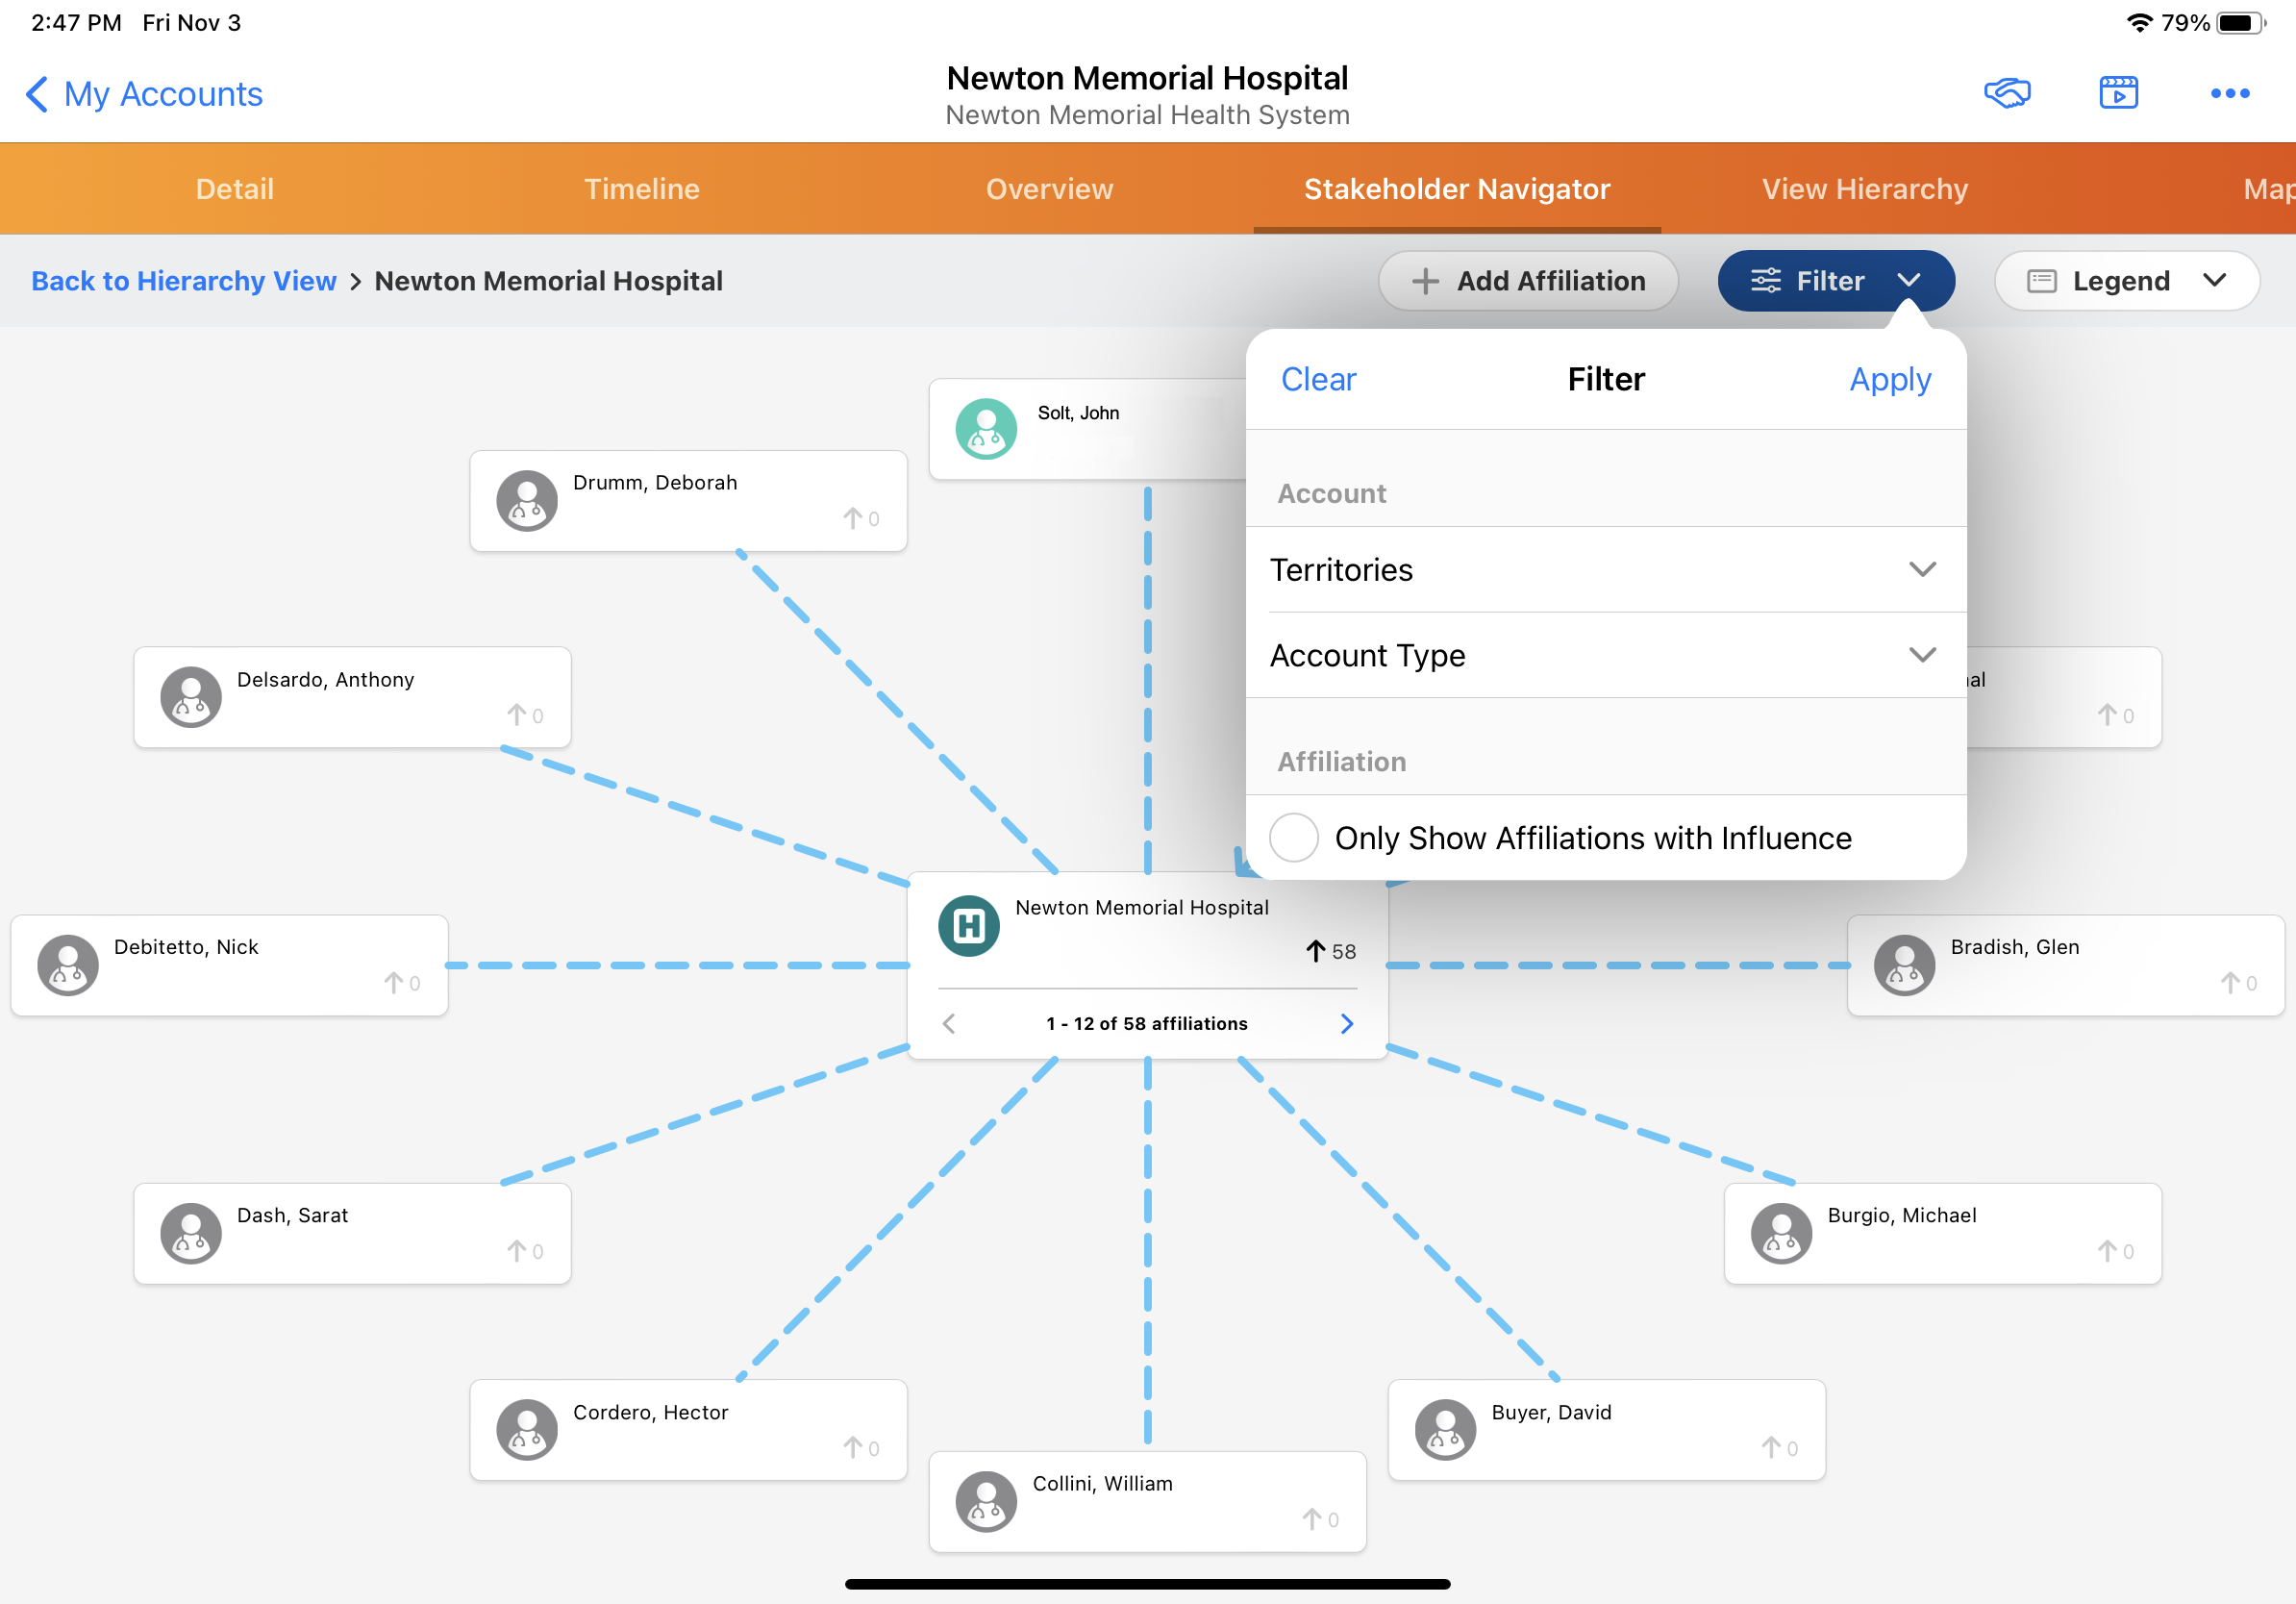
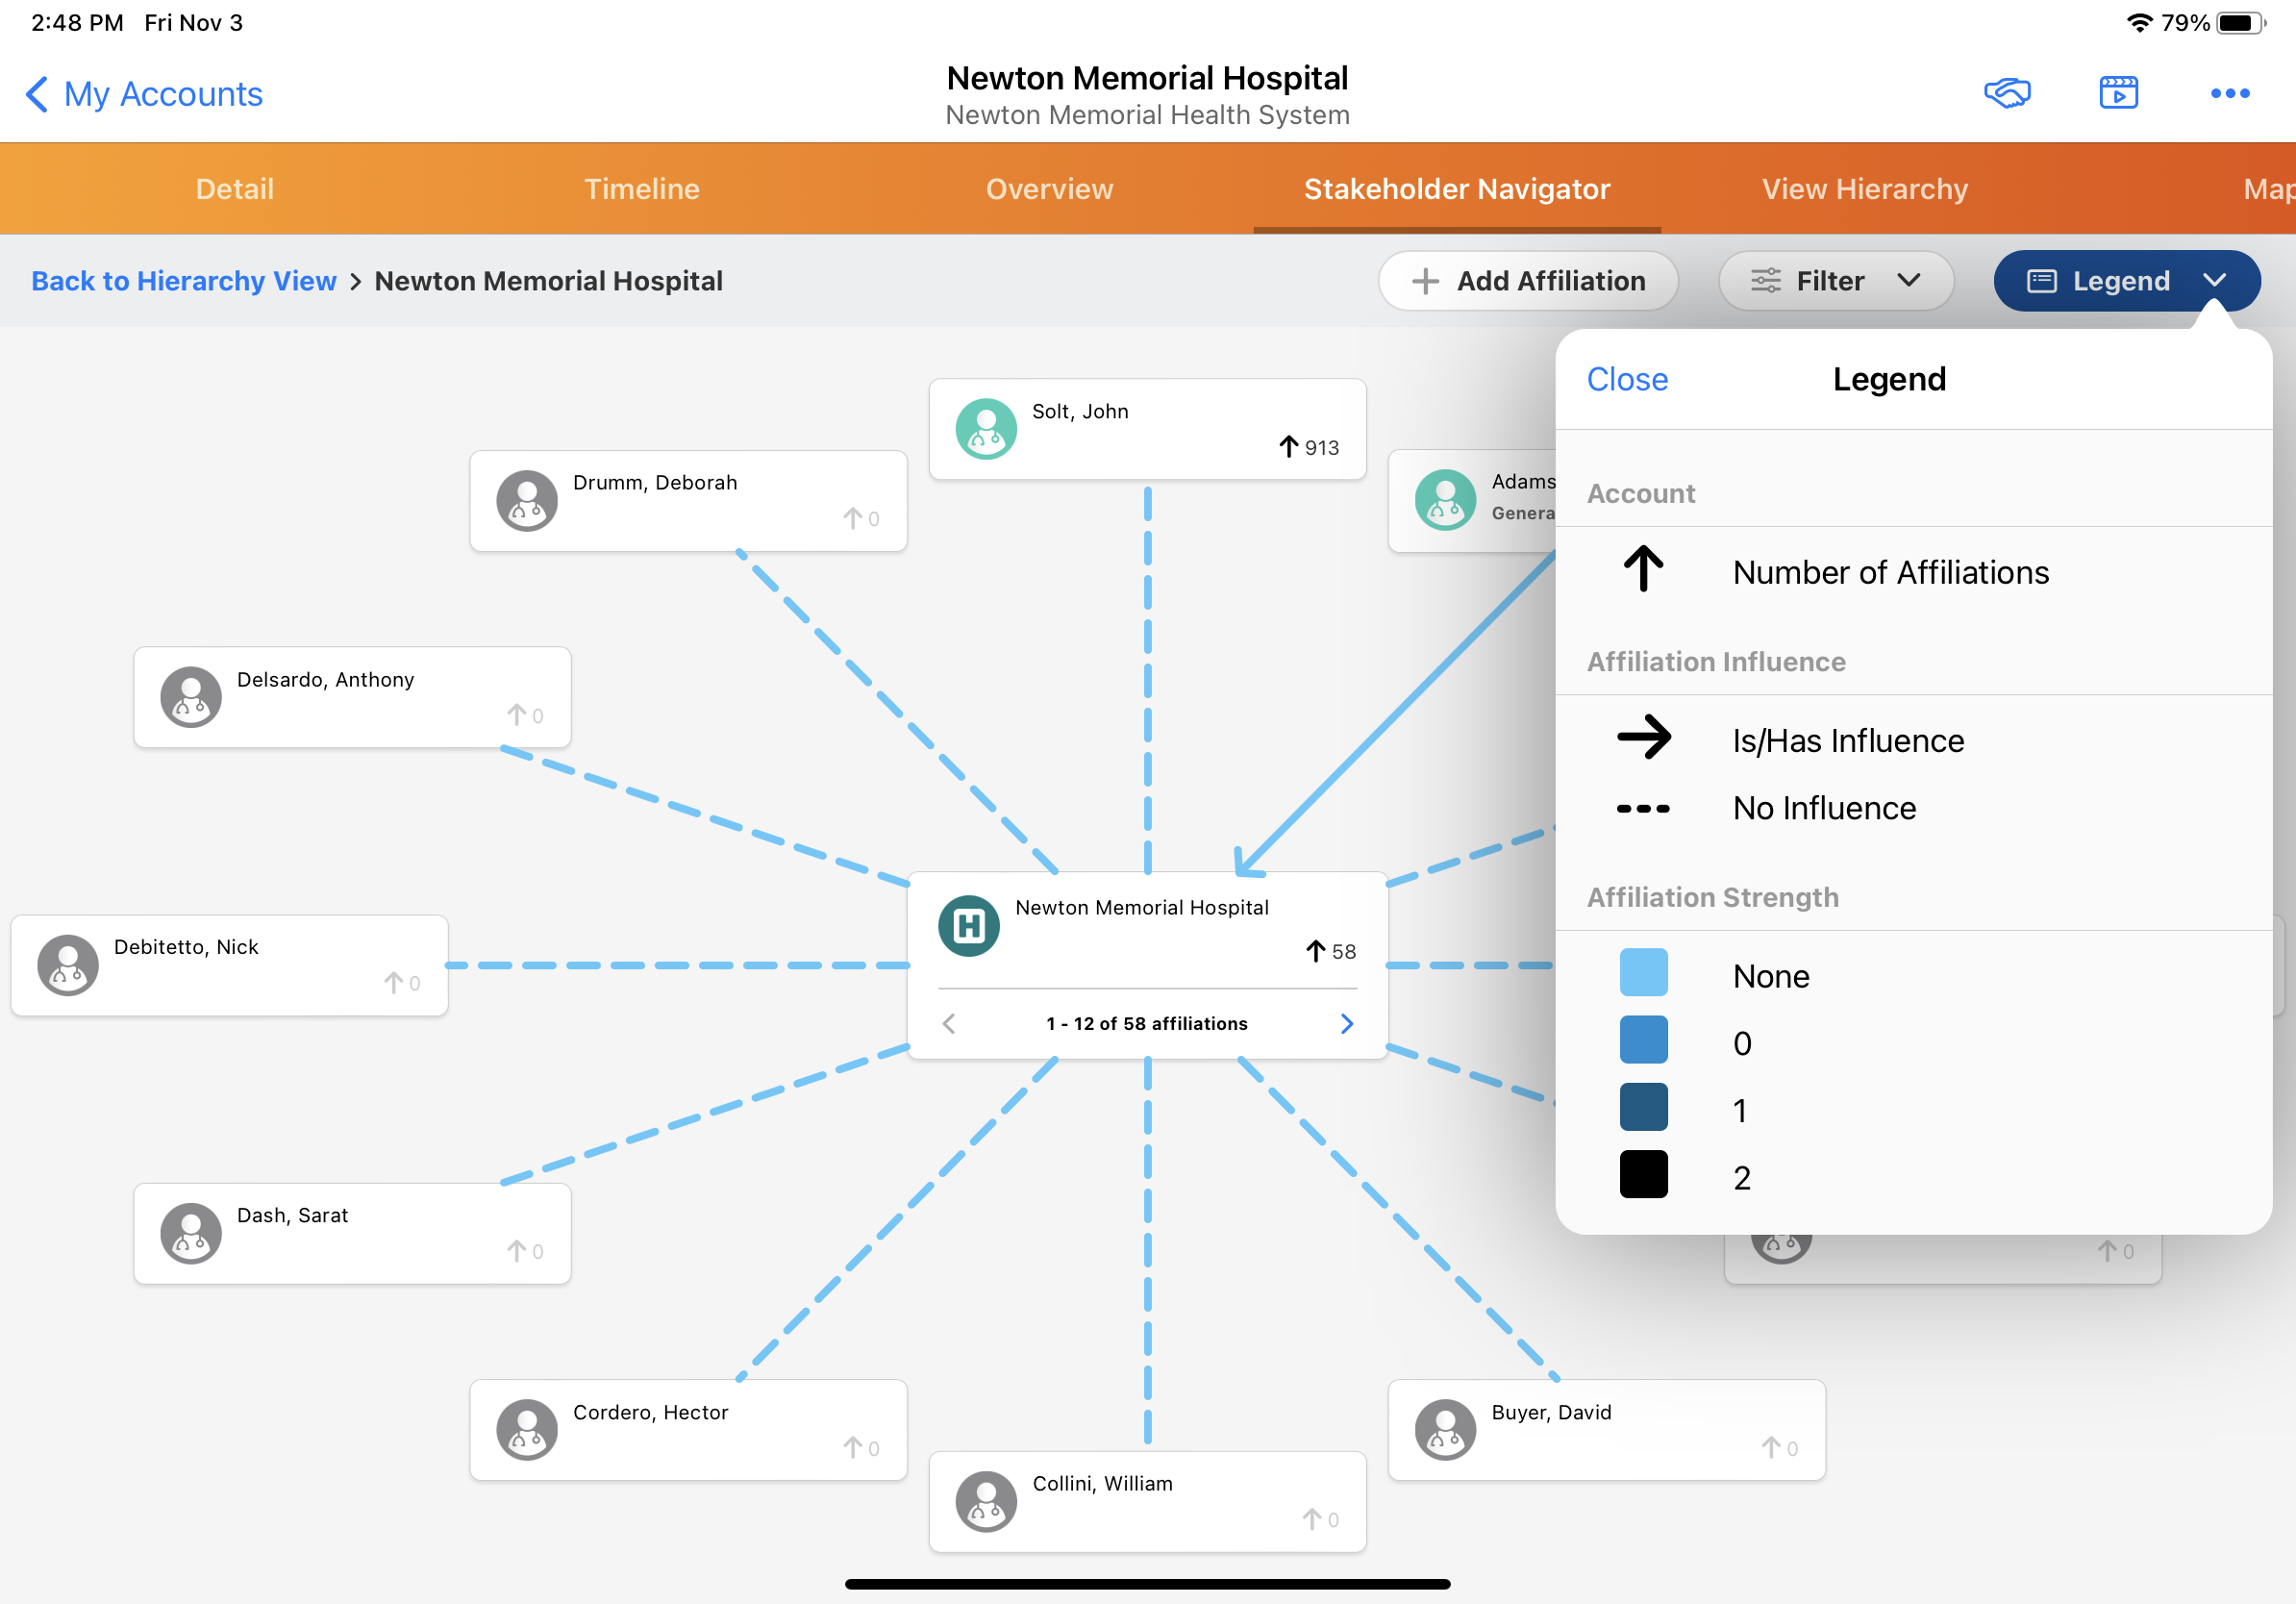
- Legend - displays a description of the types of affiliations represented in the All Affiliations view
Adding an Account Affiliation
To create a new affiliation:
- Select Add Affiliations.
- In the account picker, search for and select the account you wish to add.
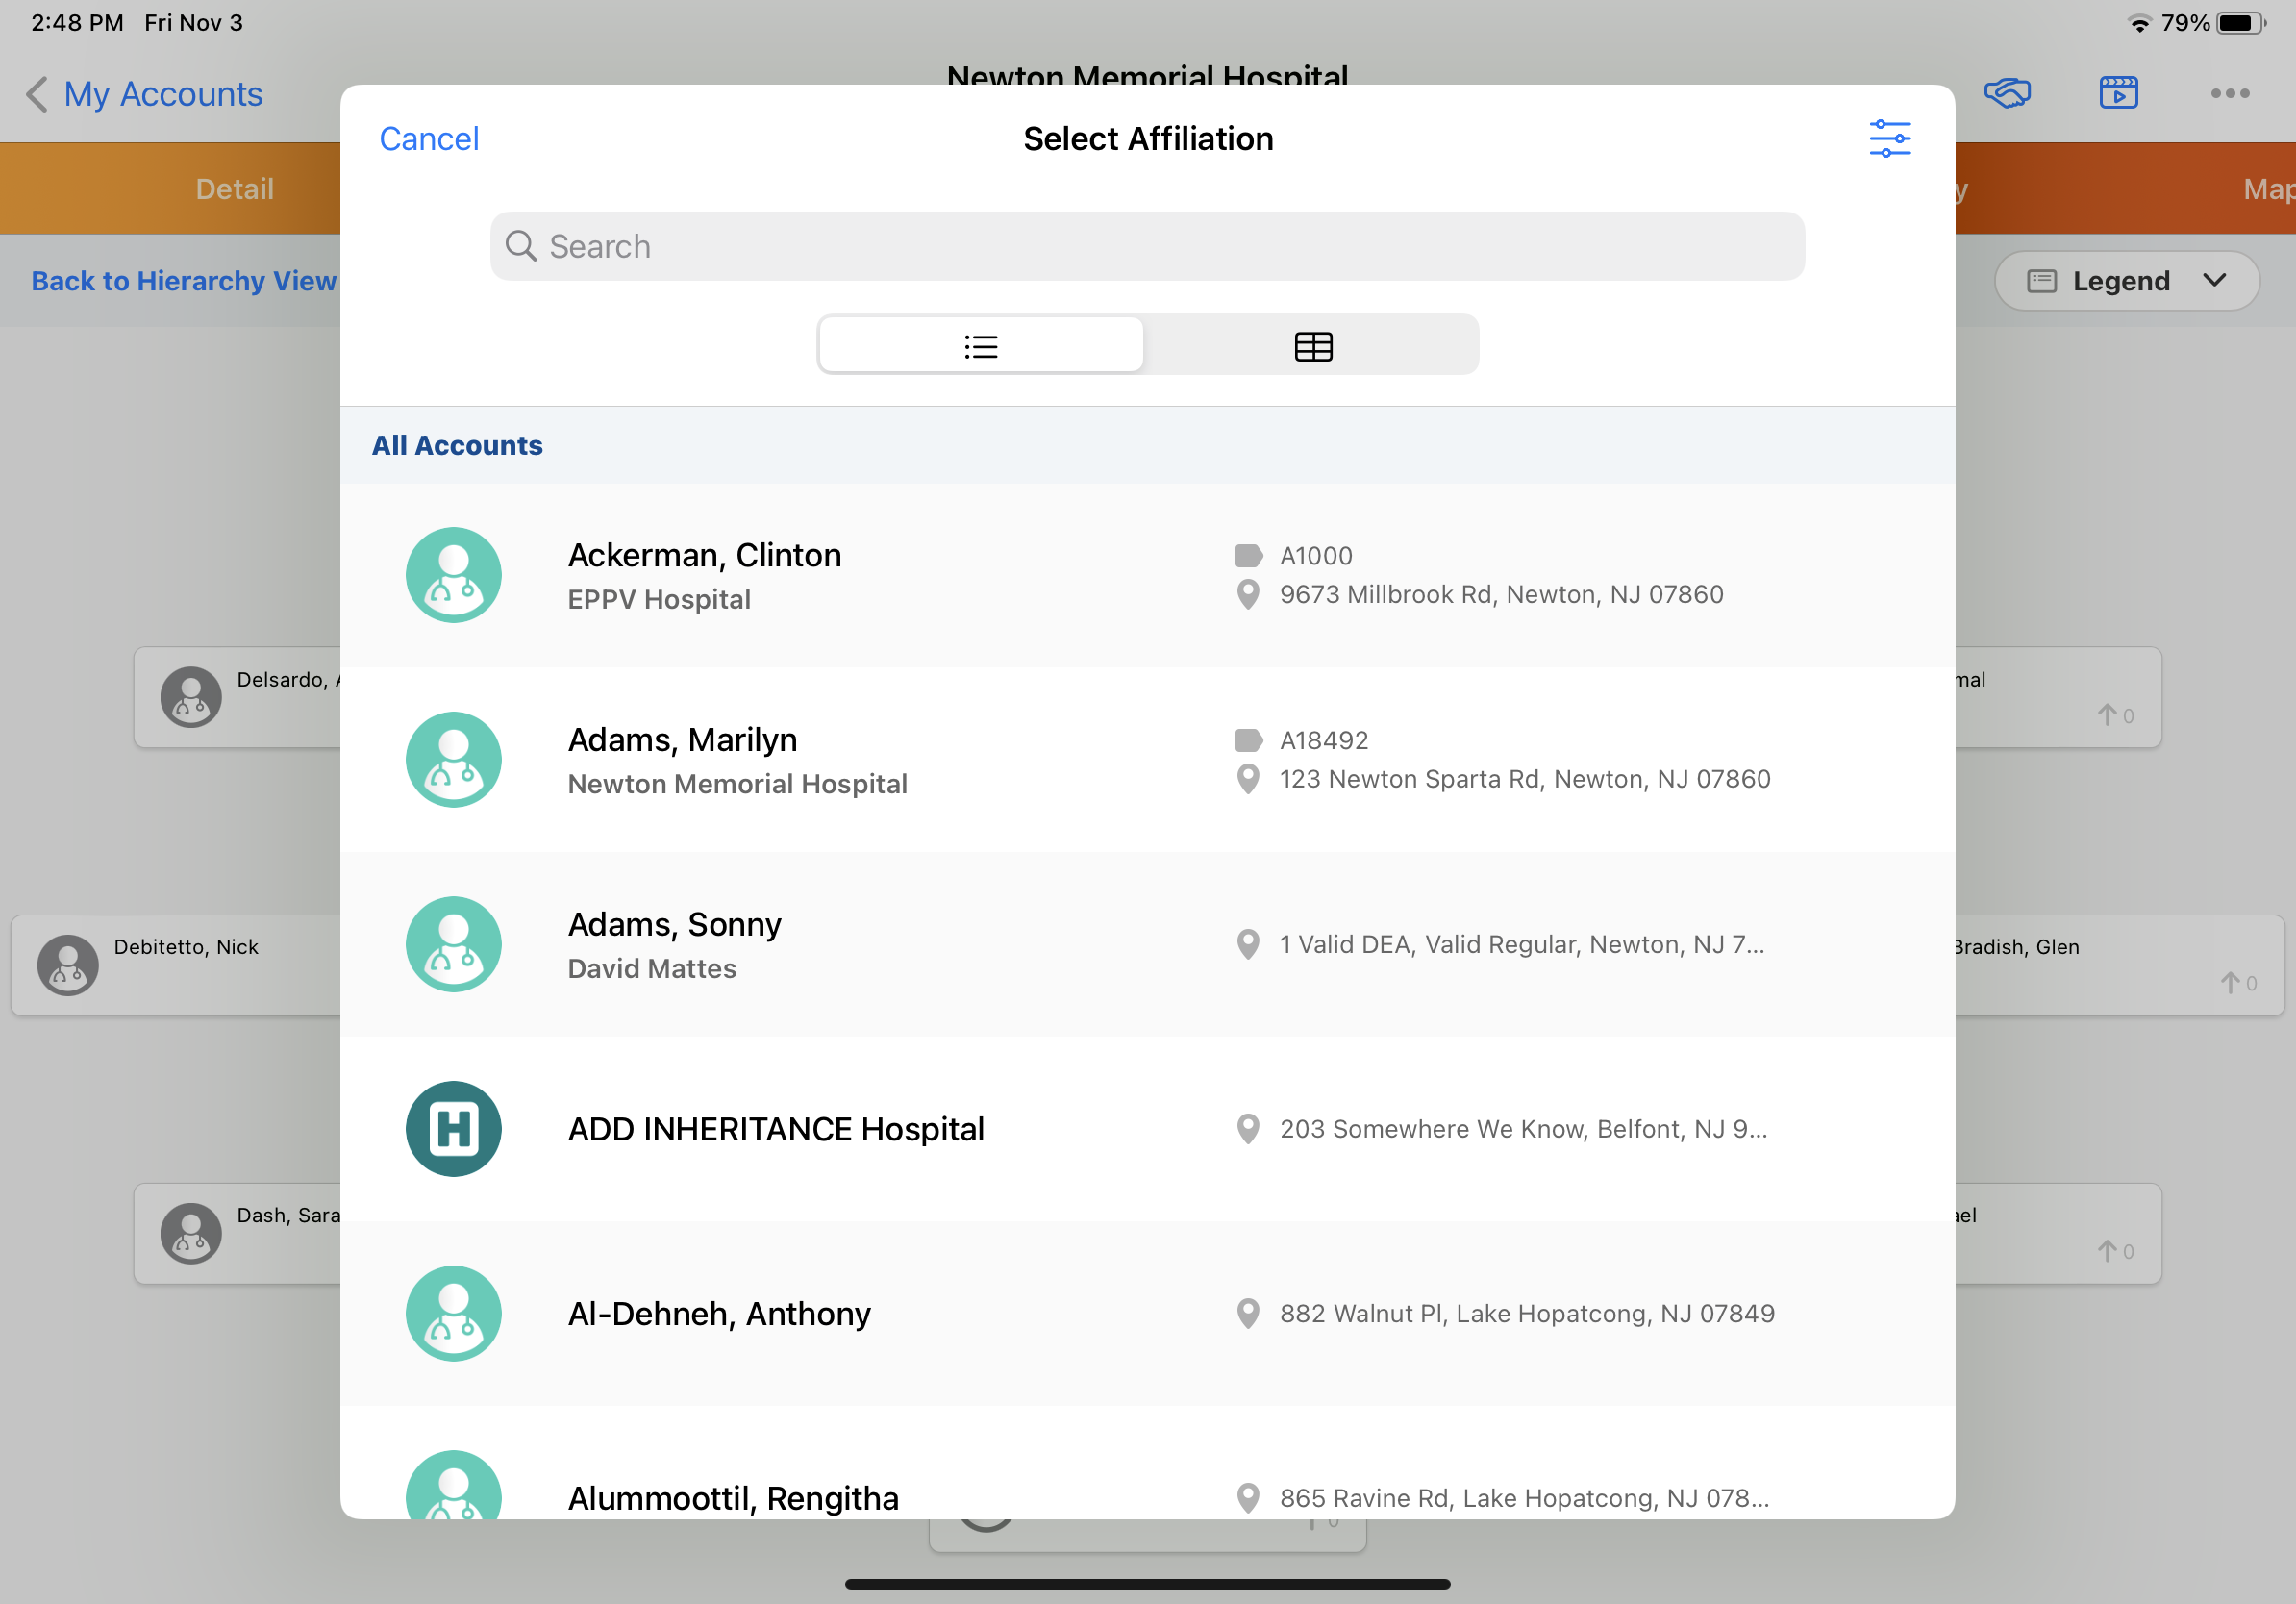
- In the Add Affiliation modal, enter information about the affiliation.
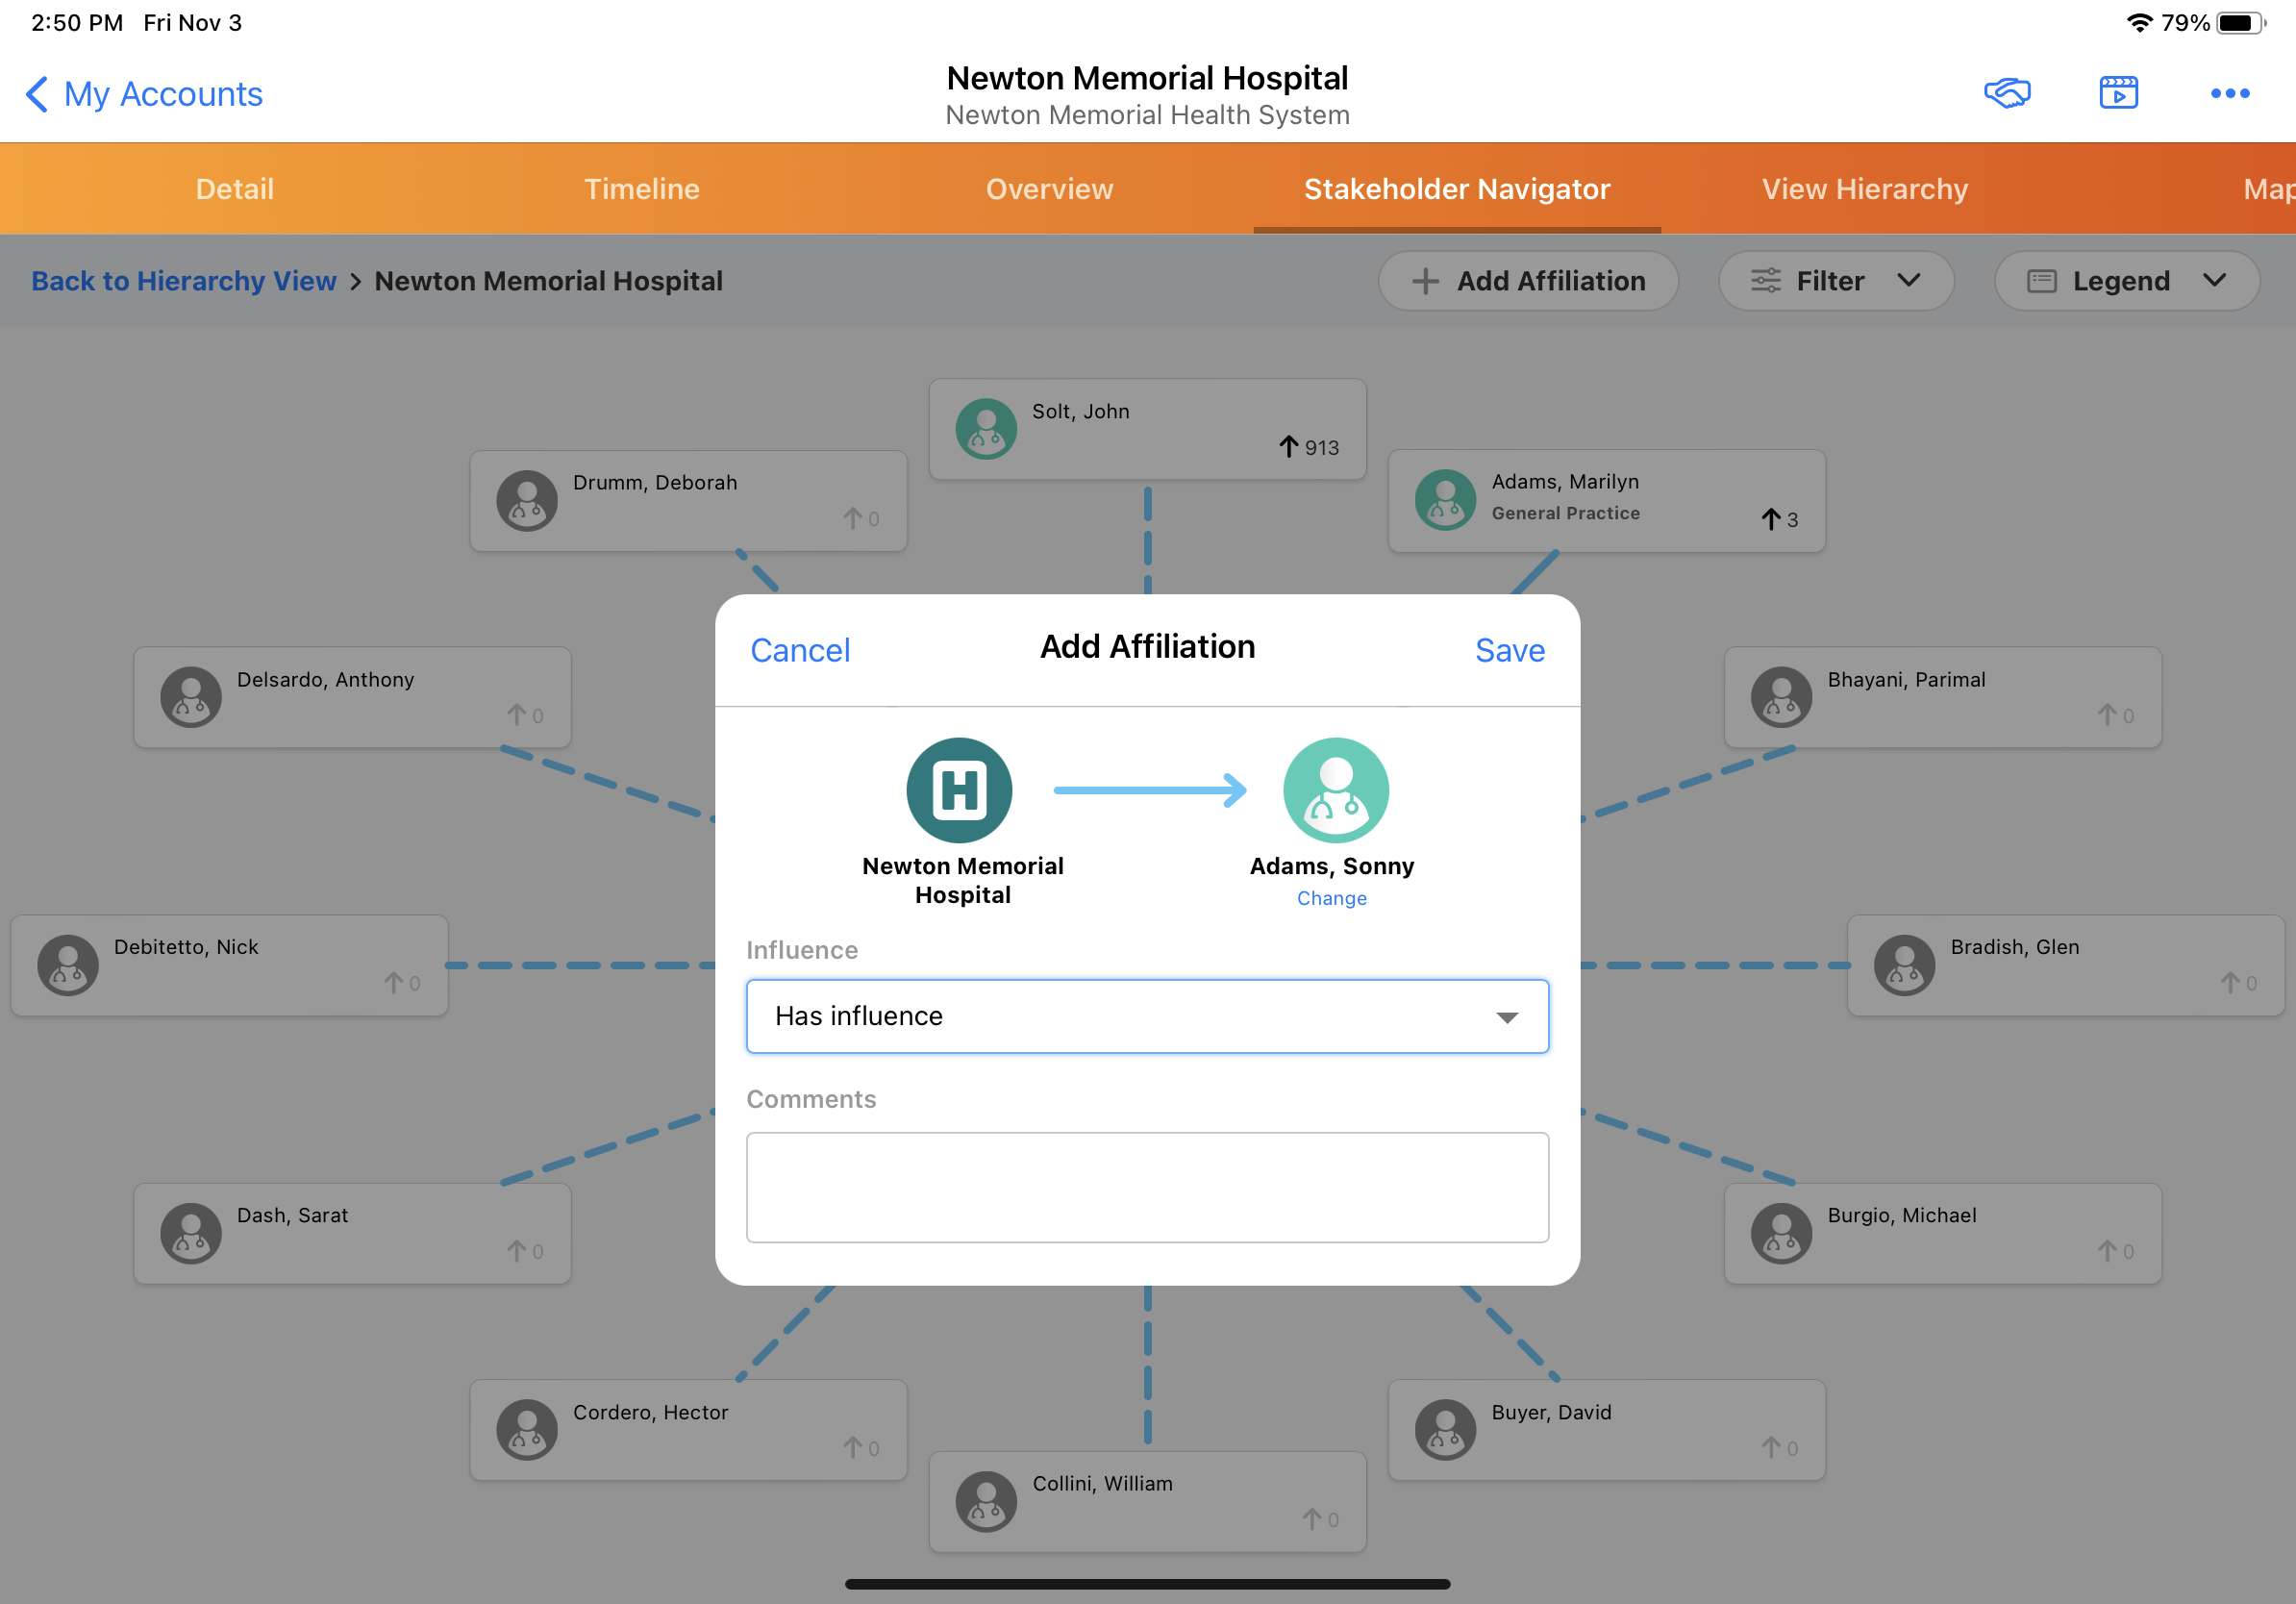
- Select Save.
Viewing, Editing, or Deleting an Account Affiliation
Users can select an affiliated account in the All Affiliations view to open a modal displaying information about the affiliated account.
The modal contains the following options:
- View All Affiliations - displays a new All Affiliations view with the selected account as the root account. The previous account is added to the breadcrumbs.
- Edit - modify the affiliation
- Delete - removes the affiliation
To view account information, select the account name of one of the accounts involved in the affiliation. An Account Information modal displays information about the selected account. The information displayed in this modal is the same as what displays in the Info tab of the Account modal when selecting the account in the hierarchy view of Stakeholder Navigator, including any custom fields defined. Additionally, in the Account Information modal, the following options are available:
- Account Details - displays the Account Details page for the account
- View Timeline - displays the Timeline View for the account
- Add to Territory - adds an out-of-territory account to the users territory
Approved Email
CRM Auto-Publishing for Email Fragments
Some content may not require medical, regulatory, or legal review in PromoMats or MedComms; this could be content like a holiday greeting or a logistical document, for example an agenda. To allow end users to send documents not requiring this process, Business Admins and Content Creators can upload content directly to CRM, and bypass Veeva Vault. End users can add the content as a fragment when they create Approved Email messages.
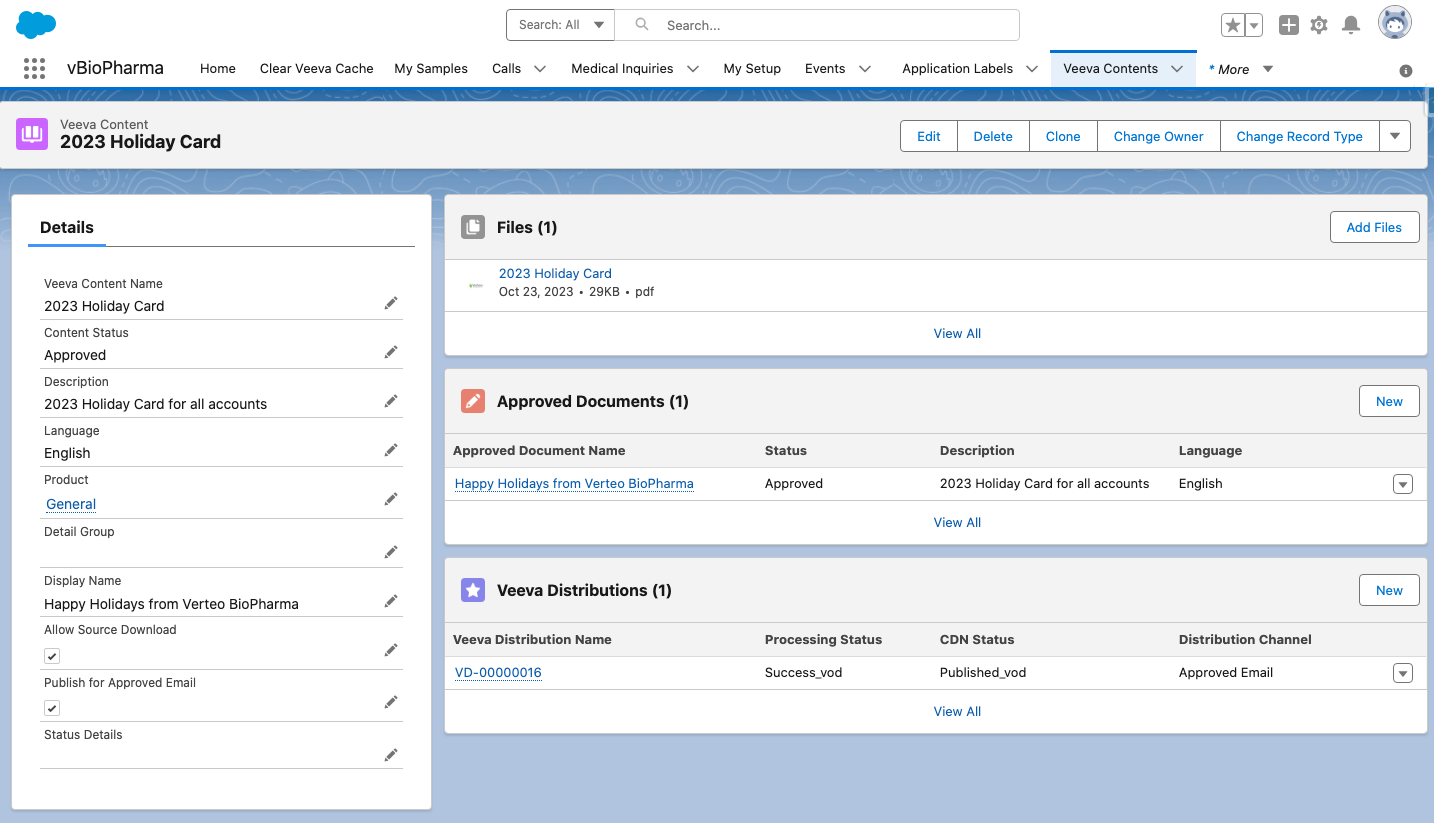
For example, a Content Creator can upload content for a holiday greeting message and indicate it should be published for Approved Email. End users can then open Approved Email, see the holiday greeting message as an available fragment, and add it to an email message. When HCPs receive the email containing the message, they can select a link to view the greeting.
Content is uploaded as a Salesforce File and associated with a Veeva Content record. CRM will automatically publish the content through a Veeva Distribution record and make it available to end users as an Approved Document email fragment.
Using Auto-Publishing for Email Fragments
Publishing Content to CRM and Making it Available as a Fragment
Content Creators can upload and publish content to CRM and make it available as an Approved Email fragment:
- Create and save a Veeva Content record.
- Upload the content as a Salesforce File in the Files related list. The HCP Content Player displays a preview of the following file types:
- Image (.gif, .jpeg, .jpg, .png)
- Video (.mov, .mp4)
- PDF (.pdf)
For unsupported file types, the content does not render. The recipient will instead be shown the option to download the content if Allow_Source_Download_vod is enabled.
- Select a product in the Product_vod field.
- Select a detail group in the Detail_Group_vod (if applicable) field.
- Enter a name for the content in the Display_Name_vod field (optional). This text displays as the content's name in the Approved Email message. If this field is not populated, the name defaults to the value of the Name field on the Veeva_Content_vod object.
- Select a language in the Language_vod field for the content (optional). This language displays as the fragment's language when end users compose email messages.
The Language_vod field is a picklist containing language ISO codes as values. By default, there is only one picklist value, en_US, the ISO code for English. Content admins can add all necessary picklist values and can also set a different default value.
- Enter a description in the Description_vod field (optional). This text displays as the fragment's description when end users compose email messages.
- Select the Allow_Source_Download_vod checkbox to display a Download button in the rendered content that enables email recipients to download the source content (optional).
- Access the Veeva Content record you just created.
- Enter Approved_vod in the Content_Status_vod field.
- Select the Publish_for_Approved_Email_vod check box to create an email fragment pointing to the content.
- To set this value, the Content_Status_vod field value must be Approved_vod, and the Product_vod and Detail_Group_vod fields must be populated (if applicable)
If Content Groups are enabled for your organization, create a corresponding Content Group Content record for the CRM auto-published email fragment.
Customizing the Styling of Fragment Content
By default, fragments are created with a snippet of HTML containing an icon of the content's file type and a hyperlink to the uploaded content.

Content Admins can customize the styling of the HTML snippet by adding the following CSS class selectors to the <style> tag of the Email Template that contains the {{insertEmailFragments}} token:
- .ae-dynamic-email-fragment – Controls the overall style of the table that contains the HTML snippet(s)
- .ae-dynamic-email-fragment td – Controls the overall style of the table cells
- .ae-dynamic-email-fragment td.file-type-icon – Controls the style of the specific table cell containing the file type icon
- .ae-dynamic-email-fragment td.file-name – Controls the style of the specific table cell containing the file name
- .ae-dynamic-email-fragment a – Controls the style of the file link
- .ae-dynamic-email-fragment a:link – Controls the style of the unvisited file link
Adding Content to Email Messages
End Users can send published CRM content to accounts by adding the fragments to their approved email templates when composing email messages. See Email Fragments for more information.
When sending an Approved Email, CRM auto-published email fragments are available for users within the standard list of email fragments from Vault.
Users can preview email fragments. To preview a fragment, select the document link in Preview mode.
Any activity users perform on links while previewing the fragment is not tracked. Users are prevented from downloading the content while previewing as well.

When recipients select the link to the fragment in the Approved Email message, the content displays in the HCP Content Player. For information on how content renders and is tracked in the HCP Content Player, see Using the HCP Content Player.
Versioning is not available for auto-published email fragments.
Expiring Auto-Published Fragments
To expire an available fragment, either set Content_Status_vod to Expired_vod or Publish_for_Approved_Email_vod to FALSE.
Auto-published fragments expire when the content record they are associated with expires. The expired content is also removed from the CDN.
Call Sampling
Preventing Negative Sample Inventory
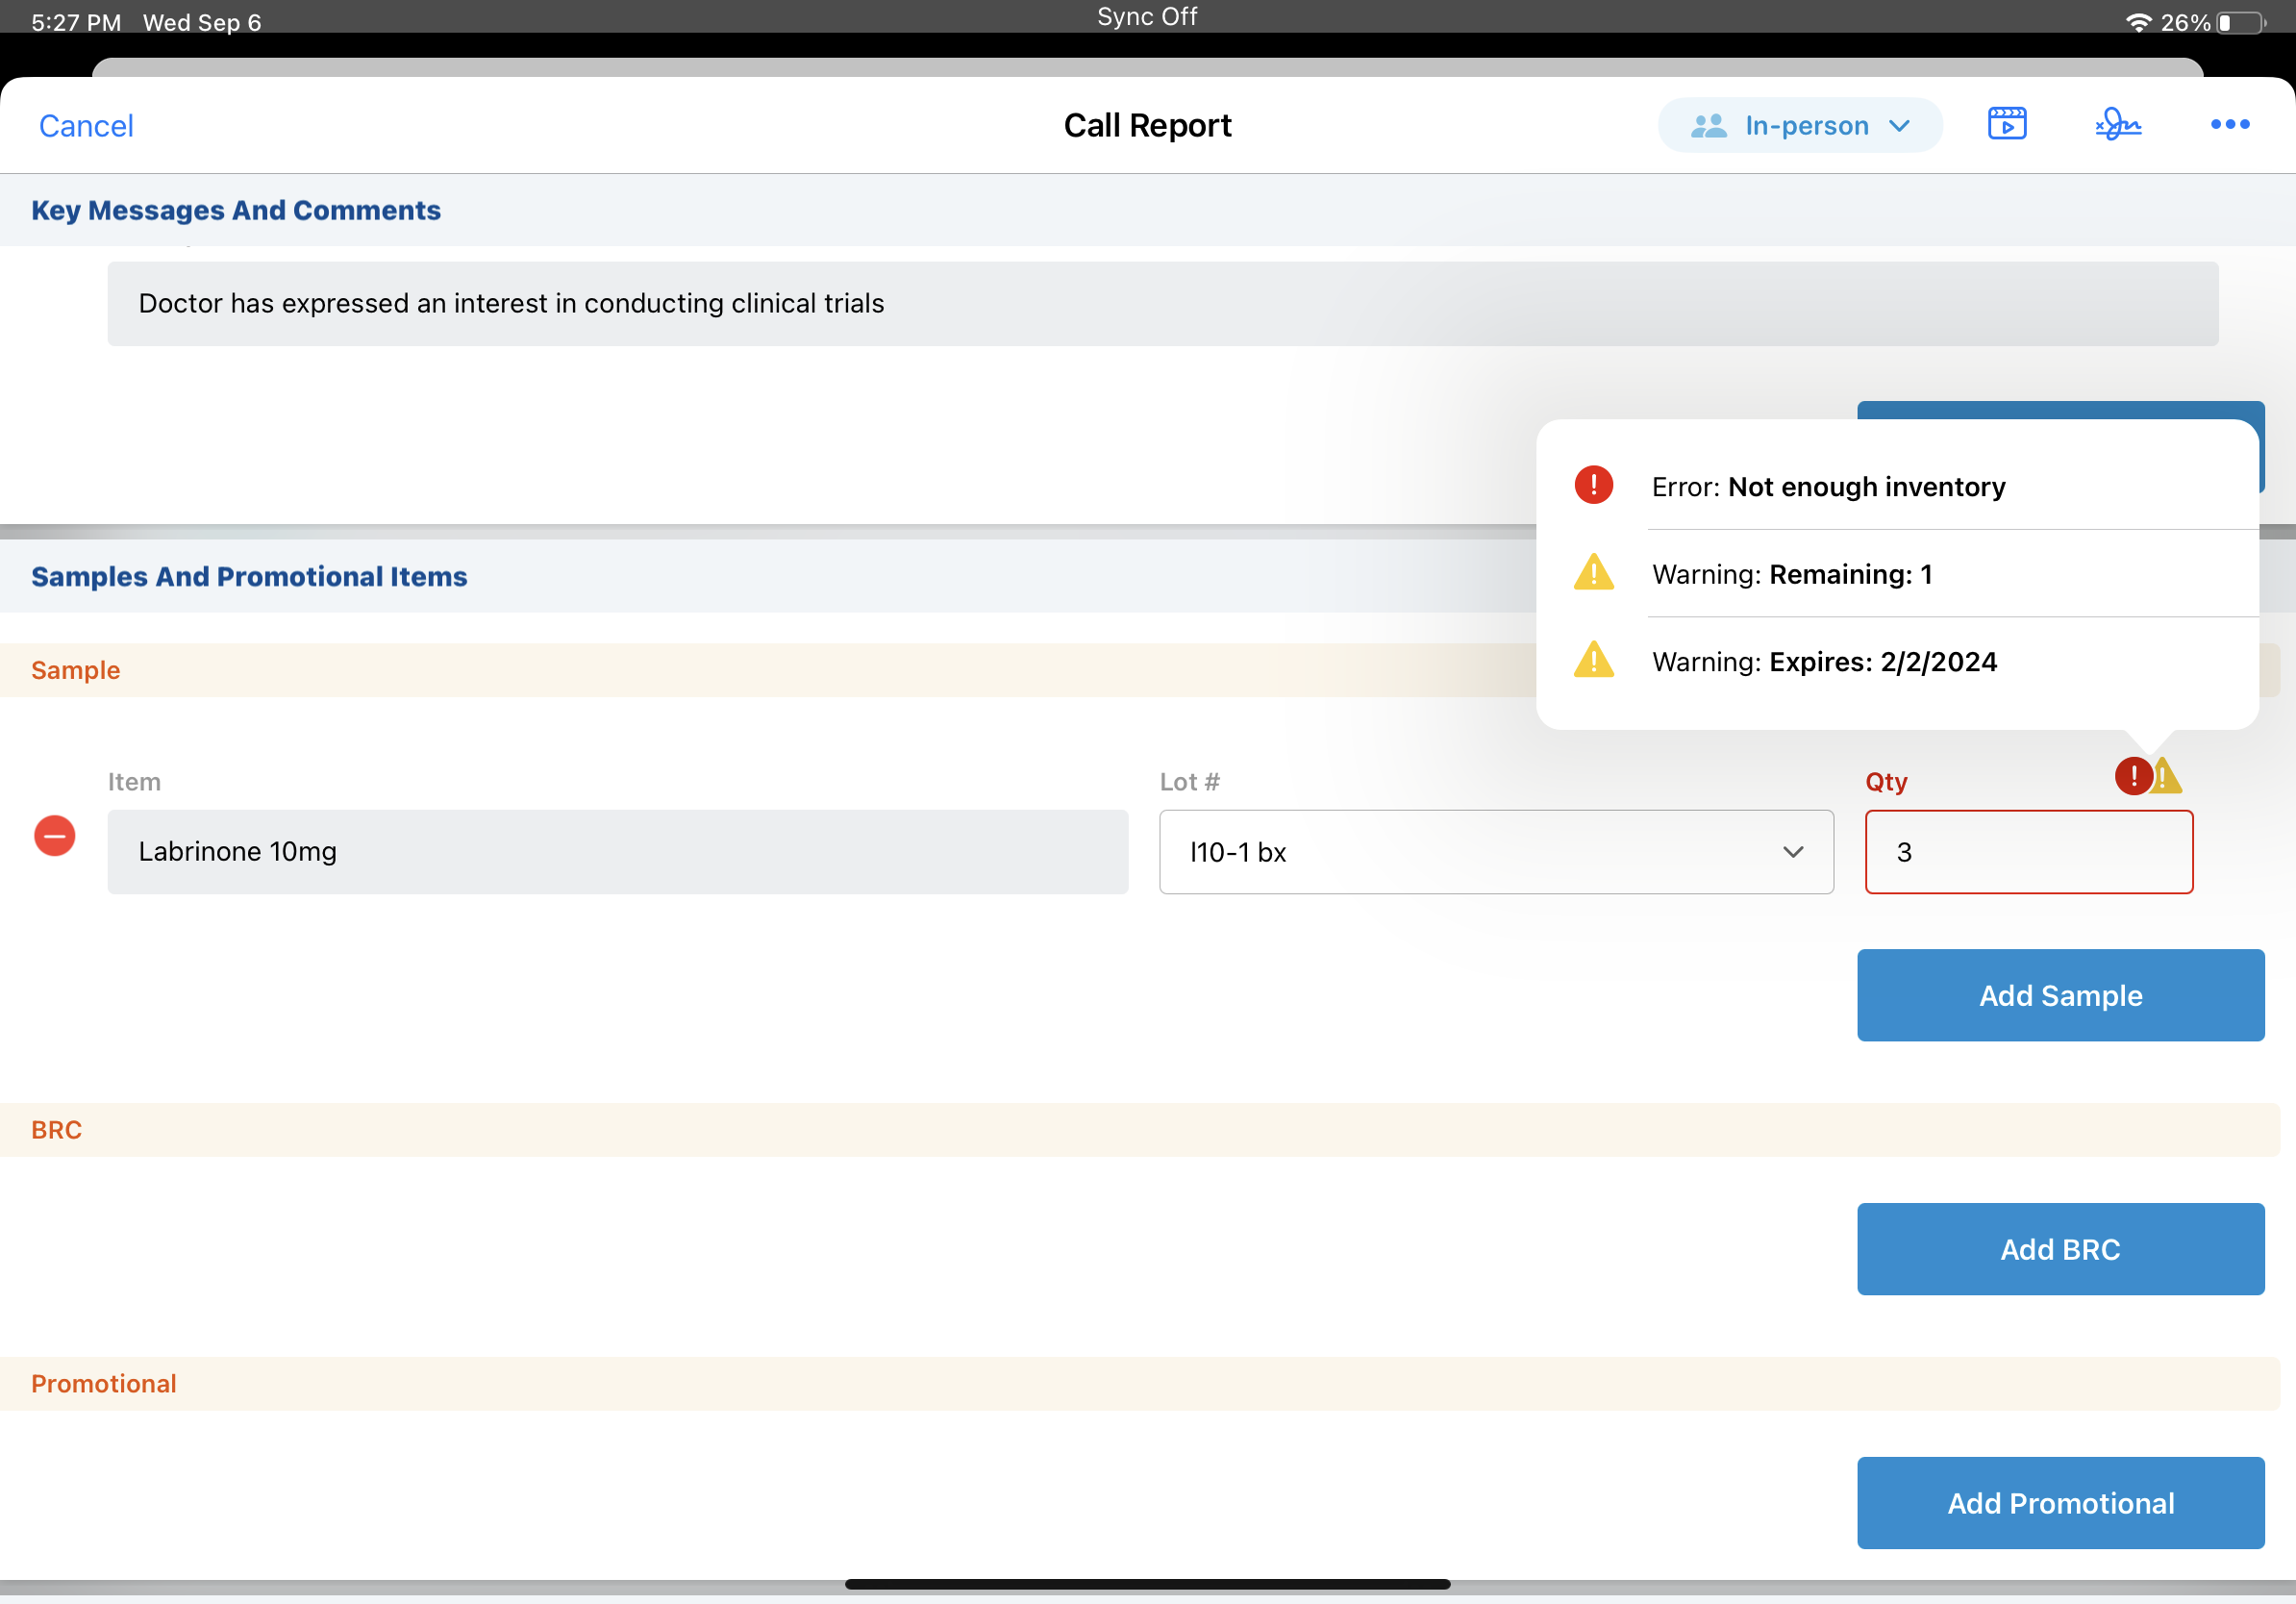
To reduce discrepancies in inventory counts, users can be prevented from recording product disbursements exceeding their on-hand inventory for the product sample lot.
For example, your sample inventory only shows two boxes of a product remaining, even though you actually have several cases on hand. If you attempt to disburse more than two boxes of the product, you are prevented from adding the boxes to the call report and inadvertently creating a negative sample inventory count.
Veeva recommends enabling either Preventing Negative Sample Inventory or Displaying the Negative Sample Warning Indicator. If users should be allowed to complete disbursements as originally entered, even if they cause a negative inventory count, enable Displaying the Negative Sample Warning Indicator instead of Preventing Negative Sample Inventory.
If users enter a value in the Quantity_vod field on the call report exceeding the inventory count for the product, an error displays and they are prevented from saving the call, submitting the call, or capturing a signature. This functionality applies for products with lot numbers, including virtual lot numbers for non-sample products, if configured.
The error does not display if the user already captured a signature, sample card number, or sample send card number for the call.
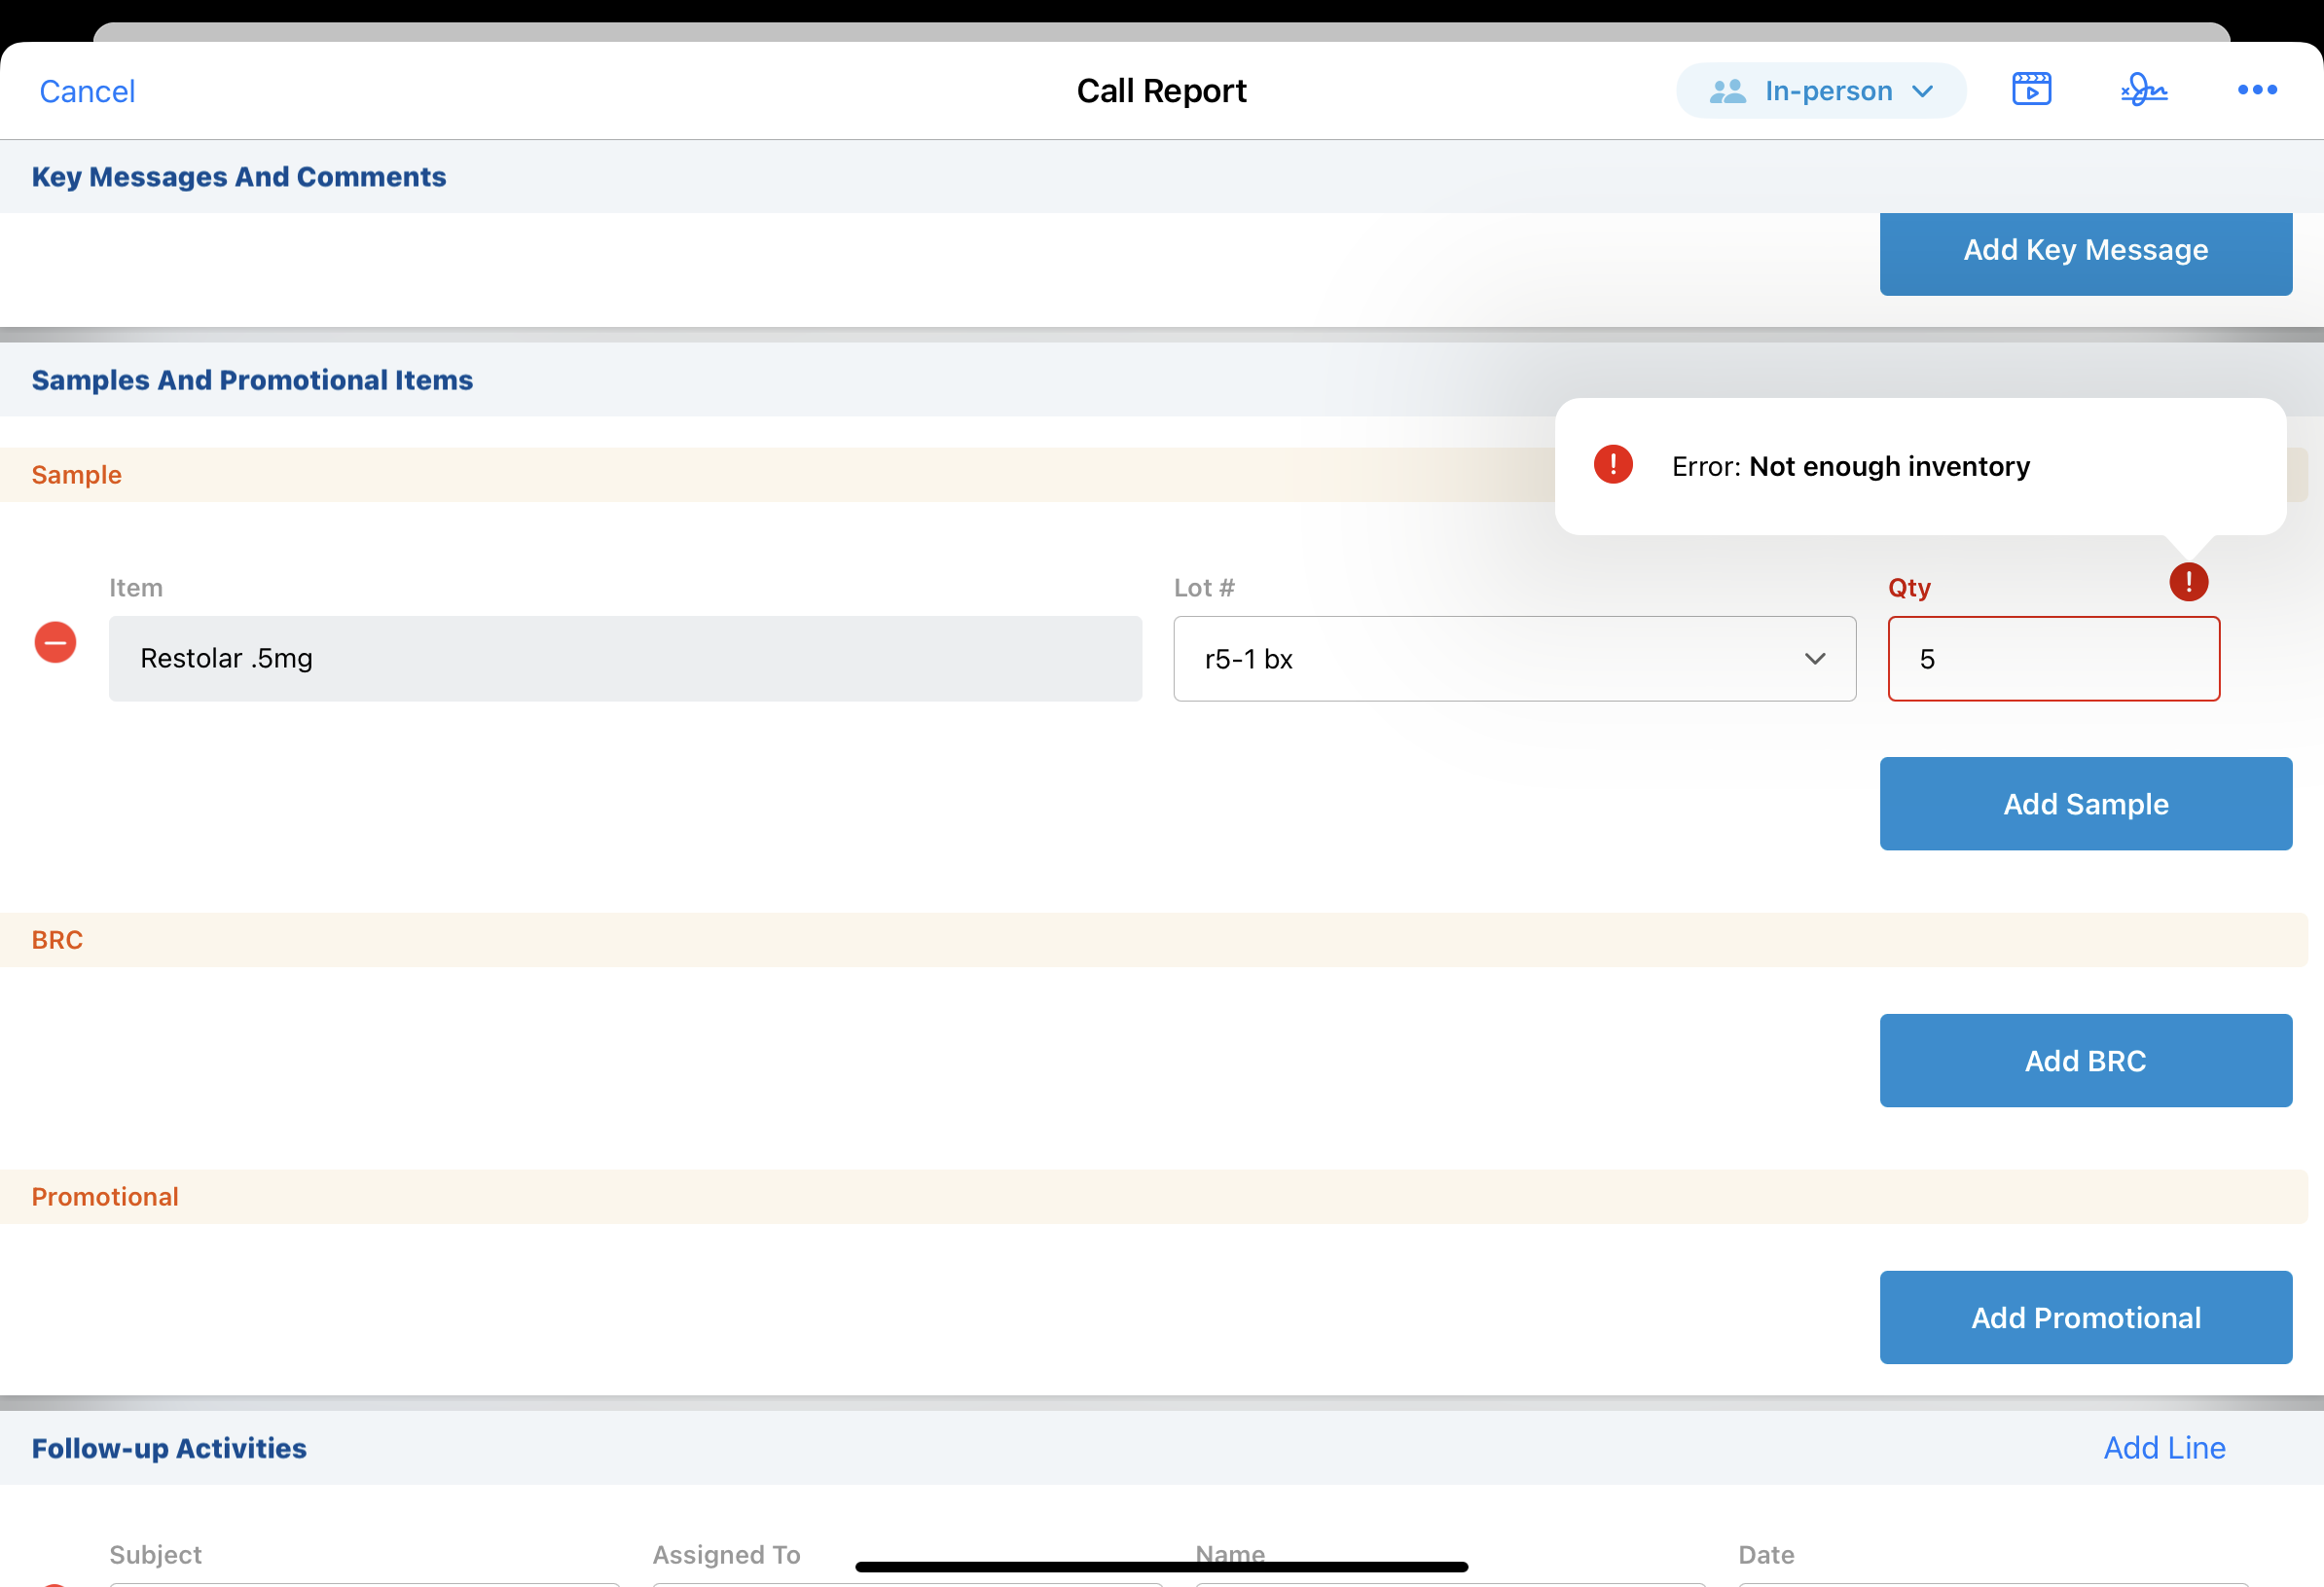
If users attempt to save, submit, or capture a signature on a call report where the value in the Quantity_vod field exceeds the inventory count for the product, the error displays.
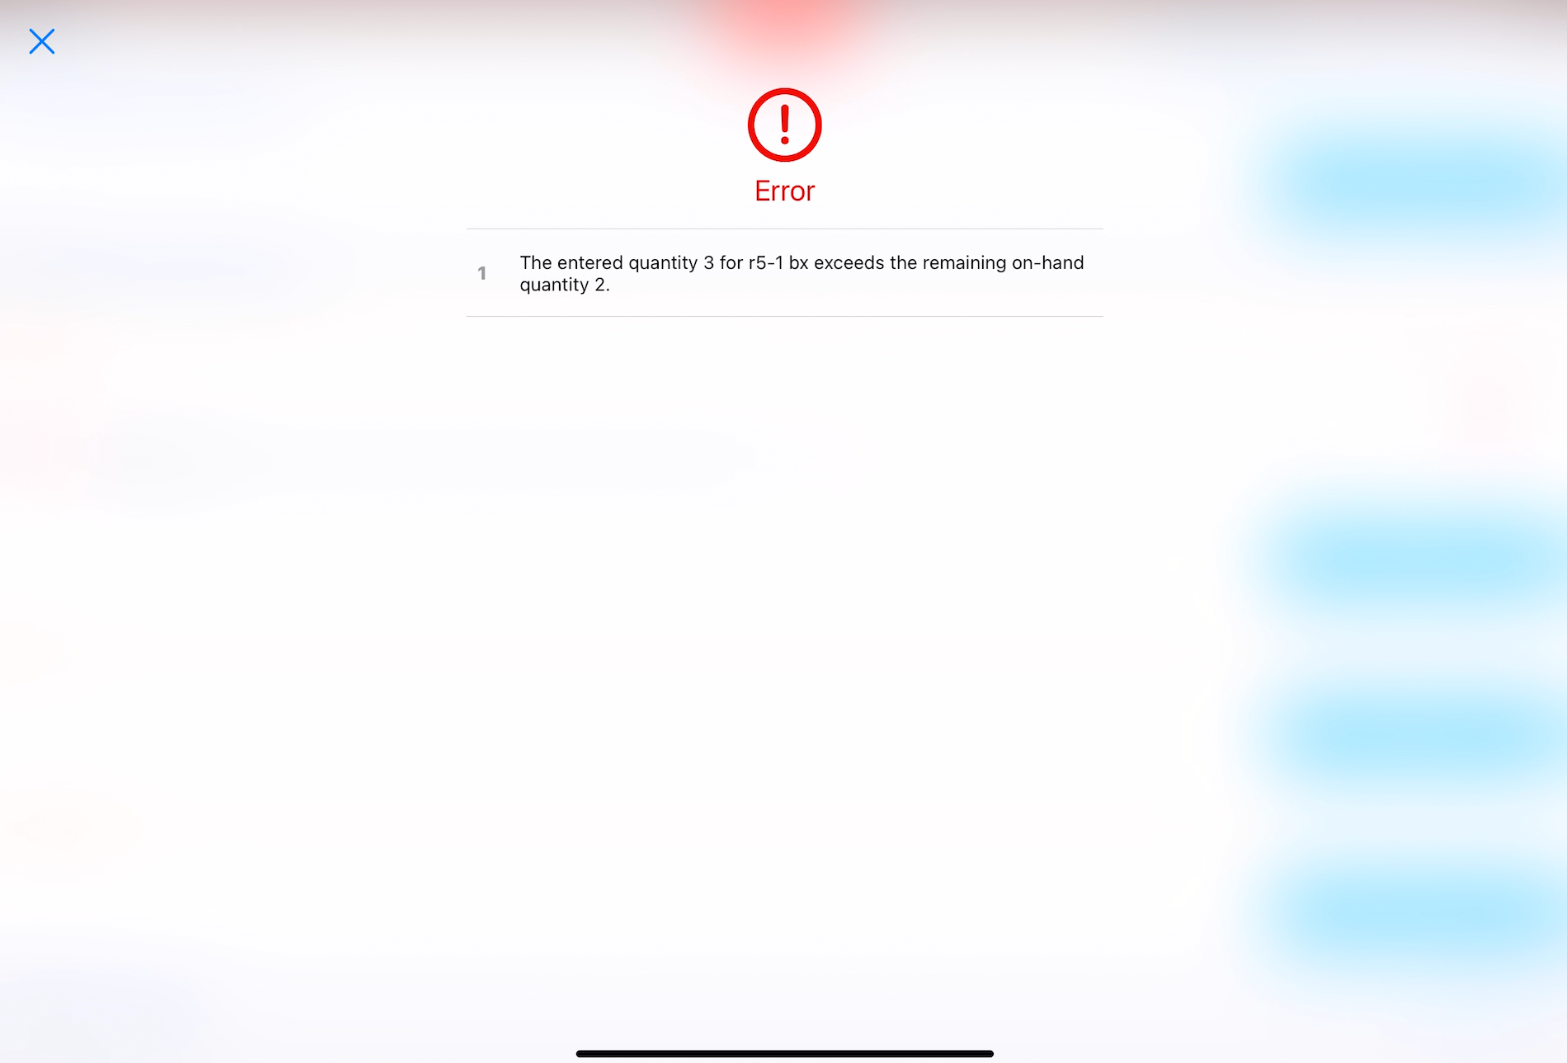
If there are multiple errors, the error for preventing negative sample inventory displays first.
CLM
Aligning Approved Email and CLM Content
Content alignment allows customers to give the right users access to the right content using content groups. Content groups are groups of users who have access to the same content, allowing admins to efficiently manage the Approved Email and CLM content assigned to large groups of users. Content alignment provides customers with more transparency over what content is available for specific types of users. Customers can use content alignment with Align and/or Vault to further streamline the process. Customers can build dashboards and reports to understand which users have access to which content.
Veeva CRM does not support using both content alignment and custom sharing rules to manage user access to content.
The Align integration for content groups will be available in sandbox on November 30, 2023 and in production on December 7, 2023.
Creating and Managing Content Alignment
Content alignment is composed of the following objects:
- Content_Group_vod - defines a group of users aligned to the same content. A content group can have multiple CRM users and many pieces of CLM and Approved Email content. A corresponding Salesforce Group record is automatically created for each Content_Group_vod record.
- Content_Group_User_vod - assigns a user to a content group. A user can be assigned to multiple content groups. A corresponding Salesforce GroupMember record is automatically created for each Content_Group_User_vod record.
- Content_Group_Content_vod - assigns a piece of content to a content group. A piece of content can be assigned to multiple content groups. For Approved Email, a piece of content consists of an Approved_Document_vod record. For CLM, a piece of content consists of a CLM_Presentation_vod record and its associated Key_Message_vod records. For each Content_Group_Content_vod record, a corresponding record is automatically created in the Salesforce Approved_Document_vod__Share, CLM_Presentation_vod__Share, or Key_Message_vod__Share tables.
The process of creating and managing content groups, and assigning users and content to each group depends on whether the customer is integrating CRM with Align and/or Vault.
Creating and Managing Content Alignment in CRM Only
To align content in CRM:
For customers who are only using CRM, admins must manually create or data load all Content_Group_vod, Content_Group_User_vod, and Content_Group_Content_vod records for each content group.
- Define content groups. Create Content_Group_vod records with the Content_Group_vod record type and populate at least the following fields:
- Name - name of the group
- Status_vod - Active. Set to Inactive when deactivating but not deleting a content group. Approved_Document_vod__Share, CLM_Presentation_vod__Share, and Key_Message_vod__Share records for all content are deleted and users no longer have access to that content.
- External_Id_vod - unique ID of the group
Define a naming convention and use optional fields, for example, Country_vod, Description_vod, and Language_vod, to provide additional context for the content group, which may be useful across teams.
- Assign users to each content group. Create Content_Group_User_vod records with the User_vod record type and populate at least the following fields:
- Content_Group_vod - lookup to the Content_Group_vod record, usually the External ID of the content group
- User_vod - lookup to the User record
- Assign content to content groups.
- To assign Approved Email content, create Content_Group_Content_vod records with the Approved_Document_vod record type and populate at least the following fields:
- Content_Group_vod - lookup to the Content_Group_vod record, usually the External ID of the content group
- Approved_Document_vod - lookup to the Approved_Document_vod record
- Record_Type_Name_vod - Approved_Document_vod
- For a CLM presentation, admins must create Content_Group_Content_vod records for the presentation and each of its associated key messages.
Sub-presentations are treated the same as CLM presentations and Shared Resources are treated the same as key messages. Admins must create Content_Group_Content_vod records for a sub-presentation and its key messages, as well as for a Shared Resource. Veeva recommends data loading Content_Group_Content_vod records for key messages (including Shared Resources) first, followed by CLM presentations (including sub-presentations).
- Create Content_Group_Content_vod records with the CLM_Presentation_vod record type and populate at least the following fields:
- Content_Group_vod - lookup to the Content_Group_vod record, usually the External ID of the content group
- CLM_Presentation_vod - lookup to the CLM_Presentation_vod record
- Record_Type_Name_vod - CLM_Presentation_vod
- For each key message in a CLM presentation, create Content_Group_Content_vod records with the Key_Message_vod record type and populate at least the following fields:
- Content_Group_vod - lookup to the Content_Group_vod record
- Key_Message_vod - lookup to the Key_Message_vod record
- Record_Type_Name_vod - Key_Message_vod
- To assign Approved Email content, create Content_Group_Content_vod records with the Approved_Document_vod record type and populate at least the following fields:
Creating and Managing Content Alignment using Align and CRM
Customers can use Align to manage content groups and users. The content assigned to each content group is managed in CRM.
To align content using Align and CRM:
- Create content groups and assign users in Align. Admins in Align manually create content groups and the users are automatically assigned to each group based on territory assignments. Admins then sync the content groups and users to CRM. In CRM, Content_Group_vod and Content_Group_User_vod records are automatically created and linked based on the content groups synced from Align.
- Sync the content groups and users from Align to CRM.
- Assign content to each content group.
- To assign Approved Email content, create Content_Group_Content_vod records with the Approved_Document_vod record type and populate at least the following fields:
- Content_Group_vod - lookup to the Content_Group_vod record, usually the External ID of the content group
- Approved_Document_vod - lookup to the Approved_Document_vod record
- Record_Type_Name_vod - Approved_Document_vod
- For a CLM presentation, admins must create Content_Group_Content_vod records for the presentation and each of its associated key messages.
- Create Content_Group_Content_vod records with the CLM_Presentation_vod record type and populate at least the following fields:
Sub-presentations are treated the same as CLM presentations and Shared Resources are treated the same as key messages. Admins must create Content_Group_Content_vod records for a sub-presentation and its key messages, as well as for a Shared Resource. Veeva recommends data loading Content_Group_Content_vod records for key messages (including Shared Resources) first, followed by CLM presentations (including sub-presentations).
- Content_Group_vod - lookup to the Content_Group_vod record, usually the External ID of the content group
- CLM_Presentation_vod - lookup to the CLM_Presentation_vod record
- Record_Type_Name_vod - CLM_Presentation_vod
- For each key message in a CLM presentation, create Content_Group_Content_vod records with the Key_Message_vod record type and populate at least the following fields:
- Content_Group_vod - lookup to the Content_Group_vod record, usually the External ID of the content group
- Key_Message_vod - lookup to the Key_Message_vod record
- Record_Type_Name_vod - Key_Message_vod
- Create Content_Group_Content_vod records with the CLM_Presentation_vod record type and populate at least the following fields:
- To assign Approved Email content, create Content_Group_Content_vod records with the Approved_Document_vod record type and populate at least the following fields:
When a user is moved from one territory to another, the content groups to which they are assigned are also updated accordingly.
Creating and Managing Content Alignment using CRM and Vault
Customers can use Vault to manage the content assigned to each content group. Content groups and users must be created and managed in CRM.
To align content using CRM and Vault:
- Define content groups. Create Content_Group_vod records with the Content_Group_vod record type and populate at least the following fields:
- Name - name of the group
- Status_vod - Active. Set to Inactive when deactivating but not deleting a content group. Approved_Document_vod__Share, CLM_Presentation_vod__Share, and Key_Message_vod__Share records for all content are deleted and users no longer have access to that content.
- External_Id_vod - unique ID of the group
Define a naming convention and use optional fields, for example, Country_vod, Description_vod, and Language_vod, to provide additional context for the content group, which may be useful across teams.
- Assign users to each content group. Create Content_Group_User_vod records with the User_vod record type and populate at least the following fields:
- Content_Group_vod - lookup to the Content_Group_vod record, usually the External ID of the content group
- User_vod - lookup to the User record
- Sync the content groups to Vault via the CRM Vault Metadata Sync in CRM. Content groups cannot be created directly in Vault.
- Assign content to content groups.
- To assign Approved Email content to a content group, content admins in Vault can select one or more content groups for the crm_content_groups__v field on an Email Template or Email Fragment, or on an auto-published document.
- To assign CLM content to a content group, content admins can select one or more content groups for the crm_content_groups__v field on a Multichannel Presentation or on an auto-published document.
If admins add more content groups to the source document of an auto-published document, the auto-published document must be generated again to include the additional content groups.
- Sync content from Vault to CRM.
- When CRM admins sync Approved Email content from Vault to CRM via the Approved Email Admin Console, Content_Group_Content_vod records are automatically created for each Approved_Document_vod record assigned to a content group and linked to the appropriate Content_Group_vod records via the Content_Group_vod lookup field.
- When CRM admins sync CLM content from Vault to CRM via the CLM Admin Console, Content_Group_Content_vod records are automatically created not only for each CLM_Presentation_vod record assigned to a content group, but also for each of its associated Key_Message_vod records, including shared resources, and sub-presentations. These records are automatically linked to the appropriate Content_Group_vod records via the Content_Group_vod lookup field.
CRM admins can view the content alignment successes and failures from the last seven days in the Content Alignment Process History sections in the CLM Admin Console and Approved Email Admin Console. Admins receive notification emails after each sync with information about the successes and failures.
Admins must use the CLM Admin Console to manage CLM content alignment and the Approved Email Admin Console to manage Approved Email content alignment.
Creating and Managing Content Alignment using Align, CRM, and Vault
Customers can use Align to manage content groups and users, and Vault to manage the content assigned to each content group. CRM admins manage the integrations between Align and CRM, and CRM and Vault.
To align content using Align, CRM, and Vault:
- Create content groups and assign users in Align. Admins in Align manually create content groups and the users are automatically assigned to each group based on territory assignments. Admins then sync the content groups and users to CRM. In CRM, Content_Group_vod and Content_Group_User_vod records are automatically created and linked based on the content groups synced from Align.
- Sync the content groups and users from Align to CRM.
- Sync the content groups to Vault via the CRM Vault Metadata Sync in CRM. Content groups cannot be created directly in Vault.
- Assign content to content groups.
- To assign Approved Email content to a content group, content admins in Vault can select one or more content groups for the crm_content_groups__v field on an Email Template or Email Fragment, or on an auto-published document.
- To assign CLM content to a content group, content admins can select one or more content groups for the crm_content_groups__v field on a Multichannel Presentation or on an auto-published document.
If admins add more content groups to the source document of an auto-published document, the auto-published document must be generated again to include the additional content groups.
- Sync content from Vault to CRM.
- When CRM admins sync Approved Email content from Vault to CRM via the Approved Email Admin Console, Content_Group_Content_vod records are automatically created for each Approved_Document_vod record assigned to a content group and linked to the appropriate Content_Group_vod records via the Content_Group_vod lookup field.
- When CRM admins sync CLM content from Vault to CRM via the CLM Admin Console, Content_Group_Content_vod records are automatically created not only for each CLM_Presentation_vod record assigned to a content group, but also for each of its associated Key_Message_vod records, including shared resources, and sub-presentations. These records are automatically linked to the appropriate Content_Group_vod records via the Content_Group_vod lookup field.
When a user is moved from one territory to another, the content groups to which they are assigned are also updated accordingly.
CRM admins can view the content alignment successes and failures from the last seven days in the Content Alignment Process History sections in the CLM Admin Console and Approved Email Admin Console. Admins receive notification emails after each sync with information about the successes and failures.
Admins must use the CLM Admin Console to manage CLM content alignment and the Approved Email Admin Console to manage Approved Email content alignment.
Using Content Groups
When end users in a content group sync Approved Email and CLM content to their devices, only the content assigned to their content group syncs to their devices. My Setup Products for users apply.
Realigning Content Alignment
Admins can realign content alignment from the Content Alignment Process History sections of the CLM Admin Console or the Approved Email Admin Console to fix discrepancies in content alignment object records.
Realigning content recreates the necessary Group, GroupMember, and __Share (Approved_Document_vod__Share, CLM_Presentation_vod__Share, Key_Message_vod__Share) records for content alignment. For example, an admin accidentally deletes a GroupMember record automatically created in Salesforce corresponding to a Content_Group_User_vod record. The admin cannot recreate the record, so they realign content to ensure the record exists again.
Admins receive email notifications when realignment jobs successfully complete or fail with errors.
Engage
Attendance Reporting for Microsoft Teams Meetings
To report on attendee data, administrators can track meeting attendance and meeting length for Microsoft Teams meetings started from Veeva CRM.
Attendance reporting enables admins to review attendee display names, duration, and start and end times for each meeting. Additionally, the meeting outcome status is captured so admins can easily see whether a meeting was started and whether attendees joined. From the Engage Meeting Process Administration tab, admins can review processing status for the last ten attendance reporting jobs.
Using Attendance Reporting for Microsoft Teams Meetings
Through the existing Engage reporting process, attendance data is pulled in to Veeva CRM for all call reports with a Microsoft Teams meeting associated and a call datetime in the previous two weeks. This includes call reports which are not submitted.
The reporting process can be scheduled to run at certain intervals or performed immediately by selecting the Run button on the process administration page. In the Microsoft Teams attendance reporting process, only Remote_Meeting_vod records with the MS_Teams_Call_Meeting_vod record type are updated.
If an Engage meeting was previously scheduled for the call, attendance data is pulled for both the Engage meeting’s Remote_Meeting_vod record and the Microsoft Teams meeting’s Remote_Meeting_vod record. For more on switching meeting types, see Switching Remote Meeting Types.
The following data is captured on a Remote_Meeting_vod record for each Microsoft Teams meeting started from Veeva CRM:
- Engagement_Minutes_vod - Captures the total number of minutes where the host and at least one attendee were in the meeting together
- Meeting_Duration_vod (optional) - Captures the total meeting duration
- Meeting_Outcome_Status_vod - Indicates the meeting outcome using the following values:
- Meeting_Not_Started_vod - Displays if the meeting never started
- Meeting_Not_Started_and_Attendees_Joined_vod - Displays if attendees join the meeting but the host never starts the meeting. Whether attendees can join a meeting before the host depends on the organization’s Microsoft Teams configuration.
If waiting rooms are enabled for Microsoft Teams and an attendee joins the waiting room, but does not join the meeting, they are not counted as an attendee.
- Meeting_Started_Without_Attendees_vod - Displays if the meeting started but attendees did not join
- Meeting_Started_With_Attendees_vod - Displays if the meeting started and at least one attendee joined
- Attendance_Report_Process_Status_vod - Indicates the status of the reporting process:
- Success_vod - Displays when the record is successfully processed for the last time
- Retry_vod - Displays if the admin manually sets the field value to Retry_vod
- Empty (no value) - The field is empty if this record is still in the two-week processing window or the record is set to a date in the future
The following data is captured on a Remote_Meeting_Attendee_vod record for each device joining the meeting:
- Join_Time_vod - Datetime when the device joined
- Leave_Time_vod - Datetime when the device left
- Meeting_Duration_vod - Number of minutes the device was in the meeting
- Meeting_End_Time_vod - Datetime when the meeting ended
- Meeting_Start_Time_vod - Datetime when the meeting started
- Name_vod - Attendee’s display name in Microsoft Teams
- Remote_Meeting_vod - Lookup to the Remote_Meeting_vod record for the meeting joined
- VExternal_Id_vod - Engage record ID for the attendee
If an attendee rejoins a meeting after leaving or being disconnected for any reason, a new Remote_Meeting_Attendee_vod record is created each time they join or rejoin the meeting.
Reviewing Reporting Process History
From the Engage Meeting Process Administration page, admins use the Microsoft Teams Attendance Report Process History table to review the following information from the ten most recently run reporting processes:
- Start and end timestamps - Process start and end datetime. The end timestamp only displays when the process is finished.
- Status - Indicates whether the process is currently running
- Type - MS Teams
- Success - Number of records successfully processed. To download the success log as a .CSV file, select the number in the Success column. If the number is zero, users cannot download the log.
- Error - Number of records that encountered an error during processing. To download the error log as a .CSV file, select the number in the Error column. If the number is zero, users cannot download the log.
- Message - States successes and failures that occurred during the run
Retrying Record Processing
To re-run the reporting process for a remote meeting after the two-week time period, manually set the value of the Attendance_Report_Process_Status_vod field on the appropriate Remote_Meeting_vod records to Retry_vod. Records are re-run during the next attendance processing job, and remote meeting and remote meeting attendee data is updated accordingly.
Switching Meeting Types
When both Engage Meeting and Microsoft Teams are enabled, users can switch meeting types after scheduling a meeting. Select the More Actions icon on the call report, then select the appropriate Switch to option.
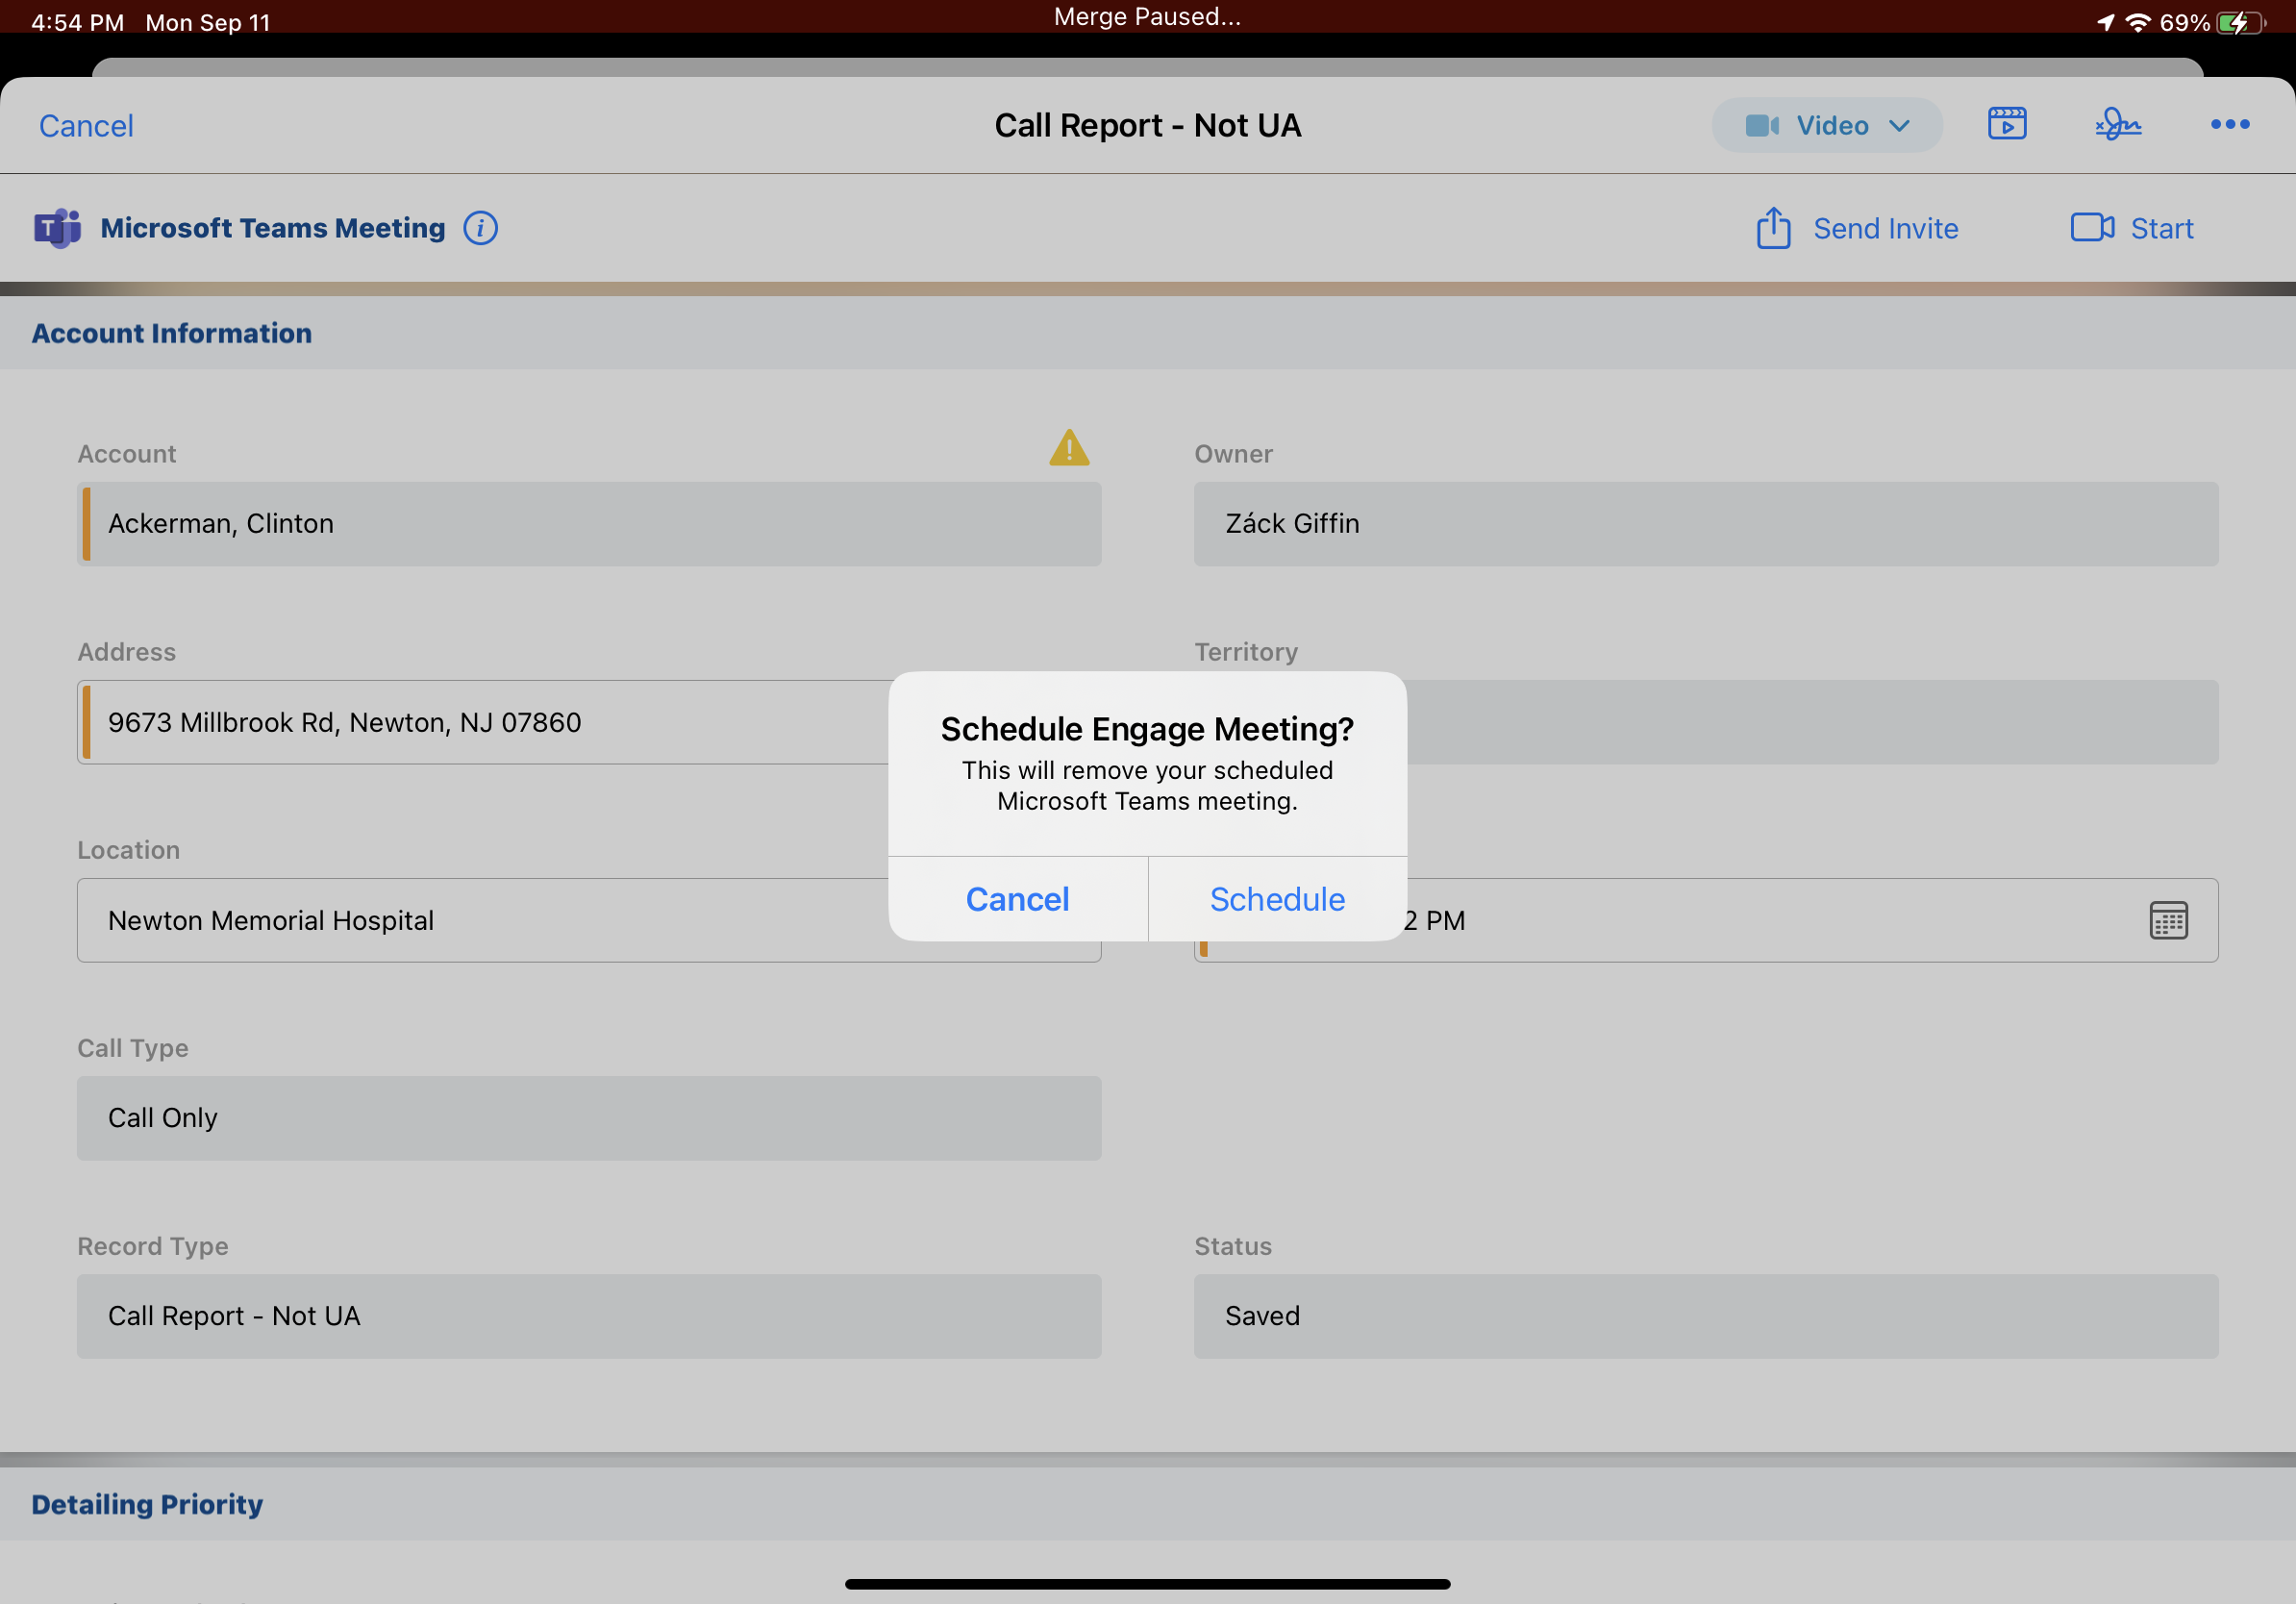
Select Schedule to confirm the change.
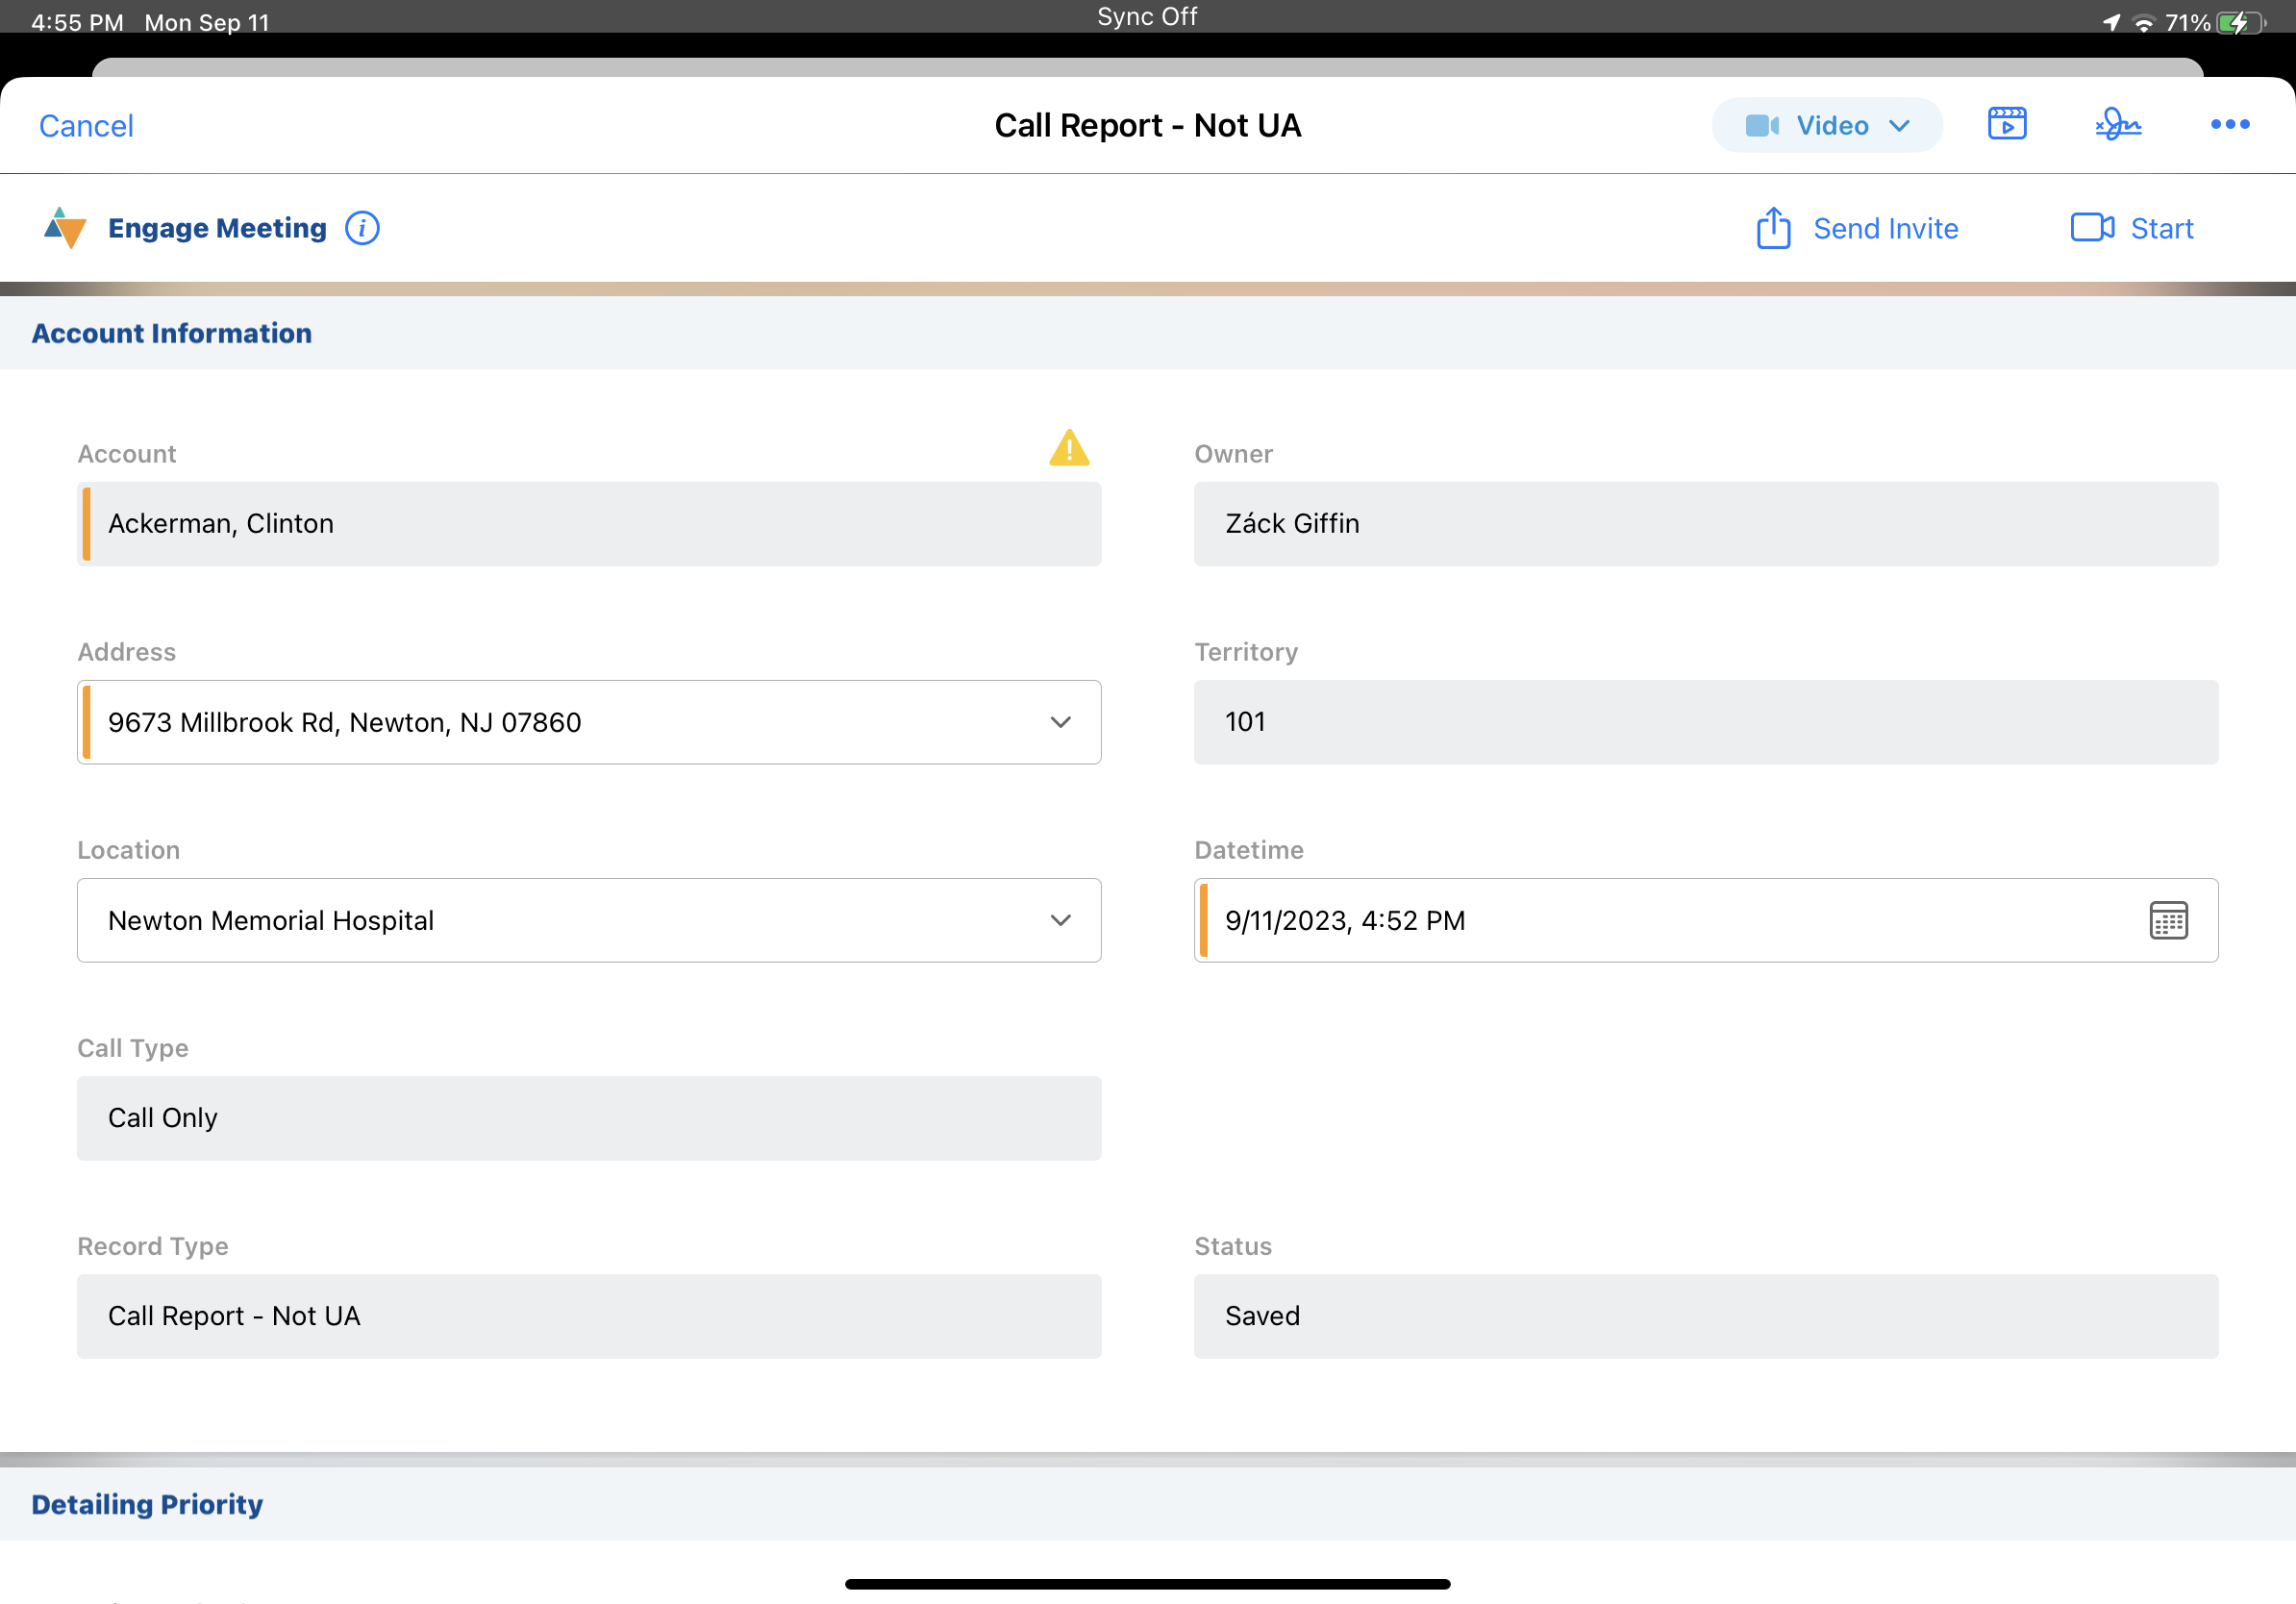
When users switch meeting types, the original remote meeting data is retained. The user interface only displays the currently scheduled meeting type. If users switch between meeting types multiple times, the previously saved Remote_Meeting_vod record is reused.
If Starting Microsoft Teams Meetings from Calls in Microsoft Outlook is enabled, switching from a Microsoft Teams meeting to an Engage meeting removes the Microsoft Teams meeting reference from the call in Microsoft Outlook. If users switch from an Engage meeting to a Microsoft Teams meeting, a Microsoft Teams meeting reference is added to the call in Microsoft Outlook.
Users can only switch meeting types prior to the meeting. Conducting both an Engage meeting and a Microsoft Teams meeting from the same call report is not supported.
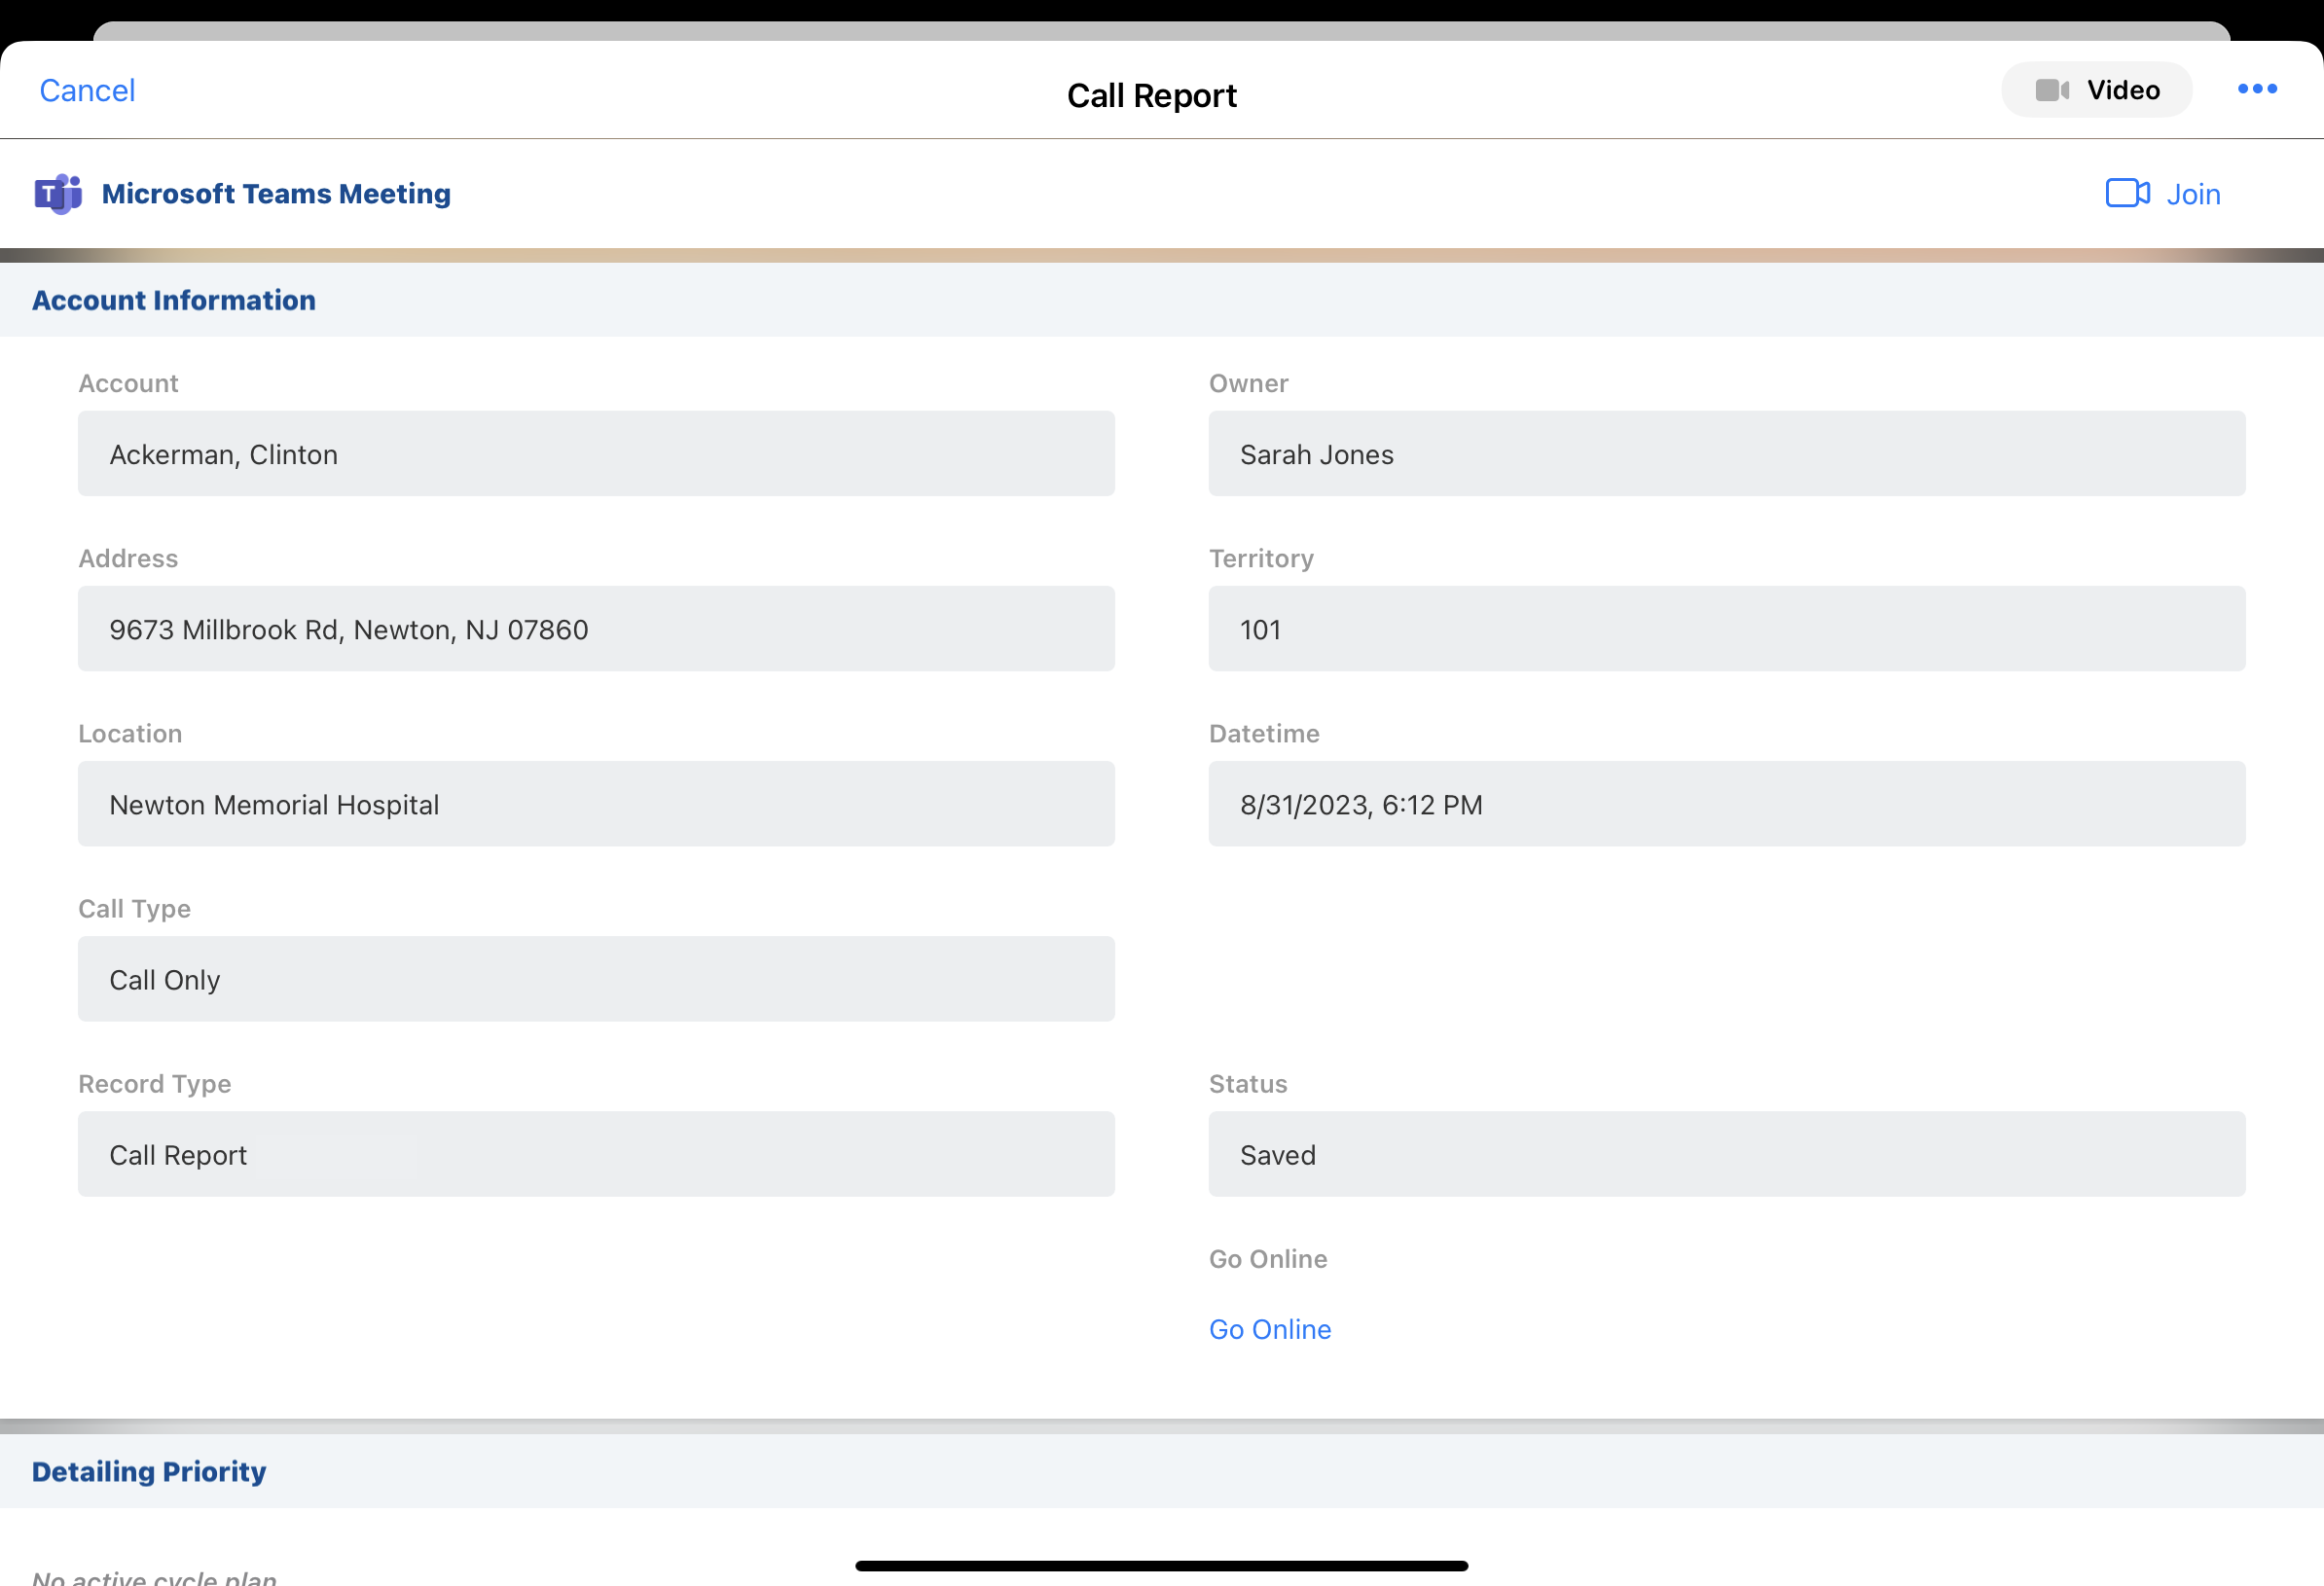
Joining Microsoft Teams Meetings as a User Attendee
When a Microsoft Teams meeting is scheduled for a call, user attendees can join the meeting from the call report. On the iPad platform, user attendees can also join from the call popover in My Schedule.
To join a Microsoft Teams meeting as a user attendee, select the Join button.
Users cannot join a Microsoft Teams meeting while in an Engage Meeting. If users attempt to join a Microsoft Teams meeting while in an Engage Meeting, they are prompted to either select Continue to launch the Microsoft Teams meeting, or select Cancel to remain in the Engage Meeting.
Using the HCP Content Player
The HCP Content Player is a dedicated browser experience enabling accounts to view content sent to them from various features of Veeva CRM. Interactions with content viewed via the HCP Content Player are tracked and saved in Veeva CRM, enabling admins to report and audit on activity of sent content. The HCP Content Player is hosted by Veeva and cannot be embedded in customer-owned pages.
The HCP Content Player supports all Veeva supported languages, including translations for the media controls, slide labels, and error messages.
The following types of content can be viewed in the HCP Content Player:
- HTML content – The following Multichannel CRM JavaScript functions are supported:
- goToSlide()
- goToSlideV2()
- Images – The following formats are supported:
- .png
- .jpg
- .jpeg
- PDFs
- Videos – The following formats are supported:
- .mp4
- .m4v
- .mov
Supported HCP Content Player Entry Points
The following Veeva CRM features utilize the HCP Content Player to view content from Veeva CRM:
- Sharing CLM Content via Web Link or QR Code® – Recipients of links for CLM presentations can view and download the content in the HCP Content Player
- Sharing Websites via Web Link or QR Code® – Recipients of links for websites can view but not download the content in the HCP Content Player
- Accessing ISI and PI Documents for CLM Content in the HCP Content Player – Links to Important Safety Information (ISI) and Prescribing Information (PI) documents associated with the slides of the CLM presentations display in the HCP Content Player. Recipients can view and download ISI and PI documents.
- CRM Auto-Publishing for Email Fragments – Recipients of Approved Email with links to Email Fragments directly uploaded to Veeva CRM can view the content in the HCP Content Player. Recipients can download the content if the Allow_Source_Download_vod field is selected on the Veeva_Content_vod record.
- Sending Local Events Management Content via Approved Email – Recipients of Approved Emails sent with locally uploaded content for an event can use the HCP Content Player to view and download the content
- Generating and Sending Dynamic Content – Recipients of Approved Emails with links to dynamic content can view and download the content in the HCP Content Player. Recipients can download the content if the Allow_Source_Download_vod field is selected on the Veeva_Content_vod record.
Viewing Content in the HCP Content Player
The HCP Content Player is optimized for both laptops and mobile devices, enabling recipients to view the content in the device most convenient for them.
When viewing the content, the slide navigation panel displays the name of the content, thumbnails for each slide in the presentation, and each slide’s number in the presentation.
Specific controls and actions in each slide vary based on the media type:
-
HTML – Viewers can directly navigate to a slide by selecting it in the panel, or can use the Previous and Next buttons to display each slide in order
Desktop Mobile 
-
Image – Viewers can directly navigate to a slide by selecting it in the panel, or can use the Previous and Next buttons to display each slide in order
Desktop Mobile 
-
PDF – Viewers can scroll through the document page by page, or can navigate to pages in the PDF directly via the page’s thumbnail in the navigation bar. Viewers can use the Zoom function to zoom in or out of the document, as well as use their browser or device’s Find function to locate specific text in the document.
Desktop Mobile 
-
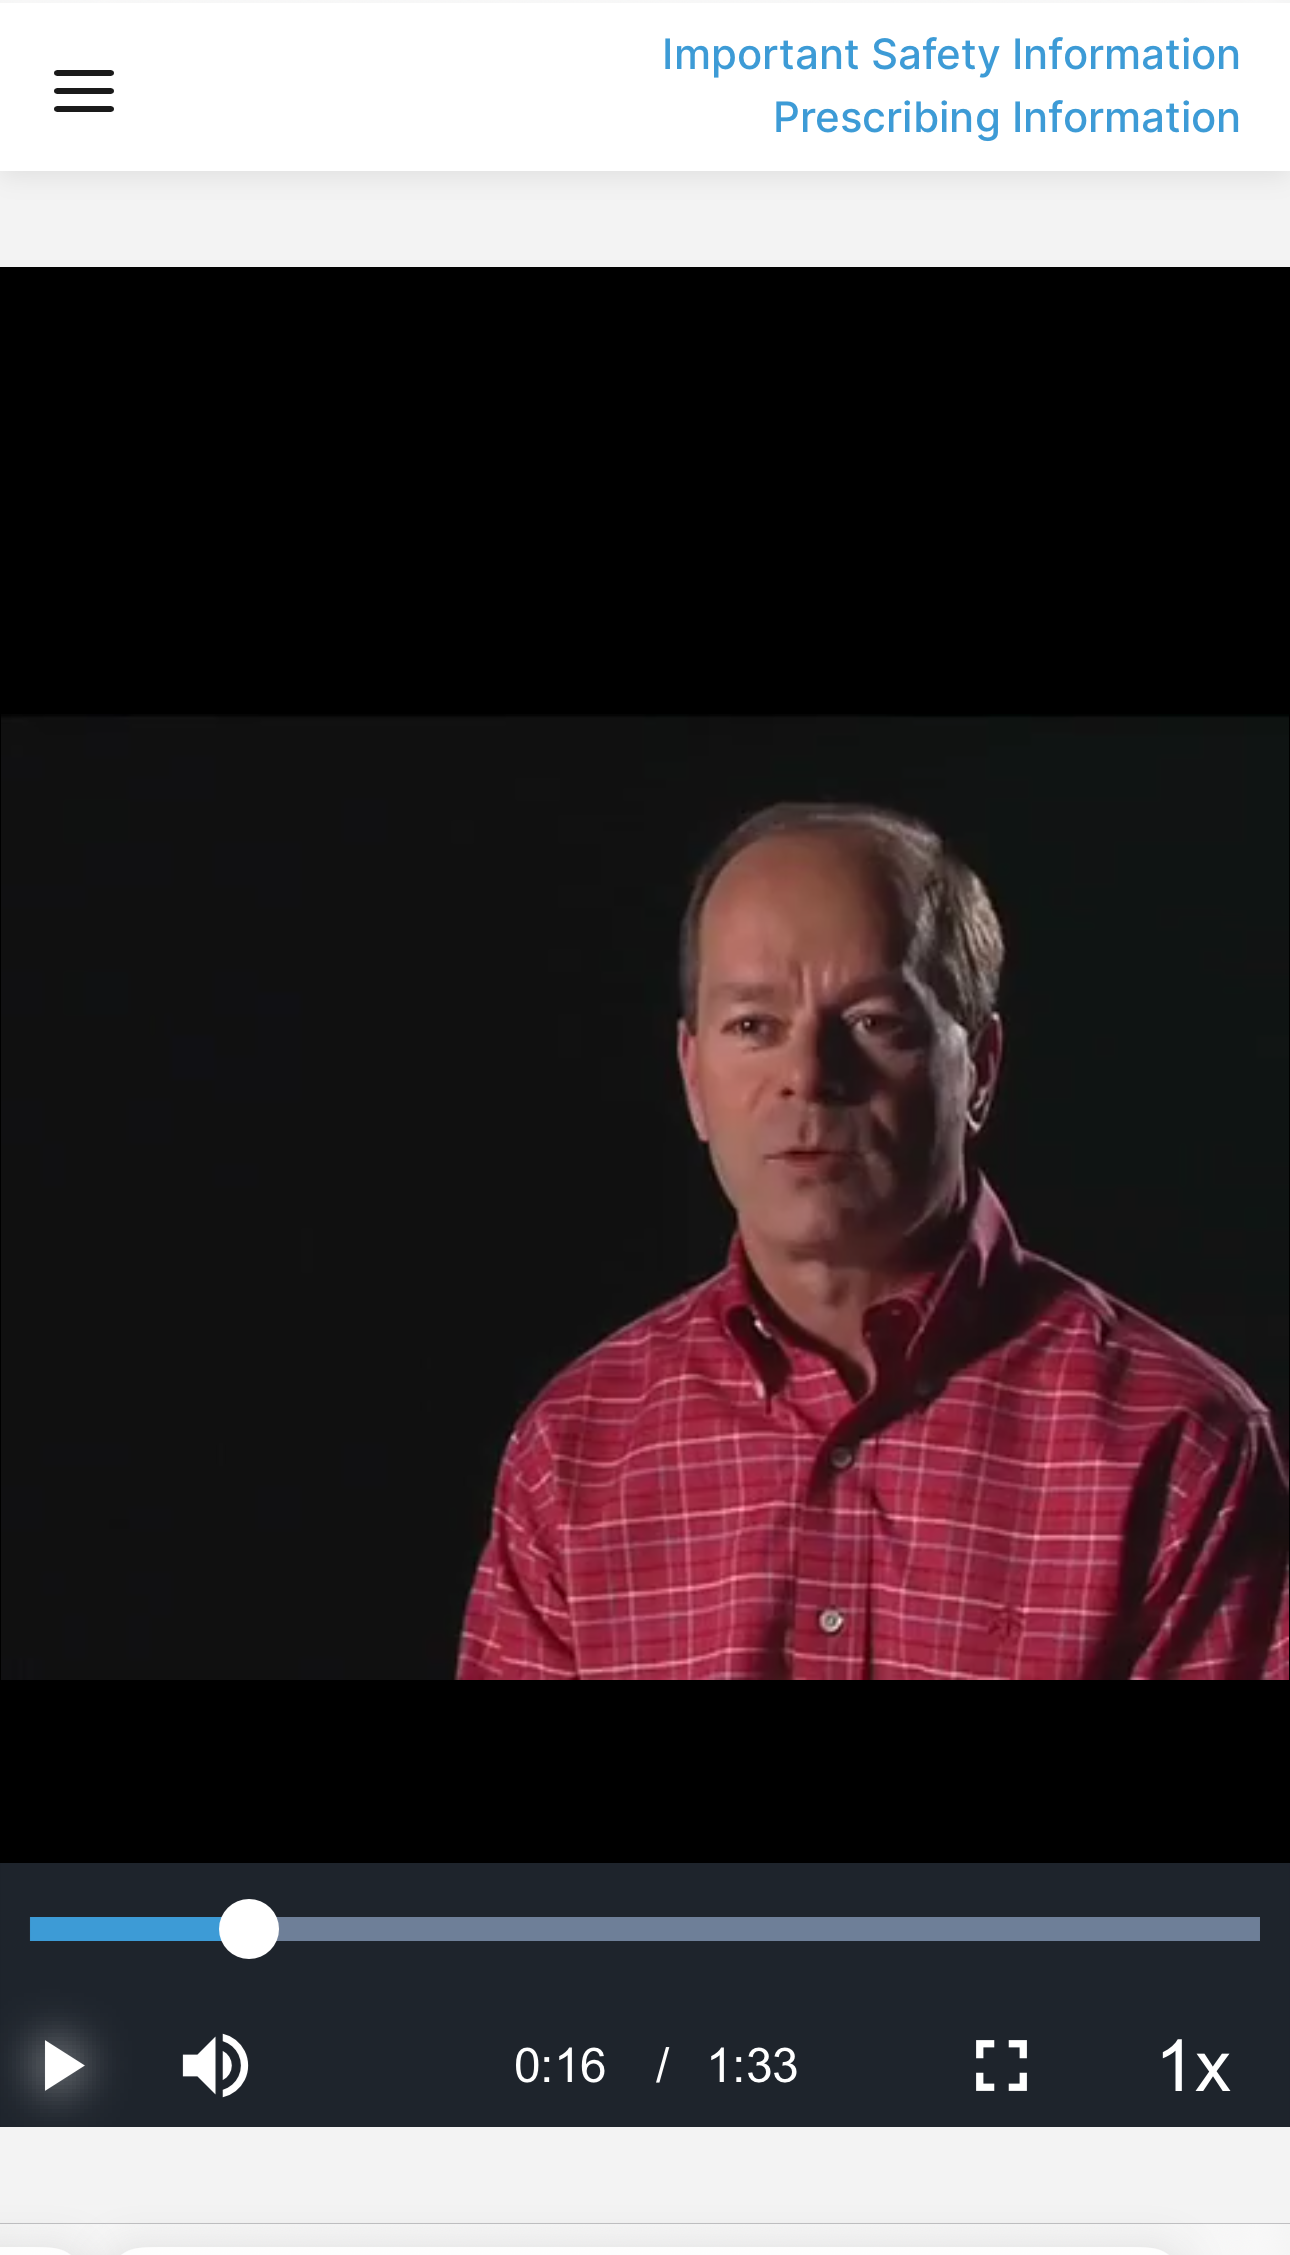
Video – A video player displays that enables viewers to pause the video, adjust volume and playback speed, and scrub the video’s timeline to navigate to specific parts of the video
Desktop Mobile 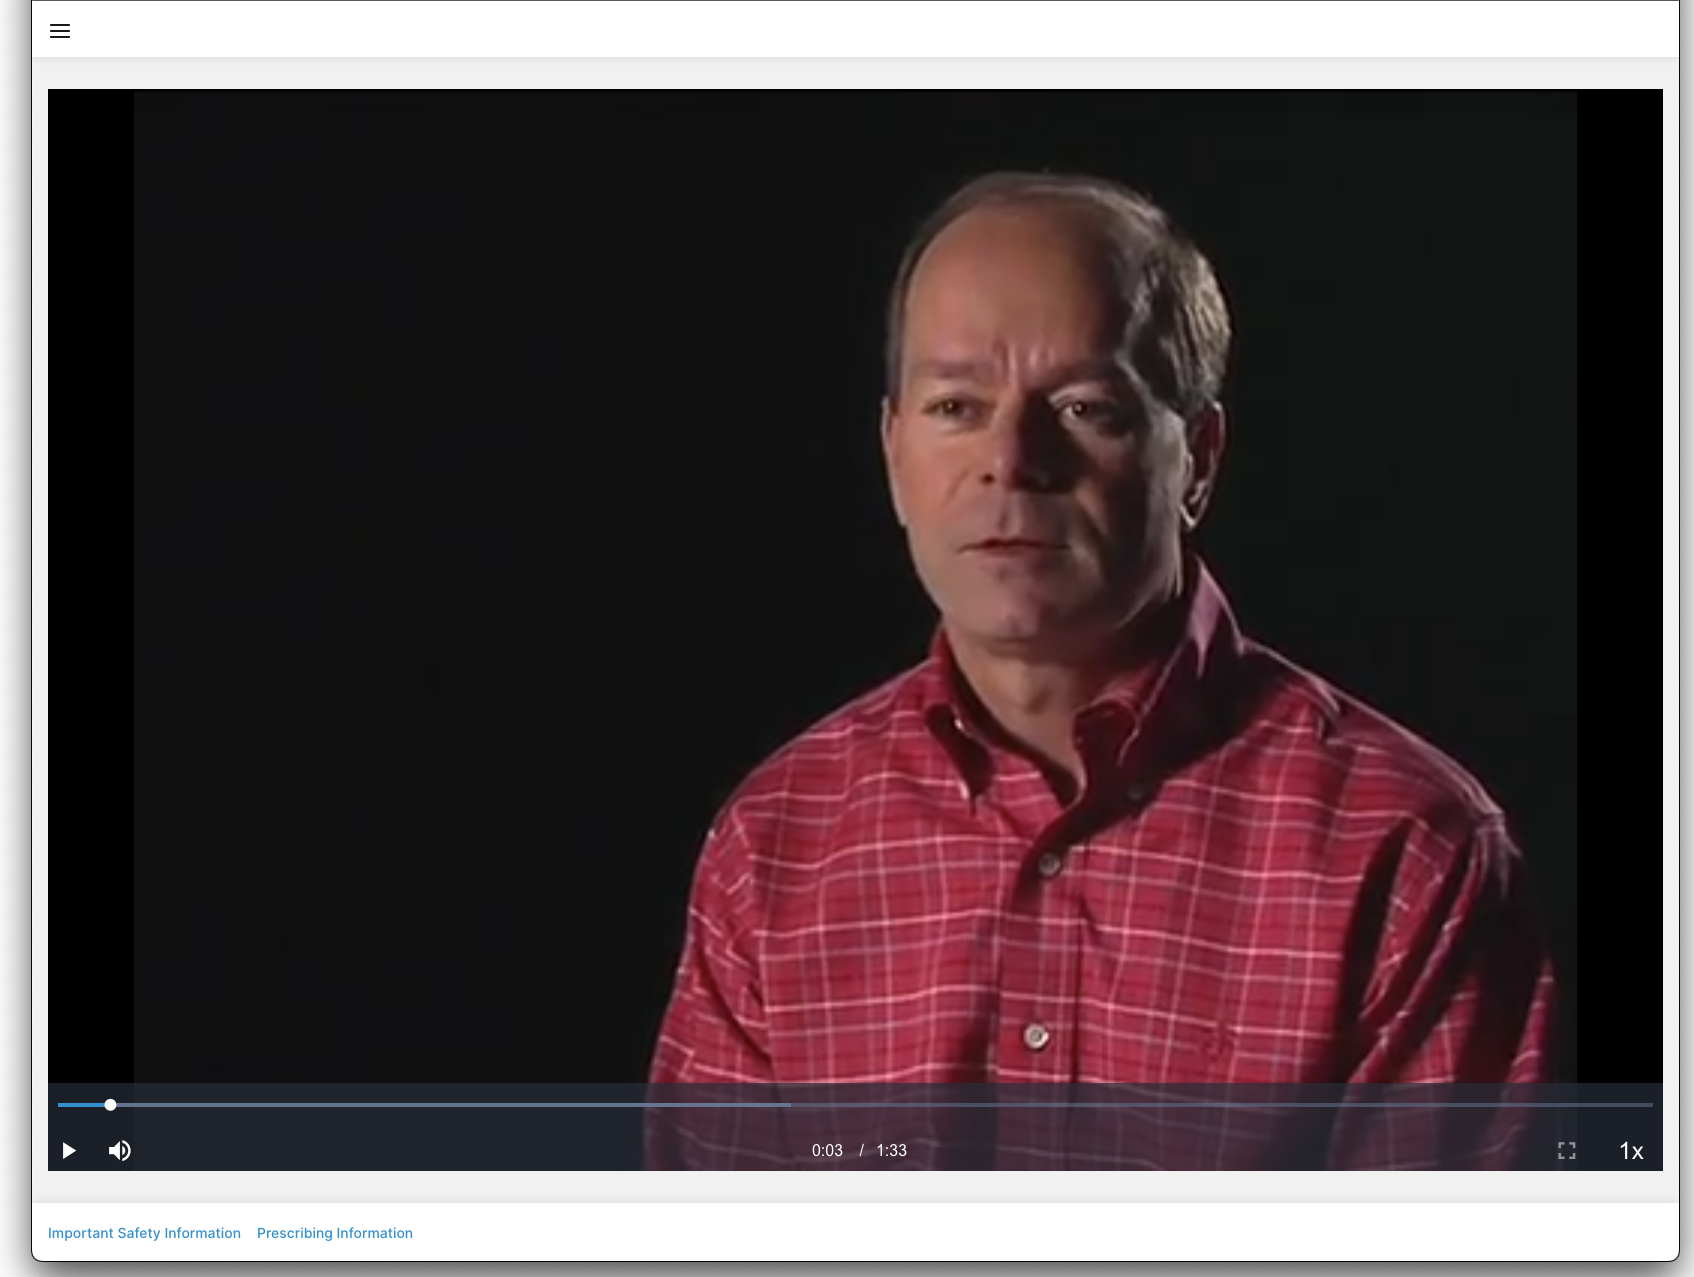
If the link to the content or the content itself is marked as expired, the link displays an error message in the HCP Content Player.
Tracking CLM HCP Content Player Activity
Whenever a slide within a presentation or a page within a PDF is viewed via the HCP Content Player for more than two seconds or downloaded, a Message_Activity_vod record is created in Veeva CRM to track the activity. This record has the following properties:
|
Field |
Description for Views |
Description for Downloads |
|---|---|---|
|
Record Type |
Veeva_Content_Player_Activity_vod |
Veeva_Content_Player_Activity_vod |
|
Key Message |
The Key_Message_vod record for the viewed slide |
The Key_Message_vod record for the downloaded slide |
|
Activity |
Viewed_vod |
Downloaded_vod |
|
Activity Datetime |
The datetime at which the slide was viewed |
The datetime at which the slide was downloaded |
|
CLM Presentation |
The CLM_Presentation_vod record for which the web link was sent
|
|
|
Media Type |
The media type of the slide. Available values include:
|
n/a |
|
Downloaded Rendition |
n/a |
The rendition type of the downloaded content. Available values include:
|
|
Session ID |
Unique ID for each session. A session begins when the HCP Content Player loads and ends when the player is closed or times out. A session times out after five minutes of inactivity.
|
|
|
View Order |
The order in which the slide was viewed during the session |
n/a |
|
Duration |
The total time spent on the slide, in seconds |
n/a |
|
Detail Group |
The detail group of the Key_Message_vod record
|
|
|
Product |
The product of the Key_Message_vod record
|
|
|
Video Last Viewed Time |
The timestamp of the furthest viewed frame in the video |
n/a |
|
Video Total Time Spent |
The total time the video was played during the session, in seconds |
n/a |
|
Video Length |
The length of the video, in seconds |
n/a |
|
Page Number |
The page number of the PDF
|
|
|
Slide Number |
The display order of the CLM_Presentation_Slide_vod record
|
|
|
Slide Version |
The slide version of the Key_Message_vod record
|
|
Creating Unavailable Time Slots from Calls
To prevent HCPs from sending meeting requests for times when users are not available, users can mark calls as unavailable for scheduling. For example, if a call is already confirmed with an HCP, or the call is particularly urgent, mark the call as unavailable to ensure other HCPs do not request a meeting at the same time.
When users mark a call as unavailable, an unavailable time slot for the same time period is automatically blocked off on the Engage Scheduling Site. If users reschedule or delete the call after marking it as unavailable, their availability is updated on the Engage Scheduling Site.
In the 23R3.0 release, a new trigger is added to the Call2_vod object. If your organization uses custom logic on the Call2_vod object, this may exceed Salesforce’s transaction limit for the Call2_vod object. Veeva recommends conducting user acceptability testing for processes which maximize the load on call triggers, for example, data loading planned calls.
Capturing the Call Date Only does not work with this feature enabled.
Creating Unavailable Time Slots from Calls
To create unavailable time slots from calls, select the Unavailable_for_scheduling_vod check box on the call report.

To create unavailable time from calls in My Schedule:
- Select the call in My Schedule.
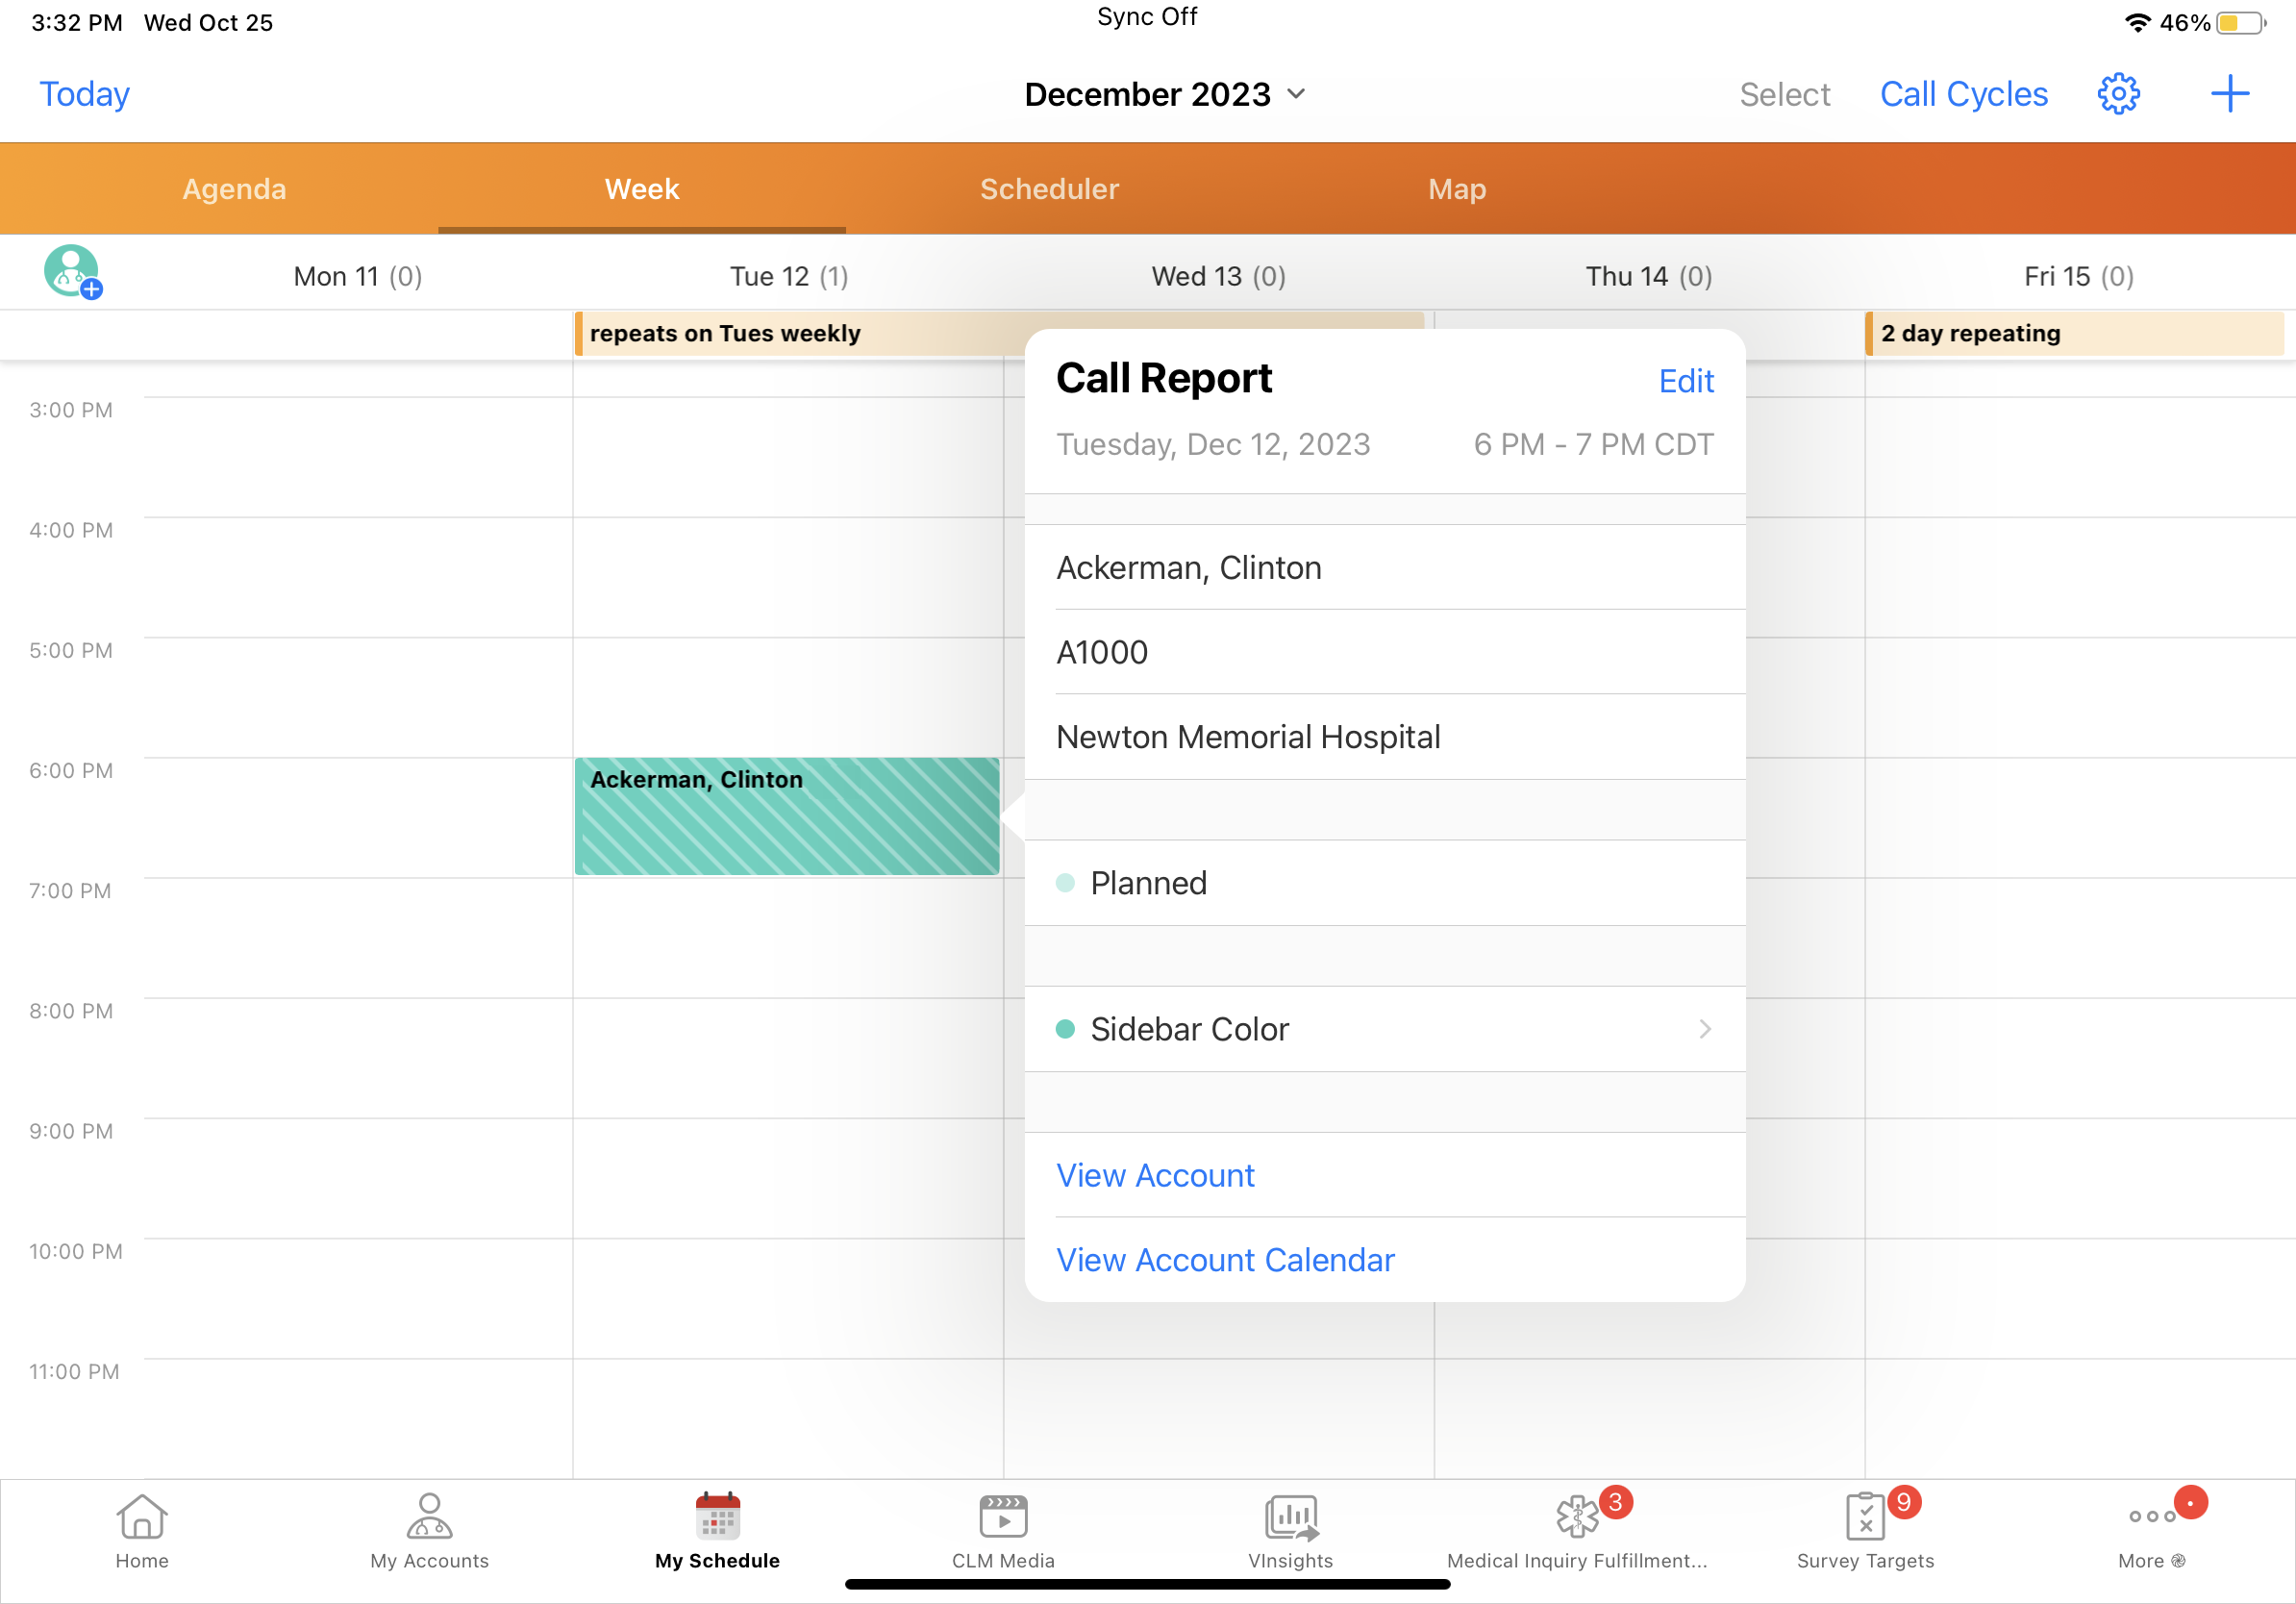
- Select the Edit button from the call popover.
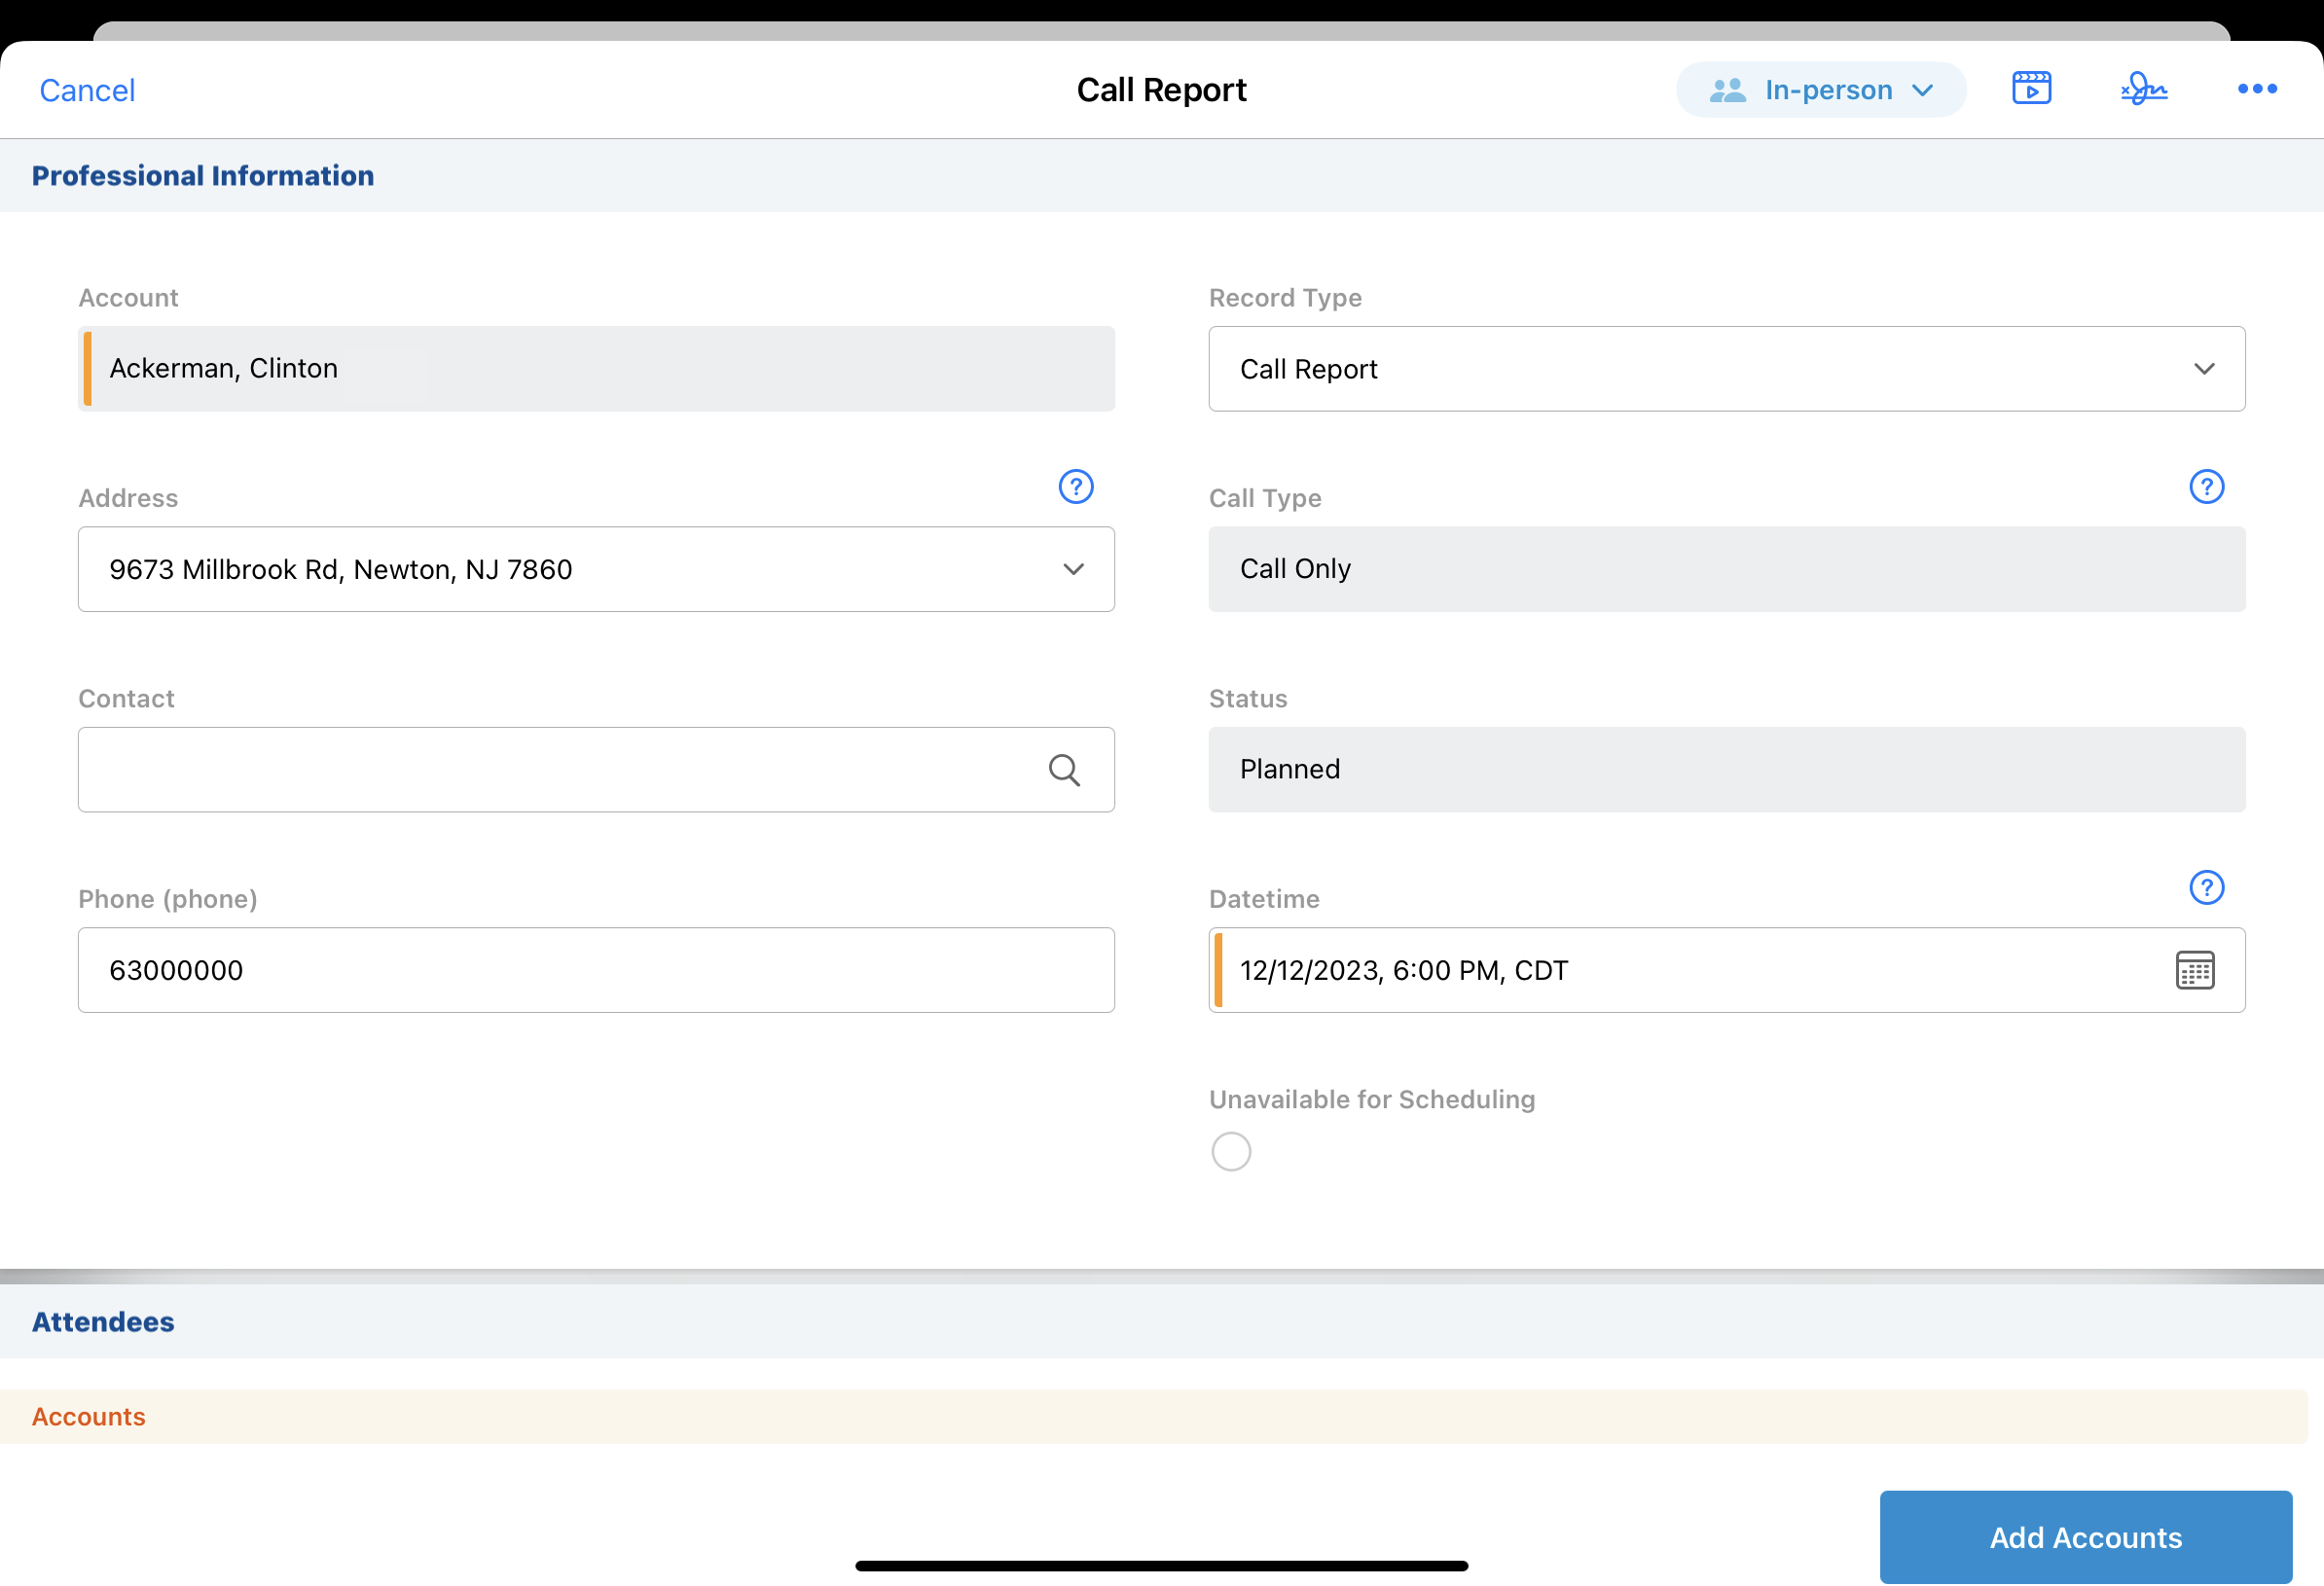
- Select the Unavailable_for_scheduling_vod check box.
- Select Save.
When users save their edits to the Call2_vod record, an Unavailable_Time_vod record is automatically created for the time and duration selected on the call report. Only the call report displays in My Schedule. From the popover, users can easily see the call is marked unavailable.
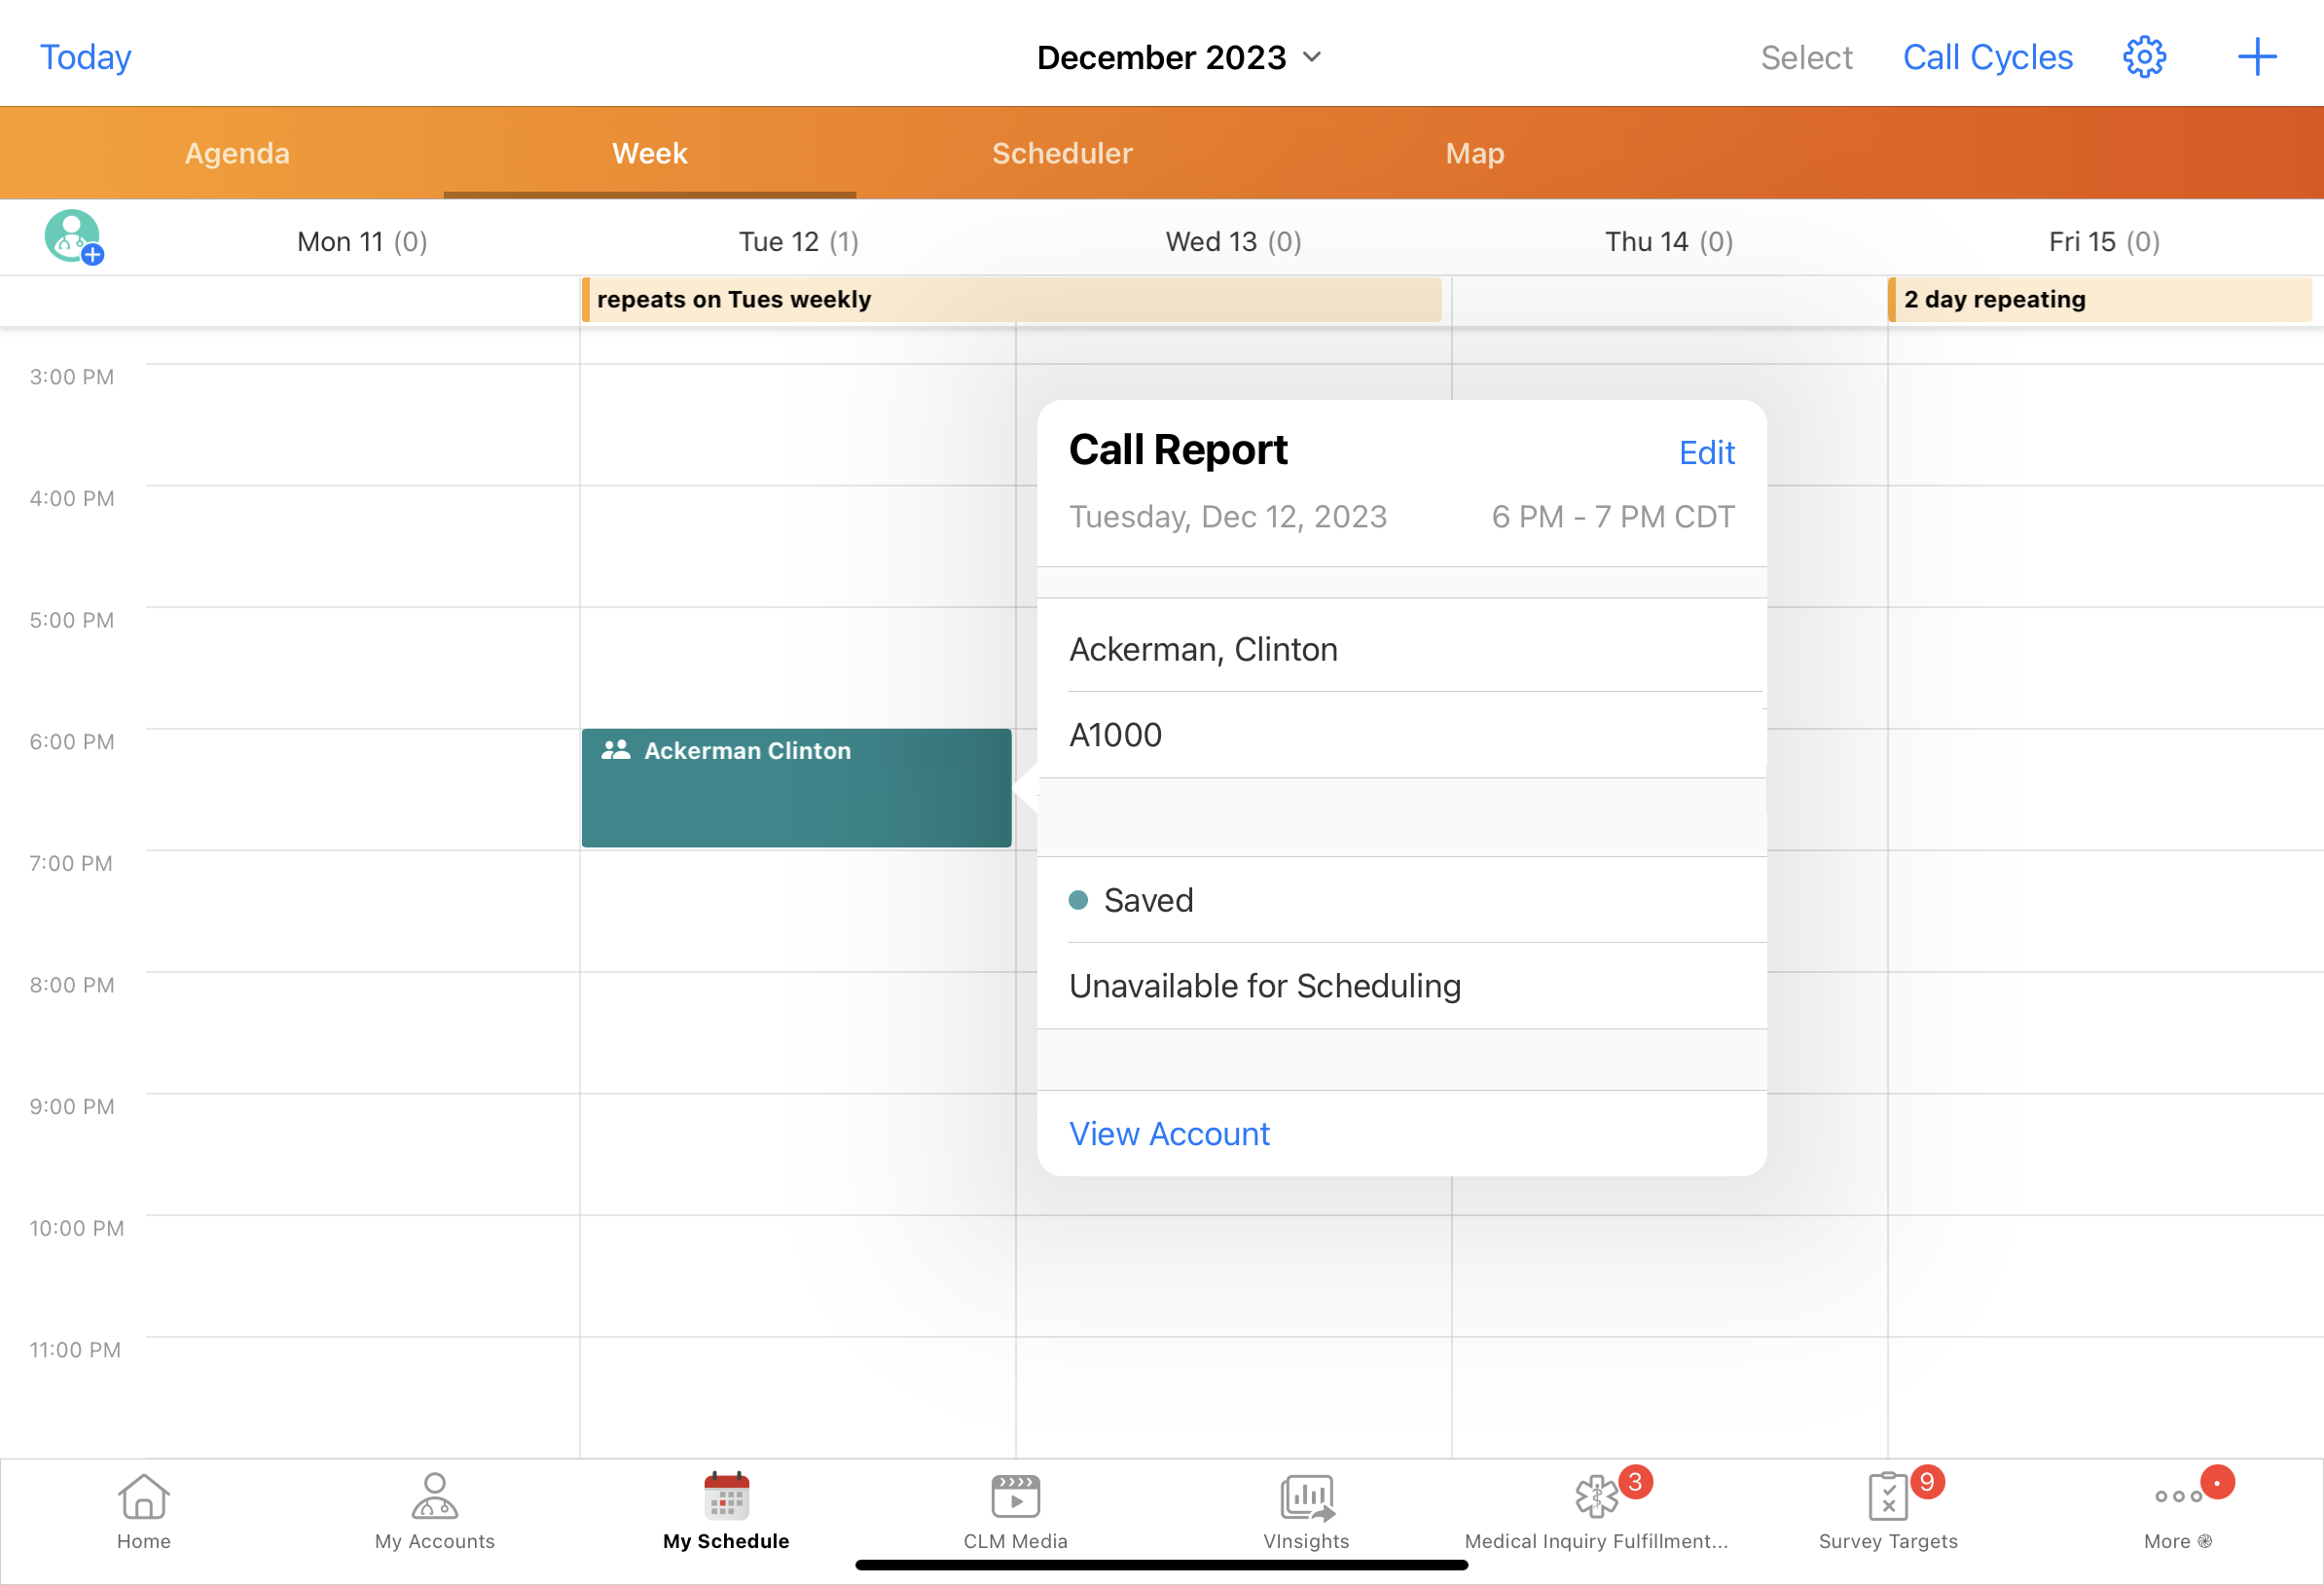
Viewing Unavailable Time Slots on the Engage Scheduling Site
The unavailable time slot displays on the Engage Scheduling Site. If users reschedule or delete the call, or deselect the Unavailable_for_scheduling_vod check box, the corresponding unavailable time slot is removed from the Engage Scheduling Site.
For group calls with unique activities, the unavailable time slot is created for the parent call’s date and time, even if attendees’ child calls are scheduled for a different date or time.
Using Message Templates When Sharing Web Links
Users can select message templates to send approved messages to HCPs with web links, allowing customers to control the messaging for users. Message templates are available when sharing web links for presentations and websites.
Creating Message Templates in Vault
Business admins create crm_message_template__v records with the appropriate object type.
Admins can create two types of message templates, depending on which presentations can be sent with each template: universal content templates and manually assigned content templates.
For message templates available for use with all presentations, admins create crm_message_template__v with the universal_content_template__v object type. These templates do not need to be associated with any documents.
For message templates only used with specific presentations, admins create crm_message_template__v records with the manual_assign_content_template__v object type and associate the templates with specific documents.
Populate the following fields on each crm_message_template__v record for both object types:
- text__v - defines the message being sent
- language__v - the language of the message
- country__v - only used in Vault to help with security and content approval processes. This field is optional and does not sync to CRM.
Associating Message Templates with Presentations in Vault
Manually assign content templates to specific presentations to ensure the templates are only available for those presentations. Admins must populate the crm_manually_assigned_content_template__v field on the presentation document with the name of the crm_message_template__v record. Multiple message templates can be associated with the same presentation.
Managing the Message Template Lifecycle in Vault
Object lifecycles in Vault allow users to control a document’s stage, or state type, in a workflow, especially content review processes. The lifecycle of the crm_message_template__v object defines the state type of each message template. These state types in Vault are mapped to the Status_vod field on Message_Template_vod records in CRM to determine if a message template is available for users. It includes the following state types:
|
State Type in Vault |
Status in CRM |
|---|---|
|
Complete State |
Approved_vod |
|
Obsolete State |
Expired_vod |
|
All other state types, or states* |
Staged_vod |
* These mappings are used regardless of the states assigned to each state type in Vault.
Syncing Message Templates from Vault
When message templates in Vault sync to CRM as part of the CLM integration, Message_Template_vod records with the corresponding record type (Manual_Assign_Content_Template_vod or Universal_Content_Template_vod) are created:
- Message_Template_vod records with the Universal_Content_Template_vod record type are available for all content and are not associated with any Message_Template_Content_vod records
- For each Message_Template_vod record with the Manual_Assign_Content_Template_vod record type, a Message_Template_Content_vod record is created to associate the template with a specific CLM_Presentation_vod record. These message templates are only available to be used with the assigned content.
The Status_vod field on each Message_Template_vod record is updated during sync.
Sending Message Templates
When users share web links via QR Code®, message templates are not available. The QR Code® only represents the link to the content.
A message template is available for presentation or website when the Message_Template_vod record meets the following criteria:
- The status is Approved
Message templates with the Staged status are available for content reviewers.
- The language matches the user’s language
- The message template is assigned to the presentation or is a universal template
When users send web links for CLM content from a call, account, or the Media tab, the share modal displays with the available sharing options as well as the available message templates. Select the appropriate template, then select the sharing option.
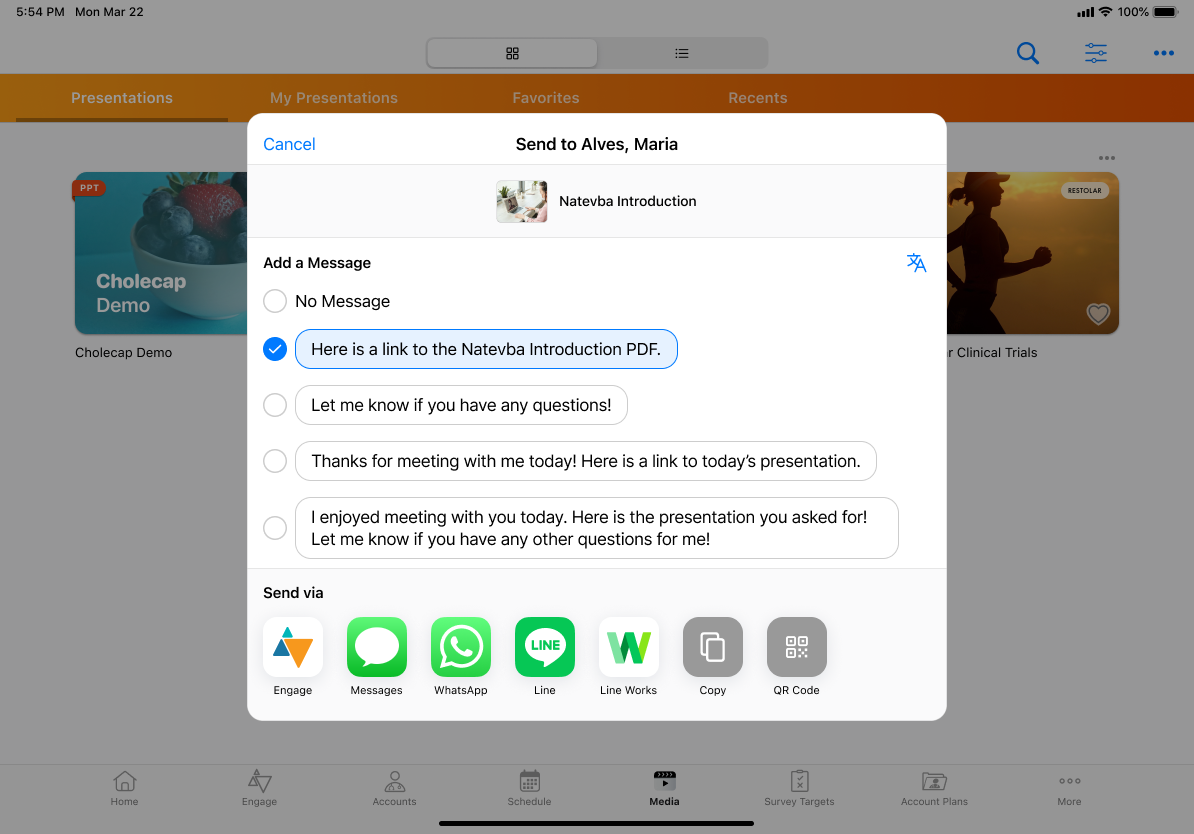
When users send web links for CLM content from the Engage tab, only the message templates display. Select the appropriate template, then select Next.
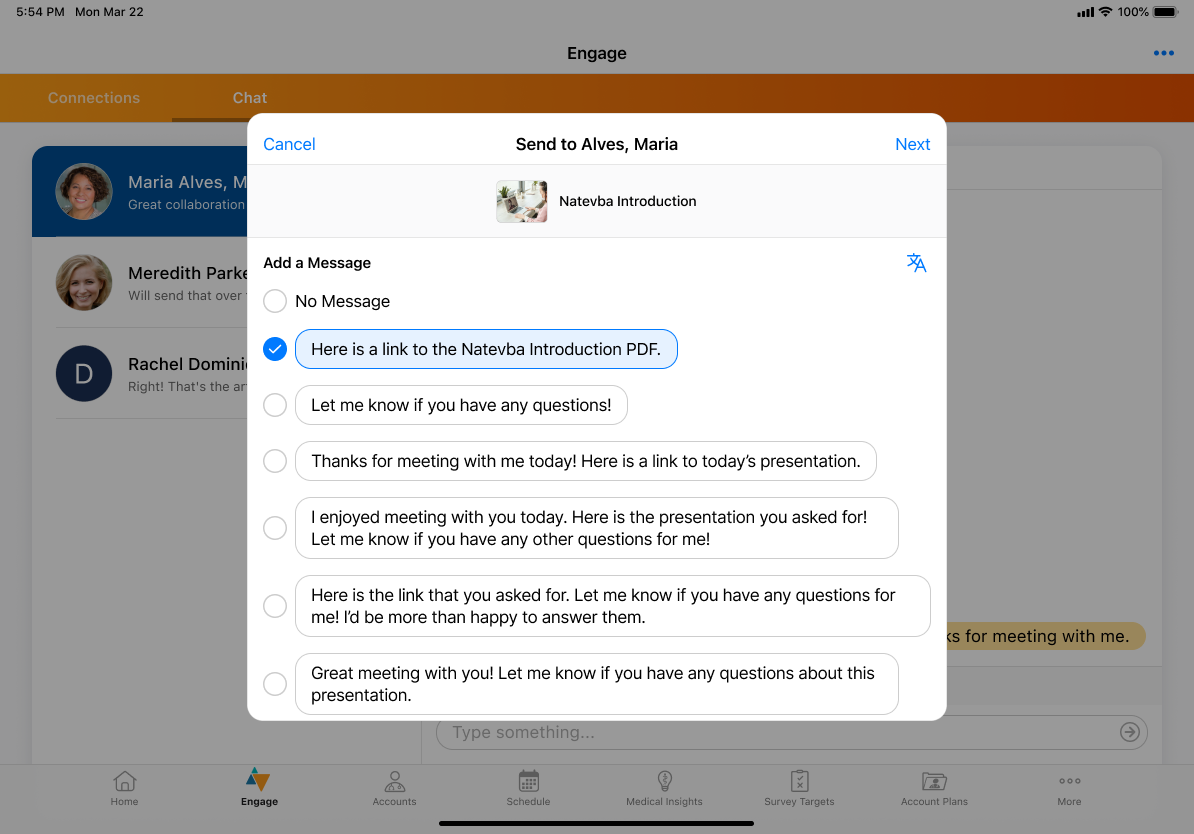
The No Message option is available for users who do not want to include message text and is selected by default.
Selecting the Language for Message Templates
Users can switch languages using the language button. Only the languages with message templates available for the presentation display. The language button only displays when the presentation has message templates for more than one language.
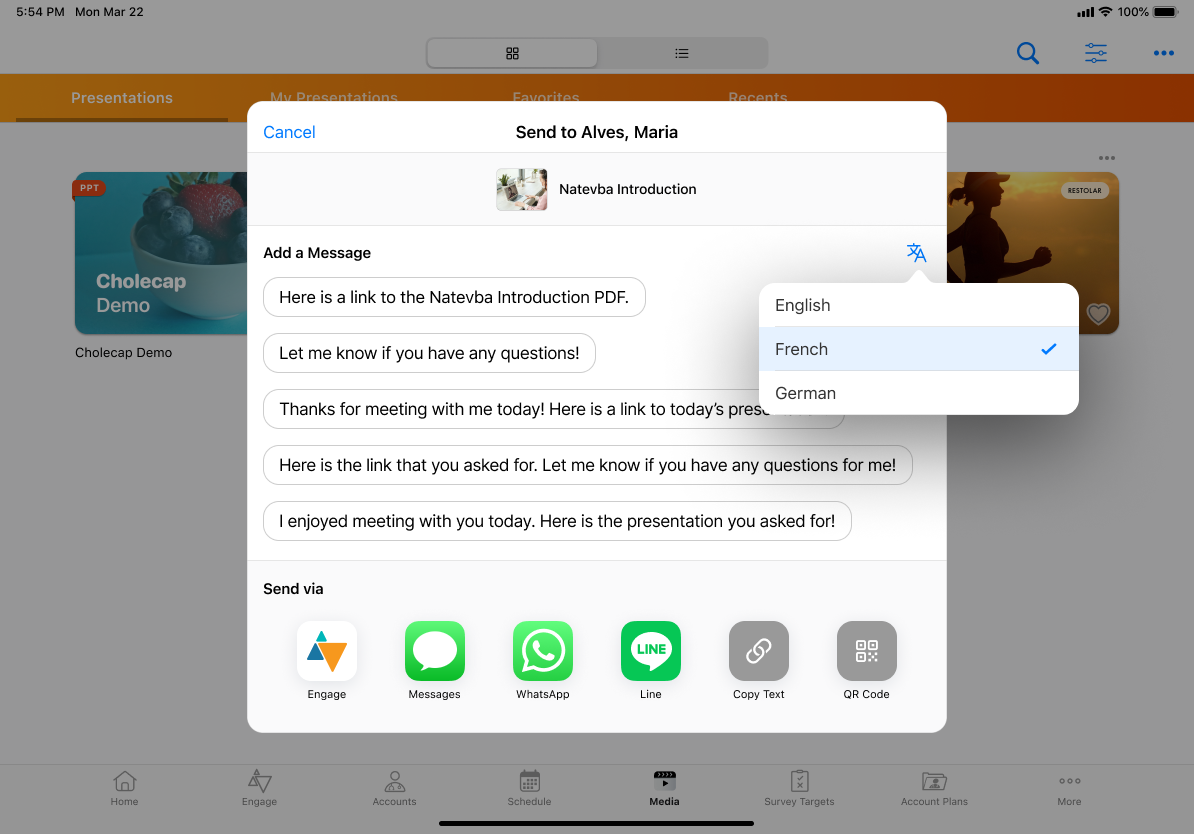
If a template is not available in any language, only the sharing options display.
When sending web links via Engage chat, the preview of the message includes the message template.
Tracking Message Templates
When users send a link with a message template, the Message_Template_vod record and the full message text, including links, are stamped on the Sent_Message_vod record created to track the activity. See Sharing CLM Content via Web Link or QR Code® and Tracking Website Links for more information about the data tracked for presentations and websites.
Message templates sent via Engage Chat are tracked in the Engage Connect reports. See Engage Connect Reports for more information. Additionally, chat messages with message templates can be imported into CRM as call records or chat messages. See Importing Engage Connect Chat Logs into CRM as Call Records and Importing Engage Connect Chat Logs into CRM as Chat Messages for more information.
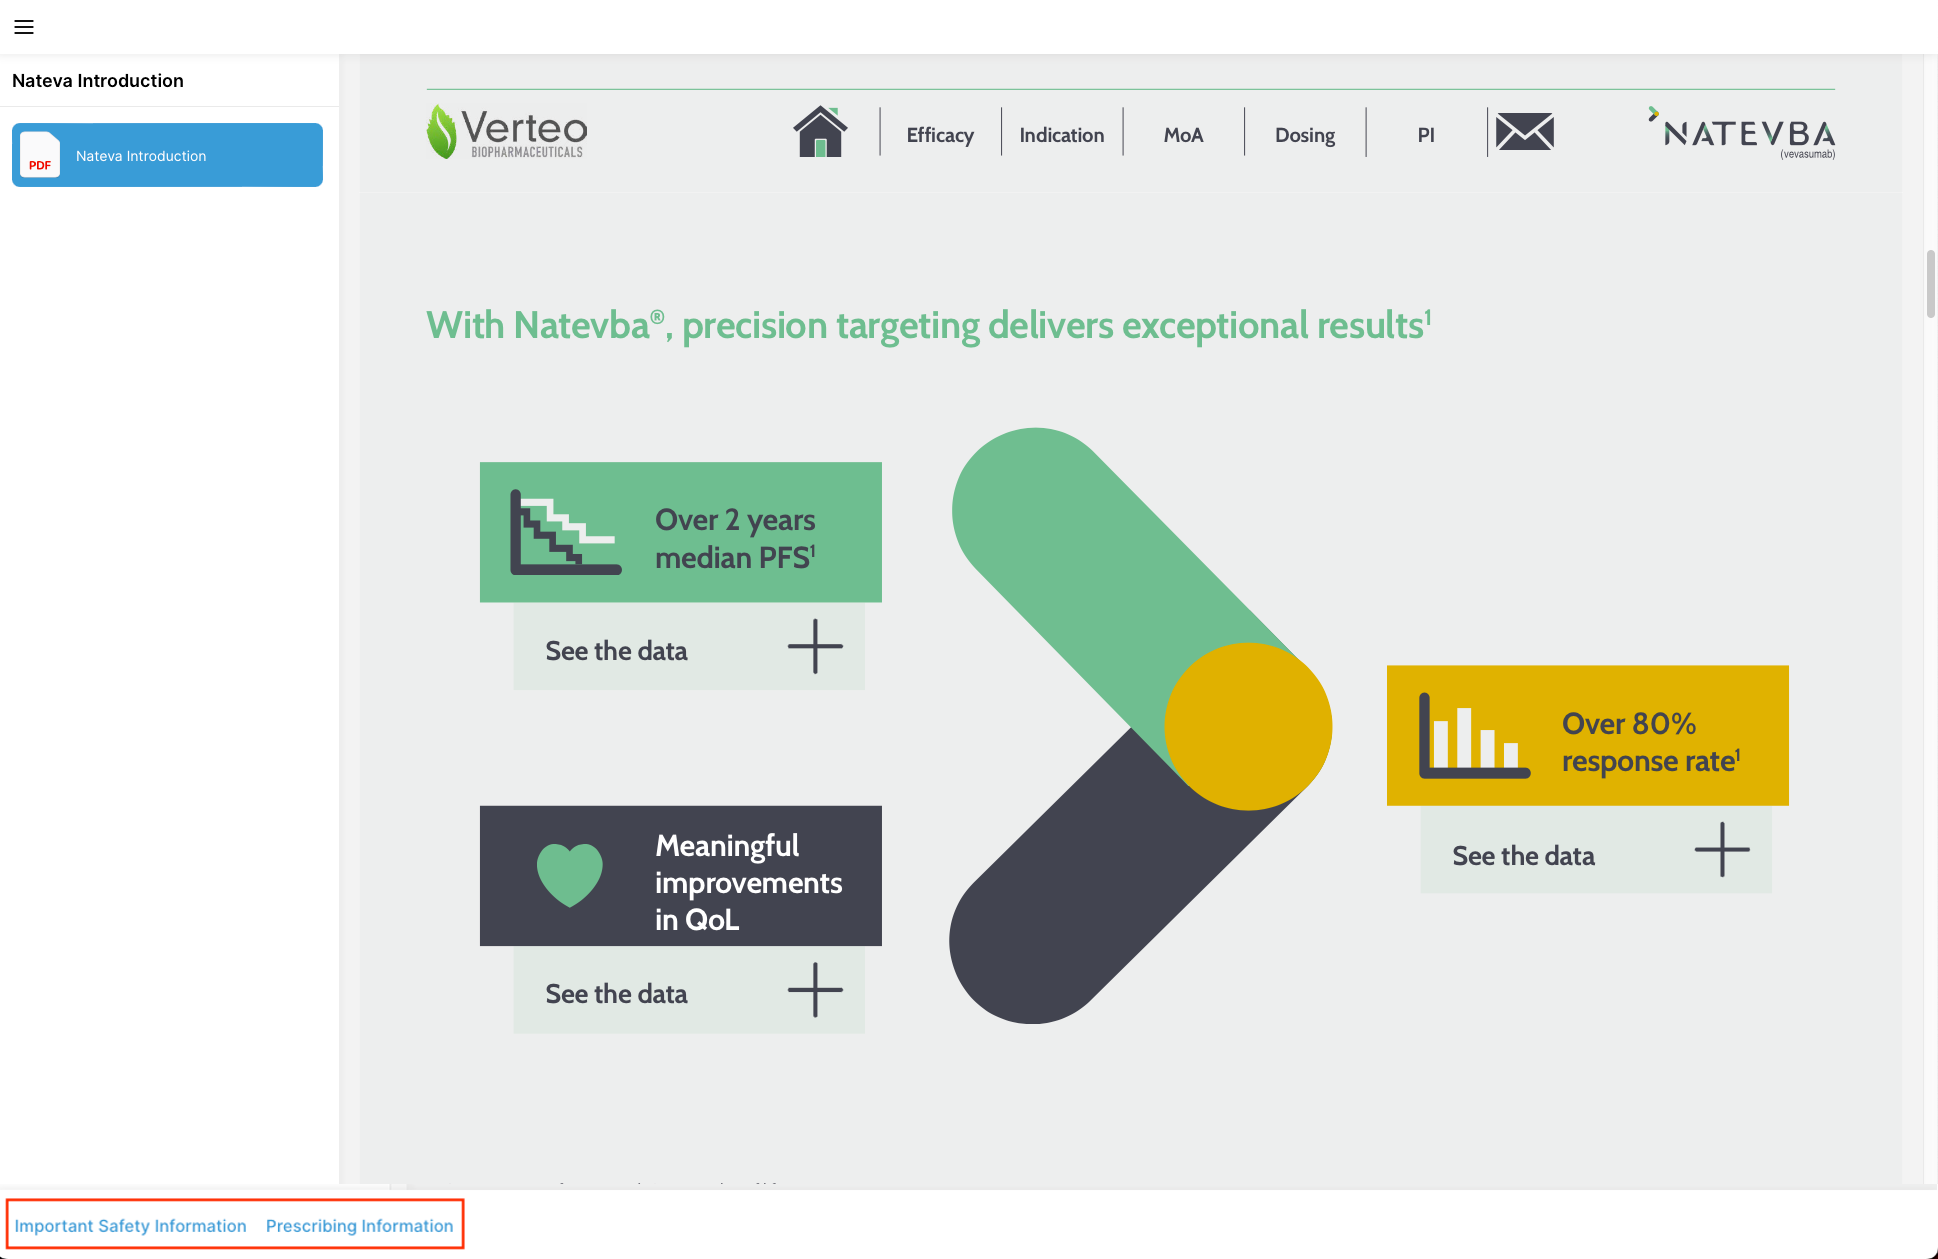
Accessing ISI and PI Documents for CLM Content in the HCP Content Player
When users send web links for CLM content, links to the associated Important Safety Information (ISI) and Prescribing Information (PI) documents are included in the HCP Content Player, allowing HCPs to access both the CLM content and the ISI and PI documents from the same web link. This ensures users satisfy compliance regulations requiring ISI and PI documents to be available to HCPs whenever they view promotional content. In Vault, content creators indicate if the web link for a presentation includes ISI and PI documents. Both ISI and PI documents must exist in Vault. Content creators must create ISI and PI documents for the same product and language as the presentation in Vault. These documents must be in Steady State.
Syncing ISI and PI Documents
To allow ISI and PI documents to sync to CRM, content admins in Vault must perform the following steps:
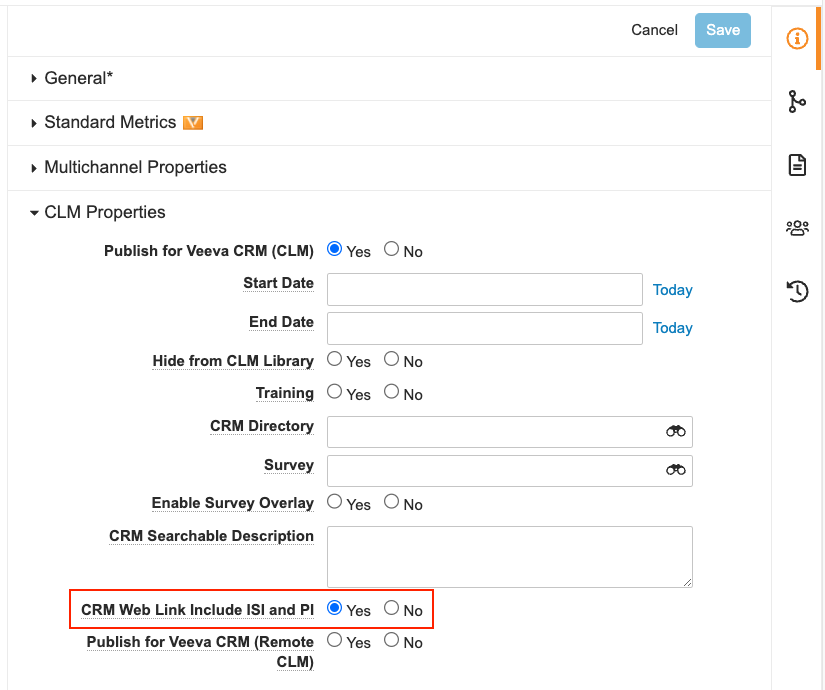
- Add the CRM Web Link Include ISI and PI (crm_web_link_include_isi_and_pi__v) field to the Multichannel Presentation Document Type, and any other document type with the Publish to CRM (CLM) (publish_for_web_link__v) field added.
- Select Yes for the CRM Web Link Include ISI and PI (crm_web_link_include_isi_and_pi__v) field on the document in Vault. Ensure Yes is also selected for the Publish for CRM (CLM) (publish_for_web_link__v) field.
Only the following document types and subtypes are supported for ISI and PI documents in Vault:
|
Vault Type |
Document Type |
Subtypes |
|---|---|---|
|
PromoMats |
reference__c* |
|
|
PromoMats |
reference_document__vs |
|
| MedComms |
medical_library__c* |
|
| MedComms |
medical_library__vs |
|
* If this document and its subtypes do not exist in your Vault, create them manually.
To sync ISI and PI documents along with CLM content in CRM, CRM admins must perform the following steps:
- Navigate to the CLM Admin Console.
- Select Edit for the appropriate Vault connection in the Vault Connection Management section. Populate the Reference Documents WHERE Clause field. This step is optional.
- Select View Map for the same Vault connection.
- Select Compare CRM to Vault to update the field mappings.
- Ensure Vault_ISI_Document_Id_vod and Vault_PI_Document_Id_vod display in the System Mapping section. Since Related ISI and PI are relationships in Vault, these fields are not mapped to any Vault fields.
- Select Return to Previous Page.
- Select Sync in the CLM Subscription History section.
- A Reference_Document_vod record is created for each available ISI document and PI document. The ISI_vod and PI_vod fields on CLM_Presentation_vod and Key_Message_vod records are populated with the associated Reference_Document_vod records.
For each combination of language and product for an ISI document, for example, English and Cholecap, only one Reference_Document_vod record is created. Similarly, for each combination of language and product for a PI document, only one Reference_Document_vod record is created.
- For each Approved ISI and PI document, the source file is retrieved from Vault and stored in CRM as a Salesforce File. This File is then published to the CRM CDN and its publishing status is tracked on a Veeva_Distribution_vod record. The Salesforce File is associated with the Veeva_Distribution_vod record and with the appropriate Reference_Document_vod record. The Veeva_Distribution_vod record is also associated with the Reference_Document_vod record.
- If an existing Veeva_Distribution_vod record is associated with an Approved Reference_Document_vod record but the document is not published to the CRM CDN, the publishing process for the document is retried. Admins can manually prepare Veeva_Dictribution_vod records for publishing by updating the Processing_Status_vod field to Ready_to_Publish_vod.
- If a published ISI or PI document is no longer Approved, it is withdrawn from the CRM CDN. Admins can manually prepare Veeva_Dictribution_vod records for withdrawal by updating the Processing_Status_vod field to Ready_to_Withdraw_vod.
- A Reference_Document_vod record is created for each available ISI document and PI document. The ISI_vod and PI_vod fields on CLM_Presentation_vod and Key_Message_vod records are populated with the associated Reference_Document_vod records.
- Confirm the ISI_vod and PI_vod lookup fields on each CLM_Presentation_vod and Key_Message_vod record are populated with the Reference_Document_vod records that have the same Language_vod and Product_vod values, including empty values.
Viewing Associated ISI and PI Documents for CLM Content
When an HCP selects the web link for CLM content with associated ISI or PI documents, the content displays in the HCP Content Player in the browser and the associated ISI and PI documents for each slide are available as links below the slide in the bottom left corner of the window.
Selecting the link for an ISI or PI document displays the document in a new tab. Views and downloads of the documents are tracked on Message_Activity_vod records in CRM.
Events Management
Using Attendee Self-Registration with Events
Event organizers can send a unique event registration link to potential attendees to better prepare for an event and capture attendee interest. Attendees can select this link to view important event details and self-register to the event by filling out required information.
Each event is automatically assigned a unique registration link that can be distributed through any invitation channel, for example, Approved Email and Print Invitation materials.
Business admin users can create registration form templates corresponding to products, event formats, location types, and event types in their organization. These templates can be manually assigned to an event, or automatically assigned based on event attributes and Event Rules.
Two types of registration forms are available:
- Open registration – Anyone can access the event registration link and register. This is useful when sending the link to offices and hospitals, where link recipients can register and forward the link to other potential attendees.
- Closed registration – Only targeted recipients who receive the link through Approved Email can register
Once recipients register for an event, event organizers can view and approve or reject the registrant. Event organizers approve registrants by reconciling the registrant, just as they would reconcile a walk-in attendee.
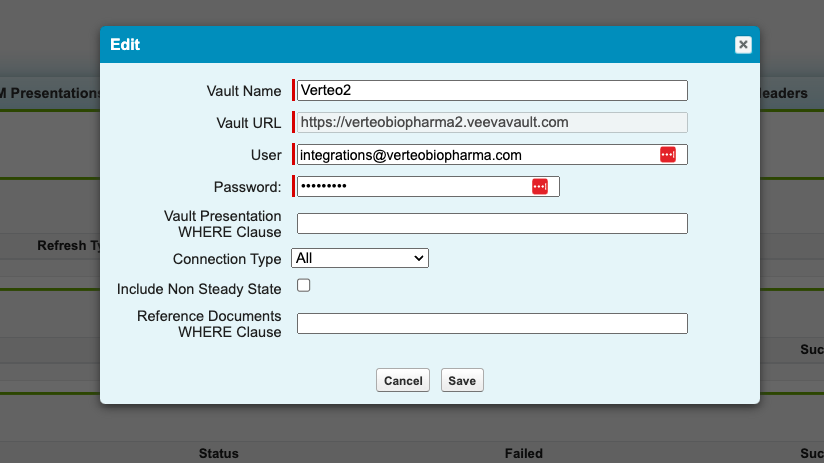
Defining the Registration Integration User
Events created with a populated Registration_Form_vod field, as well as the registration form templates themselves, must be synced to the server via an integration user before registration links can be used by recipients:
- Navigate to the Registration & QR Sign In Administration tab.
- Select Edit in the Veeva CRM Connection Management section.
- Enter the appropriate administrator credentials.
- Select Is This a Sandbox? If the org is a sandbox.
- Select Save.
If Signing into an Event using a QR Code® is enabled, the same integration user credentials can be used.
Scheduling the Event Registration & Sign In Process
The Event Registration & Sign In Process both generates the URL to the registration page for distribution, as well as imports registrant information into the respective event in Veeva CRM. To schedule the Event Registration & Sign In Process:
- Navigate to the Process Scheduler.
- Edit the Event Registration & Sign In Process job.
- Schedule the process or run the process immediately by selecting Run. It is recommended to schedule the job to run daily.
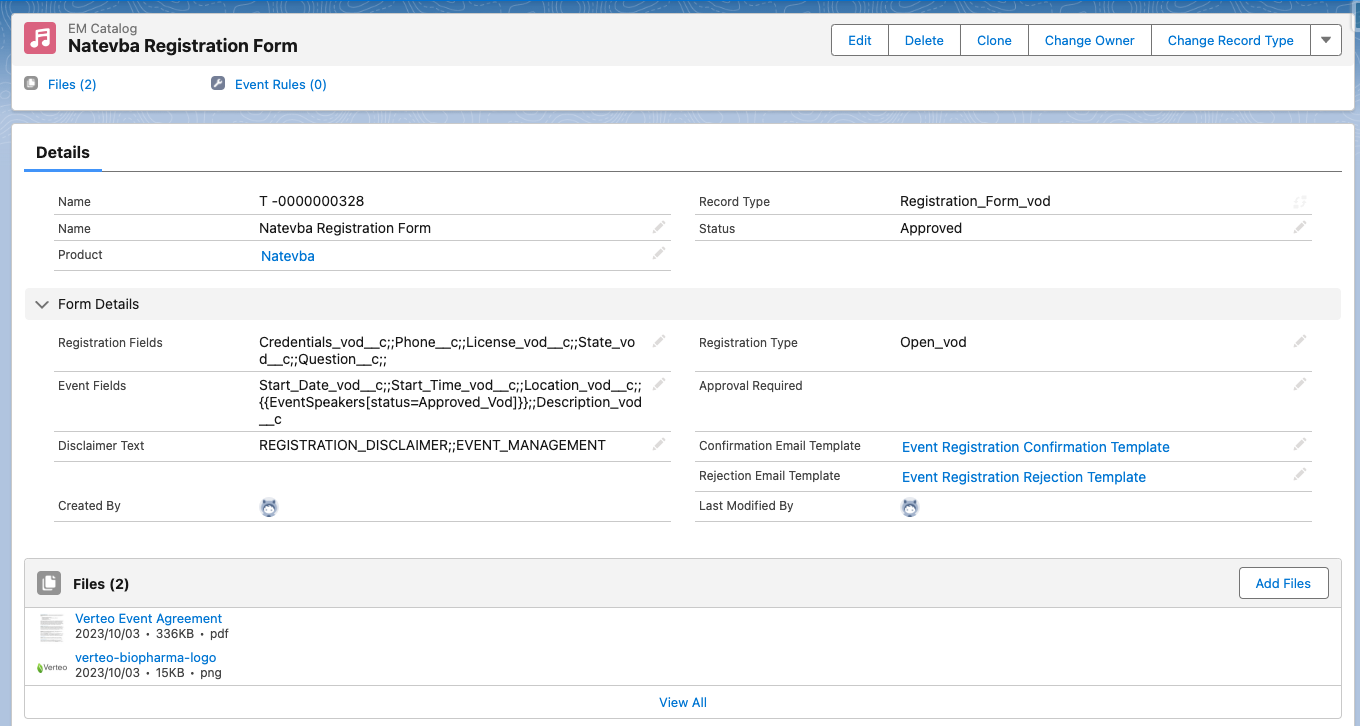
Creating Registration Forms
Registration forms are created by creating EM_Catalog_vod records that contain form details, for example, event fields, as well as approval information.
The following sections describe the various types of EM_Catalog_vod fields and sections that define the registration form’s details and fields, matching event attributes, banner images, and more:
- Basic Fields – Fields that are required for any created registration form
- The Approval_Required_vod Check Box – Defines if open registrants must be approved by the event organizer before approved for the event
- The Disclaimer_Text_vod Field – Defines text that displays as a disclaimer on the registration form that attendees must agree to before submitting the form
- Matching Event Attributes – Optional EM_Catalog_vod fields to assign the appropriate registration form template when creating or updating an event
- Confirmation and Rejection Email Templates – Fields that can be populated to specify Approved Email templates automatically sent to registrants when approved or rejected from the event
Basic Fields
The following EM_Catalog_vod fields are required for any created registration form:
- Record Type = Registration_Form_vod
- Name_vod
- Status_vod – Available values are:
- Approved_vod – The EM_Catalog_vod record is automatically assigned to events based on Creating Registration Form Assignment Rules
- Staged_vod – Does not assign the EM_Catalog_vod record to events
- Registration_Type_vod – Available values are:
- Open_vod – Anyone with the registration link can register to the event
- Closed_vod – Only targeted recipients who receive the link through an Approved Email can register. See Sending Targeted Registration Links via Approved Email for more information.
-
Event_Fields_vod – A double semicolon separated list of EM_Event_vod fields to display on the registration form. You can also add each event speaker’s Speaker_Formatted_Name_vod field to this list using the {{EventSpeaker}} token. The list of speakers can be further filtered based on their Status_vod field using the [status=STATUS] parameter on the token. For example:
Topic_vod__c;;Start_Time_vod__c;;{{EventSpeaker[status=Approved_vod]}}
The event’s Name or Event_Display_Name_vod field automatically displayed in each registration form and should not be added to the list of event fields. When the Topic_vod or Description_vod fields are added, the field displays as a single column on the registration form on larger devices.
-
Registration_Fields_vod – A double semicolon separated list of EM_Attendee_vod fields to display on the registration form for recipients to complete as part of form submission. The following types of fields are supported to add to this list:
- Text – Up to 255 characters are supported
- Phone
- Picklist – Only single-select picklists are supported
- Check box – Displays to registrants as a picklist with values for Yes and No
Add <R> to the end of a field name to mark the field as required. For example:
Credentials_vod__c<R>;;City_vod__c<R>;;State_vod__c<R>;;License_vod__c
First_Name_vod, Last_Name_vod, and Email_vod fields are always included and marked as required in each registration form and should not be added to the list of registration fields. If registration should be enabled for event speakers, add the fields configured in Registration_Fields_vod on the EM_Event_Speaker_vod. The fields are updated when an event speaker fills out the registration form.
Defining a Disclaimer
Populate the Disclaimer_Text_vod field to reference a Veeva Message whose text displays as a disclaimer on the registration form that attendees must agree to before submitting the form. This field is optional. If this field is left blank, no disclaimer displays.
Use the following format to reference the appropriate Veeva Message:
MESSAGE_NAME;;Category
The Category_vod of the Veeva Message must be EVENT_MANAGEMENT and the Type_vod must be Label_vod. The text of the Veeva Message can use the following HTML tags to create a rich-text format for the disclaimer:
- <p> – the dir attribute can be set to rtl to ensure right-to-left languages display correctly
- <br>
- <b>
- <i>
- <u>
- <ol> and <ul> – <li> tags within ordered and unordered lists are supported
- <a> – Hyperlinks must have the attribute target=“_blank”
Only one Veeva Message is supported per registration form. Configure multiple languages of the same Veeva Message to display disclaimers in different languages.
Enabling Requiring Registrant Approval
Select the Approval_Required_vod check box if approval is required for open registrants. When selected, registrants must be approved by the event organizer before they receive a confirmation email. See Reviewing Registrants for more information.
This check box only applies to open registrants. Targeted recipients invited via Approved Email are automatically approved.
Matching Event Attributes
The following fields are optional, but can be configured to assign forms based on the event attributes:
- Product_vod – When populated, the matching Product_vod on an event is used to determine the corresponding form to use
- Location_Type_vod – When populated, the matching Location_Type_vod on an event is used to determine the corresponding form to use
- Event_Format_vod – When populated, the matching Event_Format_vod on an event is used to determine the corresponding form to use
If these parameter fields are blank, the registration form matches to any value of the corresponding field on the event. When there are multiple forms, an exact match on these parameters is used to determine the appropriate form for an event.
Confirmation and Rejection Email Templates
The following fields on the EM_Catalog_vod record can be populated to specify Approved Email templates automatically sent to registrants when they are approved or rejected from the event:
- Confirmation_Email_Template_vod – Select the appropriate Approved Email template automatically sent to registrants when approved. When targeted registrants complete the registration form, they are automatically sent the selected Approved Email template.
- Rejection_Email_Template_vod – Select the appropriate Approved Email template automatically sent to registrants when rejected
Uploading a Banner Image and Agreement Policy
After creating the EM_Catalog_vod record, admin users can upload a company logo and event agreement document to display on the registration form by using the record’s Files related list:
- Agreement Policy – A required document that must be viewed by registrants in order to register. Populate the File’s CRM_Content_Type_vod field with Event_Registration_Agreement_vod. The attached document must be a PDF. Due to mobile devices potentially limiting the agreement to a single page, it is recommended the PDF be only one page.
-
Banner image – A banner image that displays in the top-left corner of the registration form. Populate the File’s CRM_Content_Type_vod field with Event_Registration_Banner_vod.
The banner image must have the following properties:
- Format – The following formats are supported:
- .PNG
- .JPG/.JPEG
-
.GIF
GIF files do not animate.
- Aspect ratio of 2:1
The combined file size of Agreement Policy document and Banner Image should not exceed 10 MB.
Creating Registration Form Assignment Rules
Business admin users can create EM_Event_Rule_vod records that automatically assign a registration form template to new and updated EM_Event_vod records:
- Navigate to the Event Rules related list of the appropriate EM_Event_Configuration_vod record.
- Select New.
-
Populate the following fields:
- Record Type = Registration_vod
- Country_Override_vod – Enter the appropriate country, if applicable
- Registration_Form_vod – Select the appropriate Registration_vod type EM_Catalog_vod record
- Select Save.
Multiple EM_Event_Rule_vod records can be created to assign multiple allowed registration forms for an event type.
Generating an Event Registration Link
When a registration-enabled event is created or updated, an EM_Catalog_vod record is automatically referenced in the event’s Registration_Form_vod field based on configured EM_Event_Rule_vod records and matching form attributes to Product_vod, Location_Type_vod, and Event_Format_vod.
If multiple matches are found, the first match is assigned to the event. If a match is not found, the Registration_Form_vod field does not populate.
If the event’s Product_vod, Location_Type_vod, or Event_Format_vod fields are updated, the Registration_Form_vod field may also update if the field updates result in a different registration form matching to the event.
To ignore any matching logic, populate the event’s Registration_Form_vod field when creating the event to manually assign the event’s registration form.
Once a registration form is associated to the event, a unique registration link for the event is automatically generated and stored in the following fields:
- Registration_URL_Long_vod – The full URL to the registration form
- Registration_URL_vod – A shortened, user-friendly URL to the registration form
The registration link is inactive until the event is synced through the Registration & Sign In job and the Publish_Event_vod check box is populated. The link then remains active until the event's End_Time_vod.
The Publish_Event_vod check box does not update automatically. Customers must define and configure this field to activate or inactivate an event’s registration link during the correct stage of the event’s lifecycle. For example, administrators can configure the Salesforce Approval Process to update Publish_Event_vod to true after an event is approved.
Sending Targeted Registration Links via Approved Email
Content administrators can include the registration link to the event in Approved Email templates using the following tokens:
- {{EM_Event_vod__c.Registration_URL_Long_vod__c}} – When sent, this token displays a targeted registration URL unique to each recipient. Targeted links are only supported for attendees and event speakers, all other recipient types will display the normal registration link.
- {{EM_Event_vod__c.Registration_URL_vod__c}} – Displays an open registration URL
It is recommended to use the {{EM_Event_vod__c.Registration_URL_Long_vod__c}} token, since targeted links can accessed as open links if they are forwarded from the original recipient to other recipients. See Targeted Registration for more information.
Adding a Registration QR Code® to Print Templates
Content creators can include a QR Code® that represents the event registration link within Print Templates, using the {{RegistrationQRCode}} to display the registration link as a QR Code® that attendees can scan.
Do not place the token within a table in the print template.
By default, the QR Code® generates a 200x200 pixel square image. Content creators can customize the size of the square image by adding the <Size=SIZE> parameter. For example, {{RegistrationQRCode<Size=1000>}} generates a 1000x1000 pixel image for the QR Code®.
Add the <O> parameter to mark the token as optional.

Registering for an Event
Recipients accessing the registration form’s URL can view event details and complete the form to register for the event.
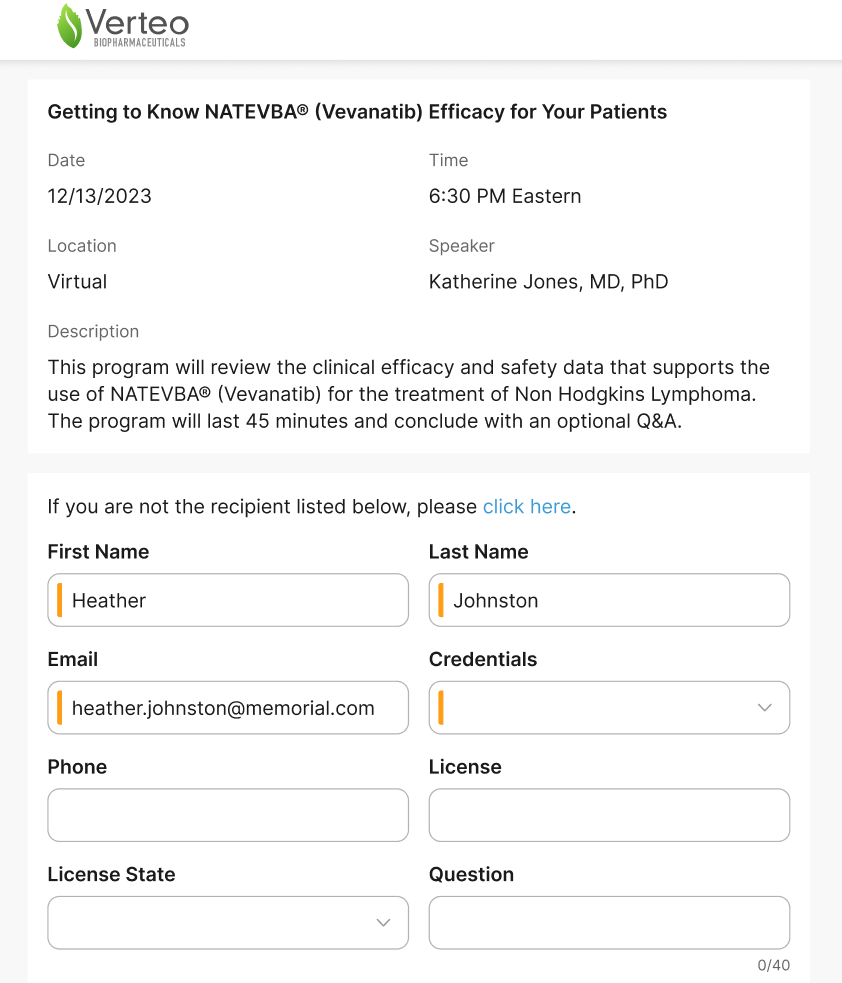
Depending on the registration form configuration and the link used, recipients will land on varying landing pages to register.
Open Registration
Open registration is available when the Registration_Type_vod field is Open_vod. Recipients can register by scanning the print QR Code® or directly via Registration_URL_vod link and completing the form.
If recipients access the link when Registration_Type_vod is Closed_vod, a message notifies the recipient that the event is invite only.
Targeted Registration
Targeted links sent via Approved Email are unique to the recipient. When targeted recipients access the link, their first name, last name, and email address automatically populate on the form.
If the Registration_Type_vod field is Open_vod, recipients of targeted link can forward the form to other potential registrants. To ensure forwarded recipients do not register on behalf of the original recipient, a message and link displays to the forwarded recipient that enables them to register as themselves.
Forwarded recipients cannot access the targeted link if the form's Registration_Type_vod is Closed_vod.
Submitting Registration
After populating all of the appropriate fields, attendees can complete their registration by selecting Register.
If the registration form has a configured disclaimer or Agreement Policy document, attendees must agree to the disclaimer and view the Agreement Policy document before they can select Register.
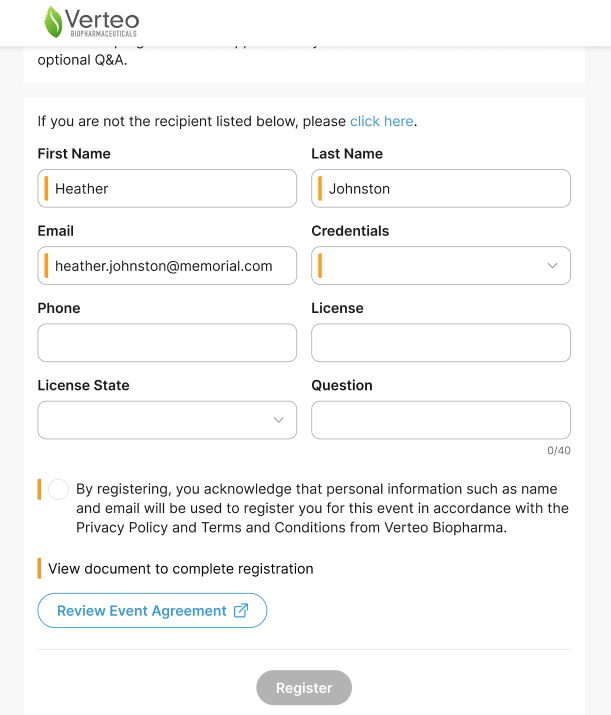
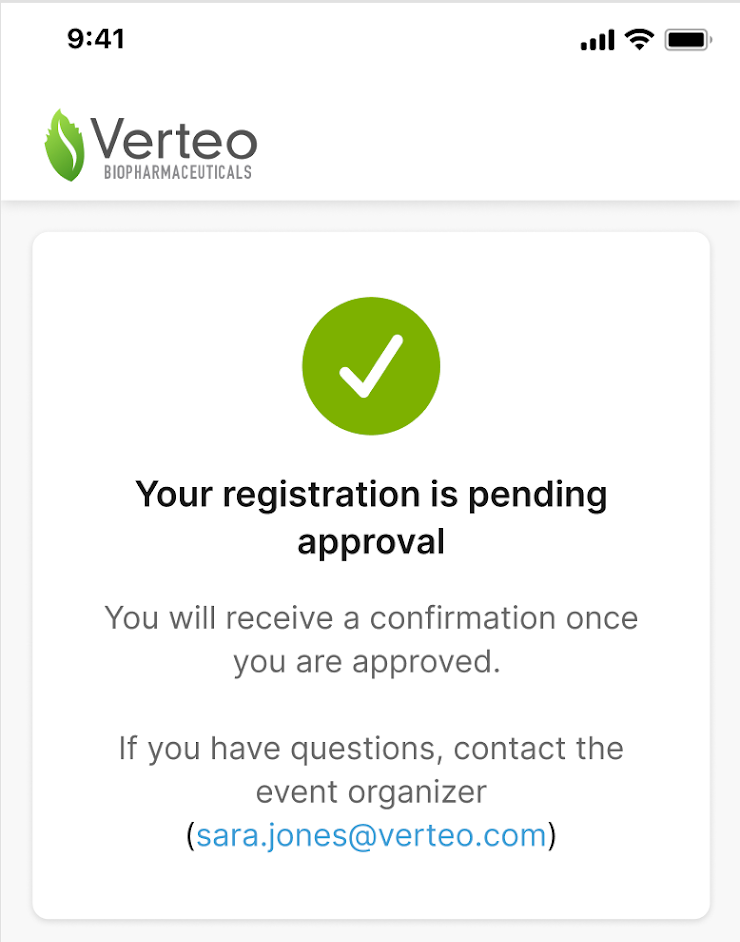
If the registration form has the Approval_Required_vod check box selected, registrants must be approved before they are confirmed for the event and receive a confirmation email. If Approved_Required_vod is not checked or recipients register via targeted links, registrants do not need to be reviewed and receive an automatic email confirmation upon registering.
Displaying Key Contact Information
To help registrants communicate with the event organizer, the Key_Contact_Name_vod or Key_Contact_Email_vod fields for the event display to the registrant upon completion of registration or registration errors. Administrators are responsible for defining the appropriate information in these key contact fields.
Syncing Registrants with Veeva CRM
Registrants are immediately synced to Veeva CRM upon registering. If the attendee registered via a targeted link, the associated EM_Attendee_vod or EM_Event_Speaker_vod record is updated as part of the sync:
- Status_vod – Updates to Registered_vod
- Registration_Timestamp_vod – Updates to the registration timestamp
- Registration_Status_vod – Updates to Registered_vod. Only applies to EM_Attendee_vod records.
- Registration_Method_vod – Updates to Targeted_vod. Only applies to EM_Attendee_vod records.
- All other fields defined on the registration form – If a field defined in the registration form’s Registration_Fields_vod field is populated by the registrant, the corresponding field in Veeva CRM also updates
If the attendee registered via an open link, an EM_Attendee_vod record is created as part of the sync with the following fields:
- First_Name_vod – Populates based on the value entered in the registration form
- Last_Name_vod – Populates based on the value entered in the registration form
- Email_vod – Populates based on the value entered in the registration form
- Registration_Timestamp_vod – Updates to the registration timestamp
- Walk_In_Status_vod – Updates to Needs_Reconciliation_vod
- Registration_Method_vod – Populates with one of the following values:
- Open_vod – The registrant used an open registration link to register
- Forwarded_vod – The registrant used a targeted link forwarded from the original recipient to register
- All other fields defined on the registration form – If a field defined in the registration form’s Registration_Fields_vod field is populated by the registrant, the corresponding field in Veeva CRM also updates
-
The Status_vod and Registration_Status_vod fields populate depending on if the registrant must be approved by the event organizer:
Approval Required?
Status_vod
Registration_Status_vod
Yes
Registration_Pending_vod
Pending_Approval_vod
No
Registered_vod
Registered_vod
If an error occurs when updating EM_Attendee_vod or EM_Event_Speaker_vod record as part of the Event Registration & Sign In process, the error is noted in the Sync Alert History section. Admins can review, address, then retry any errors that occur.
Reviewing Registrants
When completing the registration form, registered attendees are updated in the event and can be viewed by event organizers.
- Targeted Registrants – Recipients that registered through links sent via Approved Email are automatically approved. Confirmation emails are sent upon syncing registrant information to Veeva CRM.
- Open Registrants – If an event’s registration form has a selected Approval_Required_vod check box, open registrants are treated as walk-in attendees to the event that end users must review, reconcile, and approve or reject. When approval is not required, open registrants automatically receive confirmation emails upon syncing registrant information to CRM.
Reconciling Open Registrants
Open registrants must be reconciled to existing accounts in Veeva CRM before they can be approved to be added to the event:
-
Navigate to the Attendee Reconciliation page in the event.
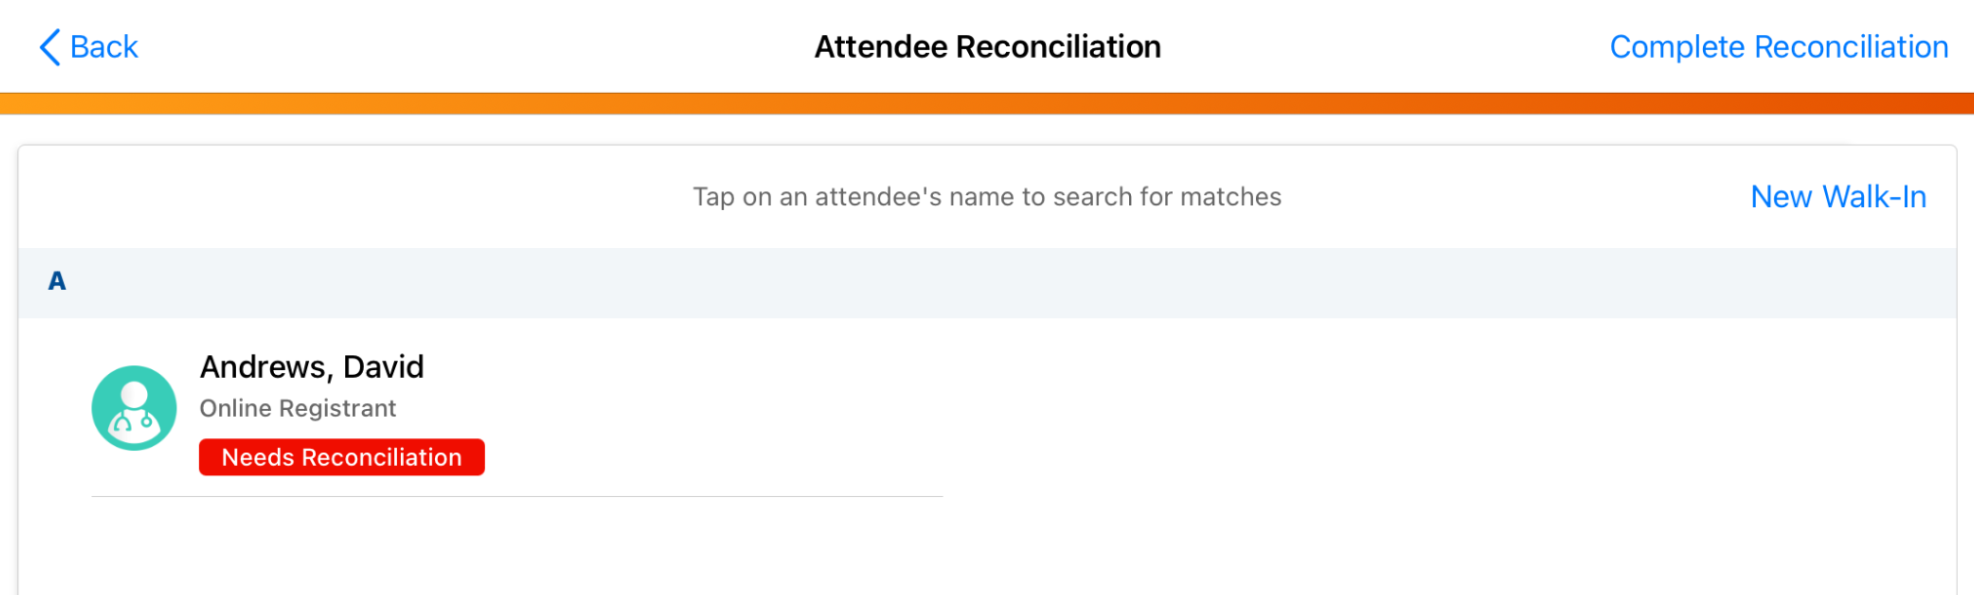
-
Select the appropriate open registrant.
Attendees with a status of Rejected or Signed do not display.
- Search for the appropriate match.
- Select Confirm Match to reconcile the registrant to the appropriate account.
Event Attendance Rules with Reconciled Registrants
When matching a registrant with an account, any configured Event Attendance Rules are checked before the match is confirmed. If a rule is violated, the appropriate rule warning displays and event organizers can take one of the following actions:
-
If the rule is a Hard Warning-type rule, event organizers can select Reject Registrant to immediately reject the registrant and send them a rejection email via Approved Email
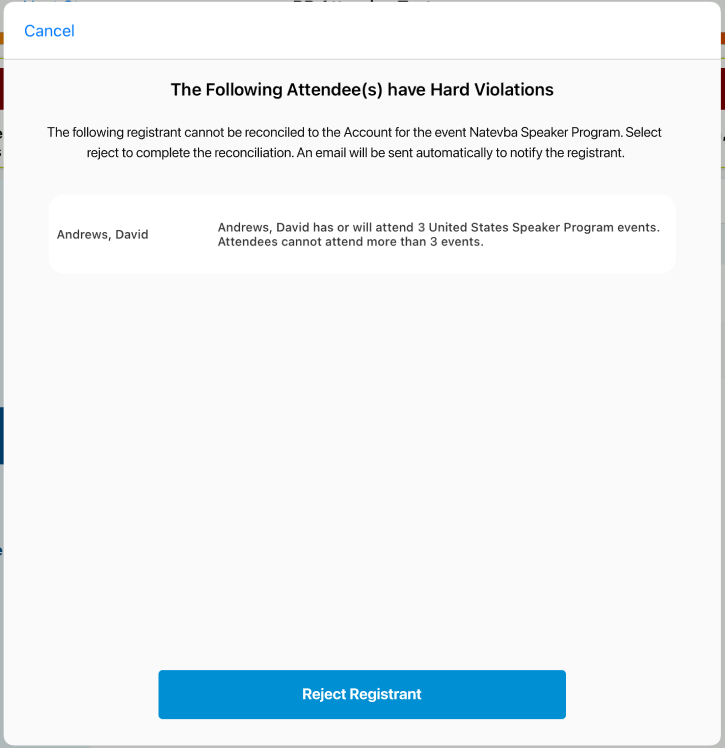
-
If the rule is a Soft Warning-type rule, event organizers can submit comments if they are available or required, then can select Confirm Match to proceed with matching the registrant
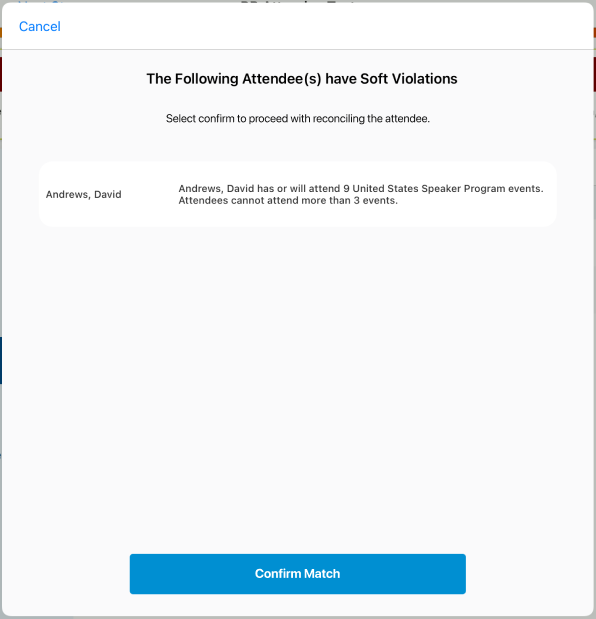
Configured Event Attendance Business Rules are checked when reconciling open registrants, but not when reconciling walk-in attendees captured from the traditional sign-in method.
Approving or Rejecting Open Registrants
To approve or reject open registrants:
- Navigate to the Attendee section in the event.
- Select the appropriate registrant.
- Select Edit.
-
Update the Status_vod field to the appropriate value:
- Registration_Approved_vod – Approves the registrant. Only open registrants that have been reconciled to an account can be approved.
- Registration_Rejected_vod – Rejects the registrant
- Select Save.
After saving, the appropriate confirmation or rejection Approved Email is sent to the registrant. The sent email address uses the Email_vod value entered from registration.
To bulk approve or reject, enable Mass Update for Attendees or Editing Related Lists Inline in Lightning for Events Management to update Status_vod field for multiple attendees.
Sending Local Events Management Content via Approved Email
Salesforce Files associated with event materials can be included in Approved Email sent for that event. This enables users to send local documents in Veeva CRM to non-CRM users, for example, event attendees and speakers.
Sending this local content within the CRM application via Approved Email enables users to send the right content to the right people without the need to first add the content in Vault. Using Approved Email templates with a dedicated token, users can search for Salesforce Files and include files in the email as a link. Email recipients can download the file to their device and have that interaction tracked in CRM.
Using Local Events Management Content in Approved Emails
Adding Salesforce Files to Event Material Records
Local Salesforce Files can be made available in Approved Emails by attaching the file to the appropriate EM_Event_Material_vod record.
Salesforce Files must be attached to EM_Event_Material_vod records with a status of Approved and have Yes_vod selected for the Approved_vod picklist.
The following formats are supported:
|
File Category |
Supported File Extensions |
|---|---|
|
Microsoft Office Files |
|
|
|
|
|
Audio Files |
|
|
Video Files |
|
|
Image Files |
|
Adding the {{insertEventFiles}} Token to Email Templates
To enable this functionality in email templates, insert the {{insertEventFiles}} token. Approved Email content creators should consider the following when using the {{insertEventFiles}} token:
- The token can only be used in Events Management email templates
-
The token should be enclosed in an empty <table> HTML tag
Adding the token via the BEE Editor automatically encloses the token in the appropriate tag.
- The token cannot be used in conjunction with the {{insertEmailFragments}} token. If both tokens are present in the Email Template, the {{insertEmailFragments}} token is ignored and does not render.
Styling the {{insertEventFiles}} Token
Displayed files can be styled via the enclosing <table> tag or via the following CSS classes:
- .ae-dynamic-email-fragment – Controls the style of the table
- .ae-dynamic-email-fragment td – Controls the style of the table cells
- .ae-dynamic-email-fragment td.file-type-icon – Controls the style of table cells containing file icons
- .ae-dynamic-email-fragment td.file-name – Controls the style of the table cells containing file names
- .ae-dynamic-email-fragment a:link – Controls the style of an unvisited file link
- .ae-dynamic-email-fragment a:visited – Controls the style of a visited file link
Adding Files to Events Management Approved Emails
To add local Salesforce Files related to an event to an Approved Email:
- Select the appropriate Events_Management_vod Approved Email template to send. Templates with the {{insertEventFiles}} token display a red placeholder prompting users to add files to the email.
-
Select the Add Files (
 ) button to display the Add Files modal, which displays all Salesforce Files associated with the event via EM_Event_Material_vod records.
Only Salesforce Files attached to EM_Event_Material_vod records with a status of Approved and an Approved_vod field of Yes_vod display as available for selection.
-
Select the check box next to the appropriate files to add to the email. Users can locate files to add via the following methods:
- Searching for a file’s name, description, or type
- Filtering the list of files by the appropriate document type
- Select Add.
- Arrange the files in the appropriate order.
Previewing Approved Emails with Events Management Files
Once all appropriate files are added to the email and arranged, select the Preview button to preview how the inserted files will display in the final email sent to recipients. Files display as hyperlinks, with the name serving as the link text.
Viewing and Downloading Files From Sent Emails
Selecting the File Name hyperlink in the sent email displays the Salesforce File via the HCP Content Player in the device’s browser. Recipients can select the Download button to download the Salesforce File from the HCP Content Player.
Withdrawing Content Sent via Approved Email
If content sent via Approved Email becomes outdated, end users can remove recipient access by deleting the associated Salesforce File. When the Salesforce File is deleted, existing links to the content no longer function.
Tracking File Views and Downloads
When a file in an Approved Email is selected and downloaded by the recipient, an Email_Activity_vod record is created and associated with the Sent_Email_vod record representing the email. This Email_Activity_vod record has the following properties:
- RecordType – Veeva_Content_Player_Activity_vod
- Event_Type_vod – Downloaded_vod
- Activity_DateTime_vod – The time the recipient selected Download
- Veeva_Distribution_vod – References the Veeva Distribution record used to access the downloaded file
- Transaction_Type_vod – Events_Management_vod
- Client_Name_vod – The name of the email client used to open the email
- Client_OS_vod – The operating system of the device used to open the email
- Client_Type_vod – The client type used to open the email
- Device_Type_vod – The device type used to open the email
- User_Agent_vod – The user agent
Adding QR Codes® to Event Print Templates
Content creators can use a dedicated Print Template token to display an event’s QR sign-in code in materials created for an event. This enables event organizers to print and distribute their event’s QR Code®. Printed QR Codes® make it easier for attendees to sign in by scanning the code on their devices, providing more options for signing into an event.
Using the {{SignInQRCode}} Token
Add the {{SignInQRCode}} token to the appropriate Print Templates to insert a QR Code® that attendees can scan on their device to sign into the event.
Print Templates containing the {{SignInQRCode}} should only be made available to events configured to use QR Codes® for signing in. An error occurs if end users try to generate a Print Template containing this token from an event not configured to use QR sign-in.
The token can be marked as optional by adding the <O> parameter to the token.
{{SignInQRCode<O>}}
Resizing the QR Code®
By default, the QR Code® generates as a 200x200 pixel square image. Content creators can customize the size of the square image by adding the <Size=SIZE> parameter.
For example, {{SignInQRCode<Size=1000>}} generates a 1000x1000 pixel image for the QR Code®.
Generating Print Templates with QR Codes®
When end users generate a Print Template including the {{SignInQRCode}} token, the resulting PDF contains a QR Code® of the event’s sign-in link.

This PDF can then be printed or distributed to attendees to easily scan the QR Code® with their own devices to sign into the event.
Using Event Sign-in URLs
Event owners can copy and distribute their QR-enabled event’s sign-in URL. This enables event owners to easily share the URL with attendees of their event, since attendees can receive the copied URL via the chat of a virtual event or any other communication channel, and use the URL to sign into the event directly from their device.
It is not recommended to include the Sign-In_URL_vod field when configuring Event Templates for Child Events. If this is a shared field between parent and child event, it the parent's Sign In URL copies to child events.
When a QR-enabled event is created, a shortened version of the sign-in URL is populated in the event’s Sign-In_URL_vod field. If the URL does not immediately display, refresh the page.
This field can be copied and distributed as needed to provide attendees with a URL to sign into the event.
Since selecting the Preview QR Code® button updates the URL embedded in the QR Code®, the Sign-In_URL_vod field also automatically updates if the event is QR-enabled and the field is blank.
Viewing Expense Headers and Expense Lines in Lightning for Events Management
Event organizers using Lightning for Events Management can quickly view expense headers and their associated expense lines, streamlining the expense allocation process.
Admins can define a combination of Expense_Line_vod and Expense_Header_vod fields to display as columns on the Expense Headers related list of an event, enabling end users to better view expenses associated with their event.
Customizing Columns on the Expenses Related List
Since both Expense_Header_vod and Expense_Line_vod records display in the Expense Headers related list of an event, admin users can define fields on both objects to display as columns of the related list:
-
Create a new Veeva Message to serve as the list of fields. The Veeva Message should have the following properties:
- Message Name – Define the appropriate name
- Category = EXPENSE_FIELDS
- Type = Label_vod
- Active – Select this check box
- Language = en_US
-
Text – A semicolon separated list of up to ten fields from both the Expense_Header_vod and Expense_Line_vod objects. Use the following format:
Object1APIName.FieldName;Object2APIName.FieldName;
For example,
Expense_Header_vod.Concur_Status_vod;Expense_Header_vod.Transaction_Date_vod;Expense_Line_vod.Actual_vod;Expense_Line_vod.Committed_vod;Expense_Line_vod.Expense_Type_Name_vod;
If a field has the same API name for both objects, only enter the Expense_Line_vod version of the field. Do not include the Name field on either object in the list, as this column is automatically included.
- Navigate to the Event Layouts related list of the appropriate EM_Event_Configuration_vod record.
- Edit the appropriate EM_Event_Layout_vod record.
-
Populate the Expense Related List Fields field with the created Veeva Message using the following format:
VeevaMessageName;;Category
For example, SpeakerProgramExpenseFields;;EXPENSE_FIELDS
- Clear the Events Management cache.
Viewing Expense Headers and Expense Lines
Expense headers with associated expense lines display in an event’s Expense Headers related list as a collapsed list. Expand the expense header to display the list of the header’s associated expense lines.

The columns of the related list display based on the configured Veeva Message. Users can sort, search, and filter this related list.
The following filters are available:
- Record Type
- Split Lines? – Filters the related list if the expense header contains a split expense. See Creating and Editing Expense Headers and Expense Lines for more information on creating split and non-split expenses.
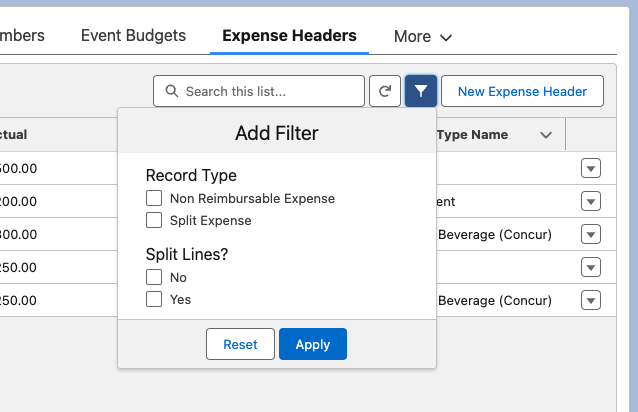
See Filtering Related Records for more information on sorting, searching, and filtering related lists in Lightning for Events Management.
To display the Expense_Header_vod record’s detail page, select the Expense_Header_vod record.
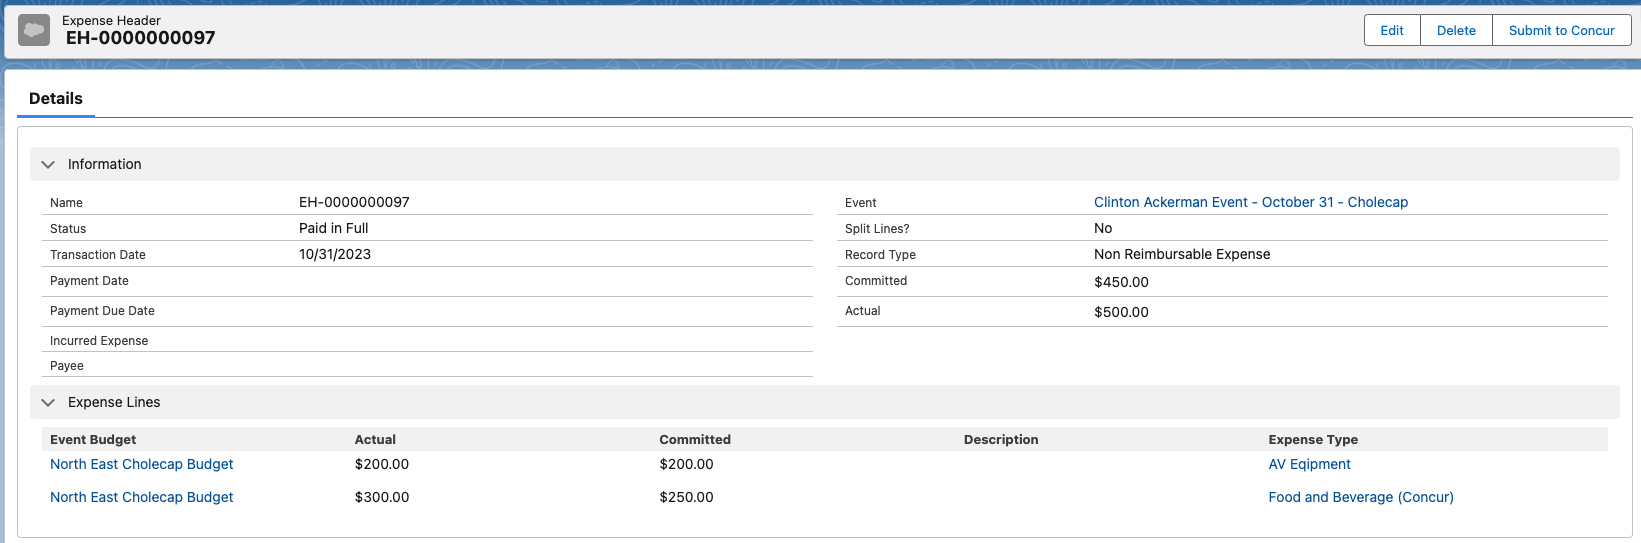
The Expense Lines section of the detail page displays all of the Expense_Header_vod record’s associated expense lines, using the same fields and ordering as on the New Expense Header modal. To display the Expense_Line_vod record’s detail page, select any of the associated Expense_Line_vod records in the section.
Users can add, edit, or remove expense lines to the expense header by editing the Expense_Header_vod record. See Creating and Editing Expense Headers and Expense Lines for more information.
Editing expense lines from the related list displays the Edit Expense Line Modal to update the expense line directly.
Creating and Editing Expense Headers and Expense Lines
Event organizers can create both split and non-split expense headers while creating the expense header’s associated expense lines simultaneously, streamlining expense entry.
For non-split expenses, admins can specify up to ten Expense_Line_vod fields to display in the New Expense Header and Edit Expense Header modals, enabling end users to quickly input expense line information when they create or edit the expense header.
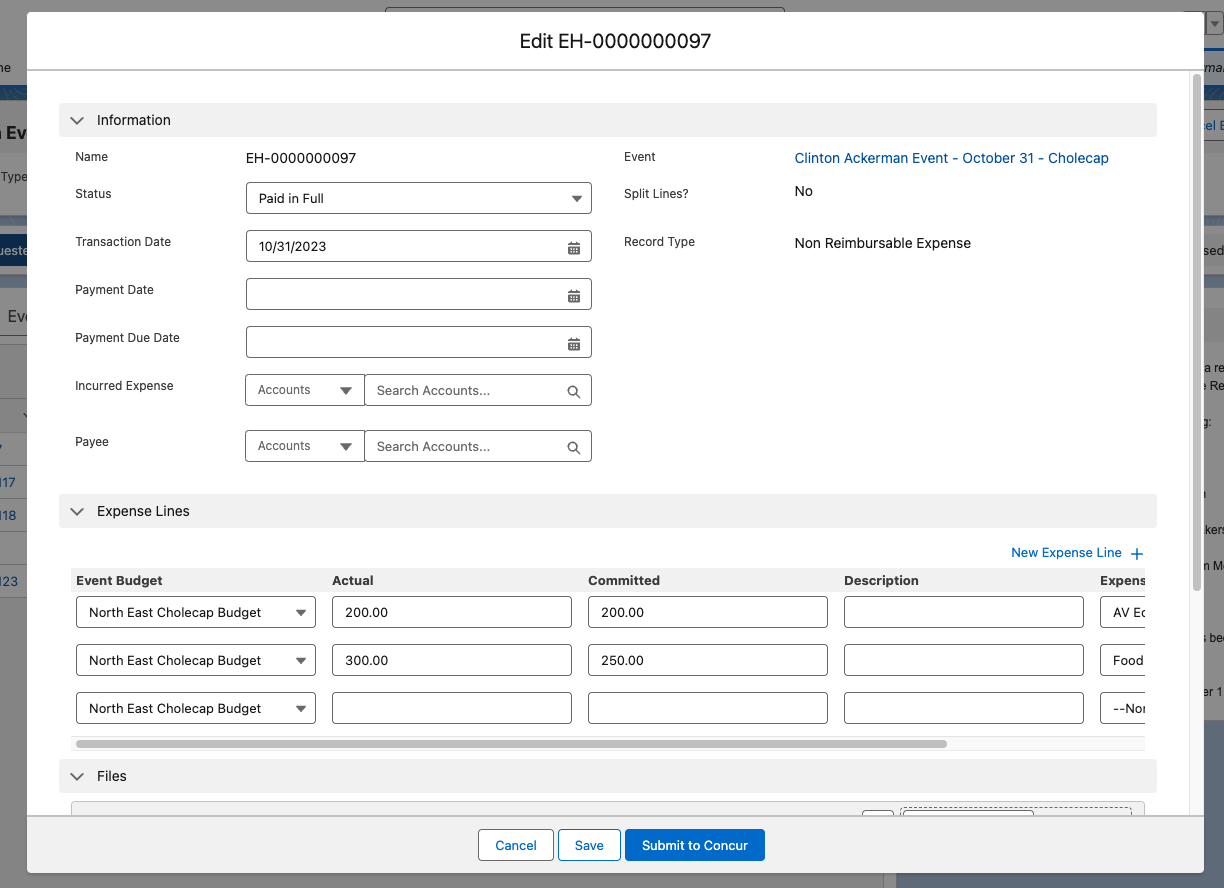
For split expenses, end users can enter split expenses that quickly distribute the expense's Actual cost across the appropriate event attendees, speakers, or team member.
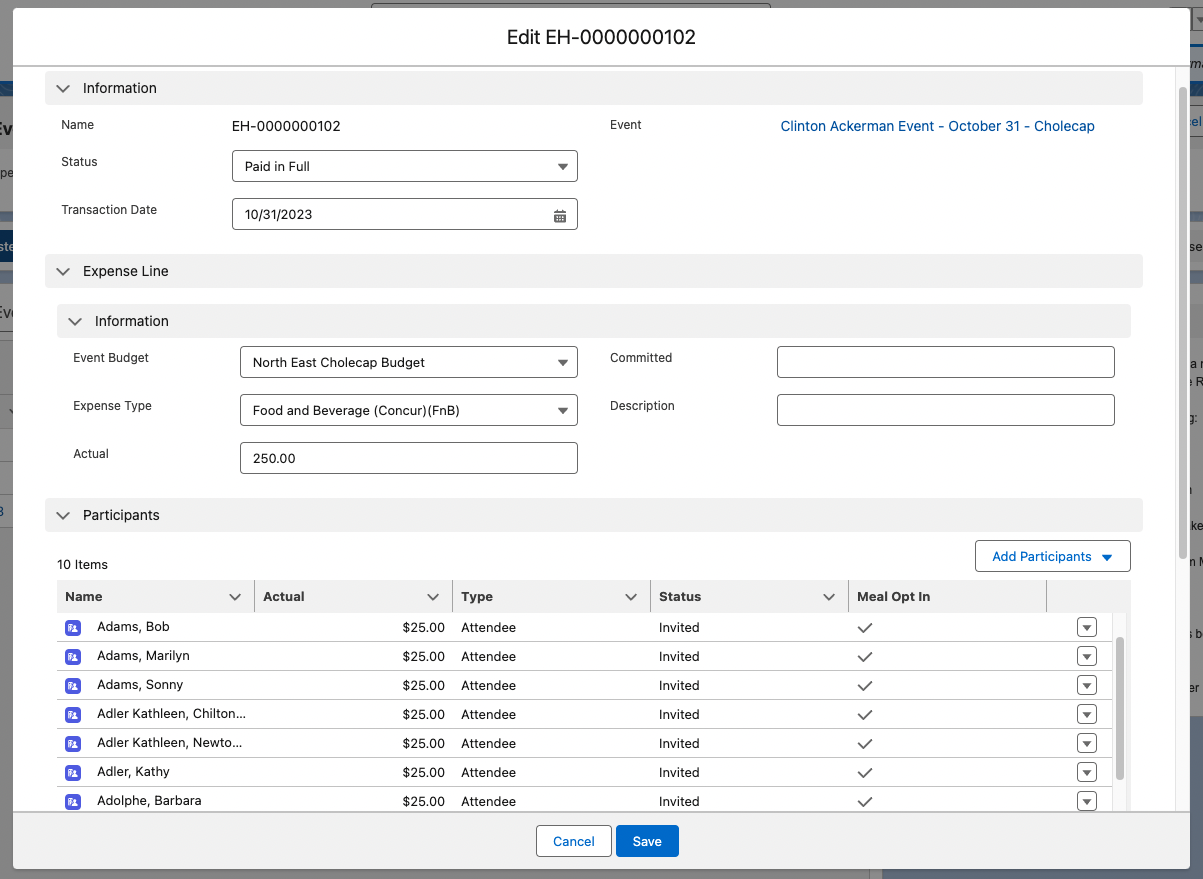
Defining the Expense Line’s Record Type
Admins can define the record type of Expense_Line_vod records created alongside Expense_Header_vod records.
Grant users access to an Expense_Line_vod record type with the same developer name as the selected Expense_Header_vod record type, to automatically use that Expense_Line_vod record type.
If no matching record type exists, the default Expense_Line_vod record type of the user’s profile is used instead.
Defining the Expense Line Fields for Non-Split Expenses
Up to ten Expense_Line_vod fields can display in the New Expense Header and Edit Expense Header modals of non-split expenses, enabling end users to quickly populate the appropriate fields of a new expense line.
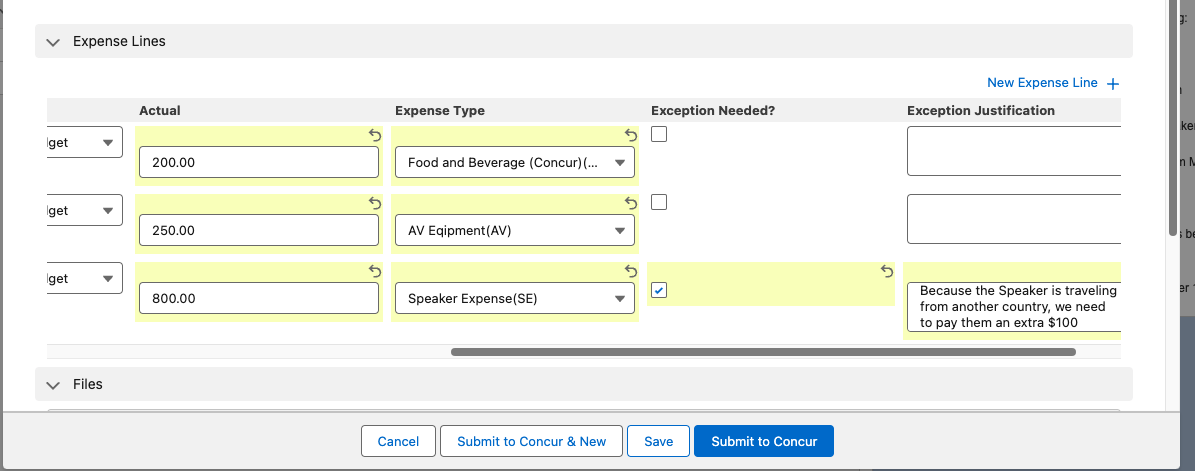
Define the Expense_Line_vod fields to display by adding or rearranging fields on the appropriate Expense_Line_vod object page layout.
Any standard or custom field can be added, though the following fields and field types are not supported:
- Any fields of the following types:
- Time
- Roll-Up Summary
- Encrypted
- Geolocation
- The following standard fields:
- Number_Of_People_vod
- Concur_Response_Timestamp_vod
- Concur_System_ID_vod
- CreatedById
- Event_vod
- Expense_Estimate_vod
- Expense_Header_vod
- Expense_Type_Code_vod
- Expense_Type_Name_vod
- External_ID_vod
- LastModifiedById
- Mobile_ID_vod
- Name
- Override_Lock_vod
- Parent_Expense_Type_Code_vod
- Parent_Expense_Type_Name_vod
- RecordTypeId
- Split_Amount_Per_Person_vod
Users must have FLS edit permission to a field for it to be considered available. If a field is not supported or if the user does not have sufficient FLS permission, the field is skipped and does not display. Formula fields display with only read permission.
The first ten available fields on the page layout display in the modals, going in descending order of the page layout, section by section. In two-column sections, fields in the left column are considered first, then fields in the right column, followed by the next section.
Displaying the Split Expense Selector
Admins can define whether the Split Expense selector displays when creating new expense headers of specific record types. Depending on customer needs, an Expense_Header_vod record type may need to be designated as being only for split expenses, non-split expenses, or available for either.
This can be defined for each standard or custom Expense_Header_vod record type. To define if an Expense_Header_vod record type should display this selector:
- Create the appropriate record types on the Expense_Header_vod and Expense_Line_vod objects.
- Grant users access to the record types on the Expense_Header_vod and Expense_Line_vod objects.
- Navigate to the Expense_Header_vod object.
-
Edit the record type’s access to the values of the Split_Lines_vod picklist:
- Yes_vod – Enables using split expenses for this record type
- No_vod – Enables using non-split expenses for this record type
If both values are enabled for the record type, the Split Expense modal displays whenever a new Expense_Header_vod record is created, enabling end users to choose whether the expense is for a split expense or not.
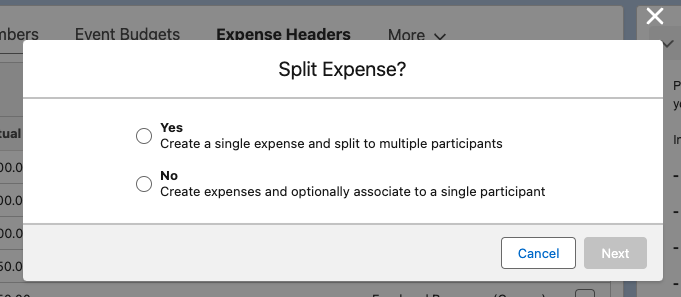
If only one value is enabled for the record type, the Split Expense modal is skipped when creating a new Expense_Header_vod record and the available value is automatically used.
- Create EM_Event_Layout_vod records for both the Expense_Header_vod and Expense_Line_vod objects linking the record types to the appropriate page layouts. See Defining Page Layouts for more information.
Using the Split Expense Record Type
For ease of configuration, admins can enable the Split_Expense_vod record type to serve as a split expenses-only expense header:
-
Grant users access to the Split_Expense_vod record type on the following objects:
- Expense_Line_vod
- Expense_Header_vod
- Navigate to the Expense_Header_vod object.
-
Edit the Split_Expense_vod record type’s access to the values of the Split_Lines_vod picklist:
- Yes_vod – Enable access for this record type
- No_vod – Remove access for this record type
-
Create EM_Event_Layout_vod records for the following objects:
- Expense_Header_vod – Link the Split_Expense_vod record type to the Split Expense Header page layout
- Expense_Line_vod – Link the Split_Expense_vod record type to the Split Expense Line page layout
When users create Split_Expense_vod expense headers, the Split Expense selector is skipped and a new split expense header is created.
Creating Expense Headers and Lines
To create an expense header and its associated expense lines:
- Navigate to the Expense Headers related list of the appropriate event.
- Select New Expense Header.
- Select the record type if more than 1 record type is available.
- Select Next.
-
Select a value on the Split Expense selection modal.
If there is only one value of the Split_Lines_vod picklist available for the selected record type, this selector is skipped.
- Select Next.
Creating Non-Split Expenses
After selecting a non-split expense, the New Expense Header modal displays for end users to populate expense header and expense line details:
- Populate all appropriate Expense_Header_vod fields.
Windows users using Tap to Click functionality on their laptop trackpad must double-click when selecting a value for the Payee and Incurred Expense fields.
-
Select the New Expense Line button in the Expense Lines section.
-
Populate all appropriate Expense_Line_vod fields based on the configured page layout.
Formula fields display as read only and are calculated after saving the expense.
- Select the New Expense Line button again to continue adding expense lines to the header, if applicable.
- Select either Save or Save & New. If Events Management is integrated with SAP Concur, the event organizer can directly submit the expense by selecting Submit to Concur or can submit the expense and create a new expense by selecting Submit to Concur & New.
Any violations of any defined Expense Limit Rules that apply to the event and added participants display when selecting either Save or Save & New.
Creating Split Expenses
After selecting a split expense, the New Expense Header modal displays for end users to populate expense header, expense line, and participant details:
- Populate all appropriate Expense_Header_vod fields.
Windows users using Tap to Click functionality on their laptop trackpad must double-click when selecting a value for the Payee and Incurred Expense fields.
- Populate the Expense Line section with the appropriate details about the expense, including the Actual field with the expense amount.
-
Select the Add Participants drop down in the Participants section of the modal. The following options display:
- Meal Opt-In – Select this option to add all attendees and speakers on the event who opted into a meal for the event
- Groups from previous split expenses – These options only display if other split expenses exist on the event. These options allow end users to quickly select the same group of participants as other split expenses.
- Select Participants – Select this option to search for and select individual attendees, event speakers, or event team members
The Actual value for each added participant is calculated by dividing the expense line’s Actual cost by the number of added participants.
For example, if the expense line’s Actual cost is $250 and ten participants are added, each participant has an Actual cost of $25.
- Select either Save or Save & New. If Events Management is integrated with SAP Concur, the event organizer can directly submit the expense by selecting Submit to Concur or can submit the expense and create a new expense by selecting Submit to Concur & New.
Any violations of any defined Expense Limit Rules that apply to the event and added participants display when selecting either Save or Save & New.
Viewing Expense Headers and Lines
The page layout of Expense Headers and Expense Lines based on the Split_Lines_vod field of the Expense Header:
- If Split_Lines_vod is either No_vod or blank, the Non-Split Expense layout displays
- If Split_Lines_vod is Yes_vod, the Split Expense layout displays
If an Expense_Header_vod record is a split expense, but contains multiple Expense_Line_vod records, the Non-Split Expense Layout displays.
Searching for Child Account Attendees Outside a User’s Territory
Event organizers can search for child accounts outside of their territory to add as attendees to their event. This enables greater event organization capabilities in orgs using both Child Account Attendees and Outside Territory Searching.
Searching for Outside Territory Child Accounts
To search for outside territory child accounts to add as attendees:
- Navigate to the Attendees modal from the event.
-
Select the View dropdown.
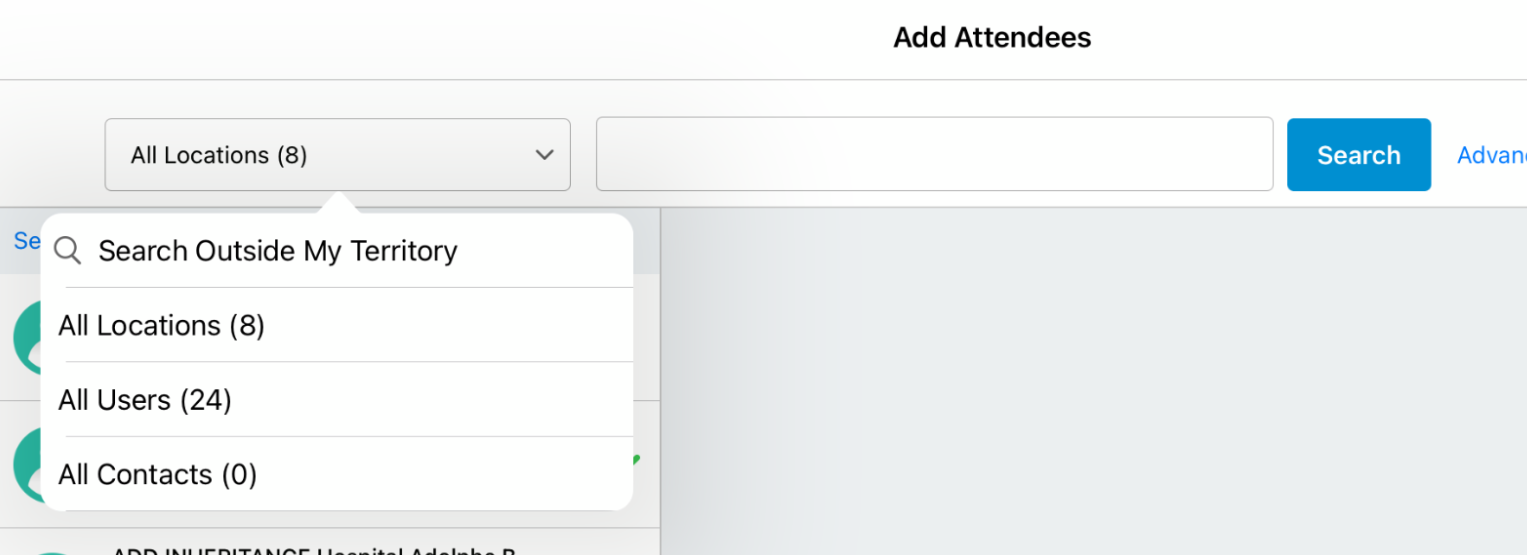
- Select Search Outside My Territory.
- Enter the appropriate search term.
-
Select Search. Child_Account_vod records display based on their Parent_Child_Name_vod fields. Results display in the Outside Territory section with gray icons.
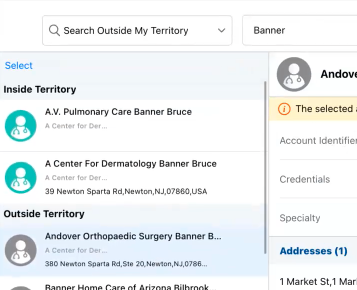
Results filter based on any defined limits to outside territory searching. Child accounts display if either their associated Person or Business Account records match one of the defined filter requirements. For example, limits to outside territory searching can ensure that only Japanese accounts display as outside territory results for a Japanese end user, even if the org also contains accounts in South Korea.
- Select the appropriate child account.
- Select Add Attendee.
Only one child account per associated account can be added as an attendee, regardless if the added child account is outside the user’s territory. Other associated child accounts display with a grayed out Add Attendee button.
Viewing Outside Territory Child Account Attendees
When a child account is added as an attendee, an EM_Attendee_vod record is created with the following fields populated:
- Child_Account_vod – References the associated Child_Account_vod record. This field does not populate if the child account is outside the user’s territory.
- Account_vod – References the Person Account record associated with the child account
- Attendee_Name_vod – Populates with the Parent_Child_Name_vod field from the associated Child_Account_vod record
- Child_Account_Id_vod – The ID of the Child_Account_vod record
- Location_vod – References the Business Account record associated with the child account. This field does not populate if the child account is outside the user’s territory.
- Location_Id_vod – The ID of the Business Account associated with the child account
- Location_Name_vod – Populates with the Name field of the Business Account associated with the child account
Medical
Using the Medical Identifier Field
The Account_Identifier_vod field on the Account object stores and displays any account identifier needed by users, for example sales teams. Medical users, however, often require different information displayed in this field to help them identify an account or provide additional context for an account. Admins can configure the Medical_Identifier_vod field on the Account object to store and display additional information about an account for medical users.
Using the Medical Identifier Field
The Medical Identifier displays anywhere the Account Identifier would display by default. This includes the following locations:
|
UI Location |
Platform |
Description |
|---|---|---|
|
Account Hierarchy |
iPad |
Displays on account nodes and under the account name |
|
Events |
iPad |
Displays in Attendee Search |
|
Browser |
|
|
|
Call Objectives |
iPad |
Displays for a call objective in the Call Objective tab |
|
Browser |
Displays in Search results |
|
|
Call Report |
iPad, iPhone |
|
|
Browser |
Displays in Attendee Search |
|
|
Child Accounts |
Browser |
Displays in Parent/Child Account Lookup |
|
Improved Account Picker |
iPad, iPhone |
Displays in the search results for an account |
|
Maps |
iPad |
Displays for an account in Map view |
|
Medical Insights |
Browser |
Displays in Select Account |
|
My Accounts |
iPad, iPhone |
Displays as secondary information for an account when in List view |
|
My Schedule |
iPad |
|
|
Browser (Lightning) |
|
|
|
Network Account Search |
iPad, Browser |
Displays in Inside Territory Search results |
|
Order Management |
Browser |
Displays in New Order - Add Recipients |
|
Plan Tactics |
Browser |
Displays in Tactical Associations |
|
Sphere of Influence |
iPad |
Displays for an account under the account name |
|
Stakeholder Navigator |
iPad |
Displays for an account on nodes and in various modals, and under the account name |
|
Browser |
|
|
|
Suggestions |
iPad |
Displays for an Account within the Suggestions tab |
|
Browser |
Displays in Suggestions List |
|
|
Territories Adds and Drops |
iPad |
Displays for an account in the Territories Adds and Drops tab |
MyInsights
Migrating MyInsights Content
The myInsightsV2 Lightning Web Component allows admins to migrate MyInsights content between sandbox and production orgs without manual intervention.
Using MyInsights Migration
Ensure the External_Id_vod field is populated in the Lightning Web Component of the record you want to migrate.
If the External_Id_vod field is left blank, the Salesforce Id Is used and can cause the migration to fail.
MyInsights Studio
Using the Diagnosed Patient Page Template
The Diagnosed Patient page template displays metrics and detailed diagnosis data, including prescribed products, within the selected territory for patients diagnosed with a specific disease or treatment option.
The Diagnosed Patient page template is available for content creators to start with, and helps end users answer some of the most common sales questions:
- How many patients were diagnosed in the last 30 days in my territory?
- Do I have a new patient in my territory?
- Which HCP diagnosed the patients?
- Who is the referring HCP?
Using the Diagnosed Patient Page Template
Offline devices require an internet connection to display data.
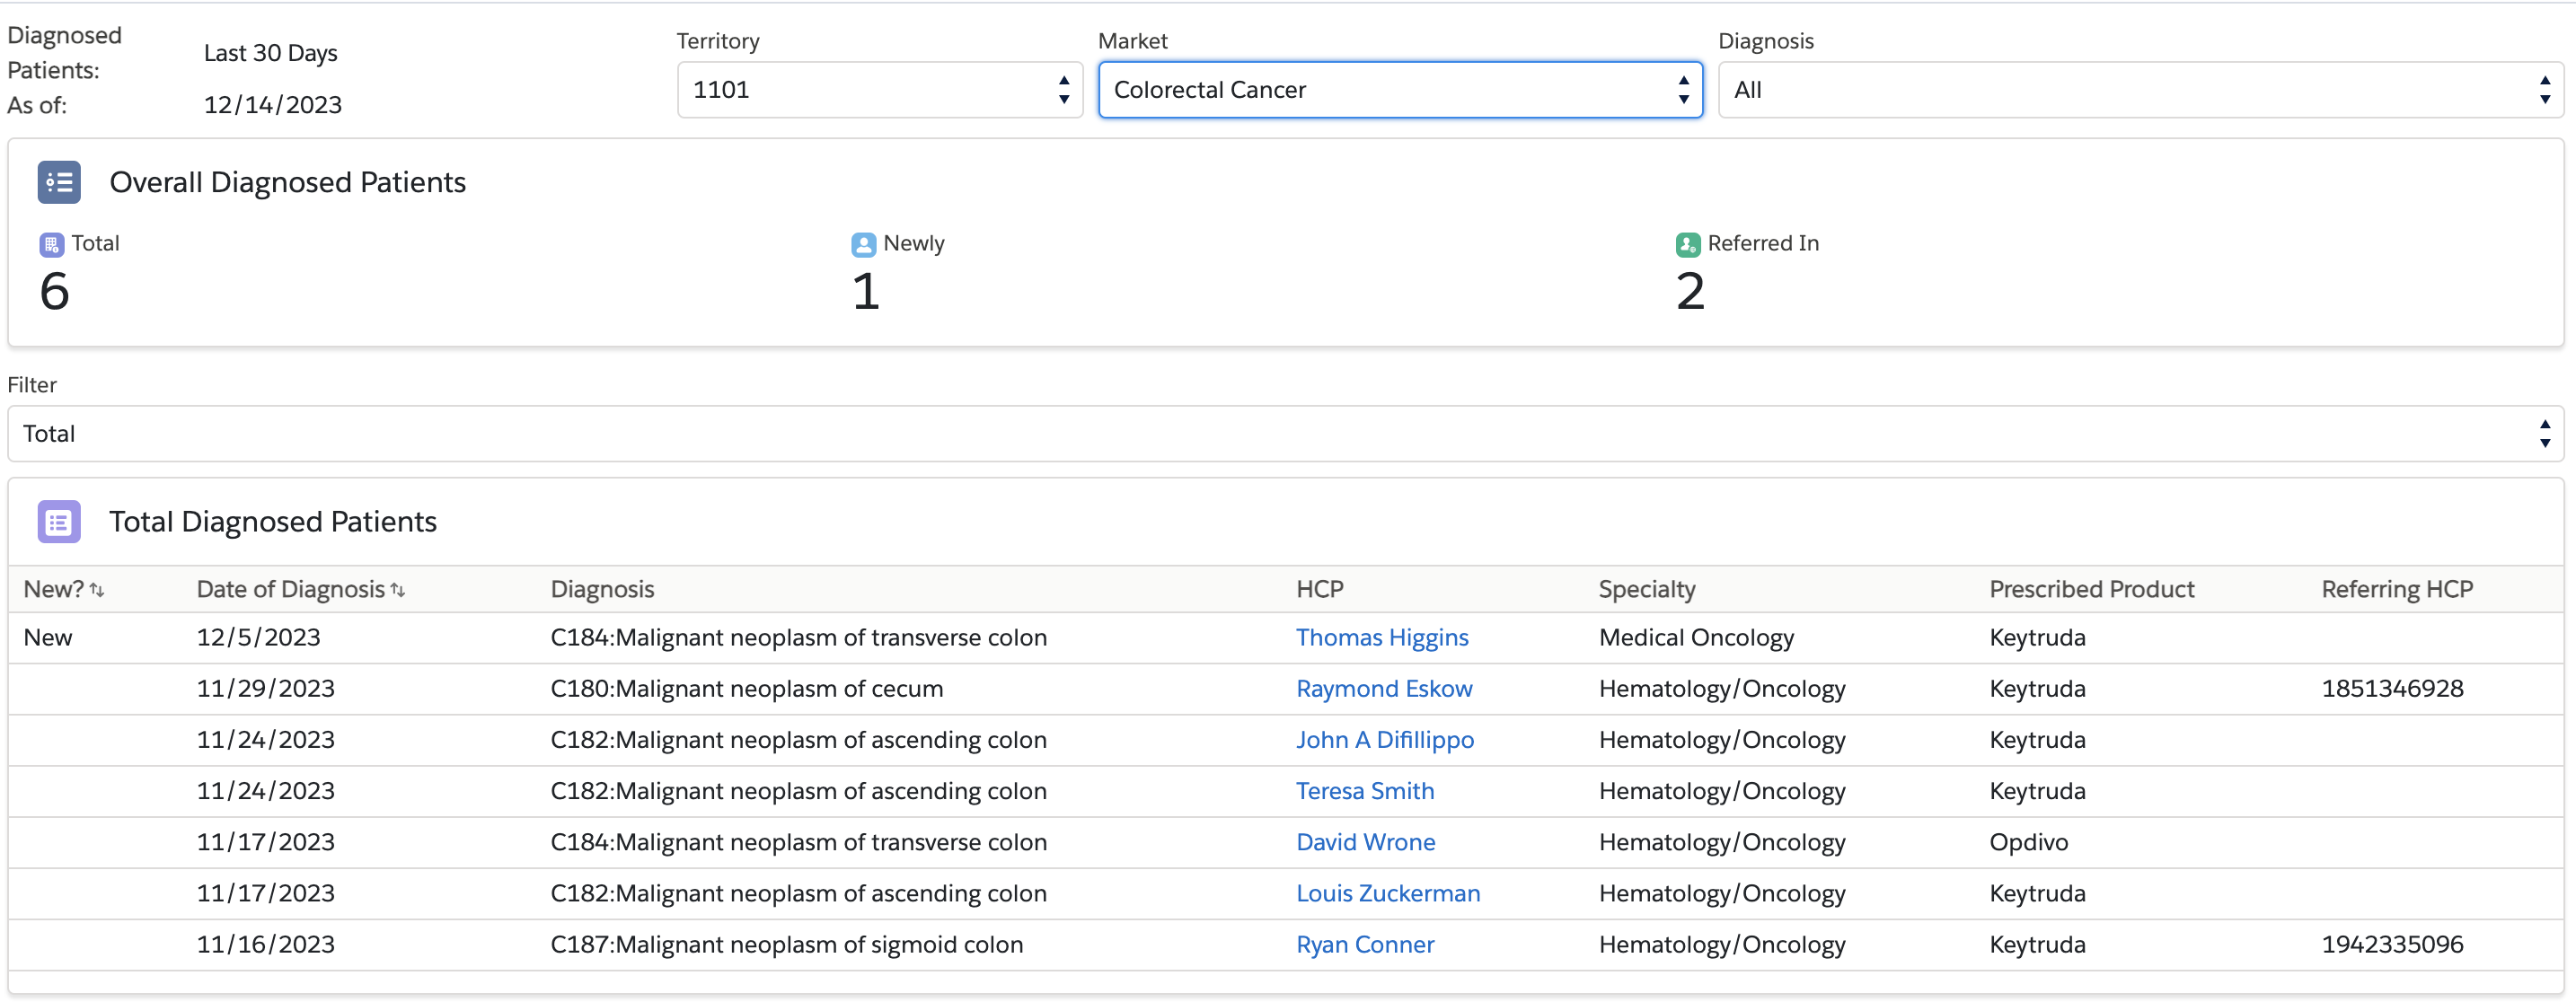
The Diagnosed Patient page template displays the following sections:
Content creators can extend the date range in the template to display up to 90 days of data.
- Territory - Aligned territories for the user
- Market - Displays market list based on Analytics Market object
- Diagnosis - Select the diagnosis code to display data for
- Overall Diagnosed Patients:
- Total - Displays the total number of diagnosed patients in the last 30 days in the selected territory and market
- Newly - Displays the number of newly diagnosed patients in the last 30 days in the selected territory and market. Newly diagnosed patients are counted if a patient’s Mapped market from the diagnosis code in the Analytics Product Group is included for the first time or after a one year period from Compass patient data.
- Referred In - Displays the number of referred patients in the last 30 days in the selected territory and market. Referred patients are counted if the diagnosis data contains the referring HCP’s information.
- Filter Type - Select Total, New, or Referred In to limit the results displayed
- Diagnosed Patients -Displays individual diagnosis data matching the selected criteria. If the referring HCP is outside of the territory, display the NPI number instead of the name of HCP
SAP Concur Integration
Enabling SAP Concur API Version 3
New SAP Concur APIs enable admins in Veeva CRM to configure additional mappings between the two systems, as well as configure the integration to support submitting multiple call expenses.
Mapping to SAP Concur in API Version 3
Updates to Available Mappings
Certain field mappings between Veeva CRM and SAP Concur are available and automatically updated when API Version 3 is enabled. These mappings can be reviewed on the Concur Admin tab:
- CrnCode – Relabeled to TransactionCurrencyCode
- ExpKey – Relabeled to ExpenseTypeCode
- AttendeeType – Relabeled to AttendeeTypeCode
- Custom1-20 – Updated to include Custom1-25
- SystemOwner – Field removed
- UpdateExisting – Field removed
Fields removed or relabeled only apply to default mappings and custom mappings created after updating the API version. Custom field mappings created prior to updating the API version are unaffected and do not affect the ability to submit expenses.
Mapping the AssociatedAttendeesCount Field
The AssociatedAttendeesCount field in SAP Concur enables admins to map a number count when syncing expenses. This is useful when specifying a number of people instead of named attendees for expenses.
To configure mapping the number count:
- Navigate to the Attendee Mapping section of the Concur Admin page.
-
Populate the following fields:
- Concur Field – Enter AssociatedAttendeesCount
- Veeva Field – Enter the appropriate Veeva CRM field to map

- Select the + button to add the mapping.
- Select Save.
Connected List Mapping
To correctly send the appropriate value mapped between fields in Veeva CRM and SAP Concur, mapped SAP Concur fields must be mapped with an SAP Concur Connected List. Connected Lists can be mapped for both call and medical event expenses and are used when syncing with SAP Concur to retrieve the List Item matching the mapped field value in Veeva CRM.
If the List Item is not found, the raw Veeva Field value is synced.
To configure the SAP Concur List for a custom field mapping:
- Navigate to the appropriate mapping section of the Concur Admin Page.
-
Populate the following fields:
- Concur Field – Populate with the appropriate field from SAP Concur
- Veeva Field – Populate with the appropriate field from Veeva CRM
- Concur List – Select the corresponding list that is mapped to the SAP Concur Field
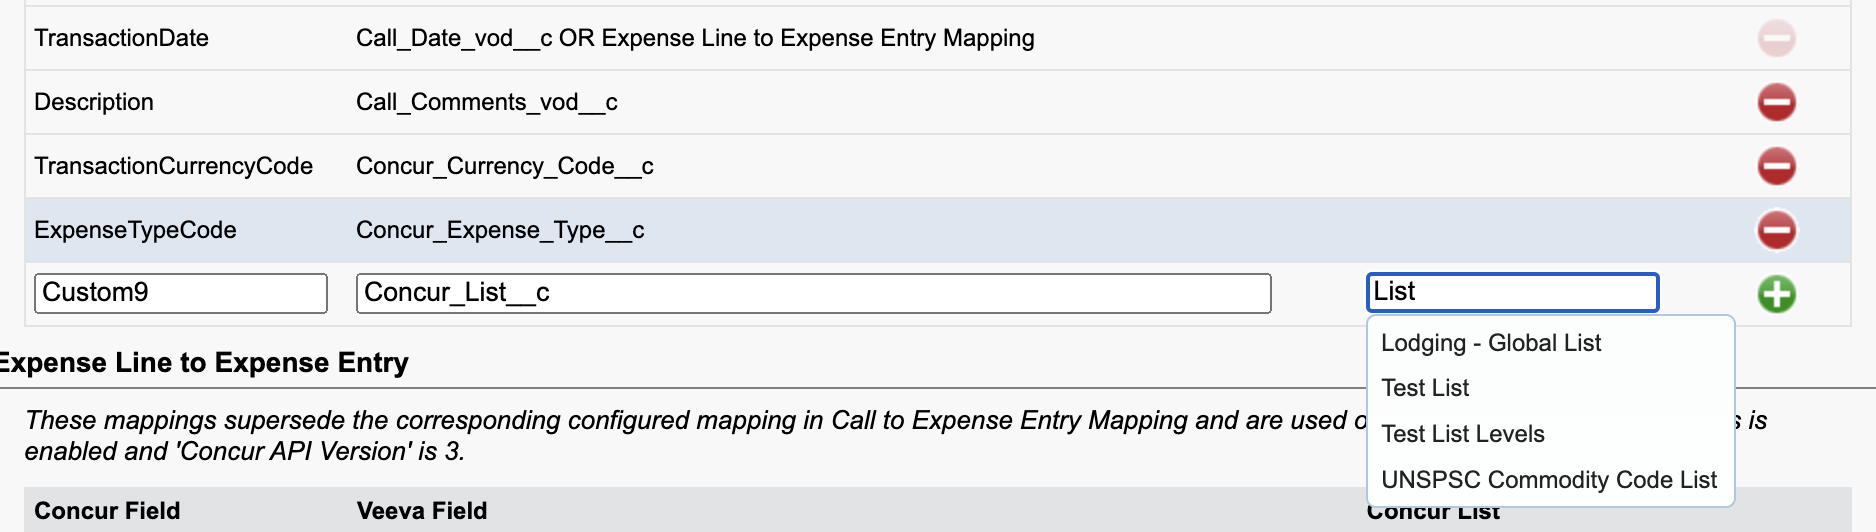
- Select the + button to add the mapping.
- Select Save.
To identify the appropriate SAP Concur List for mapping, in SAP Concur:
- Navigate to Forms and Fields in Expense Administration.
- Select the appropriate Form Type.
-
Select the Form Fields tab.

- Select the appropriate Form Field record.
- Select the field to map in Veeva CRM.
-
Select Modify Form Fields. The appropriate list to use when mapping this field in Veeva CRM displays in the List field.
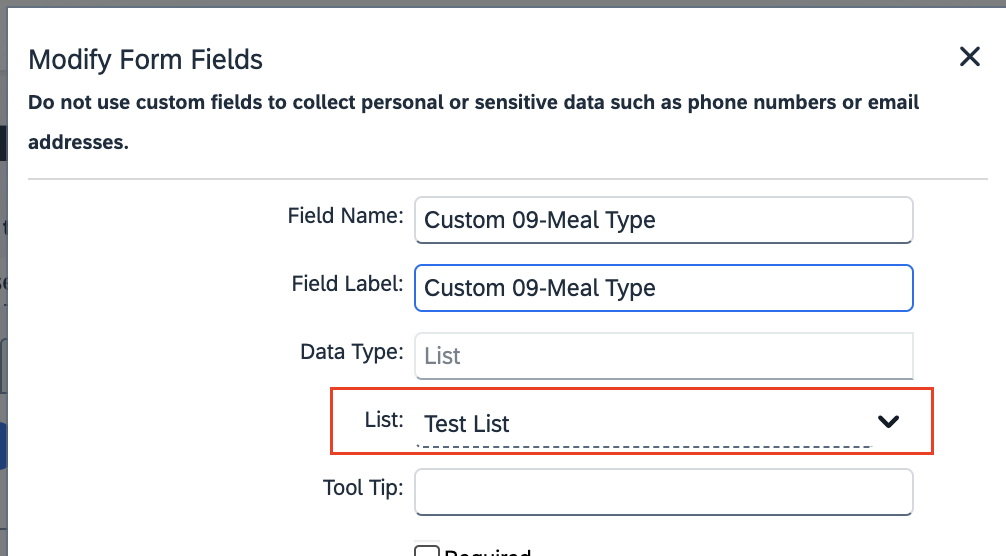
See SAP Concur Technical Documentation for more information.
Sync Details in the SAP Concur Sync Log
To troubleshoot SAP Concur Sync, a sync log is available with information to review expense information that is submitted through the connector to SAP Concur. The file contains details about each expense, attendee, receipt images, and error messages.
To download a sync log, select the appropriate row in the Concur Sync History table on the Concur Admin tab.

The sync log downloads as a CSV file with the following columns:
- ObjectType – Can be either Call or Medical Event
- ObjectId – The specific Call2_vod or Medical_Event_vod record
- OwnerId / Concur User – The owner of the record in Veeva CRM and their corresponding user ID in SAP Concur
- Response – Information returned by SAP Concur on the specific expense, attendee, or other synced record
- Error – Displays any error messages for the synced row, if applicable
Submitting Multiple Call Expenses to SAP Concur
End users may incur multiple expenses as part of meetings with HCPs, for example, meals and beverages purchased for a lunch and learn. Admins can configure the Veeva CRM integration with SAP Concur to enable end users to report multiple expenses within calls, avoiding manual entry in both systems.
End users can create multiple expenses as part of a call report. These call expenses can be configured as part of the SAP Concur integration and submitted for expense reporting.
Creating Expense Types
Admins must create Expense_Type_vod records that map to SAP Concur to allow end users to select different expense types when entering calls.
Expense_Type_vod records must utilize a corresponding SAP Concur ExpenseTypeCode. To retrieve the list of expense codes from SAP Concur:
- Log in to SAP Concur as an admin with access to Expense Admin.
- Navigate to Localization > Export Localization.
-
Select Expense Types.
- Select Export.
-
Open the downloaded localization txt file. This file contains available ExpenseTypeCode used for mapping to Expense Type.

Once all Expense Type Codes are retrieved from SAP Concur, create all appropriate Expense_Type_vod records in Veeva CRM with the following properties:
- Exclude_From_vod – This multi select picklist must not have Call_vod selected
- Expense_Code_vod – Populate this field with the corresponding SAP Concur ExpenseTypeCode
- Active_vod checkbox enabled
Expense_Type_vod records used for call expenses can also be used with Events Management Expenses. Parent Expense Types are not supported.
Viewing Expense Line Mappings
Mappings for submitting multiple expenses to SAP Concur can be found in the Expense Line to Expense Entry section of the Concur Admin tab. The following mappings are available by default:

Creating Multiple Expenses on a Call
End users can enter multiple expenses from Call2_vod records:
- Navigate to the section of the call report containing the Expense_Amount_vod field.
-
Select Add Line.

-
Populate the following fields:
- Transaction_Date_vod – Defaults to either the Call_Datetime_vod or Call_Date_vod field
- Expense_Type_vod – Select the appropriate active Expense_Type_vod record. Records with an Exclude_From_vod field containing Call_vod do not display for selection
- Amount_vod – The amount of the expense
- Description_vod – This field is optional
- Select Add Line again and repeat this process to enter multiple expense lines.
-
Select either Save or Submit. Saving the call does not change the Expense_Post_Status_vod field, and the user can still change the expense. Submitting the call sets the Expense_Post_Status_vod field to Pending when the expense amount is greater than zero.
When Attaching Expense Receipts for Call Reporting with SAP Concur is enabled, receipts are saved to the parent call. Receipts are consolidated and submitted with each expense line to SAP Concur.
Creating Multiple Expenses on a Call is available on the CRM Desktop (Windows) platform using High Performance Call Report.
Once calls with multiple expenses are saved or submitted, Expense_vod records are created for each added expense line.
Syncing Calls with Multiple Expenses to SAP Concur
Calls with multiple expenses are synced to SAP Concur by scheduling the SAP Concur Sync or manually initiating the sync from the Concur Admin tab.
Expense_vod records created from Call2_vod records are synced to the connected instance of SAP Concur based on the configured field mappings.
The results of sync processes can be reviewed in the Concur Sync History table on the Concur Admin tab.

Each row in the table contains the following information:
- Total Call Expenses – The number of expense lines submitted
- Total Call Expense Attendees – The total number of attendees submitted per expense. If there are multiple expenses per call the number is multiplied by the number of call attendees.
- Total Expense Receipts – The number of expense receipts
Selecting a job in the table downloads a spreadsheet for all synced records for the selected area, enabling admins to view more details about each synced record.
Territory Management
Tracking Manual Territory Alignment History
The Manual Territory Alignment History object in Veeva CRM tracks when end users manually add an account to their territory in order to document interactions. Records of this object provide an auditable history of when an account was manually assigned to a territory that can be used by business admins and other management groups for both reporting and for use in territory alignment rules.
Manual Territory Alignment History records are automatically created whenever a user manually assigns an account to their territory, and contains references to the user, account, the account’s previous territories, and the account’s new territories.
Using Manual Territory Alignment History Records
The Manual_Territory_Alignment_History_vod object tracks the manual assignment of an account to a territory when added via one of the following features:
Manual_Territory_Alignment_History_vod records are not created when the account is added to the territory using Network Account Search. If Network Account Search and Global Account Search are both enabled for a user's profile, Network Account Search is used.
When an Account_Territory_Loader_vod record is successfully created or updated via one of the above features, a Manual_Territory_Alignment_History_vod record is created with the following fields:
- User_vod – References the user who initiated the manual alignment
- Account_vod – References the account the user manually aligned
- New_Territories_vod – The list of all selected territories added to the Territory_to_Add_vod field on the Account_Territory_Loader_vod. Territories are listed in semicolon separated format.
- Previous_Territories_vod – The list of all territories the account was aligned to prior to the manual alignment, including territory alignments based on the ObjectTerritory2Association records for the account. Territories are listed in semicolon separated format.
- Source_vod – How the manual alignment was initiated. Available values are:
- Global_Account_Search_vod
- Stakeholder_Navigator_vod
- Account_Hierarchy_vod
- Platform_vod – The platform the user used to perform the manual alignment
If the user manually assigns multiple accounts to their territory at once, one Manual_Territory_Alignment_History_vod record is created for each account added.
