

22R3.0 Functionality Guide
The Functionality Guide is intended for Sales Operations, Business Administrators, System Integrators, and others responsible for making decisions about what features are needed for end users to be successful and deciding which features work together with existing customer configurations.
Account Management
Improved Account Picker for Call Attendees
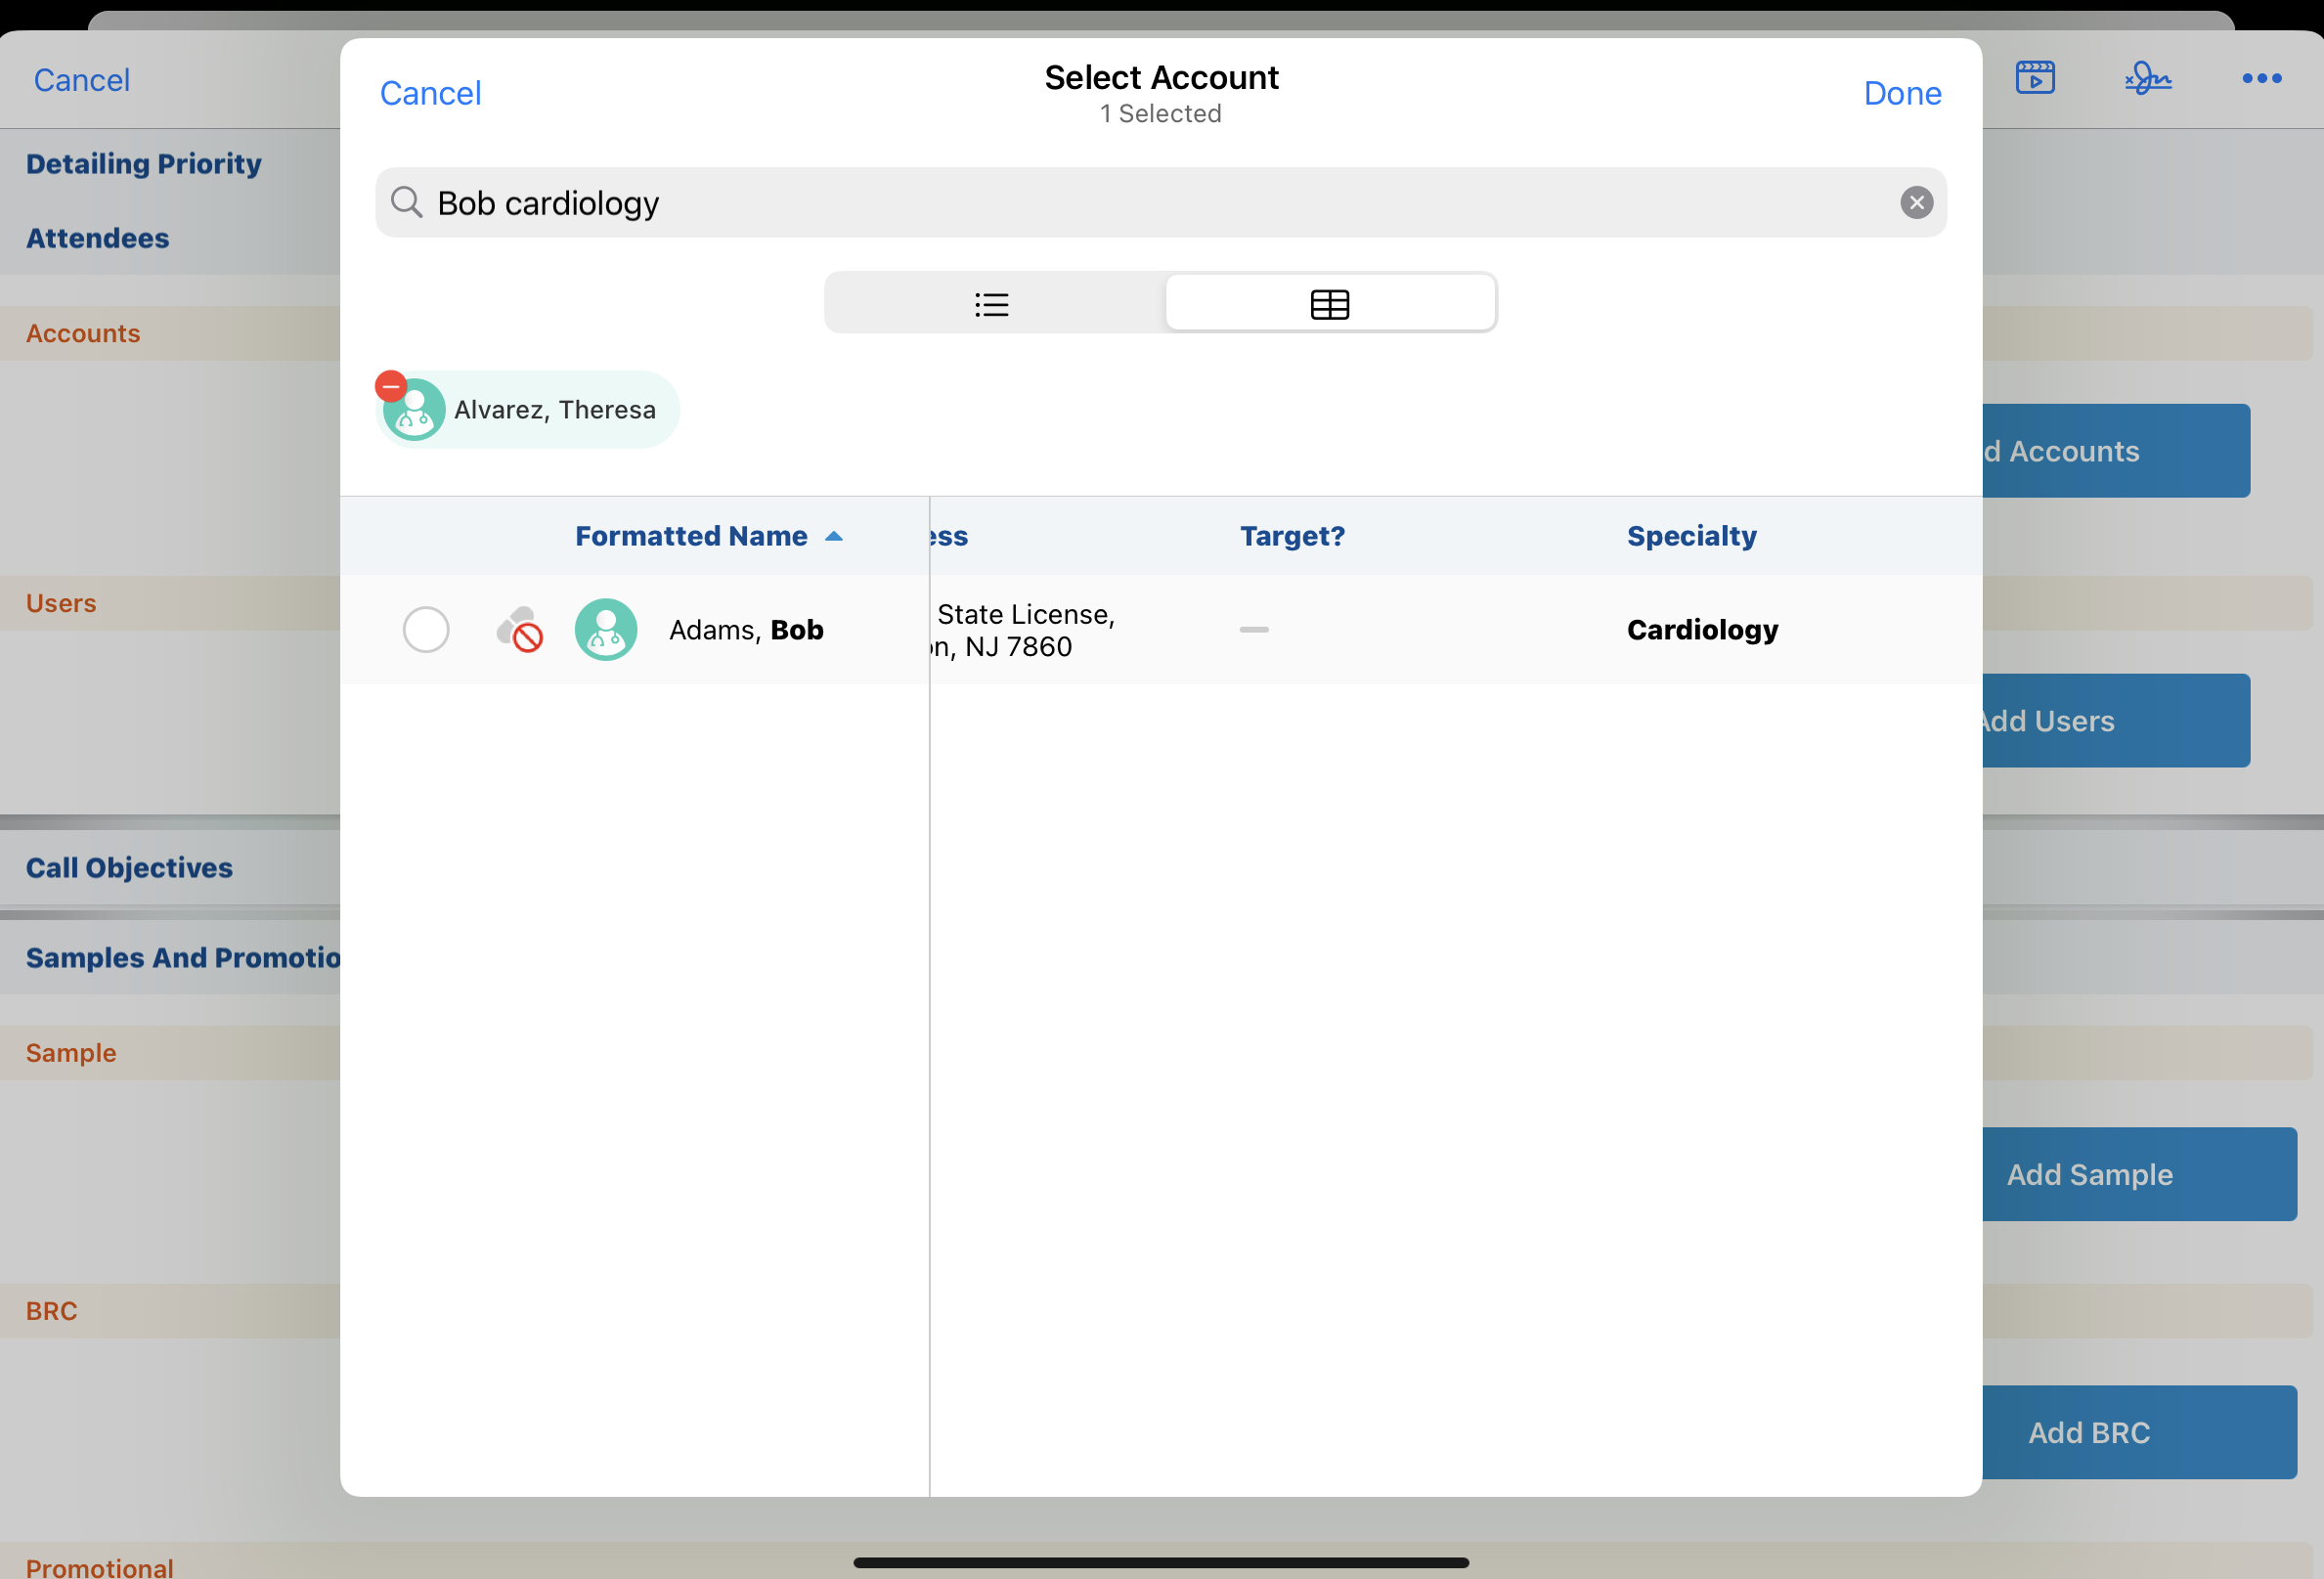
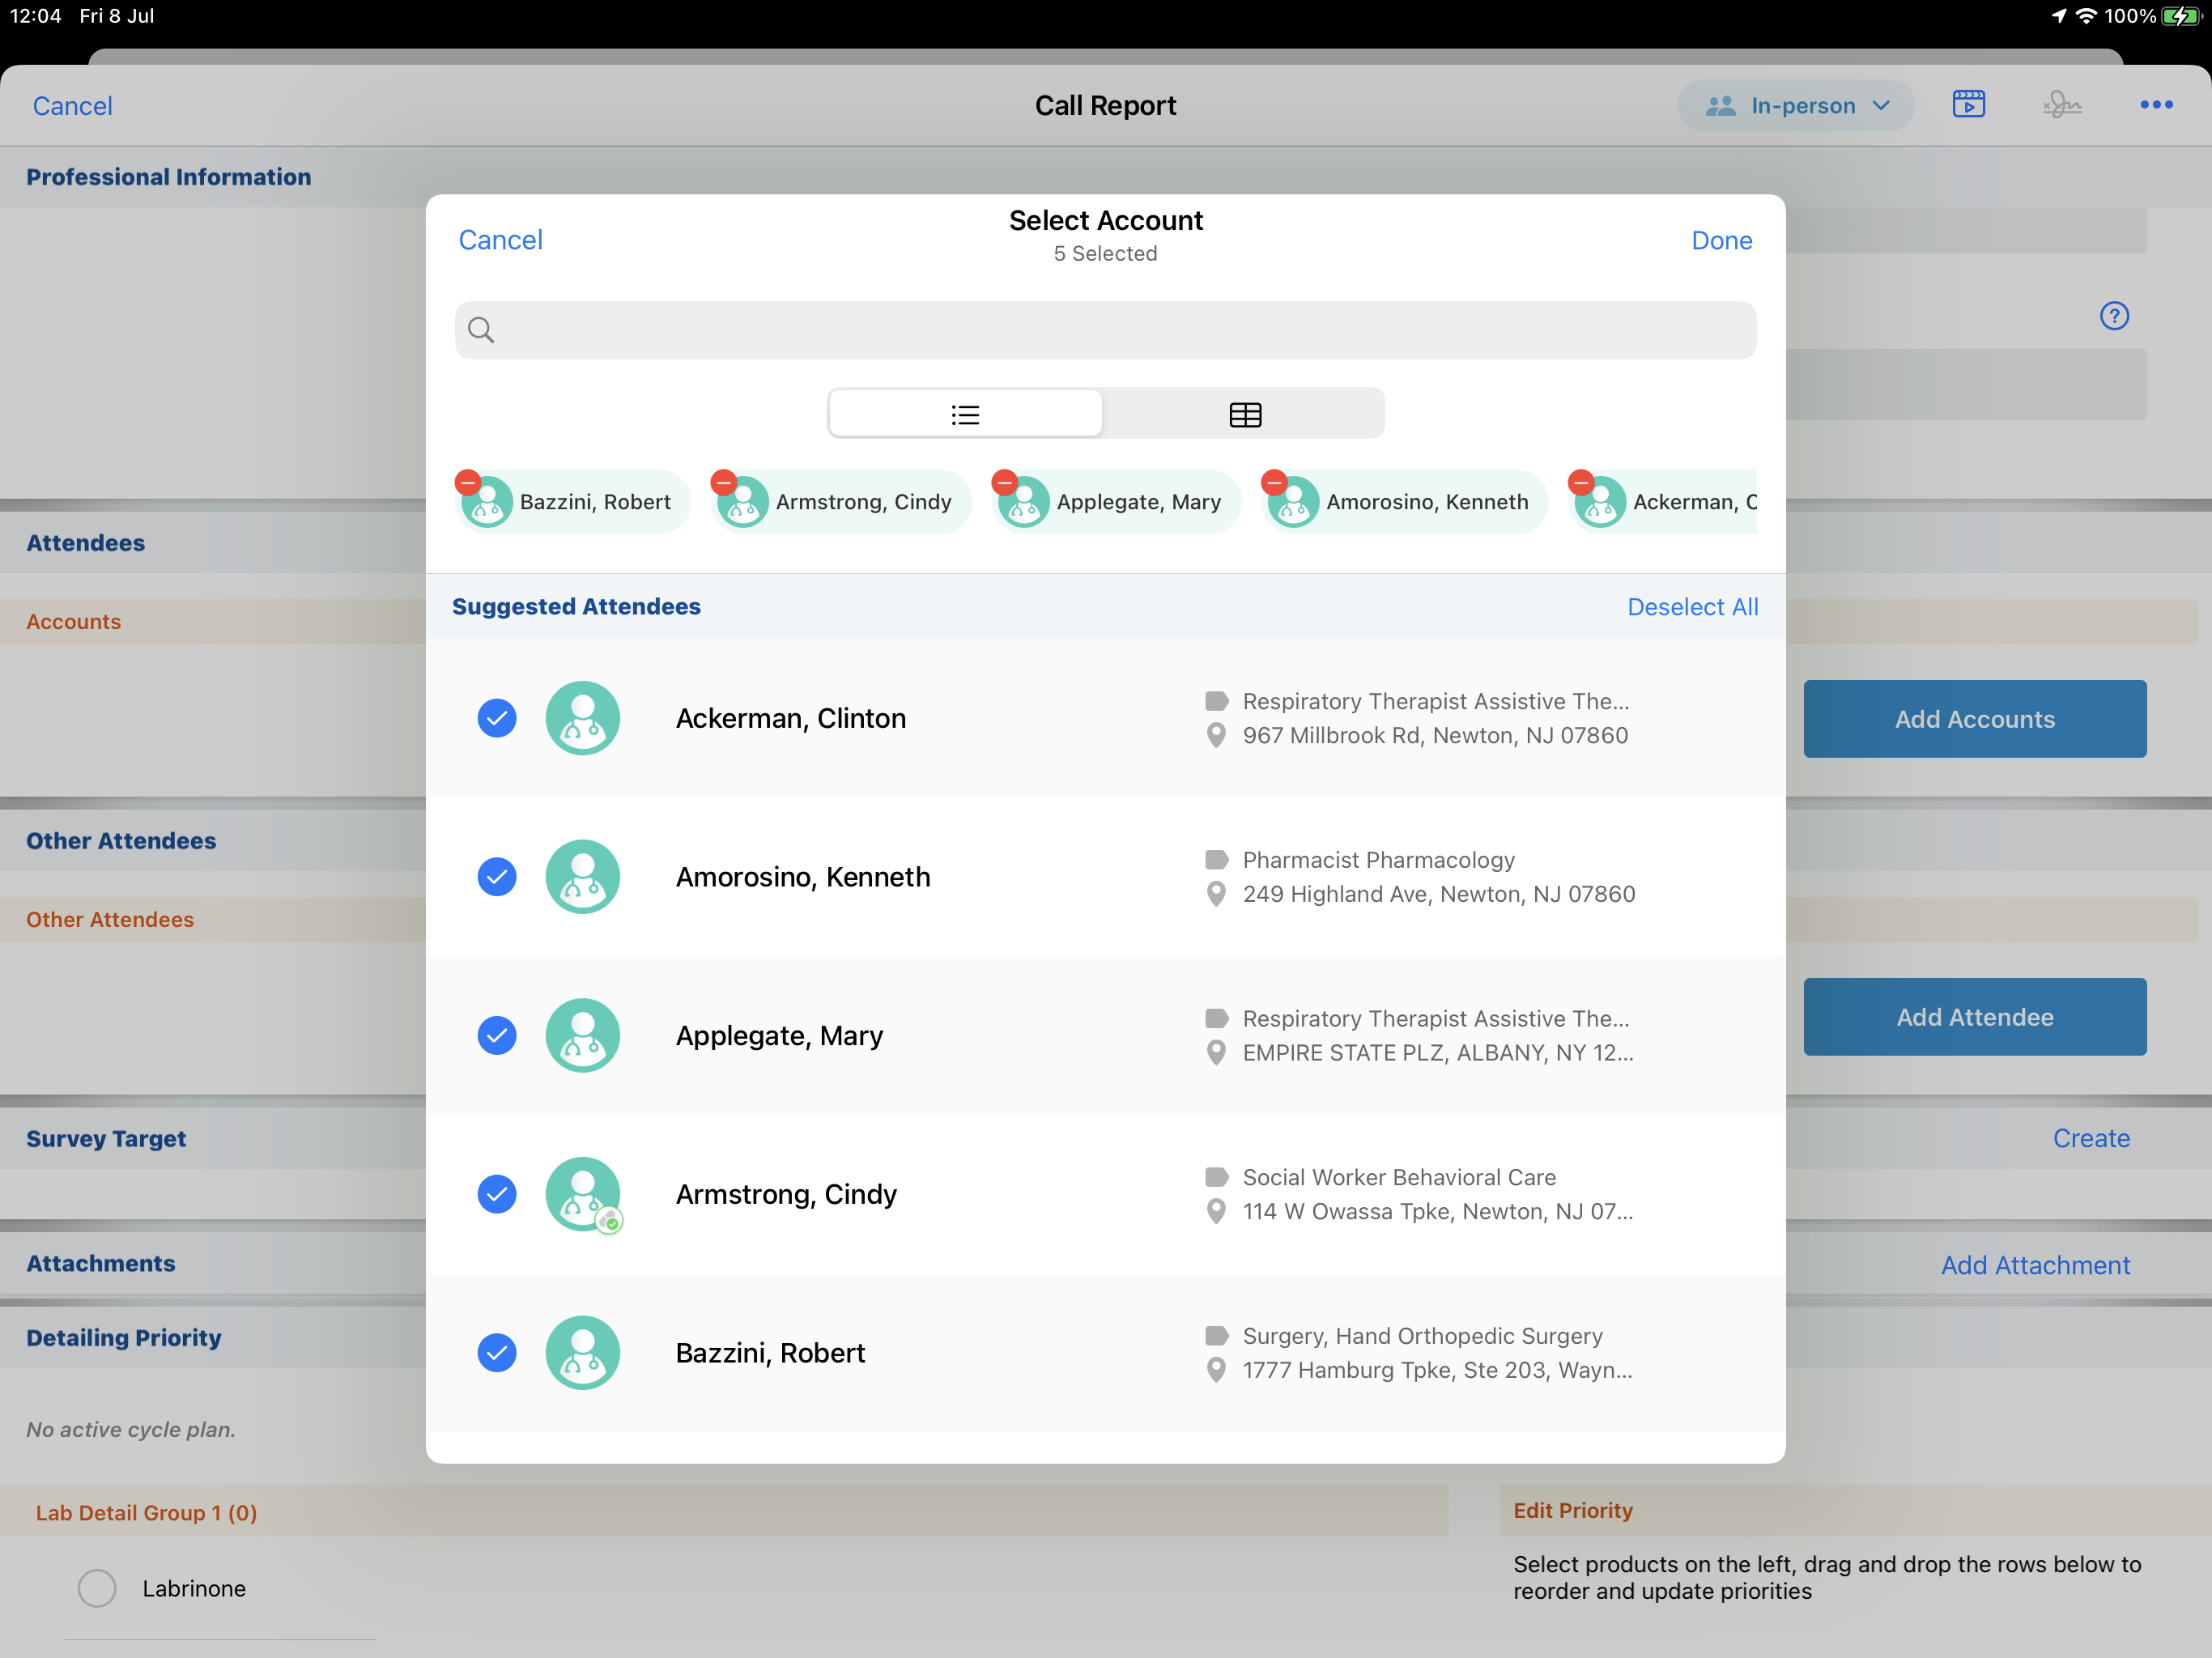
To enable customers to easily find accounts, the Improved Account Picker is now available when selecting Call Attendees. Users can select multiple Call Attendees and add them all at once. Also, users can see the record type icon, highlighting of search terms, and table view with custom defined fields when adding Call Attendees.
Sarah Jones just finished a call with Dr. Ackerman where she presented information on Restolar. Dr. Theresa Alvarez and Dr. Bob Adams were also present for the discussion. When completing the call report on her iPad, Sarah adds the call attendees. She searches for Alvarez and sees her search term highlighted in the row containing Dr. Alvarez’s information. She selects the row to include her as an attendee. She searches for Bob, but sees multiple results. Sarah adds Cardiology to the search field, and the list displays Dr. Bob Adams as the only result, with the match against the Specialty field highlighted. She selects the row for Dr. Adams and selects Done. Both doctors are added to the call report as attendees.
This feature does not require configuration. Admins can add custom fields to the Improved Account Picker Table and List views by updating the Search Layouts.
Using Improved Account Picker for Call Attendees
When searching for call attendees, users can add one or more accounts by selecting the row for each account name. The selected attendees are displayed across the top of the list. The new dialog also displays the record type icon, highlighted search terms, and a table view with custom defined fields.
To add call attendees:
- From the Attendees section of the Call Report, select Add Accounts.
- Enter search terms in the Search field.
- Select the row for each account you want to add. The selected accounts display across the top of the search modal.
- Select Done.
For more information on using the Improved Account Picker to select accounts, see Improved Account Picker.
Approved Email
Favorite Email Templates and Fragments
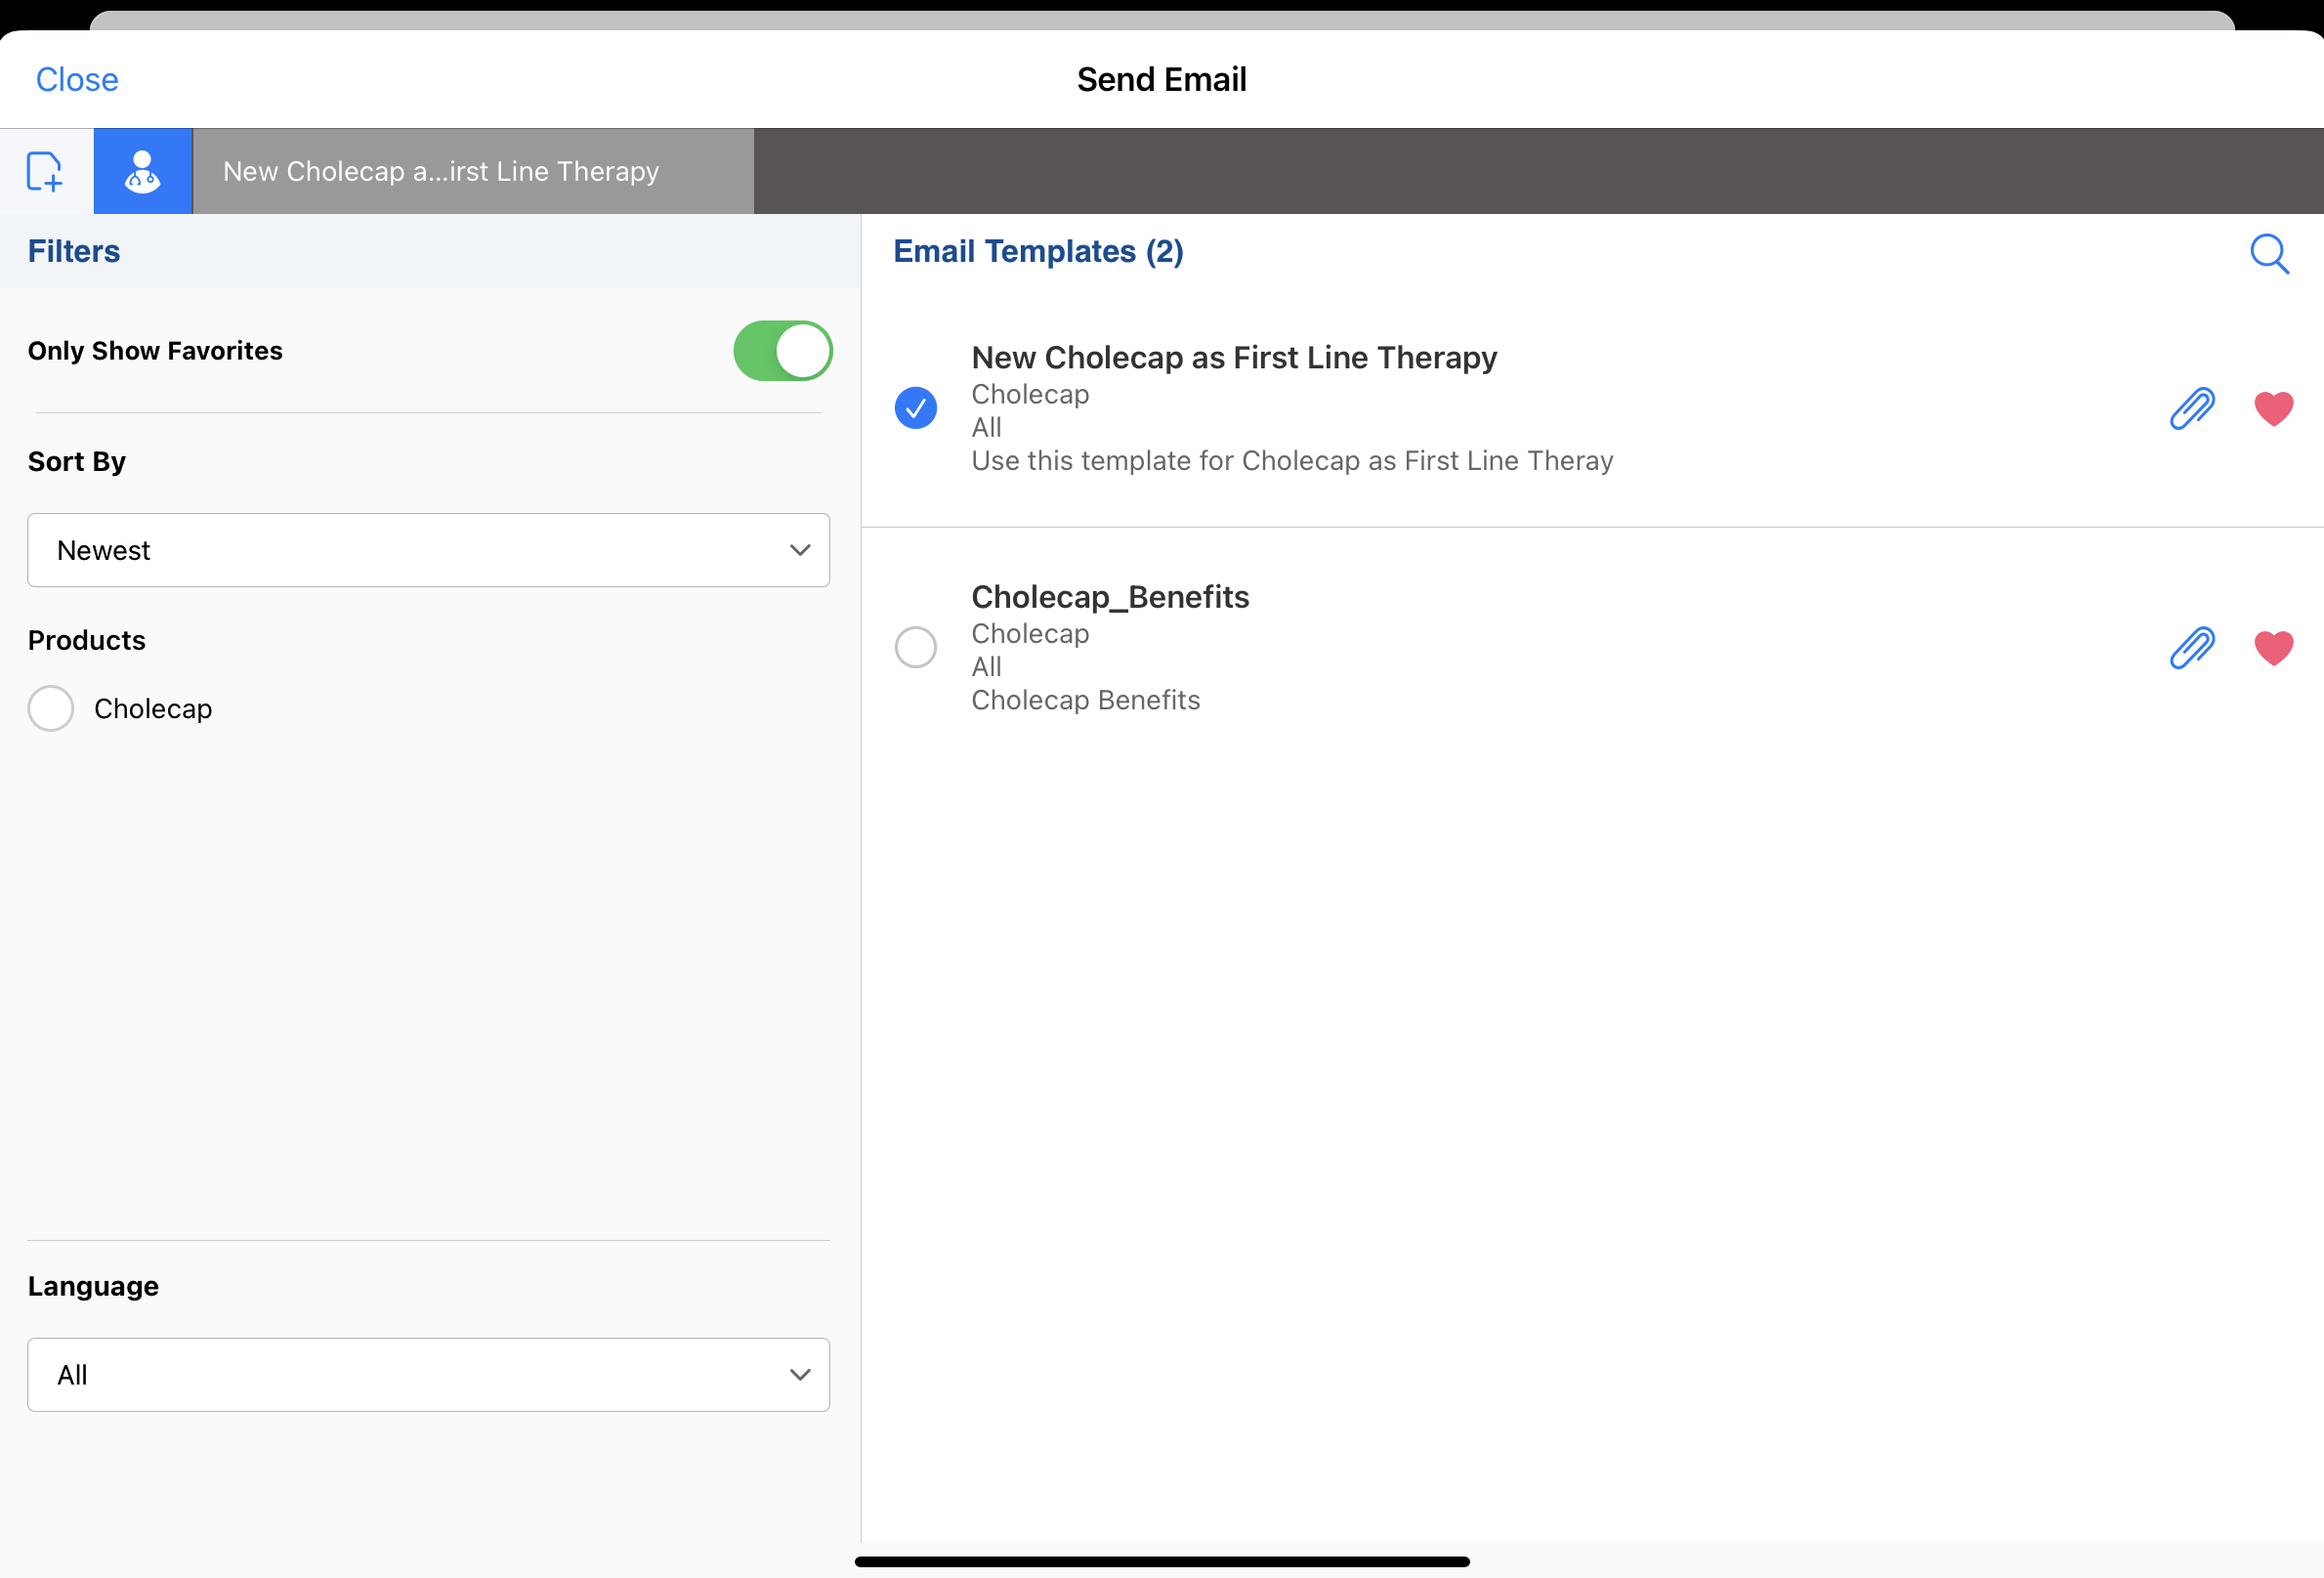
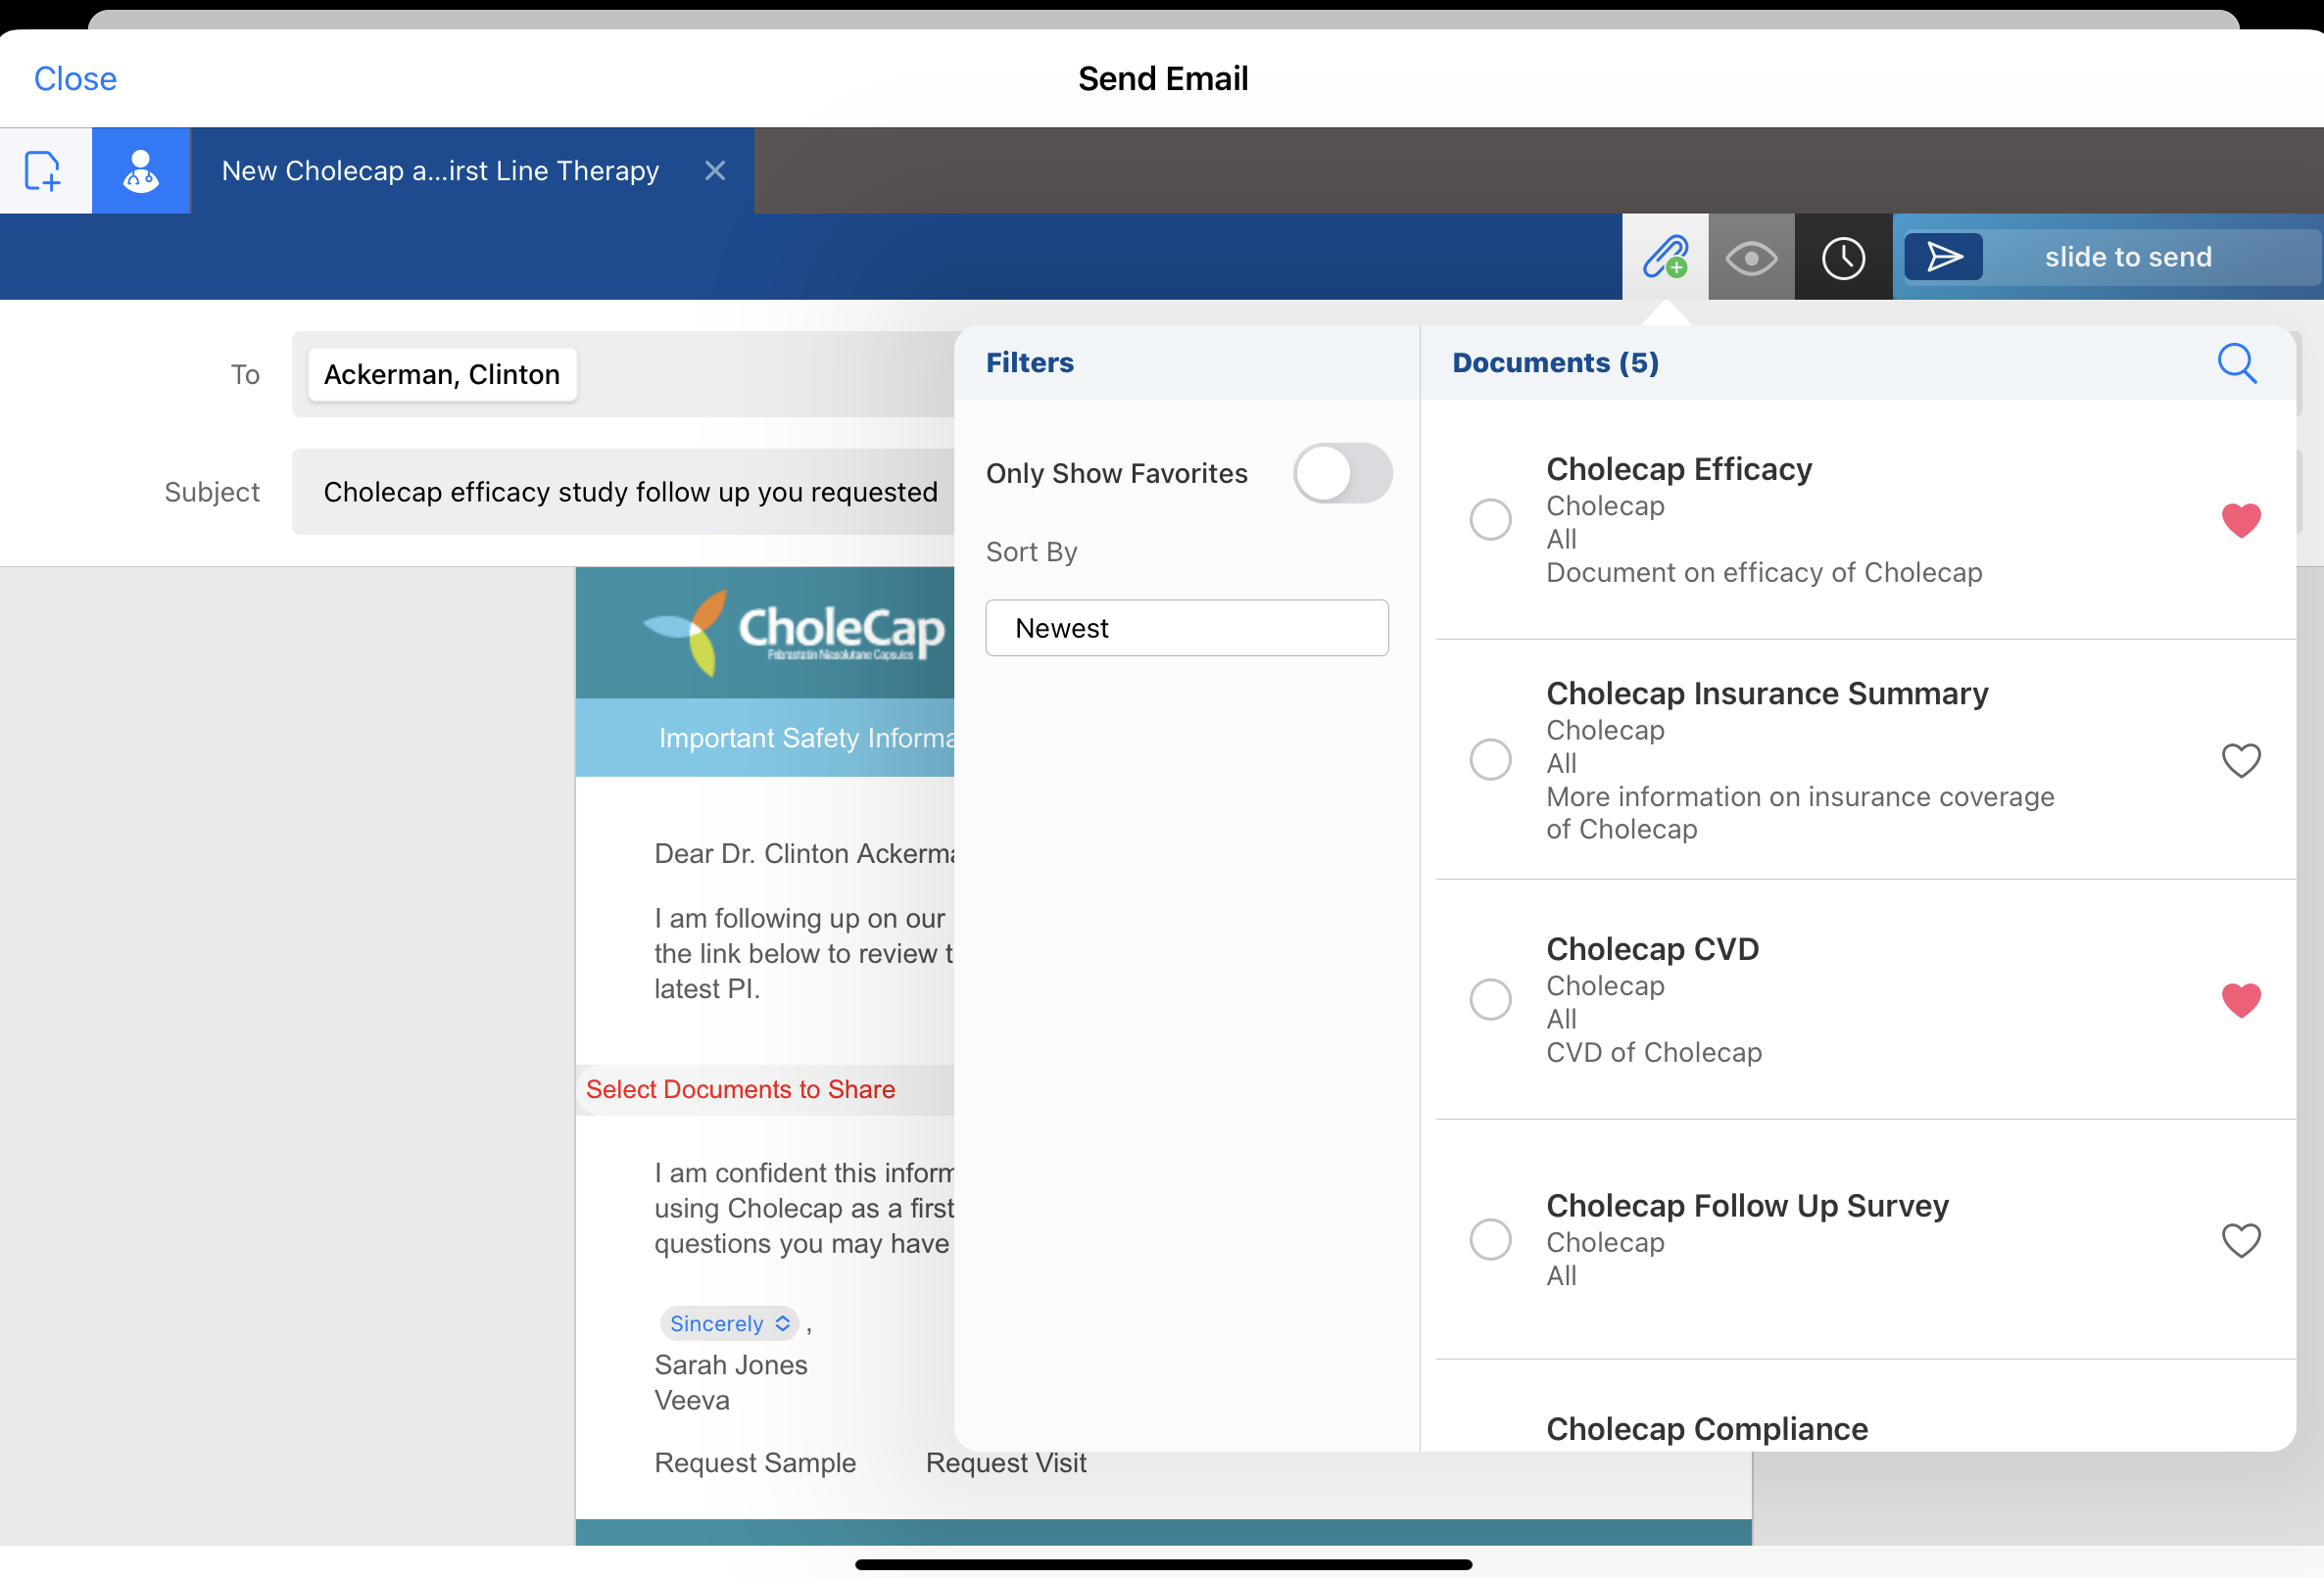
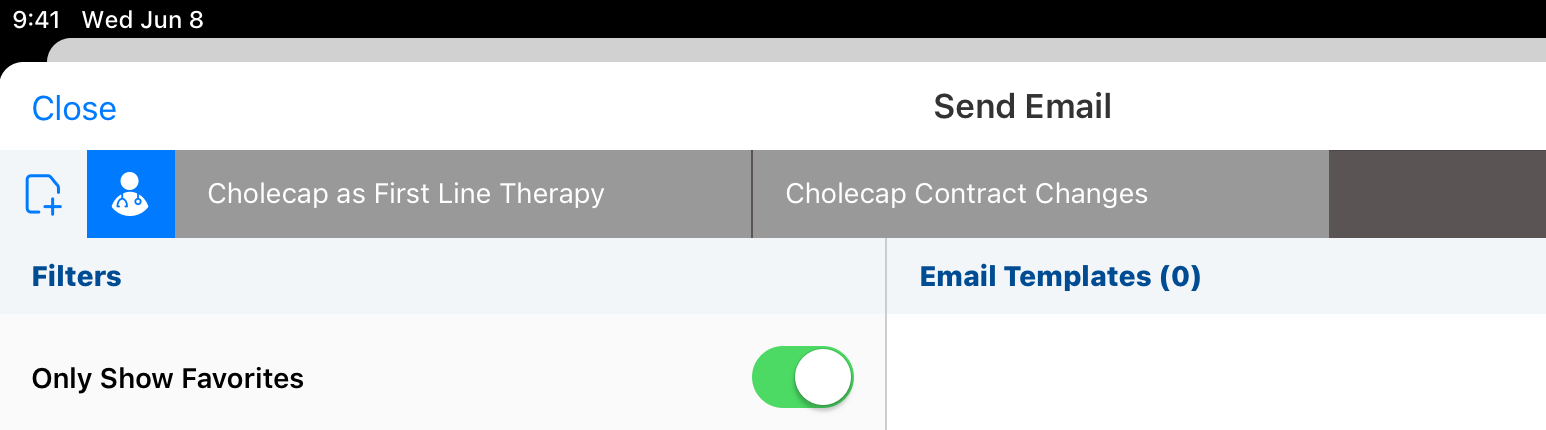
To quickly find templates and fragments used on a regular basis, users can now select the heart icon to favorite these items. This makes it easier and faster to select templates and fragments when composing emails.
For example, Sarah Jones has emailed several HCPs using a particular email template. She uses it so much, she decides to add it to her favorites by selecting the Heart icon for the template. After a meeting with Dr. Ackerman, Sarah needs to send information about the efficacy of Cholecap. From Dr. Ackermans account, she accesses the Send Email screen, selects the Only Show Favorites toggle, and selects the template she needs.
Using Favorite Email Templates and Fragments
To mark an approved email template or fragment as a favorite, access the Send Email screen and select the check box (Browser platform) or the heart icon (iPad platform) next to the template or fragment.
The ability to favorite templates and fragments is not supported in Approved Email for Events Management.
Templates and fragments are limited to one hundred favorite items each. If users try to favorite an item after reaching the limit, an error message displays.
Favorite email templates and fragments are not device-specific. When you favorite items on one device, they will display as favorites on other devices.
Filtering on Favorites
Users can select the Only Show Favorites filter when creating approved email content. This reduces the list to only the templates or fragments they have selected as favorites. The filter can be applied alongside other available filters to further refine the templates or fragments displayed.
Call Reporting
Stamping Suggestion Title and Reason on the Call Report
To help users plan and prepare for calls, the suggestion title and reason display on call reports created from Suggestions and are stamped on the call report record. Admins and managers use suggestions to recommend users take certain actions—for example, suggesting users schedule a call with a specific HCP.
On a Suggestion record, the Title and Reason fields are used to summarize the suggestion and communicate the reason for the suggestion to the end user. When users then create calls from suggestions on the Account Overview Timeline, the Suggestion tile on the Veeva CRM homepage, or from MyInsights visualizations, the suggestion title and reason are stamped and displayed on the resulting call report.
Group calls are not supported. Stamping suggestions on the call report is only supported for individual calls.
For example, Sarah Jones schedules a call with Dr. Ackerman from the Suggestion tile on the Veeva CRM homepage. The Reason field indicates Dr. Ackerman recently viewed Cholecap efficacy information in a marketing email. When Sarah prepares for her call with Dr. Ackerman, she sees the suggestion reason on the call report and ensures she is prepared with follow-up information on Cholecap’s efficacy.
Prerequisites
Viewing Stamped Suggestions on the Call Report
When users create a call report from a call-type suggestion, the following fields are stamped on the call report based on the originating Suggestion_vod record:
- Suggestion_Reason_vod field on the Call2_vod object - stamped with the value of the Reason_vod field from the Suggestion_vod record. Hyperlinks and rich text are supported.
- Suggestion_Title_vod field on the Call2_vod object - stamped with the value of the Title_vod field from the Suggestion_vod record
Suggestions are stamped on the call report only when users create a call report by accepting a call-type suggestion. When users save, edit, or submit calls, the Suggestion_Reason_vod and Suggestion_Title_vod fields are not updated.
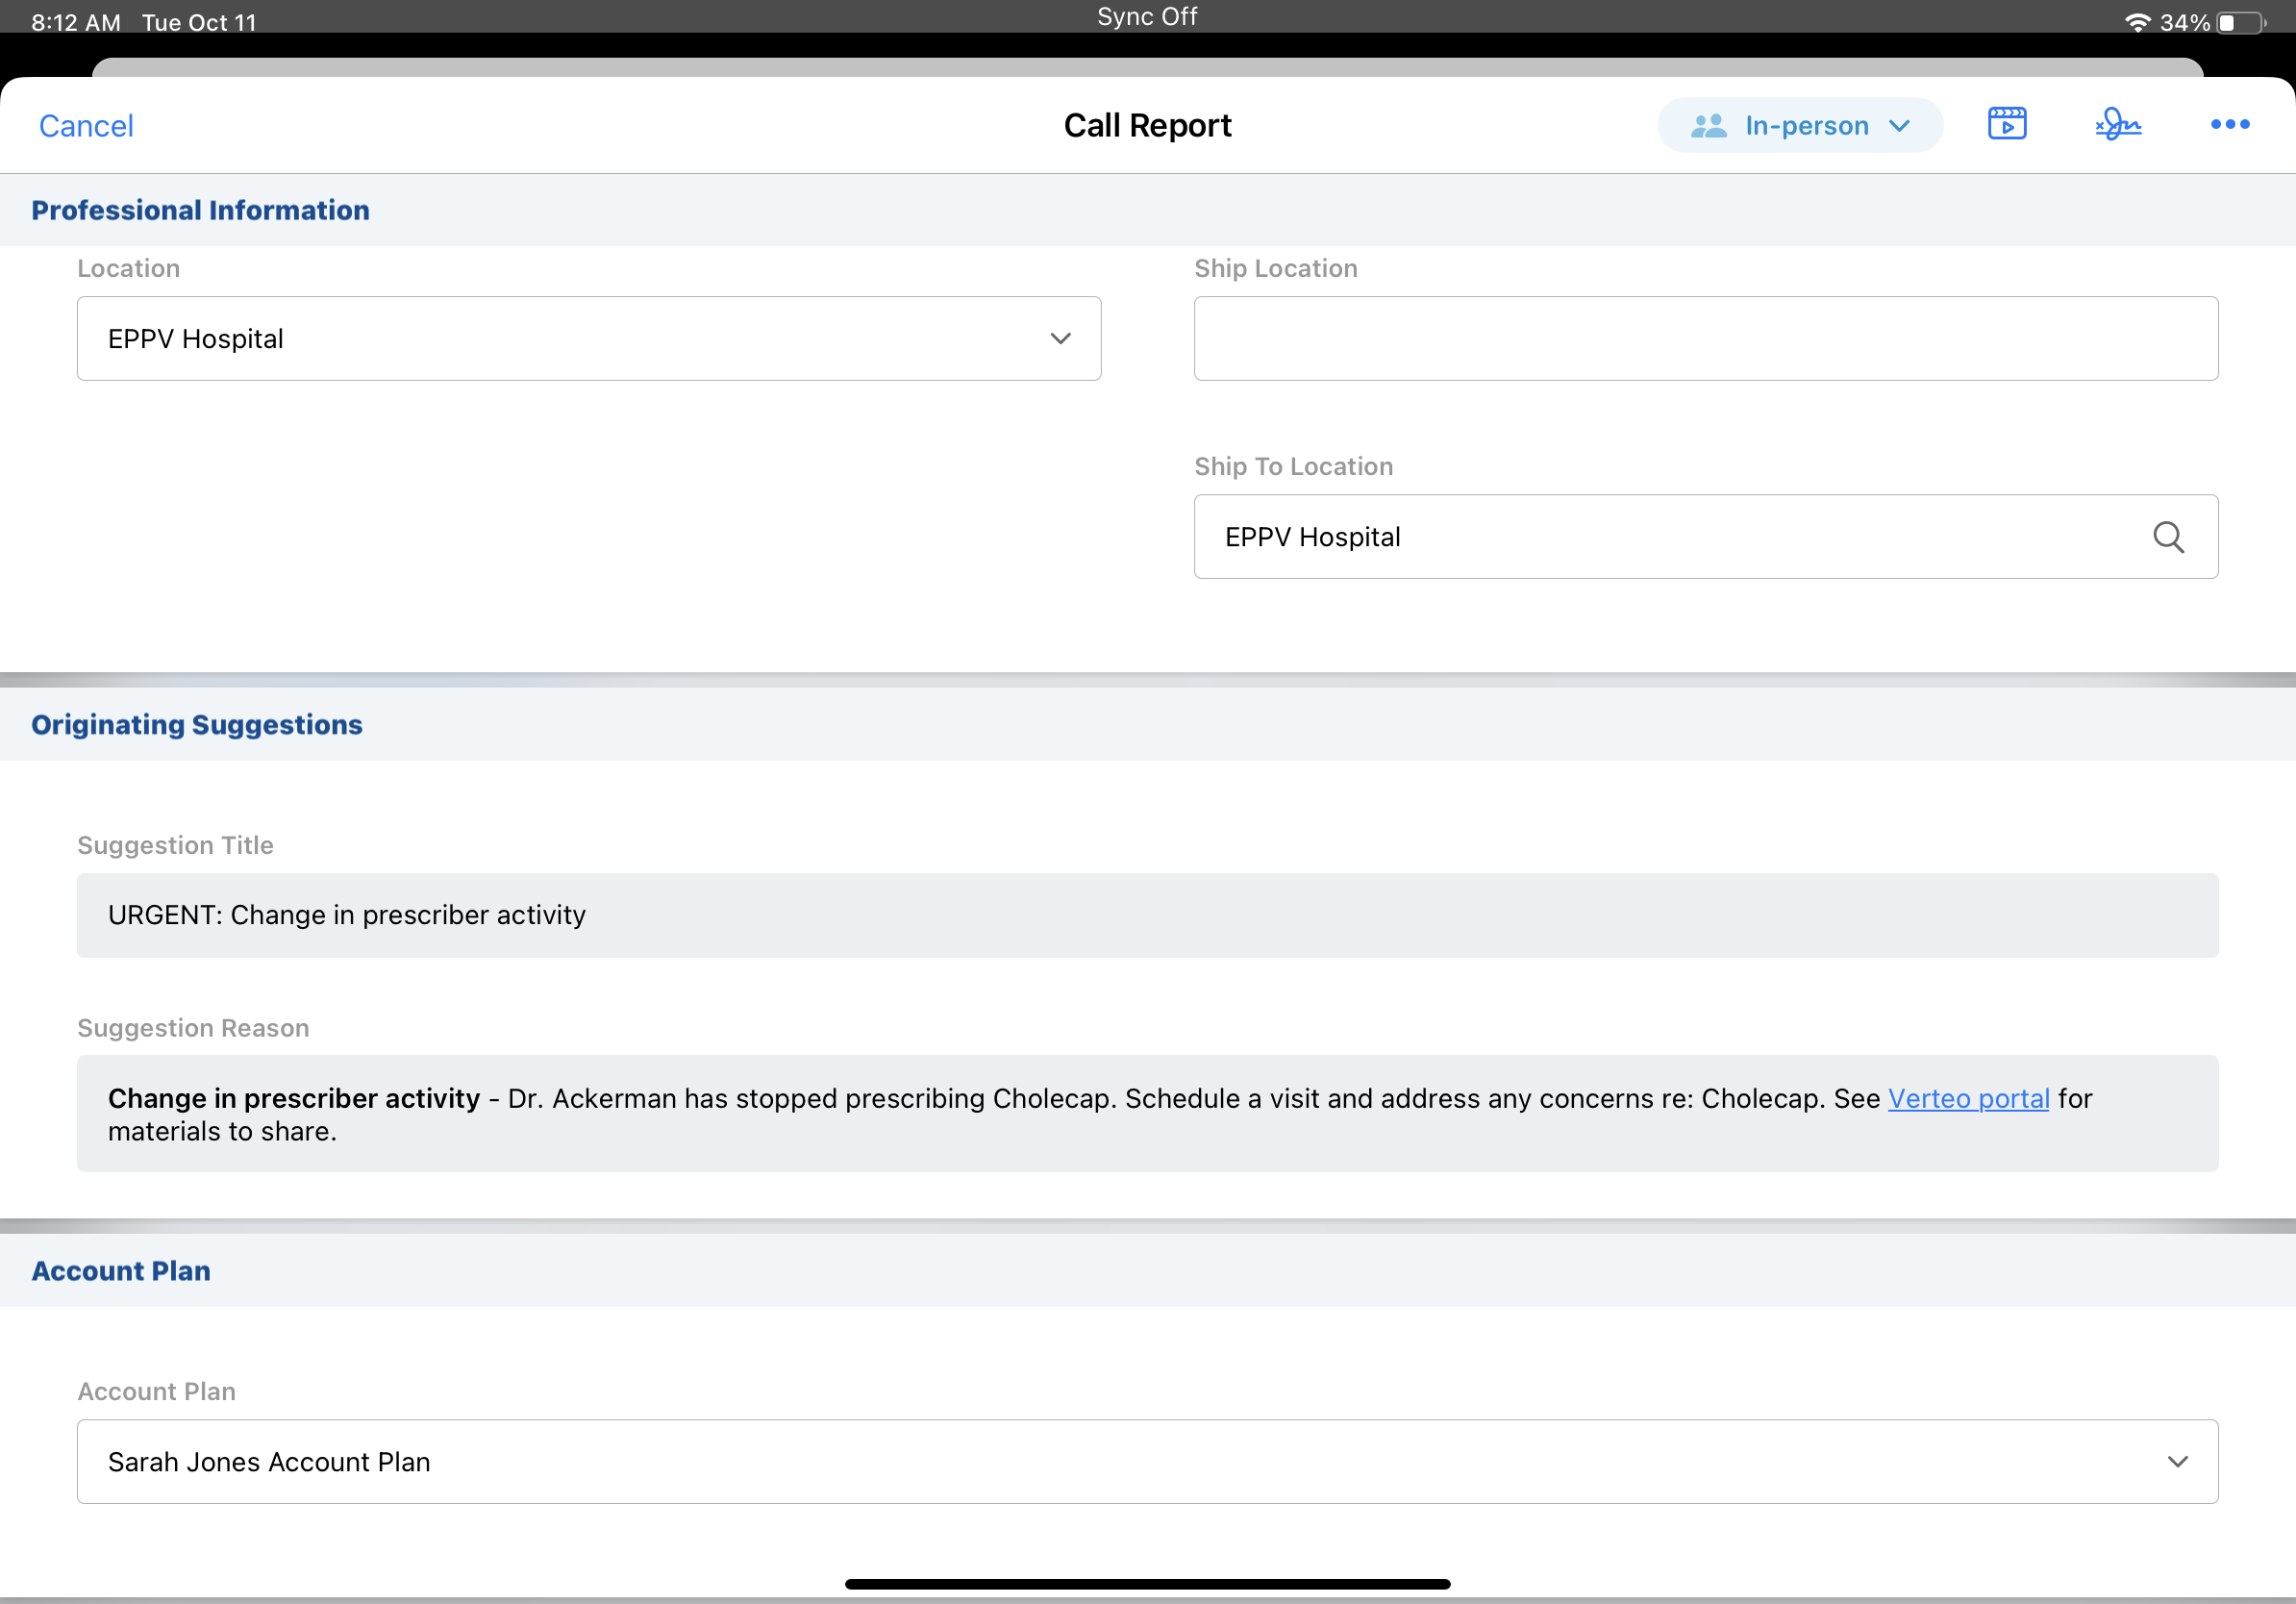
Users cannot edit the Suggestion_Reason_vod and Suggestion_Title_vod fields from the call report. To preserve hyperlinks to external materials, Suggestion_Title_vod and Suggestion_Reason_vod always display as read-only on the call report, regardless of users’ FLS permissions.
Platform Specific Details
- On the CRM Desktop (Mac, Windows) platforms, the stamped suggestion title and reason display on existing call reports, but stamping does not occur on the platform
- iPhone users can only execute call-type suggestions from MyInsights. For more information on suggestions in MyInsights, see Deep Linking in MyInsights.
- iPad and iPhone users can select hyperlinks in the Suggestion_Reason_vod field to display external materials
- For Browser (Classic, Lightning) users, the Suggestion_Reason_vod field does not retain hyperlinks or rich text formatting
CLM
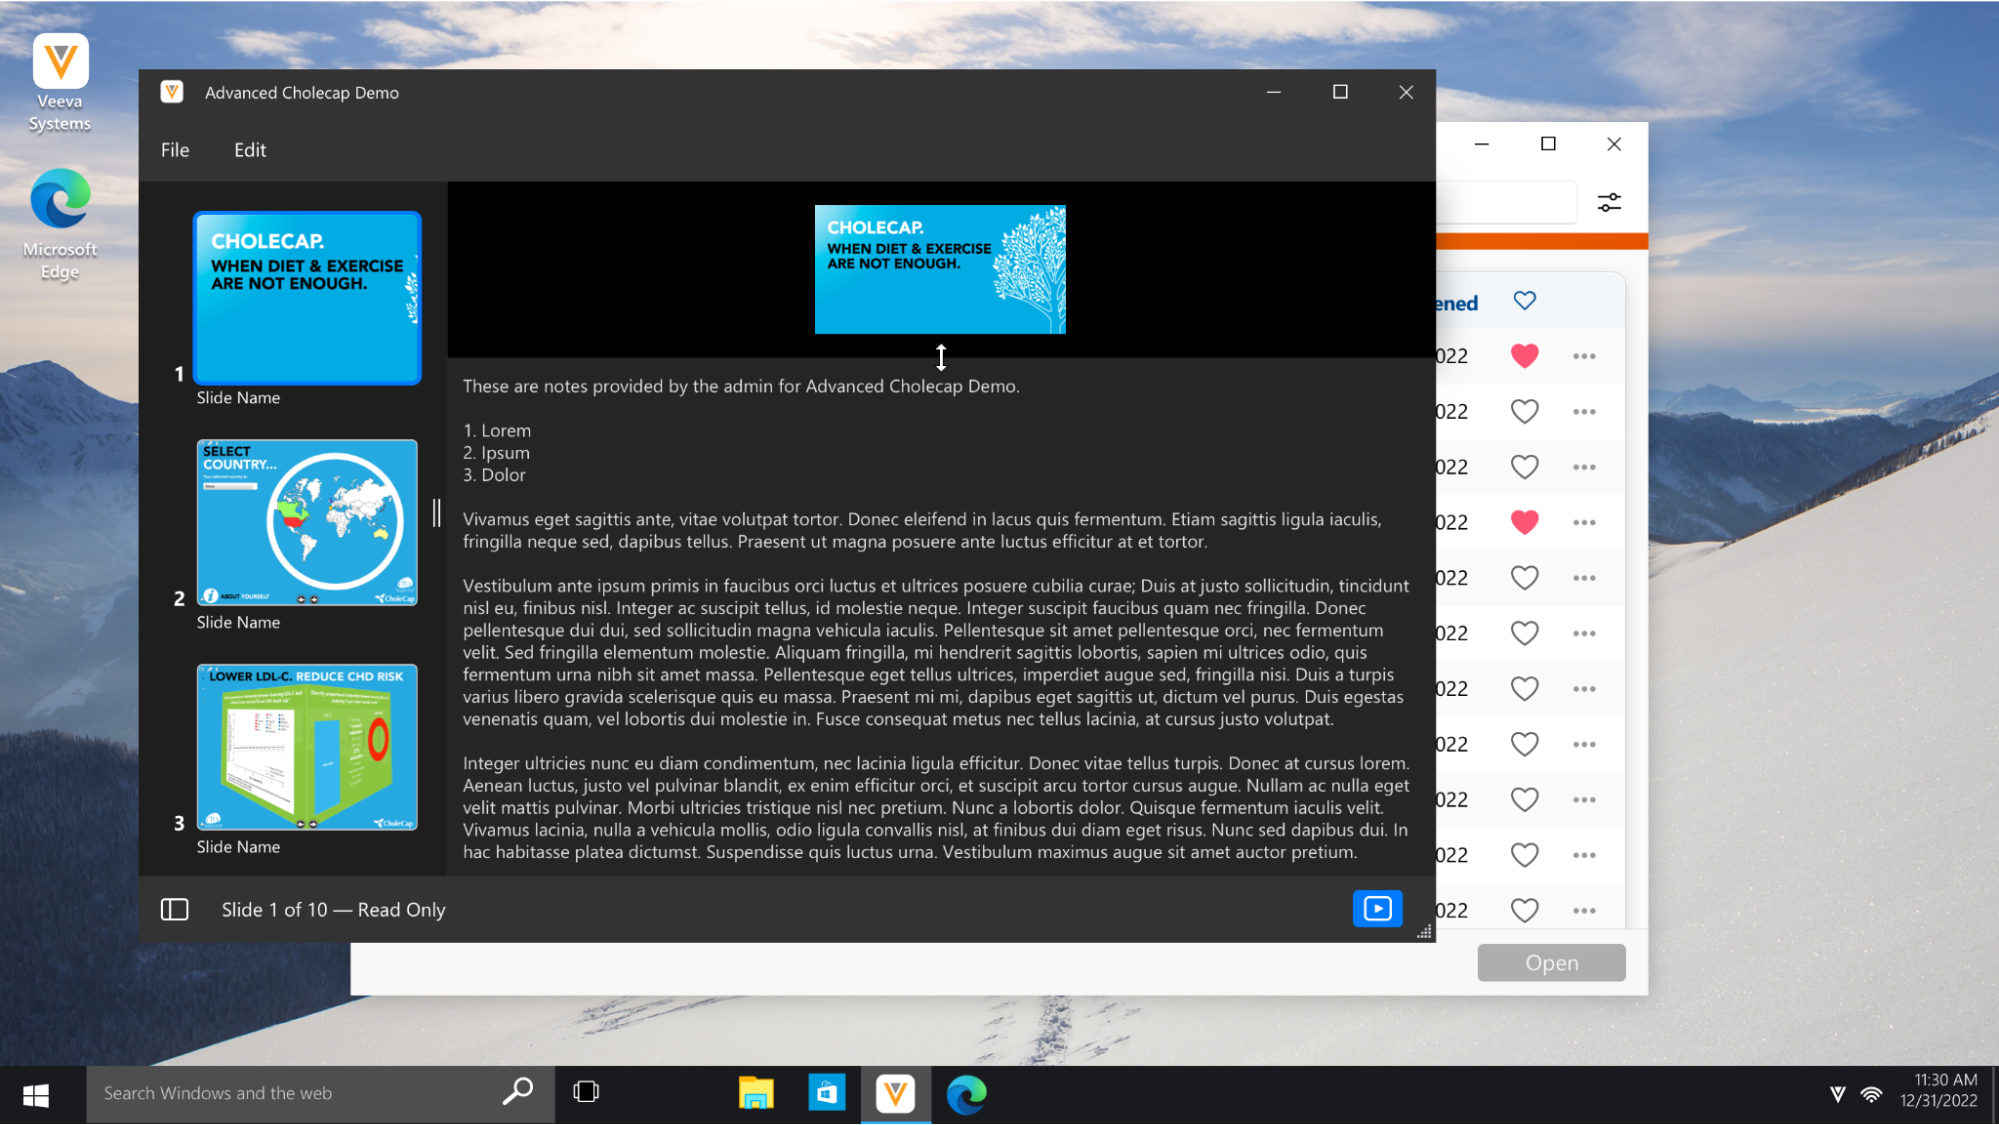
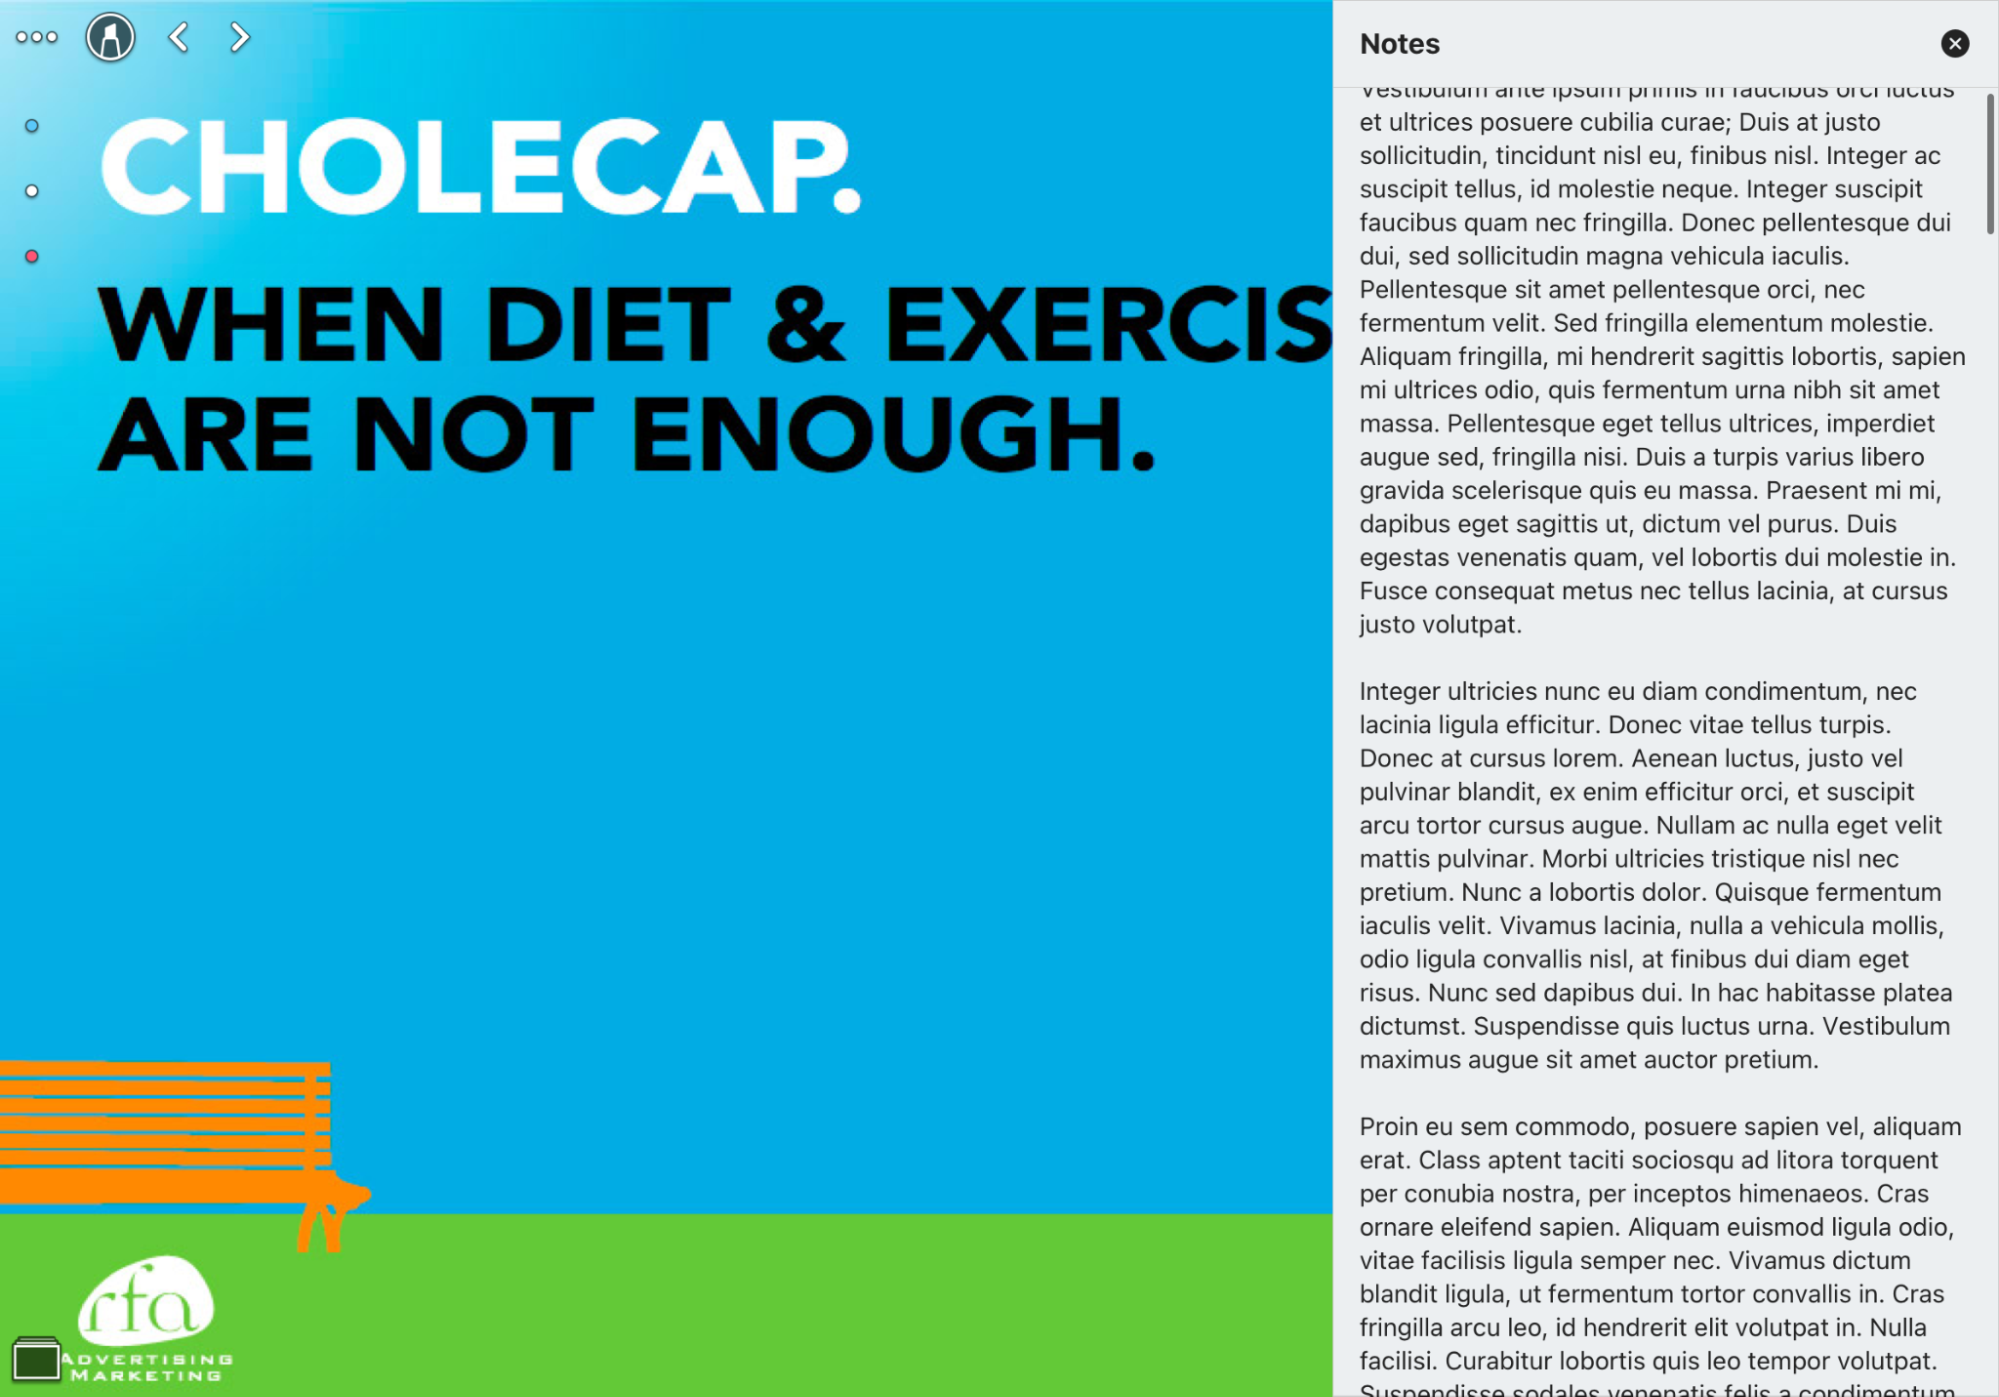
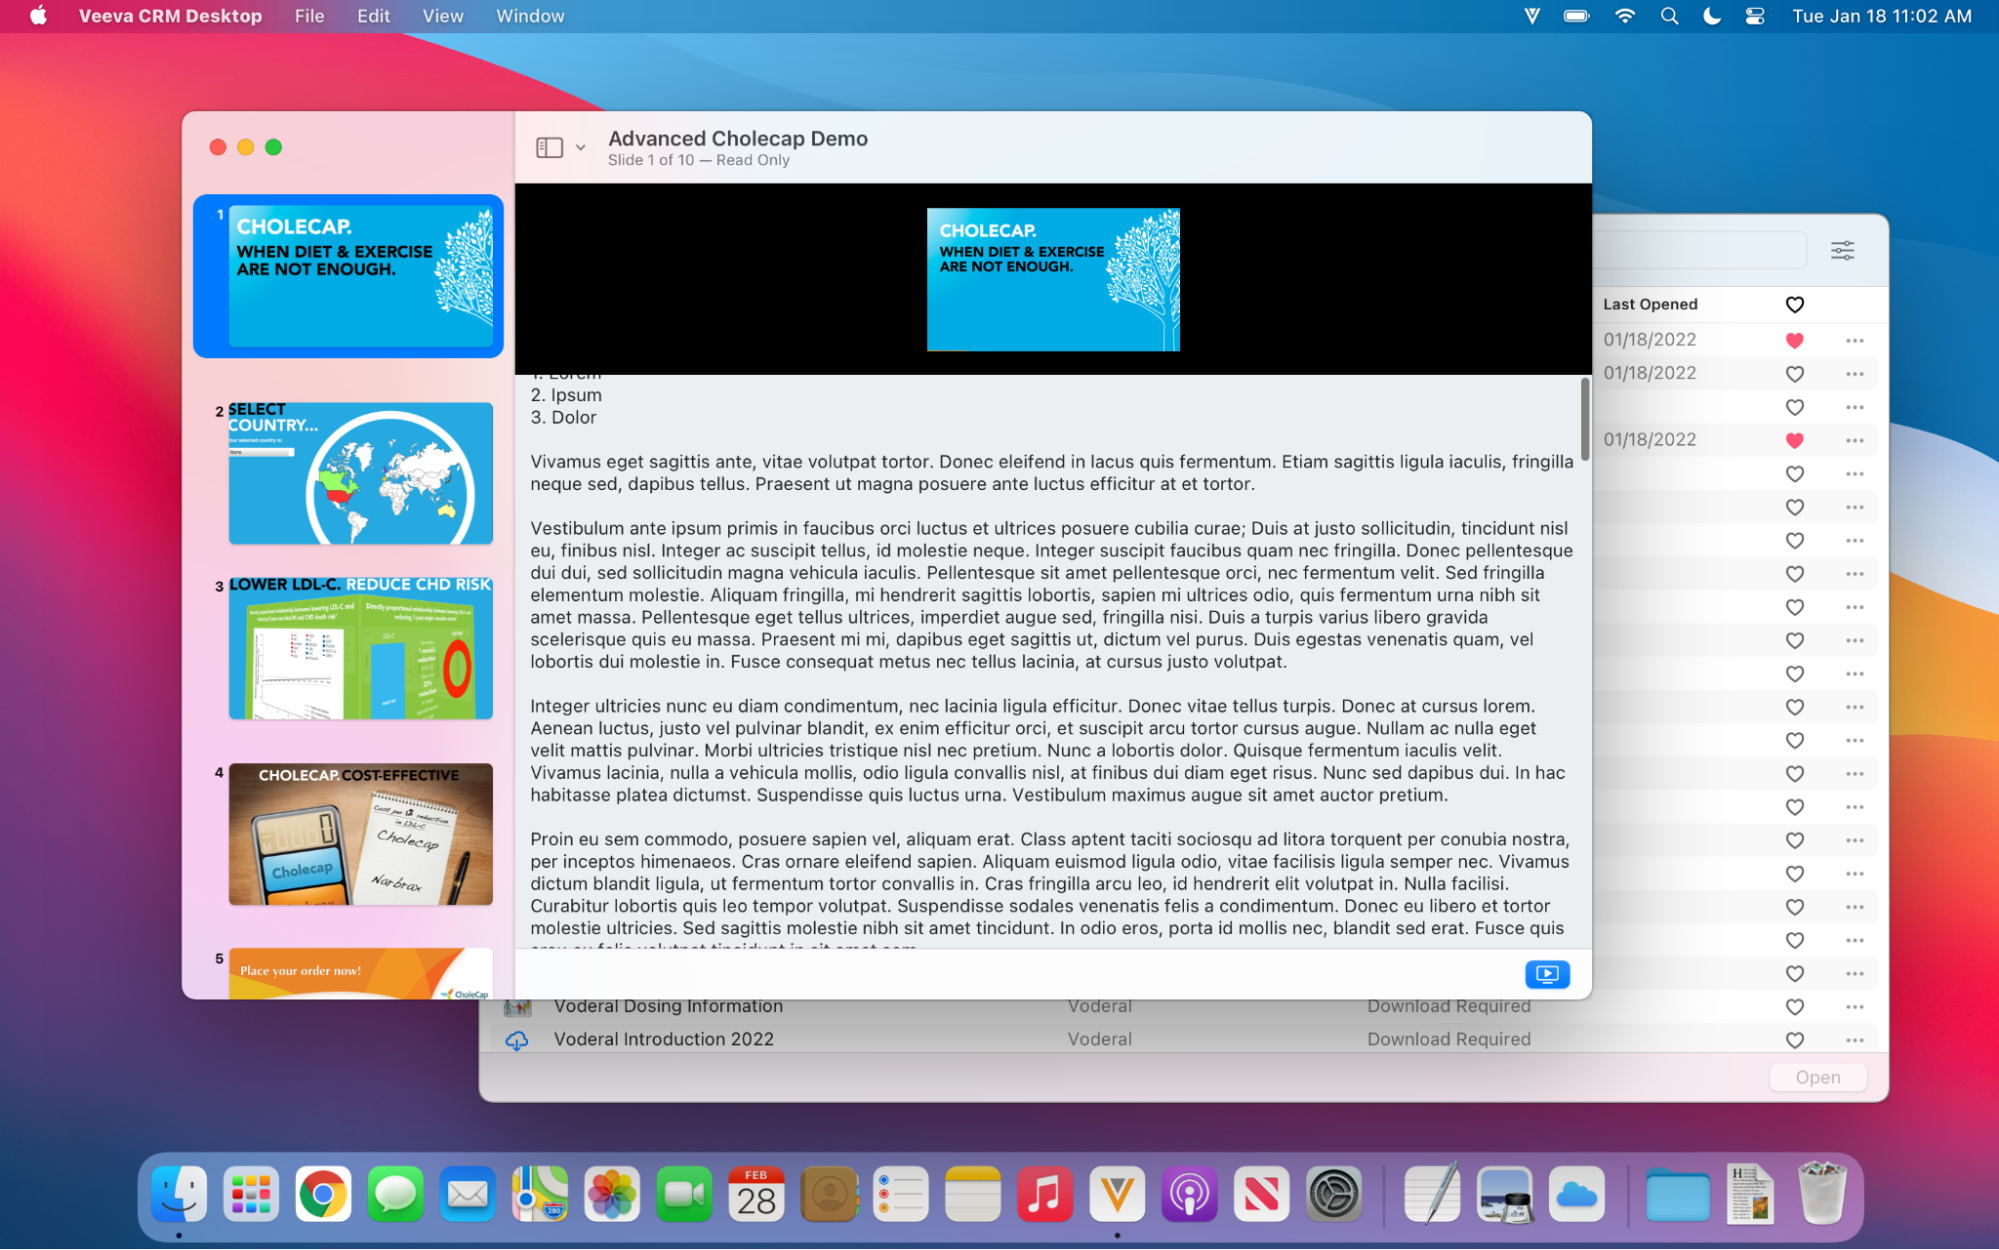
Viewing Slide Notes in Presentations
When preparing CLM content in the CLM media player, users can view notes for each key message to ensure they deliver specific, tailored content to HCPs. Slide notes for CLM content are automatically synced from Vault, allowing content creators to include all the necessary context for users when they display the content to HCPs.
PowerPoint content with slide notes must be auto-published as multi-slide presentations. See Using Vault's Auto-Publishing for CLM for more information.
Syncing Slide Notes
The slide notes for auto-published PowerPoint content are synced from Vault to the HQ_Slide_Notes_vod field on the appropriate Key_Message_vod records. Any text formatting in the slide notes for PowerPoint presentations is preserved when synced to CRM. Users can view the progress of syncing slide notes in the Slide Notes Process History section of the CLM Admin Console to check how long they need to wait for the slide notes to be available in CRM.
To process a PowerPoint presentation and sync the slide notes, the file extension must be lowercase (.pptx).
For other types of content published via binders and slides, content creators must populate the crm_slide_notes__v field on the slide documents in Vault. The crm_slide_notes__v field syncs to the HQ_Slide_Notes_vod field on the appropriate Key_Message_vod records in CRM.
In Vault, the crm_slide_notes__v field must be added to the appropriate document types and Vault integration users need Read access to the crm_slide_notes__v field.
In CRM, admins must update the field mapping in the CLM Admin Console to map the crm_slide_notes__v field from Vault to the HQ_Slide_Notes_vod field on the Key_Message_vod object in CRM.
Admins can manually update the text in the HQ_Slide_Notes_vod field on a Key_Message_vod record, but the changes are overridden in the next sync.
Best Practices
As a best practice to correctly sync slide notes, ensure the following:
- Each slide note contains fewer than 130,000 characters
- PowerPoint presentations contain 1000 slides or fewer
- PowerPoint files are less than 100MB
Viewing Slide Notes
When sharing content in an Engage meeting, sharing is paused when the user opens the slide notes and resumes when the user closes the notes. When sending a presentation via web link or QR Code®, the slide notes are not included.
When Host Screen Sharing on the iPad is enabled for the Engage Connect group to which the user belongs, sharing does not pause when slide notes are open.
To view slide notes when displaying a presentation on the iPad:
- Select the More Actions button to display the action menu.
-
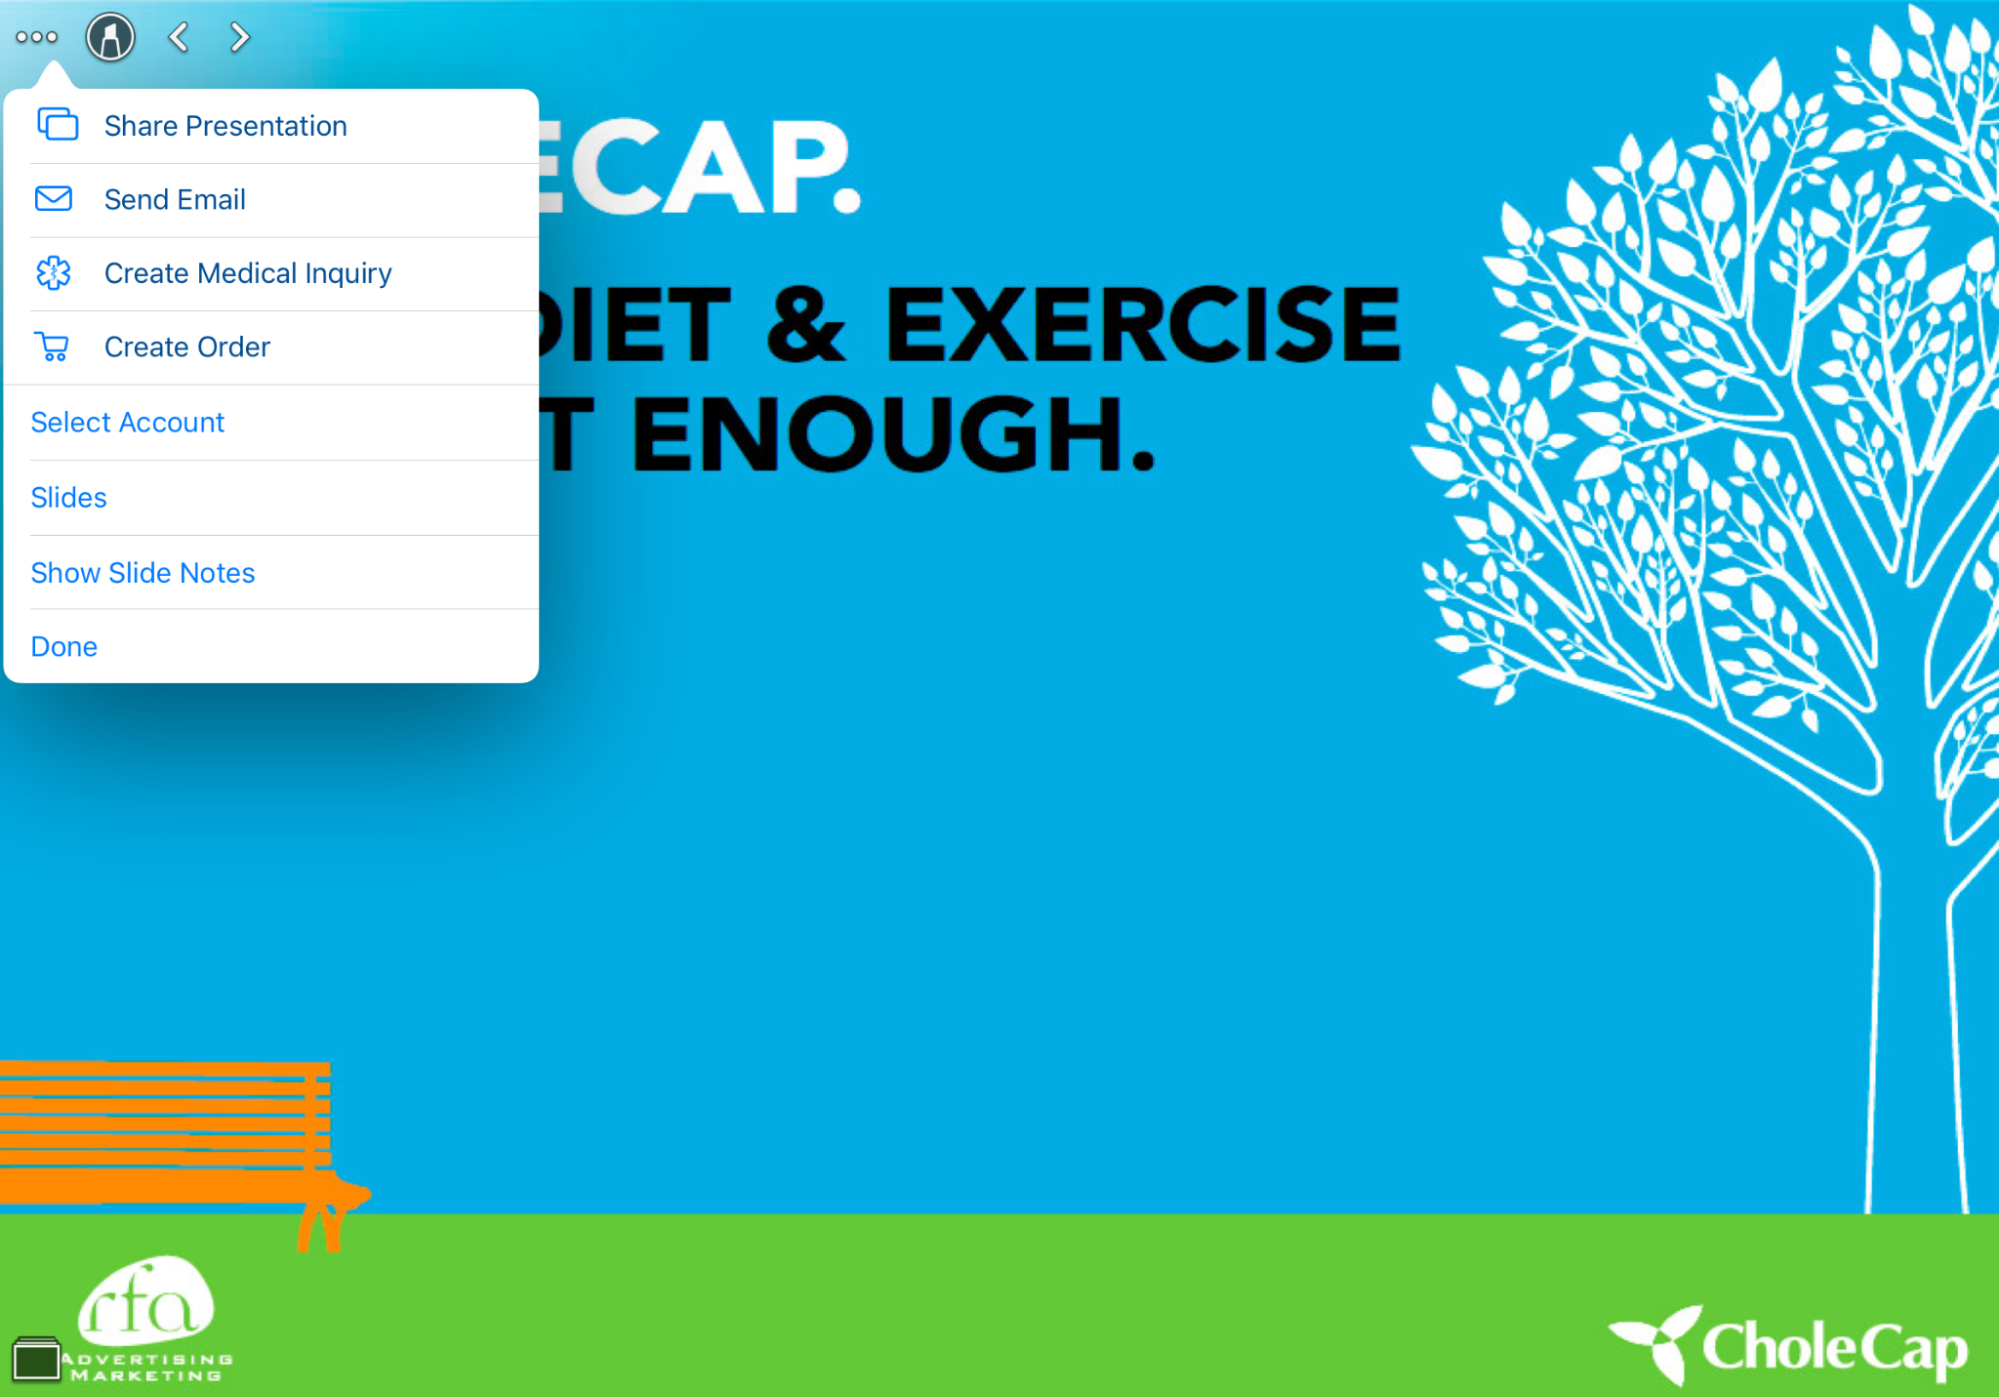
- Select Show Slide Notes.
-
The slide notes also display when the iPad is in portrait mode.

When displaying presentations in Normal View in Veeva CRM on Desktop, the slide notes display below the slide preview.
Users can select and drag the top of the notes panel to expand it and view more of the text.
Slide notes also display in Presenter View. See Displaying Presentations in Presenter View for more information.
Engage
Data-Loading Engage Connect Groups
To create or edit Group Settings for Engage Connect Groups, admins can data-load Engage Connect Group Requests.
For example, Alice Adams has ten users that need to be assigned to two distinct Engage Connect groups. She creates the two Engage Connect groups by data-loading Engage Connect Group Requests, ensuring all appropriate permissions for each group are populated. Alice can then assign the ten User records to the new groups.
Data-Loading Engage Connect Group Request Records
Admins can create or update several Engage Connect Groups at once by data-loading Engage_Connect_Group_Request_vod records. Each record should contain the following information:
- Name – The name of the Engage Connect Group
-
External_ID_vod – When creating a new group, leave this field empty
- Customer_Key_vod – Custom identifier for the group. Enables managing Engage Connect Groups outside of CRM.
- All appropriate fields corresponding to Engage Connect Group Settings:
- Primary_Color_vod
- Secondary_Color_vod
- User_Profile_Company_Name_vod
- User_Communication_Channel_vod
- Display_Future_Meetings_vod – This field is required
- Brands_vod – A semi-colon delimited list of the appropriate Engage Connect Brand IDs. Admins can locate this information from the ID column from the Brand tab of the Company Configuration file.
When Engage_Connect_Group_Request_vod records are data-loaded, the Engage Connect server creates or updates the appropriate groups. The data-loaded records are automatically updated with the following information to inform users of the server request status:
- Processing_Status_vod – Automatically updates to In Process when the record is initially loaded. Updates to either Success or Failure to indicate the server status.
- Error_Description_vod – If Processing_Status_vod is updated to Failure, this field describes the error preventing the creation or update of the Engage Connect Group
- External_ID_vod – If a new group was successfully created, this field automatically updates with the group’s External ID. This External ID can be used for future data-loading to update the existing group.
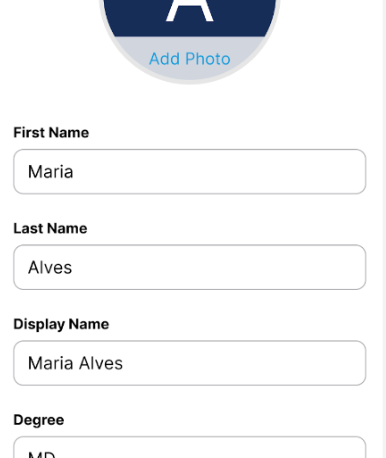
Editing Display Names in Engage and Engage Connect
In both Engage and Engage Connect, there are three fields representing a user’s name: First Name, Last Name, and Display Name. A user’s Display Name represents how their name displays throughout both applications, for example, in Engage meetings. By default, the Display Name is the first and last name, formatted based on the user or account’s country in CRM. To allow for personalization of profiles, users can edit their Display Name in the Me tab of both Engage and Engage Connect.
For example, Dr. Clinton Ackerman wants to append his credentials to his Display Name in Engage. He navigates to the Me tab and edits his contact information to add his credential, DO, to his display name. Later, when Sarah Jones meets with Dr. Ackerman via Engage, Dr. Ackerman’s name displays to her as Clinton Ackerman, DO.
This feature does not require configuration.
Editing a Display Name
To edit a Display Name in either Engage or Engage Connect:
- Navigate to the Me tab.
- Select Edit My Profile.
-
Edit the Display Name field appropriately.
- Select Save.
Edits to the Display Name are displayed throughout the Engage and Engage Connect apps.
Once a user edits their Display Name, updates to their first name or last name are no longer automatically reflected in the Display Name.
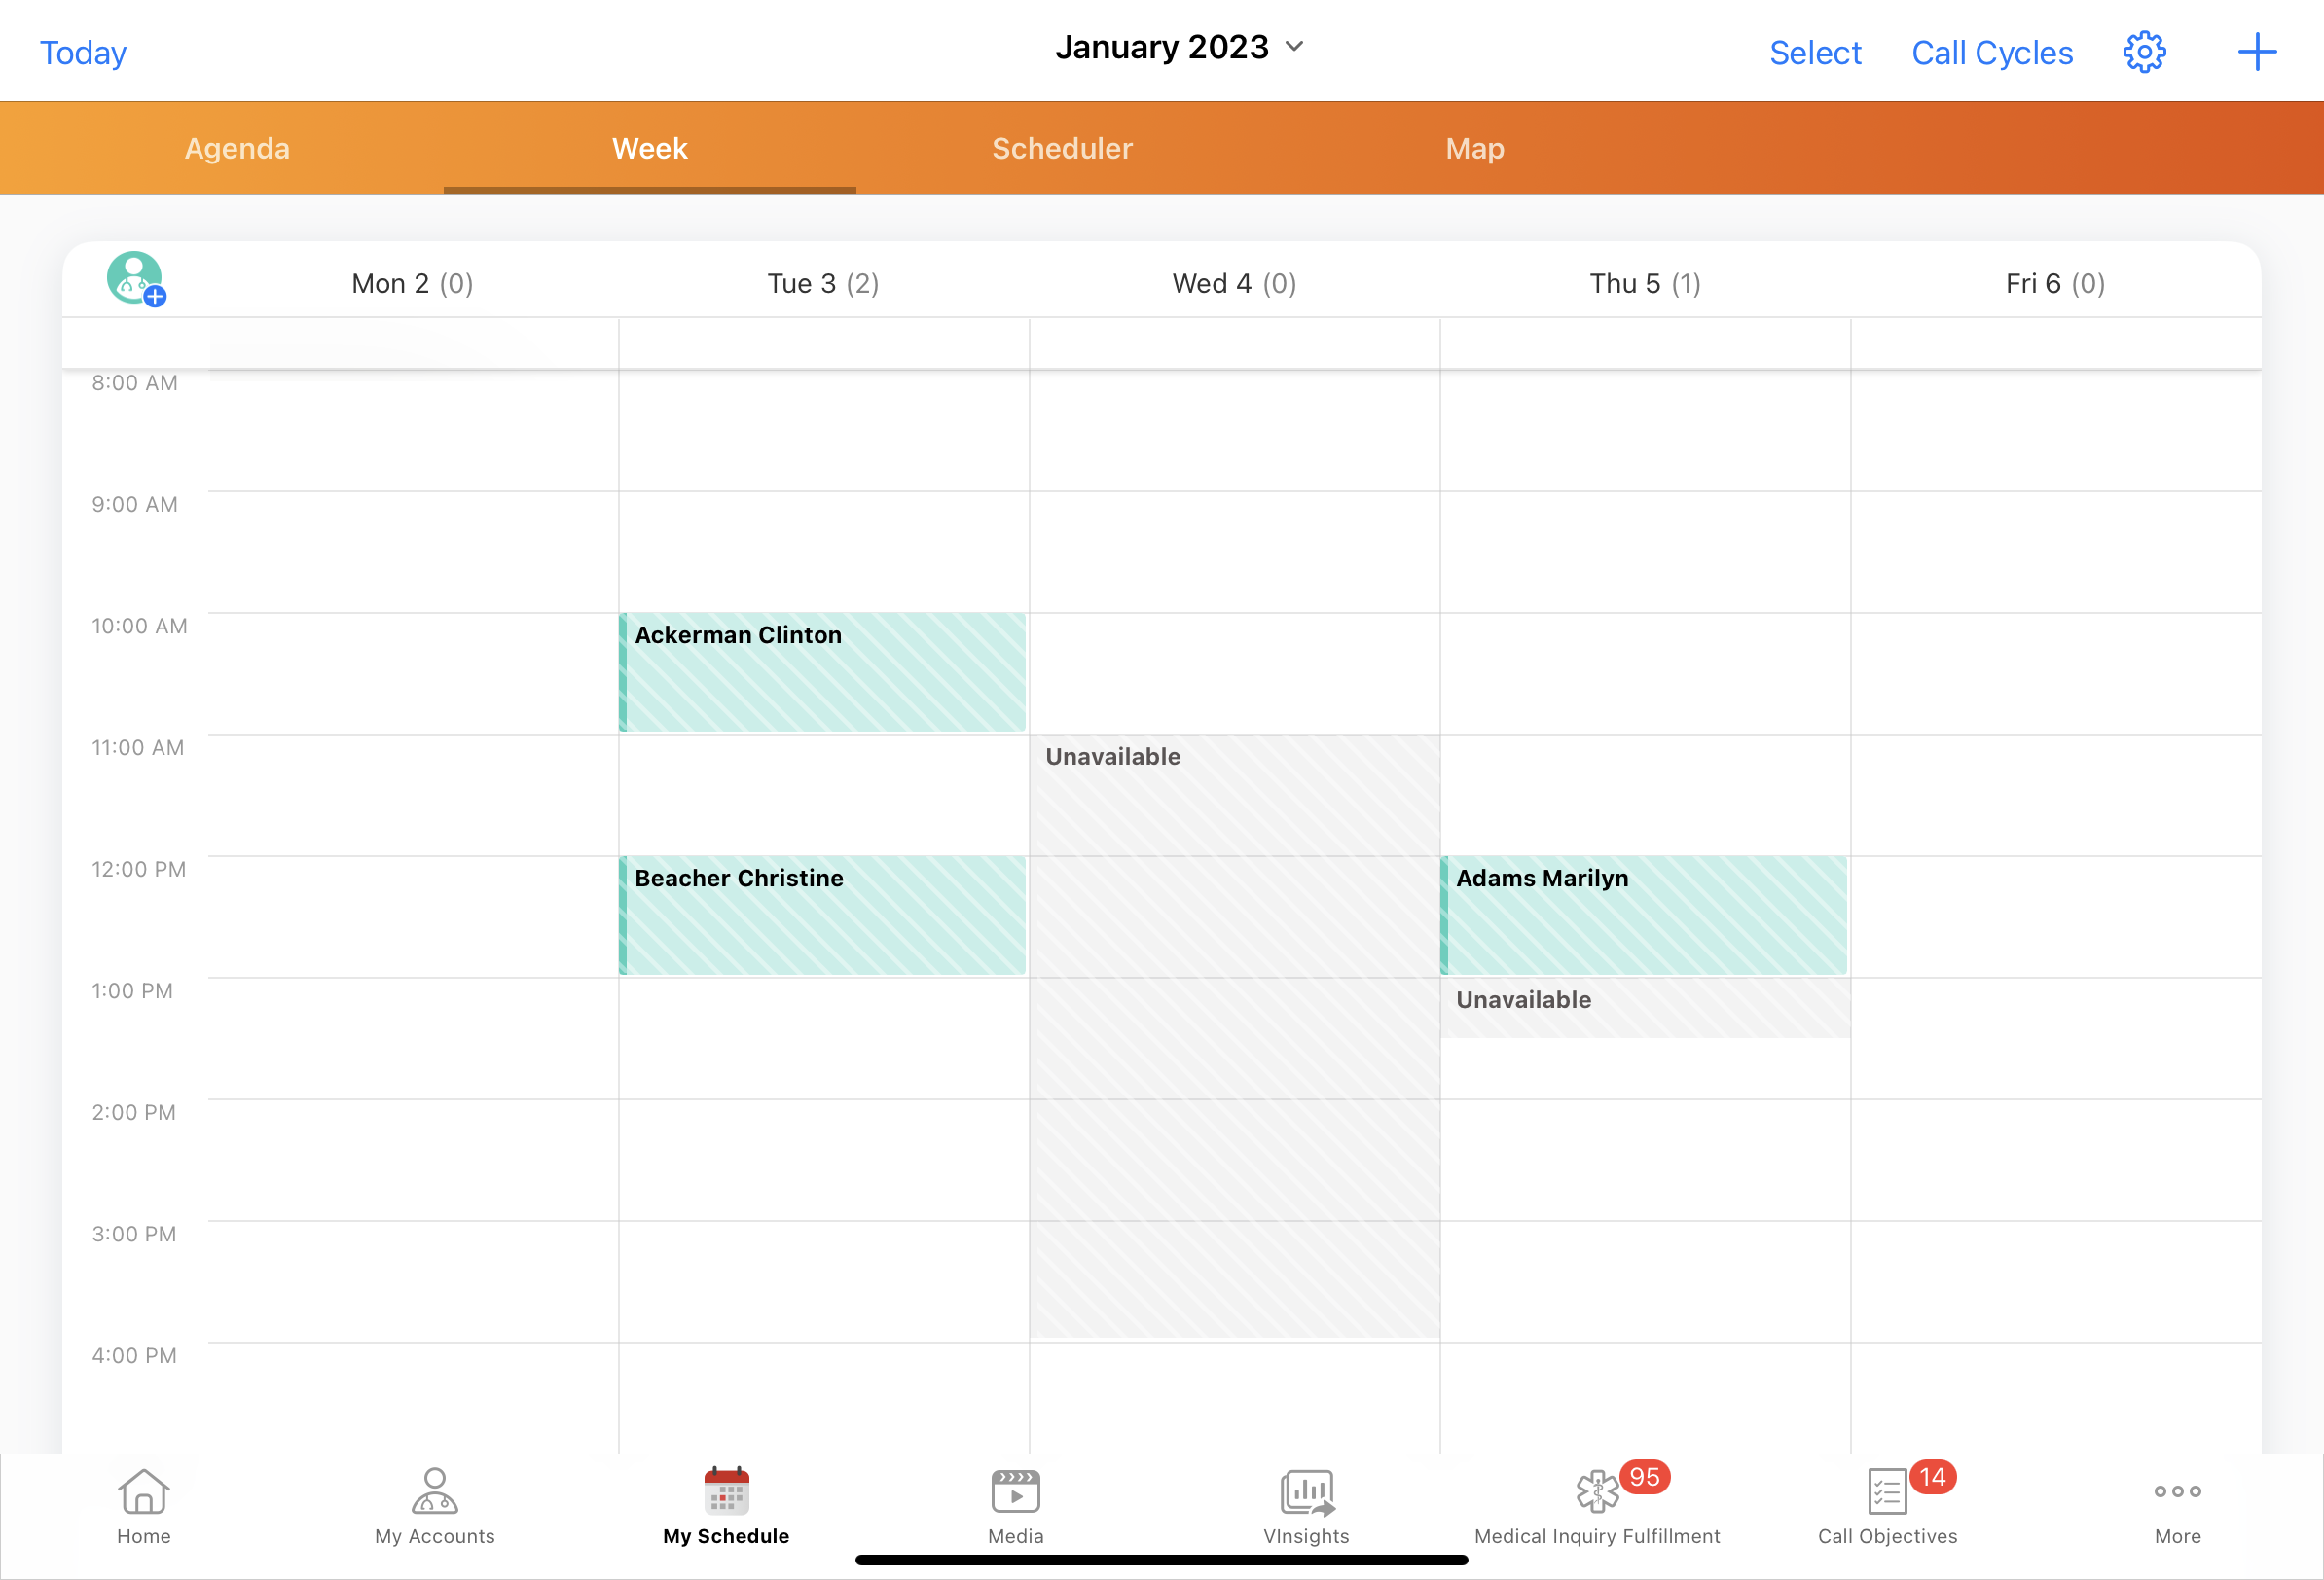
Unavailable Time Slots on the Engage Scheduling Site
CRM users can create unavailable time slots in My Schedule to prevent HCPs from requesting meetings during that time. When users create unavailable time in My Schedule, their unavailable time slots are automatically reflected on the Engage Scheduling Site for HCPs.The times available on the Engage Scheduling Site are also dynamically updated when users edit or delete unavailable time slots in My Schedule.
For example, Sarah Jones is on vacation from August 22 through August 26. She blocks this time off on her calendar. Dr. Ackerman wants to have a follow-up call with Sarah to discuss the efficacy of Restolar. When he opens the scheduling link Sarah sent, he sees she is not available from August 22 through August 26. Dr. Ackerman submits a meeting request for August 28, which Sarah accepts.
For iPad users, unavailable time slots are only supported in My Schedule’s Week View and Map View.
Prerequisites
Creating Unavailable Time Slots in My Schedule
To create unavailable time slots:
- Select the plus icon in the My Schedule header.
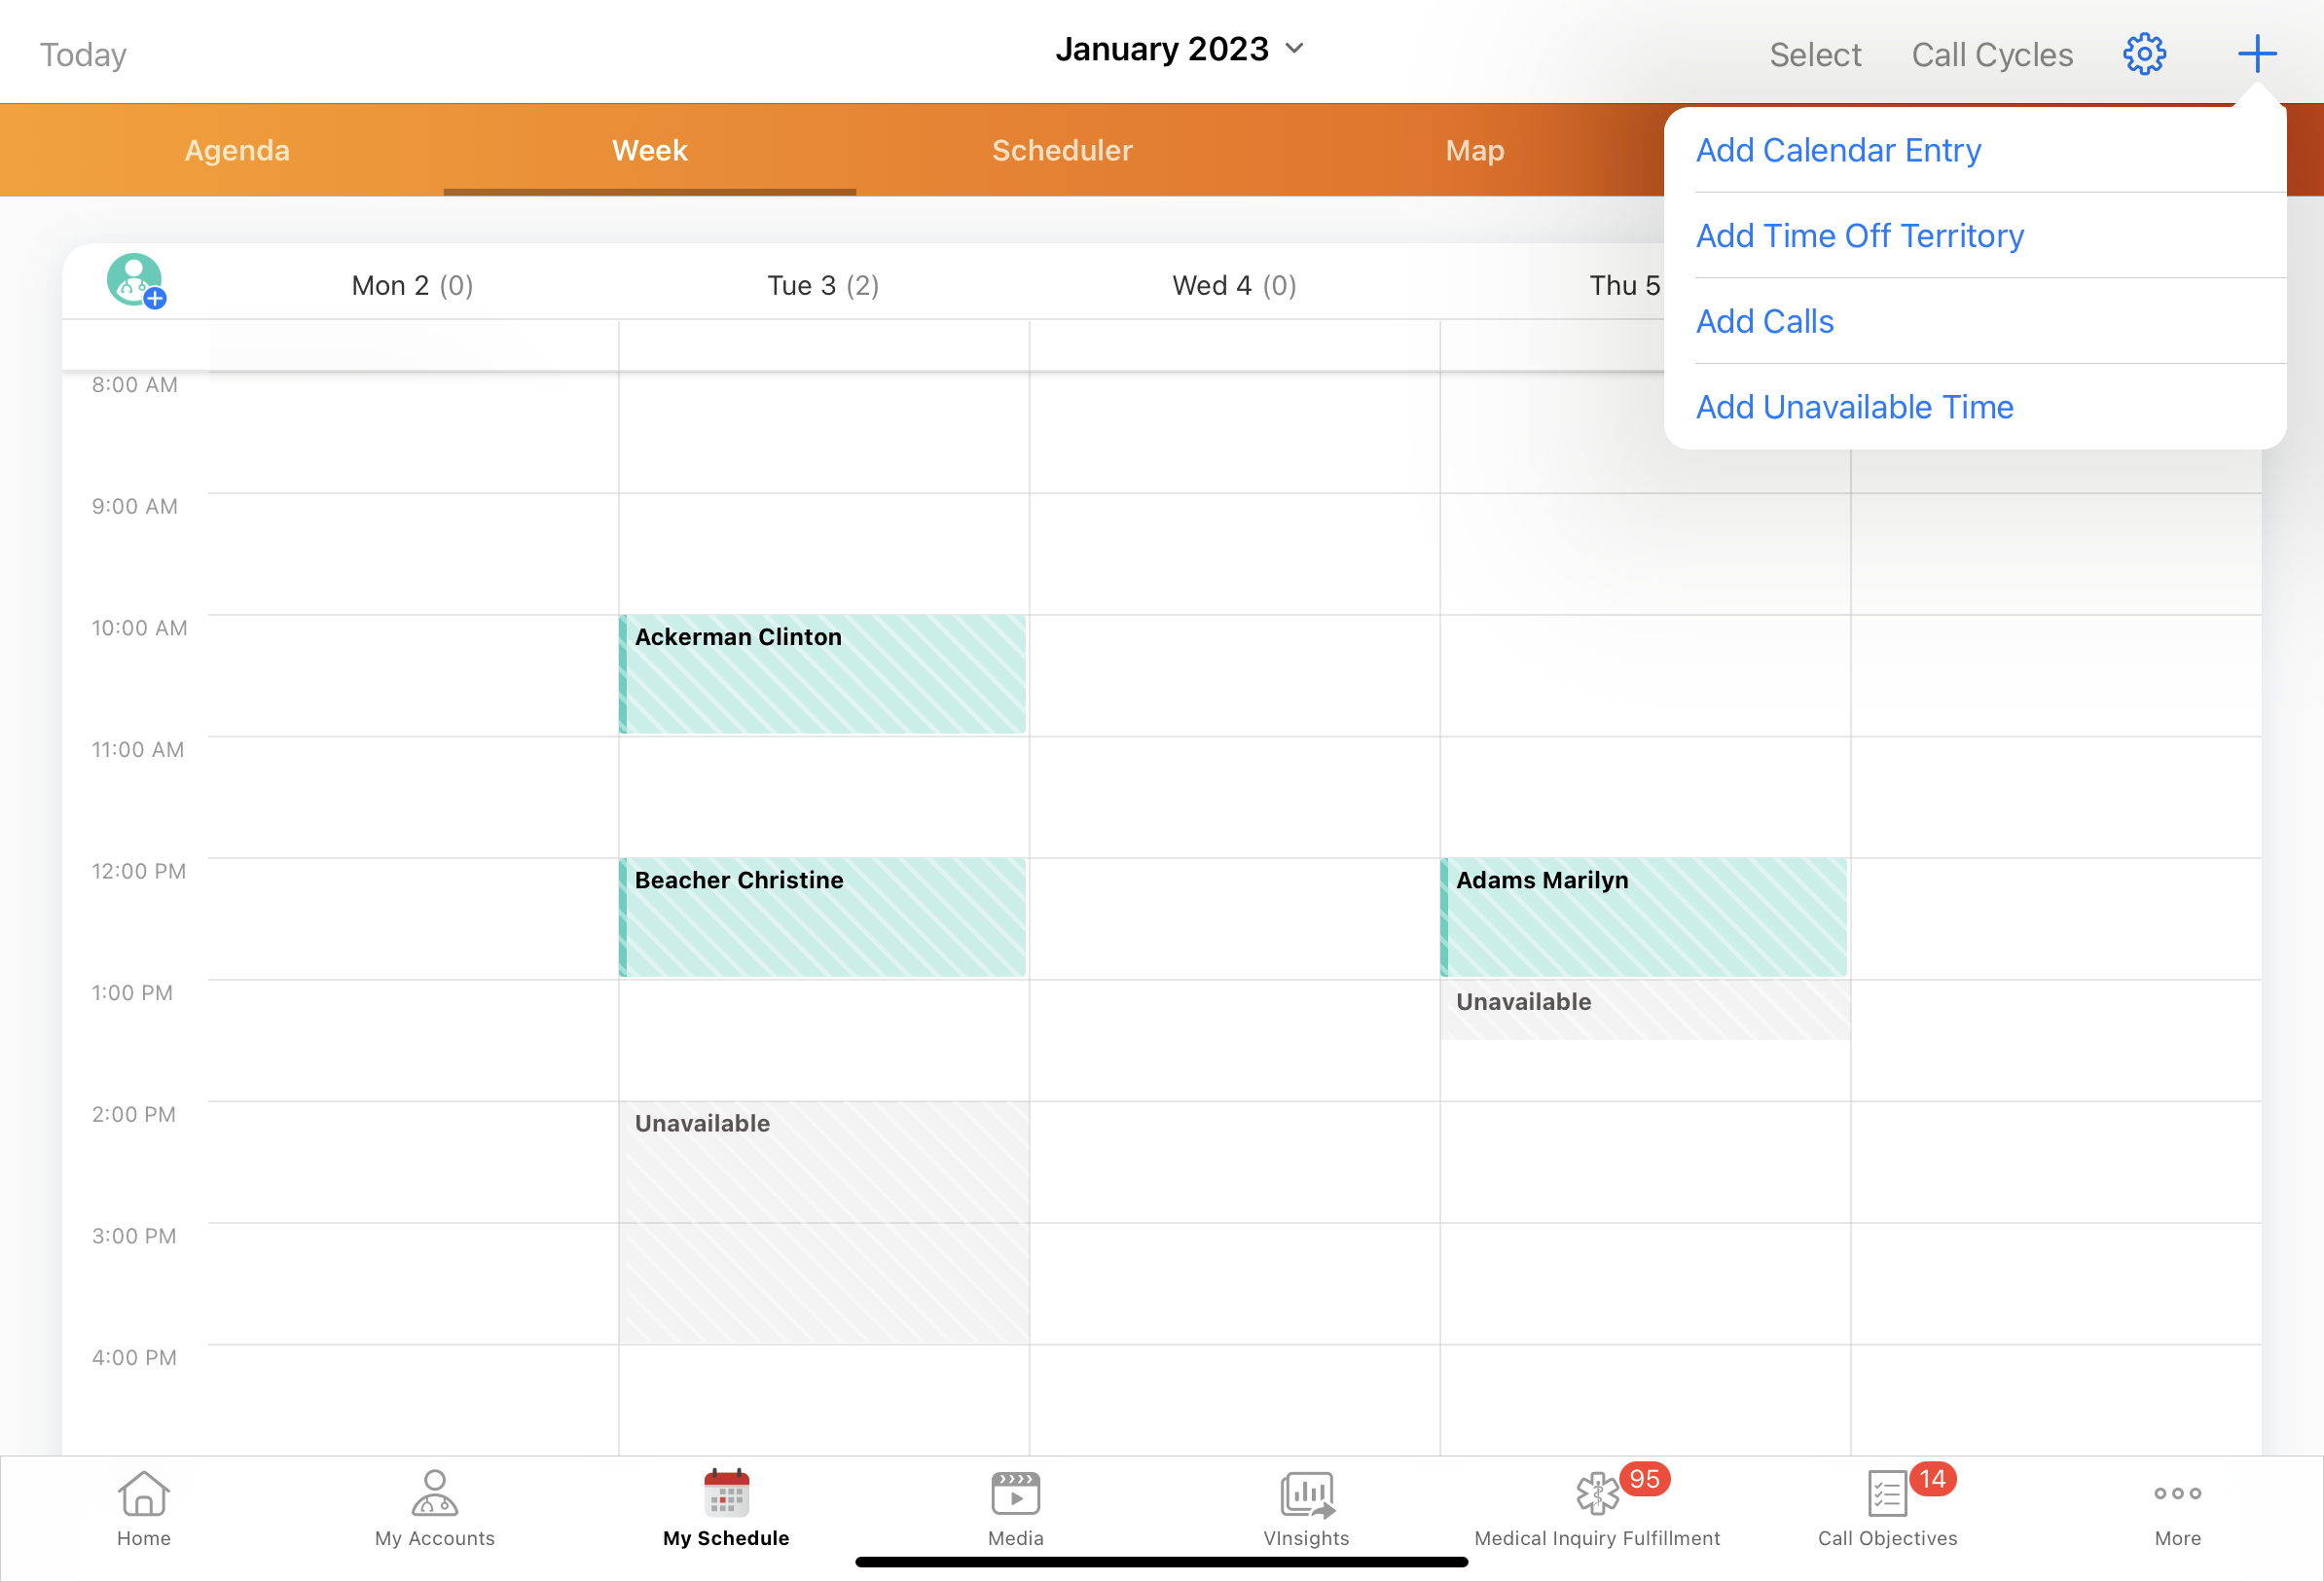
- Select Add Unavailable Time.
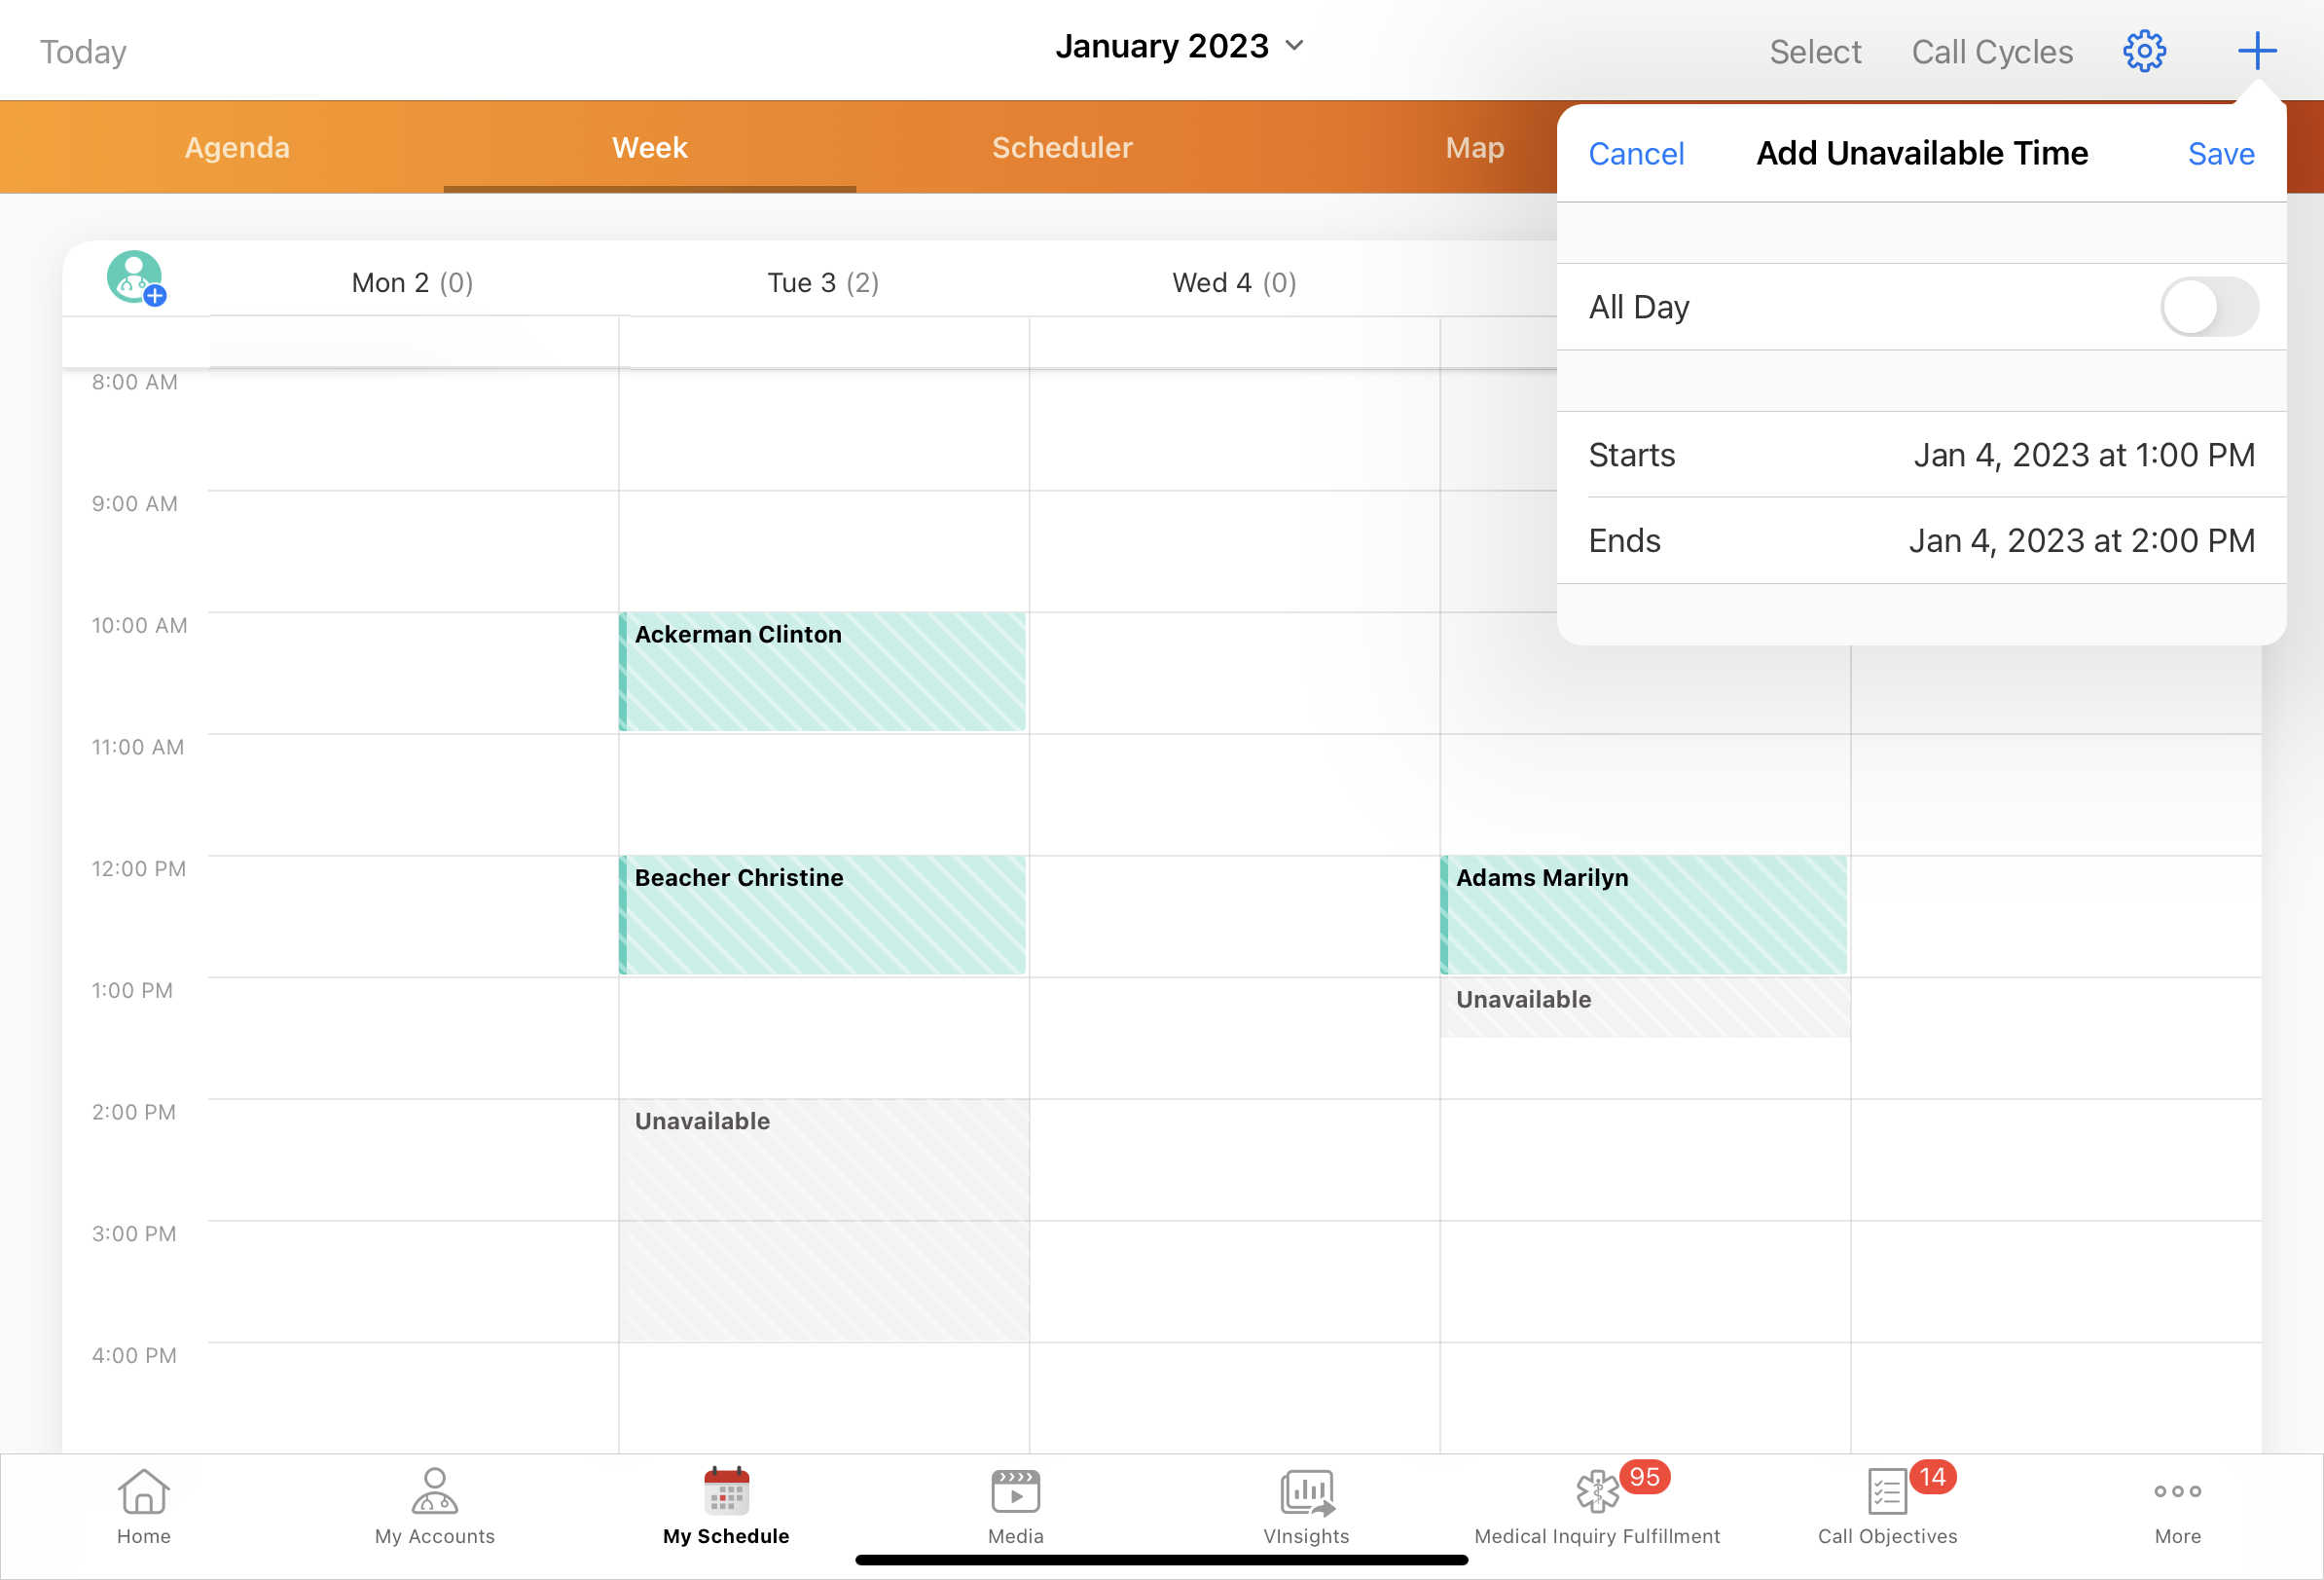
- Select the All Day toggle if the unavailable time slot applies to the entire day (optional).
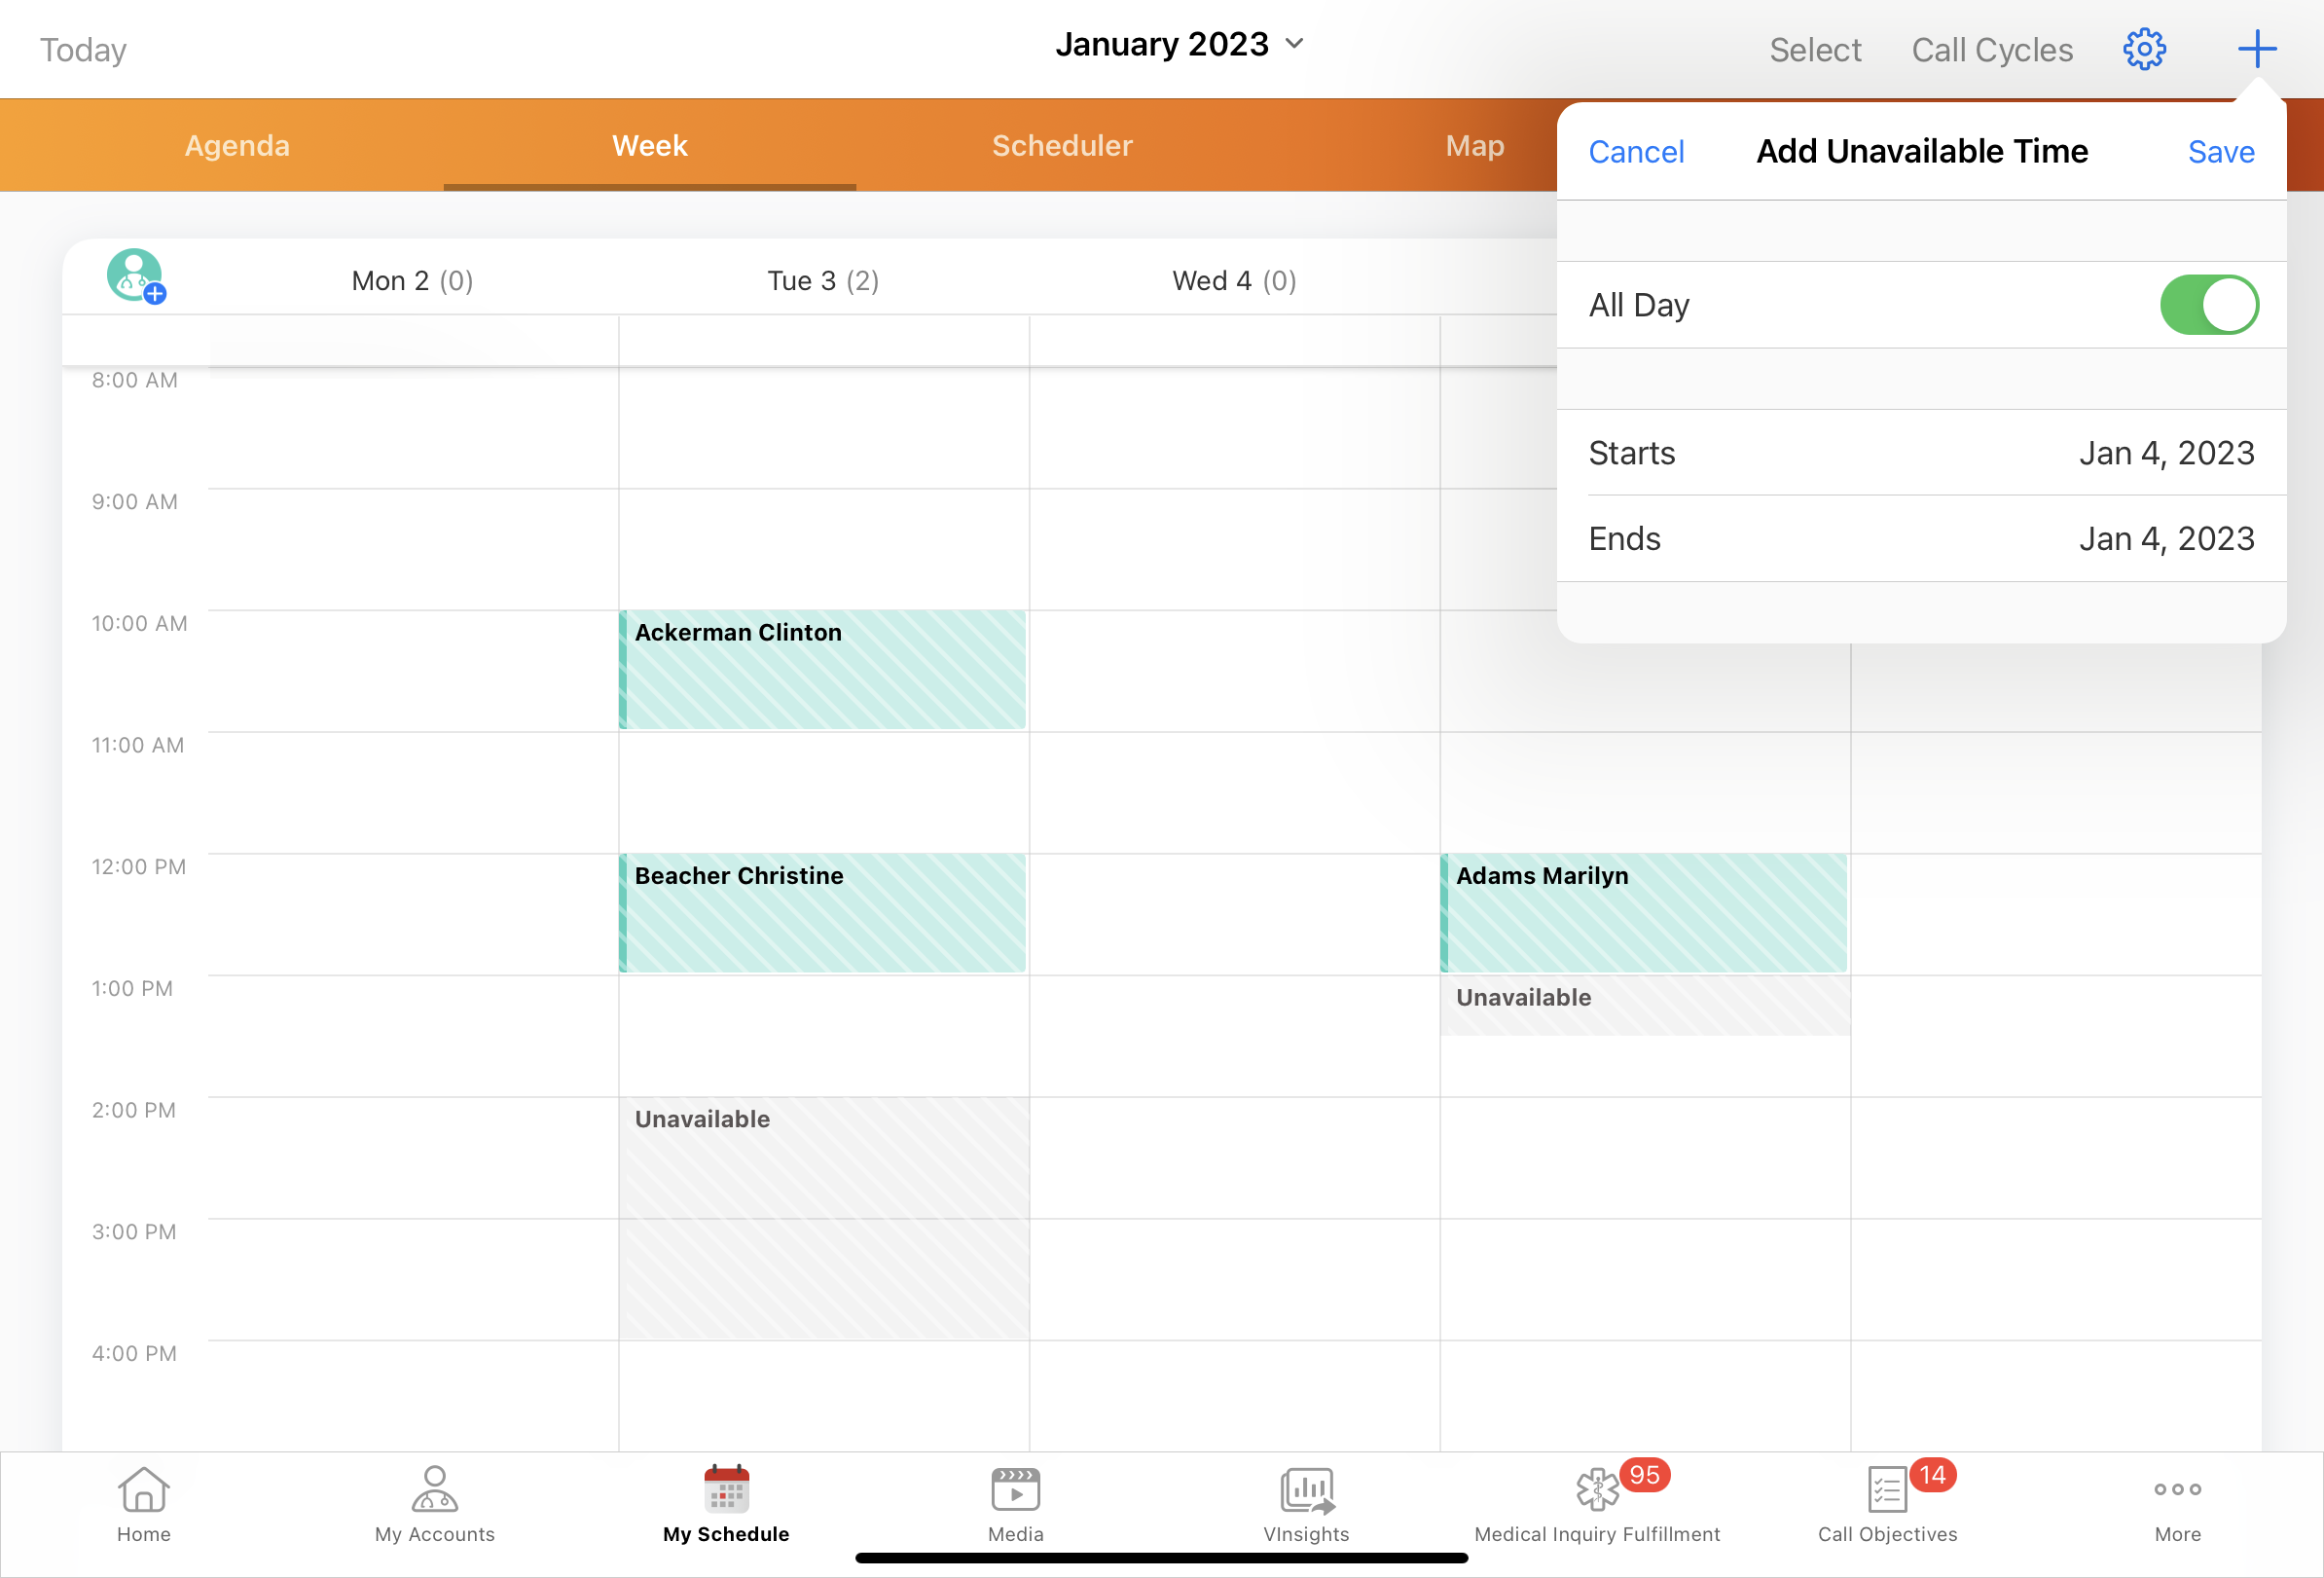
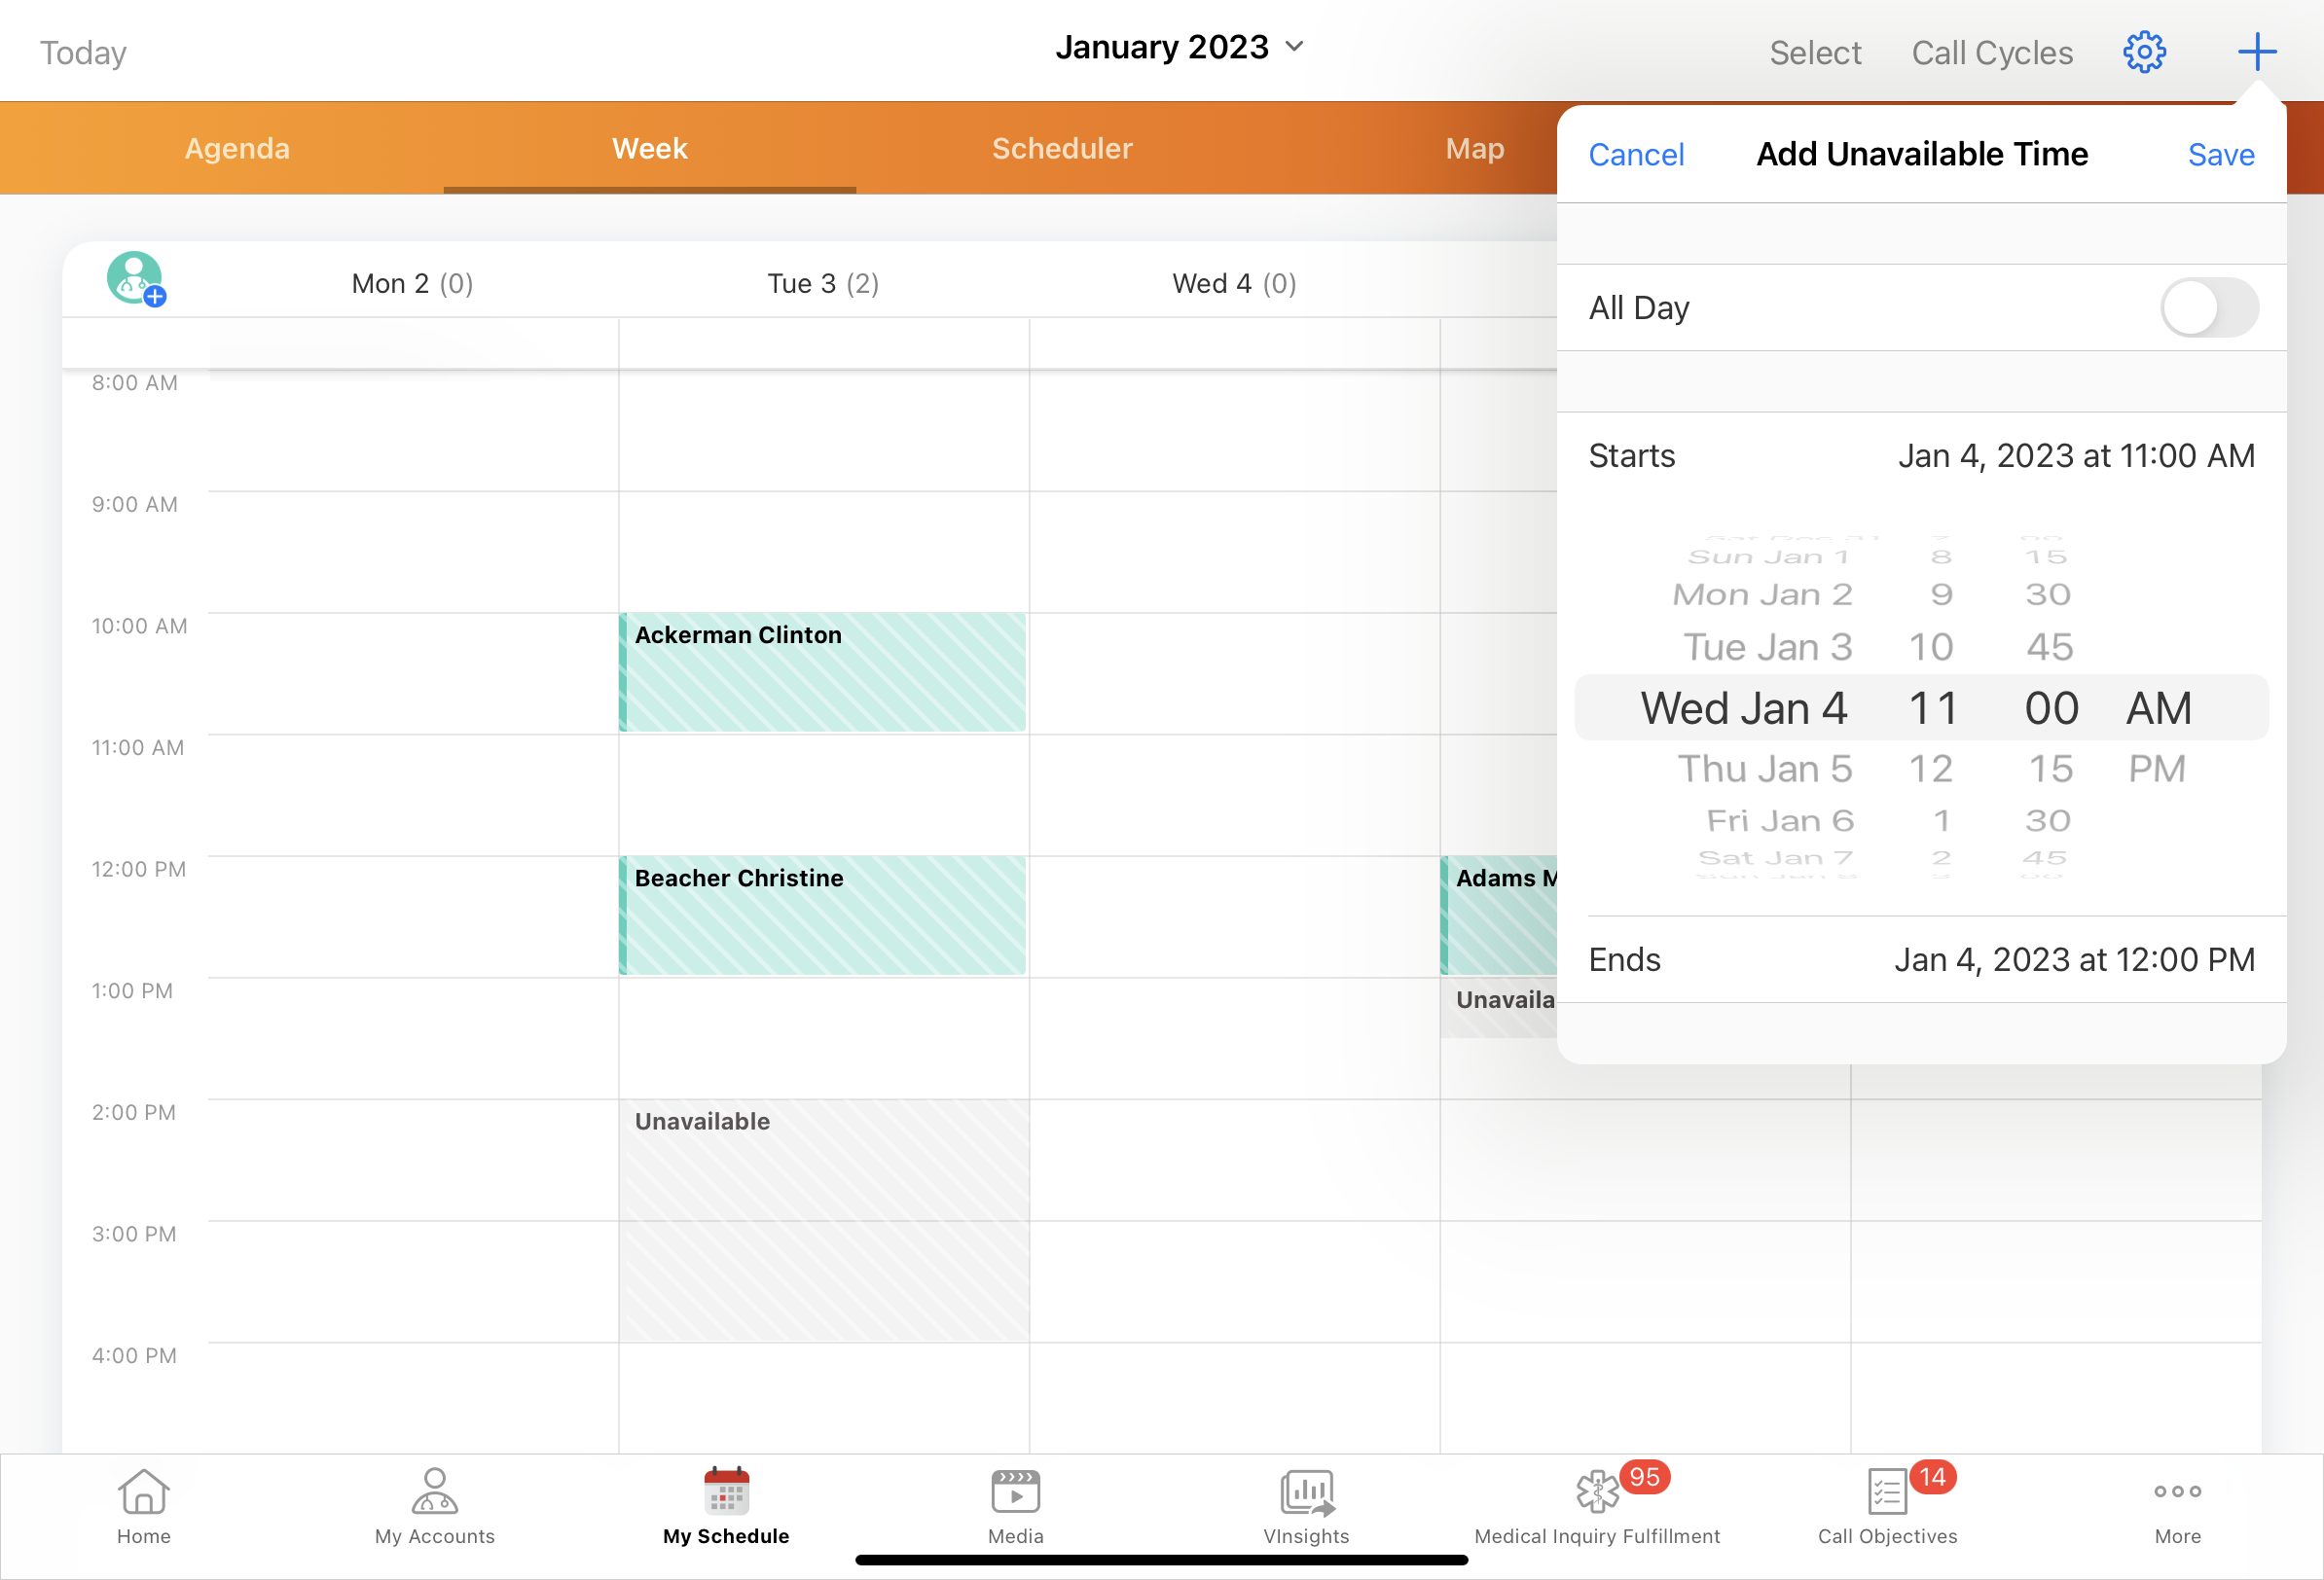
- Select the appropriate start and end times using the Starts and Ends fields.
Displaying Time Zones is not supported for unavailable time.
- Select Save.
If users attempt to save an unavailable time slot where the end date and time are before the start date and time, an error displays.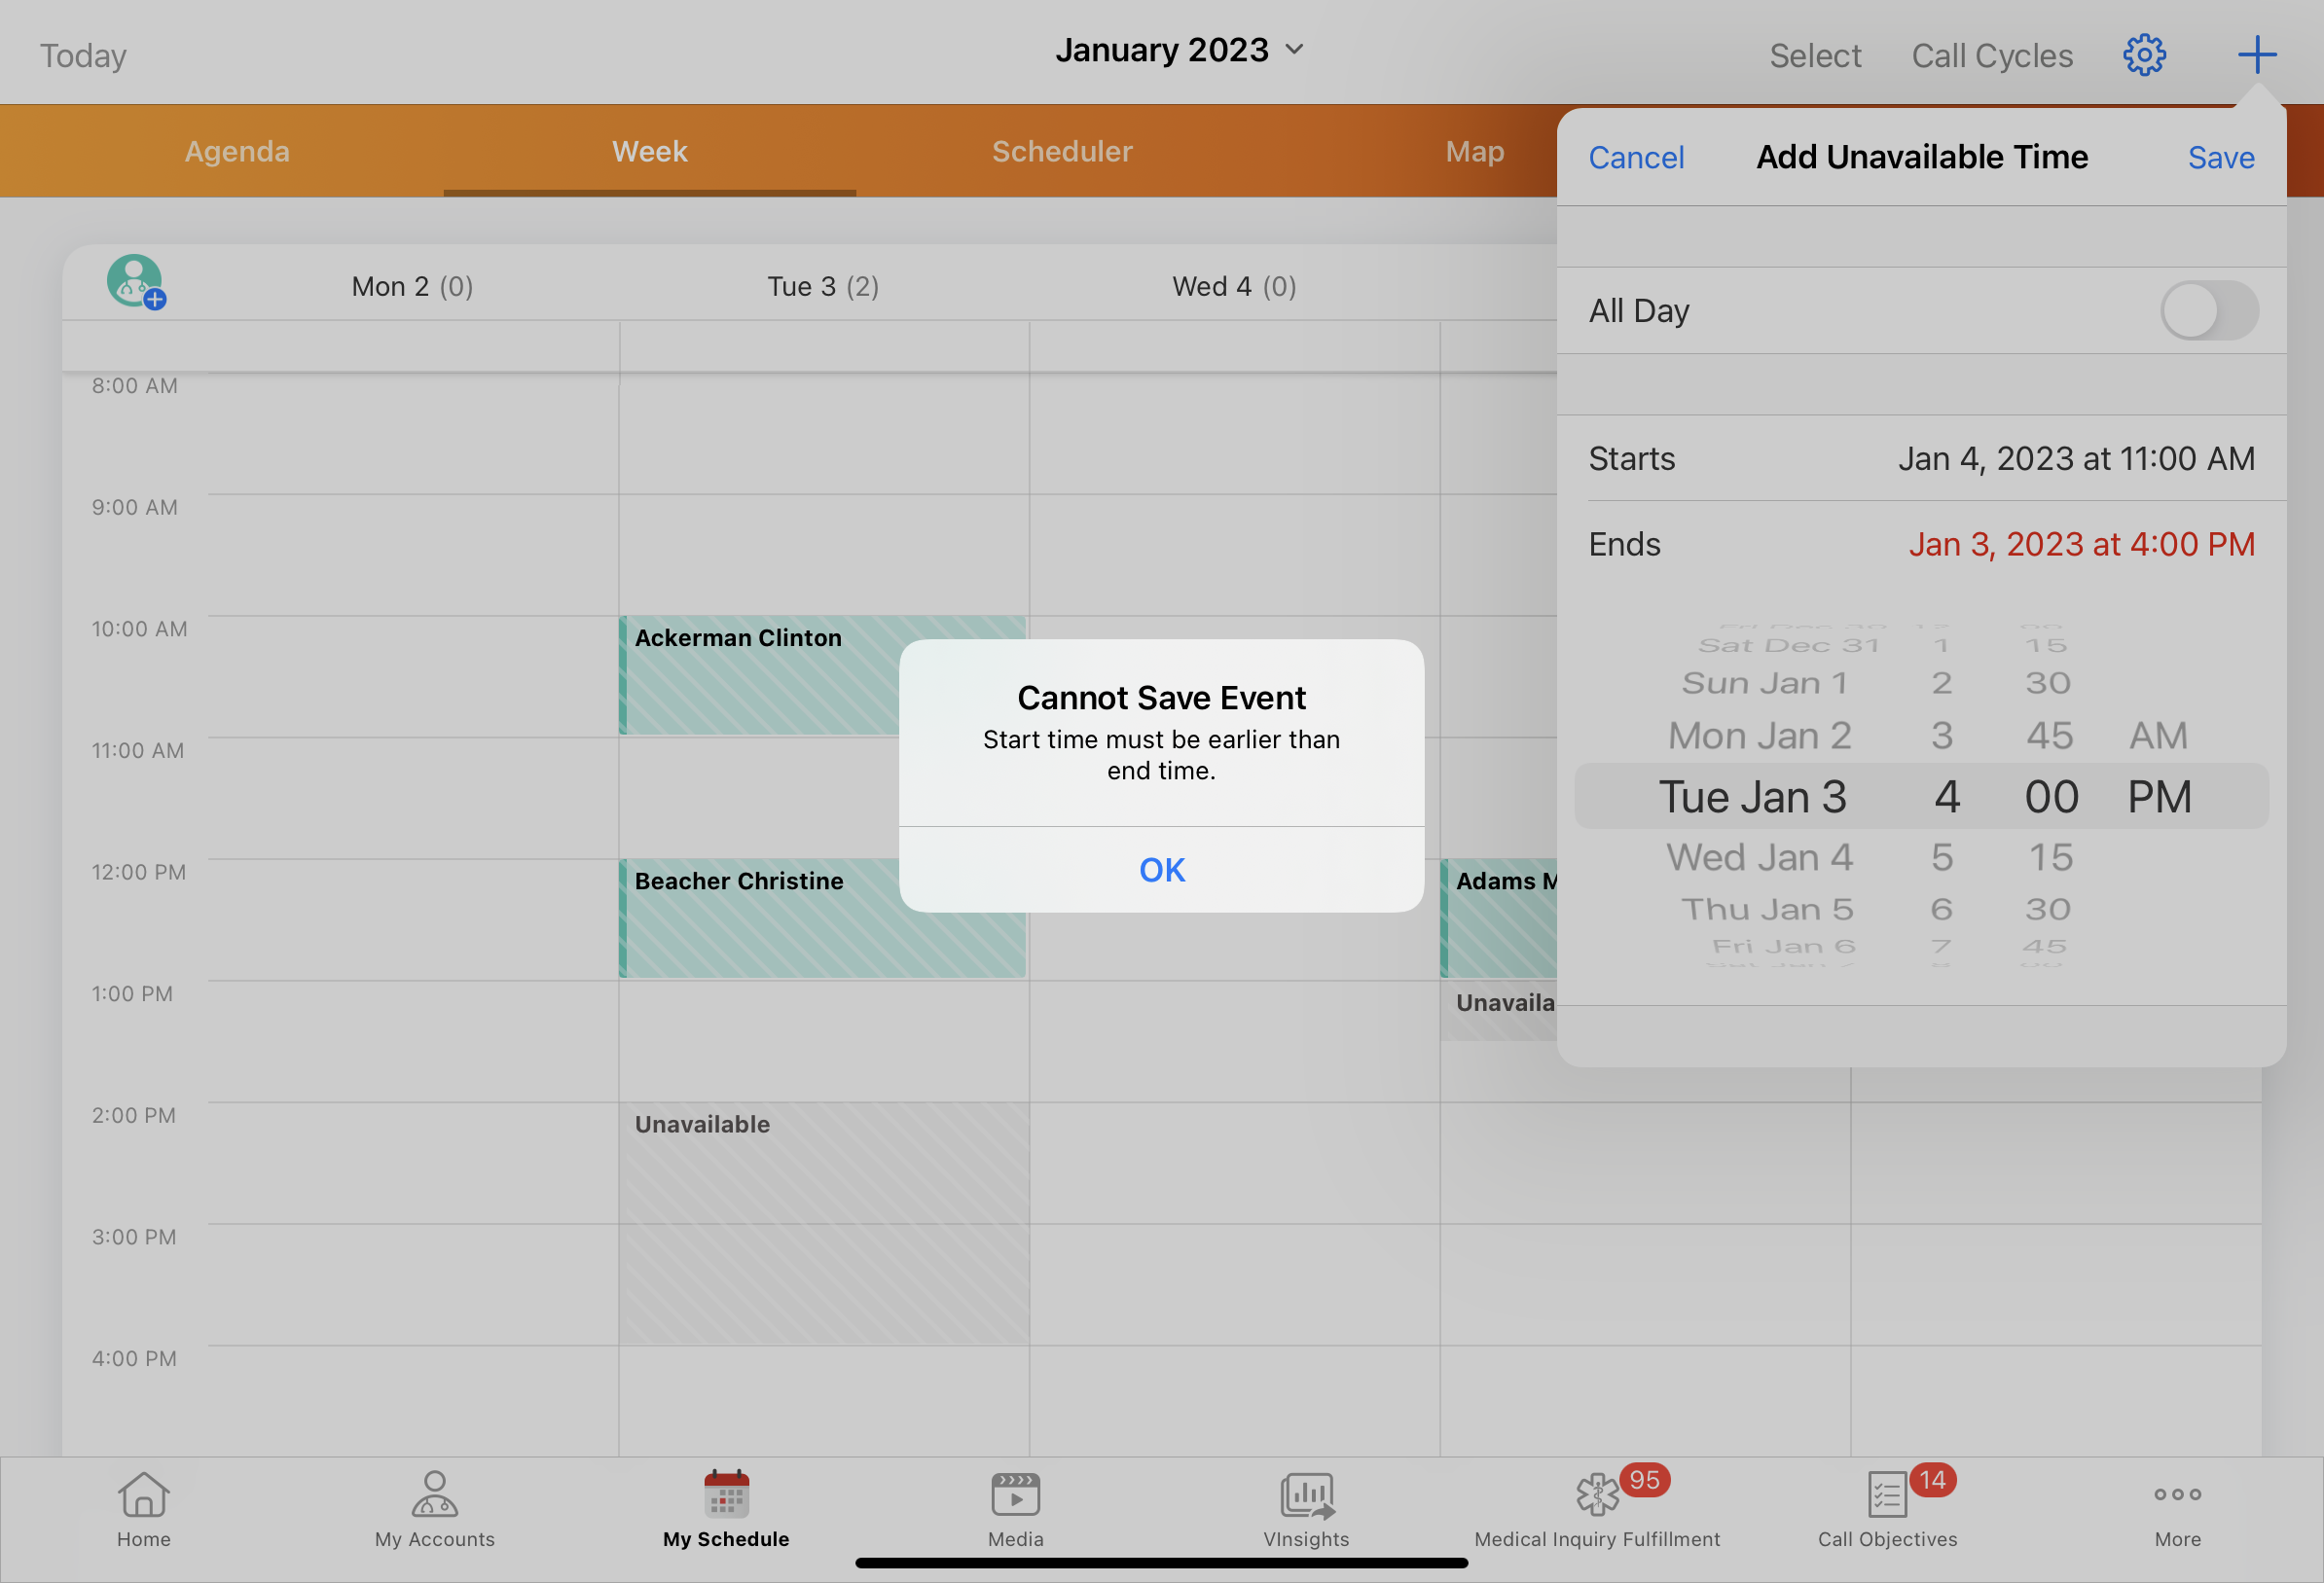
Unavailable time slots display in gray in My Schedule. Time slots shorter than fifteen minutes display as a 30-minute block.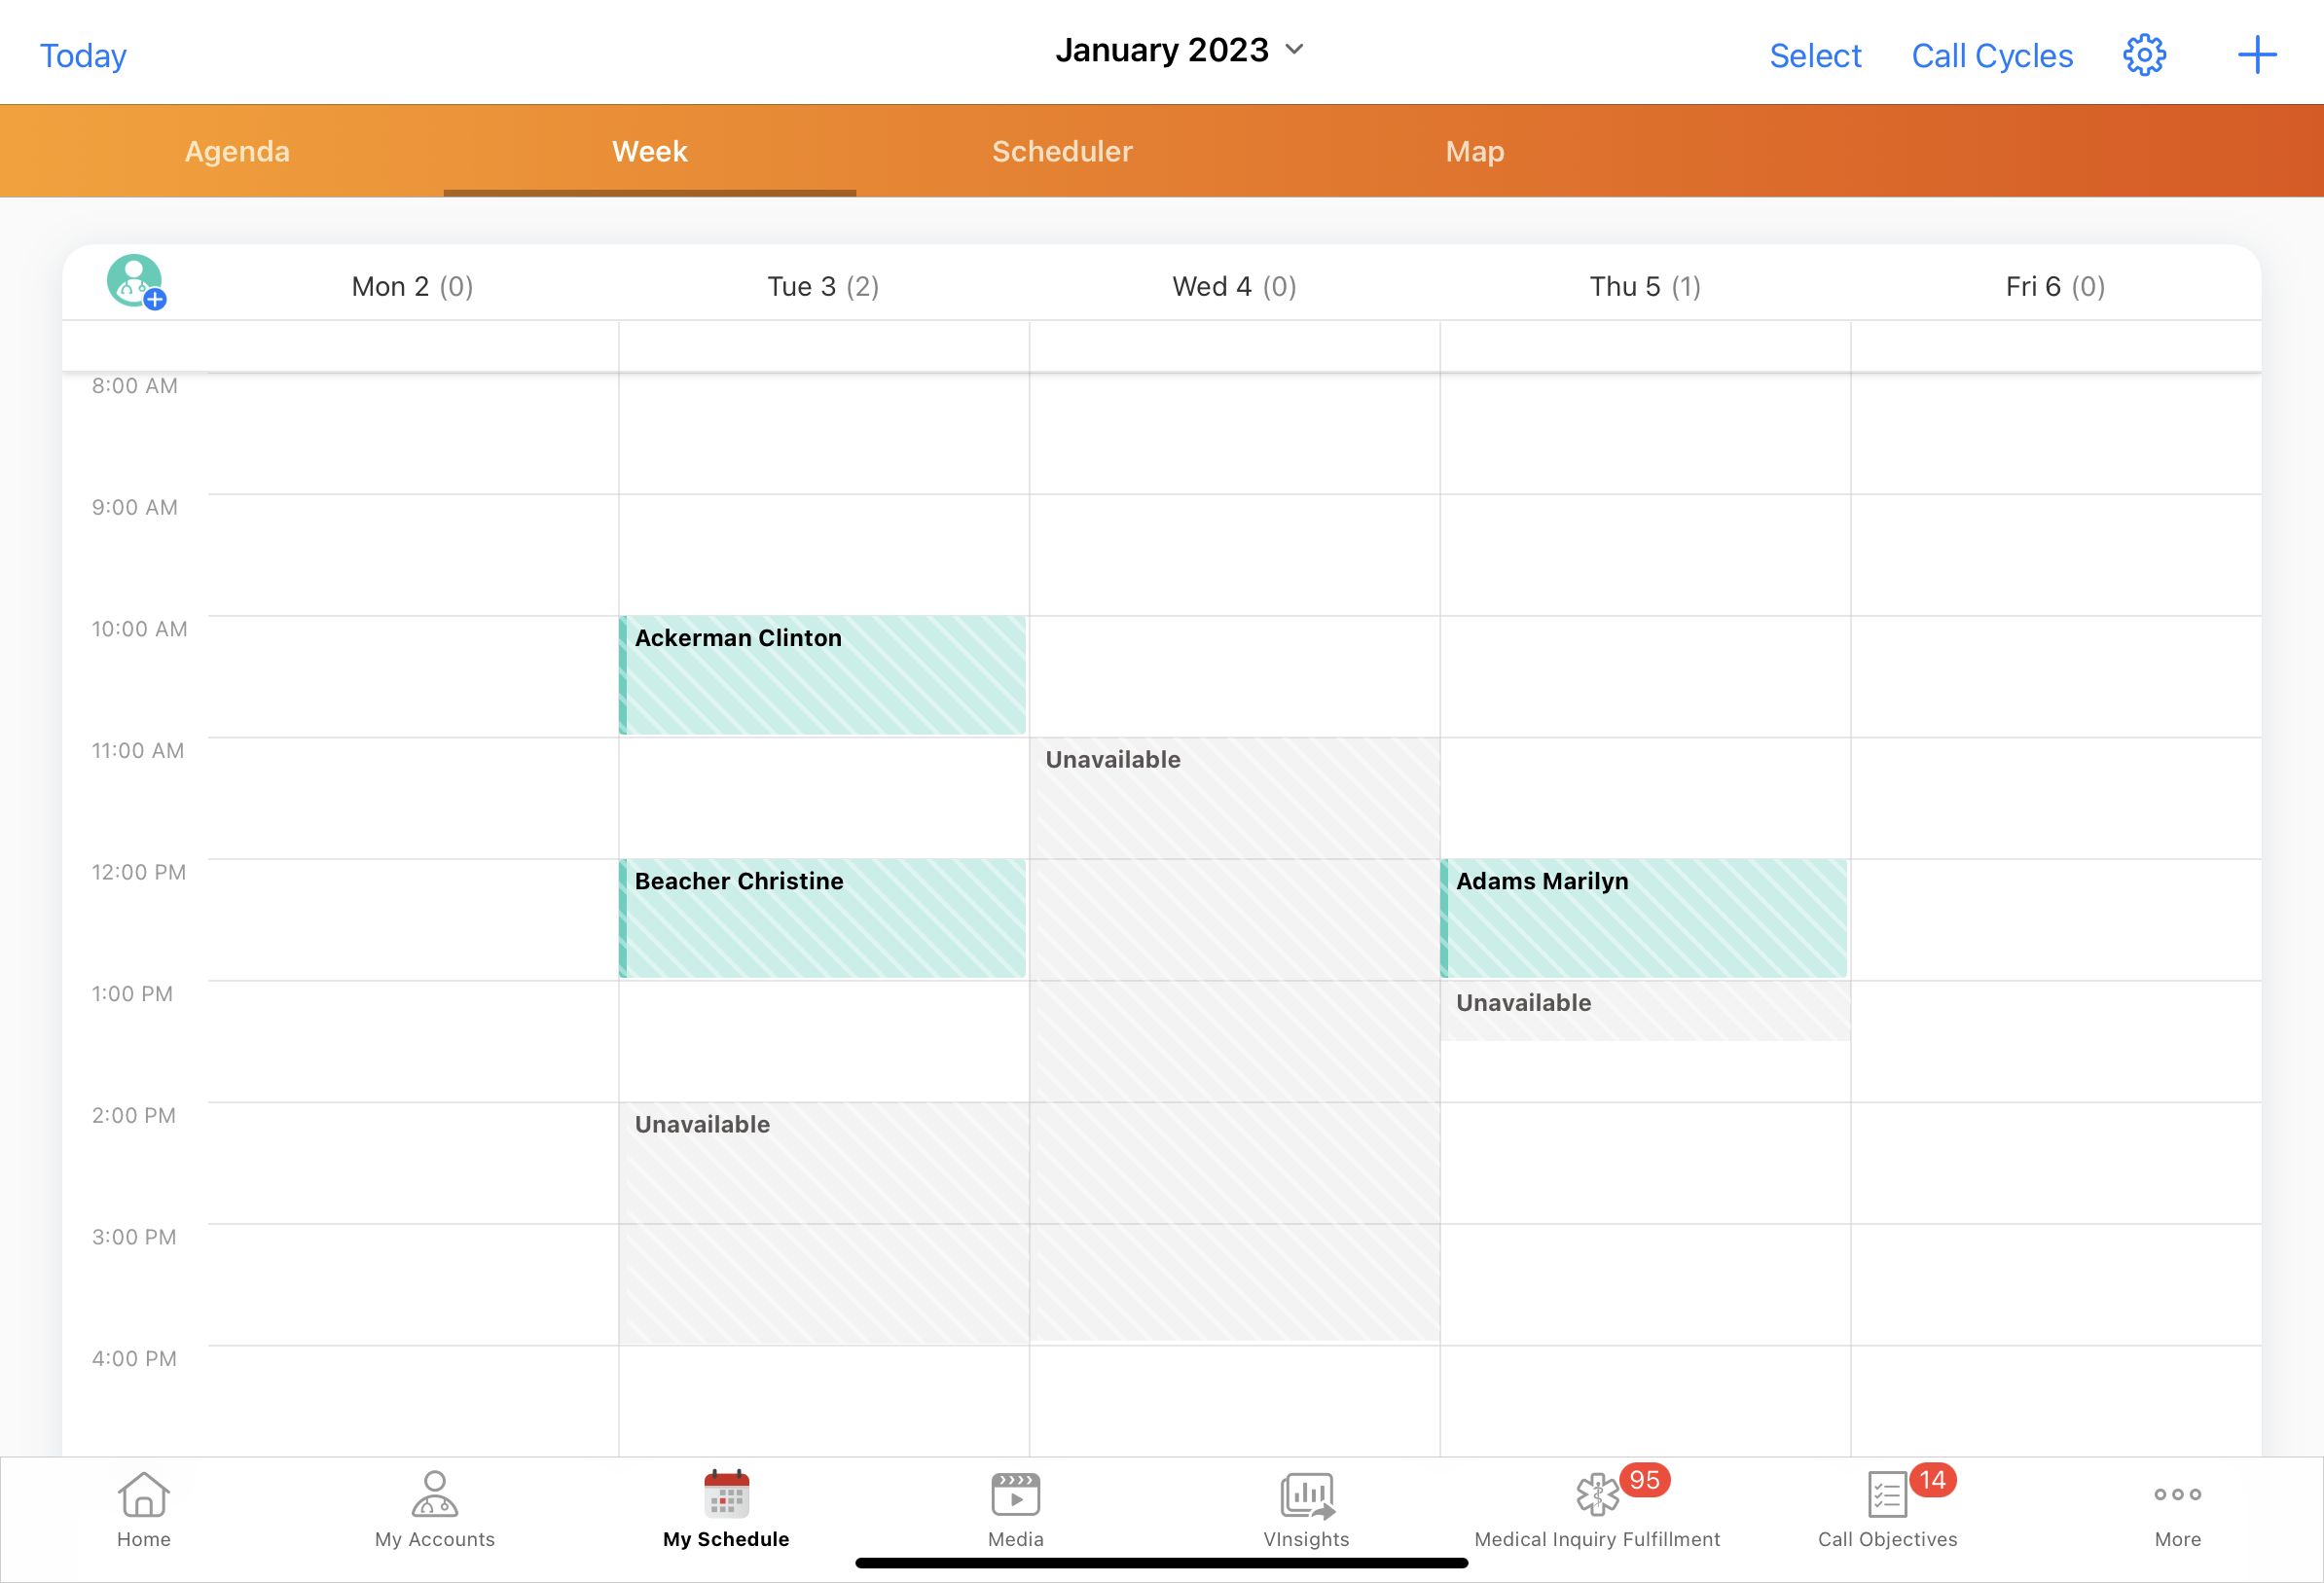
Changes to unavailable time slots are auto-synced and displayed on the Engage Scheduling Site. For information on viewing unavailable time as an HCP, see Viewing Unavailable Time Slots on the Engage Scheduling Site.
If CRM users create, edit, or delete unavailable time slots while an HCP is viewing the user’s calendar on the Engage Scheduling Site, the changes do not display until the HCP refreshes their browser page.
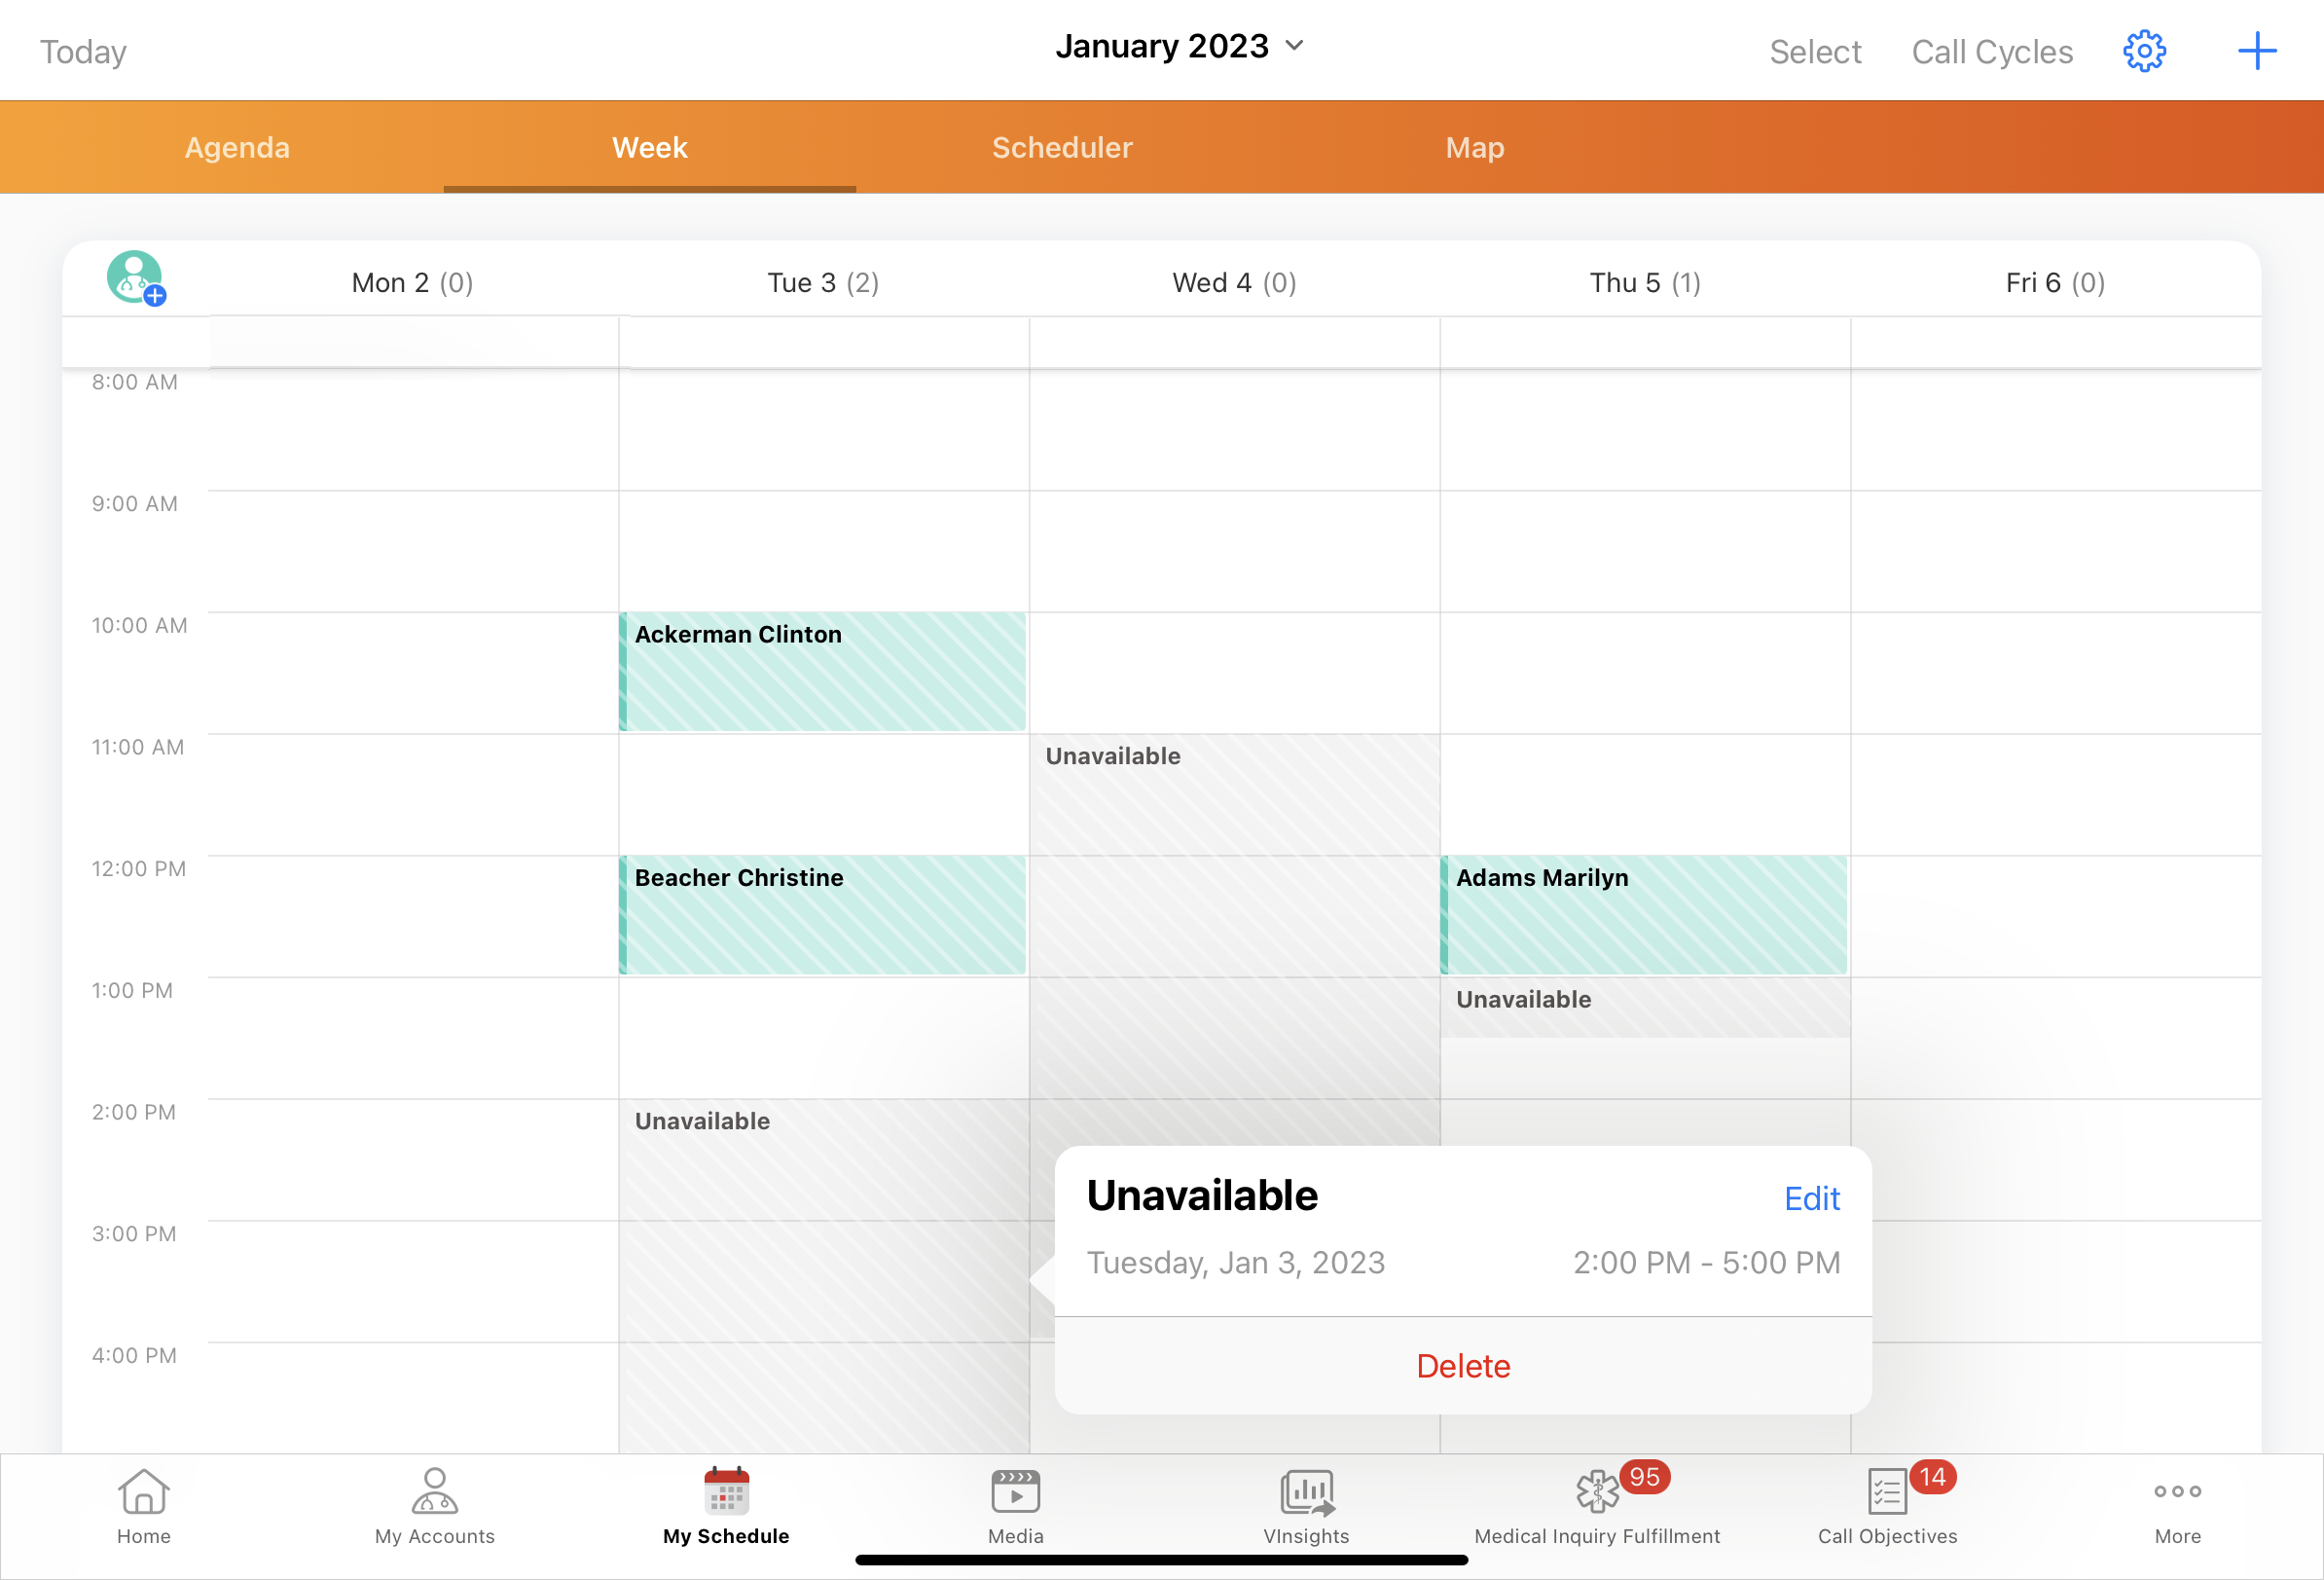
Editing Unavailable Time Slots
To edit unavailable time slots:
- Select the unavailable time slot to display a popover with details on the entry.
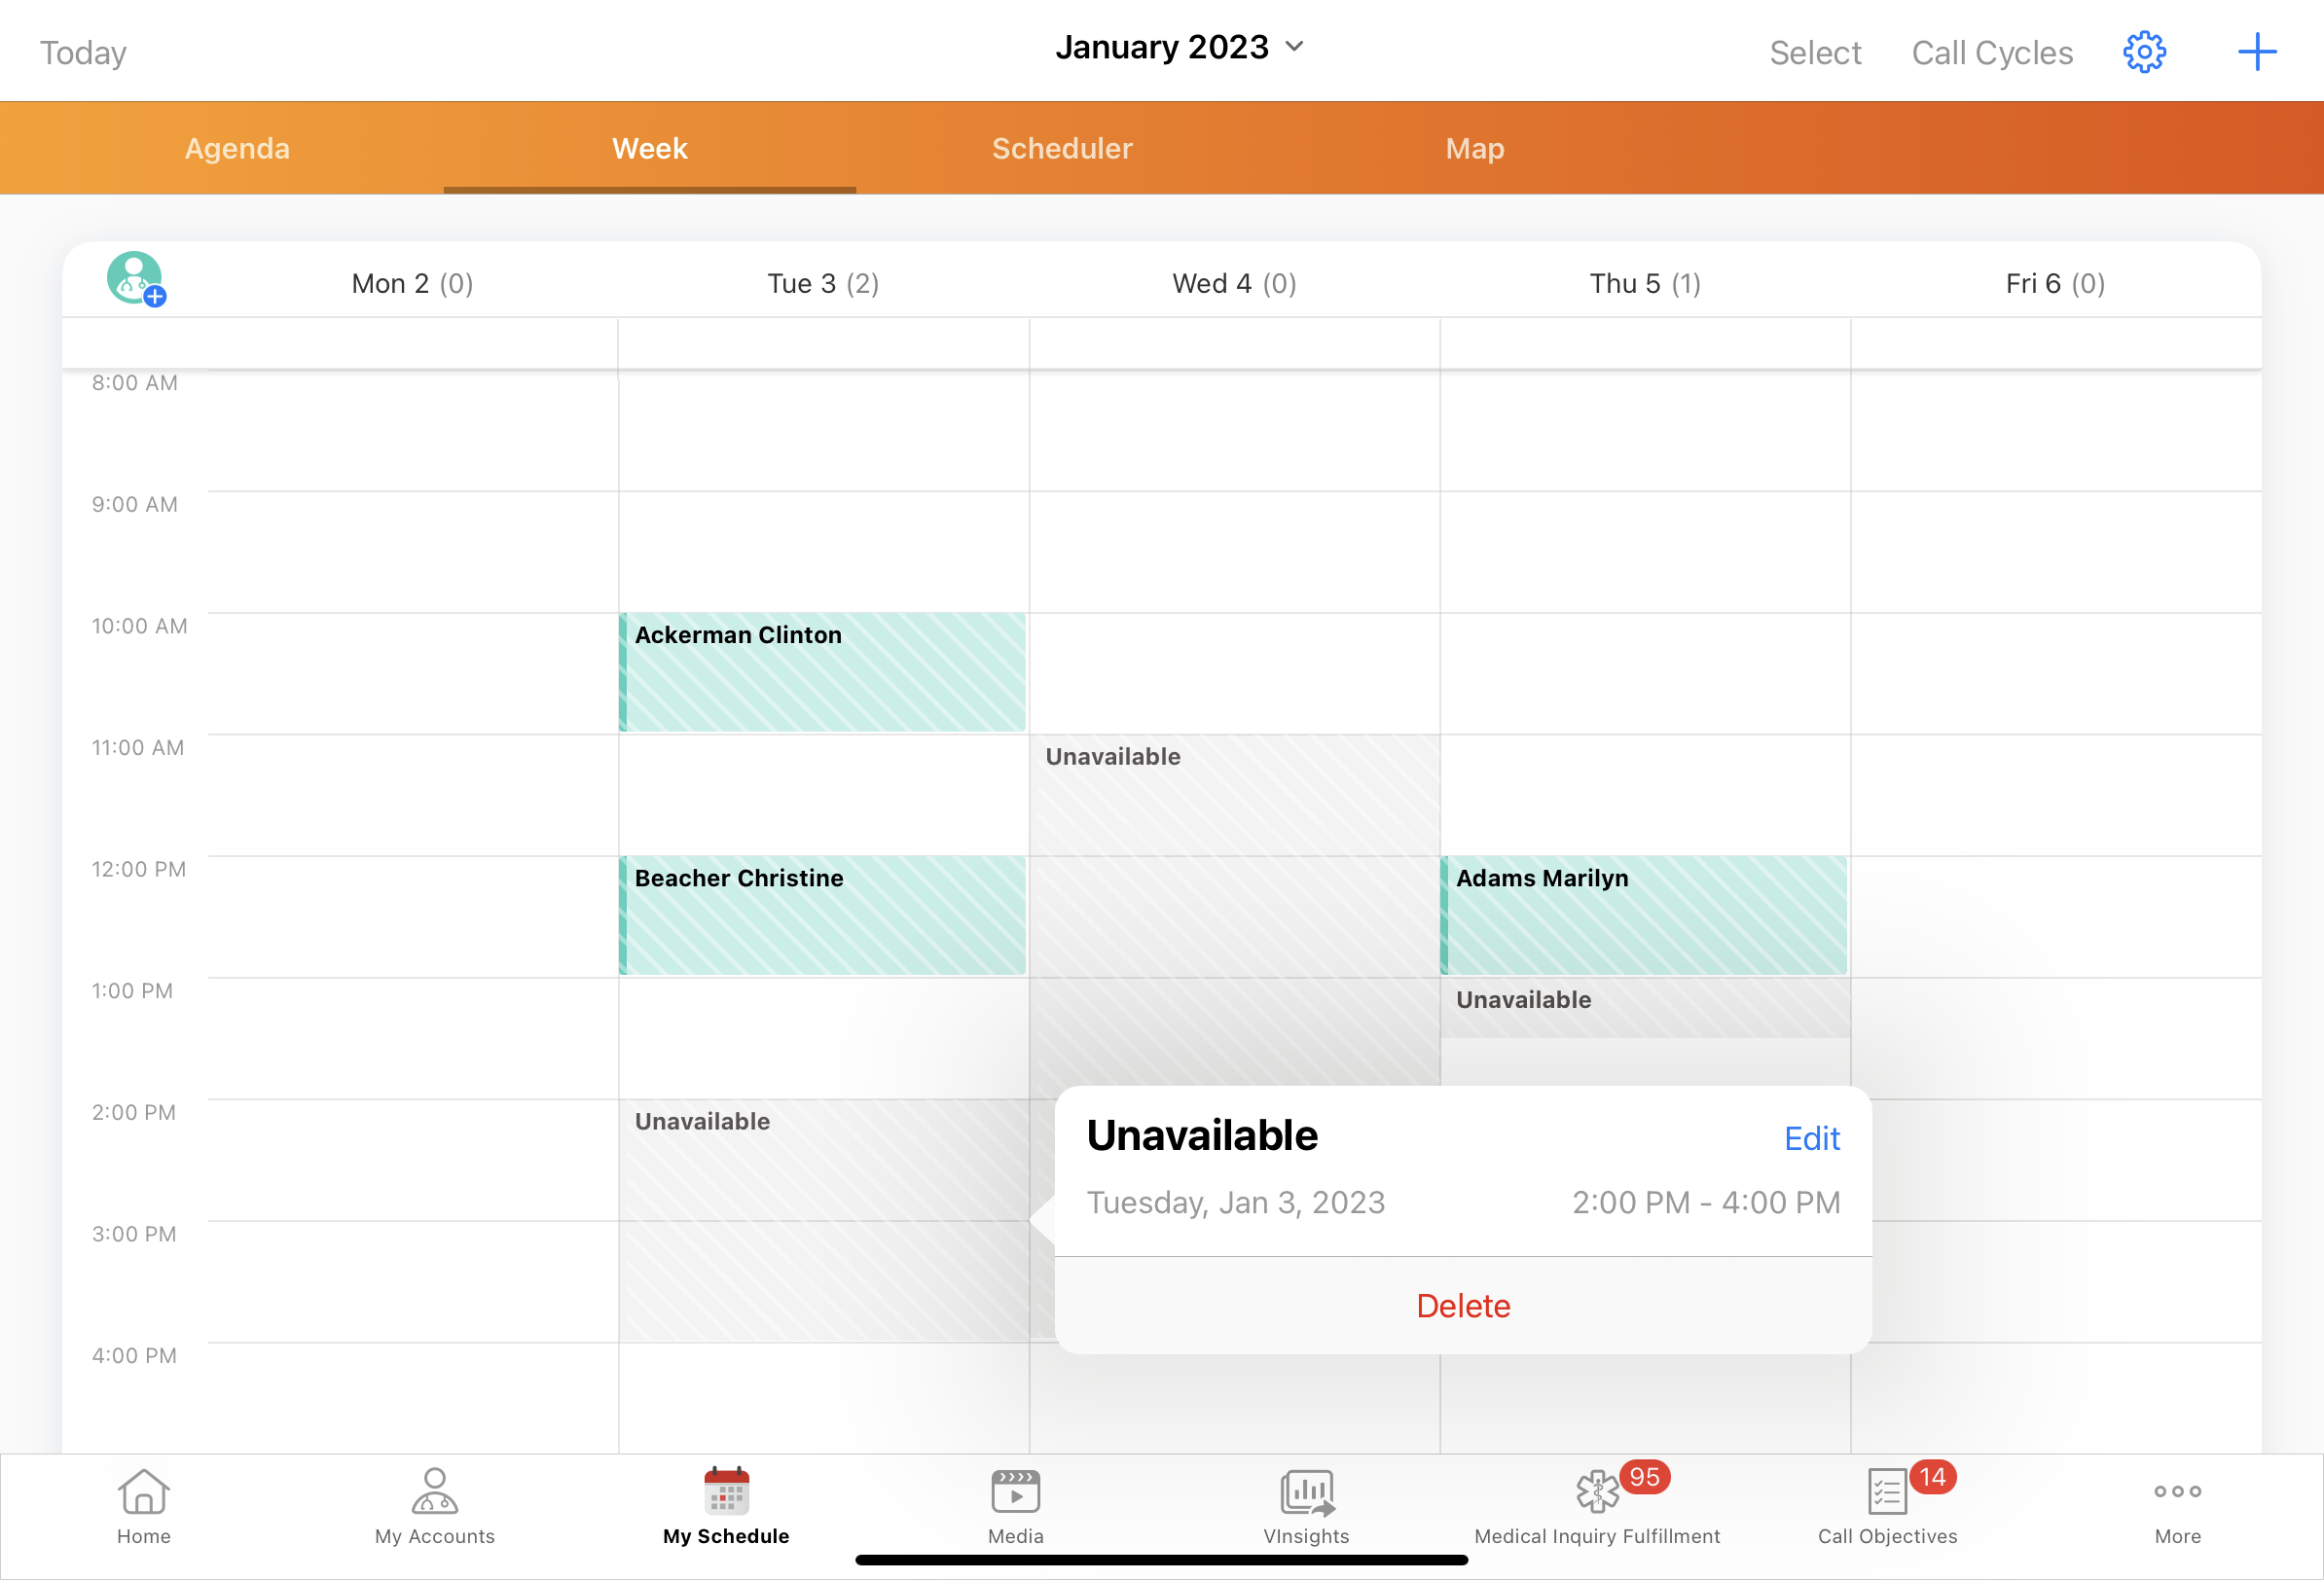
- Select the Edit button from the popover.

- Modify the All Day toggle, the start time, or the end time as desired.

- Select Save.

Deleting Unavailable Time Slots
To delete unavailable time slots on the iPad platform:
- Select the unavailable time slot.
- Select the Delete button.
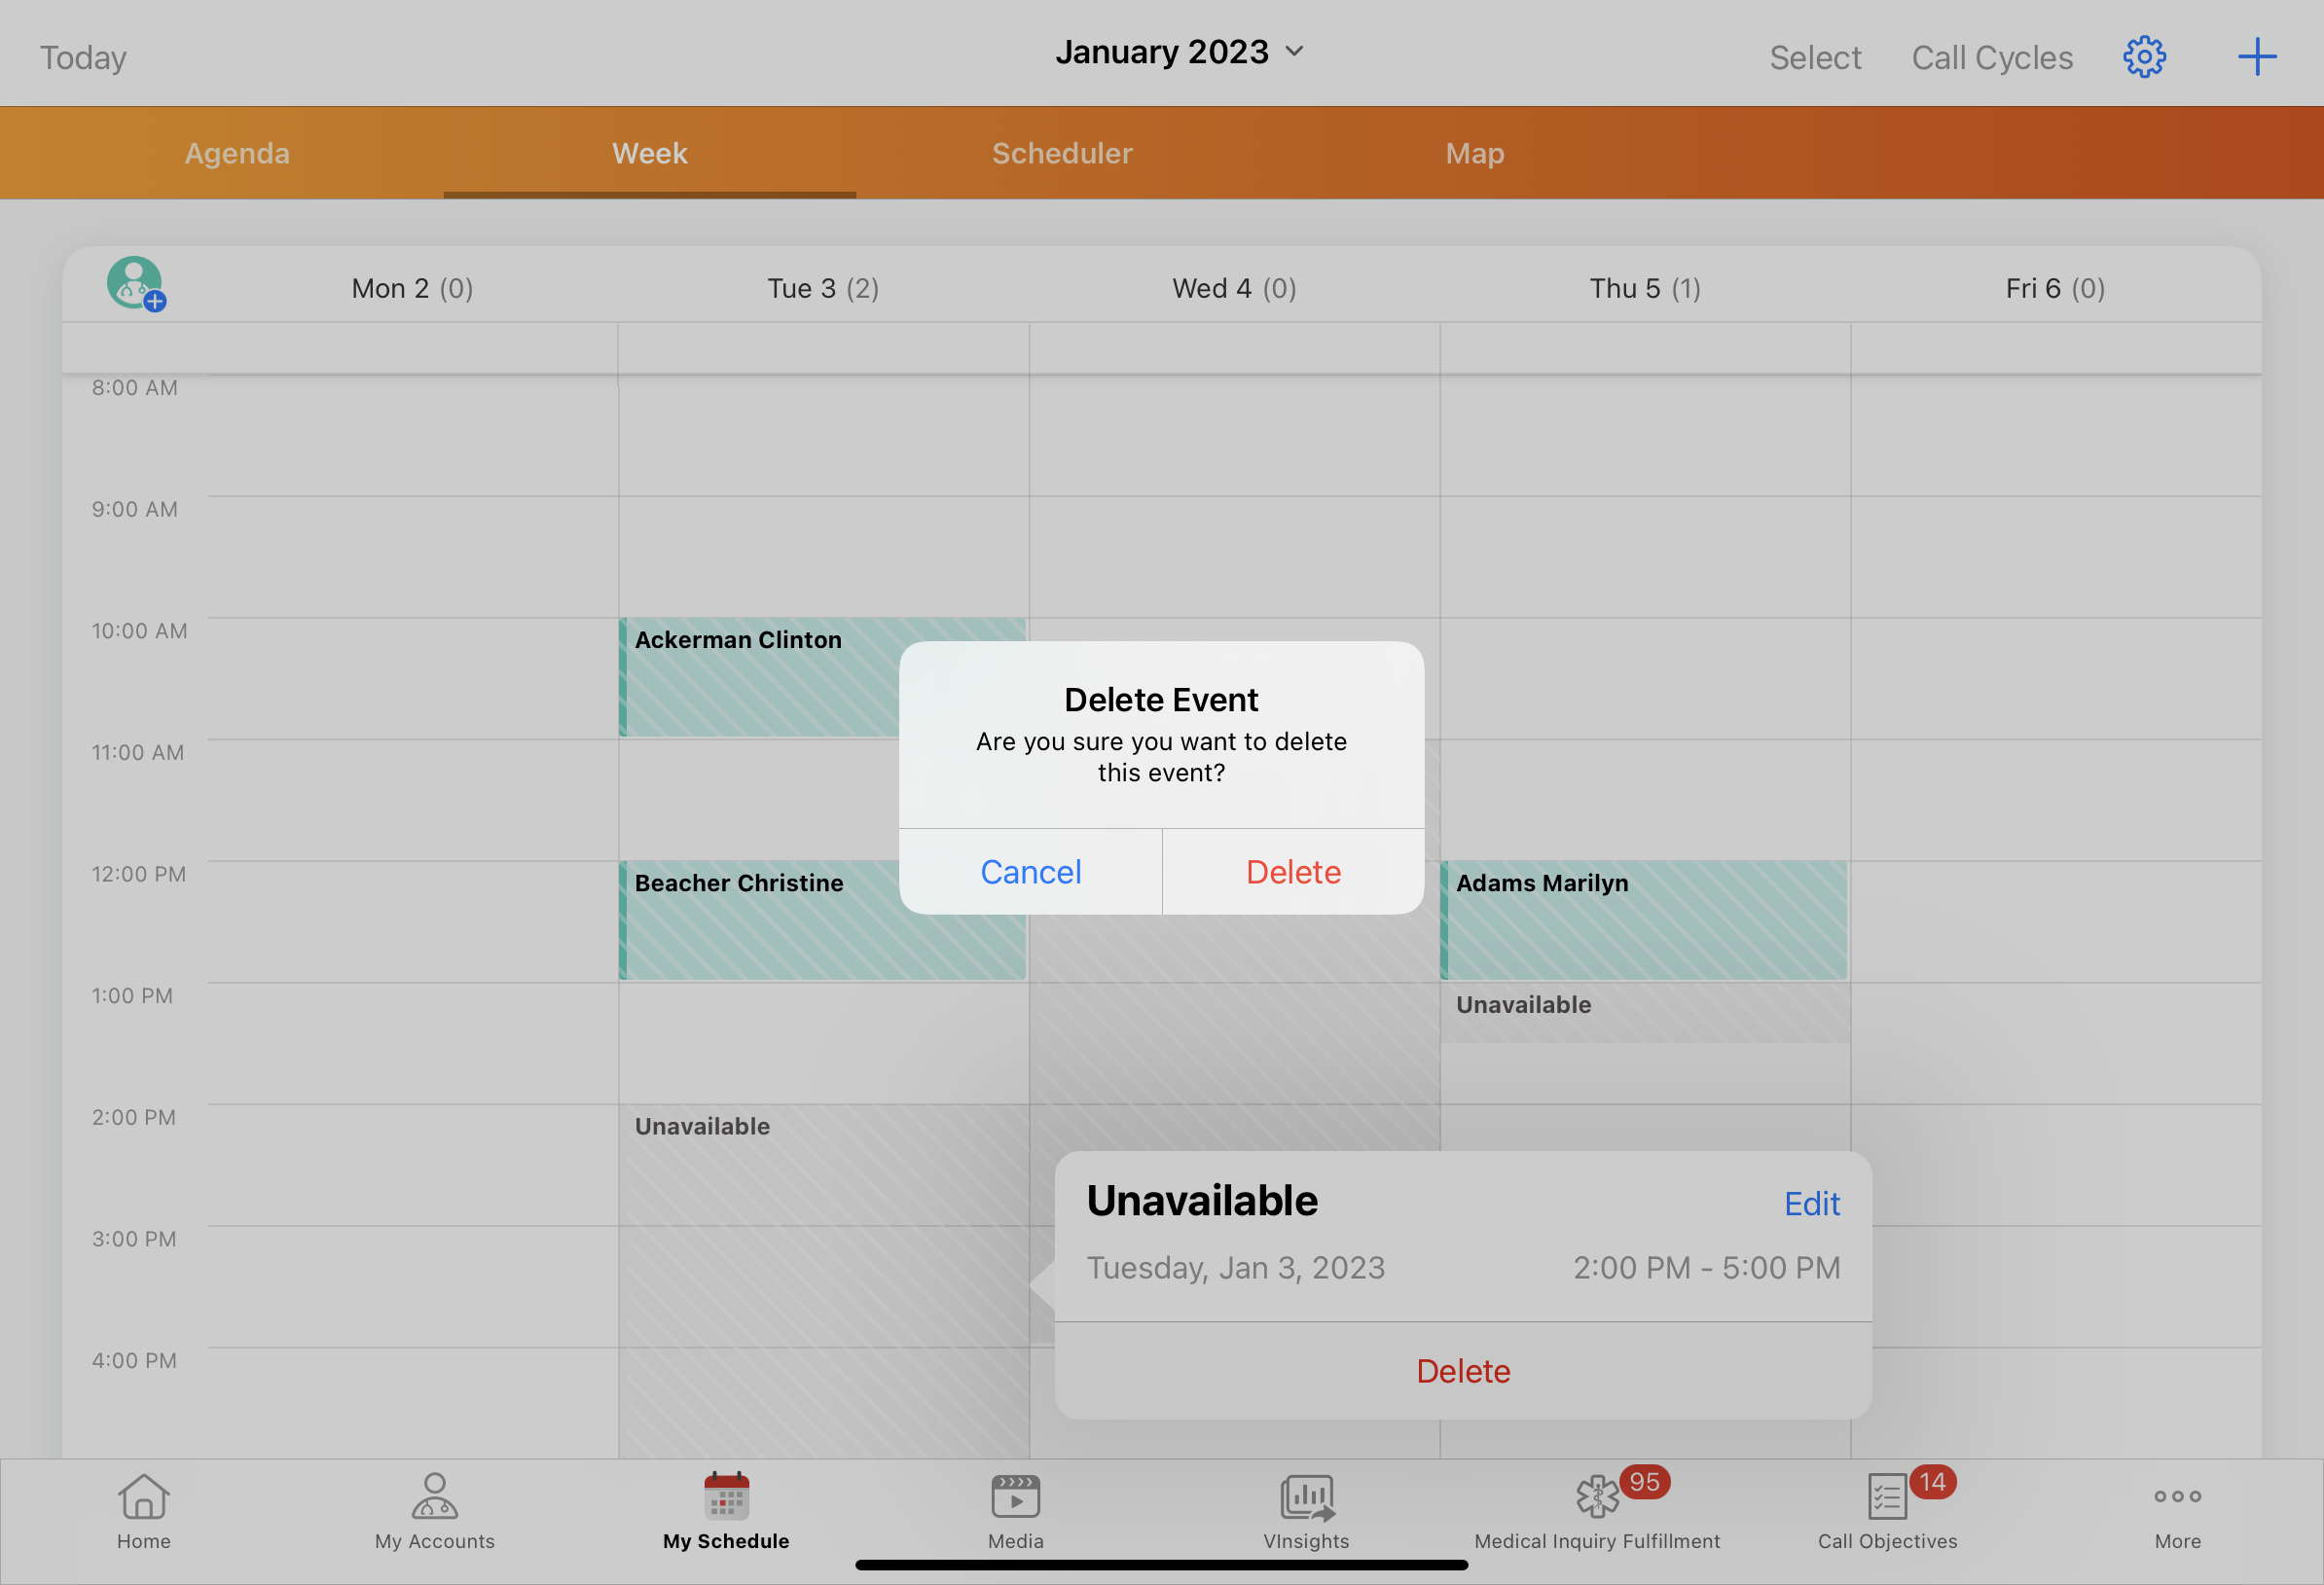
- Select Delete again to confirm the deletion.
Viewing Unavailable Time Slots on the Engage Scheduling Site
On the Engage Scheduling Site, unavailable dates display in gray on the HCP’s calendar. HCPs cannot select times or dates within an unavailable time slot.
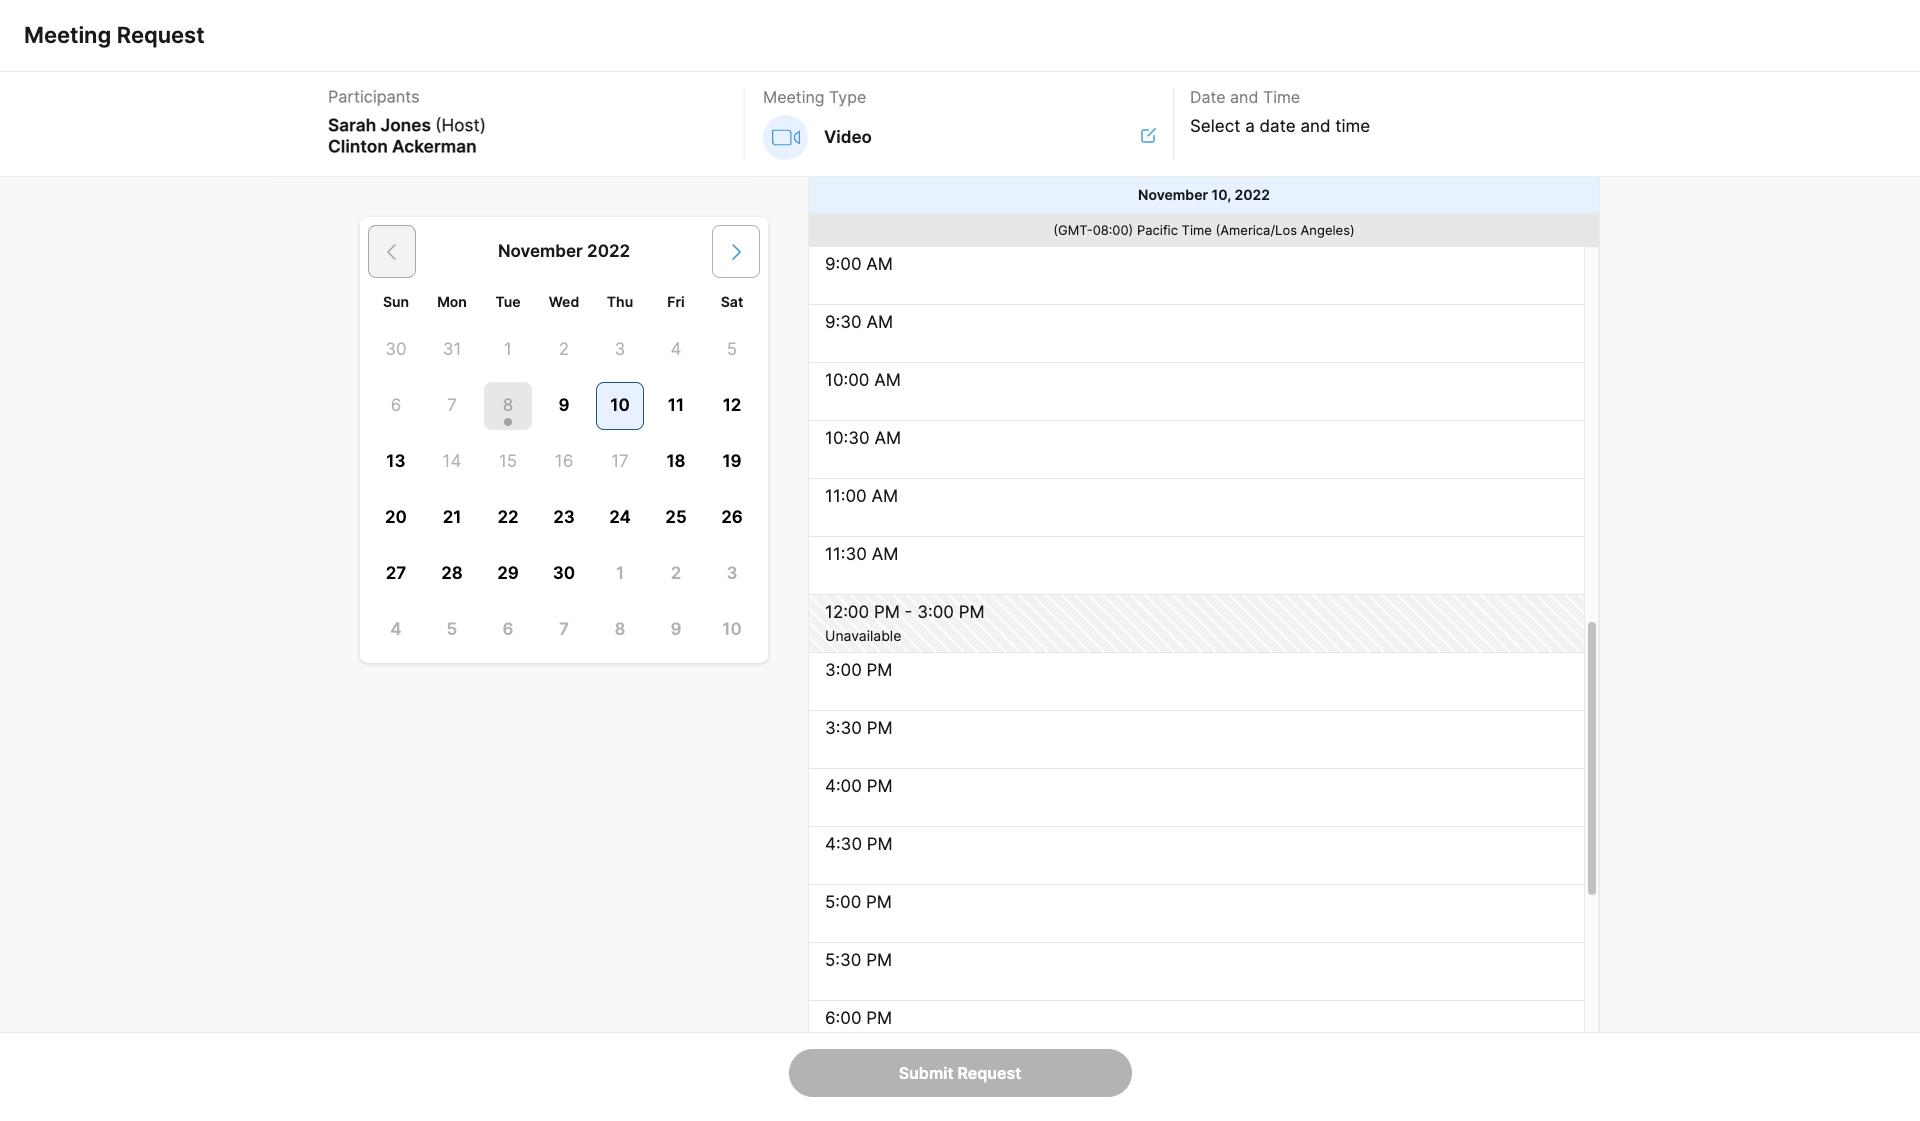
Unavailable time slots are automatically adjusted based on the viewer's internet browser time zone. For example, Sarah Jones creates an unavailable time slot starting at 9 AM Eastern Time. Dr. Beacher, an HCP in the Central time zone, sees the unavailable time slot starting at 8 AM Central Time.
Saturdays and Sundays are automatically available for scheduling, unless users create unavailable time slots blocking off weekend days.
When HCPs view a user’s schedule, the month and date default to the CRM user’s first available date. For example, the current date is September 15 but Sarah Jones’ first available time slot is on October 12. When Dr. Ackerman views Sarah Jones’ calendar on the Engage Scheduling Site, the calendar opens to Sarah’s first availability on October 12.
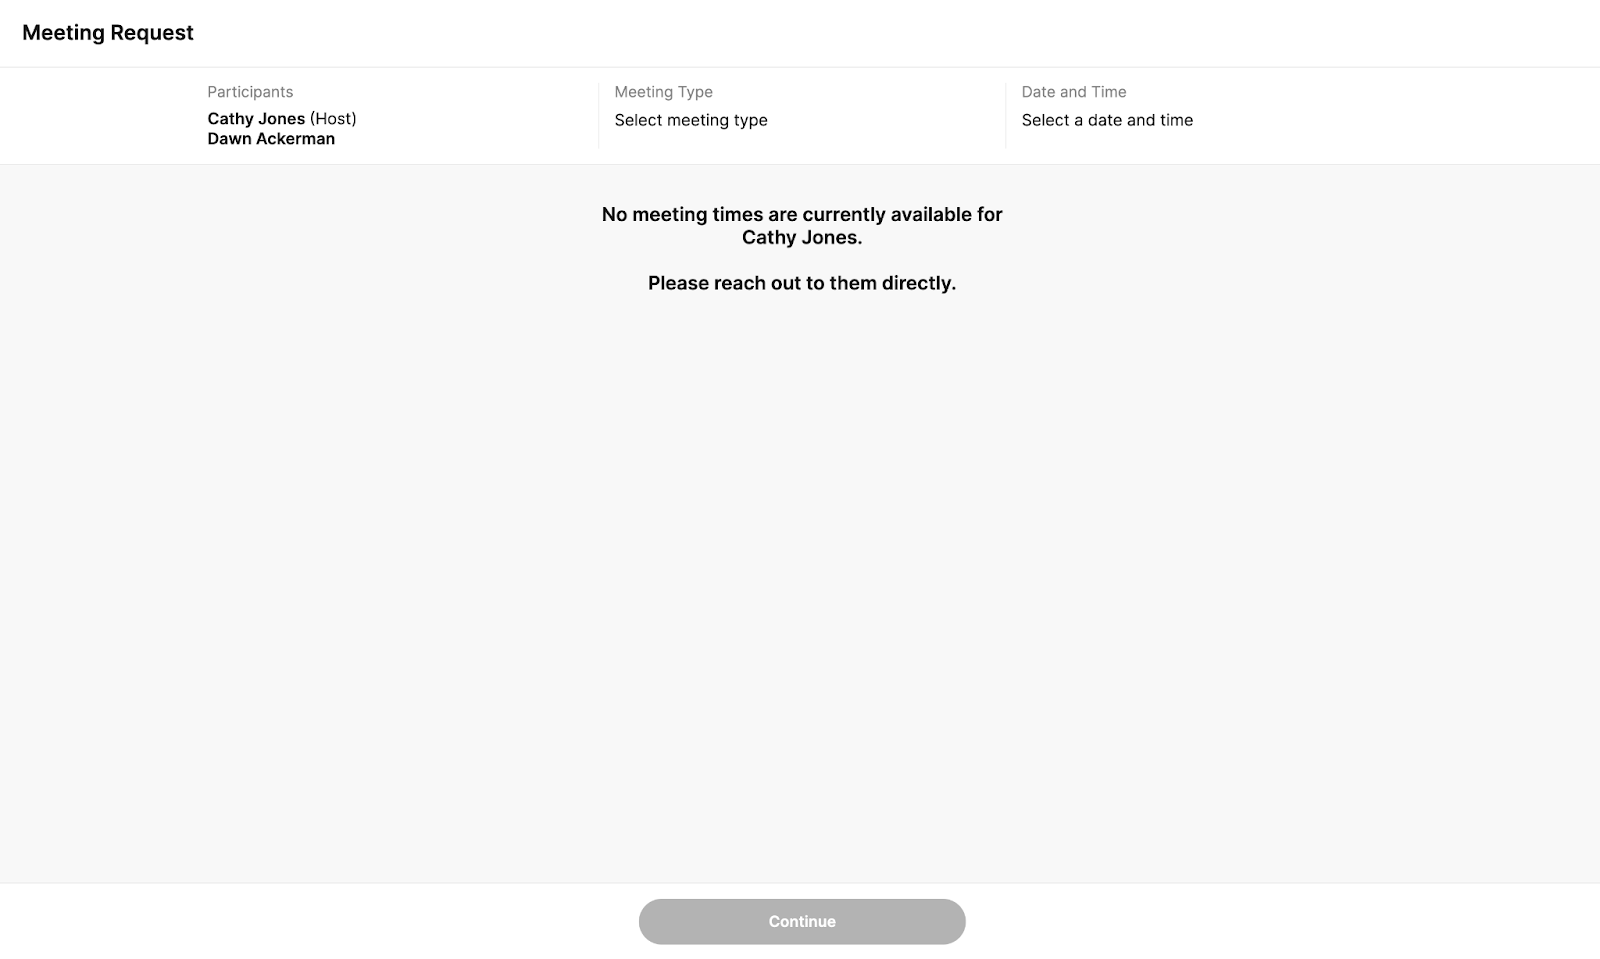
If all dates in the next three months are unavailable, a message displays encouraging HCPs to reach out to the end user directly.
Events Management
Applying Event Attendance Rules to Event Topic Categories
To provide granularity when applying Event Attendance Rules to events, admins can specify that certain business rule limits should only be applied to events with EM_Catalog_vod records with matching customer-defined topic categories. This can be especially useful when creating business rules about products with multiple indications.
This feature is supported by the following types of Event Attendance Rules:
- Per Attendee Attendance Limit Rules
- Cross-Event Per Attendee Attendance Limit Rule
- Meal Opt-In Attendance Limit Rule
- Cross-Event Meal Opt-In Attendance Limit Rule
For example, Verteo BioPharma has a rule that attendees cannot be added to a Speaker Program if they already attended one on the same subject within a 30-day period. Last week, Dr. Ackerman attended a program about Cholecap’s pain relief indication. This week, Sarah Jones plans a Speaker Program about Cholecap, but focuses on one of Cholecap’s other indications, cholesterol control. Sarah successfully adds Dr. Ackerman to the additional Speaker Program because it focuses on cholesterol control and not pain relief.
Applying Event Business Rules to Event Topic Categories
To apply a business rule for a specific topic:
- Edit or create the appropriate business rule.
-
Select the Per_Event_Topic_Category_vod check box.
This check box cannot be used with the Per_Event_Topic_vod check box.
- Select Save.
After saving the business rule, events are only counted towards the business rule’s limits if the events have associated topics with matching Topic_Category_vod fields.
Event Attendee Restricted Product Rules
Attendee Restricted Product rules improve compliance when planning events by warning event organizers about attendees who have a product designated as restricted for that account. These attendees cannot be added to that event.
For example, Sarah Jones plans an event about Cholecap. She attempts to add Dr. Clinton Ackerman as an attendee to her event, but Dr. Ackerman’s account has Cholecap listed as a restricted product. When Sarah attempts to submit her event for approval, a warning displays that Dr. Ackerman cannot be an attendee of this event. Sarah removes Dr. Ackerman from the event, then successfully submits her event.
Prerequisites
Creating Attendee Restricted Product Rules
To create Restricted Product Rules:
- Navigate to the Event Business Rules tab.
- Create an Event Rule with a record type of EM_Attendee_Product_Restriction_Rule_vod.
- Select Next.
-
Populate the following fields:
- Name
-
Attendee_Account_Type_vod – Restricts the rule to only match the specified account type based on the Attendee_Account_Type_vod formula field on the EM_Attendee_vod object. If left empty, the rule applies to all attendees whose Attendee_Account_Type_vod field is not null. Uses the following format:
;;Attendee Account Type 1;;Attendee Account Type 2;;
This field uses the API Names for the entered event statuses and attendee statuses. For example, ;;Professional_vod;;Prescriber_vod;;
-
Attendee_Status_vod – Uses the following format to define which attendee status and event status combinations the rule should apply to:
;;Event Status 1:Attendee Status 1,Attendee Status 2;;Event Status 2:Attendee Status 1;;
This field uses the API Names for the entered event statuses and attendee statuses. For example, ;;Approved_vod:Invited_vod,Accepted_vod;;Closed_vod:Attended_vod;;
- Global_Rule_vod – Applies the rule to all countries, regardless of any countries associated via Event Business Rule Configuration records. This field cannot be edited after the record is created.
- Warning_Type_vod – Select either Hard Warning or Soft Warning. See Warning Text and Tokens for more information.
- Warning_Text_vod – Displays the Veeva Message that displays if this rule is violated. See Warning Text and Tokens for more information.
- Comment_Required_vod – Only displays if the Warning Type is Soft Warning. Select one of the following options:
- Required – Organizers must leave a comment when dismissing a soft warning
- Optional – Organizers may leave a comment when dismissing a soft warning
- Hidden – The comment box does not display
- Run_Rule_Event_Action_vod – Enter the appropriate button name to run the rule whenever the event organizer selects the button. Enter only one button name and do not use any of the following buttons:
- Attendee_Reconciliation_vod
- Cancel_Event_vod
- Generate_Invitations_vod
- Generate_Sign_In_vod
- Manage_Attendees_vod
- Manage_Attendees_Hub_vod
- Preview_Event_QR_Code_vod
- Record_a_Call_vod
- Reschedule_vod
- Schedule_Engage_vod
- Send_Email_vod
- Start_Webinar_vod
- View_Signatures_vod
- Select Save.
Creating Attendee Restricted Product Rules Configurations
After the event rule is created, admins must create an associated EM_Business_Rule_Configuration_vod record to determine which event type, country, and timespan the rule should apply to.
To associate event rules to EM_Business_Rule_Configuration_vod records, create a EM_Business_Rule_Configuration_vod record from the Business Rule Configurations related list of the appropriate business rule with the following field values:
- Event_Business_Rule_vod – Automatically populates with the appropriate event rule
- Event_Type_vod – Enter the appropriate EM_Event_vod record type the event rule applies to
- Country_vod – Use the lookup to select the appropriate Country_vod record. This field does not display if the Global_Rule_vod check box was selected.
- Rule_Start_Date_vod – Defines the start of the active period of the rule
- Rule_End_Date_vod – Defines the end of the active period of the rule
Only one business rule configuration can be active for each combination of Event_Type_vod, Event_Business_Rule_vod, and Country_vod.
Utilizing Event Format and Location Type in Event Business Rules
Admins can configure Event Business Rules to only apply to certain event formats or location types, improving both efficiency and compliance when planning events. By making business rules more specific, admins can avoid creating redundant business rules.
The following types of business rules are supported:
- Event Attendance Rules – Supports the following record types:
- EM_Per_Attendee_Attendance_Limit_Rule_vod
- EM_Per_Event_Attendance_Limit_Rule_vod
- EM_Cross_Event_Per_Attendee_Attendance_Limit_Rule_vod
- Expense Estimate Creation Rules – Supports the following record types:
- Expense_Estimate_Meal_Rule_vod
- Event Expense Limit Rules – Supports the following record types:
- EM_Per_Event_Attendee_Expense_Limit_Rule_vod
- Required Event Material Rules – Supports the following record types:
- EM_Required_Event_Material_Rule_vod
For example, events that are an out-of-office hybrid event, users should be warned if meal expenses exceed $125 per attendee. The compliance team at Verteo BioPharma wants to warn users when meal expenses at in-office, in-person events exceed $50 per attendee. Sarah Jones plans and executes an in-office, in-person event. She logs her expenses, including $55 meal expenses for each attendee. When she attempts to close her event, a warning informs her of the rule violation.
Specifying a Format or Location for an Event Business Rule
To specify the format or location an Event Business Rule should be applied to:
- Create the appropriate Event Business Rule.
- Navigate to the appropriate EM_Business_Rule_Configuration_vod record.
-
Populate the following fields:
-
Event_Format_vod – Only applies the business rule to EM_Event_vod records with matching Event_Format_vod fields. Multiple values can be specified using a double semicolon delimited list, for example:
In_Person_vod;;Virtual_vod
-
Location_Type_vod – Only applies the business rule to EM_Event_vod records with matching Location_Type_vod fields. Multiple values can be specified using a double semicolon delimited list, for example:
In_Office_vod;;Out_of_Office_vod
These fields can be used independently or together for even greater specificity.
-
- Select Save.
Uploading Speaker Profile Photos
To help to round out the speaker profile using an interface that highlights a speaker's photo, admins can upload pictures to speaker records to serve as the speaker’s profile photo.
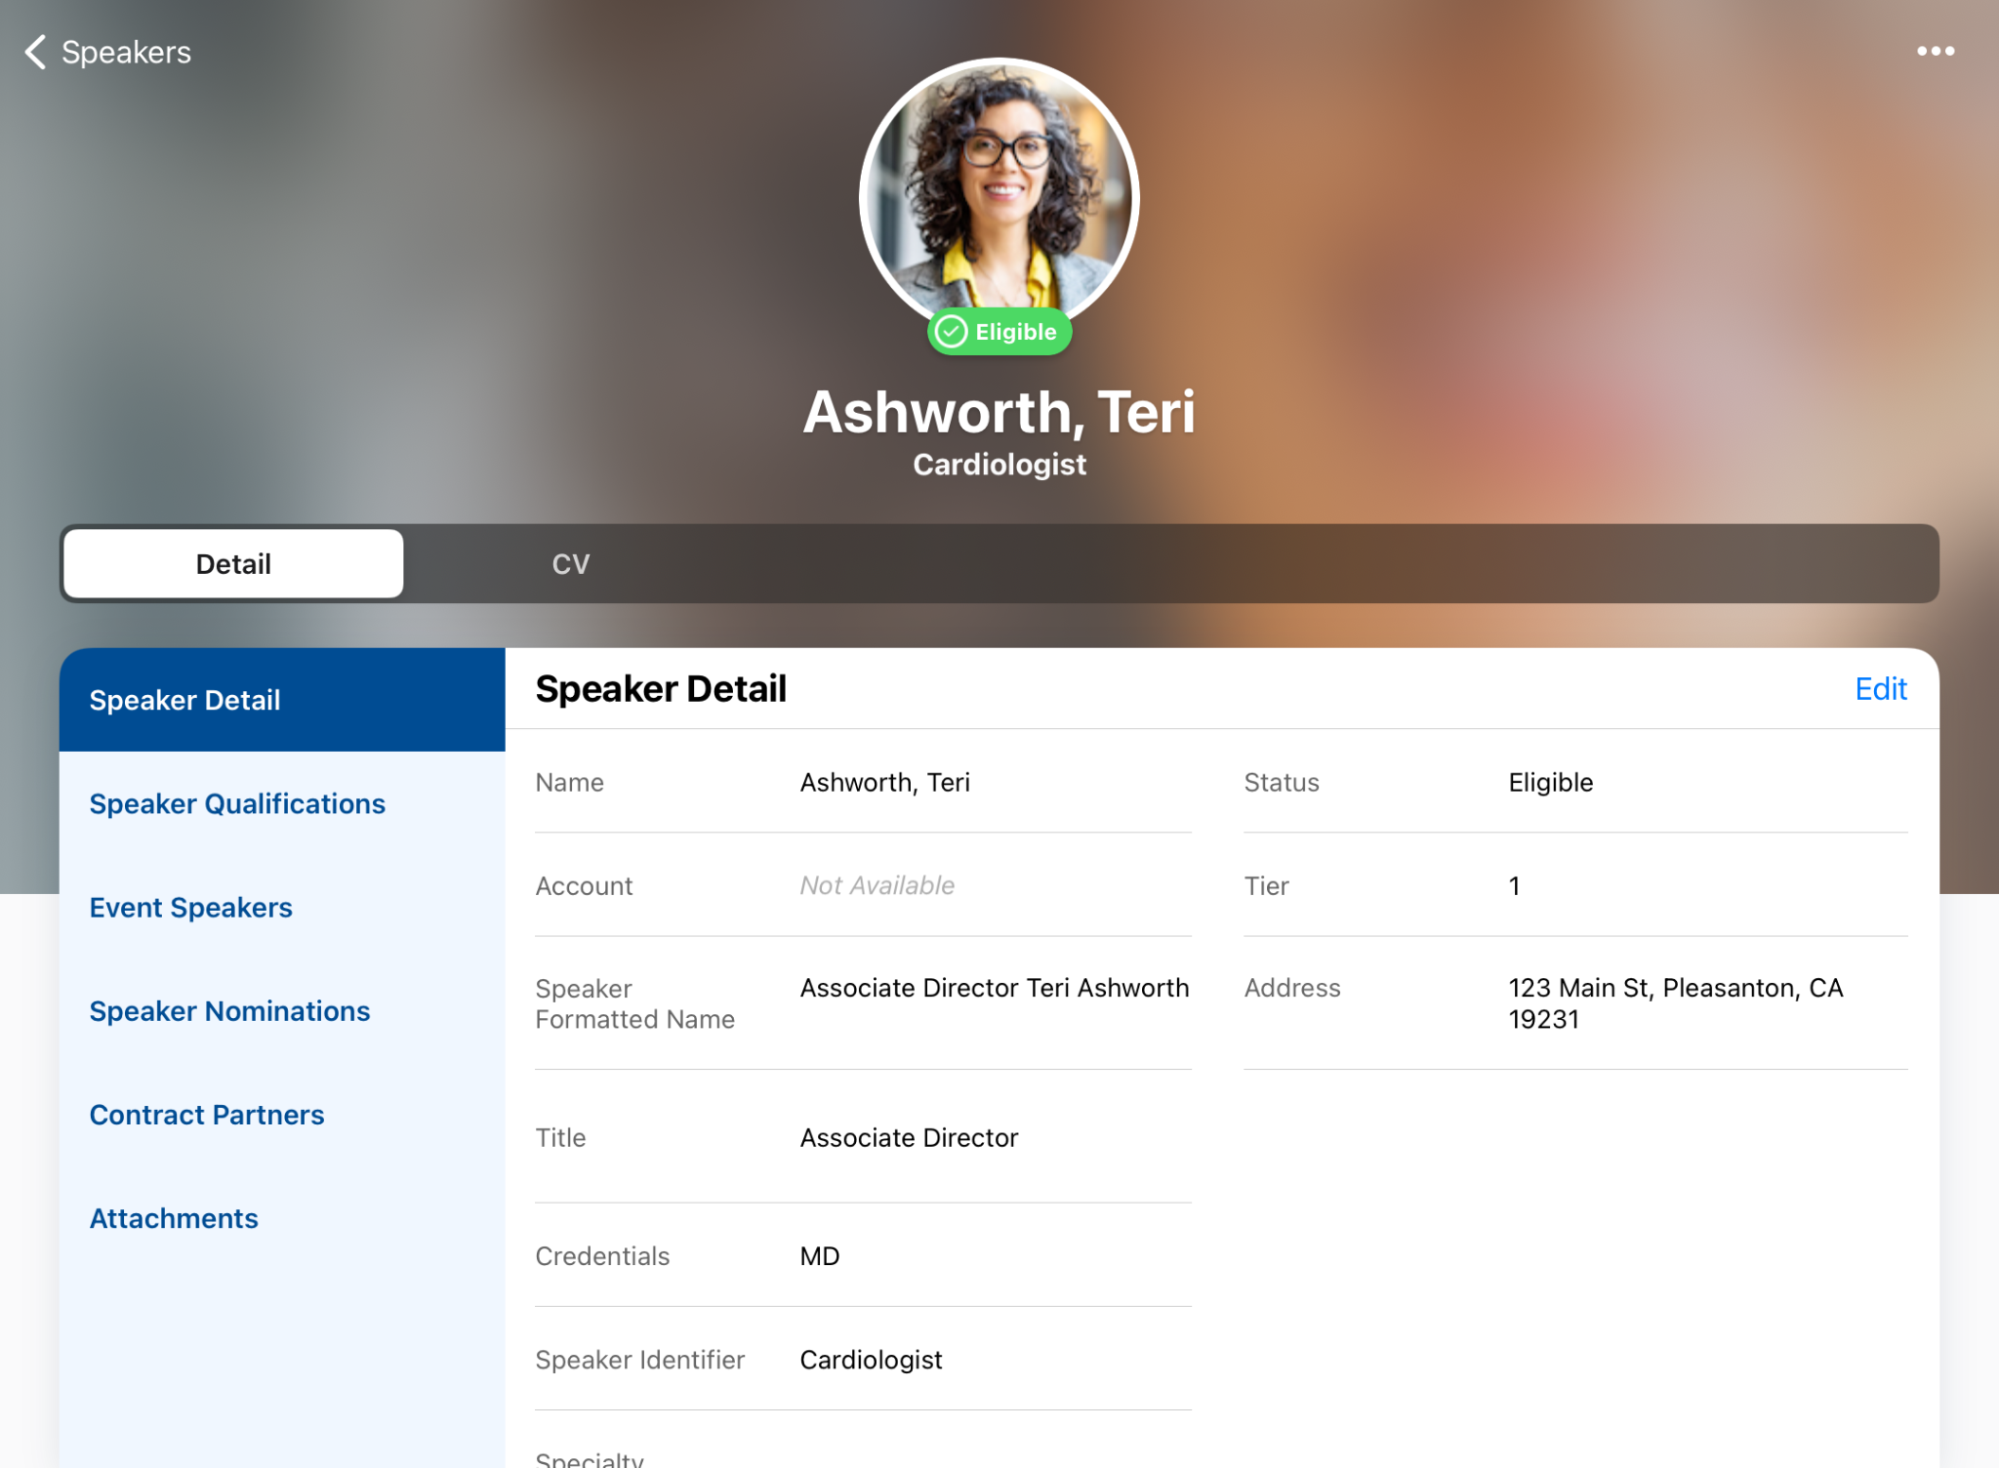
For example, Alice Adams is an admin responsible for optimizing the EM_Speaker_vod records in her org. She uploads profile pictures to each EM_Speaker_vod record to help event organizers plan their events more efficiently. Alice data loads the speaker information directly into Veeva CRM. Sarah Jones organizes meetings with Dr. Ackerman as a speaker. When Sarah navigates the Speakers tab, she quickly identifies Dr. Ackerman based on his profile photo.
Speaker Profile Photo Requirements
Profile photos uploaded to a Speaker record must meet the following requirements:
The image must have one of the following extensions:
- .jpg
- .jpeg
- .png
-
.gif
GIF files do not animate.
- The image file size cannot exceed 50KB
- The recommended image resolution is 240 x 240 pixels
Uploading a Speaker’s Profile Photo
Uploading Speaker Profile photos is only supported on the Browser (Lightning) platform.
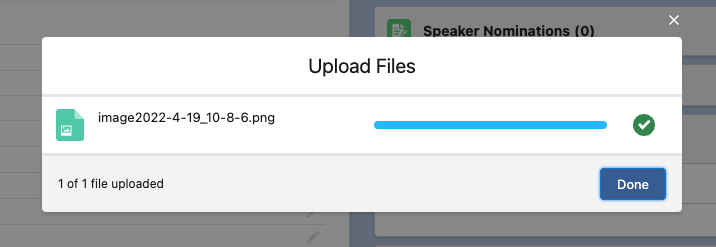
To upload an image to a Speaker Profile:
- Ensure the CRM_Content_Type_vod field is present on the General page layout of the ContentVersion object.
- Navigate to the appropriate EM_Speaker_vod record.
- Select Upload File in the Notes and Attachments related list.
- Select the appropriate image.
- Select Open.
-
Select Done when the image finishes uploading.
- Select View All on the Notes and Attachments related.
- Select View File Details in the drop-down menu for the uploaded image.
-
Select the Details tab.
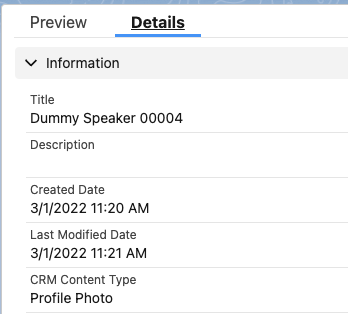
- Populate the CRM_Content_Type_vod field with Profile_Photo_vod.
- Select Save.
Profile photos are only supported when uploaded as Salesforce Files. Attachments are not supported.
Data Loading Profile Photos
Profile photos can be uploaded in bulk via data loading to Salesforce’s ContentVersion object. See the following Salesforce Help article for more information. When data loading, populate the CRM_Content_Type_vod field on the ContentVersion object with Profile_Photo_vod.
Data loading is the only way to upload profile photos on the Browser (Classic) platform.
Viewing Speaker Profile Photos
When a profile photo is defined for a speaker, the image displays in the list of speakers on the Speakers tab.
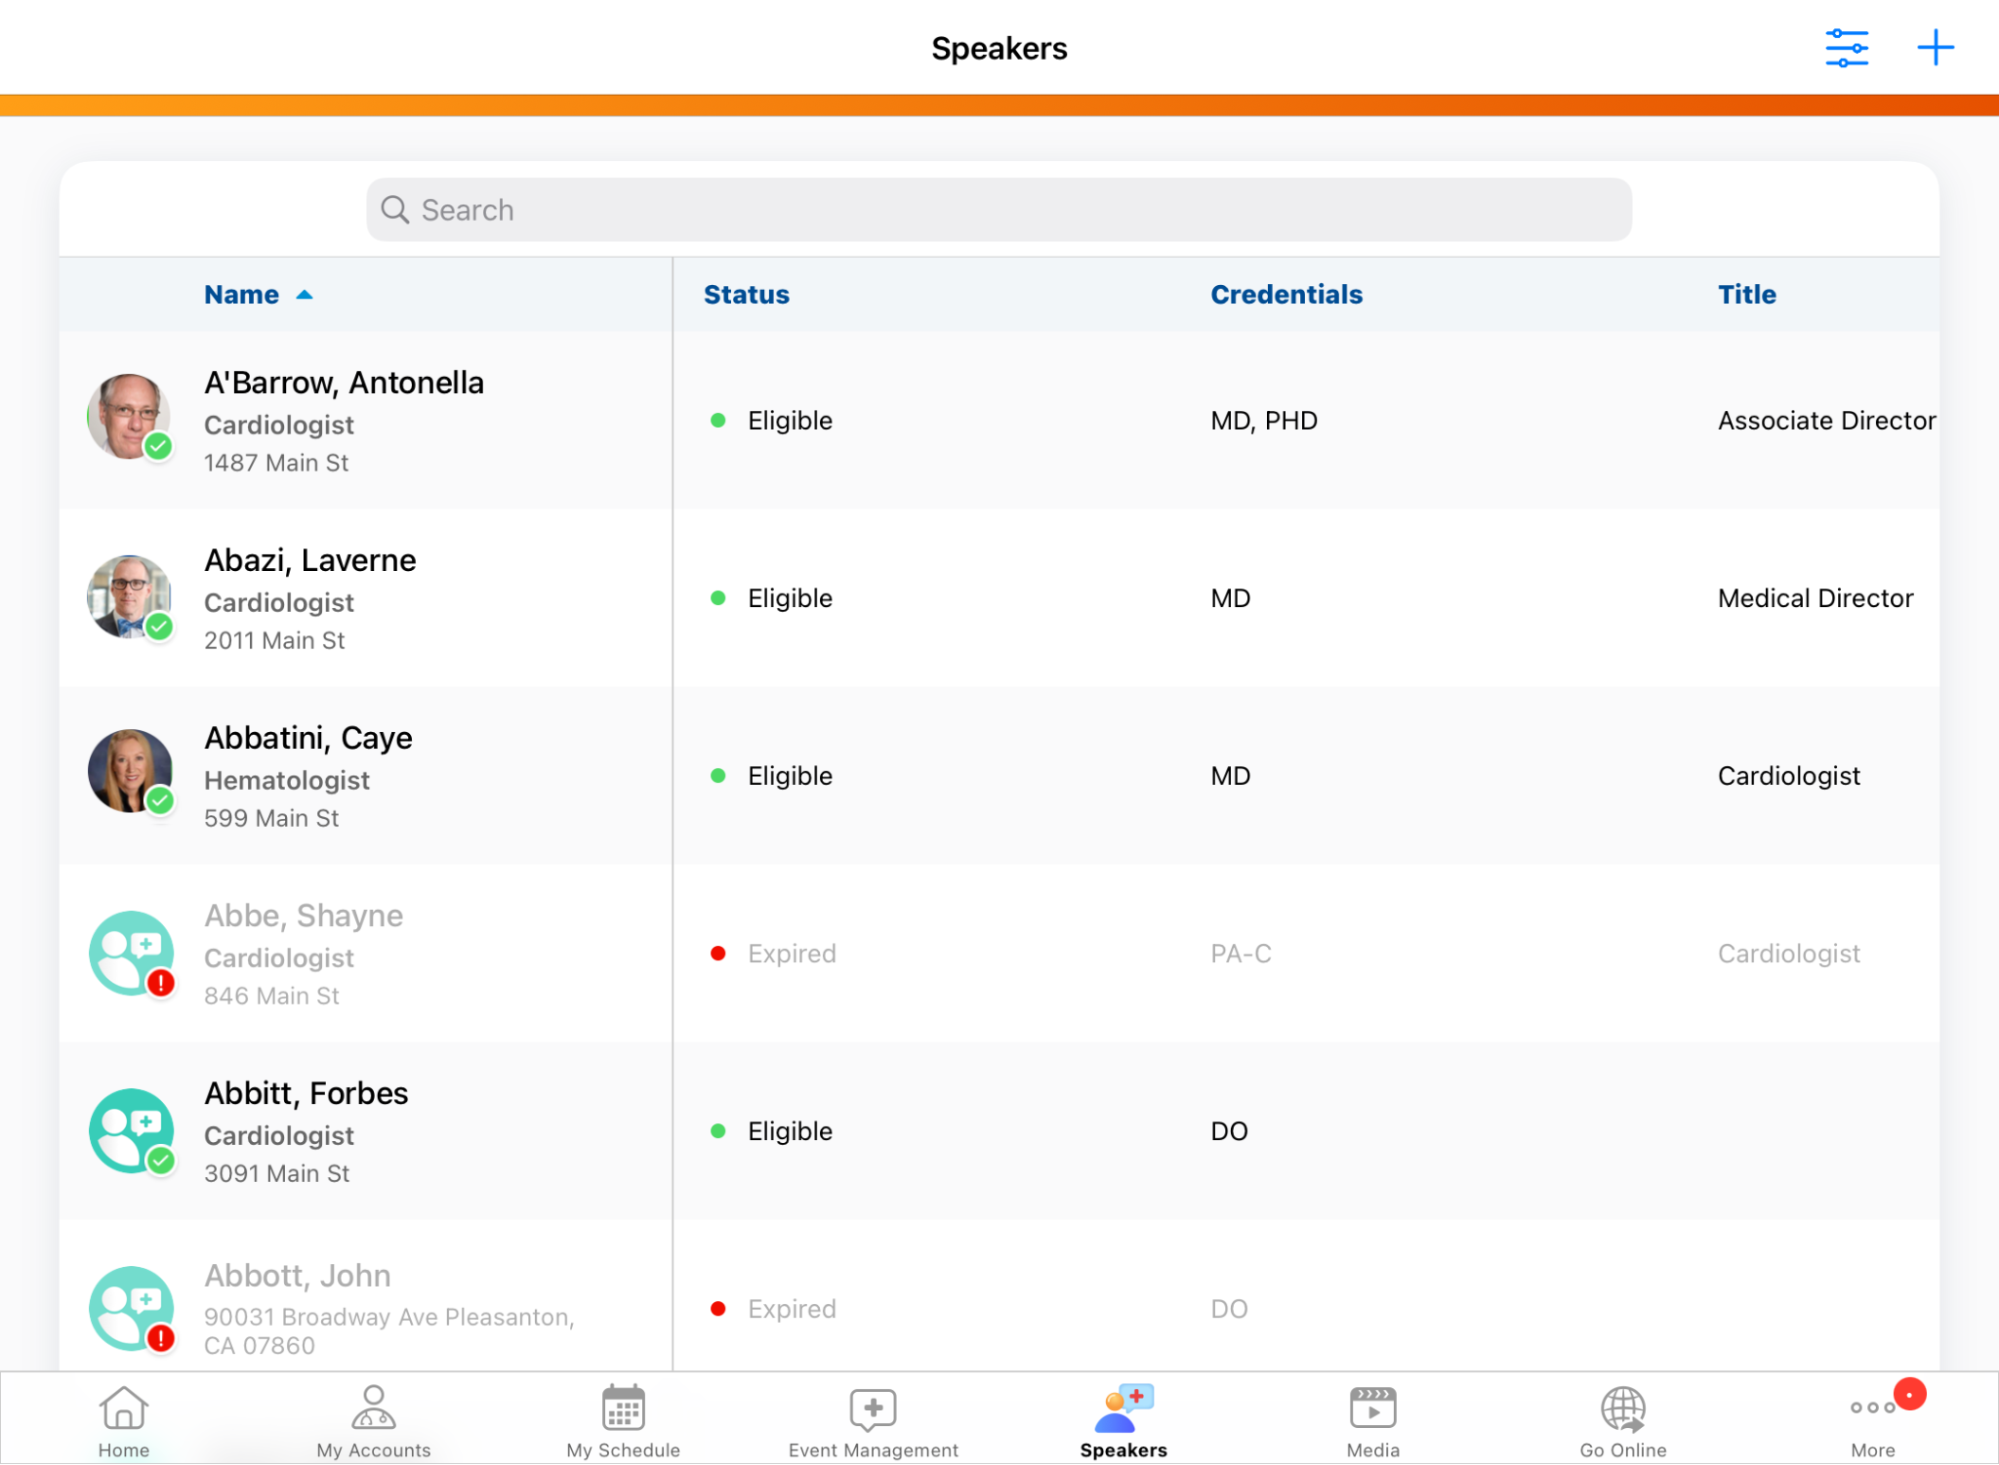
Profile photos also display on EM_Speaker_vod detail records.
Events Speaker Portal
The CRM Event Management Speaker Portal is a browser-based portal that enables speakers to view their upcoming and past events, download event material related to upcoming events, as well as download their active and expired contracts.
The Speaker Portal is enabled and managed within Veeva CRM and is included as part of the Veeva CRM Events Management license. Customers can configure the portal in their own org without the need for professional services, and can customize their portal with their company’s logo, support contact information, privacy policy, and terms of use. Each CRM org has its own dedicated Speaker Portal, utilizing data originating from the CRM org.
For example, Dr. Ackerman is added as a new speaker at Verteo BioPharma. Before his first speaking event with the company, he receives his email invitation to Verteo BioPharma’s Speaker Portal. He sees his upcoming event, material related to the event, and the ability to download the contract between him and Verteo BioPharma. Dr. Ackerman is able to use the Speaker Portal to prepare for the upcoming event.
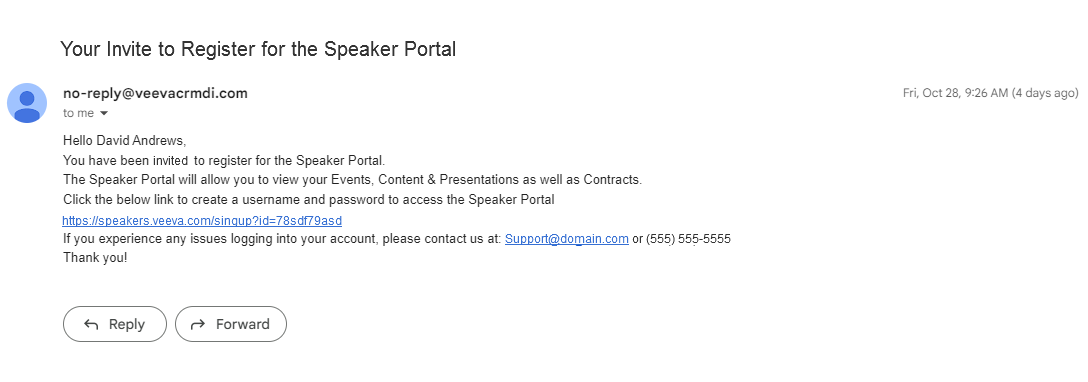
Inviting Speakers to Sign up for the Speaker Portal
Before speakers can sign up for the Speaker Portal, they must receive an invitation via the speaker profile in CRM.
CRM users can invite speakers via one of the following methods:
- Data-loading EM_Speaker_vod records with the Send_Speaker_Registration_Email_vod populated as True
-
Selecting the Send Speaker Portal Registration Email button on the appropriate EM_Speaker_vod record
Once the registration email is sent, the EM_Speaker_vod record’s Portal_Access_vod field automatically updated to Enabled and the Portal_Registration_Email_Date_vod field populates with the date and time that the invitation was sent.
Signing up for the Speaker Portal
Event Speakers can sign up for the Speaker Portal via the invitation sent to them by CRM users.
Select the link in the invitation to display the Speaker Portal registration page.
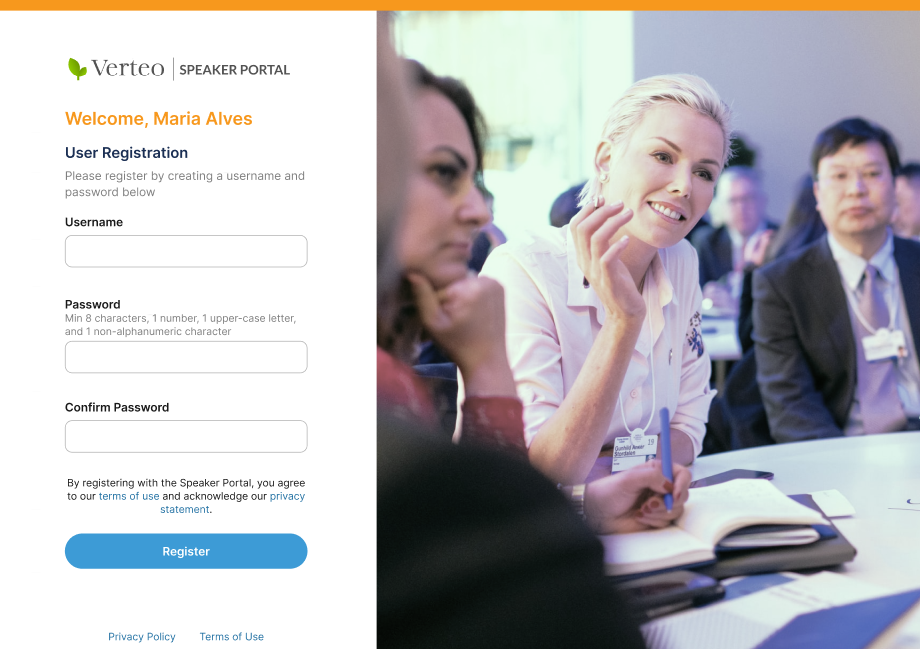
Speakers must enter a unique username and a password meeting all of the displayed requirements before they are able to successfully register.
Once the speaker successfully registers, the Portal_Account_Creation_Date_vod field on their EM_Speaker_vod record in CRM automatically updates with the date the Speaker Portal account was created.
Additional registration emails cannot be sent once the Speaker’s account is created, even if the Send Registration button is selected or if data-loading inadvertently attempts to send an invitation.
Speakers are able to log into the portal at any time via the URL in the welcome email.
Viewing Events in the Speaker Portal
Speakers can view their upcoming or past events via the Events page in the Speaker Portal.
Each event in this page displays as a card containing information about the event based on information from CRM.
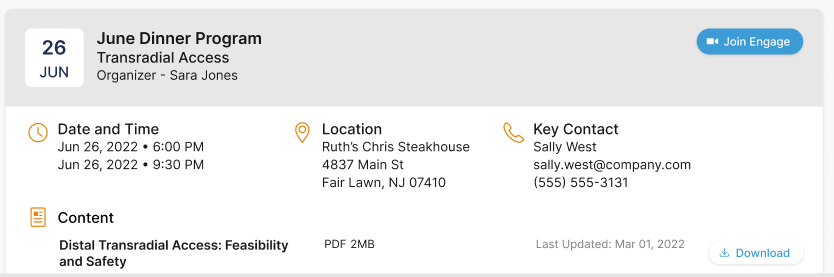
The event’s time automatically localized based on the location of the Speaker Portal user. However, if Adding Local Time and Time Zone to an Event is enabled, the time and displayed time zone is based on the event, not the user.
Active Speaker_Presentation_vod type EM_Event_Material_vod records associated with the event display as available for download in the Content section of the card.
In addition to viewing details about the event, speakers can also select the Join Engage button to join the event via Engage if the event is a virtual event.
Downloading Contracts from the Speaker Portal
Speakers can use the Contracts page of the Speaker Portal to download PDF versions of their active or expired Speaker Contracts or Speaker Agreements.
Custom record types on the Contract_vod object are not supported and do not display in the Speaker Portal.
Contracts display as a list of cards with details about the contract’s signed date and effective dates.

The PDFs available for download are from different CRM sources, depending on if the contract is a Speaker Contract or a Speaker Agreement:
-
Speaker Contract – The PDF is uploaded in the Notes & Attachments related list of the EM_Event_Speaker_vod record representing the speaker where the attachment’s name begins with the Contract Partner ID. If there is more than one file, only the newest file displays.
For example, CP-000000061_Signed_SpeakerContract.PDF
-
Speaker Agreement – The PDF is uploaded in the Notes & Attachments related list of the EM_Speaker_vod record representing the speaker where the attachment’s name begins with the Contract Partner ID. If there is more than one file, only the newest file displays.
For example, CP-000000061_Signed_SpeakerAgreement.PDF
Speakers can download contracts in both the Active Contracts and Expired Contracts tabs by selecting the Download button in the appropriate card.
Lightning
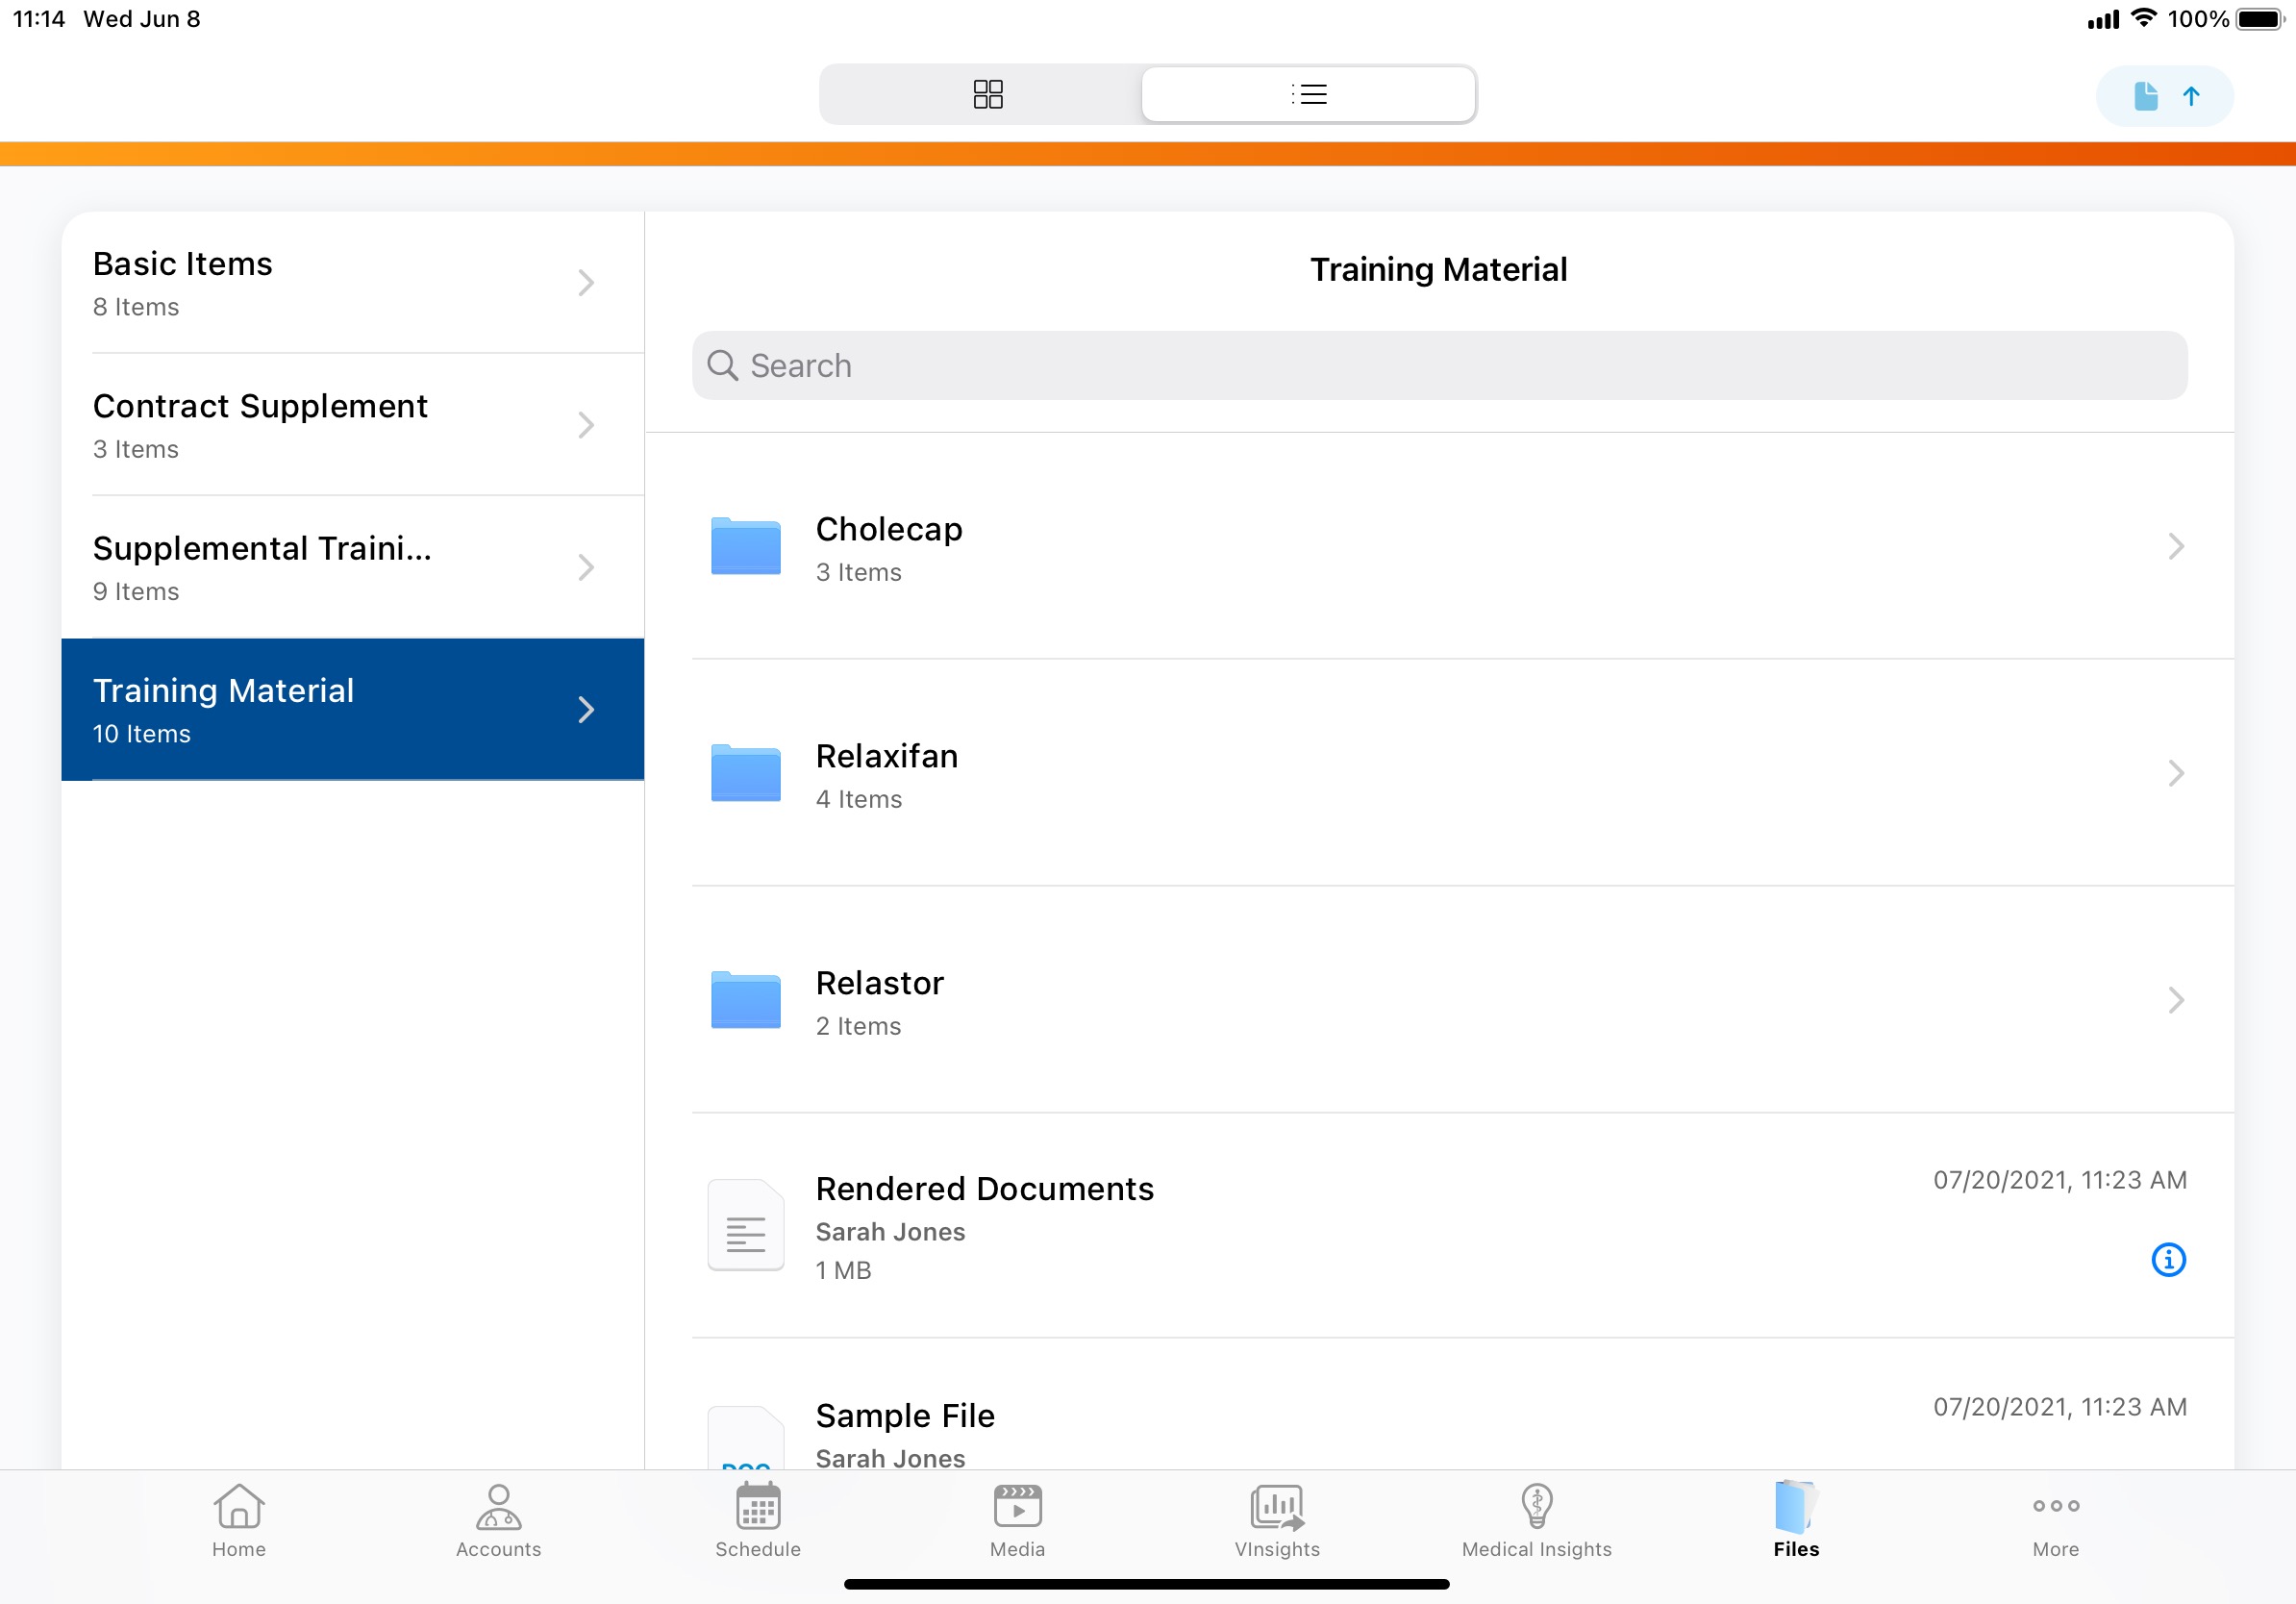
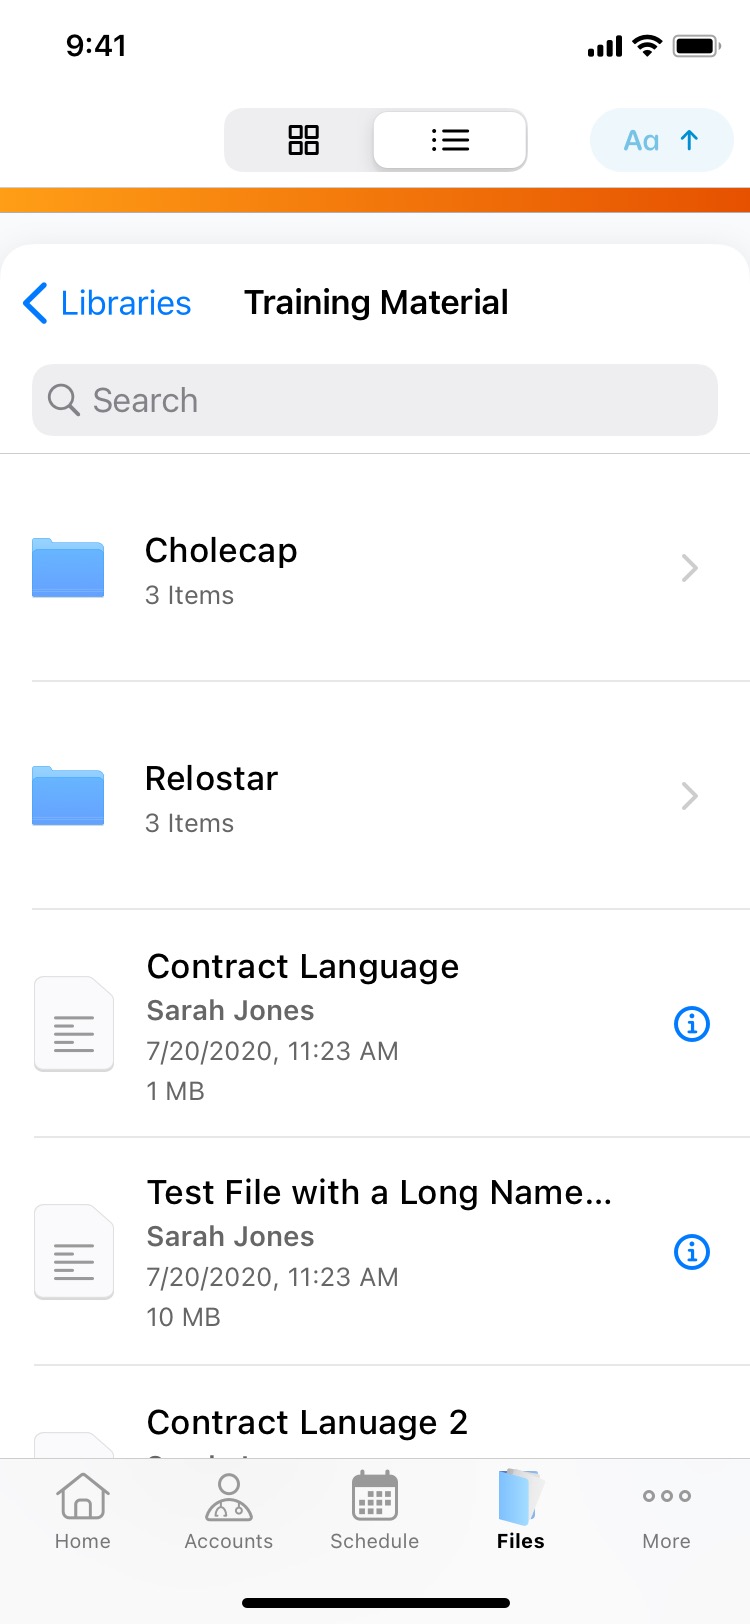
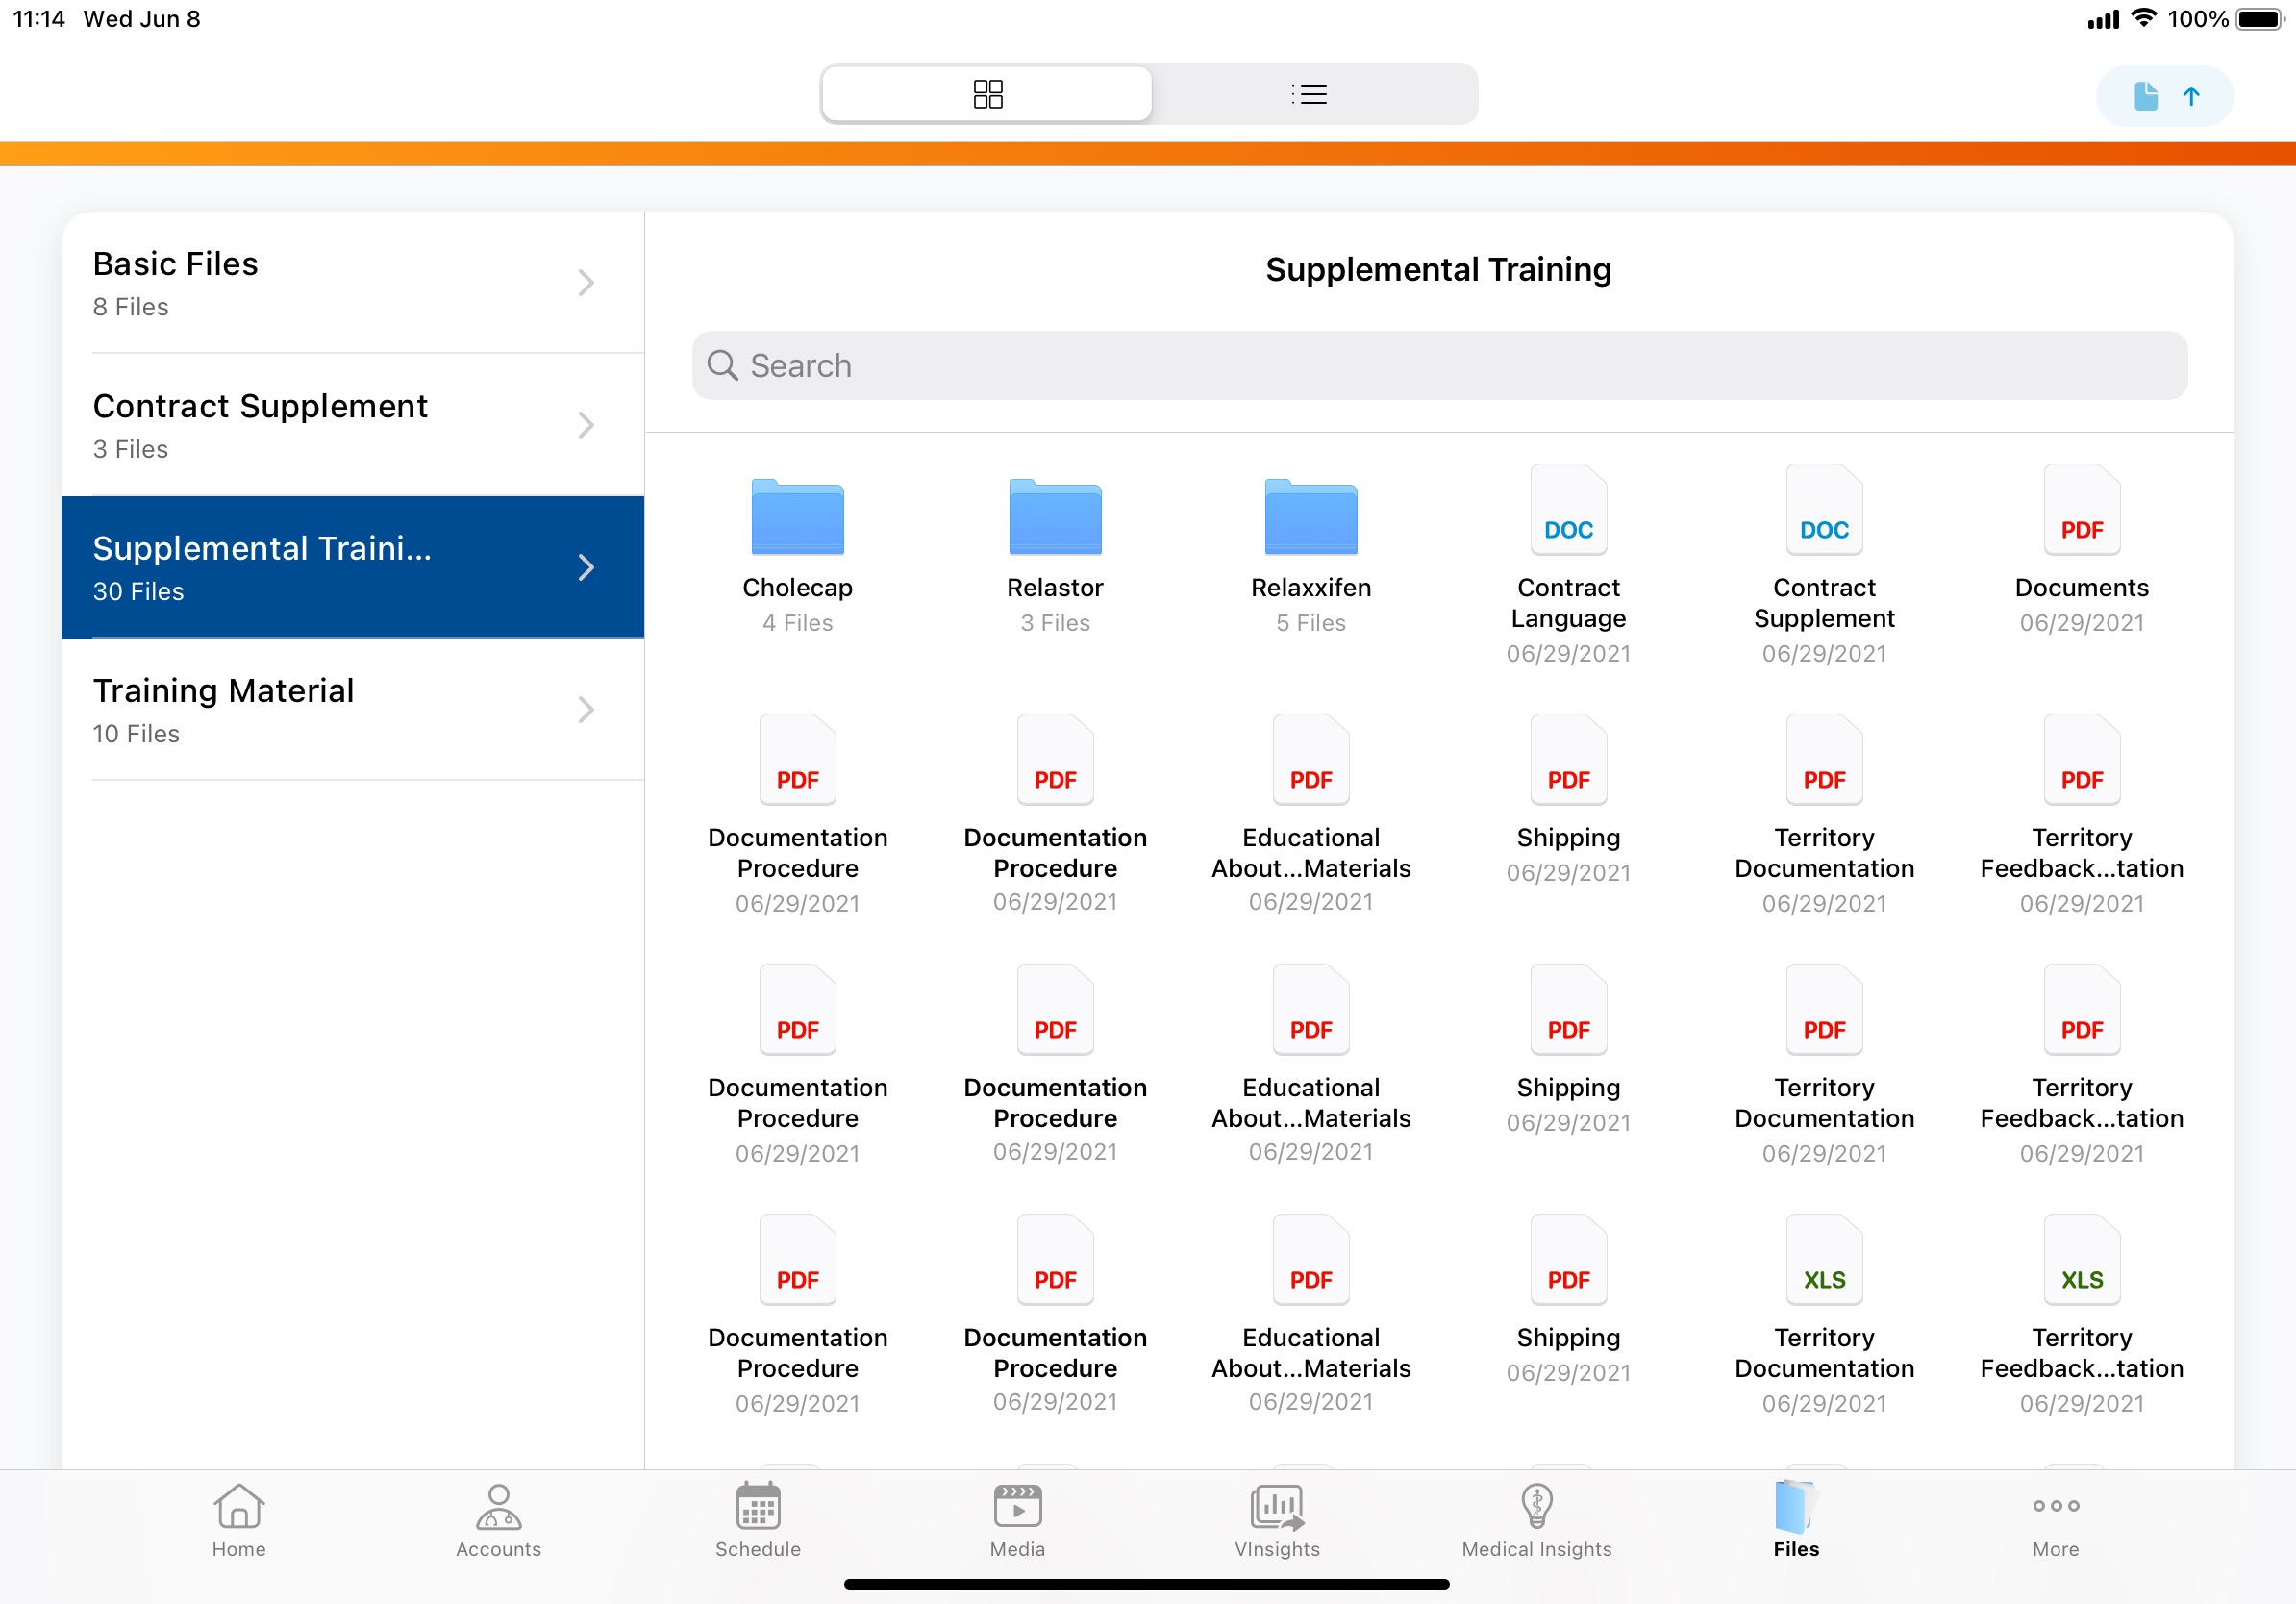
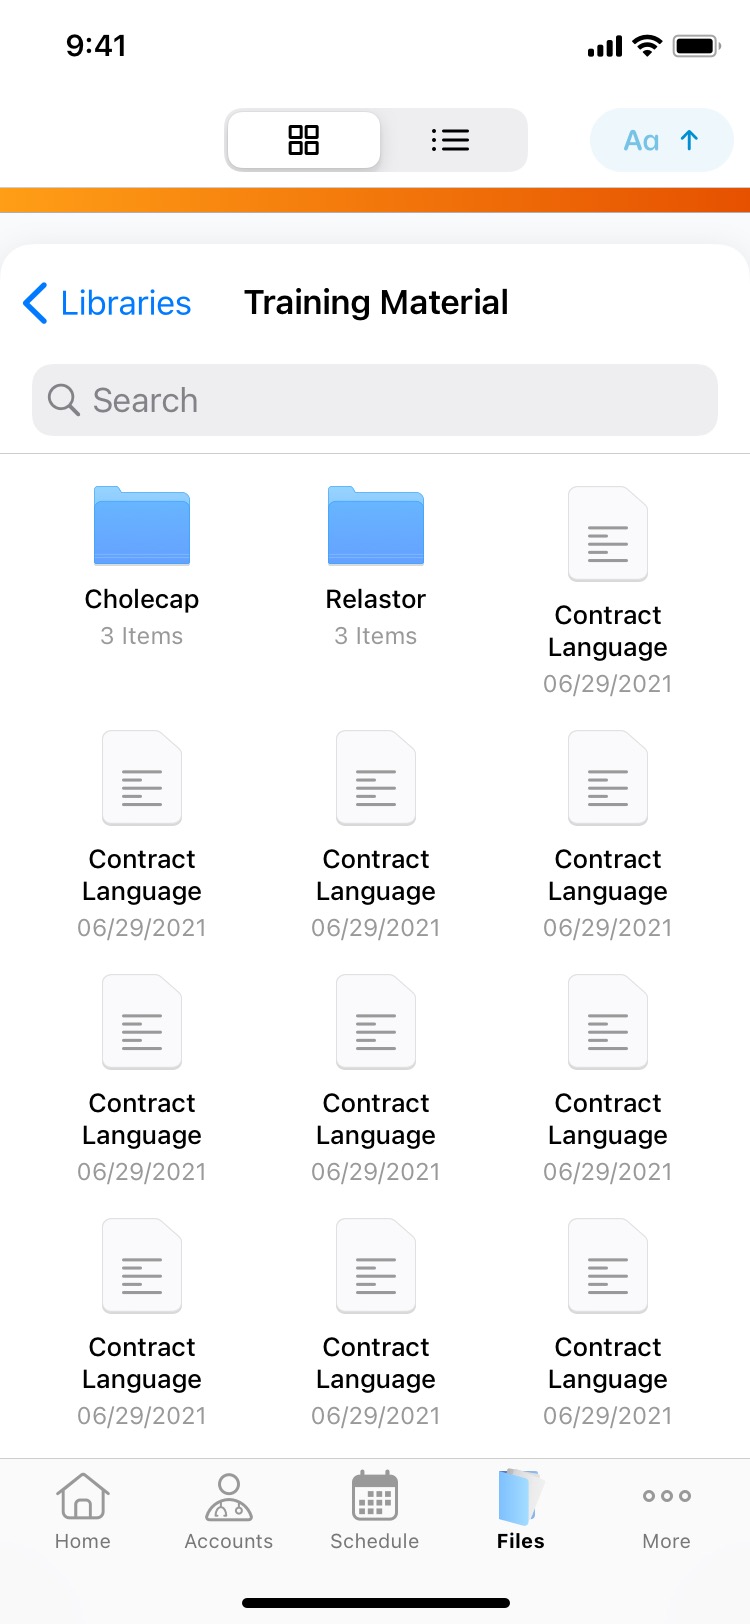
Viewing, Sharing, and Downloading Files Using the Files Tab
To make it easier to work with Salesforce Files in Lightning enabled orgs, users can view, share, and download files from the Salesforce Library using the Files tab.
For example, Sarah Jones’ manager notifies her that new training materials are available to download and review. From her device, Sarah selects the Files tab, then selects her company's training library to view available files. She selects the new training document to open it and complete the training.
Using the Files Tab
The Files Tab displays on the docked navigation bar depending on the display order set by the administrator. On the iPad, the Files Tab displays after Documents by default. On the iPhone, the Files Tab displays after Medical Insights by default.
Content creators or administrators must select the SyncOffline_vod check box on the ContentVersion object page layout to allow a file to be downloaded to offline devices and available for users to view. Users can select available libraries to access files and folders within it.
Files and Folders can be displayed as a list or grid.
The Asset Files Library is never displayed as a Library in the Files tab.
Viewing and Downloading Available Files
The following file types are supported:
- DOC - doc, .docx, .rtf
- JPEG - .jpeg, .jpg
- Generic Image - .bmp, .gif, .png, .tiff, .tif, .vsd, .svg
- PDF - .pdf
- PPT - .ppt, .pptx, .pps, .ppsx
- XLS - .xls, .xlsx
- TEXT - .txt
- Generic Text - .csv, .text
- Generic Movie - .mov, .vi, .mpeg, .mpg, .swf, .mp4, .avi
- Unknown - File with any extension that does not fall into any previous category
Previewing Files
If a file can be previewed, users can open it in the native iOS viewer to see the file content.
Due to an iOS issue, some files might not open in preview.
Sorting Files and Folders
Libraries are sorted by name in ascending order by default. Users can sort files and folders by name, date, file size, and kind (file type).
Searching for Files
Users can search in grid or list view based on the file's title or description, or the name of the folder. Search is performed within the current selection and lower.
Sharing Files
Users can share a file using the iOS viewer Share button.
Downloading Files
If automatic download is not enabled by the admin, on demand download is available. For on demand download, the system can download up to three files at one time and queues remaining files until they can be downloaded. In list view, tap or swipe to download a file. In grid view, press and hold the file, then select Download.
The automatic download limit is 5MB. The on demand download limit is 50MB; files over 50 MB in size cannot be downloaded.
Deleting Files
Users can remove unwanted files that were downloaded on demand to their device to free up storage space. Users can redownload files at any time.
To delete files:
- In List View, select the file and slide it left, then select the red remove file icon
- In Grid view, press and hold the file, then select the Remove from Offline option
Considerations
- The Files Tab does not support the My Approved Documents folder functionality that is currently available from the Documents Tab
- If a user uses the same file in the Attachments related list, and starts downloading it, the same file will be available for download via the Files tab and vice versa until it is downloaded
Medical Inquiry
Capturing Remote Signatures for Medical Inquiry Using Share Link and QR Code®
Enabling Remote Signatures Using Share Link and QR Code® allows users to capture HCP signatures for medical inquiry requests during virtual meetings or maintain physical distance during face-to-face visits. Users can send a signature link to the HCP using Share Link or generate a QR Code® from the medical inquiry, which HCPs scan using their own device, to display a signature capture screen.
For example, Dr. Ackerman requests information about a product’s off-label usage during a virtual meeting. Sarah Jones creates a medical inquiry to capture his question. Since Sarah cannot hand her device to Dr. Ackerman for signature capture, Sarah generates a signature link and sends it to Dr. Ackerman via text message. He selects the link and signs on his device. Sarah accepts Dr. Ackerman’s signature and submits the inquiry.
Generating a Share Link or QR Code® to Capture Remote Signatures for Medical Inquiry
With either the Share Link or QR Code® method, HCPs are guided through a process on their web browser to provide a signature.
To generate and share a Share Link or QR Code® for an HCP to sign for a medical inquiry:
-
Select the Sign button from a medical inquiry.
-
Select the disclaimer text language. This step is only available if Displaying Country-Specific Disclaimers is enabled.
-
Indicate if the HCP wants to receive a receipt, then use the Receipt picklist to select the email address the receipt should be sent to. This step is only available if Approved Email Receipts for Signature Transaction is enabled.
-
Select Share Link or QR Code® as the signature method.
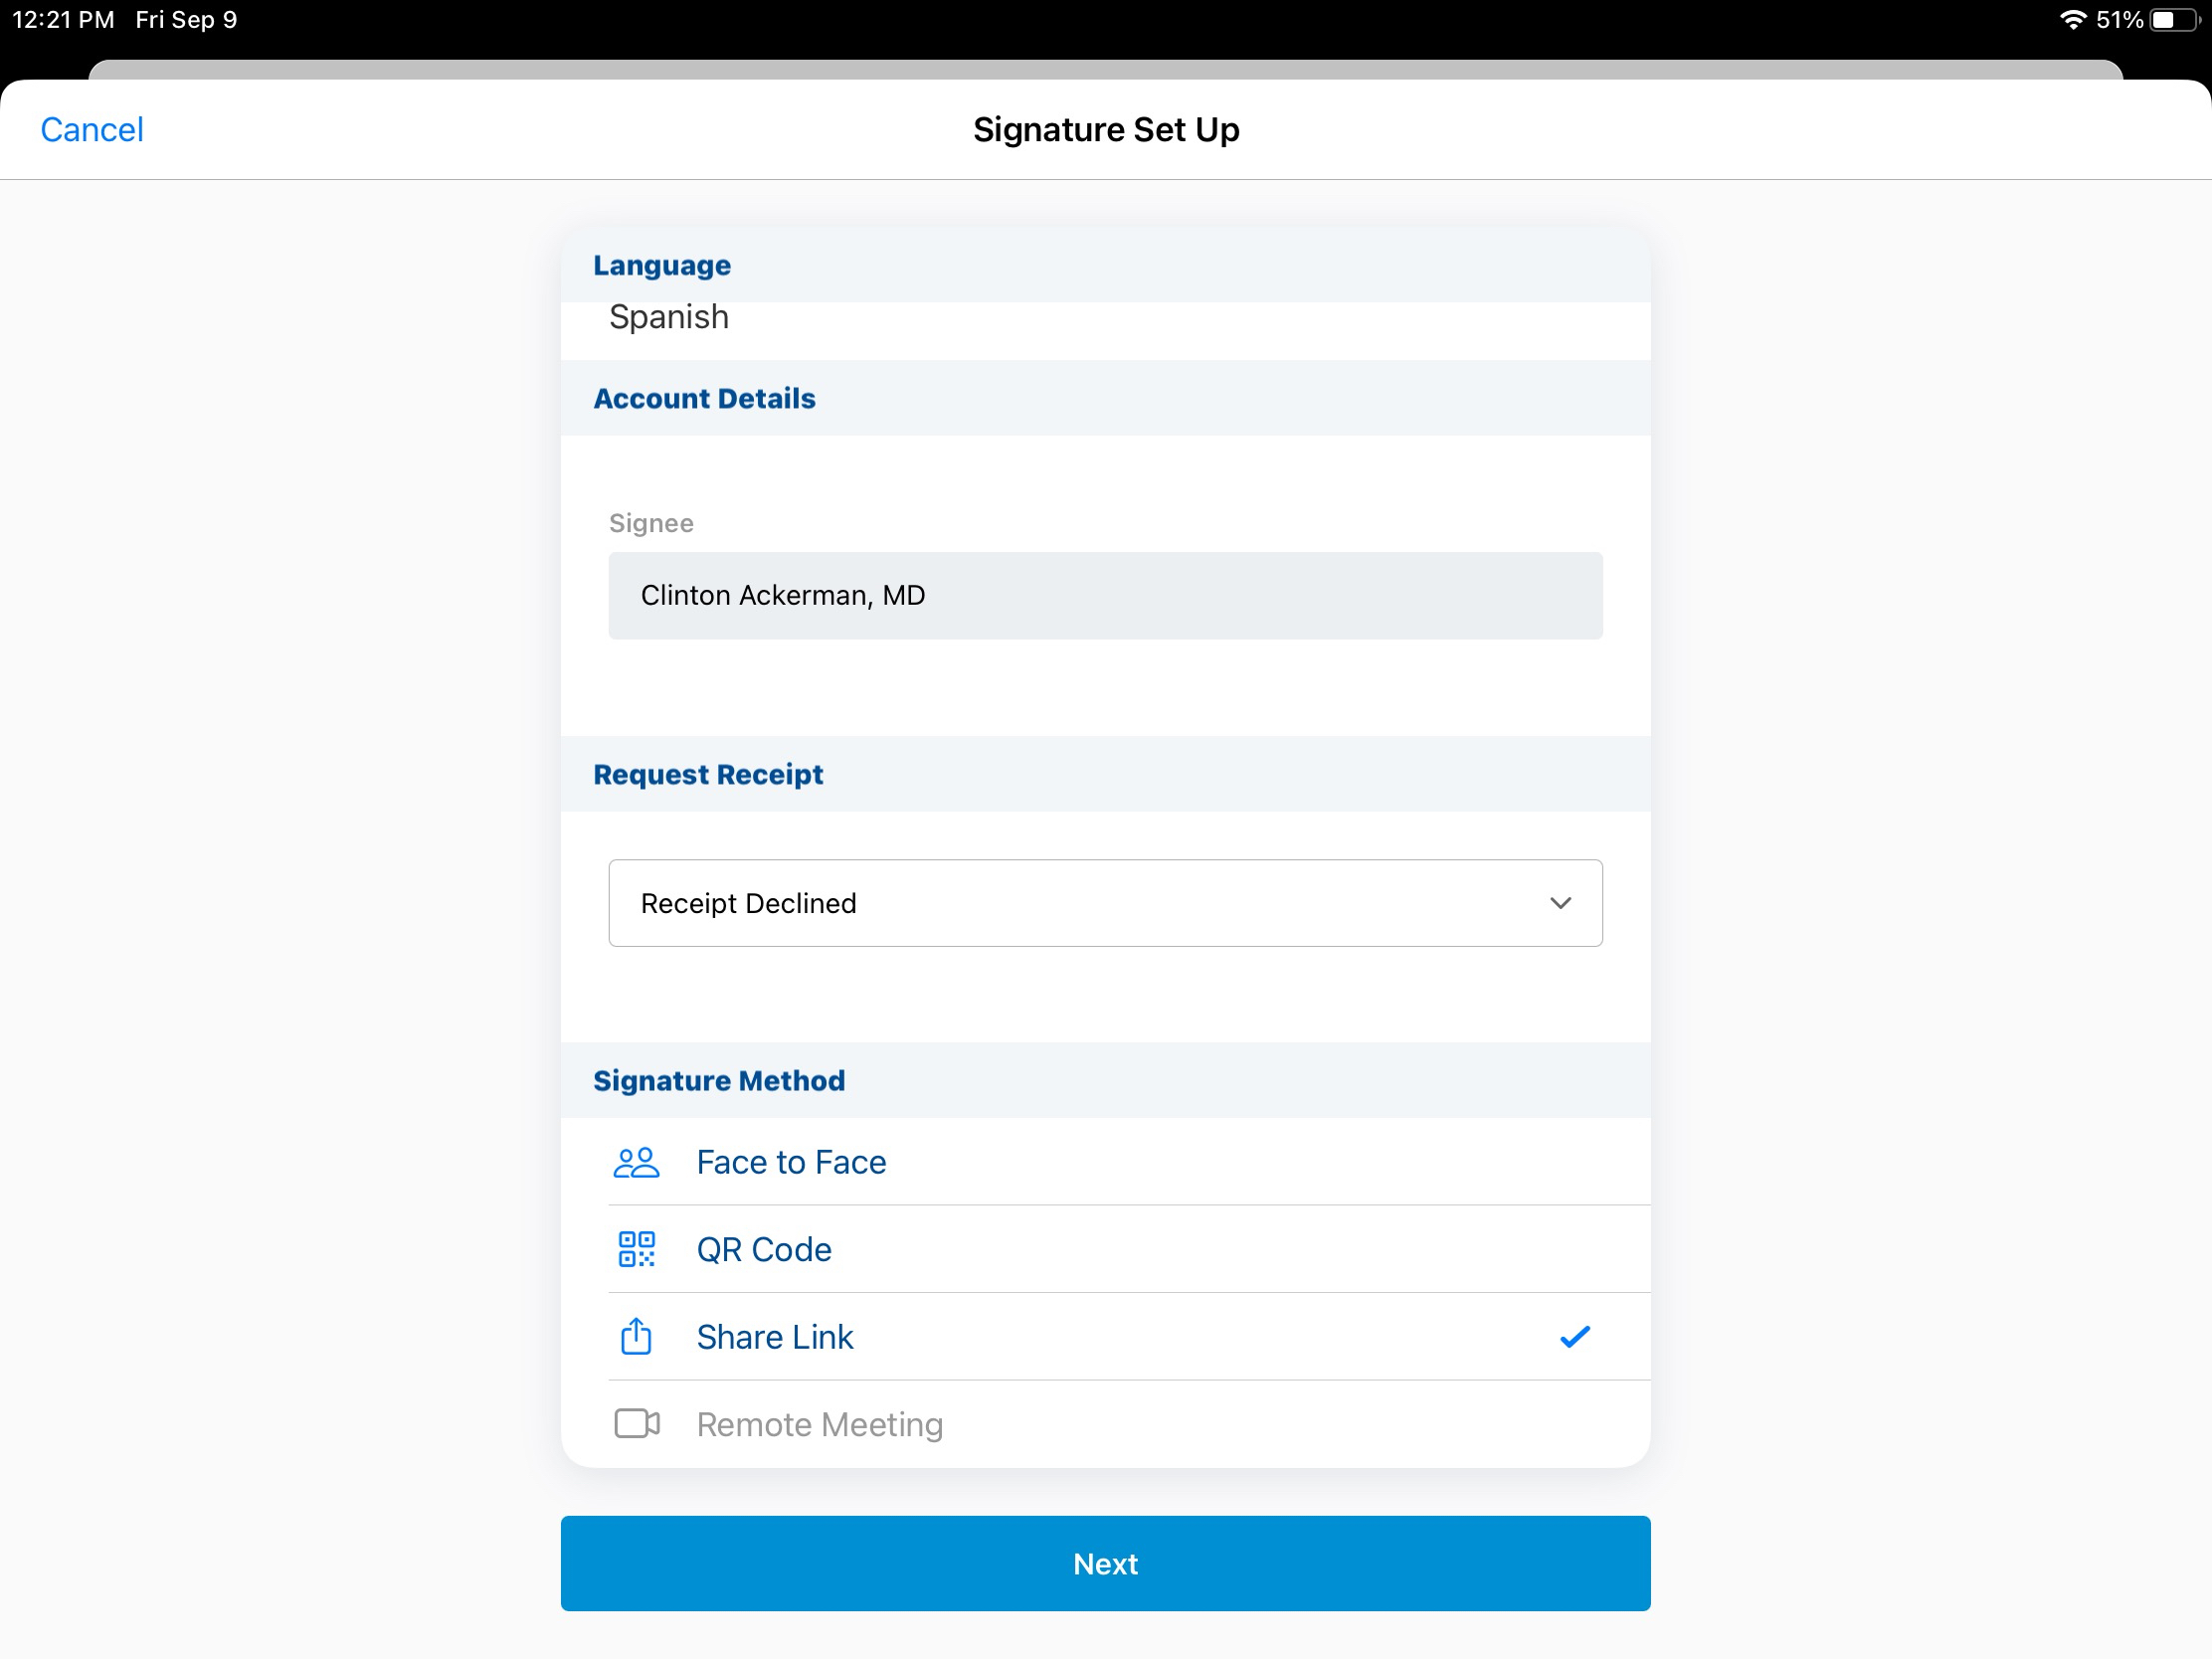
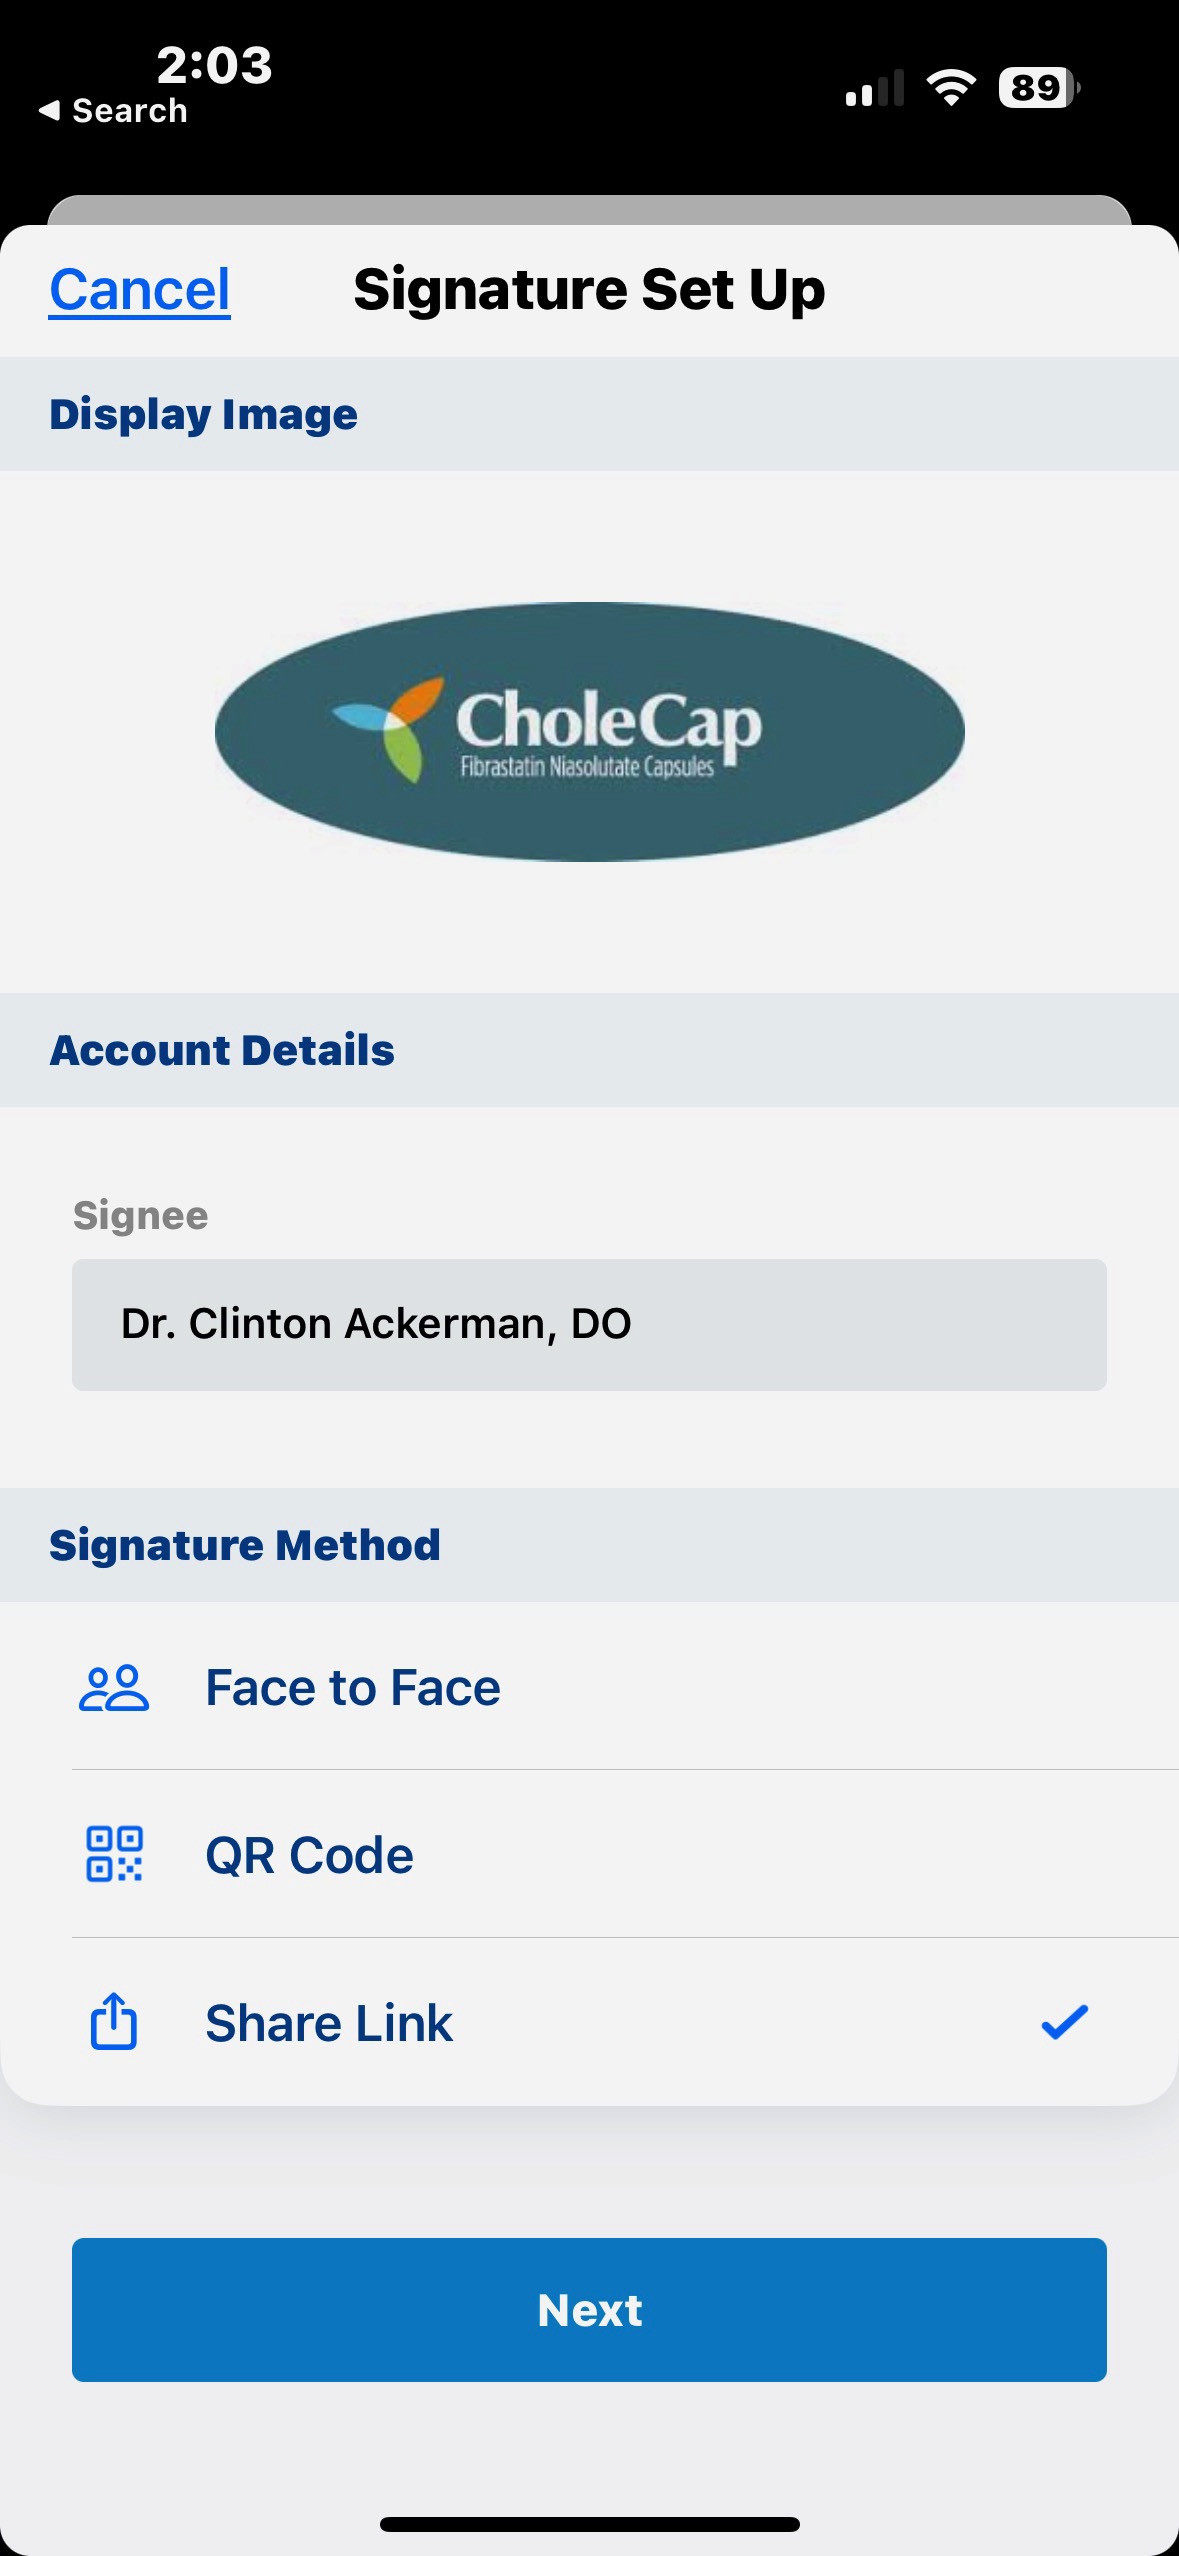
-
Select Next.
-
Share the Share Link or QR Code® with the attendee using text, email, or another appropriate method. For Share Link, a sharing message displays to the user. With either method, users must remain in Veeva CRM until the HCP provides their signature.
To capture a signature, HCPs must do the following:
-
Select the provided Share Link or scan the provided QR Code®. A page with the request details displays in a browser.
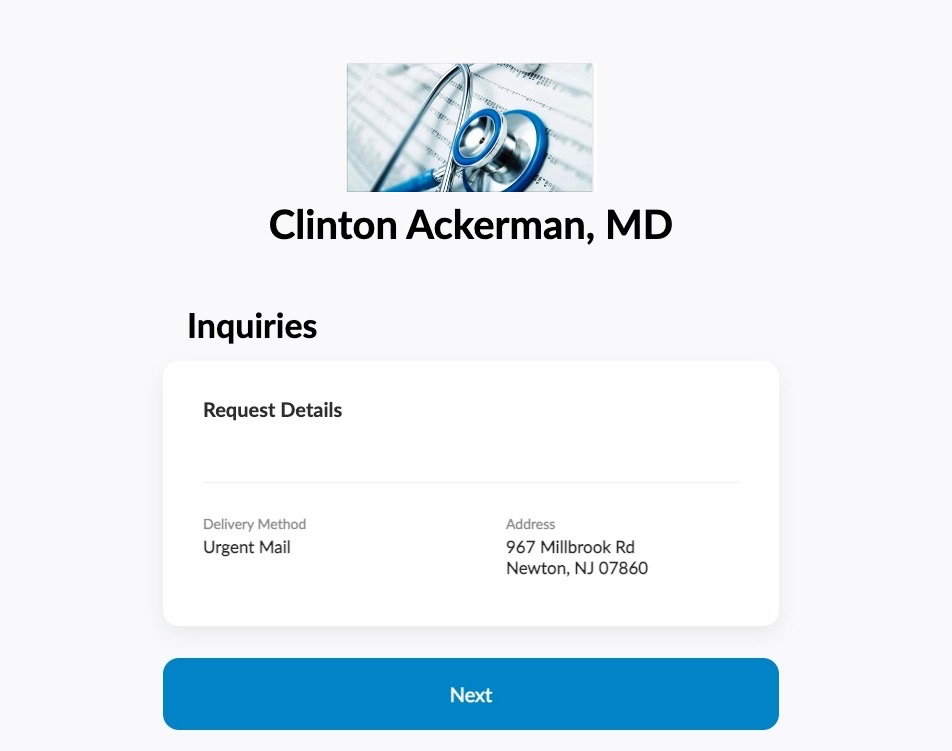
A "Signature Request Failed" error message displays if an unsupported browser is used to open the link.
-
Review the inquiry request and delivery details, then select Next.
-
Review the disclaimer, sign in the Signature box, and select Done.
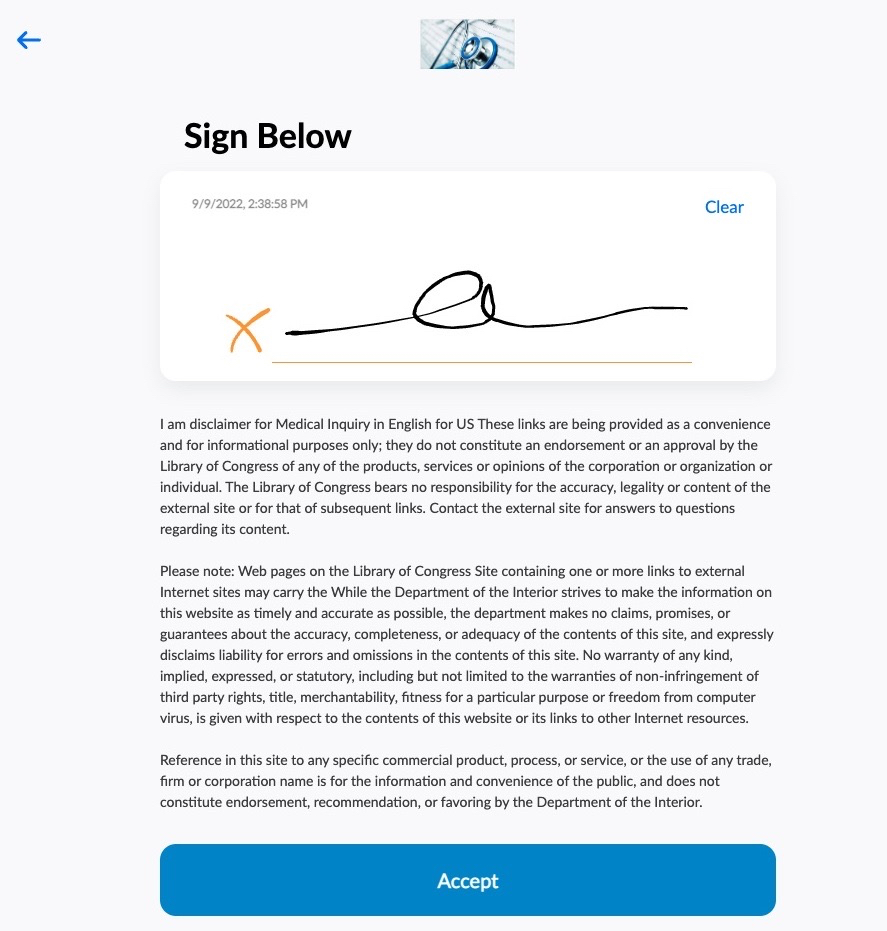
-
Select Accept to send the signature. A thank you page displays.
When the HCP selects Accept, a confirmation message displays to the user, followed by the Review Signature page. Once the user selects Accept, the signature page is locked and all fields are stamped on the medical inquiry record. The Signature_Captured_Share_Link_vod field or Signature_Captured_QR_Code_vod field is checked on the medical inquiry. If the --mpi section signal is configured, the field is checked for all records created for the medical inquiry.
Once the user selects Submit or Save from the More Actions menu, the transaction is completed.
