

Defining MyInsights Layouts
Content creators can arrange the layout and format of a MyInsights page from the Layout tab, allowing them to control how data displays to end users in CRM.
Only pages created in MyInsights Studio can be edited.
This feature is not supported for the Call entry point.
The following display elements are available.
|
Display Element |
Description |
Example |
|---|---|---|
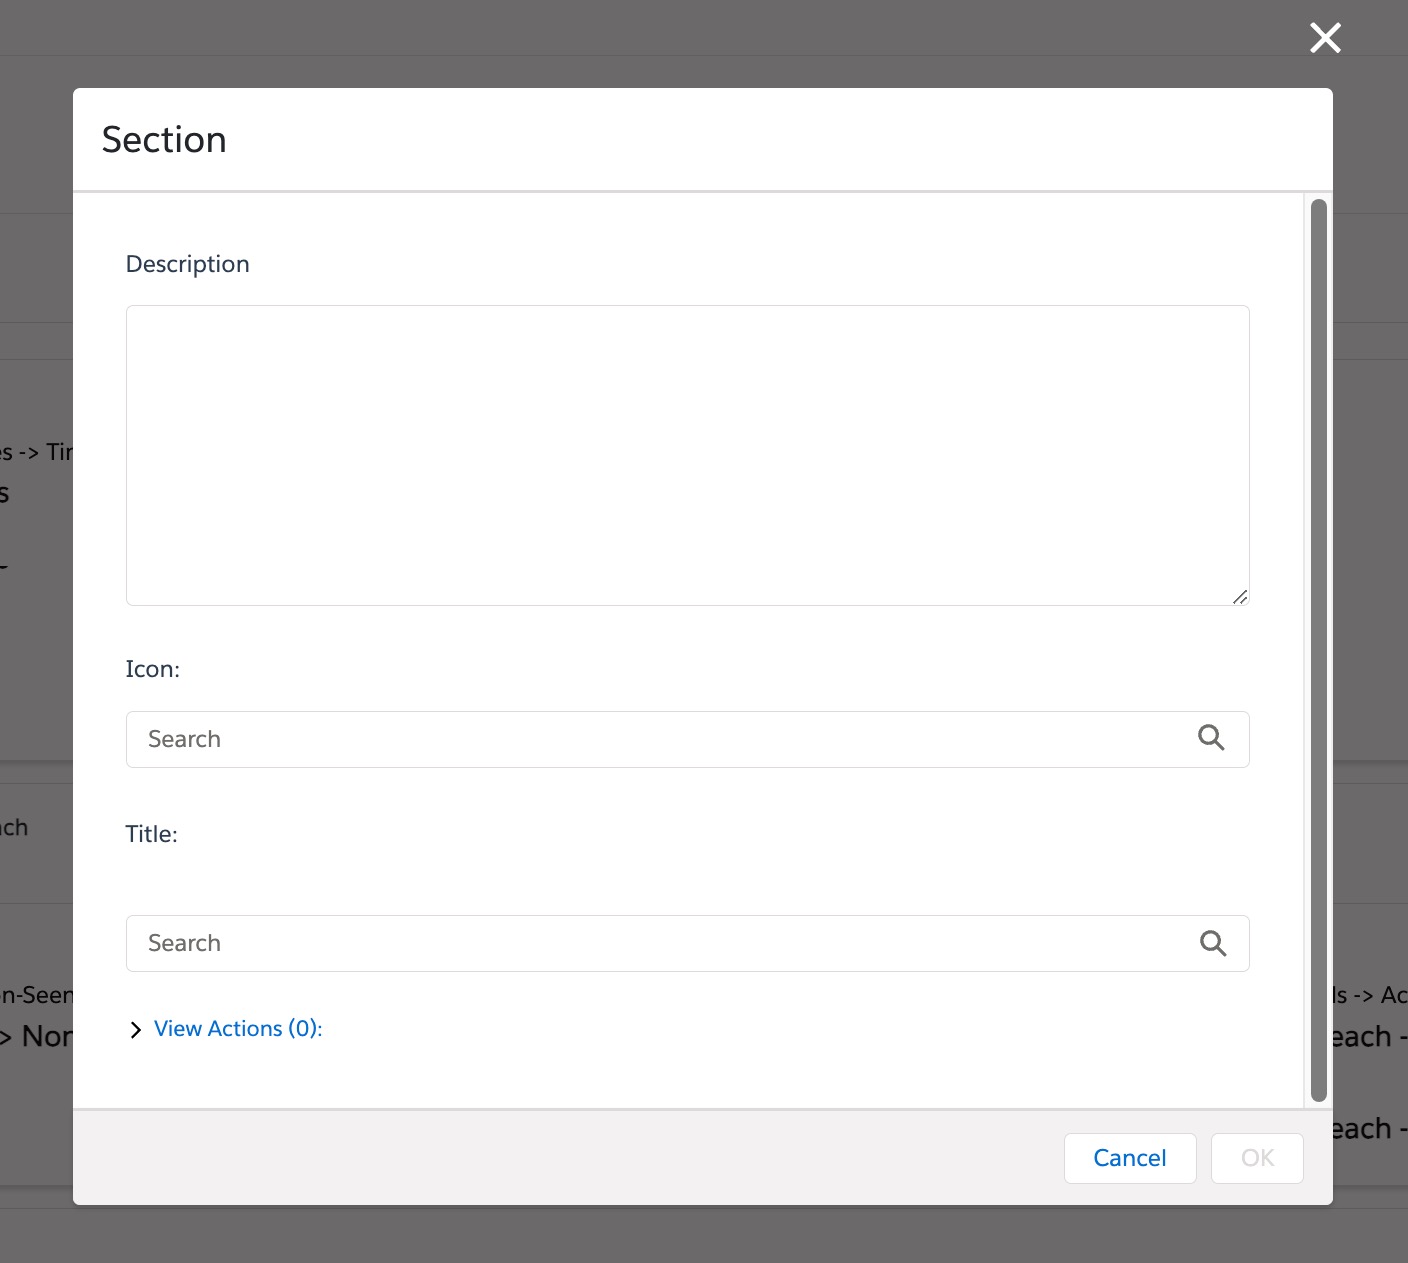
| Section | Section to group display elements. Can include a title. Can select an icon to display next to the title. |
|
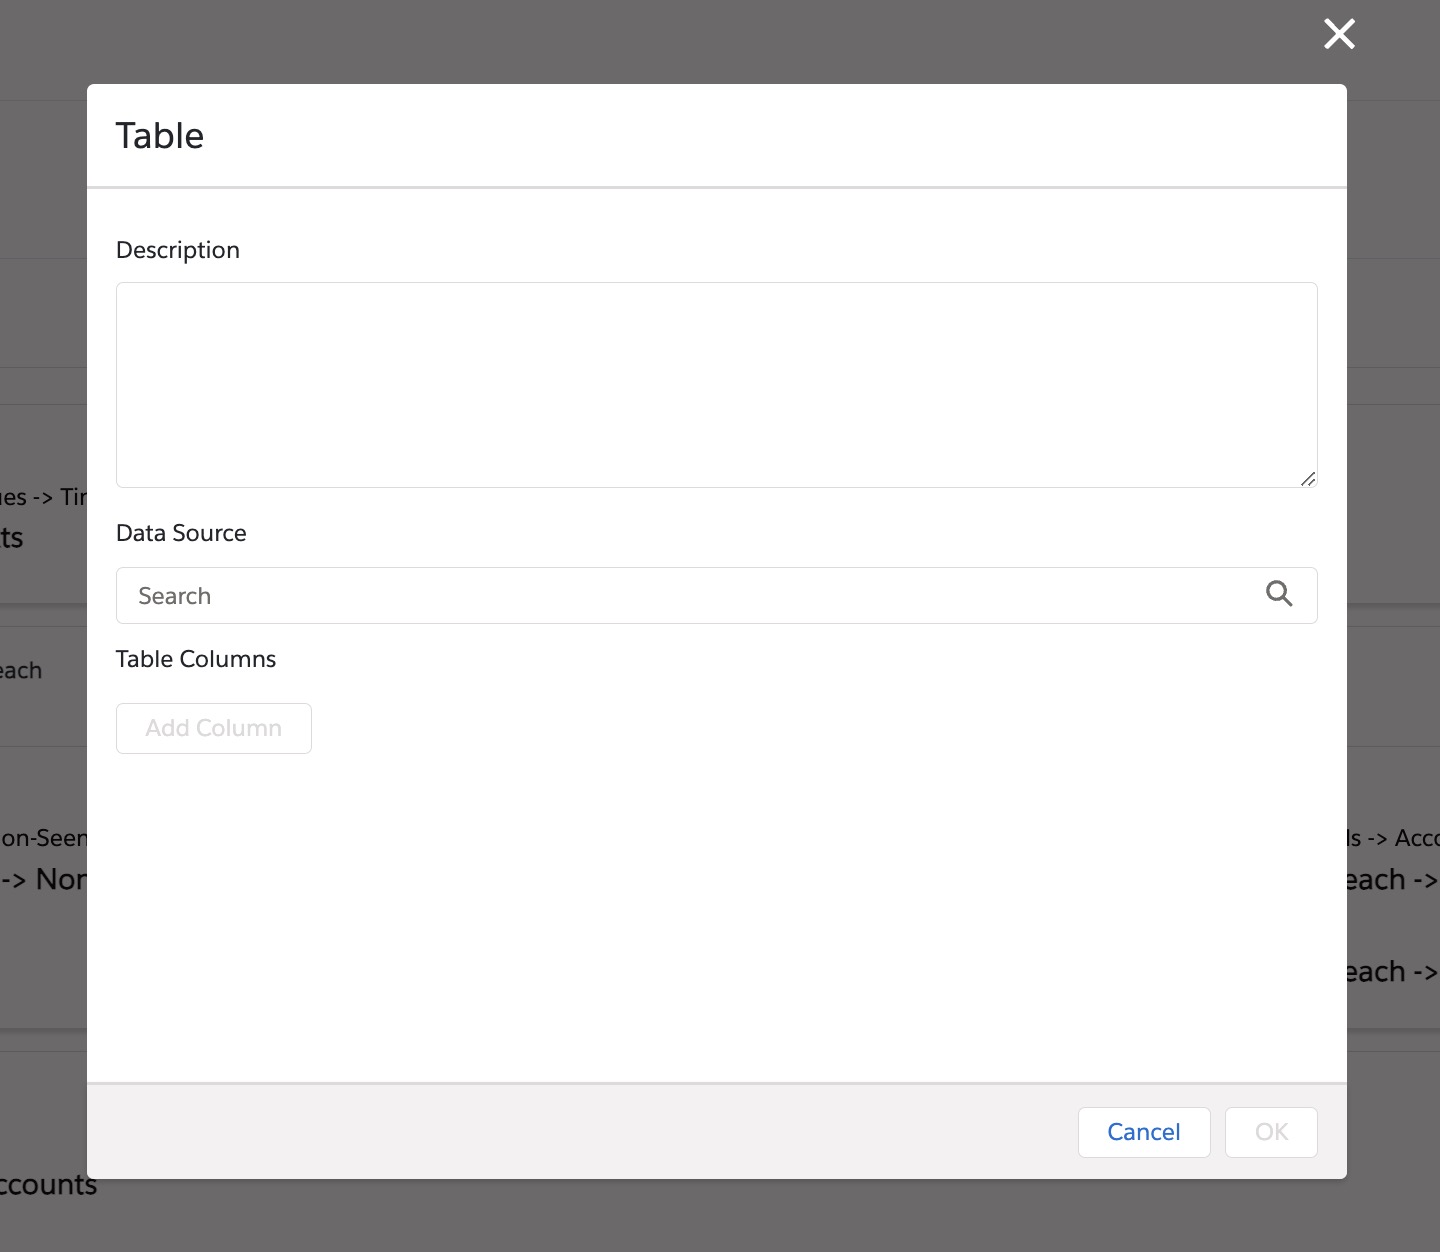
| Table | Table displaying data from a specific data element with user-defined columns. The output for the selected data element must be a list of records. Can select the User Sortable check box for any column in the table to define which columns can be sorted by users when viewing the deployed page. Can display date fields, which require date format strings. See the Format Date expression for more information. |
|
| Field List | List of labeled values from various data elements. Can select the format style for the labels and values. Can select an icon to display next to each label. |
|
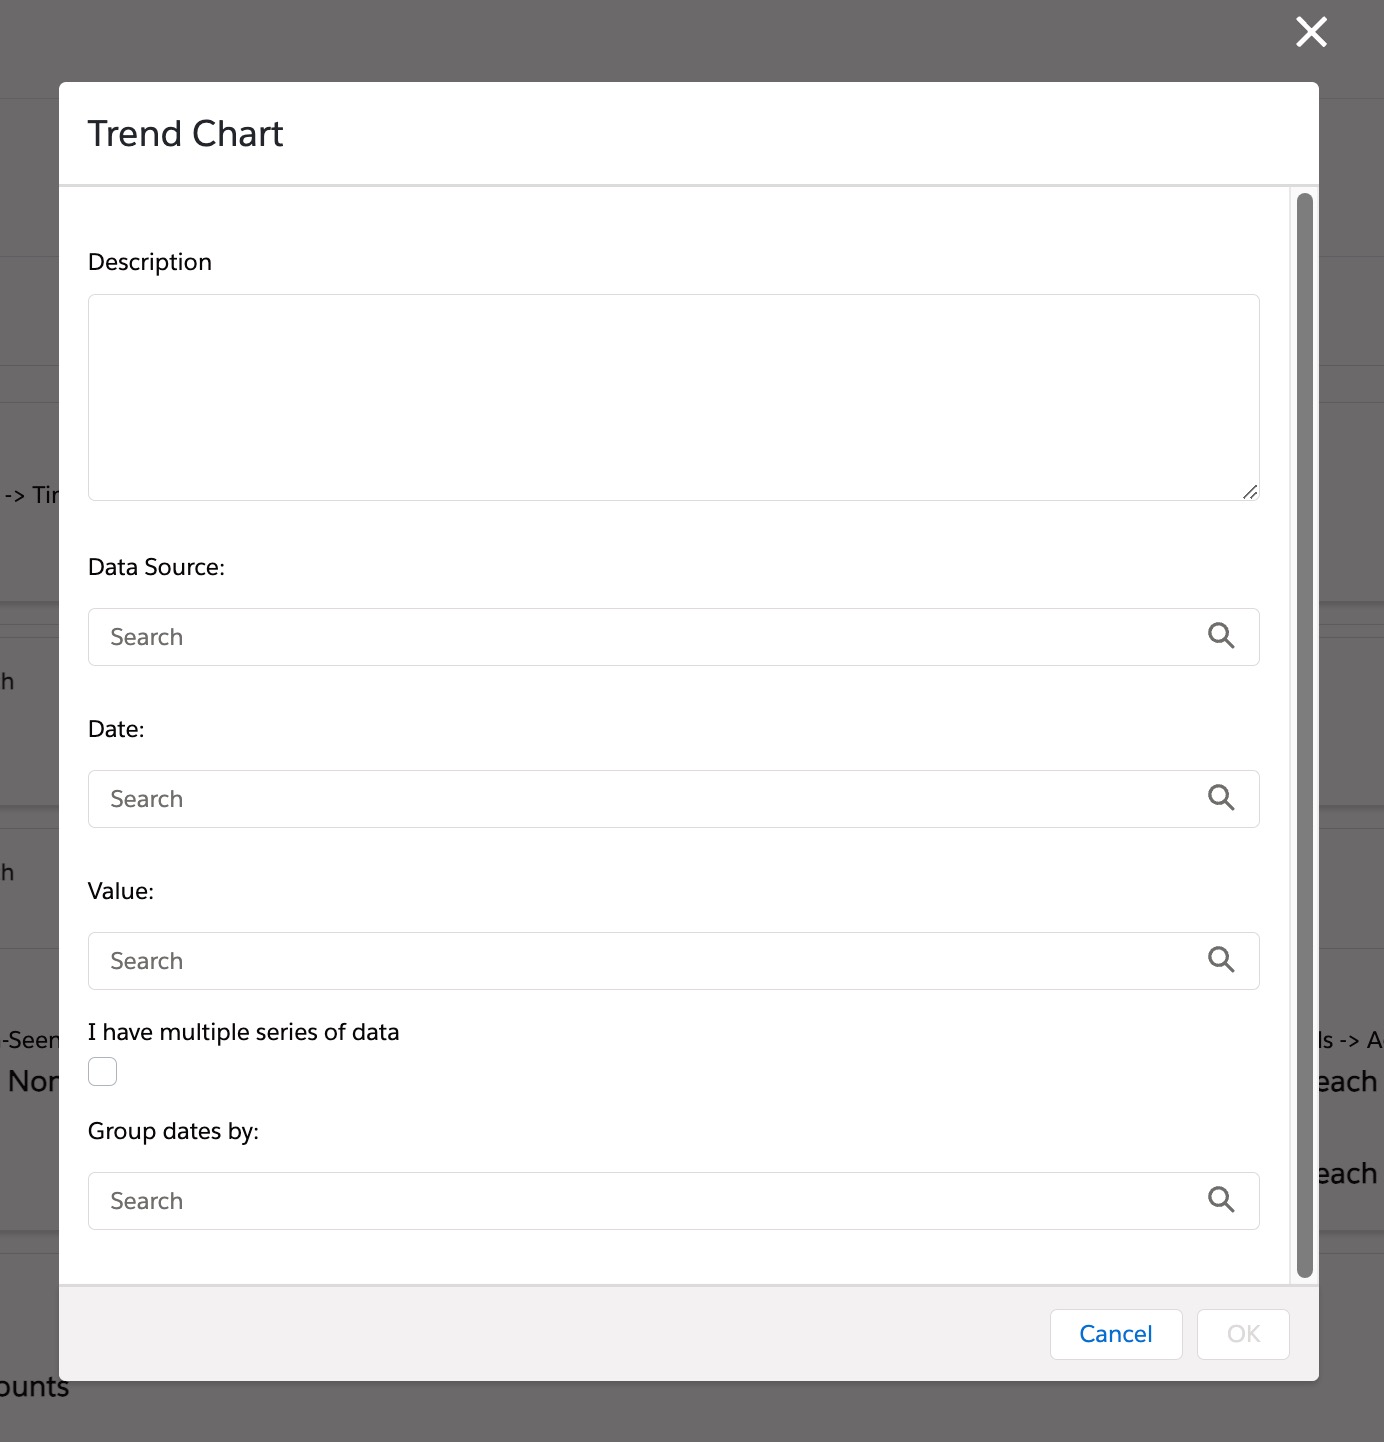
| Trend Chart | Line chart displaying data from a specific data element changing over time. The output for the selected data element must be a list of records. Multiple trends can be displayed. To display multiple trends on the same chart, select the ‘I have multiple series of data’ check box and populate the Series field with the appropriate data source field. |
|
| Progress Chart | Single-item chart displaying progress towards a goal value. Can allow the progress to exceed the goal value. |
|
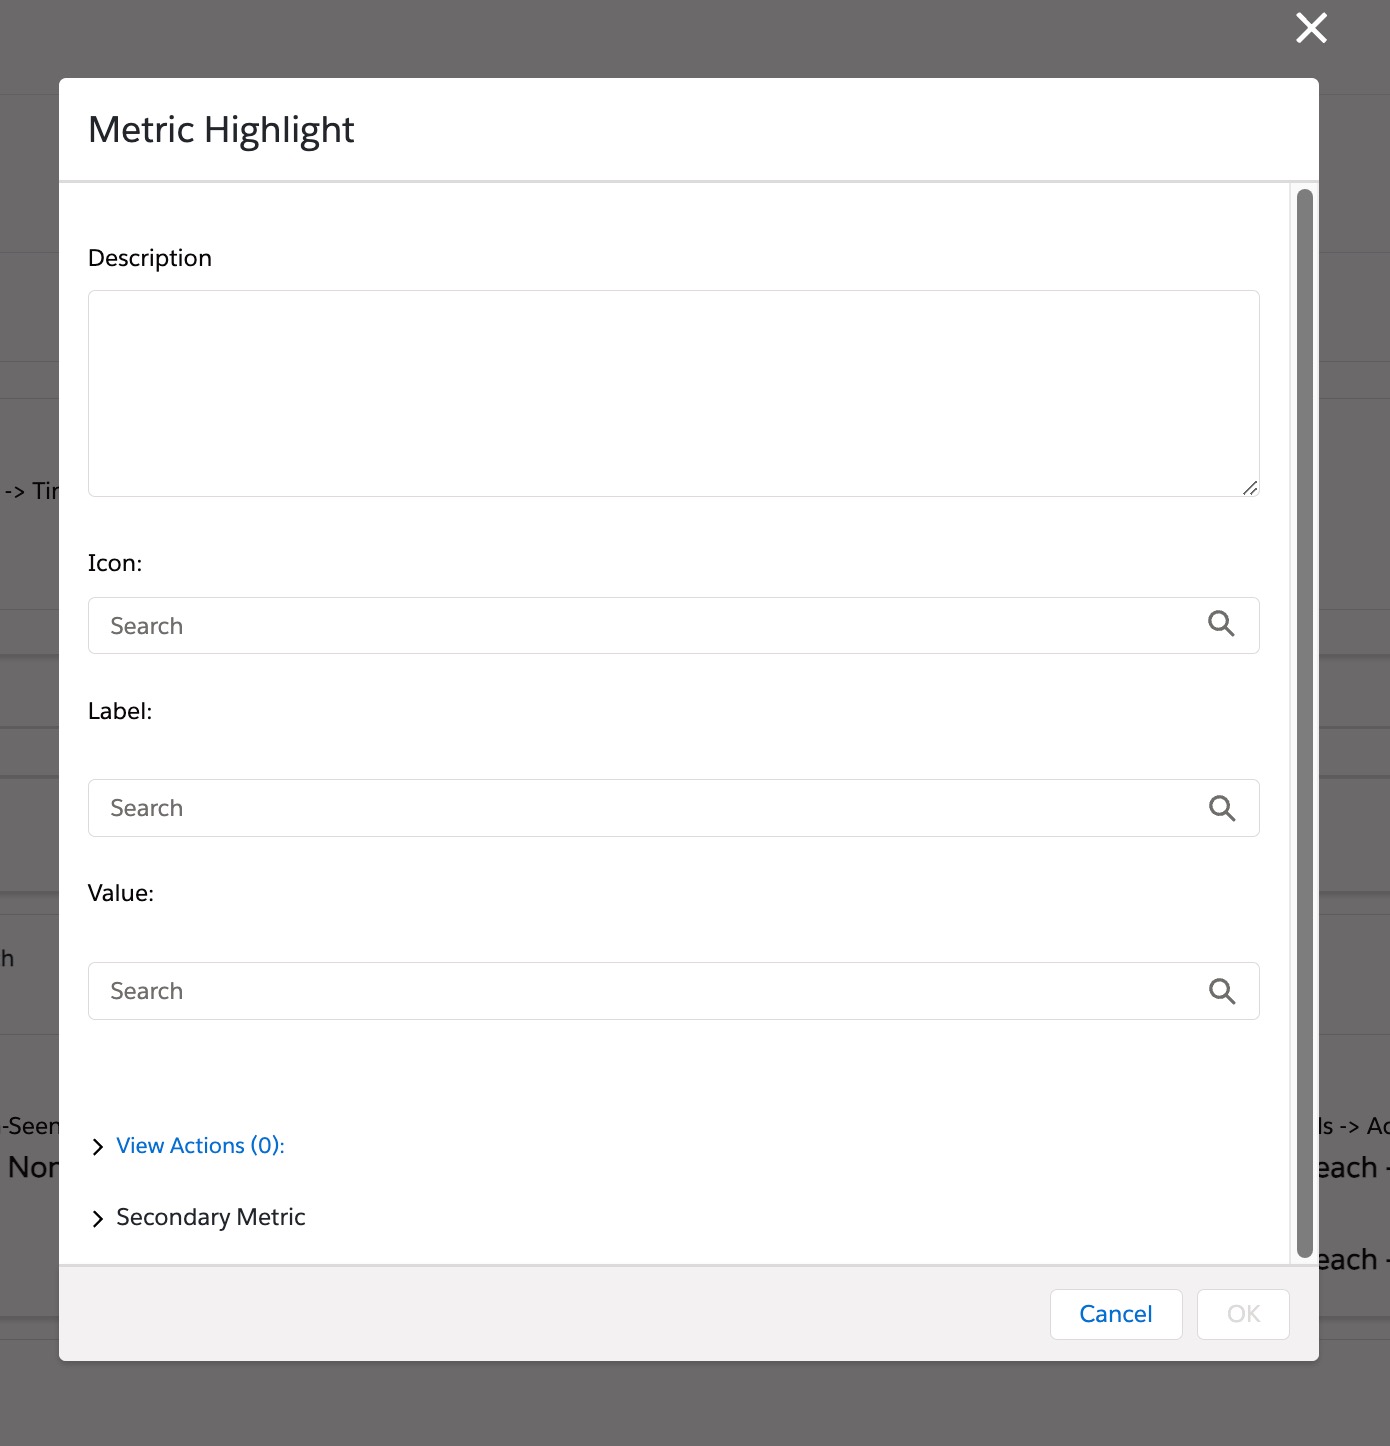
| Metric Highlight | User-defined metric displaying a label in a small font and its corresponding value in a larger font for emphasis. Can add a second metric in small font. Can select an icon to display next to each label. If the metric value is a Number, users must define the number of decimals to display. If the metric value is a Date, users must define the date format. |
|
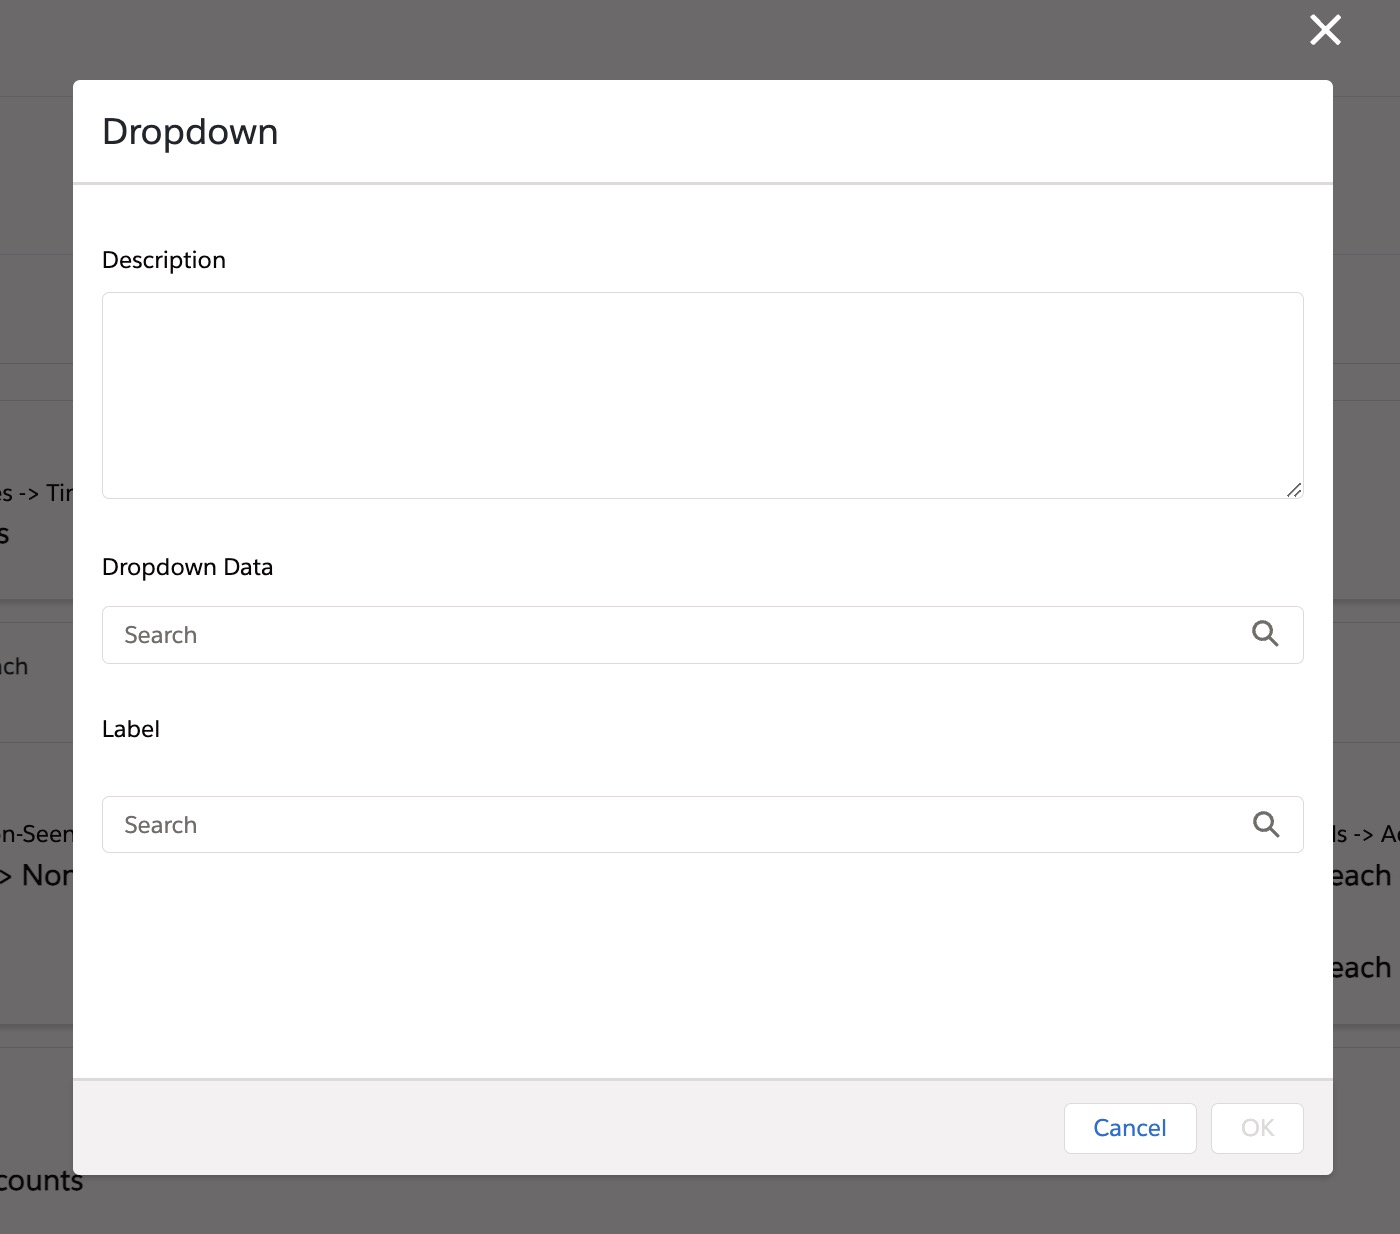
| Dropdown |
Displays a dropdown list from which users can select a single text value to filter displayed options. |
|
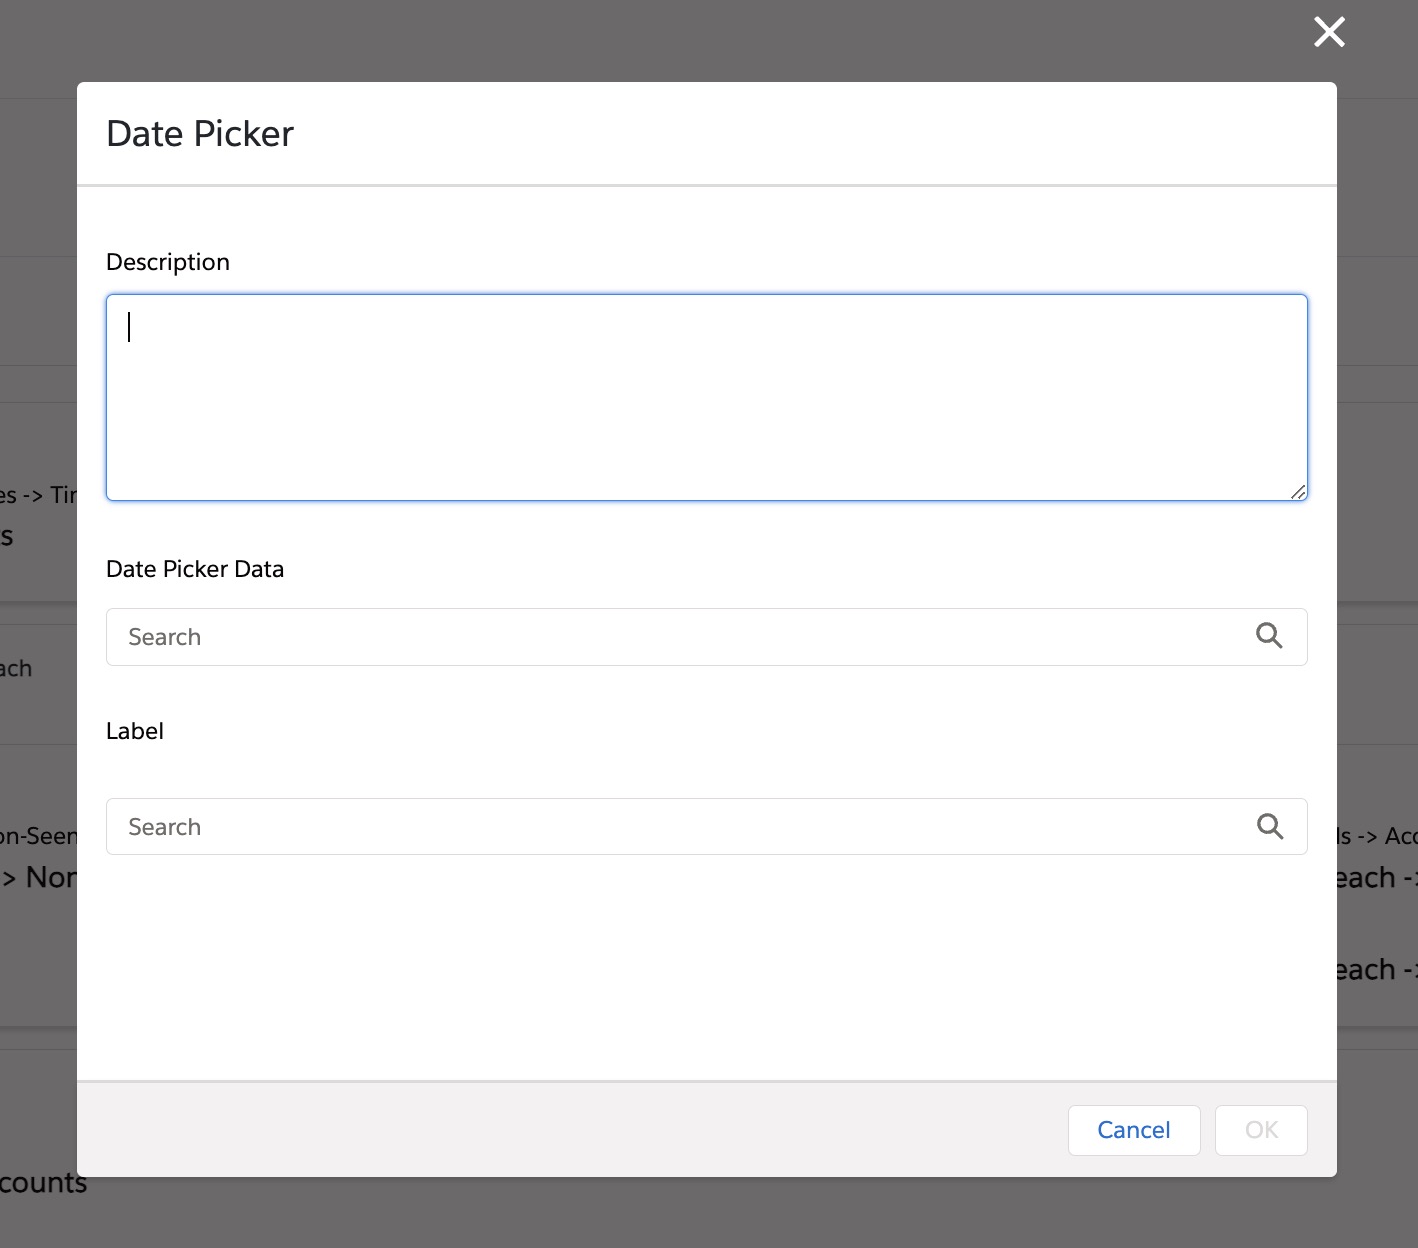
| Date Picker |
Displays a date picker from which users can select a date to filter displayed options. A default value can optionally be added. Do not use Date Picker in a Where clause of a query. This can result in displaying incorrect data.
|
|


To allow content creators in MyInsights Studio to create detailed and comprehensive MyInsights pages with integrated data from CRM and external sources, content developers can create and import custom code into MyInsights Studio as custom display elements, including code created by third party developers. See Using Custom Display Elements for more information.
Adding and Previewing Display Elements
To add a display element:
- Select Configuration on the Layout tab.
- Select and drag a display element to the blank canvas. Release the element when the appropriate position is highlighted. Available positions for an element are marked by dotted lines.
- Enter the appropriate information for the display element. Use expressions to refine the data and select the View Actions dropdown menu to add user actions, if needed. Optionally, populate the Description field to help easily identify the element.
- Select OK.
- Select Preview to view the formatted page. Preview often to ensure the page displays as expected.
User actions display as links in the display preview. Content creators can select a user action link to view a popup describing the action that occurs for end users and ensure the action is correct.
- Select Save.
After defining the page layout, content creators can deploy the page to Veeva CRM for testing or use. See Deploying MyInsights Pages to Veeva CRM for more information.
Adding Navigation Actions to Display Elements
Content creators can add user actions to display elements to create interactive and responsive pages.
Using more than 20 navigation targets is not supported.
Using the View Record Navigation Action
The View Record navigation action allows users to navigate directly from MyInsights content to a data record. Content creators can add View Record for the following objects:
Content creators can add a View Record navigation action to the following display elements:
- Section – Available if a header is included. Displays the section header as a link to a data record.
- Table – Available for each column. Displays each value in the column as a link to a record from the selected data source.
- Field List – Available for each field. Displays a value as a link to a data record.
- Metric Highlight - Available for each value. Displays the value as a link to the data record.
To add a View Record navigation action to a display element:
- Select Configuration on the Layout tab.
- Select the gear icon for the appropriate display element.
- Select the View Actions drop-down menu.
- Select View Record from the Navigation Action drop-down menu.
- Select the appropriate record ID for the target record from the Record ID lookup field.
- Select the appropriate MyInsights Tab(s) as the navigation target(s). This step is optional and only available if the object for the target record is Account.
Ensure end users have FLS read permission to the Studio_ID field on HTML_Report_vod object.
- Select OK.
- Select Save.
Using the Edit Record Navigation Action
Only valid for the Order_vod object and Call2__vod page type.
The Edit Record navigation action allows users to navigate directly from MyInsights content to a data record and edit it.
To add an Edit Record navigation action to a display element:
- Select Configuration on the Layout tab.
- Select the gear icon for the appropriate display element.
- Select the View Actions drop-down menu.
- Select the Navigation Action drop-down menu.
- Select Edit Record.
- Select the appropriate record ID for the navigation target from the Record ID lookup field.
- Select OK.
- Select Save.
Using the View Section Navigation Action
Only valid for the Account or Territory page type.
To add a View Section navigation action to a display element:
- Select Configuration on the Layout tab.
- Select the gear icon for the appropriate display element.
- Select the View Actions drop-down menu.
- Select View Section from the Navigation Action drop down menu
- Select the appropriate MyInsights Tab(s) as the navigation target(s).
- Select OK.
- Select Save.
Navigation is only permitted from Account to Account, or from Territory to Territory.
