

23R3.4 Functionality Guide
The Functionality Guide is intended for Sales Operations, Business Administrators, System Integrators, and others responsible for making decisions about what features are needed for end users to be successful and deciding which features work together with existing customer configurations.
Account Management
Long Notes in Data Change Requests
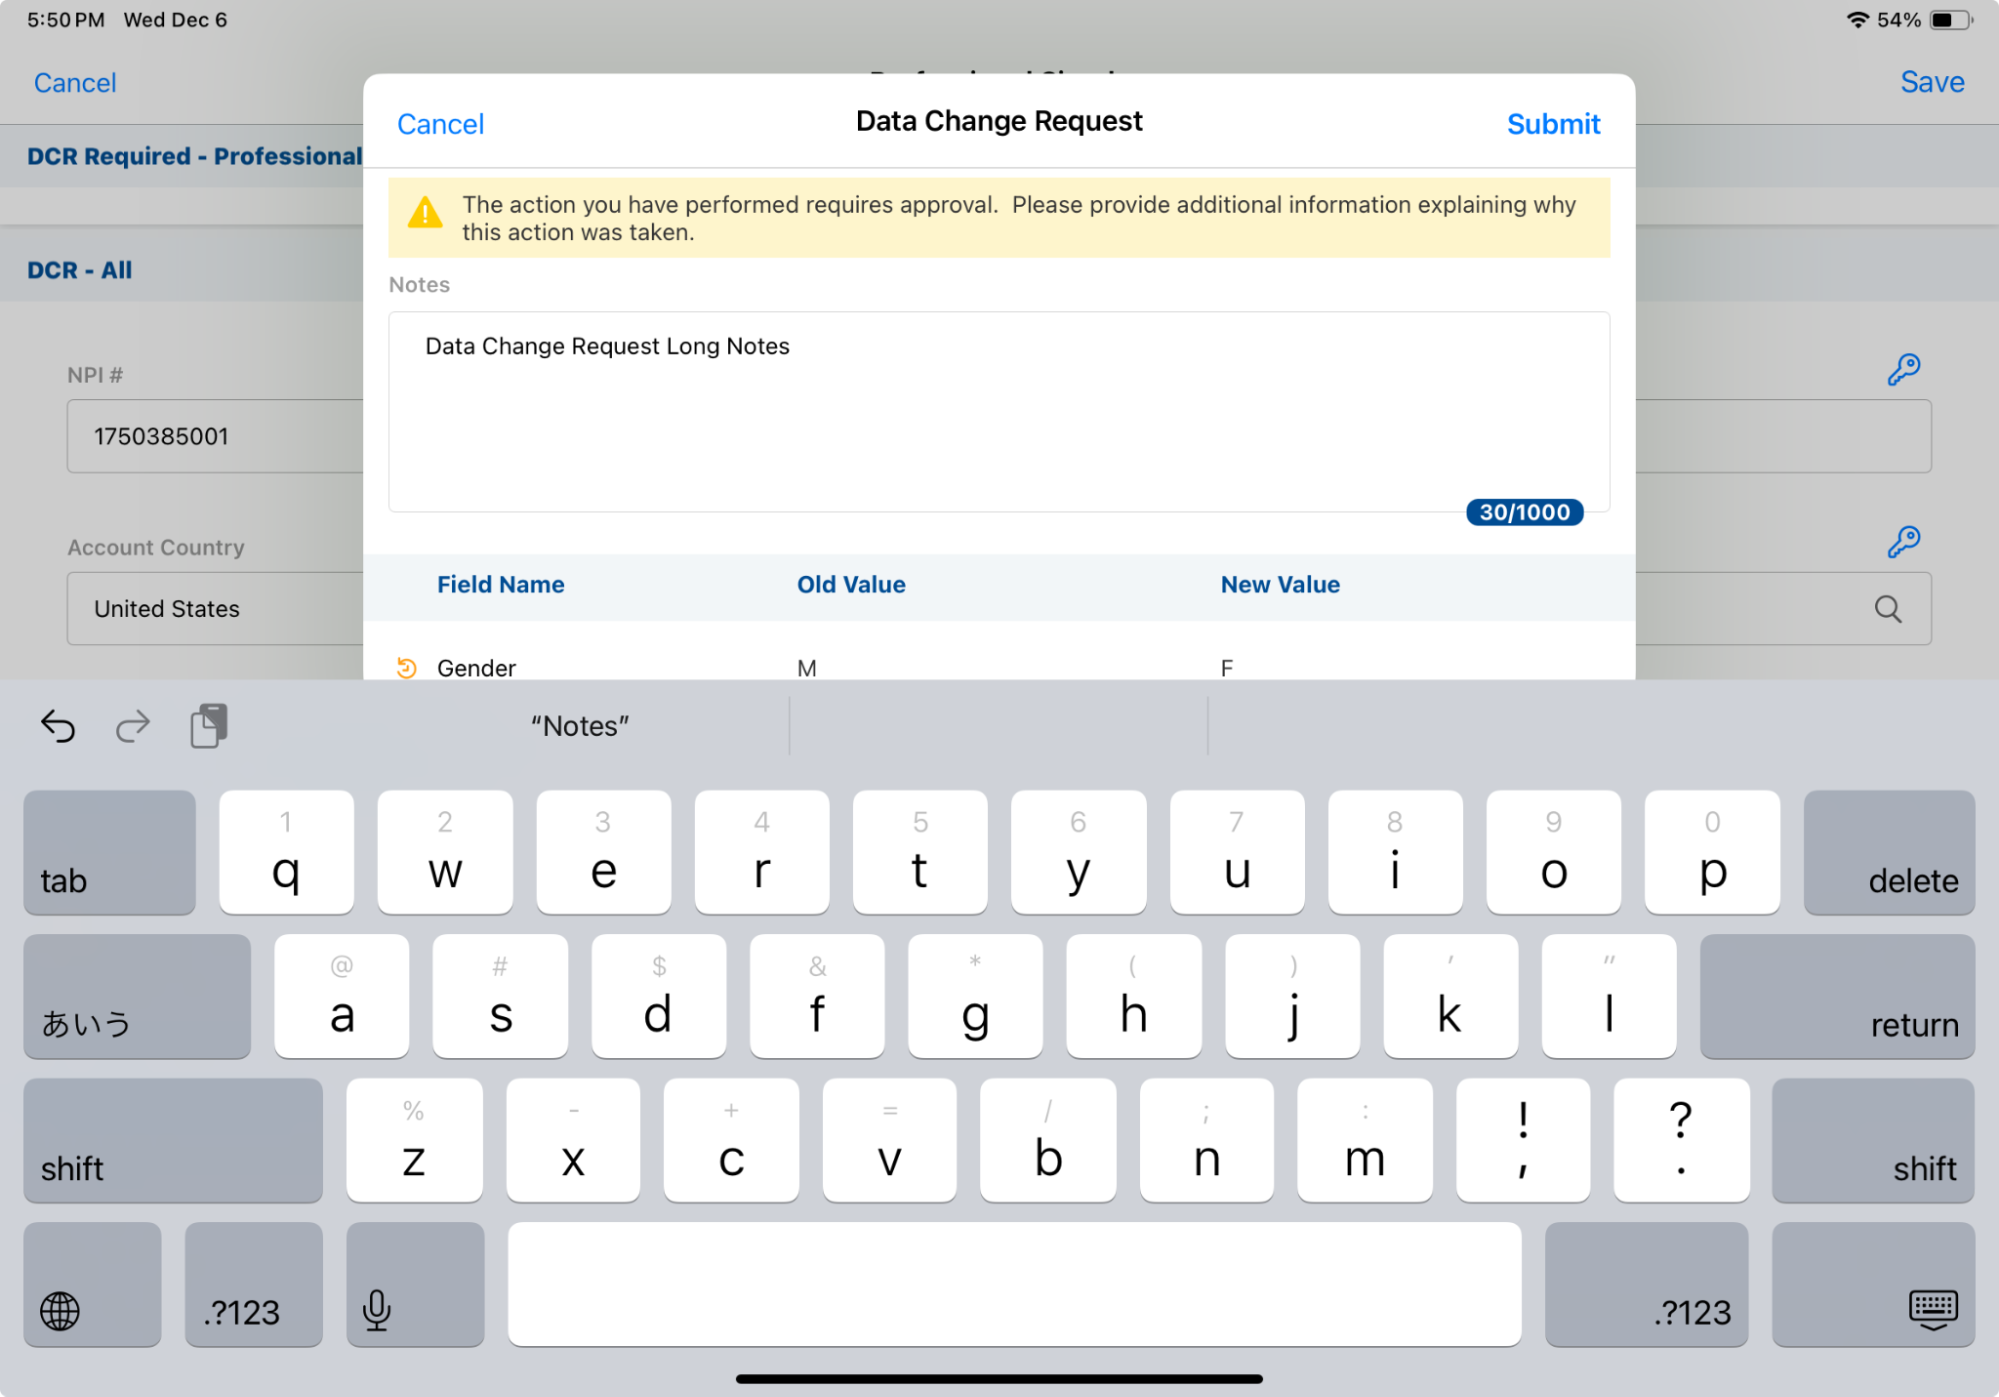
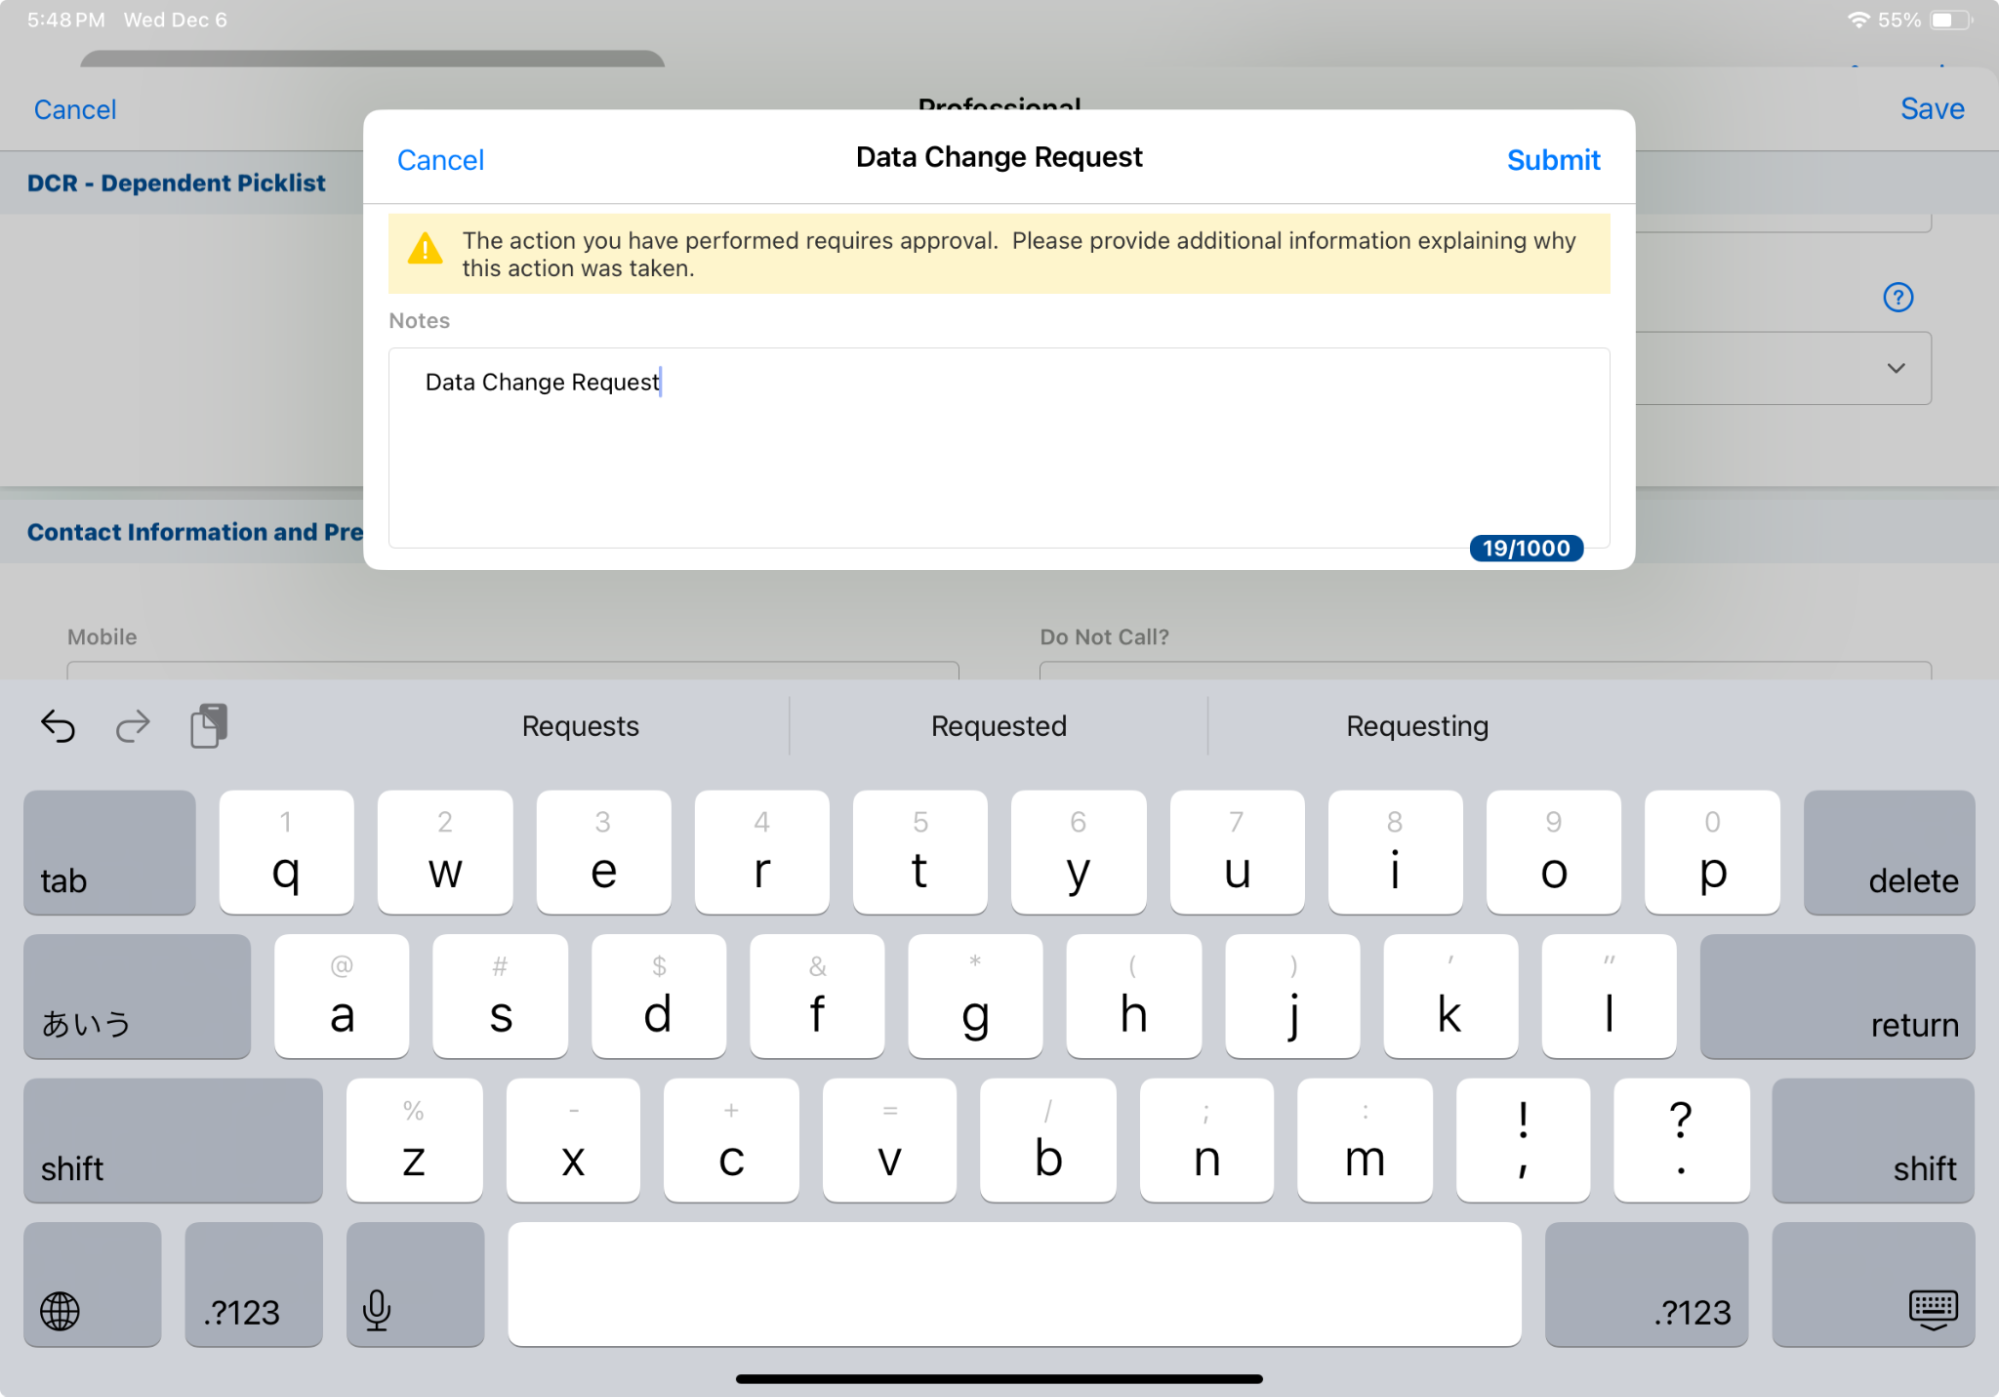
Admins can enable a long notes text area for data change requests. When end users submit a data change request, the Notes section, which is used to provide additional information about the requested change, allows up to 1,000 characters.
When a user visits an HCP and wants to submit a DCR request to update the Account, Address, or Child Account information, they can enter lengthy URL weblinks, multiple phone numbers, or feedback in the Notes section. The long notes provide data stewards the information needed to verify the requested change.
Edit DCR Modal:
New DCR Modal:
Using Long Notes in Data Change Requests
When a user enters a new DCR record or edits a DCR record, the Long_Notes_vod text area allows the user to enter up to 1,000 characters.
Entry Points
The long notes text area is available from the following entry points:
- Accounts - New Account Wizard, Edit Accounts, Global Account Search, Events Management Attendee Reconciliation
The Account Preview During Creation Veeva Setting and Network Setting are supported, so Browser users can see the DCR Note section on the preview page.
- Addresses - New or Edit actions from an Address Related List on the Account Details page
- Child Accounts - New or Edit actions from a Members of / Members Related List on the Account Details page
- Call License update
- Approved Email
- Consent Capture
Call Reporting
Displaying MyInsights Content on the Call Report
The MyInsights section on the call report displays relevant content from MyInsights pages. This enables users to easily view key information for call reporting without leaving the call report.
Content Creators can create custom MyInsights pages for the call report, or use MyInsights Studio to create content for the call report. For example, the MyInsights content could include call history for an account, sales data for a product, a summary of the steps to take on the call, or other account data to inform the user’s next visit with an HCP.
Viewing MyInsights Content on the Call Report
MyInsights content displays in its own section when users create a new call report or edit a call report. For group calls with unique activities, the MyInsights section displays on each child call.
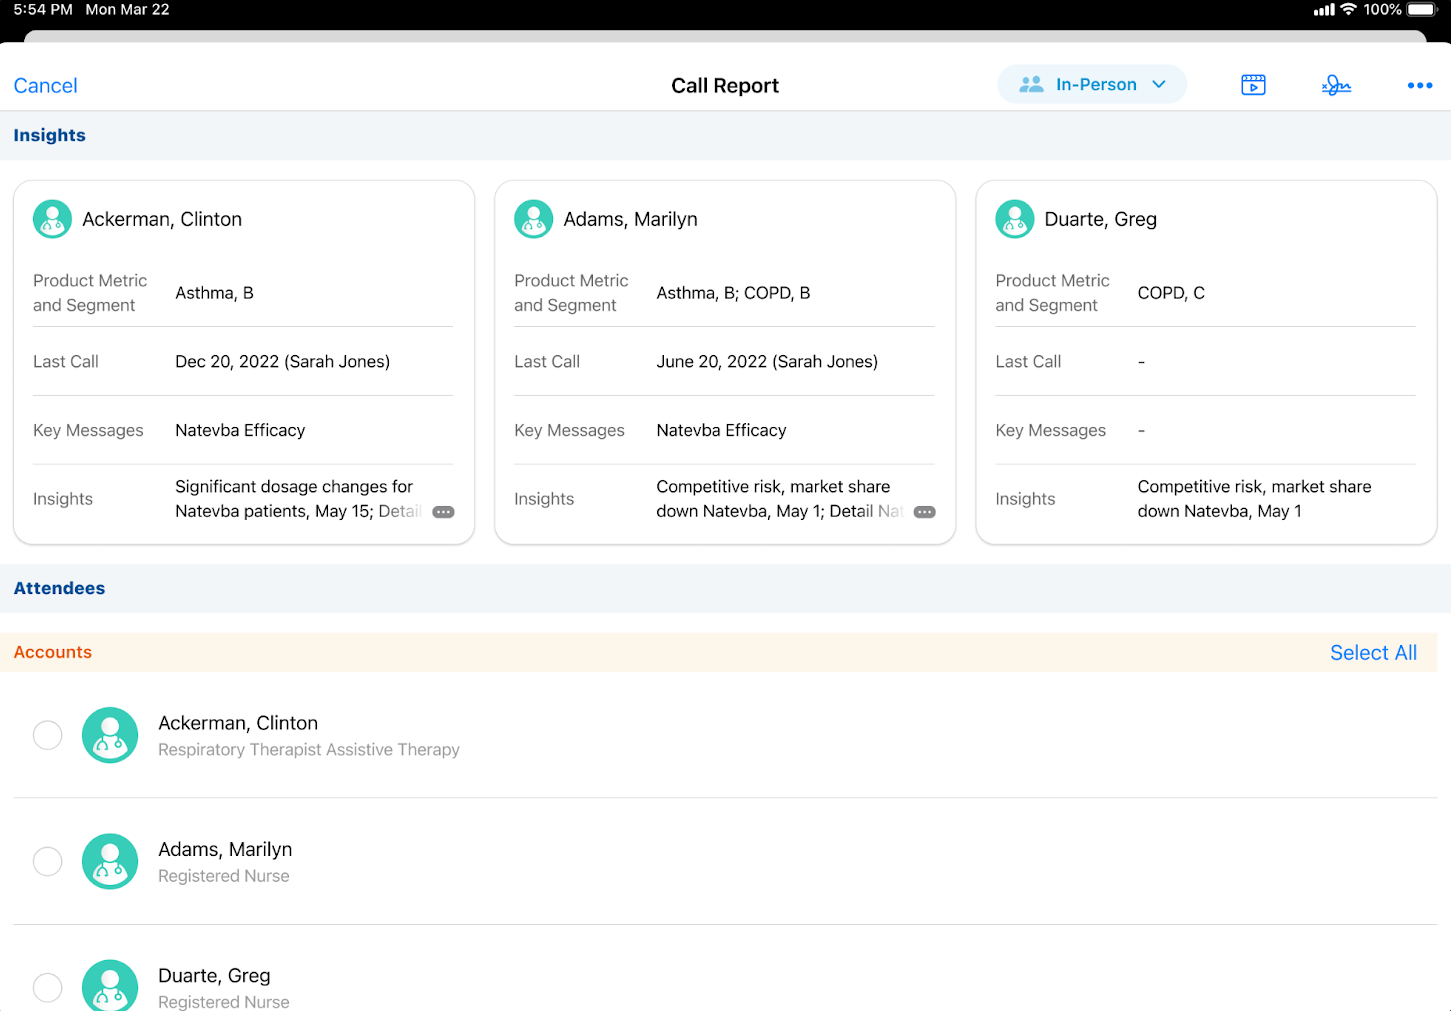
The example content in this screenshot is generated from custom MyInsights code.
The MyInsights section only displays when users create or edit a call report. It does not display when the call is in view mode or after the call is submitted.
MyInsights content is re-rendered each time one of the following occurs:
- The call territory or call record type changes
- Users return from:
- The Manage Attendees modal
- The Record Details modal
- The signature screen
- CLM content, launched from the Start Media button
- The Send Email modal
- The Create Order modal
- The Create Inventory Monitoring modal
- The Create Medical Insight modal
- The Create Medical Inquiry modal
- Users take one of the following actions on a unique activities group call:
- Return to the parent call from an attendee call report
- Move to an attendee call report using Jump To
Querying Call Information
MyInsights content developers can query call header and call attendee information using standard MyInsights querying functions. To retrieve the current call header information, use the getDataForCurrentObject method. To retrieve call attendee data, use the getAttendeeDataForCurrentCall method. The data retrieved includes both data committed to the local database and data in memory (changes made before a user saves or submits the call report).The getAttendeeDataForCurrentCall method only returns IDs for accounts listed in the Attendees section of the call report. It does not return the ID for the account selected on the parent call.
Considerations
The following functions are not supported for MyInsights content on the call report:
- Deep link functions:
- newRecord(configObject)
- viewRecord(configObject)
- executeSuggestionAction(SuggestionId,actionType)
- launchMediaForAccount(account, presentationId, keyMessageMediaFileName)
- sendToMySchedule(configObject)
- Inline edit functions:
- createRecord(configObject)
- updateRecord(configObject)
- Order-specific functions:
- refreshOrder()
CLM
Stamping Media Type and Publishing Method for CLM Content
Admins can report on the following fields, allowing customers to analyze HCP engagement with content:
- Media_Type_vod on the Key_Message_vod object
- Publishing_Method_vod on the CLM_Presentation_vod object
When users navigate to the media library, the Key_Message_vod records for each presentation are appropriately stamped with one of the following Media_Type_vod values:
- HTML_vod
- Video_vod
- Image_vod
- PDF_vod
- PowerPoint_vod
- Website_vod
Media_Type_vod is not stamped on shared resources. Additionally, it is not supported on CRM Desktop (Mac).
When a CLM_Presentation_vod record is updated, the Publishing_Method_vod field is stamped to indicate how the presentation was created:
- Vault_Published_vod - Binders and Slides, Create Presentation
- Vault_Auto_Published_vod - Auto-publishing for CLM in Vault
- CRM_Published_vod - Uploaded via FTP
Engage HCP
Managing Digital Business Cards
The digital business card (DBC) is a user profile for CRM users in Engage Connect, making it easy and convenient for HCPs to access a user’s contact information on their devices, whether or not the HCP is signed into Engage. HCPs are automatically connected to CRM users after every Engage meeting.
Admins and users can manage the profile information available to HCPs in DBCs from Veeva CRM. Additionally, deactivating a user in CRM also deactivates the user’s Engage Connect account and removes them from the Engage Connect group in CRM.
Migrating Digital Business Cards from Engage Connect to Veeva CRM
For users with DBCs enabled before 23R3.4, Veeva migrates the following information from Engage Connect to the appropriate User_Detail_vod records in Veeva CRM:
- Digital_Business_Card_Display_Name_vod
- Digital_Business_Card_Phone_vod
- Digital_Business_Card_Photo_URL_vod
- Digital_Business_Card_Title_vod
If a user does not have a User_Detail_vod record, Veeva creates the record and populates it appropriately.
Displaying Names
- If the Display_Name_vod field is not populated in Engage Connect, the field is only populated on the User_Detail_vod record if the first name and last name values in Engage Connect do not match the first name and last name values in Veeva CRM
- If the user's country is Taiwan, Japan, or Korea, the Display_Name_vod field is populated with the format [Last name][First name]. Otherwise, the field is populated using the format [First name] [Last name].
Managing User Profile Information
After DBCs are configured, a profile is automatically created when a user syncs their device for the first time. Each profile is populated with the First Name, Last Name, Email, Title, Phone, User Type, and Country.
Admins can manage the DBCs for a group of users at once or for an individual user. Users can manage their own profile information from the Veeva CRM app on iOS devices.
Users can update their profile photos in Engage Connect or Veeva CRM for iOS, not both. Users using Engage Connect on Android or Web cannot update any other profile information.
Updating Digital Business Cards as an Admin
When admins update any of the following fields on the User and User_Detail_vod records, the corresponding user profiles are immediately created or updated in Engage Connect:
- User_Detail_vod object
- Digital_Business_Card_Display_Name_vod
- Digital_Business_Card_Phone_vod
- Digital_Business_Card_Title_vod
- User object
- Country_Code_vod
- Email
The user receives a confirmation email when the Email field is updated. Changes to the Email field do not update in Engage Connect until both the user confirms the change via the confirmation email and the admin makes another change that needs to sync to Engage Connect, for example, updating another digital business card field or changing the user's membership in an Engage Connect group.
- FName
- LName
- User_Type_vod
Admins can only update a user's Country_Code_vod, Email, Fname, Lname, or User_Type_vod information from their User record. These fields on the User object override the corresponding fields on the User_Detail_vod object, so admins cannot edit the corresponding User_Detail_vod fields. The User_Detail_vod fields are used in reporting to analyze information about Engage Connect users.
To update the digital business cards for an individual user:
- Navigate to the User or User_Detail_vod record for the user.
- Edit the appropriate fields. For User_Detail_vod records, API names for fields related to digital business cards start with Digital_Business_Card_, for example, Digital_Business_Card_Display_Name_vod.
- Select Save.
To update digital business cards for a group of users at once, admins can data load the User and User_Detail_vod records for the users with the appropriate fields populated.
The changes are synced to Engage Connect and updated. If a profile does not already exist for a user in Engage Connect, one is created and populated with the profile information from Veeva CRM.
Updating Digital Business Cards as a CRM User
When users update any of the following fields on their own User_Detail_vod records, the corresponding user profiles are created or updated in Engage Connect after the changes are uploaded via autosync:
- Digital_Business_Card_Display_Name_vod
- Digital_Business_Card_Phone_vod
- Digital_Business_Card_Title_vod
To update their own profile information:
- Navigate to My Profile in Veeva CRM for iPad or iPhone.
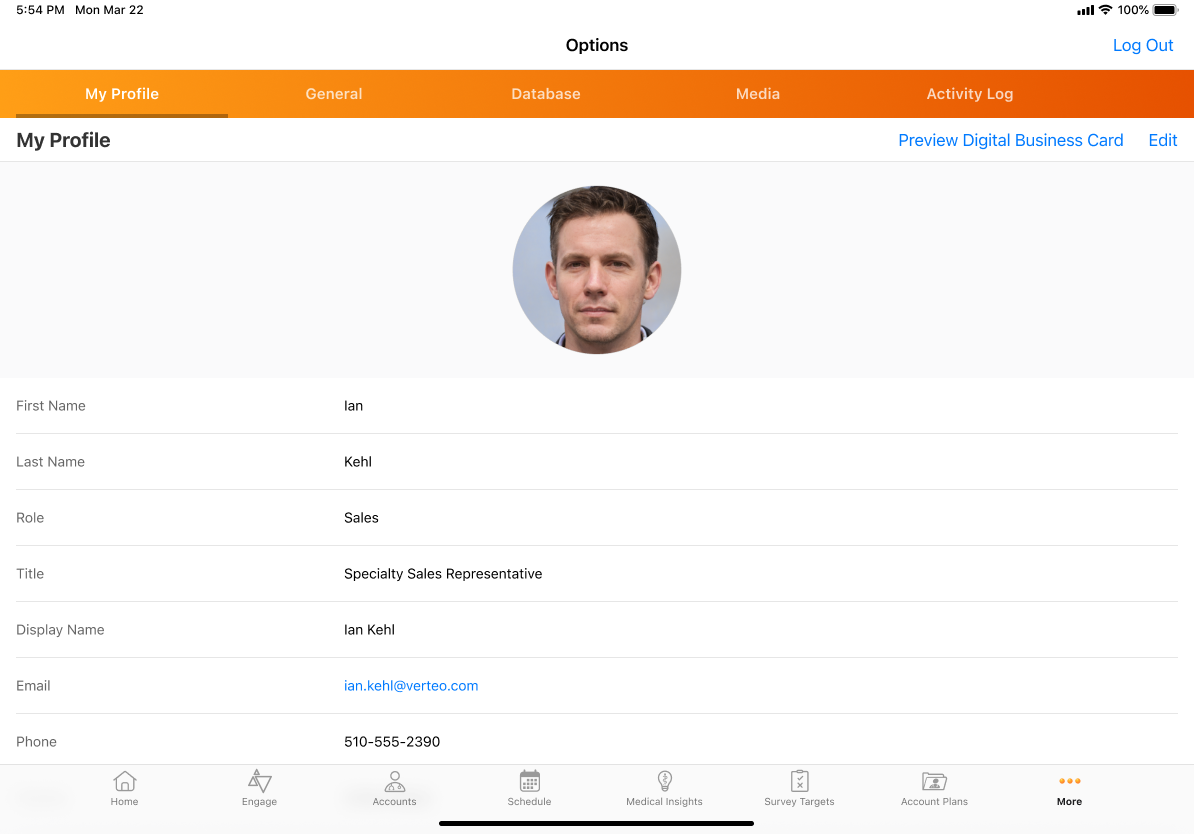
- Edit the fields appropriately. The corresponding fields on the User_Detail_vod record are automatically updated.
- Select the Edit button on the profile photo to update the photo. The following options are available:
- Take a Photo – Launches the camera app. If Veeva CRM app does not have access to the camera, a prompt displays for users to grant Veeva CRM access to it.
- Choose from Library – Launches the photo library. If Veeva CRM app does not have access to the photo library, a prompt displays for users to grant Veeva CRM access to it.
- Remove Photo – This option only displays when there is an existing photo
The Digital_Business_Card_Photo_URL_vod on the User_Detail_vod record is automatically updated.
- Select Save.
Auto-Populating Profile Information in the My Profile Tab
If the following User_Detail_vod fields are not populated or a User_Detail_vod record does not exist for a user, the User_Detail_vod record is created or updated with the Digital_Business_Card_Phone_vod and Digital_Business_Card_Title_vod fields automatically populated from the User record when the user views the My Profile tab:
- Digital_Business_Card_Display_Name_vod
- Digital_Business_Card_Phone_vod
- Digital_Business_Card_Photo_URL_vod
- Digital_Business_Card_Title_vod
An Engage Connect profile is created once the User_Detail_vod record syncs online.
Previewing Digital Business Cards as a CRM User
Users can preview their own digital business cards in a view-only mode from the My Profile tab. The preview displays the user’s digital business card as it displays to HCPs who are not signed into Engage. Previews are not tracked as views to the digital business card.
Users can navigate directly to the My Profile tab by selecting their profile icon in the top right corner of the Engage tab or from the Options tab.
Select Preview Digital Business Card to preview the digital business card in the embedded browser.
The Preview Digital Business Card button only displays on the App Store version of Veeva CRM for iOS. Previewing DBCs is not supported in Veeva CRM for Android.
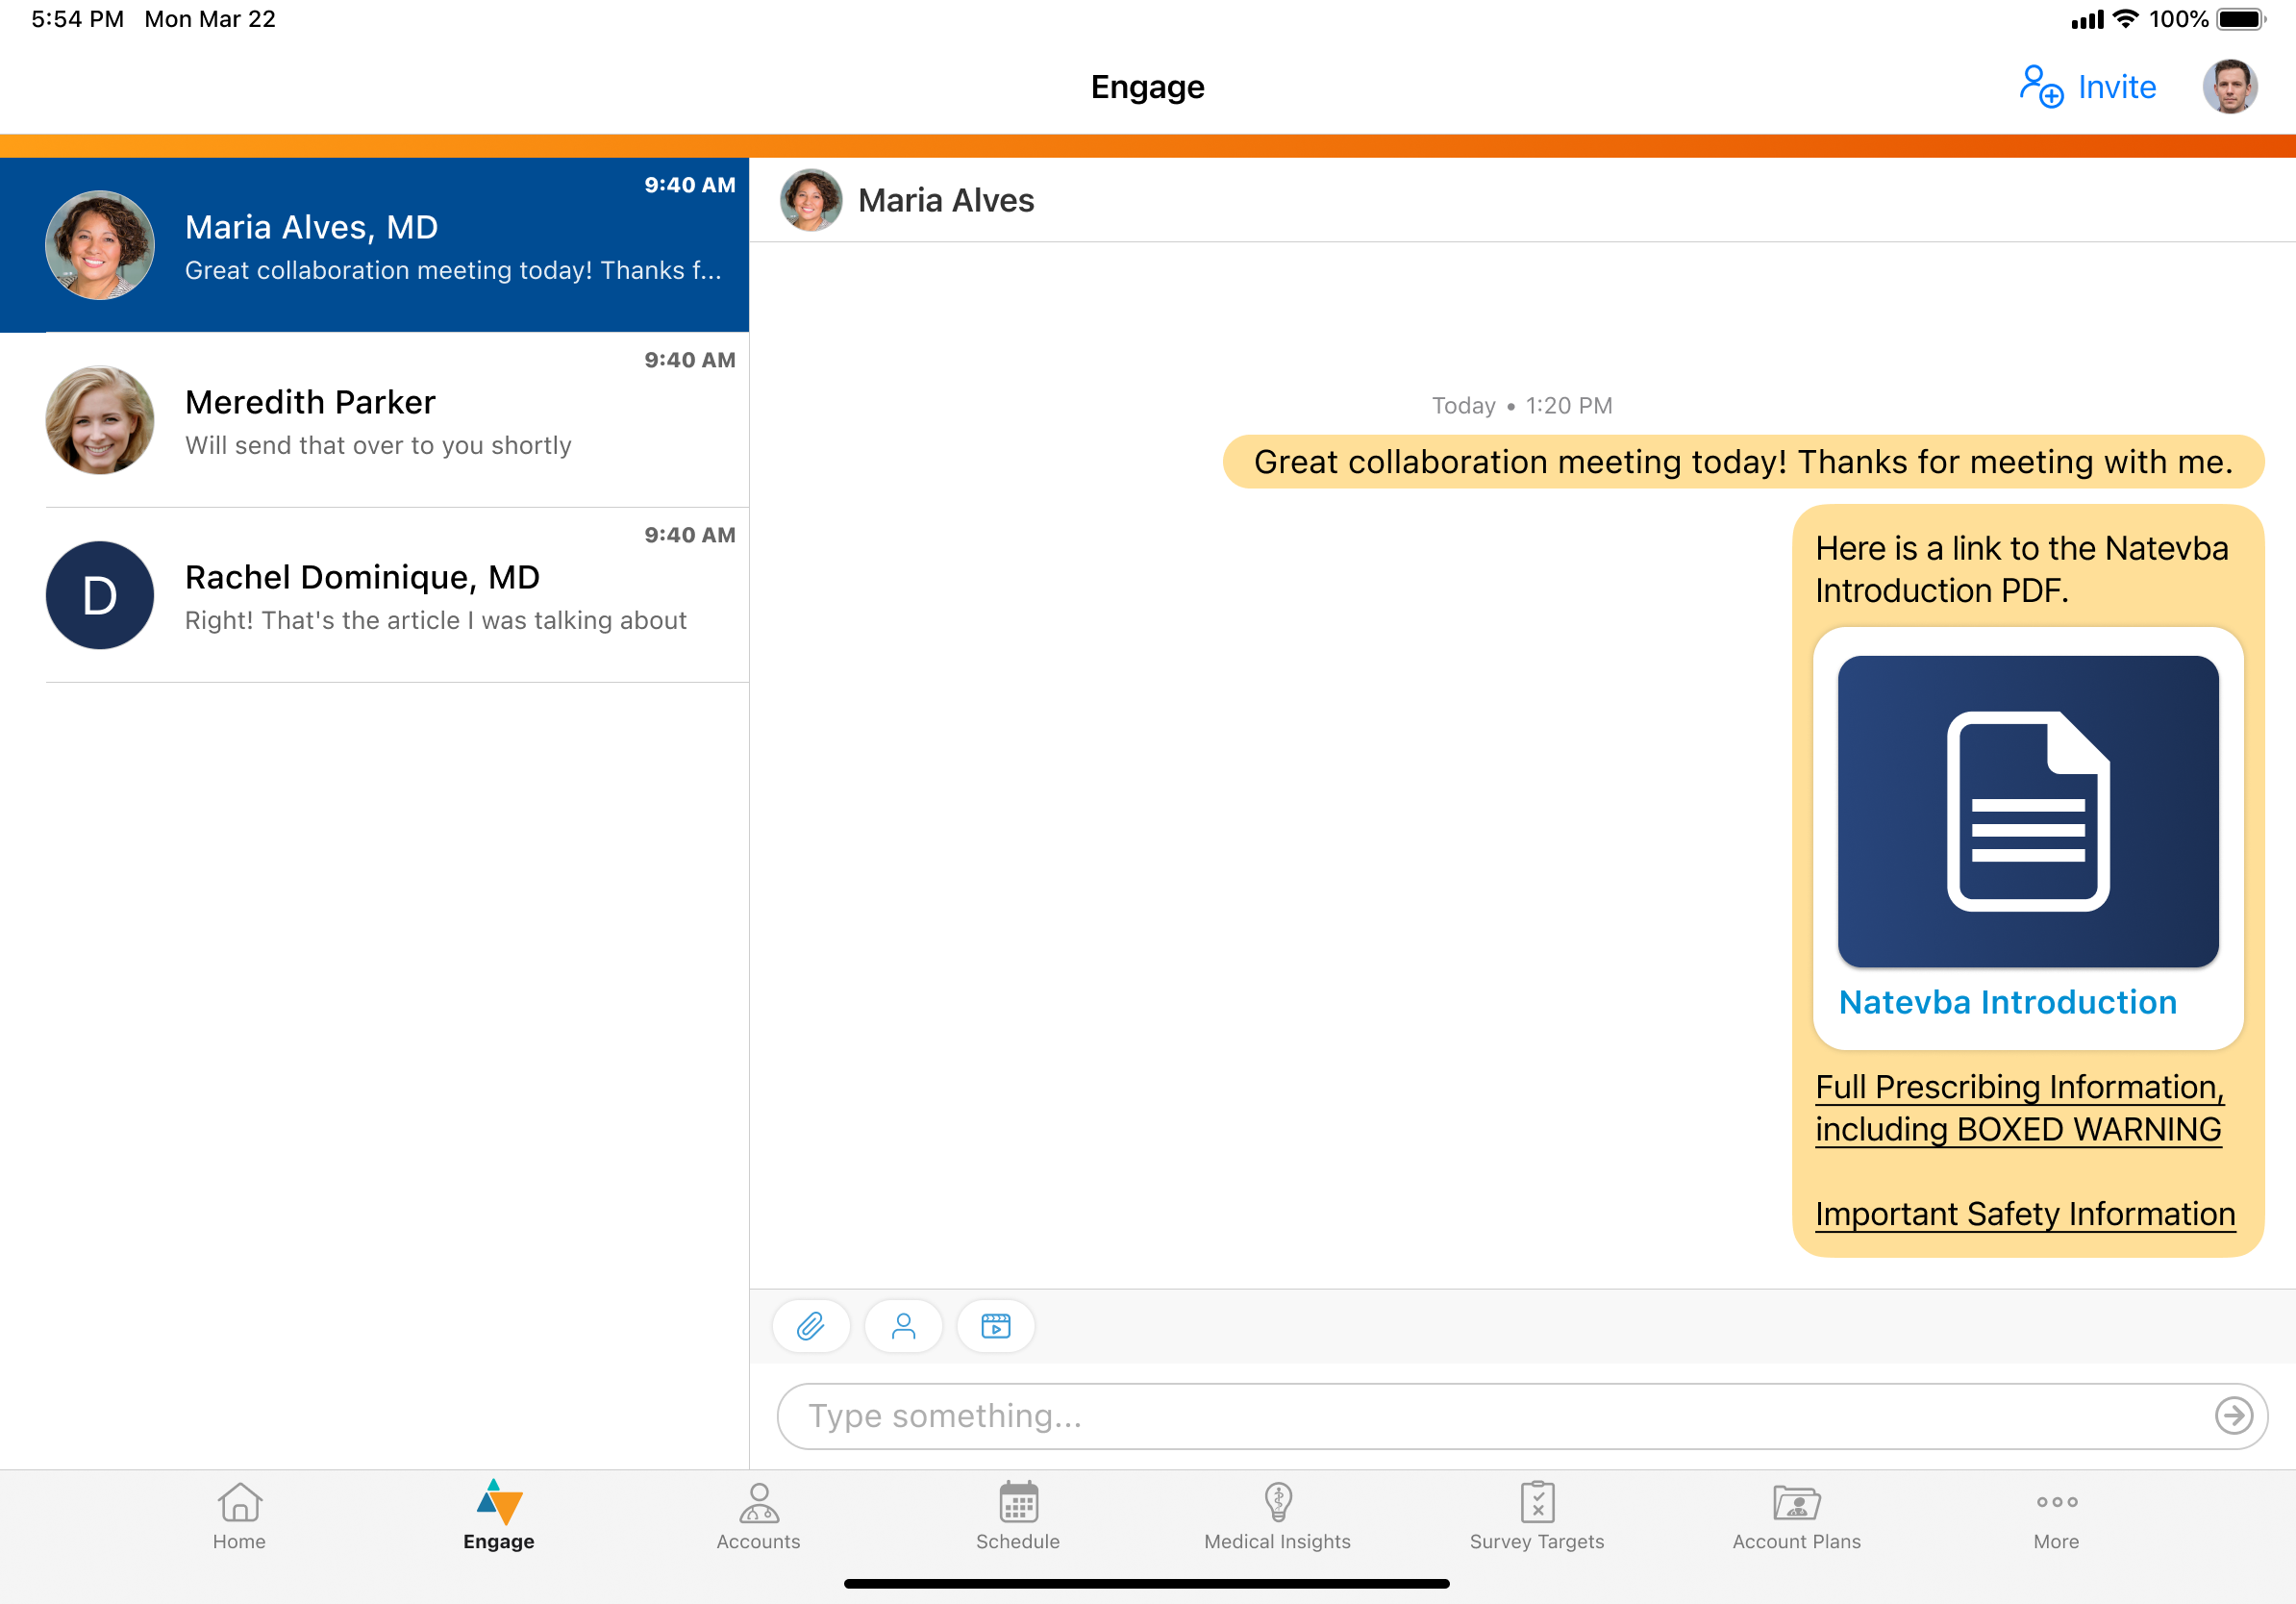
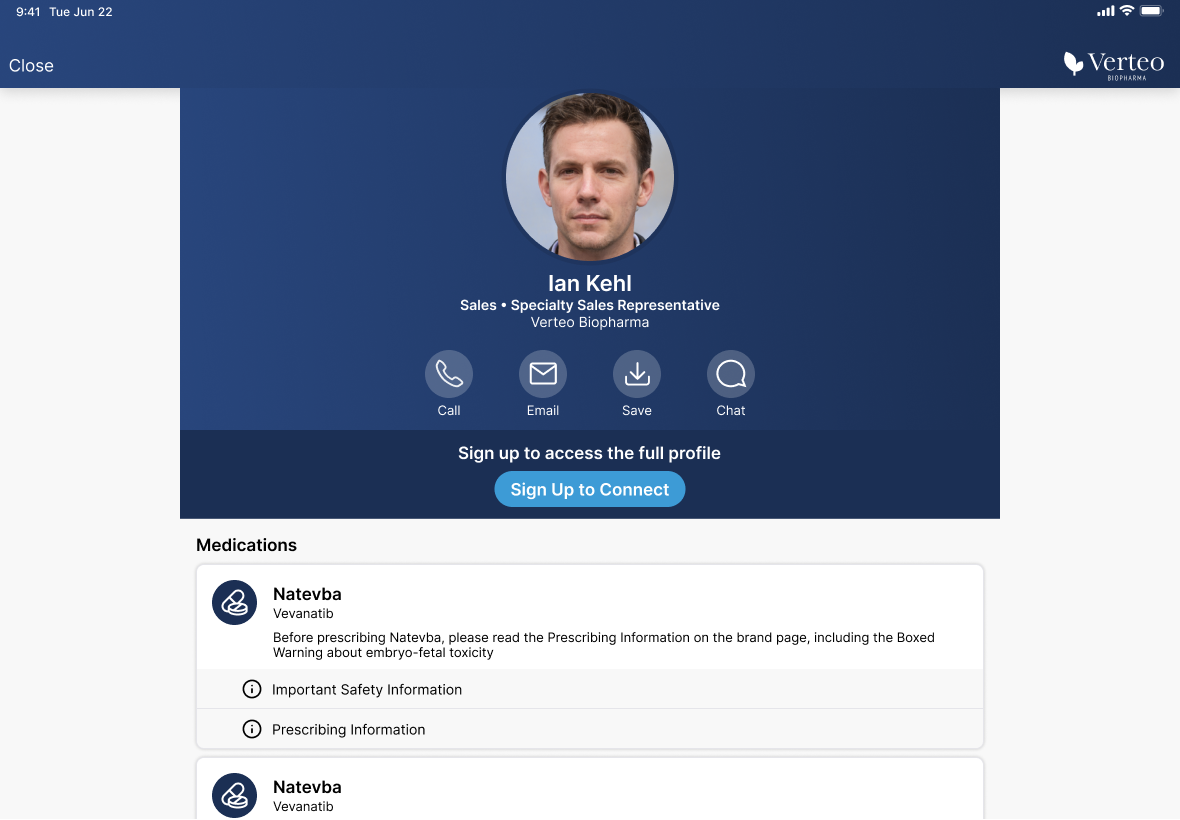
Viewing Digital Business Cards as an HCP
HCPs who are not signed into Engage can view simplified versions of digital business cards for CRM users by selecting the CRM user's connection invite link or scanning their QR Code®. The digital business card includes the CRM user's profile information and available contact methods.
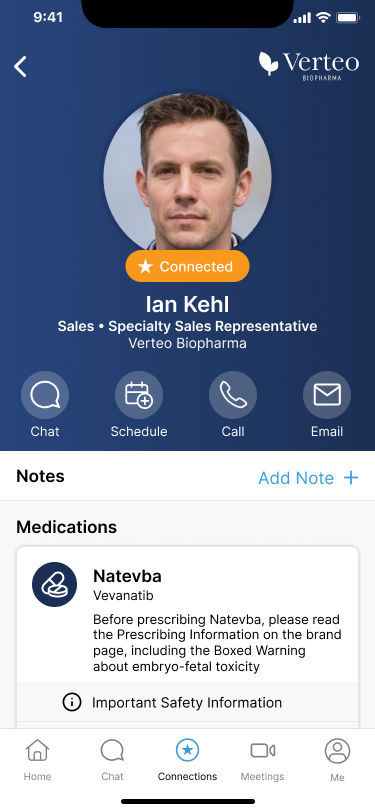
If an HCP is already signed into Engage and selects a CRM user’s connection invite link, they automatically connect to the user, and the user’s digital business card displays.
HCPs who are not signed into Engage can perform the following actions from the digital business card:
- Select the mobile number to make a phone call, if a phone number is available for the CRM user
- Select the email address to compose an email
- Select Save (mobile) or Save Contact (desktop) to save the CRM user’s contact information to their device’s address book
- Select regulatory links to view brand information in the browser
HCPs must sign into Engage to perform the following actions:
Performing any of these actions from the digital business card automatically connects the HCP to the CRM user, once the HCP finishes signing up or signing in.
- Select Chat or Ping to send messages
- Select Schedule (mobile) or Schedule Meeting (desktop) to request a meeting. See Sending Meeting Requests from Engage for more information.
- Select Sign Up to Connect to create an Engage account or to sign into an existing Engage account
- Select a brand to view the brand profile
When the HCP is not signed into Engage, their views and interactions with digital business cards are tracked as anonymous activity in the Rep Profile Activity Report. See Rep Profile Activity Report for more information.
Additionally, customers can export the connection invite links for users with digital business cards enabled via the company configuration file. See Creating the Company Configuration File for more information.
Sending Meeting Requests from Engage
HCPs can access the Engage Scheduling Site from chat threads or CRM user profiles, making it easier and more convenient for HCPs to send meeting requests to CRM users.
Sending Meeting Requests from Engage
When HCPs view CRM users' profiles or chat threads with CRM users, the Schedule button displays.
HCPs can select the Schedule button to immediately launch the Engage Scheduling Site in the app and send a meeting request.
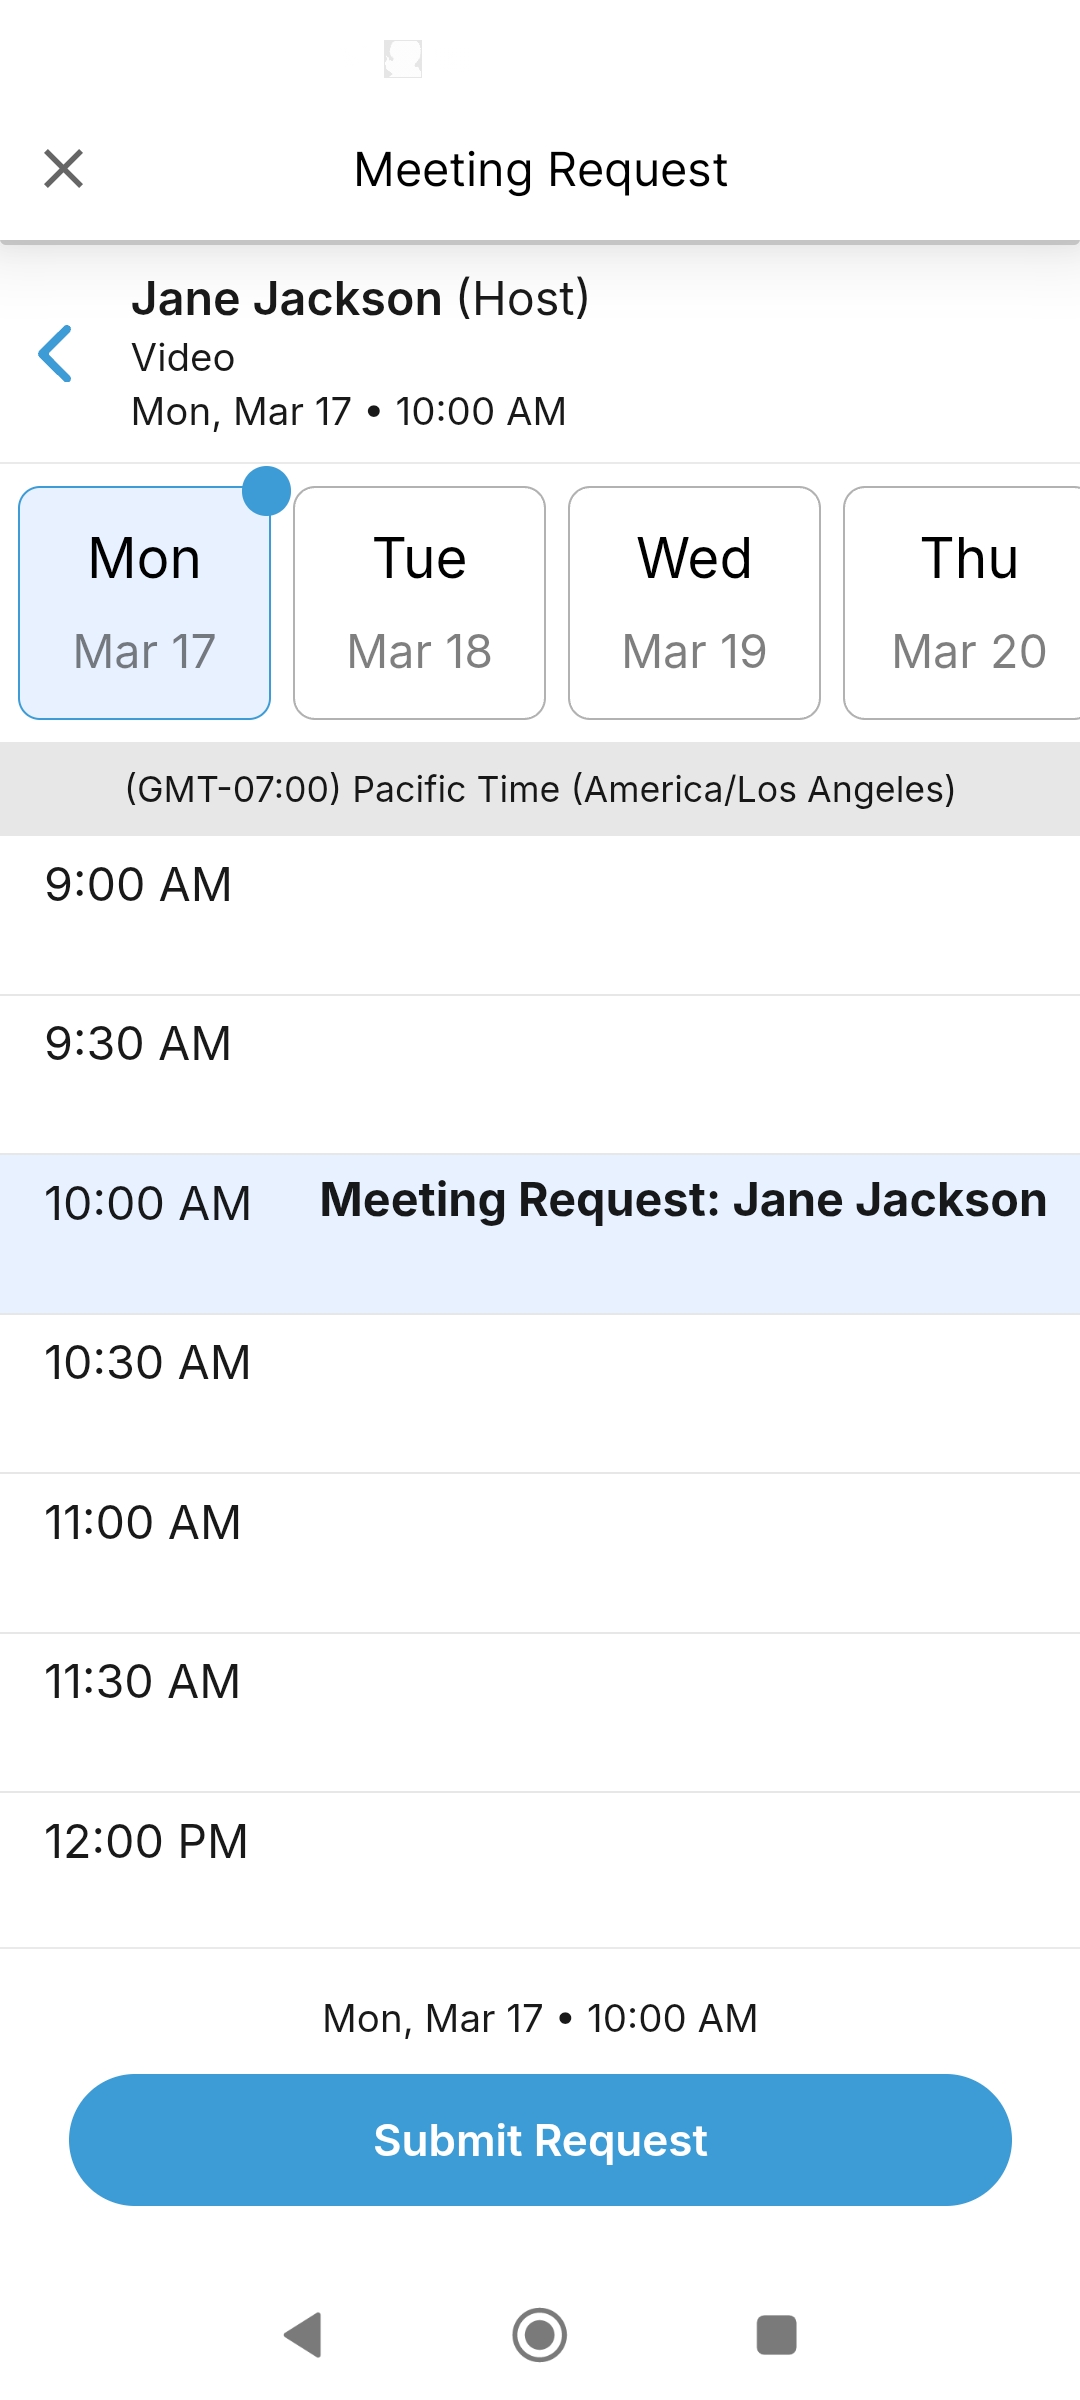
HCPs can request meetings up to 90 days in advance.
Medical Inquiry
Users can create medical inquiries for child accounts. By creating the medical inquiry for a child account instead of the parent, users can more easily maintain the relationship between the Business Account and Person Account. The business location is stamped on the medical inquiry to allow the field user to easily verify the correct child account is used.
For example, a user is detailing products for an HCP who works at multiple hospitals. The HCP requests medical information during the call, so the user creates a Medical Inquiry from the call report. The field user enters the relevant information, associates the hospital at which the user visits the HCP, and saves the Medical Inquiry. The information is visible on the signature page for the HCP to confirm.
Using Child Accounts with Medical Inquiries
Users can create Medical Inquiries for child accounts from a call report, CLM presentation, or account entry points. The location for the parent (business) account is pre-populated on the Medical Inquiry and is not editable.
Only iPad users can create a Medical Inquiry from a CLM presentation.
Users cannot create a Medical Inquiry from the Child Account Hierarchy, from the Medical Inquiry tab, or for a Child Account where the relationship is between a Business Account and a Business Account.
Order Management
Creating Orders from High Performance Call Report
Order Management is available from High Performance Call Report.
Using Order Management for High Performance Call Report
Users can perform the following functions using Order Management from high performance call report:
- Create and view orders
- MyInsights
- Enforce Order Review
- Refresh Order Pricing
- Attach photos to orders (Microsoft Windows Camera required)
- Sign orders
- Send receipts for orders
The following functions are not supported:
- Cloning an order
- Voiding an order
Users can submit or sign an order with a related IM only if the related IM record has been submitted.
Editing Orders
Users can edit an order related to the open Call Report by selecting Review Order from the More Actions menu from the high performance call report. If more than one order is available, select the order you want to edit from the displayed list.
