22R1.1 Functionality Guide
The Functionality Guide is intended for Sales Operations, Business Administrators, System Integrators, and others responsible for making decisions about what features are needed for end users to be successful and deciding which features work together with existing customer configurations.
Accounts
Custom Filters for Global Account Search
Browser (Lightning) users can apply custom filters to find accounts more easily when using Global Account Search. Admins can set up custom filters for any field on the Account or Address object.
For example, Verteo Biopharma is promoting a new product for managing diabetes. Sarah Jones wants to compile a list of all accounts in her organization with a specialty in that area of treatment. From the Global Account Search tab, she selects Diabetes from the Specialty filter set up by the org’s admin. This narrows her results to only display accounts specializing in diabetes.
Considerations
The following field types are not supported:
- Long text
- Text Area
- URL
- Date
- Date/Time
- Geolocation
- Phone
Defining Available Fields for Custom Filters
Standard or custom fields on the Account and Address_vod objects can be defined as fields available in custom filters.
To prevent conflicts, any fields defined as available for inclusive Implicit Filters should not be defined for Custom Filters for the same profile.
To define the fields available for filtering:
- Navigate to Global Account Search settings.
- Populate the GAS_User_Filters_vod setting with the appropriate Veeva Message. The default message is GAS_USER_FILTERS;;Global Account Search.
-
Populate the Veeva Message defined in the setting with a semicolon-delimited list of the fields to make available to custom filters. Use the following format:
ObjectAPIName.Field1APIName; ObjectAPIName.Field2APIName;For example, Account.Specialty_1_vod__c;Account.Credentials_vod__c;
Removing Accounts from Territories
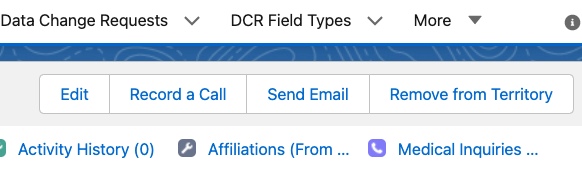
Users can quickly remove accounts from their territory via a dedicated button on the Account detail page. This button prompts the user to create a DCR to remove the account from their territory, which can include a reason for removal. The DCR can then be routed via the Salesforce Approval Process for additional review and approval.
For example, Sarah Jones attends a conference where she speaks with Dr. Ackerman about Cholecap. She needs to record this interaction for compliance reasons, however, Dr. Ackerman is not an account currently in her territory. She adds Dr. Ackerman to her territory via Global Account Search and logs the interaction. Later, she removes Dr. Ackerman from her territory since she no longer needs access to Dr. Ackerman’s account.
This feature is not compatible with assignments generated using Salesforce Territory Assignment Rules, including Zip-to-Terr Alignment and Brick-based Alignments.
Considerations
- In order to provide users immediate feedback on their request to remove an account from their territory, it is recommended to setup a Flow or Approval Process to automatically approve or reject DCRs created via this feature
- To ensure DCRs are not accidentally sent to Veeva Network, DCRs created by this feature have a Network_Customer_Master_Mode_vod field of 0. Admins should verify any integrations with external systems when using Decoupled DCRs with this feature to ensure DCRs created by this feature are not accidentally sent to external systems.
Removing an Account from a Territory
To remove an account from a territory:
- Navigate to the appropriate account.
-
Select Remove from Territory.
An error displays if users select this button on an account they are not currently aligned to. This feature only supports removing Territory2Manual OT2A records.
-
Select the appropriate territories to remove the account from if the account and user are assigned to multiple territories.
Separate DCRs are created for each selected territory.
-
Select the appropriate Challenge Reason. Values available for selection are based on the values of the Challenge_Reasons_vod picklist on the Data_Change_Request_vod object.
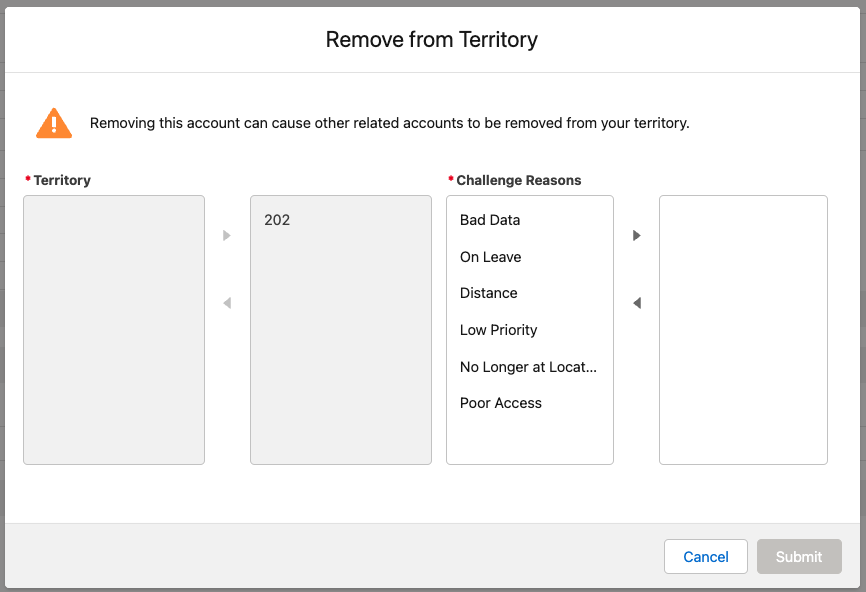
- Select Submit.
The Country_Mapping_vod field does not populate when creating a Remove from Territory DCR.
Created DCRs have an initial External_Status_vod field of CHANGE_PENDINGREVIEW. If the Result_vod field is updated to CHANGE_ACCEPTED, either manually or via an automated process, the account is removed from the requesting user’s territory.
Only the Result field should be changed when approving the DCR. This triggers a process that automatically updates other fields, such as External Status and / or Status.
If an org uses the Account Territory Loader (ATL) to manage territories, approved DCRs also remove the territory from the Territory_vod field of the appropriate Account_Territory_Loader_vod record.
If the org is connected to an instance of Align, account_exclusion__aln records are automatically created for accepted DCRs to reflect the removal. See Removing Accounts from Territories in CRM and Align for more information.
The Account_vod, Territory_vod, Response_Datetime_vod, and Result_vod fields must be populated correctly for the Align Exclusion record to be created.
Engage Meeting
Importing Engage Connect Chat Logs into CRM
Admins can configure CRM to import chat messages from Engage Connect as new Call2_vod records or as records of a dedicated Chat_Message_vod object. These records contain chat message data and automatically associate with the appropriate account and user. The data can be utilized within CRM to help analyze productivity and monitor for compliance purposes.
For example, Sarah Jones is connected to Dr. Ackerman in Engage Connect. Dr. Ackerman sends a chat to Sarah to request a sample of Cholecap. To record this interaction, records on the following objects are created in CRM during the next run of the Engage Connect process:
- A Call2_vod record with Dr. Ackerman selected as the account
- Chat_Message_vod records for each exchanged chat message
Both of these records contain information about the chat exchanged between Sarah Jones and Dr. Ackerman.
Considerations
- Call2_vod records created by this feature group all chat messages between an account and a user in the last 24 hours into one record. Records are only created if there is a corresponding Account record for the HCP.
- The Chat_Summary_vod field on the Call2_vod object, as well as supported fields on the Chat_Message_vod object can be monitored via Approved Notes
Created Records from the Engage Connect Process
When the Engage Connect Process imports chat messages between users and accounts, the following records are created:
-
A Call2_vod record with a record type of Engage_Connect_vod. The following fields populate based on values in Engage Connect:
Field in CRM
Description
Account_vod
The CRM Account in the chat conversation from Engage Connect. References the corresponding Account record in CRM.
OwnerId
The CRM User of the chat conversation.
Status_vod
Always populates with Submitted_vod.
Call_Date_vod
The date of the message. If multiple messages are documented by the Call2_vod record, this field represents the date of the earliest message.
Call_Datetime_vod
The date of the message. If multiple messages are documented by the Call2_vod record, this field represents the datetime of the earliest message.
Call_Channel_vod
Always populates with Message_vod.
Call_Type_vod
Always populates with Call Only.
Chat_Summary_vod
Indicates the category, product, and details of the chat messages.
Possible categories are:
- Content – Approved Content shared with the account
- Sample – Indicates the account requested a sample
- CRM Link – A Website Link sent to the account from the user in CRM
Messages are summarized using the following format:
{category}: {name field on the brand object} | {name field on the contents object}
For example:
Content: Cholecap | Fact Sheet
CreatedBy_Platform_vod
Always populates with Engage_Connect_vod.
LastModifiedBy_Platform_vod
Always populates with Engage_Connect_vod.
-
A Chat_Message_vod record with the following fields populated based on field values in Engage Connect:
Field in CRM
Description
Sent_Datetime_vod
The time the message was sent, formatted in UTC.
Channel_Ext_Id_vod
The unique external ID of the chat thread in Engage Connect. Used to group chats together.
Message_vod
The complete text of the chat message. This field does not populate if the Message_Metadata_vod field is populated.
Message_Metadata_vod
The metadata of the chat message. This field is used for predefined messages, for example, Approved Content, and does not populate if the Message_vod field is populated.
This field cannot be monitored via Approved Notes.
Sender_Type_vod
May be one of the following values, based on the type of sender:
- HCP_vod – The sender is an account
- User_vod – The sender is a user
User_vod
References the corresponding user in CRM.
Account_vod
References the corresponding account in CRM.
Country_Code_vod
The country code of the user who sent the message.
First_Name_vod
The first name of the sender in Engage Connect.
Last_Name_vod
The last name of the sender in Engage Connect.
External_Id_vod
The message’s unique external ID in Engage Connect.
Viewing the History of the Engage Connect Process
Admins can view the history of the Engage Connect Process from the Engage Connect Integration Process History section of the Engage Connect Process Administration tab. This section lists the results of the last 10 runs of the process.

Admins can select the Successes and Failures columns to download a CSV file of all successfully created or failed records. Failures can be retried by selecting the Retry on Next Run check box, then selecting Save.

MyInsights Studio
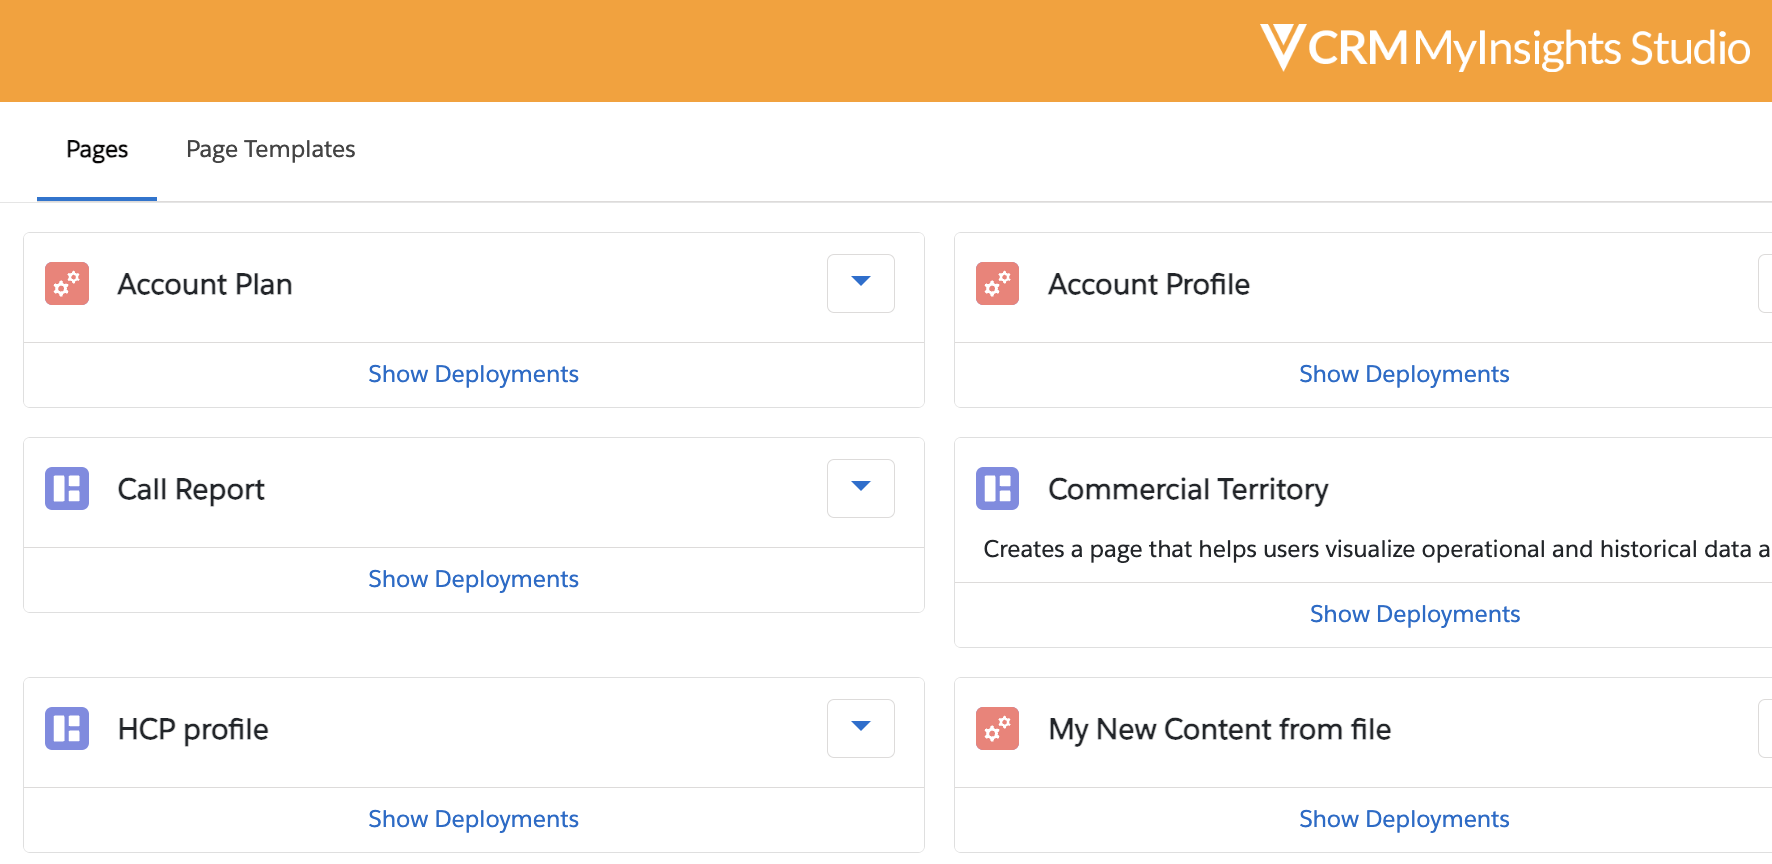
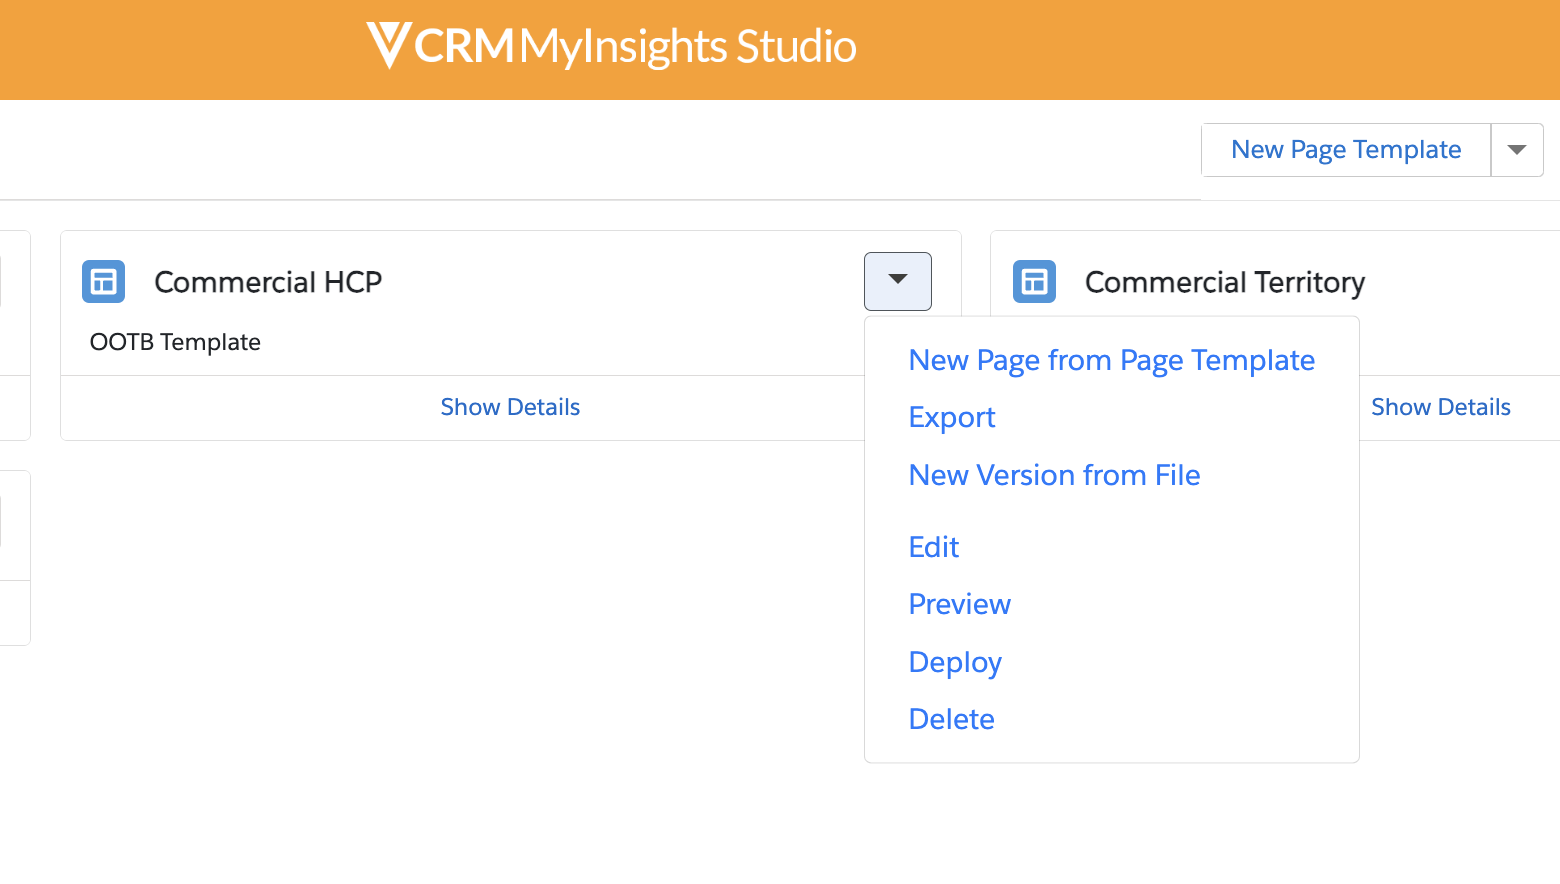
Using Templates for MyInsights Content
Content creators can import and modify page templates to quickly deploy content to end users. If page templates do not exist, content creators can create them as starting points for custom content or convert existing content into page templates, allowing reuse of the page template.
The following MyInsights Studio page templates are available:
A content creator wants to use a page template to create customized content and quickly deploy the content to their users. They import the page template into their MyInsights Studio template library and create a content page. They modify the data and display elements to query data from their org and display the appropriate metrics for sales reps.
Creating and Updating Templates
If an appropriate template does not already exist in the template library or is not available to be imported, content creators can create their own templates.
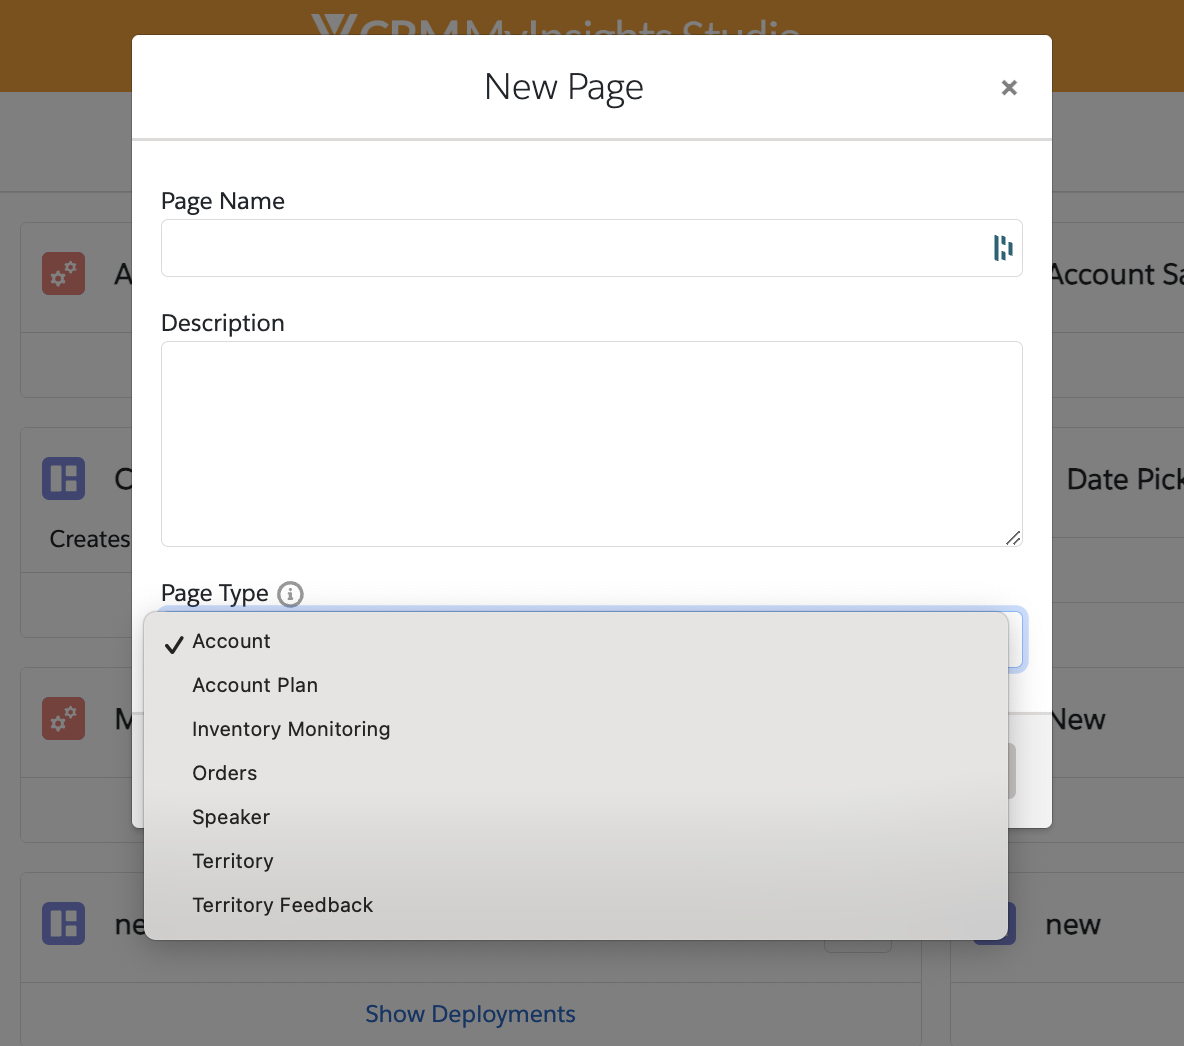
To create a template:
- Select the Templates tab on the home page to display the template library.
- Select New Template.
-
Populate the Template Name and Template Type fields. The template type is the MyInsights record type for the content. See Components of MyInsights for more information about the available record types. A test record field displays automatically depending on the selected template type.

- Add data elements and display elements.
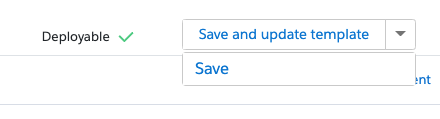
- Select Save and update template to save changes and update the version of the template used when creating content from the template. To save the changes for testing without updating the template version, select Save from the drop-down menu.
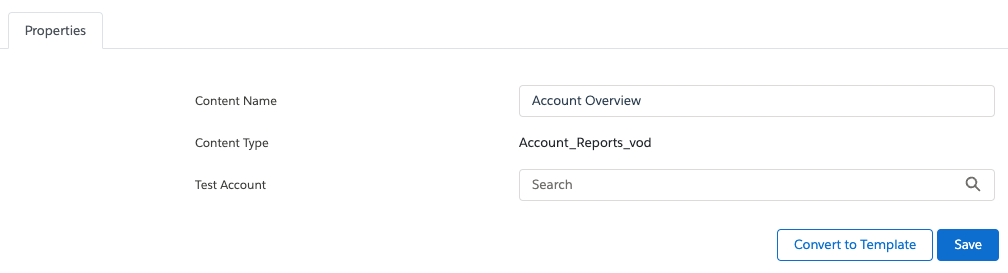
Existing content pages can be converted into templates. To convert an existing content page into a template:
- Select the Content tab on the home page to display the content library.
- Select the drop-down menu for the appropriate content page.
- Select Convert to Template.
- Select OK to confirm.
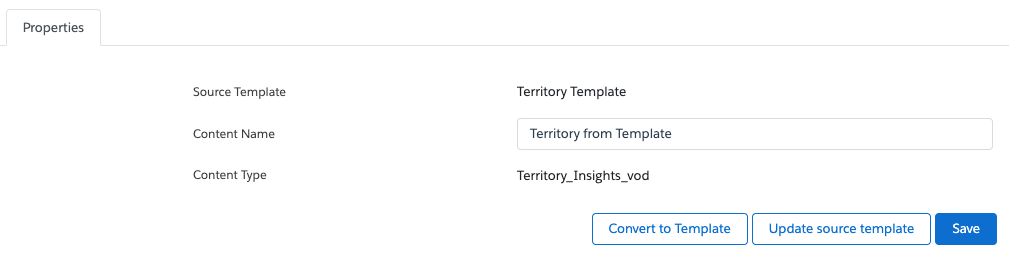
A content page can also be converted into a template from the Properties tab.
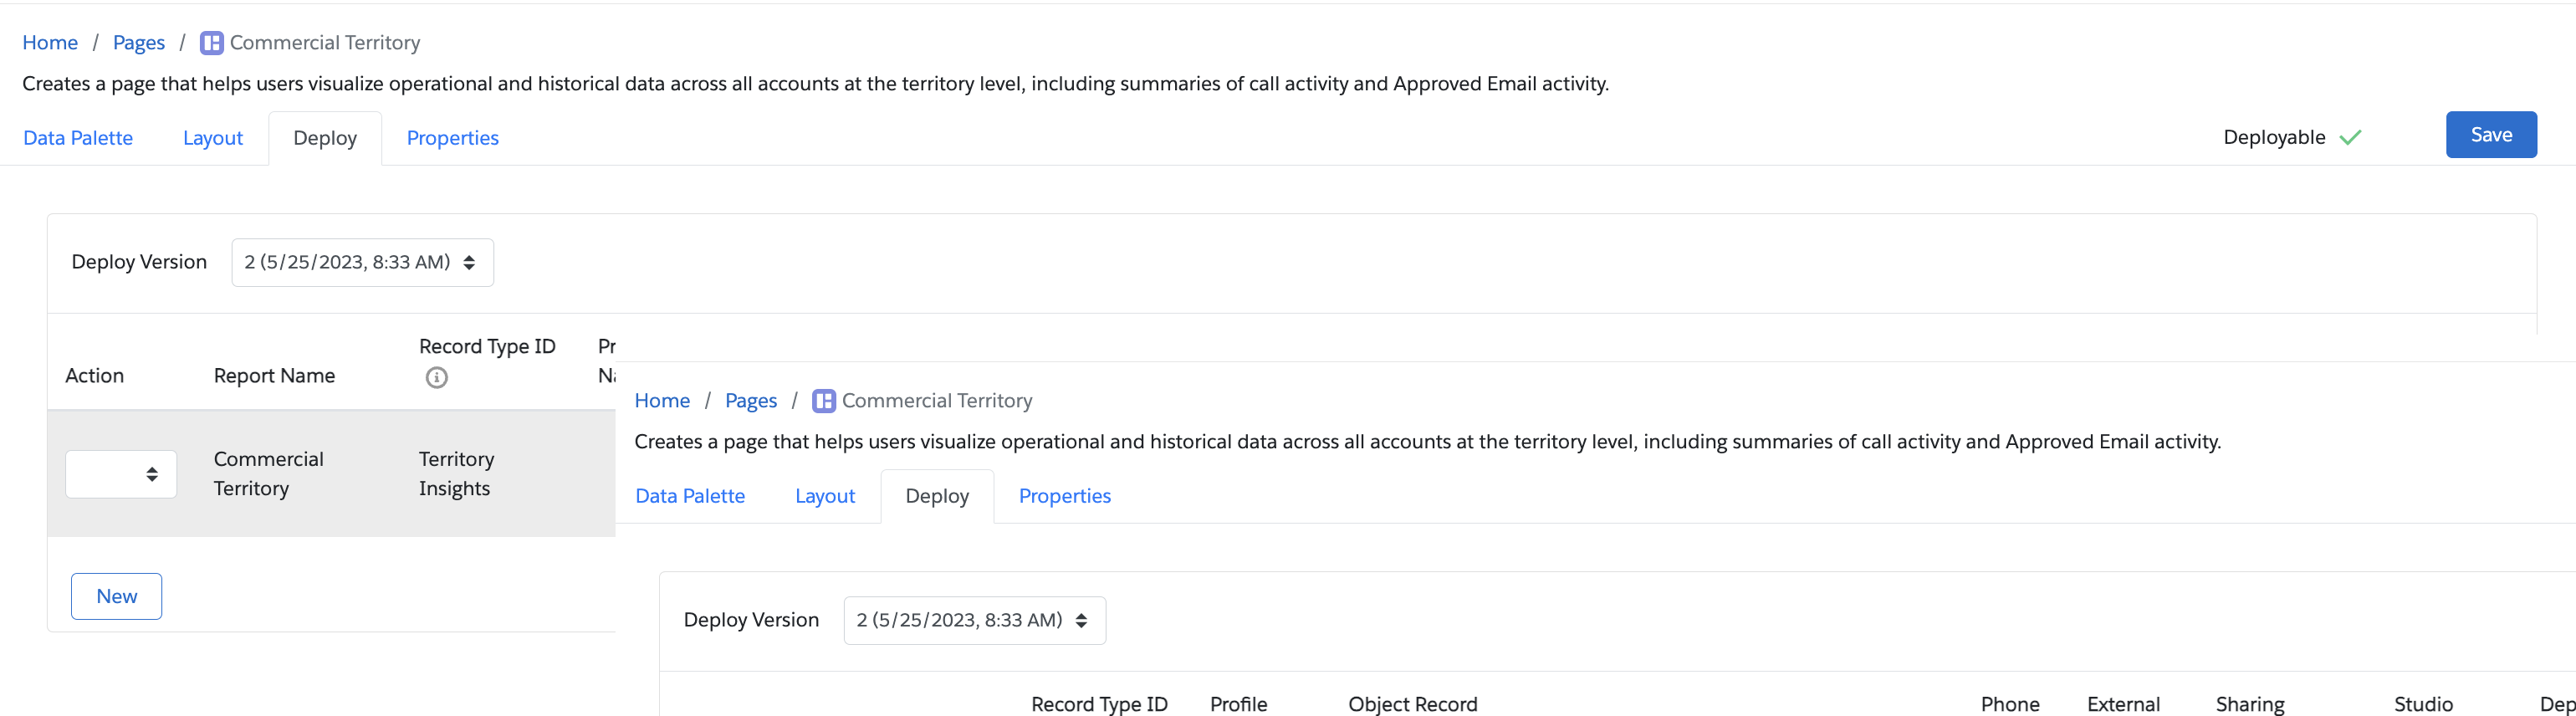
Deploying Templates
Users can deploy templates to sandbox orgs to test any changes and ensure the template displays correctly. The deployment process for templates and content is the same. See Deploying MyInsights Pages to Veeva CRM for more information.
Importing and Exporting Templates
Templates can be exported as zip files to allow users of other Studio Domains to import and use.
To export a template:
- Select the Templates tab on the home page to display the template library.
- Select the drop-down menu for the appropriate template.
- Select Export.
To import a template:
- Select the Templates tab on the home page to display the template library.
- Select the New Template drop-down menu.
- Select Import Template.
- Populate the following information in the modal:
- Create New Template – Determines if the imported template is a new template or an update to an existing template
- Template Name – Name of the new template. This field only displays when the Create New Template check box is selected.

- Template – Existing template to update. This field only displays when the Create New Template check box is not selected.
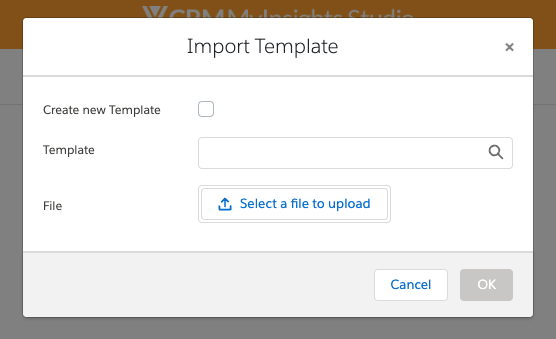
- File – The template zip file
- Select OK.
Users can import new versions of templates by selecting Import New Version from the drop-down menu of the appropriate template.
Creating Content from Templates
To create content from a template:
- Select the Templates tab on the home page to display the template library.
- Select the drop-down menu for the appropriate template or select the New Content drop-down menu.
- Select New Content from Template.
- Enter the Content Name.

- Edit the data elements and display elements appropriately.
- Select Save.
Users can also create content from a template file without importing it first:
- Select the Templates tab on the home page to display the template library.
- Select the New Content drop-down menu.
- Select New Content from File.
- Populate the following information in the modal:
- Name – Name of the new content
- File – The template zip file
- Save Template? – Determines whether to save the file as a new template in the template library
- Template Name – Name of the new template. This field only displays when the save Template? check box is selected.
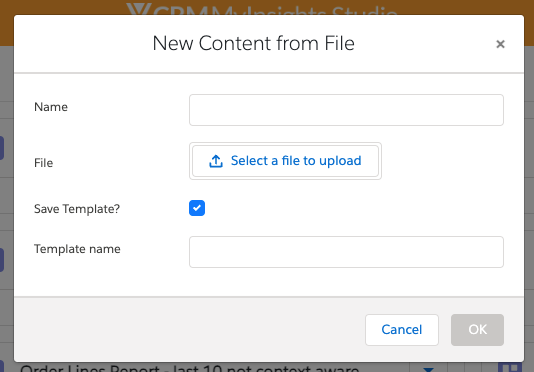
- Select OK.
When editing a content page created from a template, update the source template to the most recently saved deployable version of the page by selecting Update Source Template from the Properties tab.