

21R3.0 Functionality Guide
The Functionality Guide is intended for Sales Operations, Business Administrators, System Integrators, and others responsible for making decisions about what features are needed for end users to be successful and deciding which features work together with existing customer configurations.
Information includes an overview of each feature, examples, screen shots, and targeted information on how to use each feature. Select the heading link to display the topic which includes configuration instructions, if applicable.
Approved Email
Approved Email Tokens in Email Fragments and Template Fragments
To enhance both flexibility and reusability of Approved Email content, content creators can add several Approved Email tokens that do not require input from the user to email fragments and Template Fragments.
For example, a content creator adds the {{accCredentials}} token to an email fragment. Sarah Jones sends several Approved Email using different email templates. She adds the email fragment to each one, and the {{accCredentials}} token inside the fragment renders exactly the same across all of the email templates, just as it would if the token was added to each individual email template.
This feature does not require configuration.
Considerations
- Tokens in template fragments and email fragments are supported in all Approved Email entry points
- Tokens in template fragments and email fragments are not supported on the Windows Tablet platform
Tokens Supported in Email Fragments and Template Fragments
The following table indicates which tokens are now supported in Email Fragments and Template Fragments:
|
Token |
Email Fragments |
Template Fragments |
|---|---|---|
|
{{ObjectAPIName.FieldAPIName}} Approved_Document_vod reference tokens are not supported |
|
|
|
{{ObjectAPIName.RelationshipName.FieldAPIName}} |
|
|
|
{{accTitle}} |
|
|
|
{{accFname}} |
|
|
|
{{accLname}} |
|
|
|
{{accCredentials}} |
|
|
|
{{userEmailAddress}} |
|
|
|
{{userName}} |
|
|
|
{{parentCallDatetime}} |
|
|
|
{{addToCalendar}} |
|
|
|
{{approvedEmailAction}} |
|
|
|
{{customContent}} |
|
|
|
{{timeZone}} |
|
|
|
{{unsubscribe_product_link}} |
|
|
|
{{userPhoto}} |
|
|
|
{{EmailAddressUnsub}} |
|
|
|
{{OrgId}} |
|
|
|
{{EmailId}} Not supported in Edit or Preview mode |
|
|
|
{{PieceLink}} |
|
|
|
{{ISILink}} |
|
|
|
{{PILink}} |
|
|
|
{{$VaultDocId}} |
|
|
|
{{engageLink}} |
|
|
|
{{surveyLink}} |
|
|


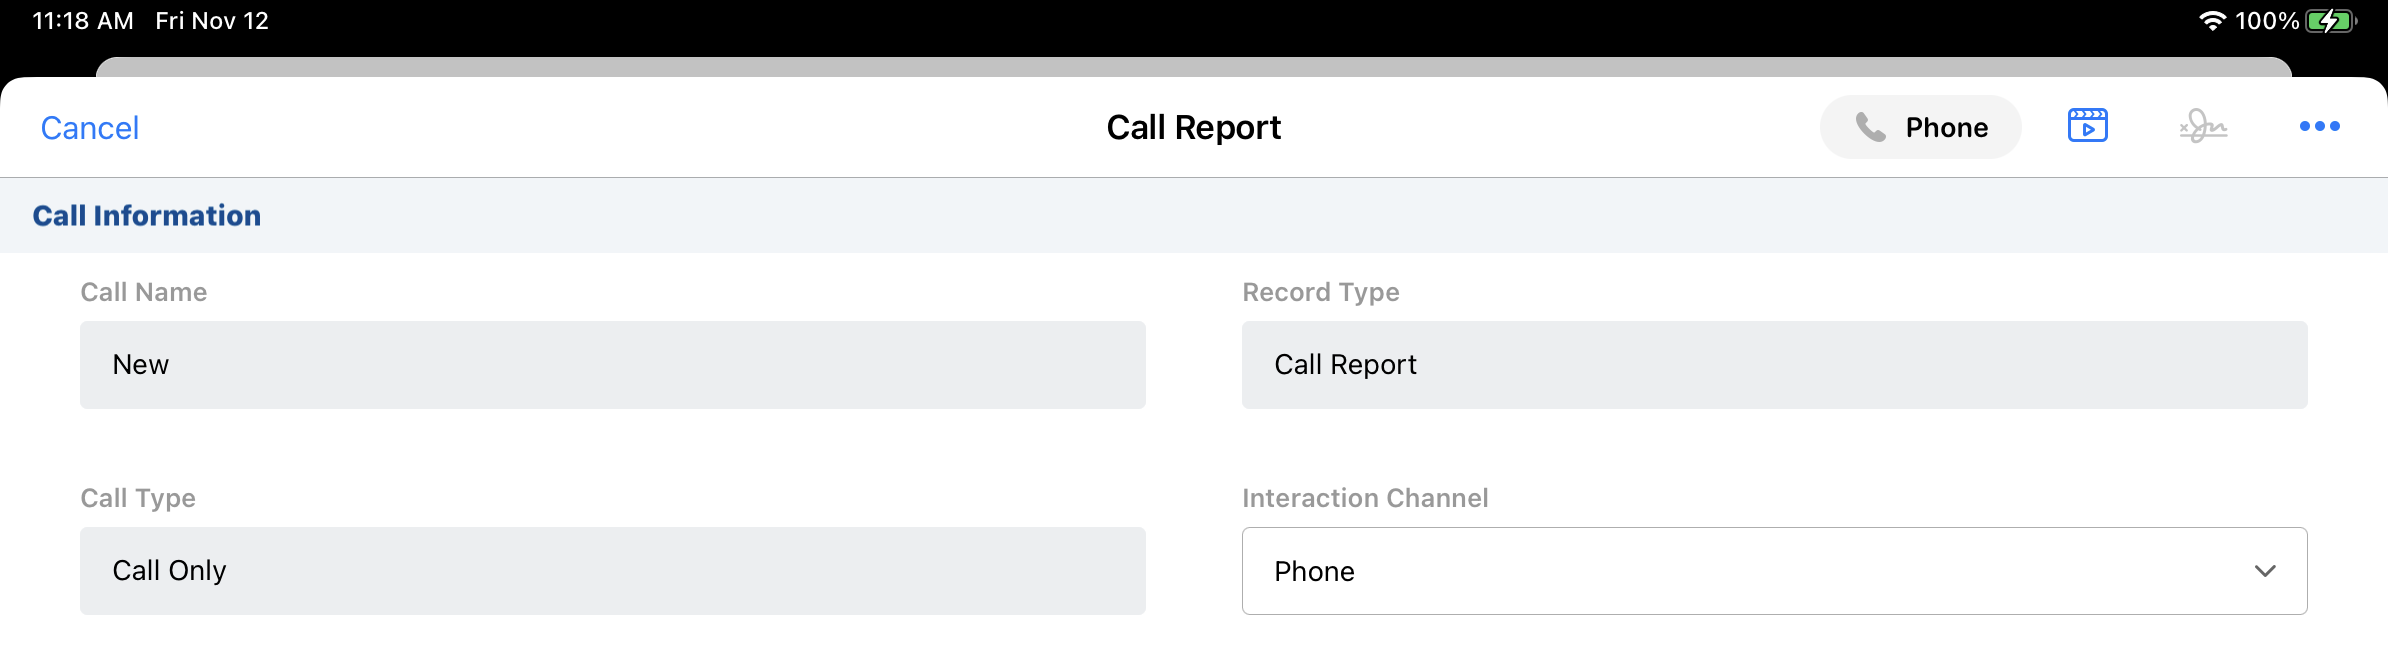
Call Reporting
Auto-Populating the Call Channel
Admins can configure the value in the Veeva standard Call_Channel_vod field to auto-populate based on customers’ own call channel fields. This enables customers to ensure downstream systems are not affected by the switch to a standard Call_Channel_vod field and minimize disruptions to user workflows.
Admins can configure the value in the Veeva standard Call_Channel_vod field to auto-populate based on customers’ own call channel fields. This enables customers to:
- ensure downstream systems are not affected by the switch to a standard Call_Channel_vod field
- minimize disruptions to user workflows
For example, Verteo Biopharma already uses a custom Call Method field to capture call channel information. When Sarah Jones selects the Phone Call option from Verteo Biopharma’s custom Call Method picklist, the standard Call_Channel_vod field automatically populates with Phone_vod. She does not need to select a value from the standard Call_Channel_vod field in order to save and submit the call report.
Using the Auto-Populated Call Channel Field
The call channel drop down menu does not display when users create a call report. When users save or submit a call report, the Call_Channel_vod field is updated automatically based on users’ selections for the fields referenced in the Call_Channel_Formula_vod formula field. On the call report, the Channel selector displays the formula results as read-only.
Consent Capture
Capturing Consent Using Confirmation Emails for All Channels
To capture consent when users are unable to meet HCPs face-to-face, users can send confirmation emails to confirm opt-in consent for any channel, including custom channels.
For example, during a phone call with Dr. Clinton Ackerman, Sarah Jones requests Dr. Ackerman’s consent for email and SMS communications about Cholecap. Sarah selects the Email method on the Consent Summary screen to capture his consent. Dr. Ackerman receives an email with a link to confirm his consent. He selects the link, which displays a message listing the channels and products he opted in to and a button to confirm consent. He selects the confirmation button, which confirms his consent and displays a confirmation message.
Considerations
- This functionality overrides Double Opt-In for all consent types related to the consent header
- This functionality replaces the Use Email to Capture Consent toggle. The toggle is only available on iPad.
- Sending Consent Capture Receipts with Approved Email is not supported when users select Email as the Consent Confirmation Method
- Requiring Signatures on Opt-Out is not supported. Customers can either require opt-out signatures or enable consent confirmation emails.
Using Confirmation Emails for All Channels
After toggling consent for the appropriate consent channels and consent lines on the Consent Capture screen, users can select the appropriate confirmation method in the Consent Confirmation Method section on the Consent Summary screen:
- In-person – Capture signature
- Email – Send confirmation email
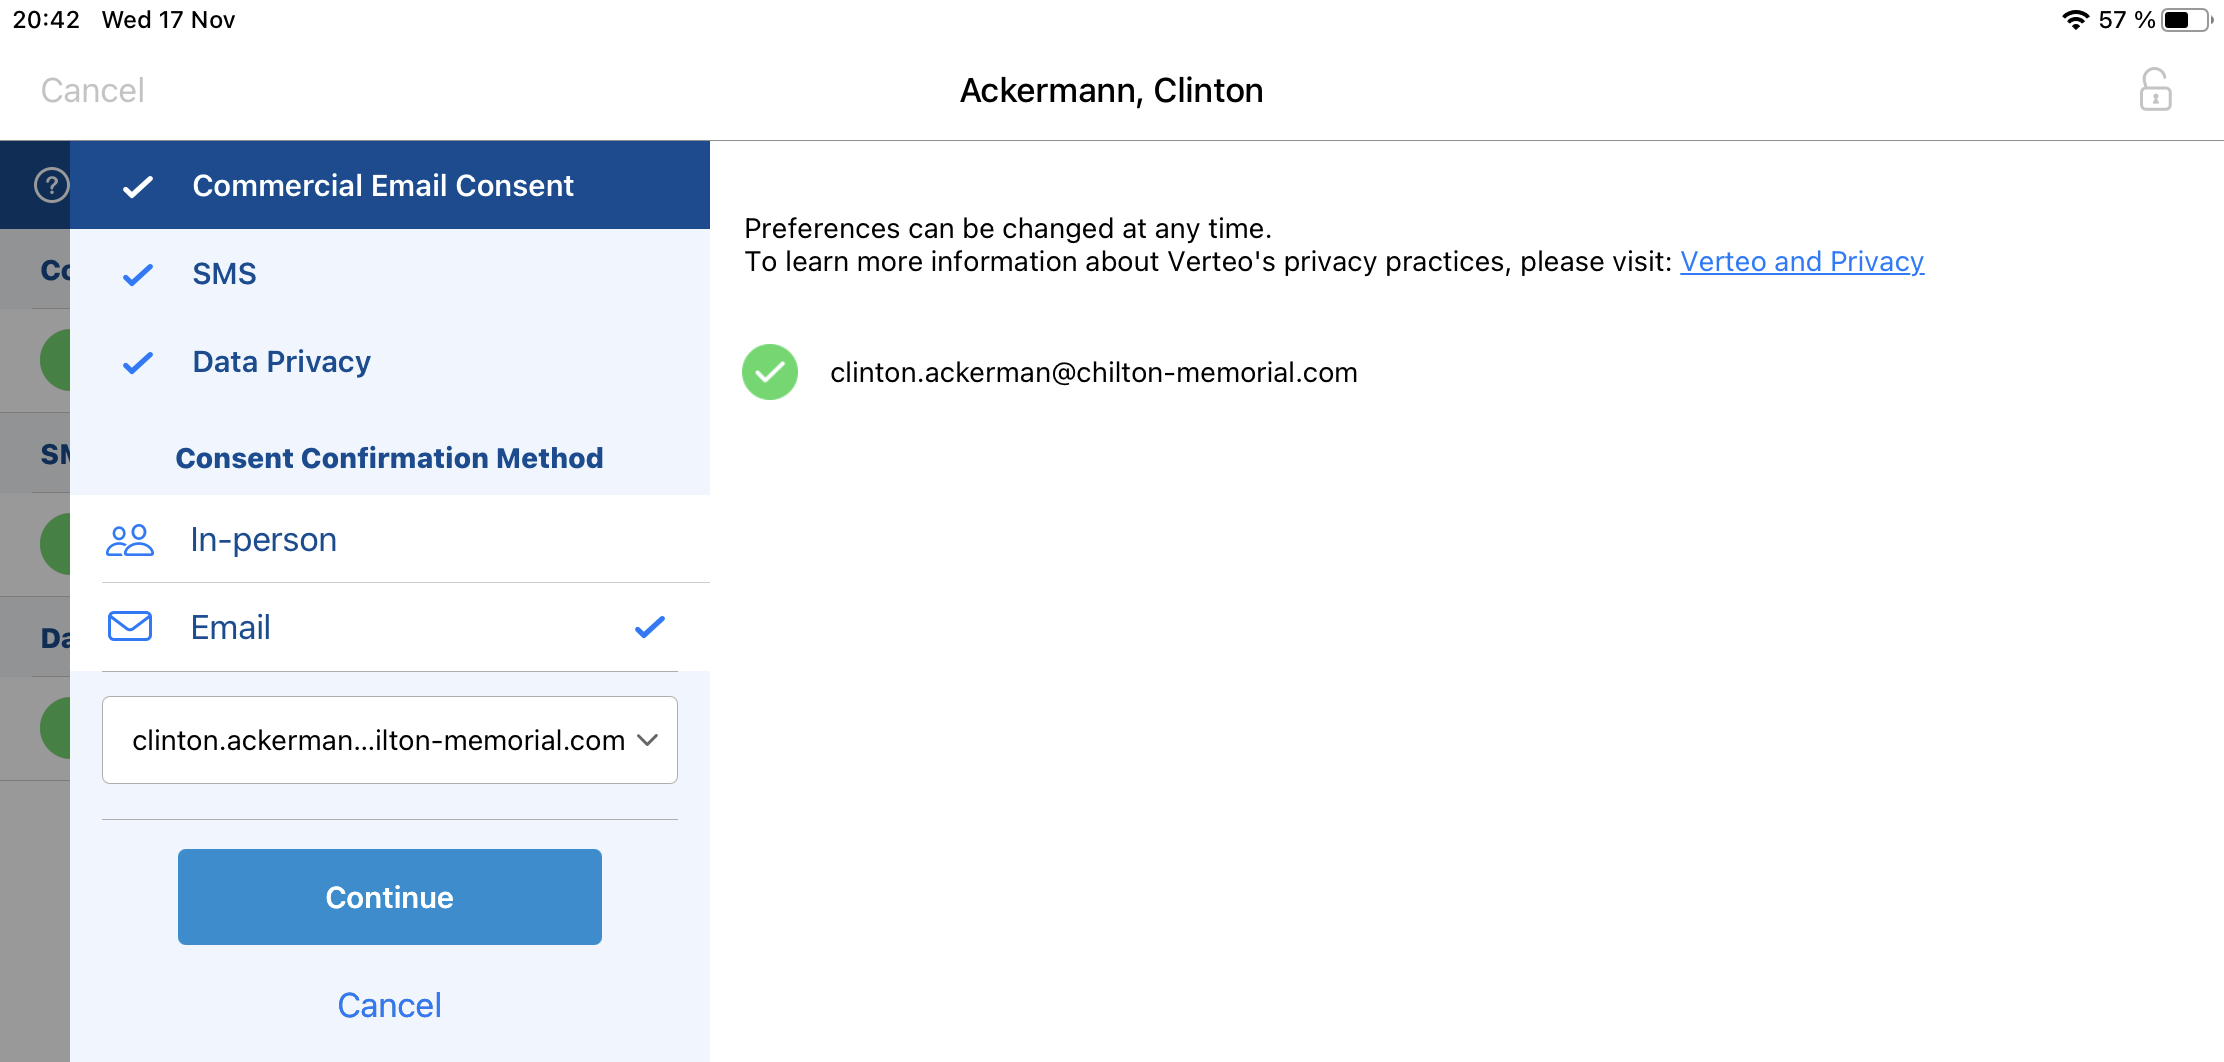
Users can then select the appropriate email address and complete the Consent Capture process. If there is at least one opt-in consent, the confirmation email is sent to the selected email address. The confirmation email contains all the opt-in channels and lines captured in the same transaction. When the HCP confirms consent, all the channels and lines are opted in.
Additional Step for Consent Confirmation Emails
To prevent the recipient’s systems from unintentionally confirming opt-in consent for an HCP, admins can configure an additional confirmation step for HCPs before they confirm their consent. Customers define the content displayed for the additional step.
Engage Connect
Engage Connect in Veeva CRM (Available December 16, 2021)
Engage Connect is an asynchronous messaging platform providing a communication and networking channel between users and HCPs. With Engage Connect, users and HCPs can connect, chat, exchange approved content, request samples, and coordinate meetings all within a single platform, providing greater engagement with HCPs.
Engage Web Service
Capturing Remote Signatures for Sampling with QR Codes®
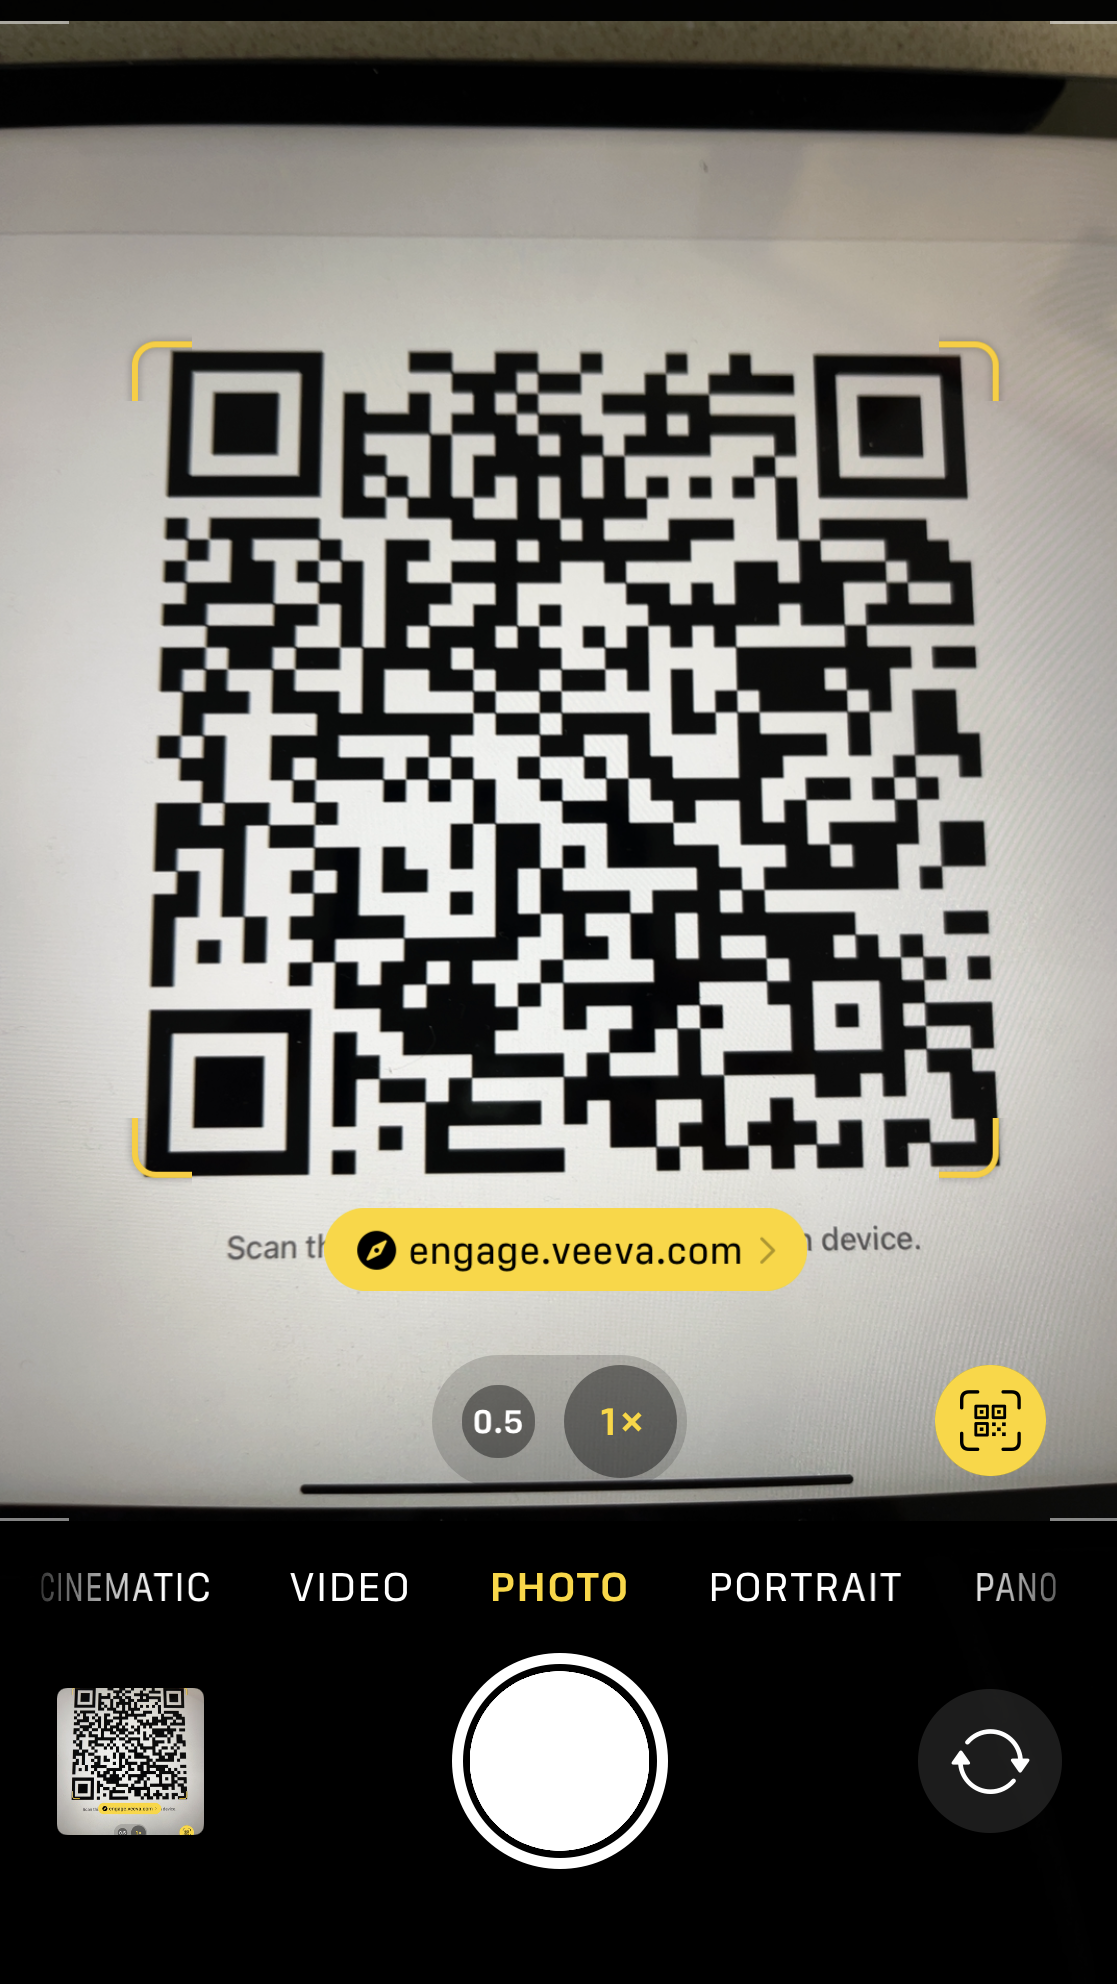
QR Code® signature capture enables CRM users and HCPs to maintain physical distance and eliminates the need to share devices during face-to-face visits. CRM users generate a QR Code® from the call report. HCPs scan the QR Code® to display a signature capture screen, then provide a signature from their own device.
For example, Dr. Ackerman requests samples of Cholecap during a face-to-face visit. Instead of handing her device to Dr. Ackerman for signature capture, Sarah generates a QR Code® for Dr. Ackerman to scan. Dr. Ackerman scans the code using his iPad’s camera, and then signs on his own device. Sarah accepts Dr. Ackerman’s signature and disburses the samples.
Considerations
- Sample and BRC are the only product types supported for QR Code® signature capture. If any other type of product is selected for sampling on the call report, the QR Code® option does not display on the signature set up screen.
- QR Code® signature capture is supported for person account calls, both with and without the --paa section signal, as well as unique activity child calls. QR Code® signature capture is not supported for standard group calls.
Generating a QR Code® for Signature Capture
QR Code® is available as a signature method when there is at least one BRC or one sample-type product on the call report. To generate a QR Code® for signature capture:
-
Select the Sign button on the call report.
-
Select QR Code® on the signature set up screen.
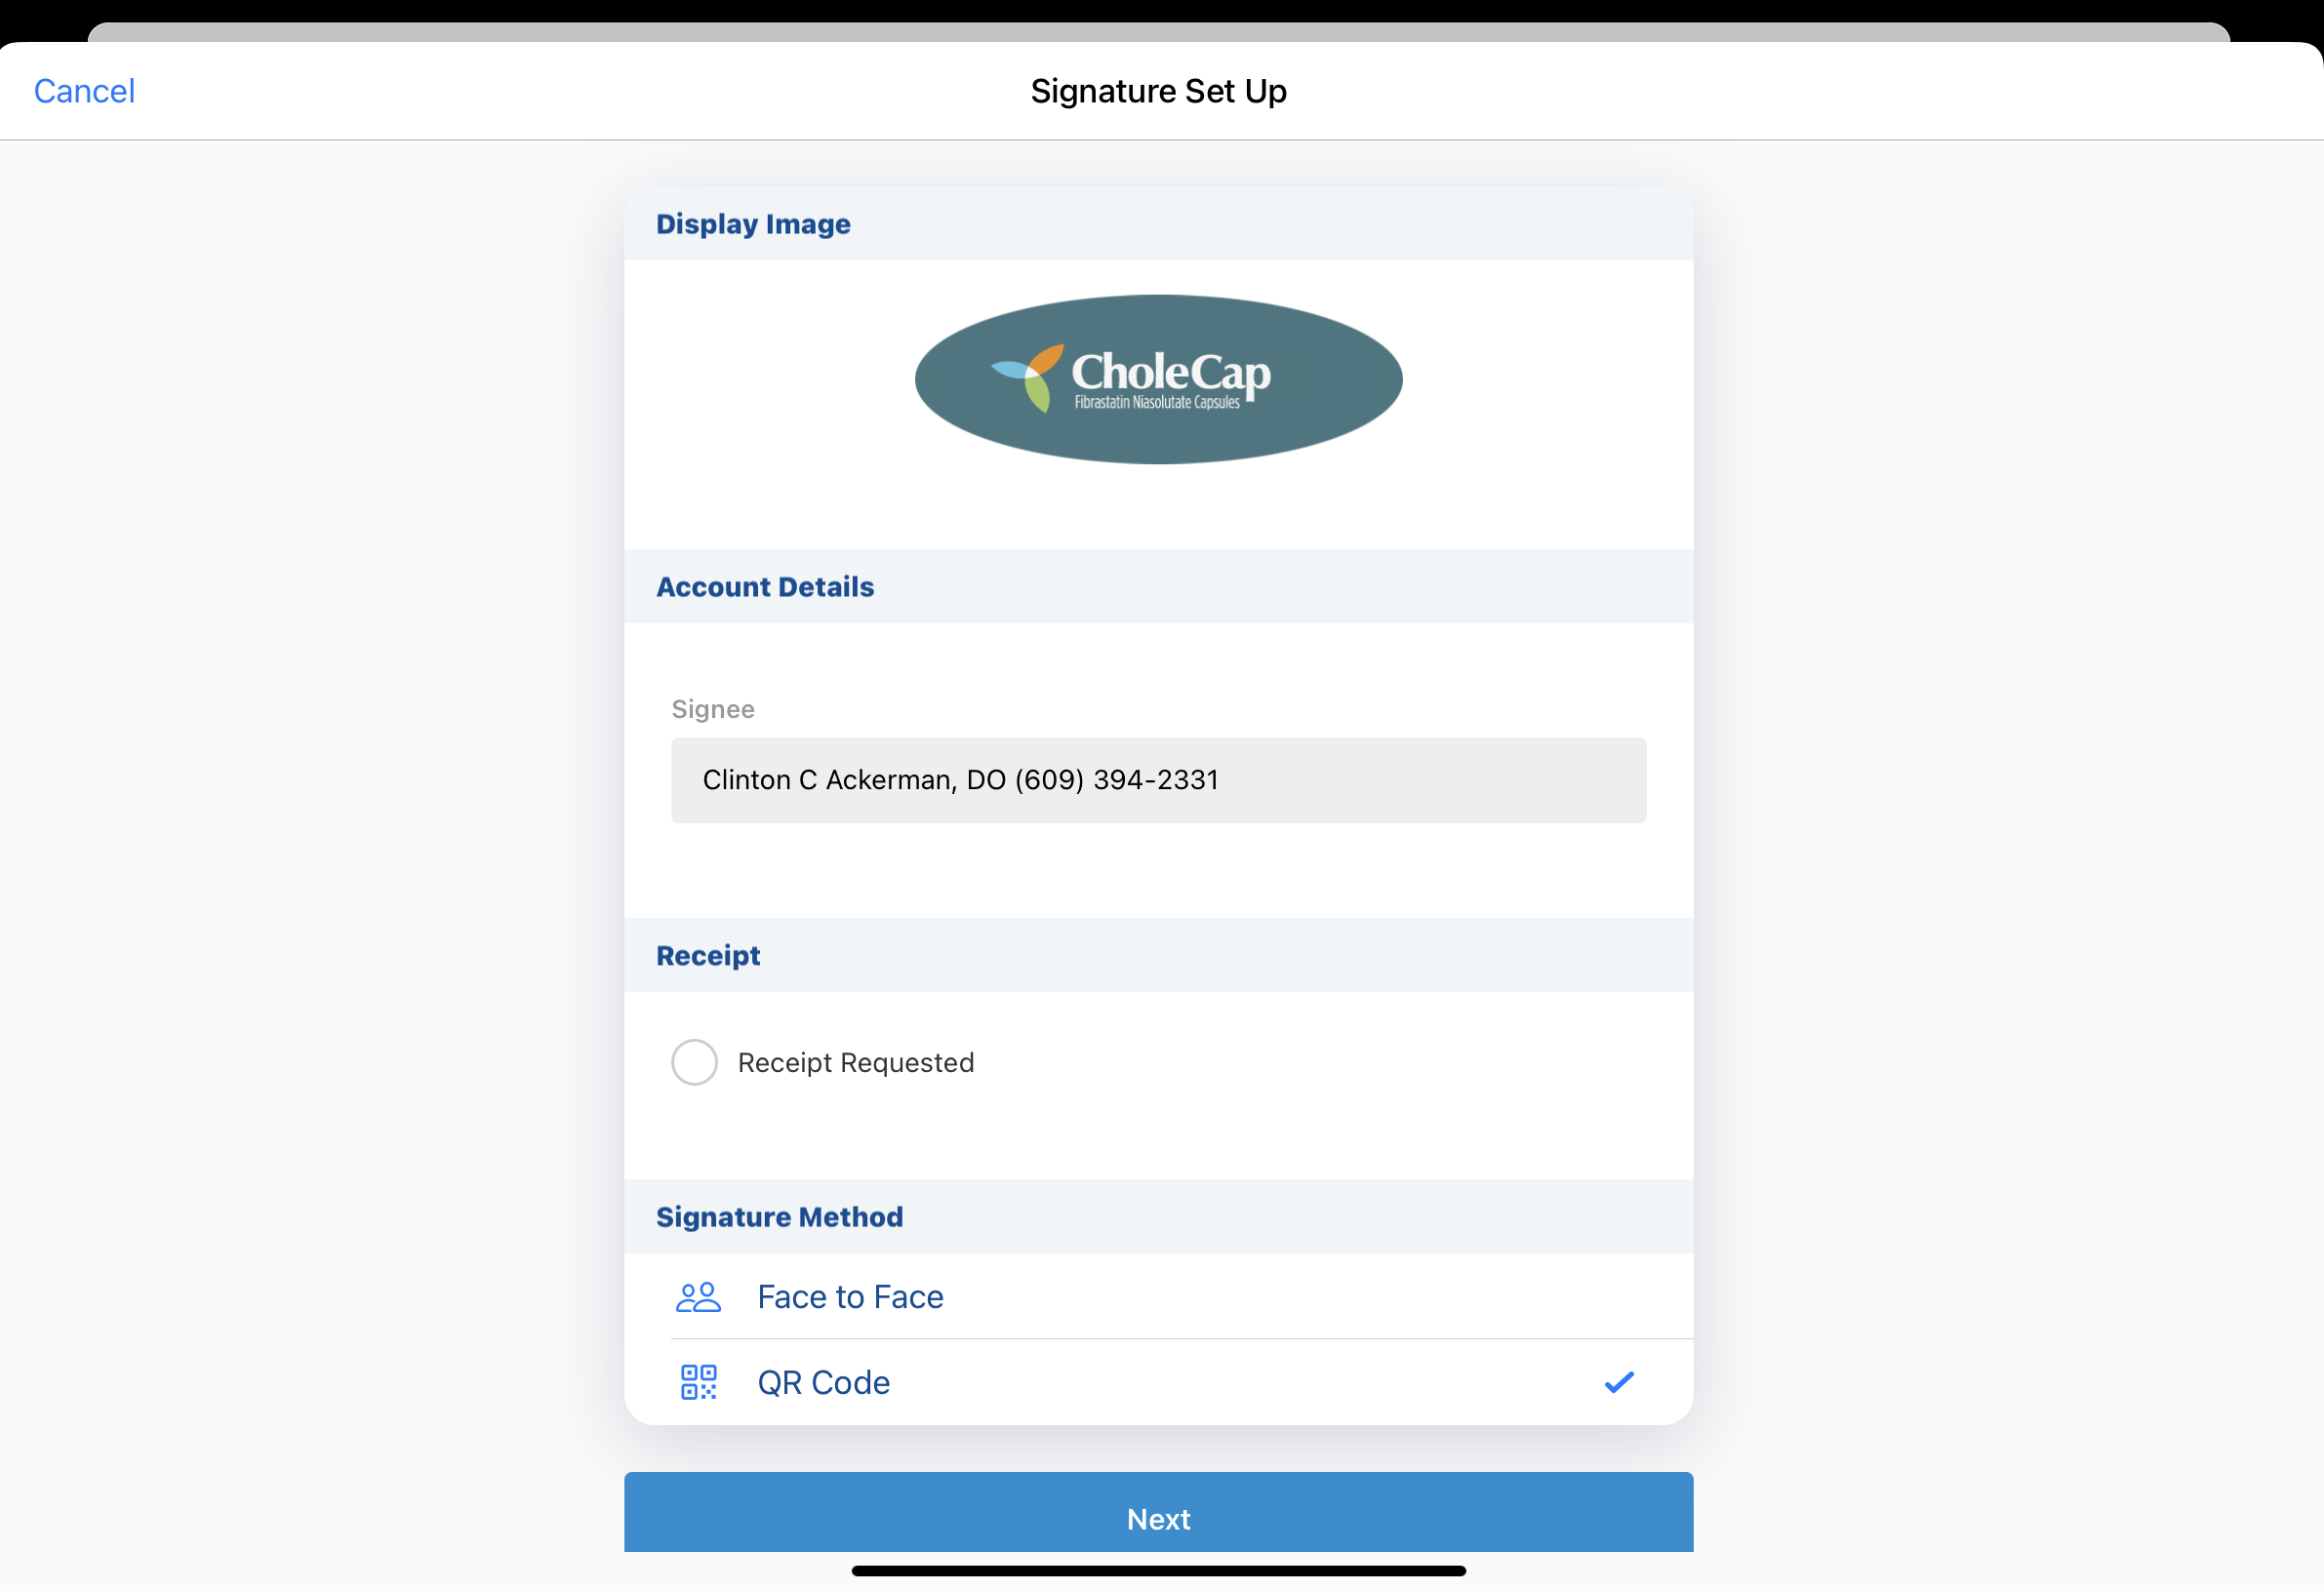
The signature set up screen only displays if there is more than one available signature capture method for the call report. If there is only one available signature capture method, it is automatically selected.
- Select the appropriate signee from the Signee picklist for child calls on group calls with unique activities.
- Select Next.
A unique QR Code® displays on the CRM users’ device. The CRM user must ask the HCP to scan the QR Code®.
QR Codes ® are single-use. A Request Expired error message displays to accounts if they attempt to open the same QR Code® twice.
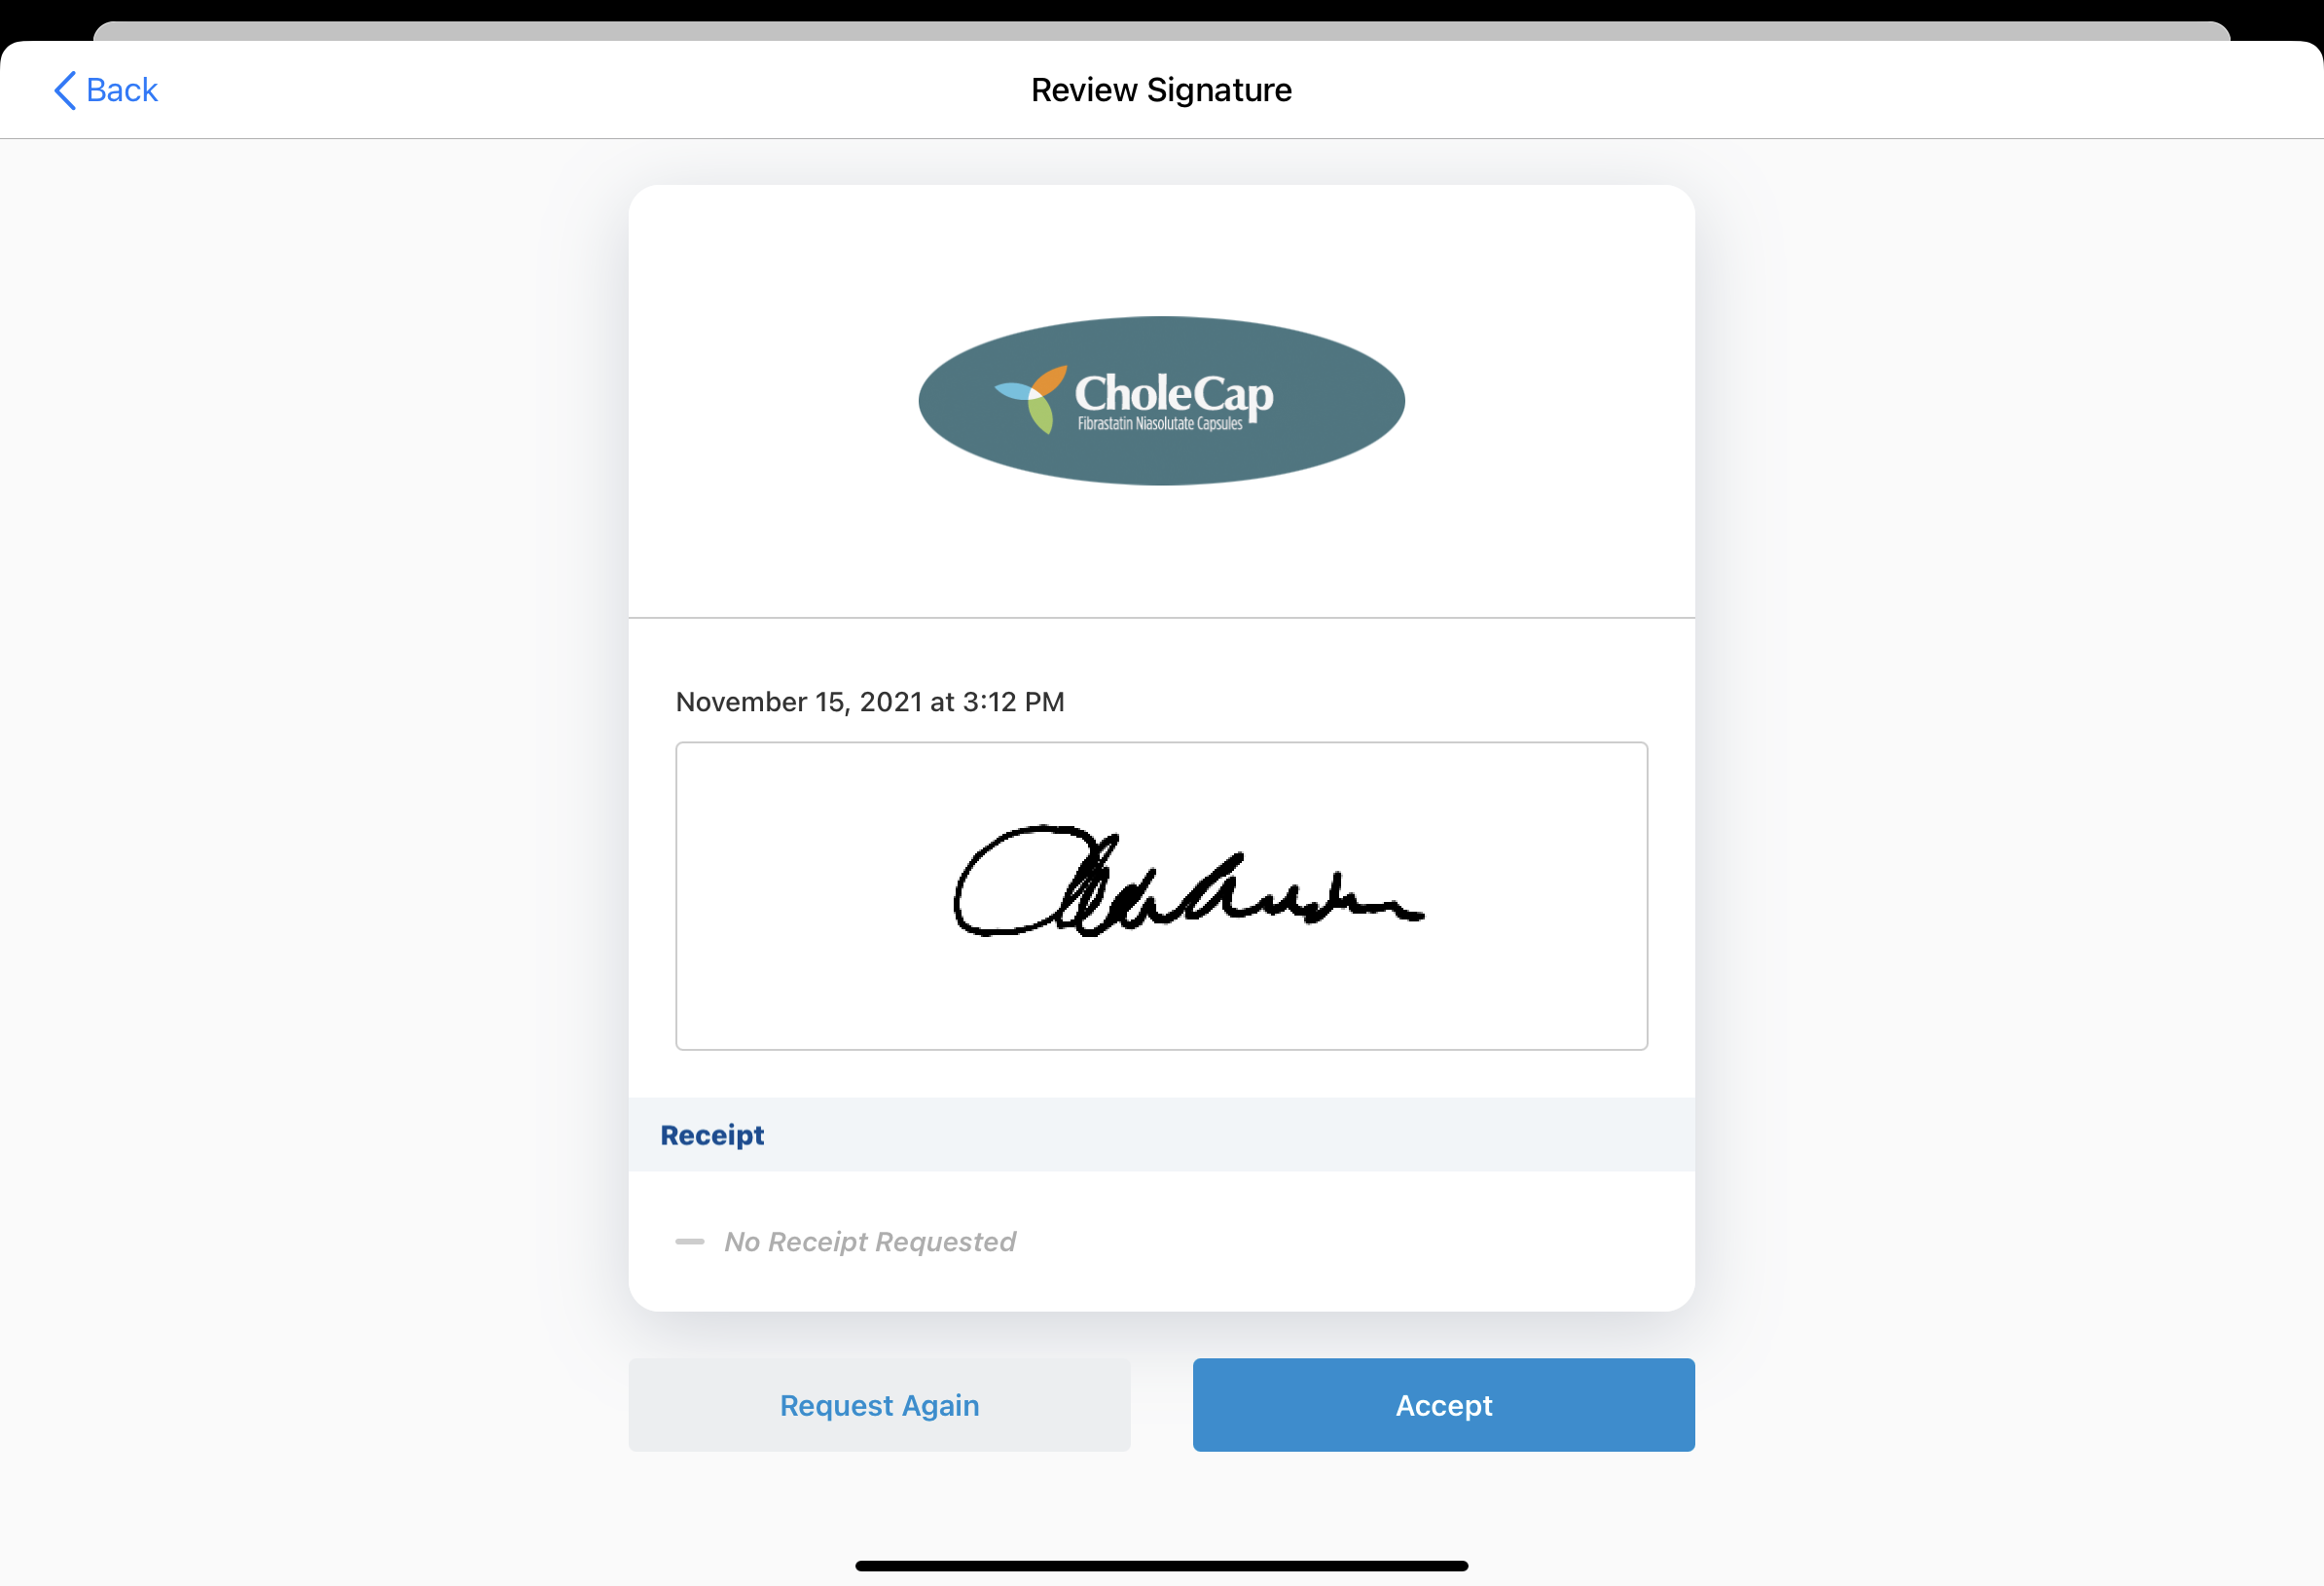
Signing for Samples
To provide a signature, HCPs:
-
Scan the QR Code® using their mobile device’s camera.
-
Review the account and sample details on the signature screen.

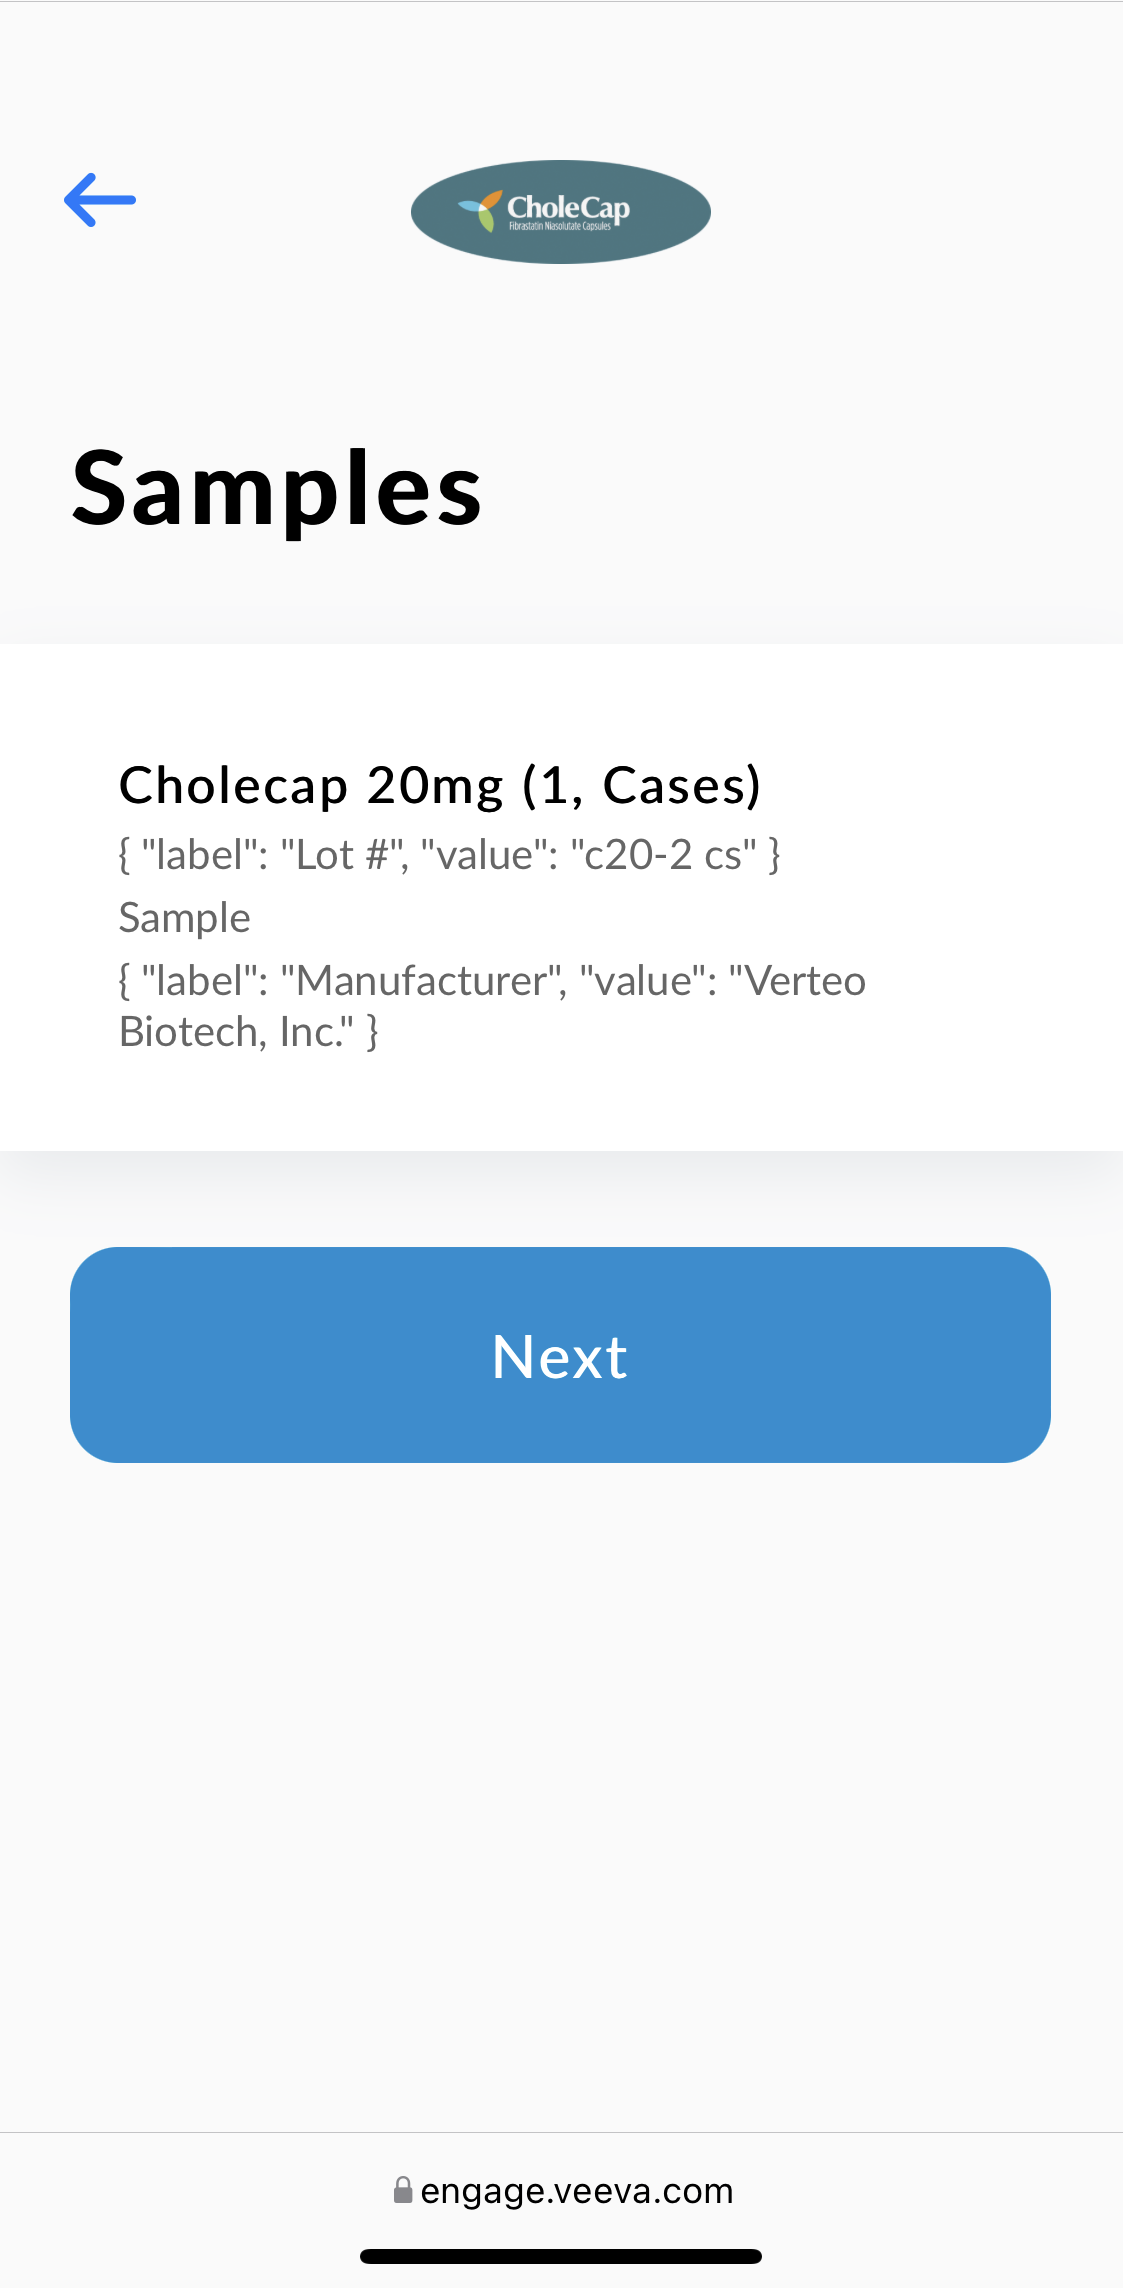
- Select Next.
-
Sign in the signature box.
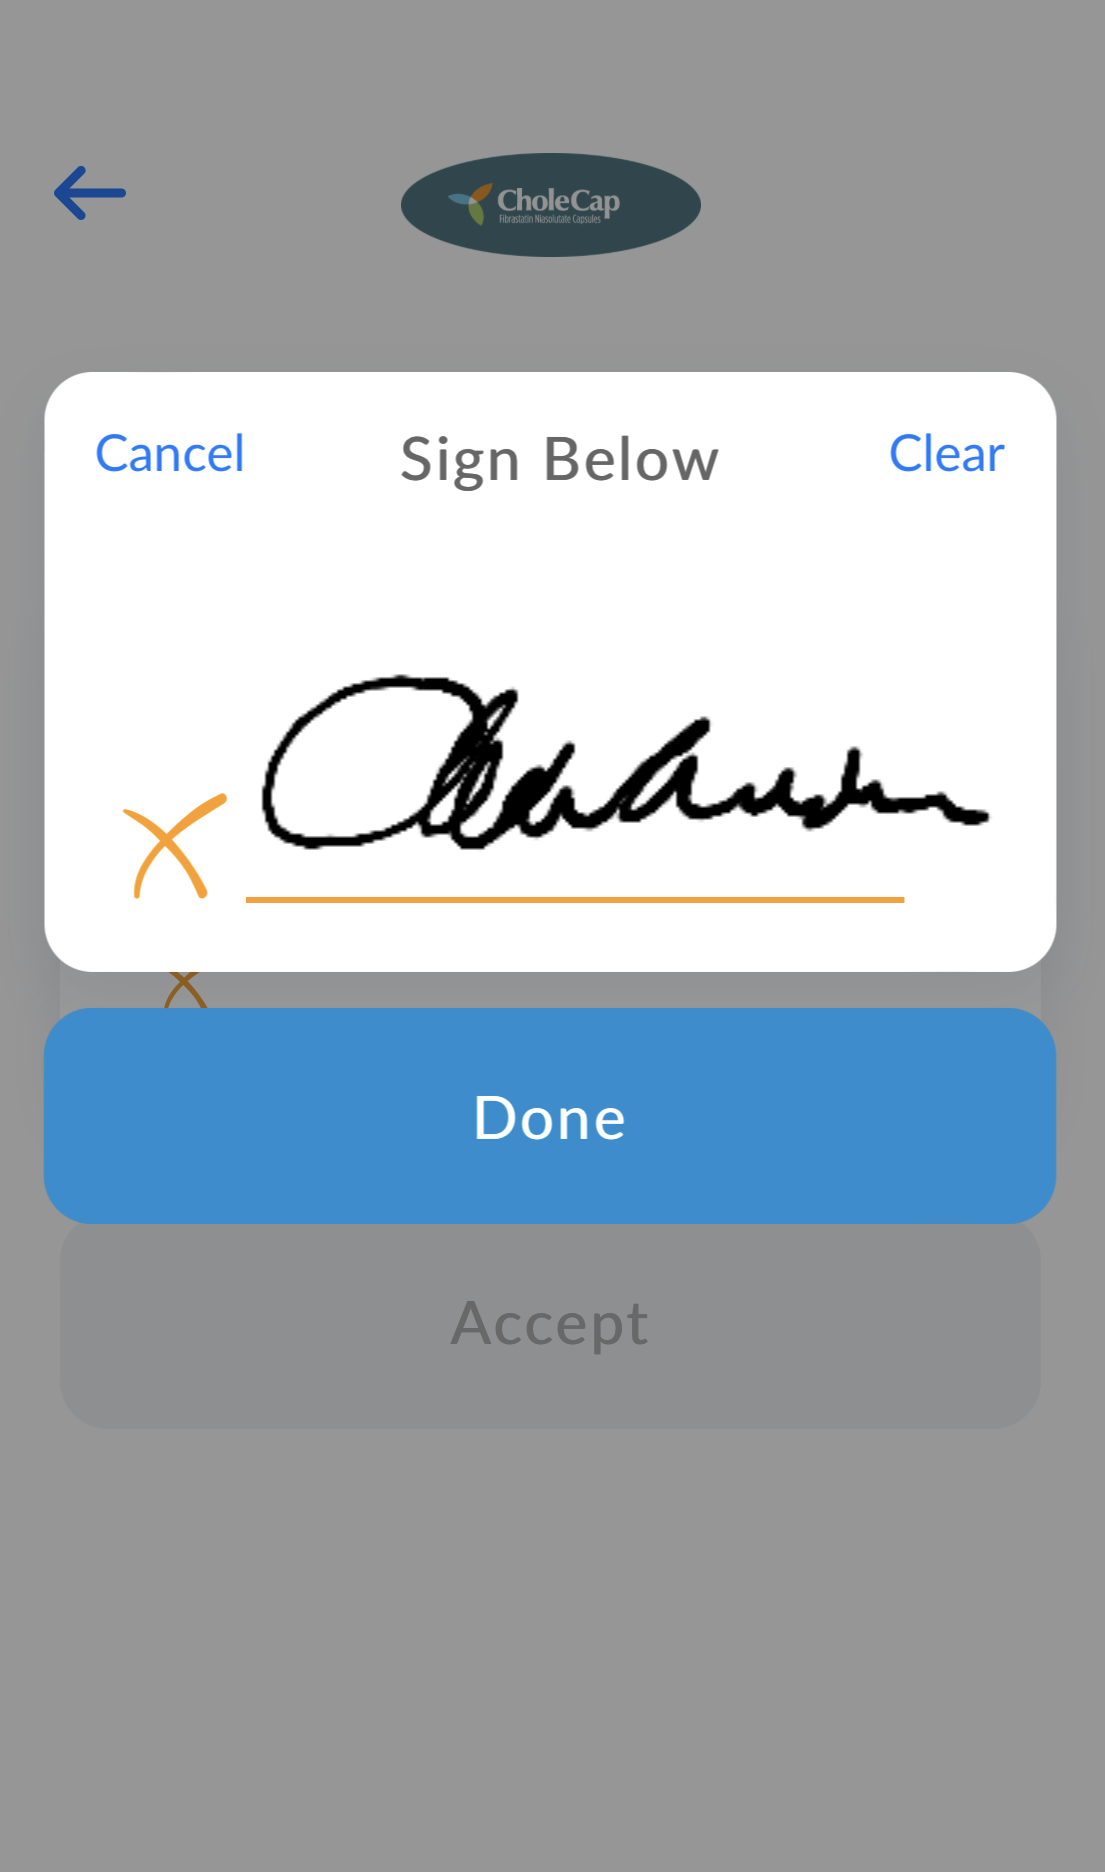
- Select Done.
-
Select Accept.
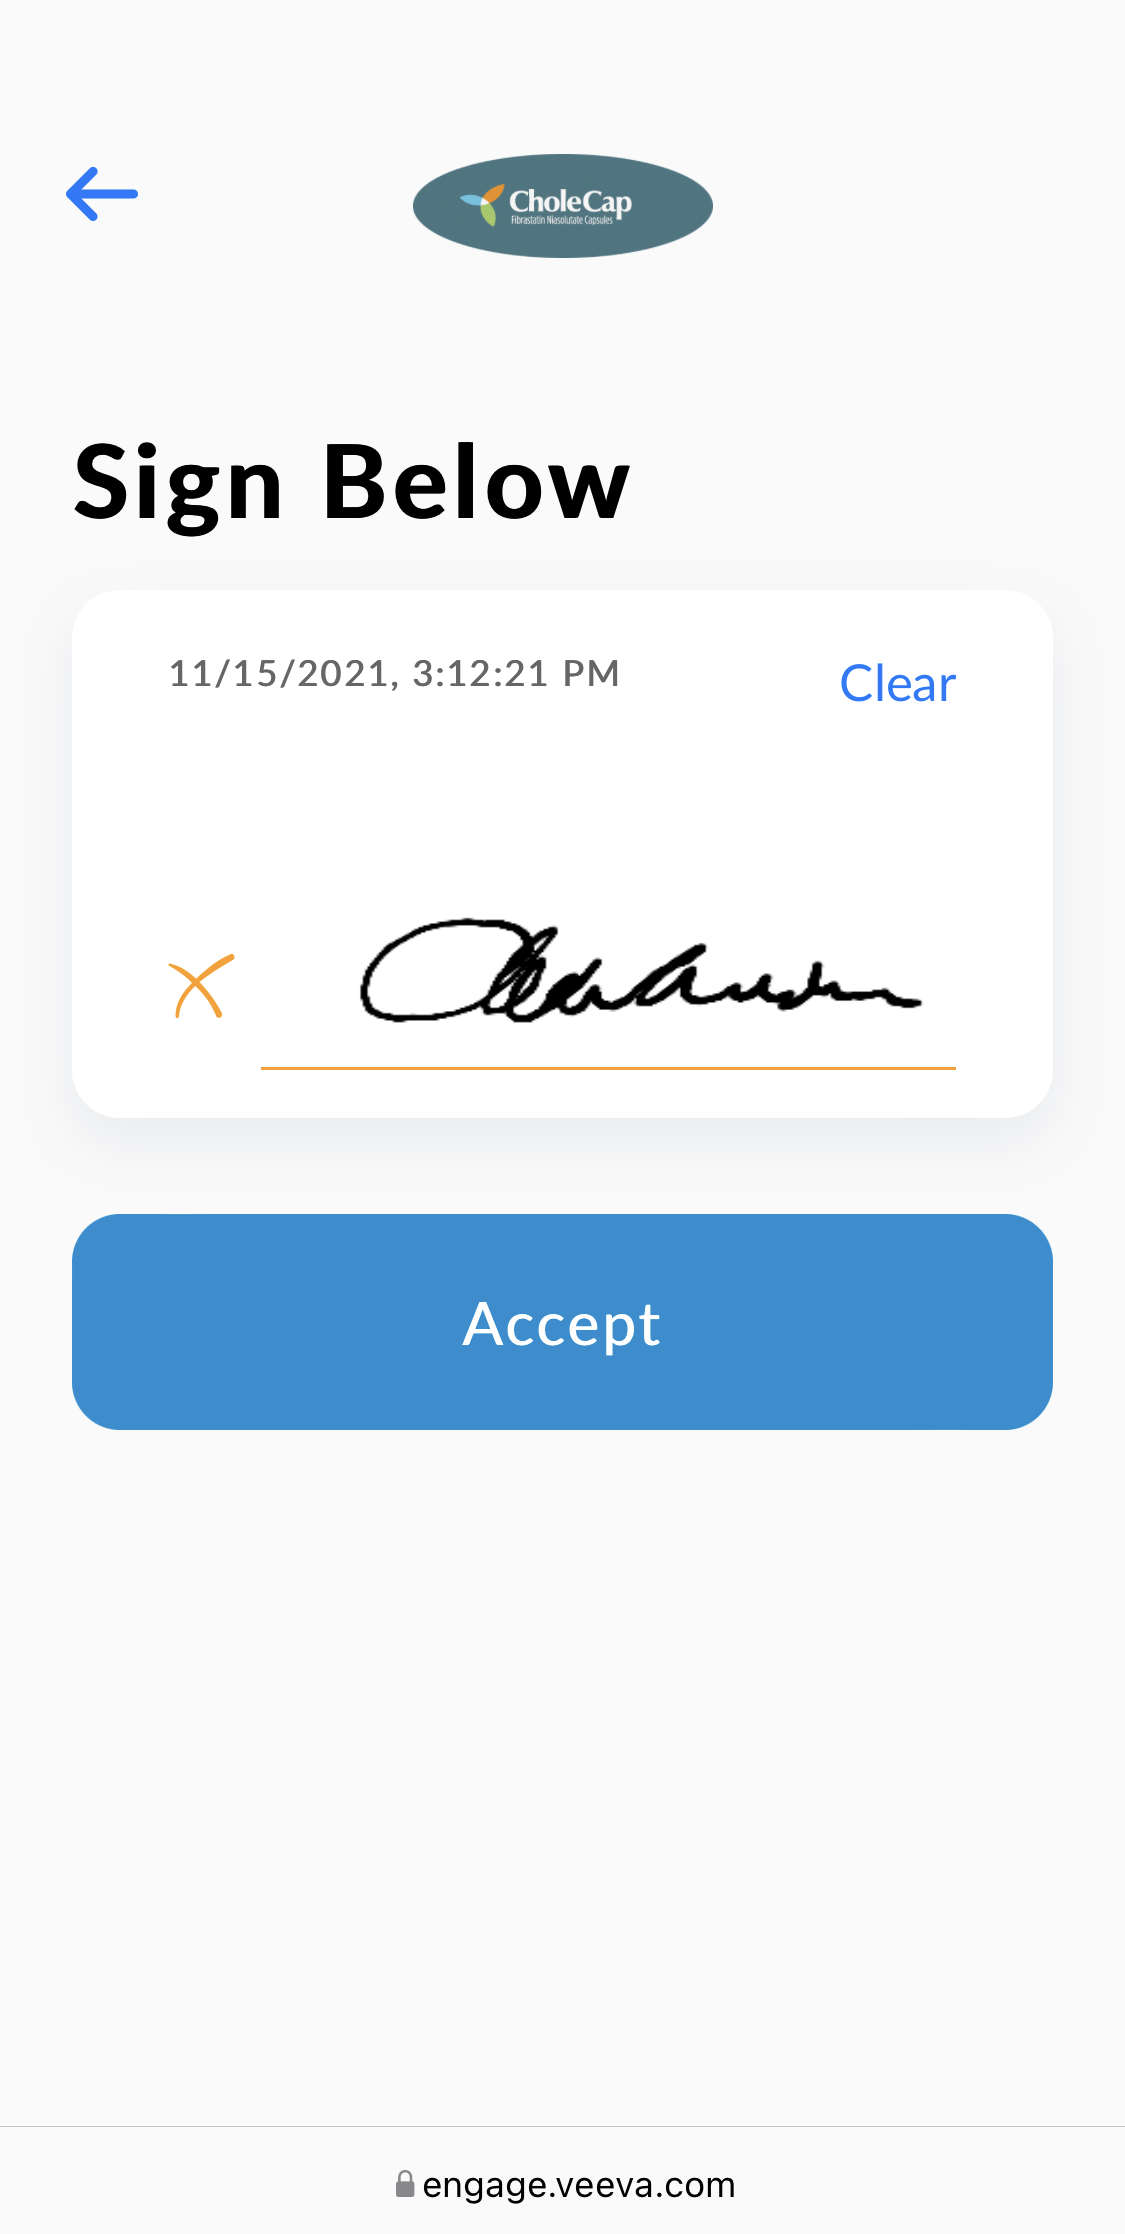
-
Once the HCP signs and accepts the signature, a confirmation message displays to the CRM user.
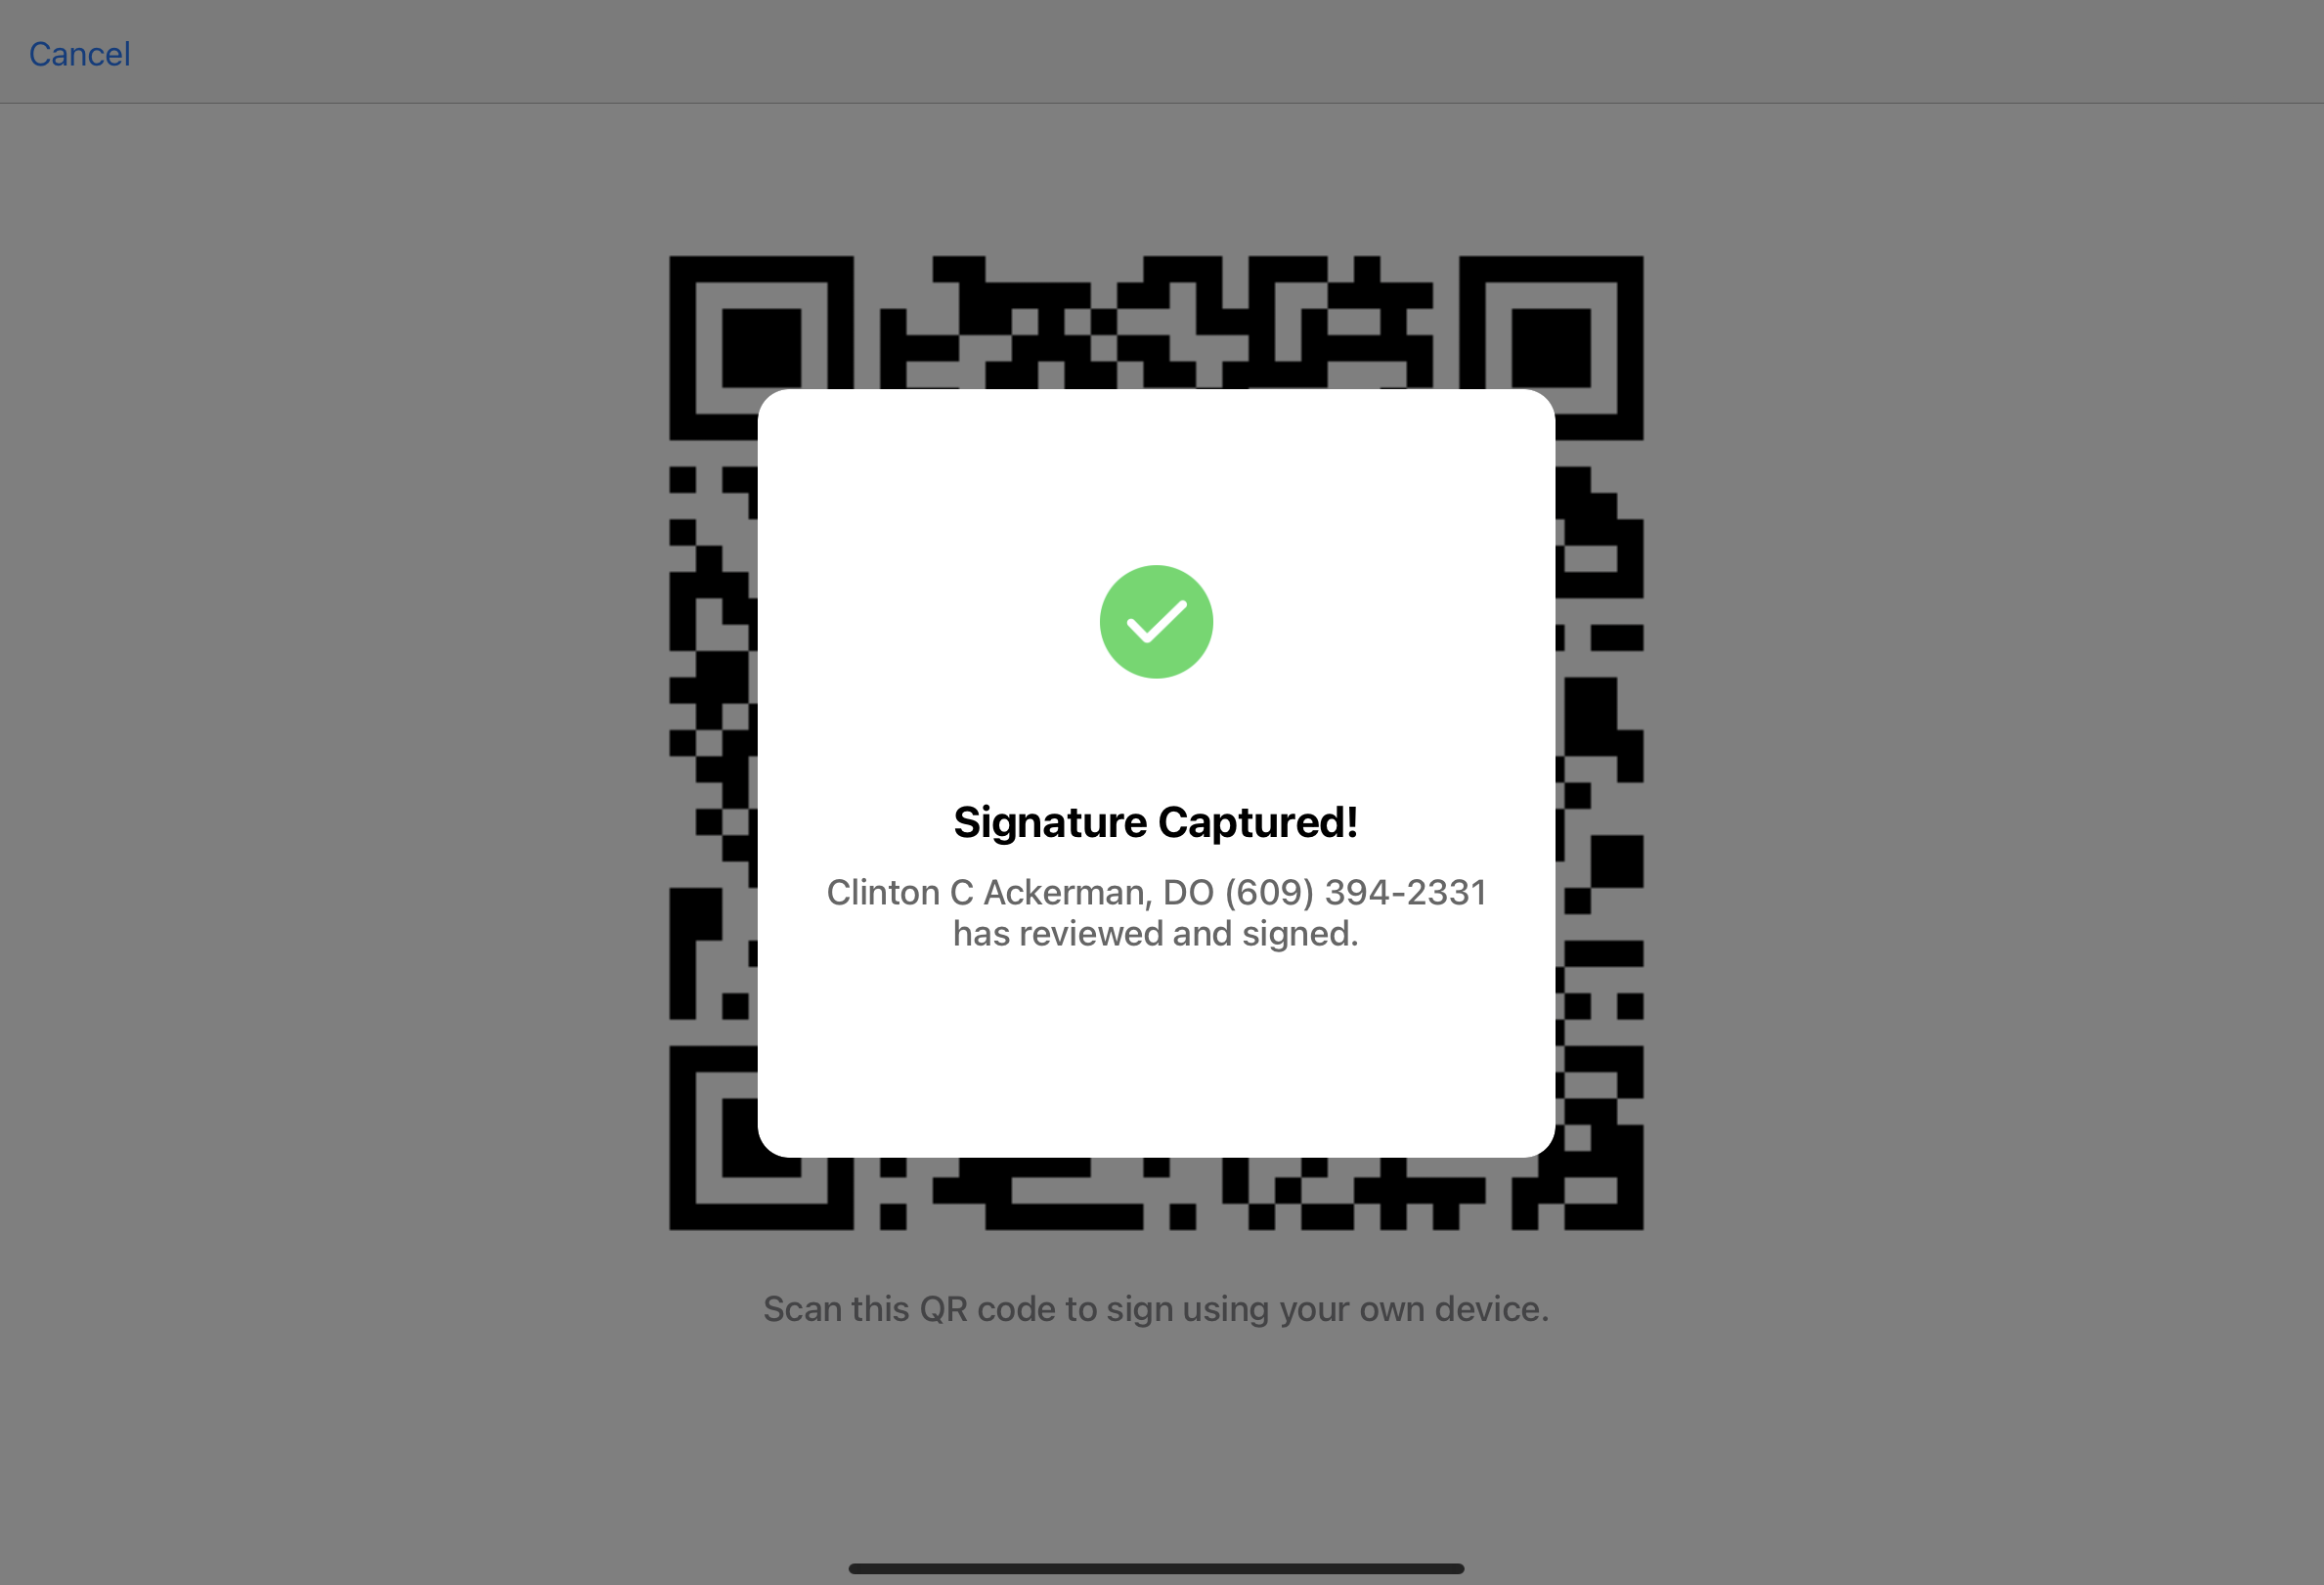
The CRM user reviews the signature. To re-request a signature and generate a new QR Code®, select Request Again. When CRM users generate a new QR Code®, the signature and related fields are cleared.
If the signature looks correct, select Accept. The signature page is locked and all fields are stamped in the audit trail.
Once CRM users accept an HCP signature for a call, they cannot generate a new QR Code® for the same call.
Canceling a Signature Request
To cancel a signature request before the HCP signs, select Cancel and then Cancel Request. Once the HCP signature is captured, CRM users cannot cancel a request.
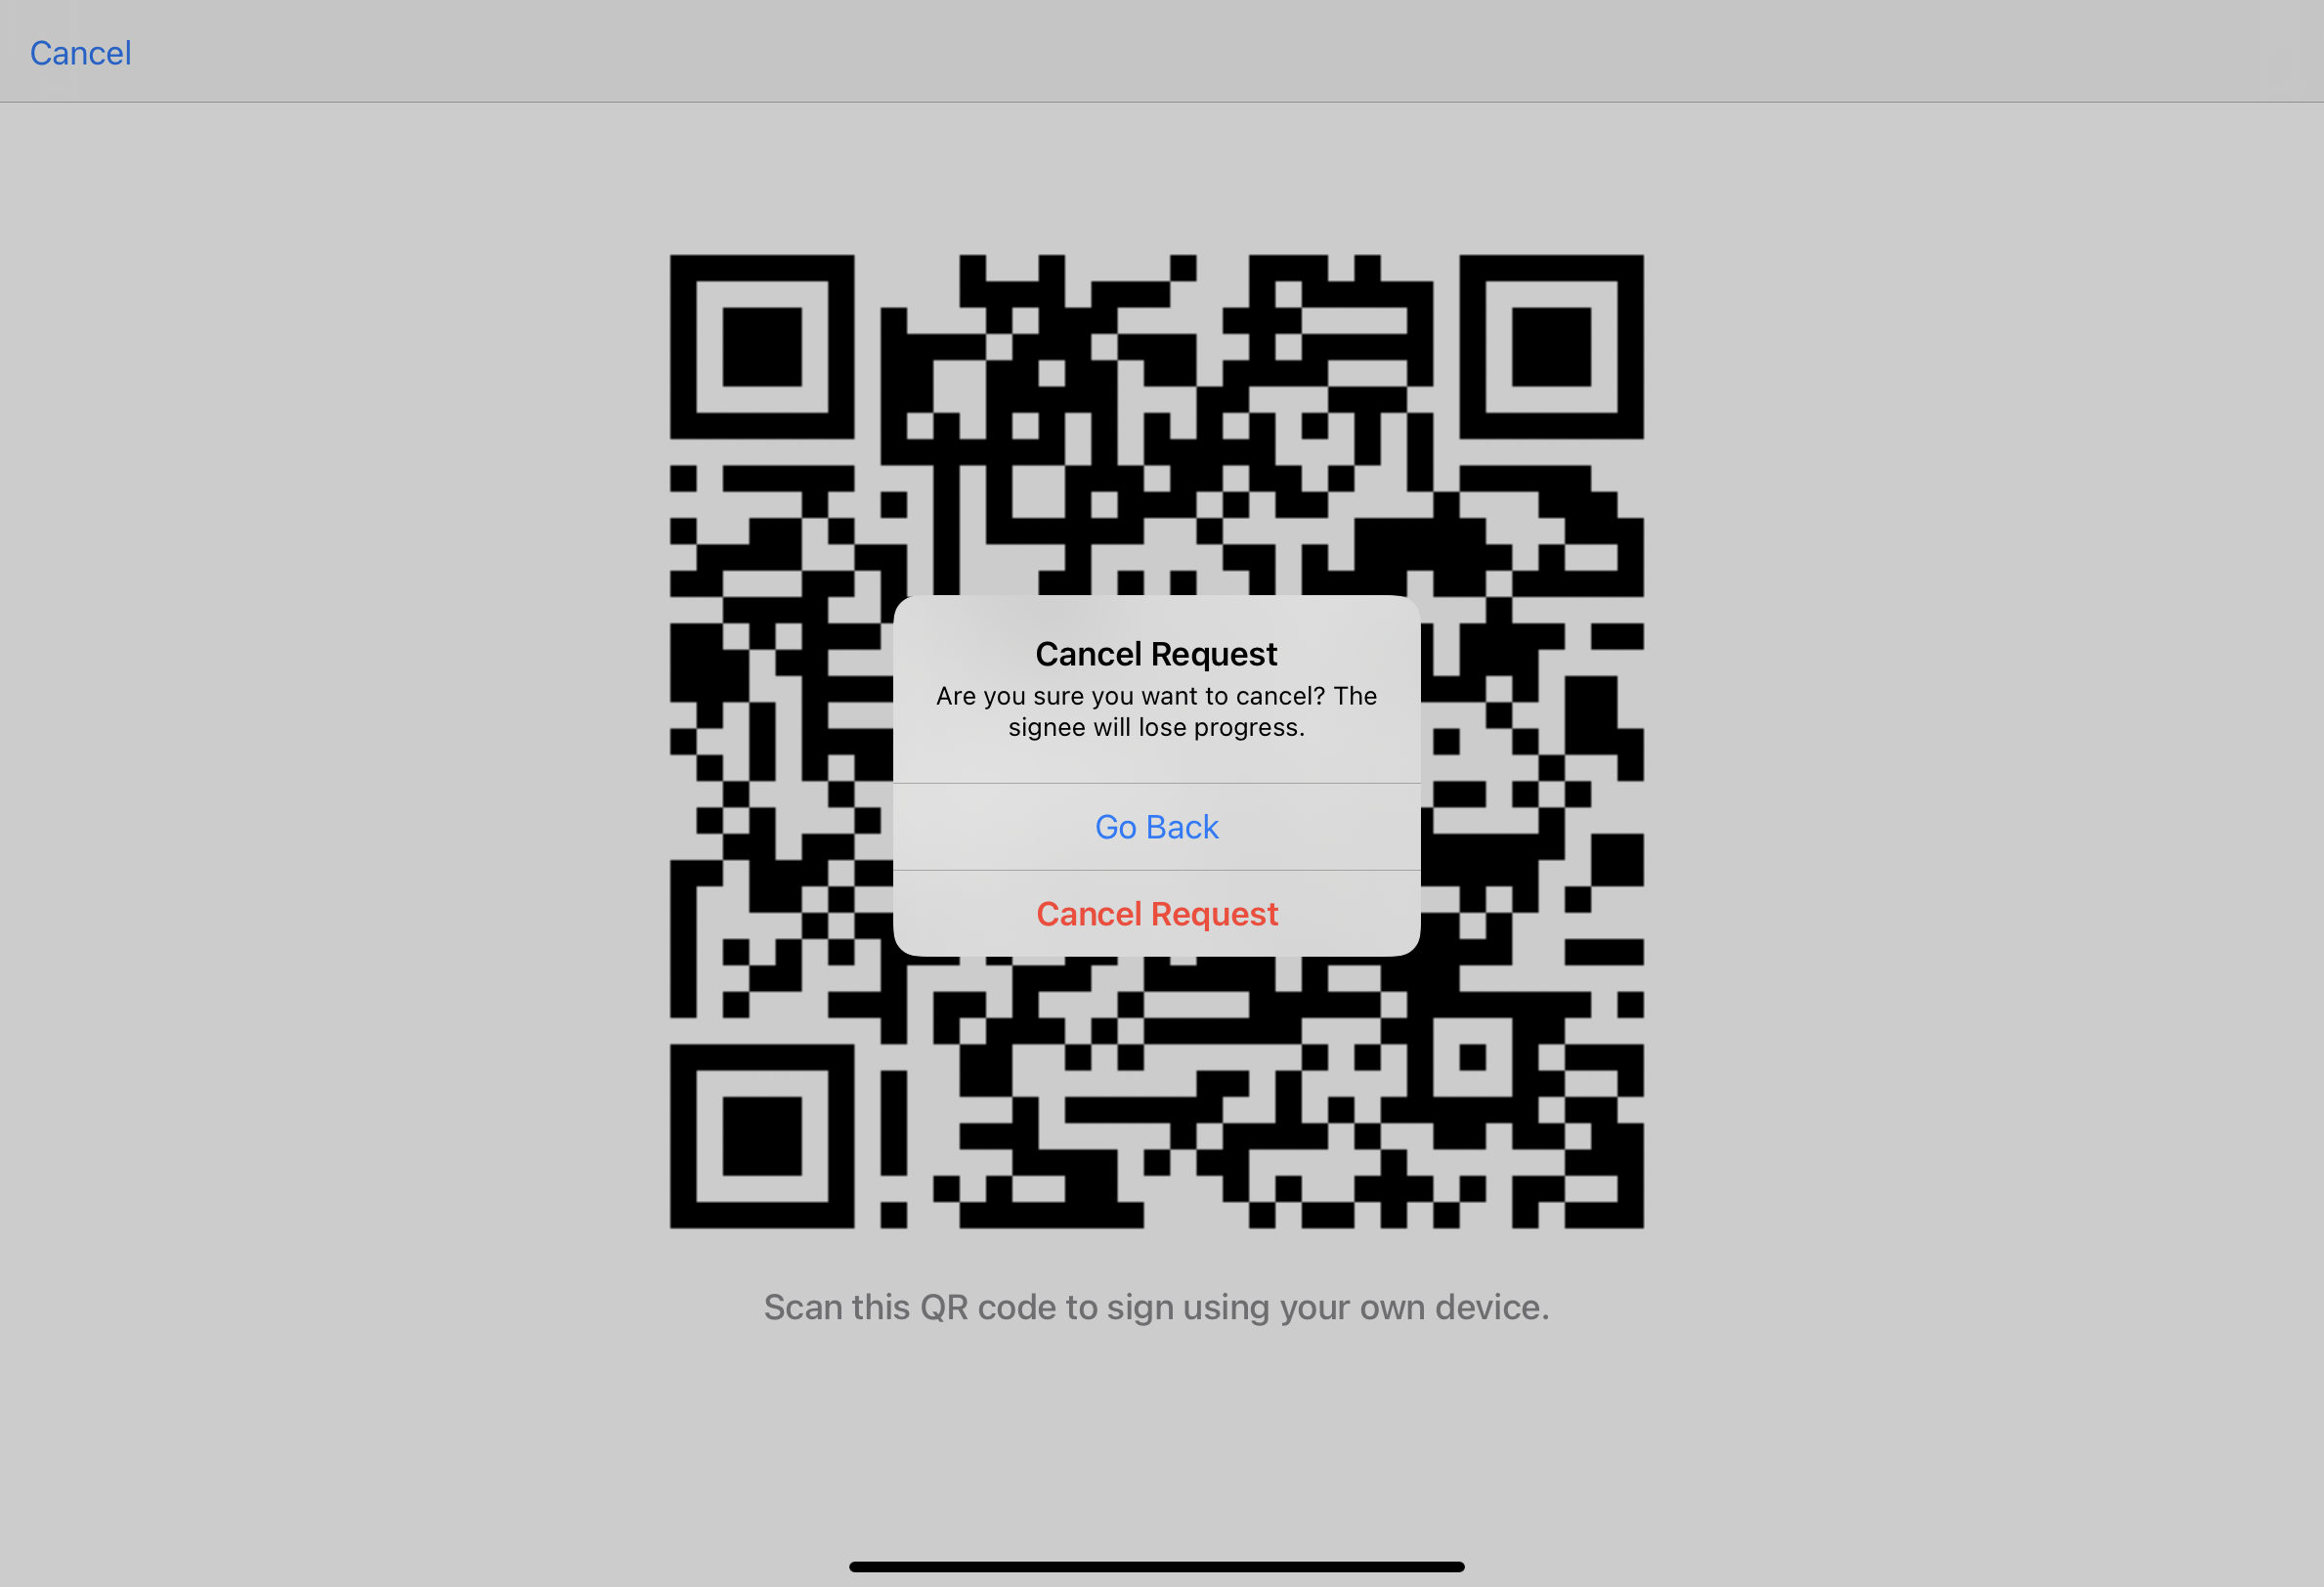
CRM users are redirected to the signature setup screen after cancellation is confirmed. A Request Expired message displays to the HCP.
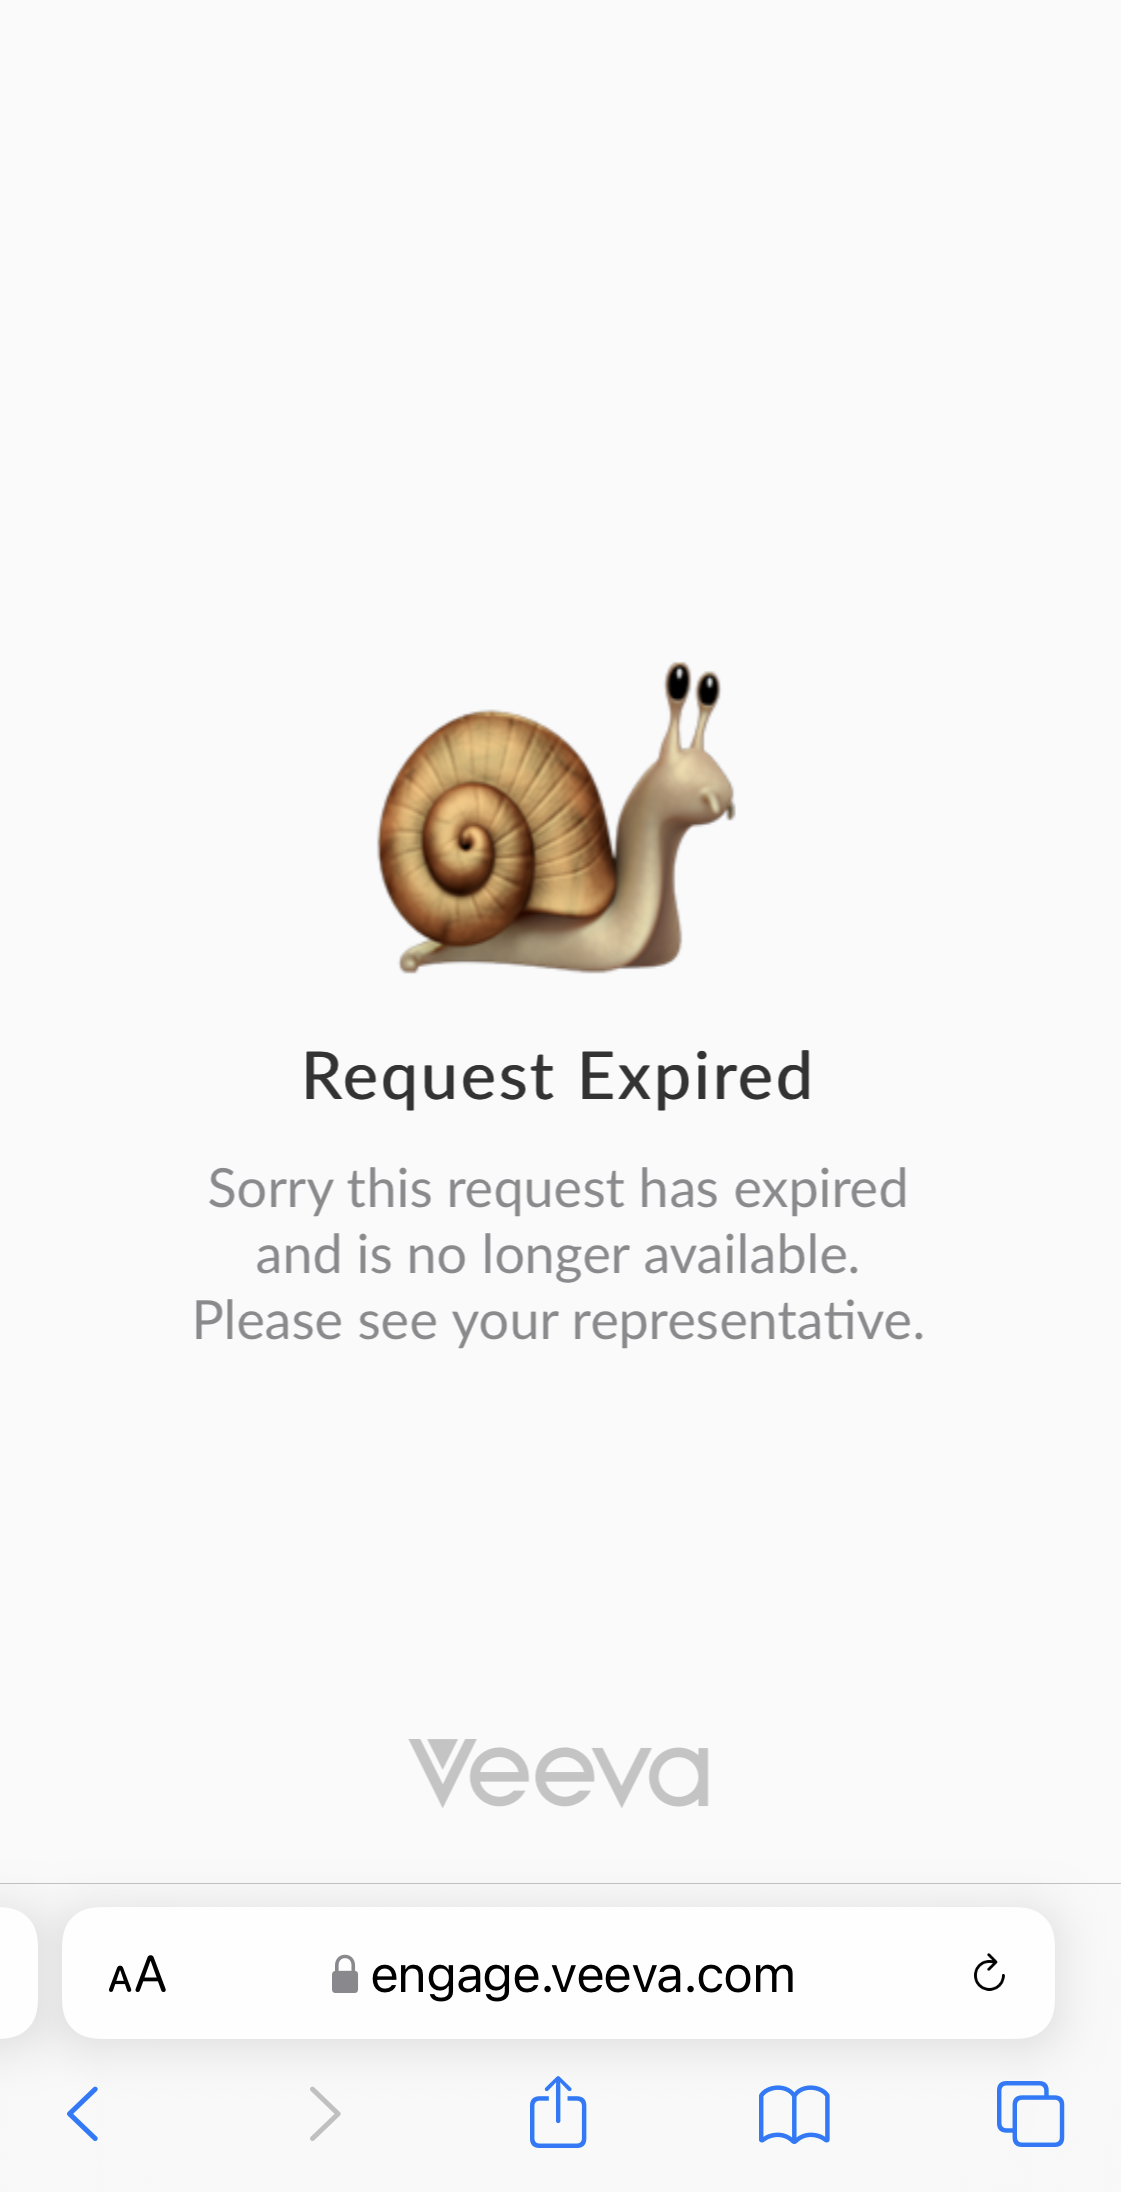
The HCP cannot submit a signature for the call unless the CRM user selects another signature capture method or generates another QR Code®.
Events Management
Using Event Type-Specific Disclaimers
To increase compliance and enhance flexibility, admins can define Event Type-specific disclaimer text. When attendees sign into an event, defined restrictions, actions, and data reporting must be communicated to attendees for compliance reasons. Depending on local regulations, certain event types may have different compliance requirements.
For example, Sarah Jones hosts a Speaker Program and launches the Sign-in Sheet from her iPad. The disclaimer text that displays to her attendees is specific to Speaker Program events. Later, Sarah organizes a Medical Congress event where attendees can sign into the event via a QR Code®. Medical Events have different messaging requirements, so the displayed disclaimer differs based on the event type.
Considerations
- Multi-country orgs can use this feature in conjunction with the Country-Specific Sign-in Sheet Disclaimers feature for language specificity. However, using these two features together requires separate configuration.
- This feature supports Signing into an Event Using a QR Code®
Mobile Device Setup
Managing Tab Visibility and Display Order
To customize Veeva CRM for users’ workflows and streamline navigation, admins can reorder or remove visibility to tabs on the navigation bar. This functionality includes the option to display My Cycle Plan, Suggestions, and My Tasks on the navigation bar, so iPad users can quickly navigate to those tabs without returning to the home page.
For example, Sarah Jones uses the My Tasks tab multiple times a day. Her admin includes the My Tasks tab in the first six items of the TAB_NAV_DISPLAY list, so the tab displays on the bottom navigation bar and Sarah can select it quickly, rather than navigating through the More button or back to the home page to reach My Tasks.
Considerations
The following existing settings are disregarded when the TAB_NAV_DISPLAY Veeva Setting is enabled:
- ENHANCED_COACHING_MODE Veeva Setting (Advanced Coaching Reports tab)
- ENABLE_IPAD_MYSAMPLES Veeva Setting (My Samples tab)
- KAM_ENABLE Veeva Setting (Account Plan tab)
- ENABLE_OFFLINE_CALL_OBJECTIVES Veeva Setting (Call Objectives tab)
Managing Widget Visibility
When the TAB_NAV_DISPLAY Veeva Setting is enabled, admins can configure the following items to display as tabs on the navigation bar, in addition to configuring them as widgets on the home page. To remove any of these tabs from the navigation bar so they only display as home page widgets, do not include the corresponding list value in the TAB_NAV_DISPLAY Veeva Message:
|
Tab |
List Value |
|---|---|
|
Call Objectives |
CallObjectives |
|
My Cycle Plan |
MyCyclePlan |
|
Suggestions |
Suggestions |
|
My Tasks |
MyTasks |
Additional widgets are available. For more information on changing widget visibility and configuring widgets, see CRM Mobile Application Home Page.
The zvod_Call_Objectives_vod field on the VMobile_Home_Page_Layout_vod object no longer controls Call Objectives tab visibility on iPad; to view the Call Objectives tab, users only need Read permission for the Call_Objective_vod object. The zvod_Call_Objectives_vod field still controls Call Objectives widget visibility.
Viewing Tabs
Tabs display in the order specified in the TAB_NAV_DISPLAY Veeva Message. The Home tab always displays as the first icon in the navigation bar. For Engage Connect users, the Engage tab always display as the second icon in the navigation bar. See Enabling Engage Chat in CRM for more information.
Depending on the device, the following tabs display in the navigation bar:
- iPad - the first six tabs specified in the TAB_NAV_DISPLAY Veeva Message display in the navigation bar. If six or fewer tabs are specified, the More icon at the end of the navigation bar is replaced by the Options icon.
- iPhone - the first three tabs specified in the TAB_NAV_DISPLAY Veeva Message display in the navigation bar. If three or fewer tabs are specified, the More icon at the end of the navigation bar is replaced by the Options icon.
To view additional tabs, select the More icon, then select the appropriate tab.
MyInsights
Managing MyInsights Visibility for Accounts
Admins can control whether or not MyInsights content displays for a specific account. This ensures content only displays when the necessary data is available.
For example, Sarah Jones has a MyInsights visualization for accounts which queries data from Veeva Link. Dr. Clinton Ackerman has a Veeva Link profile, while Dr. Bob Adams does not. When Sarah views Dr. Ackerman’s account record on her iPad, the tab for visualization containing Veeva Link data displays in the Sunrise bar. When Sarah views Dr. Adam’s account record, the tab does not display.
MyInsights content visibility is controlled using the custom check box field on the Account record, not on the HTML_Report_vod record itself.
Admins can only manage visibility to MyInsights content displayed for Account records, which includes HTML_Report_vod records with the following record types:
- Account_Profile_Override_vod
- Account_Reports_vod
- KOL_vod
- EM_Speaker_vod
To manage end user visibility to MyInsights content for an account:
- Navigate to the appropriate Account record.
- Select Edit.
- Select the custom check box field to display the MyInsights content on the record. Deselect to hide the MyInsights content.
MyInsights Studio
Using the Now Data Element (Available December 16, 2021)
Users can get the current date and time as a single record with a single value using the Now element. Users do not need to populate any additional information to retrieve this value.
Improved Trend Chart Display Element (Available December 16, 2021)
Users can select the 'I have multiple series of data' check box to define and display multiple trends from the same data source on the same trend chart.
