

24R1.0 Functionality Guide
The Functionality Guide is intended for Sales Operations, Business Administrators, System Integrators, and others responsible for making decisions about what features are needed for end users to be successful and deciding which features work together with existing customer configurations.
Accounts
Formatting HCP Display Names
In some instances, it is important for HCP names to include credentials or salutations, for example, Doctor or MD. By default, only the first and last name on an account record display for HCPs. To ensure HCP names display appropriately, admins can define the format of the display names for accounts.
The formatted name displays when HCPs perform one of the following actions:
- Submitting a meeting request on the Engage Scheduling Site – The HCP name displays in the Participants section of the page. See Sending Meeting Requests with Approved Email for more information.
- Viewing a confirmation email for an accepted meeting request – The HCP name displays in the email. See Integrated Scheduling: Accepting and Declining Meeting Requests in My Schedule for more information.
- Granting consent on the Consent Capture screen – The HCP name displays in the header. See Granting Consent for more information.
Approved Email
Email Builder
Email Builder is a new way to compose emails that provides end users a guided experience when creating Approved Emails. Email Builder grids are associated with templates allowing users to select from approved blocks of text for the subject, greetings, paragraphs, and documents sections of the email.
Building Emails
Email templates with Email Builder capability can be accessed from all entry points except Events Management, Recommended Emails, and Suggestions. A label displays to indicate email templates with Email Builder capability.
Email Builder does not support multiple products. Content creators cannot associate multiple products with Email Templates containing lookups to the Email Builder, or with Email Fragments that are looked up by the Email Builder Cells.
To create an email using a builder:
- Select an email template that includes an email builder.

- Select a single content cell from the first available column. This enables the cells in the next column.

-
Select one cell from each of the remaining columns. With each selection, the next column is enabled.
The Documents column allows users to select one or more fragments to add to the Documents section of the message. Users can select more than one document cell from the available options.

- Select Next to view the entire message in the editor. If changes are needed, users can select Back from the editor to return to the Email Builder grid and make changes to the content selections.

-
Send or schedule the email, or select Close to save a draft, if draft functionality is enabled.
All content selections are saved in the draft. The email can be accessed via the Drafts folder on the Email Tab. Accessing the draft displays the Email Builder.
The Approved Email process verifies the Email Builder template, and the fragments associated with its document cells, have a status that allows them to be sent:
- If the sender is an Approved Email admin, the process verifies the Email Builder and associated records referenced in the Sent Email have Status_vod = Approved_vod or Staged_vod
- If the sender is an end user, the process verifies the Email Builder and associated records referenced in the Sent Email have Status_vod = Approved_vod
If any of the checks do not pass, the process does not send the email, the status is set to Failed, and one of the following messages displays to the user:
One-Click Unsubscribe
To help organizations comply with industry guidelines for bulk email senders, One-Click Unsubscribe is enabled by default for Approved Email. Email recipients can unsubscribe from future emails with the same content type or product with one click, without leaving their email application. One-Click Unsubscribe is a best practice recommended for all organizations regardless of the number of emails they currently send.
Preventing Approved Email Content from Displaying
To prevent certain email templates and email fragments from displaying to users as options to select when composing emails, content creators can mark the Approved Email content as hidden. Email Templates and Email Fragments marked as hidden still display when accessed directly, for example, when launched from CLM to send an email or share dynamic content, or when used for Recommended Emails.
Preventing Approved Email Content from Displaying
Content creators can select the Hide from CRM Library (crm_hidden__v) field on Email Templates and Email Fragments when creating content in Vault. When the content syncs to CRM, this field maps to the Hidden_vod field on the corresponding Approved_Document_vod records.
When the Hidden_vod field is checked for an email fragment, it is excluded from all entry points where users can select fragments.
When the Hidden_vod field is checked for an email template, the template does not display in the Send Email screen when users compose Approved Emails from the following entry points:
- Accounts
- Calls
- CLM
- MyInsights
- Suggestions
CLM
Creating Dynamic Content
Content creators can develop dynamic content to enable end users to generate personalized versions of content for HCPs and share them via Approved Email. This allows end users to follow up with HCPs about the personalized content discussed while presenting CLM content, for example, a cost calculator, formulary matrix, or personalized reprint.
Dynamic content consists of the following components:
- Dynamic Content Template – Content creators create dynamic content templates, which are PDF documents containing form fields. These form fields populate with personalized values from the corresponding CLM content.
- CLM Content – Content creators create CLM content that contains data from CRM or external sources, calculations, or user input. This data maps to specific form field identifiers in the dynamic content template.
- Email Template or Email Fragment – Content creators create an Email Template or Email Fragment for sharing the personalized version of the dynamic content via Approved Email
See Generating and Sending Dynamic Content for more information about generating and sending dynamic content to HCPs as an end user.
Creating Dynamic Content
The dynamic content template must satisfy the following requirements:
- Must be a PDF containing form fields. The name of each field is the identifier.
- Must be uploaded into PromoMats/MedComms using any document type (Promotional Piece, Reference Document, etc.)
Ensure the Vault (PromoMats/MedComms) integration user defined in the CLM Admin Console has access to the document type and the permission to download document source files from Vault. This user retrieves the document when generating the dynamic content. See Vault Help for more information about downloading document source files.
- Any font can be used as long as the entire font is embedded in the PDF. See Adobe documentation for more information about embedding fonts in PDF documents.
|
Dynamic Content Template |
Generated Personalized Content |
|---|---|
|
|

|
Creating the Email Template or Email Fragment
The Email Template or Email Fragment must include the {{DynamicContentLink}} token. When an end user sends an email containing dynamic content to an HCP, this token is replaced with the URL to the personalized PDF. When recipients access the link, the PDF displays in the HCP Content Player. See Creating Approved Email Templates and Creating Approved Email Fragments for more information.
The Email Template or Email Fragment containing the {{DynamicContentLink}} token must be launched from CLM via the launchApprovedEmailWithVeevaContent method to ensure the personalized PDF version (Veeva Content record) can be provided as a parameter.
Approved Email content containing the {{DynamicContentLink}} token is not applicable to any other Approved Email entry points. Mark this content as hidden to ensure it does not display as an option to select when composing Approved Emails from other entry points. See Preventing Approved Email Content from Displaying for more information.
Expiring Dynamic Content
Admins can expire published dynamic content in CRM. When an HCP accesses a link to expired content, an error message displays.
To expire published dynamic content:
- Navigate to the appropriate Veeva_Content_vod record with the Dynamic_Content_vod record type.
- Select Edit.
- Select Expired_vod for the Content_Status_vod field.
- Select Save.
Testing Dynamic CLM Content
CLM test users (users with the Enable_CLM_Testing_Features_vod check box selected on their User record) can test the dynamic content on their devices. Both Steady State and Non Steady State dynamic content templates can be used for test users. If a dynamic content template has both Steady State and Non Steady State versions, the latest version is used.
Generating and Sending Dynamic Content
Customers can use dynamic content to enable end users to generate personalized versions of content for HCPs and share them via Approved Email. This allows end users to follow up with HCPs about the personalized content discussed while presenting CLM content, for example, a cost calculator, formulary matrix, or personalized reprint.
For example, you present a CLM presentation to an HCP. The presentation includes a formulary matrix which is tailored to display relevant product information for the specific HCP. To allow the HCP to have a copy of the matrix with these specific values, you select a button in the slide labeled Share to generate a personalized version of the CLM content. Approved Email launches automatically with a link to the personalized content in the body of the email. You send the email to the HCP.
See Creating Dynamic Content for more information about and best practices for creating dynamic content as a content creator.
Generating and Sending Dynamic Content
To generate a personalized version of dynamic content, end users present CLM content associated with a dynamic content template, populate any user input fields with data from the HCP, and select the user action that executes the generateDynamicContent JavaScript method. Only Dynamic Content Templates in Steady State can be used when generating dynamic CLM content.
After the personalized version of the content is generated, the Send Email screen launches automatically with the HCP selected as the recipient. The body of the email contains a link from the {{DynamicContentLink}} token. End users can select the link to preview the content in the browser before sending the email.
Preview activity is not tracked for dynamic content links. Additionally, end users cannot download the content while previewing.
When end users send the email, the personalized version of the content is populated in the Veeva_Content_vod field on the Sent_Email_vod record. To allow recipients to download the personalized version of the content from the HCP Content Player, admins can select the Allow_Source_Download_vod field on the Veeva_Content_vod record.
When recipients select the link to the content in the Approved Email, the content displays in the HCP Content Player. See Using the HCP Content Player for more information about how content displays and activity tracking for dynamic content.
Events Management
Sending Automated Approved Emails for Events Management
Automated emails are emails automatically sent to an event's attendees and speakers, reducing manual processes for event organizers. Admins can improve event attendance and engagement by configuring automated emails using event rules to determine which emails to send, when emails are sent, and who should receive the emails.
For example, a Registration Reminder is emailed ten days before the event to attendees who have not yet registered, or a Follow-Up Thank You email is sent four hours after an event to attendees who participated. Event organizers receive a summary of sent automated Approved Emails, which they can use to review the recipients and Approved Email templates used.
Creating Automated Approved Email Event Rules
To define Approved Emails to send automatically:
-
Populate one or both of the following Events Management settings:
-
Event_Attendee_Email_Source_vod – Enables sending automated Approved Emails to an event's attendees and defines the source of recipient email addresses. Populate with a comma separated list of up to five Email type fields from the following objects:
- Account
- Address
- EM_Attendee_vod
Use the format ObjectAPIName1.FieldAPIName1,ObjectAPIName2.FieldAPIName2. For example:
Account.PersonEmail,EM_Attendee_vod__c.Email_vod__c
-
Event_Speaker_Email_Source_vod – Enables sending automated Approved Emails to an event's speakers and defines the source of recipient email addresses. Populate with a comma separated list of up to five Email type fields from the following objects:
- Account
- Address
- EM_Event_Speaker_vod
- EM_Speaker_vod
Use the format ObjectAPIName1.FieldAPIName1,ObjectAPIName2.FieldAPIName2. For example:
EM_Speaker_vod__c.Email_vod__c,Account.PersonEmail
Recipient email addresses are determined sequentially based on the delimited list, so admin users should prioritize the order of email sources. If the configured email source values exceed the character limit, create a corresponding Veeva Message with the values, then populate the Events Management Setting with the created Veeva Message.
-
- Navigate to the Event Rules related list of the appropriate EM_Event_Configuration_vod record.
- Select New.
- Select Automated_Emails_vod for the record type.
- Select Next.
-
Populate the following fields:
- EM_Event_Configuration_vod – The Event Configuration associated with the rule. If you created the new EM_Event_Rule_vod record from the Event Rules related list of an EM_Event_Configuration_vod record, this field populates automatically.
- Email_Template_vod – Populate with the appropriate Approved_Document_vod with a status of Approved_vod and a record type of Events_Management_vod
- Description_vod – Optional. The rule's description.
-
Populate the following fields to define which types of recipients the email should be sent to:
- Email_Recipients_vod – The automated email's recipient type. Available values are:
- Event_Speakers_vod
- Event_Attendees_vod
-
Event_Attendee_Entry_Criteria_vod – A comma separated list of Status_vod values on the EM_Attendee_vod object determining which attendees should receive the automated email. This field is optional. If this field is left blank, all event attendees are included in the automated email.
For example: Attended_vod,Signed_vod
This field only applies if Event_Attendee_vod is selected in the Email_Recipients_vod field.
-
Event_Speaker_Entry_Criteria_vod – A comma separated list of Status_vod values on the EM_Event_Speaker_vod object determining which speakers should receive the automated email. This field is optional. If this field is left blank, all event speakers are included in the automated email.
For example: Accepted_vod,Invited_vod
This field only applies if Event_Speaker_vod is selected in the Email_Recipients_vod field.
-
Populate the following fields to define when the automated email should be sent in relation to the event's Start_Time_vod or End_Time_vod field:
- Timing_Measure_vod – The timing measurement used to calculate when the automated email sends for each matching event. Used in conjunction with the Timing_Value_vod field to send the email. Available values are:
- Days_vod
- Hours_vod
- Timing_Value_vod – The quantity of time used to calculate when the automated email sends for each matching event. This value must be valid based on the selected Timing_Measure. For example:
- If Timing_Measure_vod = Days_vod, the Timing_Value_vod field must be between 0 and 365
- If Timing_Measure_vod = Hours_vod, the Timing_Value_vod field must be between 0 and 24
- Event_Timing_vod – Determines whether the Timing_Measure_vod and Timing_Value_vod fields apply to time before or time after the event. The following values are available:
- Before_Event_vod
- After_Event_vod
-
Populate the following optional fields to match the rule to events with matching values:
- Country_Override_vod – The event country aligned to the rule. If this field is left blank, the rule applies to all countries under the event configuration.
- Product_vod – The product aligned to the rule. If this field is left blank, the rule applies to events with no defined product.
-
All_Products_vod – Select this check box to apply the rule to events with any product.
This field cannot be used when a specific product is defined in the Product_vod field.
- Event_Format_vod – The event formats aligned to the rule. If this field is left blank, the rule applies to events with no defined format.
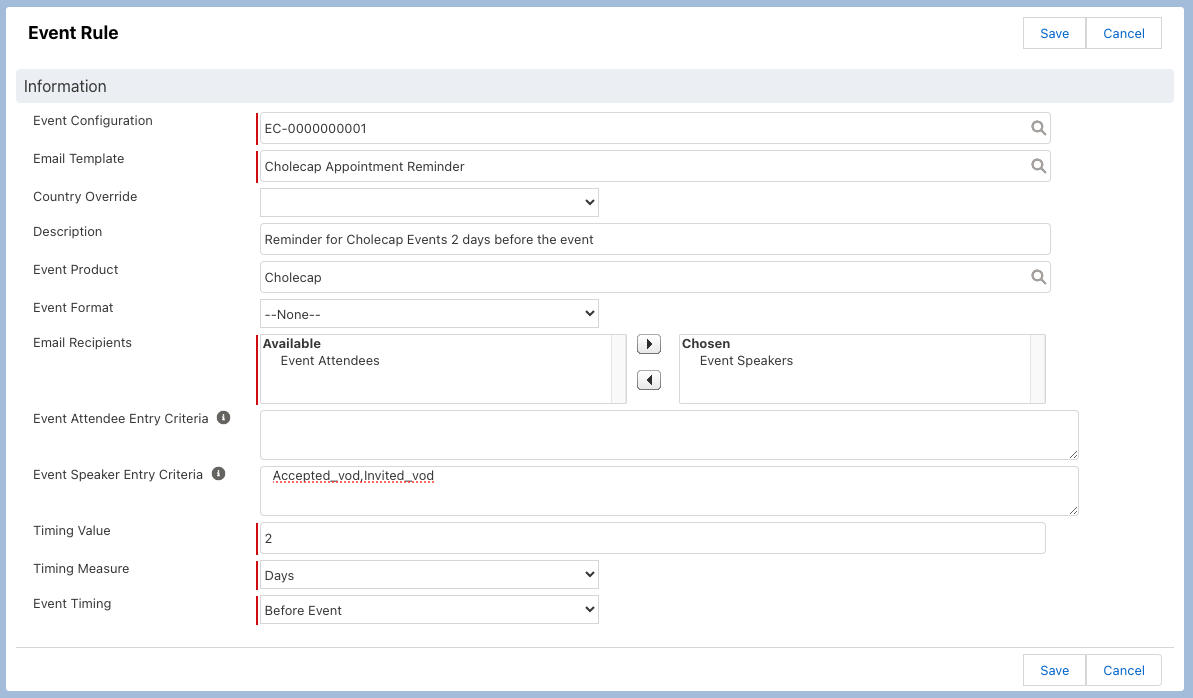
- Select Save.
Scheduling Automated Event Approved Emails
Sent_Email_vod records are created for automated Approved Emails via the Automated Event Email process based on Automated_Email_vod type event rules and any events matching the rule. The Automated Event Email process runs whenever the Approved Email job in the Process Scheduler runs, whether via scheduled job or via the manual Run button, and creates Sent_Email_vod records based on the time defined by the event rule and the scheduled job.
Sent_Email_vod records are only created when the process runs based on the event rule timing value. Admins should schedule the Approved Email job based on the most frequent event rule timing. See the following examples for more information.
Events with a status of Canceled_vod or Closed_vod do not have emails scheduled.
Example of an Hourly Rule
For example, an event rule is configured to send email reminders to registered attendees six hours before an event taking place on April 26 at 7:00 PM. The Approved Email job is scheduled to run every hour, so the first run of the Approved Email job occurring on April 26 between 12:00 PM and 1:00 PM creates and schedules the emails.
When an Approved Email job runs on April 26 at 12:30 PM, Sent_Email_vod records are created for each attendee and are scheduled to send at 1:00 PM, six hours before the event.
Example of a Daily Rule
In another example, an event rule is configured to send registration reminders to invited attendees seven days before an event taking place on April 26 at 6:00 PM. The Approved Email job is scheduled to run daily, so the first run of the Approved Email job occurring between April 18 at 6:00 PM and April 19 at 6:00 PM creates and schedules the emails.
When the Approved Email job runs on April 19 at 8:00 AM, Sent_Email_vod records are created for each attendee and are scheduled to send on April 19 at 6:00 PM, seven days before the event.
Sending Scheduled Automated Approved Emails
Sent_Email_vod records are only created and scheduled once. If new attendees are added after the job, or if the job runs again outside the timing window of the event rule, Sent_Email_vod records are not created and emails do not send. Automated emails are sent once per event recipient and event rule combination, ensuring duplicate emails are not sent to recipients.
Scheduled Sent_Email_vod records are also processed during the job. If a newly created Sent_Email_vod record has a scheduled send time after the job, the emails sends the next time the job runs. If scheduled emails need to be processed more frequently than the scheduled job, administrators can configure scheduled Sent_Email_vod records to process every 10 minutes.
The Incremental Refresh and Force Full Refresh buttons on the Approved Email Administration tab do not trigger the Automated Event Email process. The Automated Event Email process runs after all Content Sync processes complete, including syncing Events Management Email Templates.
Updating Expired Email Templates
When the Approved Email job runs or the Incremental Refresh and Force Full Refresh buttons are selected, the job automatically checks for the latest versions of Approved Email templates. If any expired Approved_Document_vod email templates are associated with an automated email rule, the rule updates with the latest version of the corresponding template.
Viewing Successes and Failures of the Automated Event Emails Process
Admins can review successes and failures of the Automated Event Emails process for troubleshooting purposes using the Automated Event Email Administration section of the Approved Email Administration tab.
The table in this section displays the last 30 days of the Automated Event Email process, along with a count of any processing errors, Sent_Email_vod records emails created, or Sent_Email_vod records not created in each job. Consent and restricted product configuration is respected when sending automated emails. If a recipient does not have valid consent, the email is logged as Sent Emails Not Created. Select a number in the Errors, Emails Created, or Emails Not Created columns to download a CSV file with more details about the job.
Sent Emails Created represents scheduled Sent_Email_vod records that were created successfully. To view the status and delivery of emails, view the Status_vod field on the corresponding Sent_Email_vod records.
Reviewing Sent Automated Approved Emails
Event organizers are notified about automated event emails sent for their events via email when the Automated Event Emails process completes, enabling organizers to be aware of the emails successfully or unsuccessfully sent to their event's attendees or speakers.
Only Event_Team_Member_vod records with a Role_vod field of Organizer_vod who are also system users in Veeva CRM receive the summary email. Group and Write-In team members are not supported.
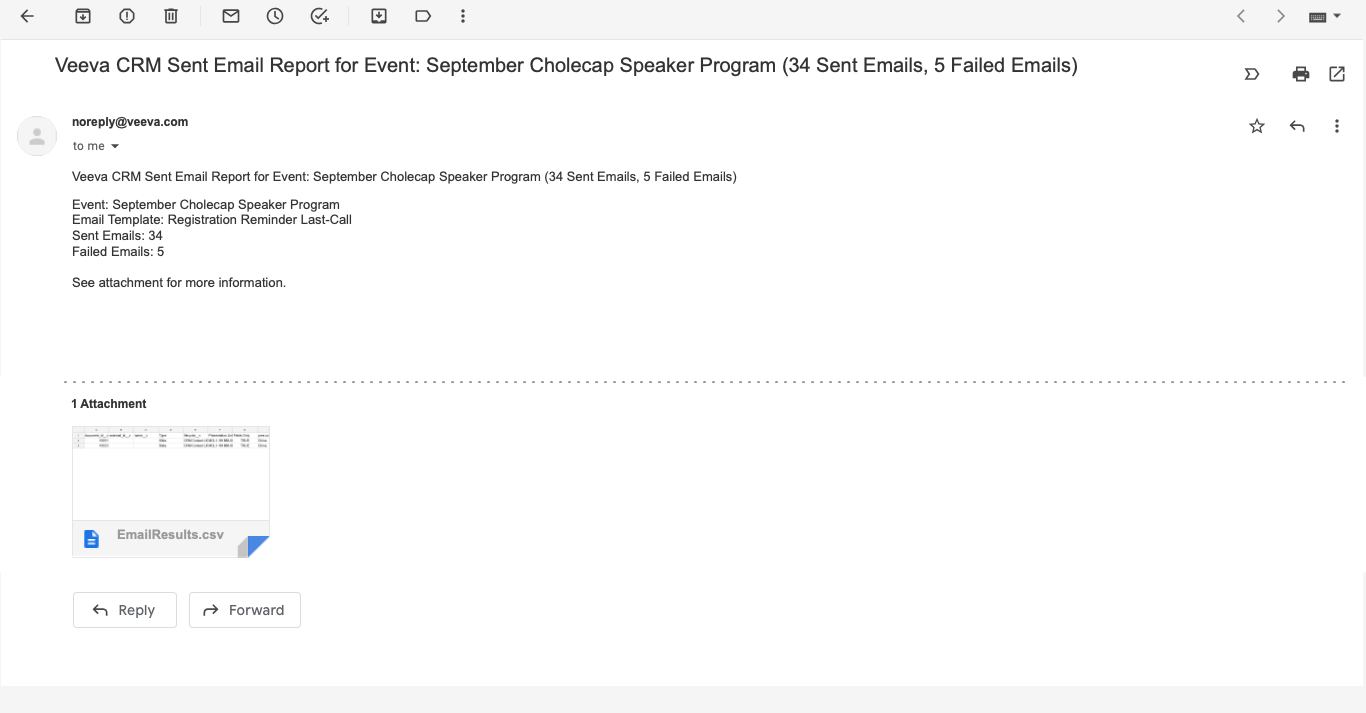
The summary email contains a CSV file that users can use to view details about each automated email that was created and not created.
Using the Refreshed Events Management UI
Admins can enable the refreshed Events Management interface on iPad to improve viewing event details and managing an event's related records. When this interface is enabled, event details are arranged alongside all of the event’s related lists into a single, unified layout that event organizers can use to quickly search for, add, and update attendees, budgets, materials, and speakers.
Once configured, the refreshed user interface supports the following Events Management functionality:
- Creating and Editing an Event – See Creating an Event and Navigating the Event Summary Page for updated functionality
- Next Steps Section – See Viewing the Next Steps Section for updated functionality
- Defining Lifecycle Stages for Events
- Adding Attendees to an Event – See Managing Attendees in the Refreshed Events Management UI for updated functionality
- Adding Walk-in Attendees
- Reconciling Walk-in Attendees
- Selecting Attendees in Hierarchies
- Searching for Out of Territory Attendees
- Child Accounts in Events Management
- Search by Furigana in Event Attendees and Speakers
- Adding Speakers to an Event – See Managing Event Speakers in the Refreshed Events Management UI for updated functionality
- Speaker Profile Photos
- Adding Event Budgets to an Event - See Managing Event Budgets in the Refreshed Events Management UI for updated functionality
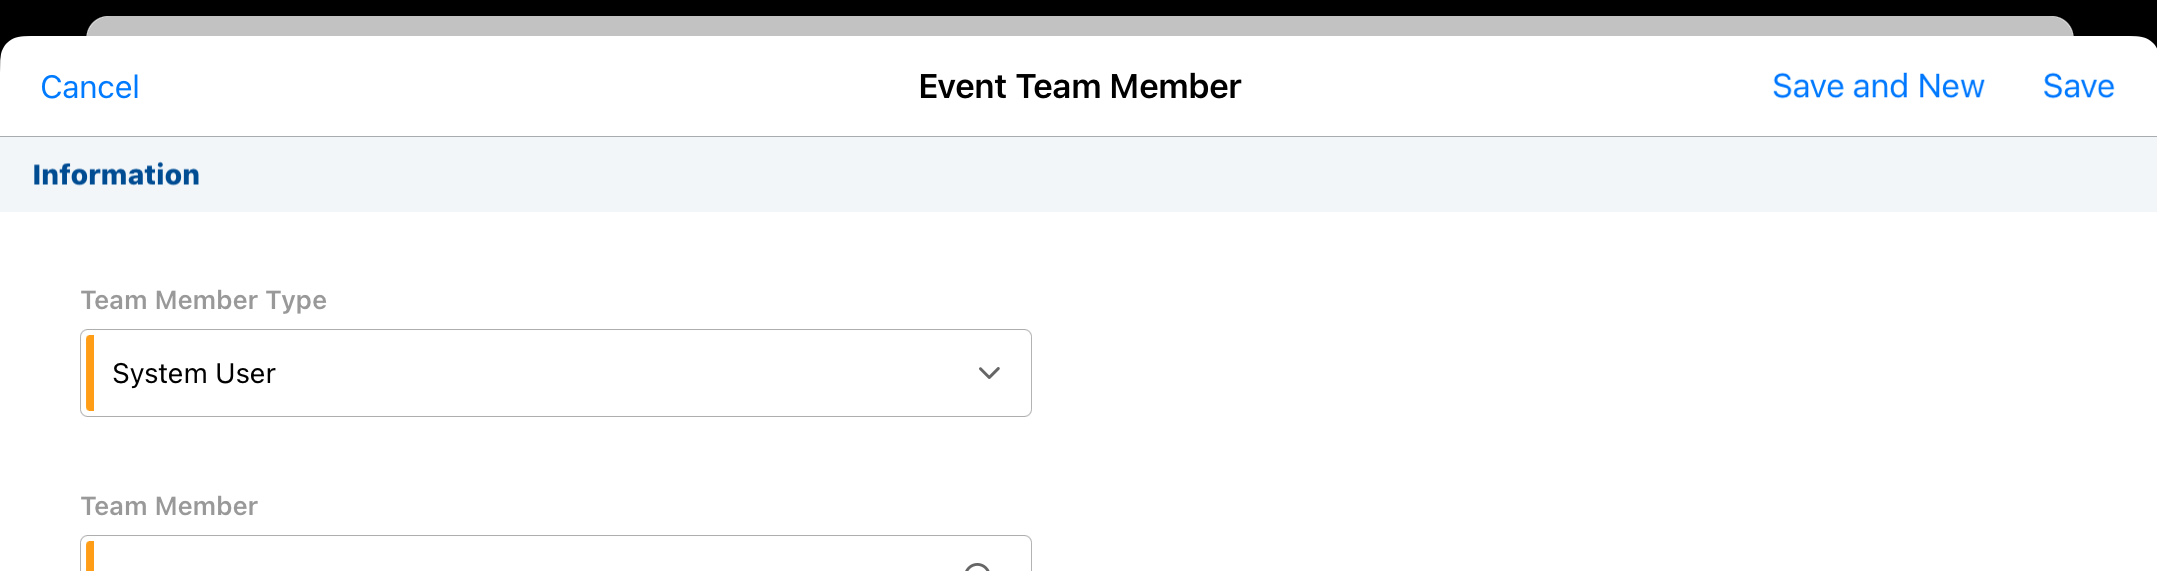
- Adding Event Team Members
- Adding Event Materials to an Event – See Managing Event Materials in the Refreshed Events Management UI for updated functionality
- Entering Expense Estimates into an Event
- Entering Expense Headers and Lines
- Expense Splitting
- Event Sessions
- Using the Files, Attachments, and Notes related lists in EM_Event_vod records
Using the Refreshed Events Management UI
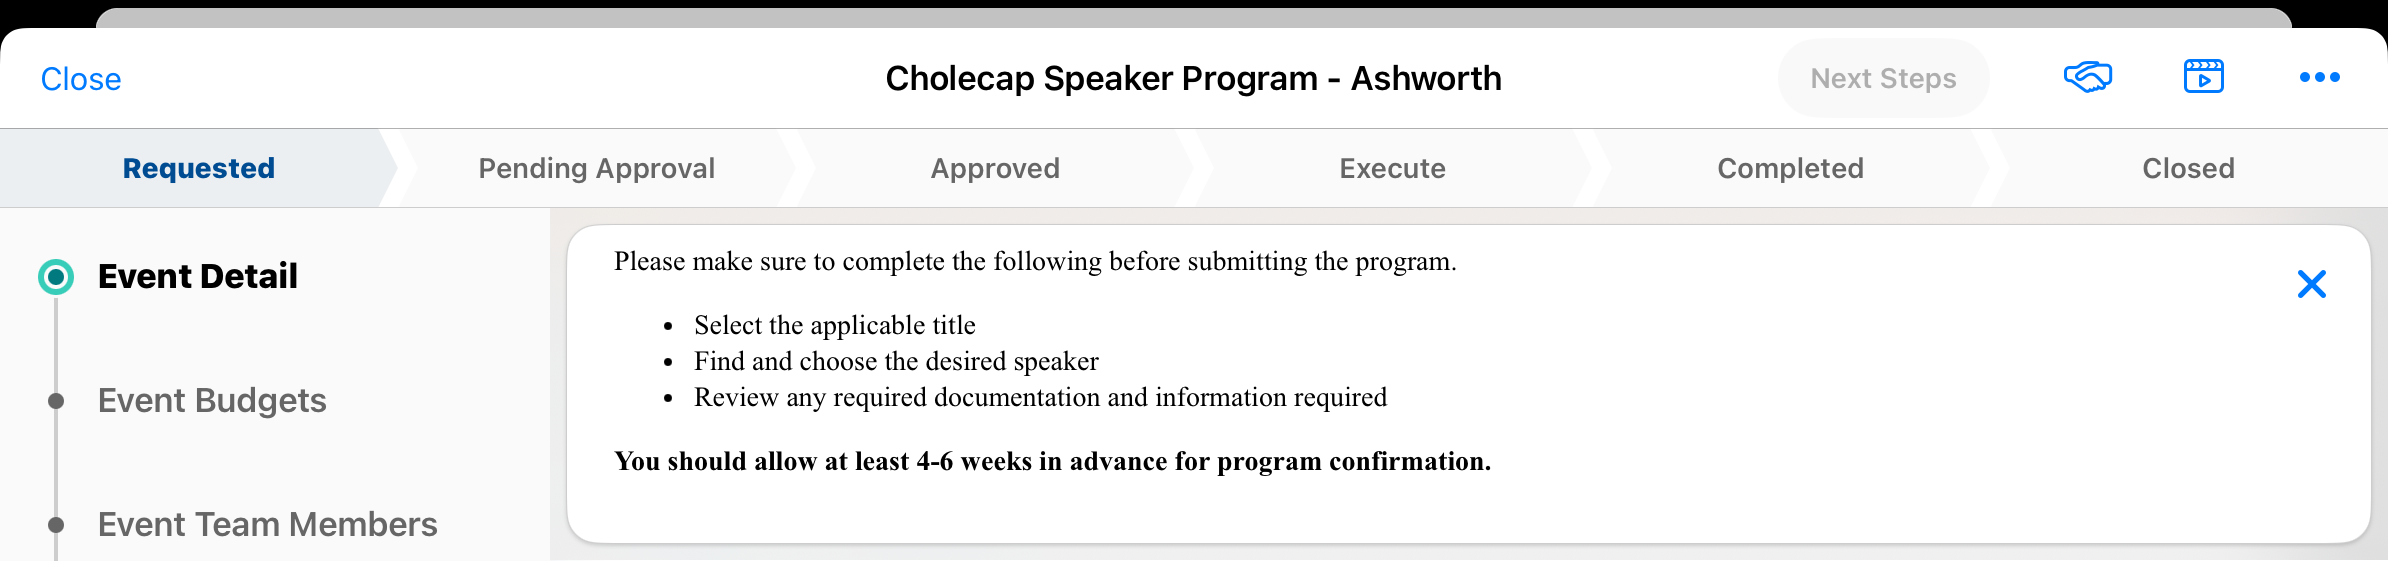
Event organizers can use the refreshed Events Management UI to create and navigate their event, as well as view any configured Next Steps for their event.
Creating Events
When creating an Event, the record type and country type selector displayed based on the current configuration. The event's Start Time and End Time are no longer required in the Event Creation wizard, but instead are entered within the Event page layout.

Start Time and End Time are always required when creating a new event.
Navigating the Event Summary Page
When event organizers view an event, the Event Details section displays first in the detail page. The layout of this section is determined by the configured EM_Event_Layout records associated with the event.

If Lifecycle Stages are configured for Events, the lifecycle displays at the top of the layout.
To navigate to the related event sections, scroll to the desired related list, or select the related list from the navigation bar in the left column to immediately navigate to that section.
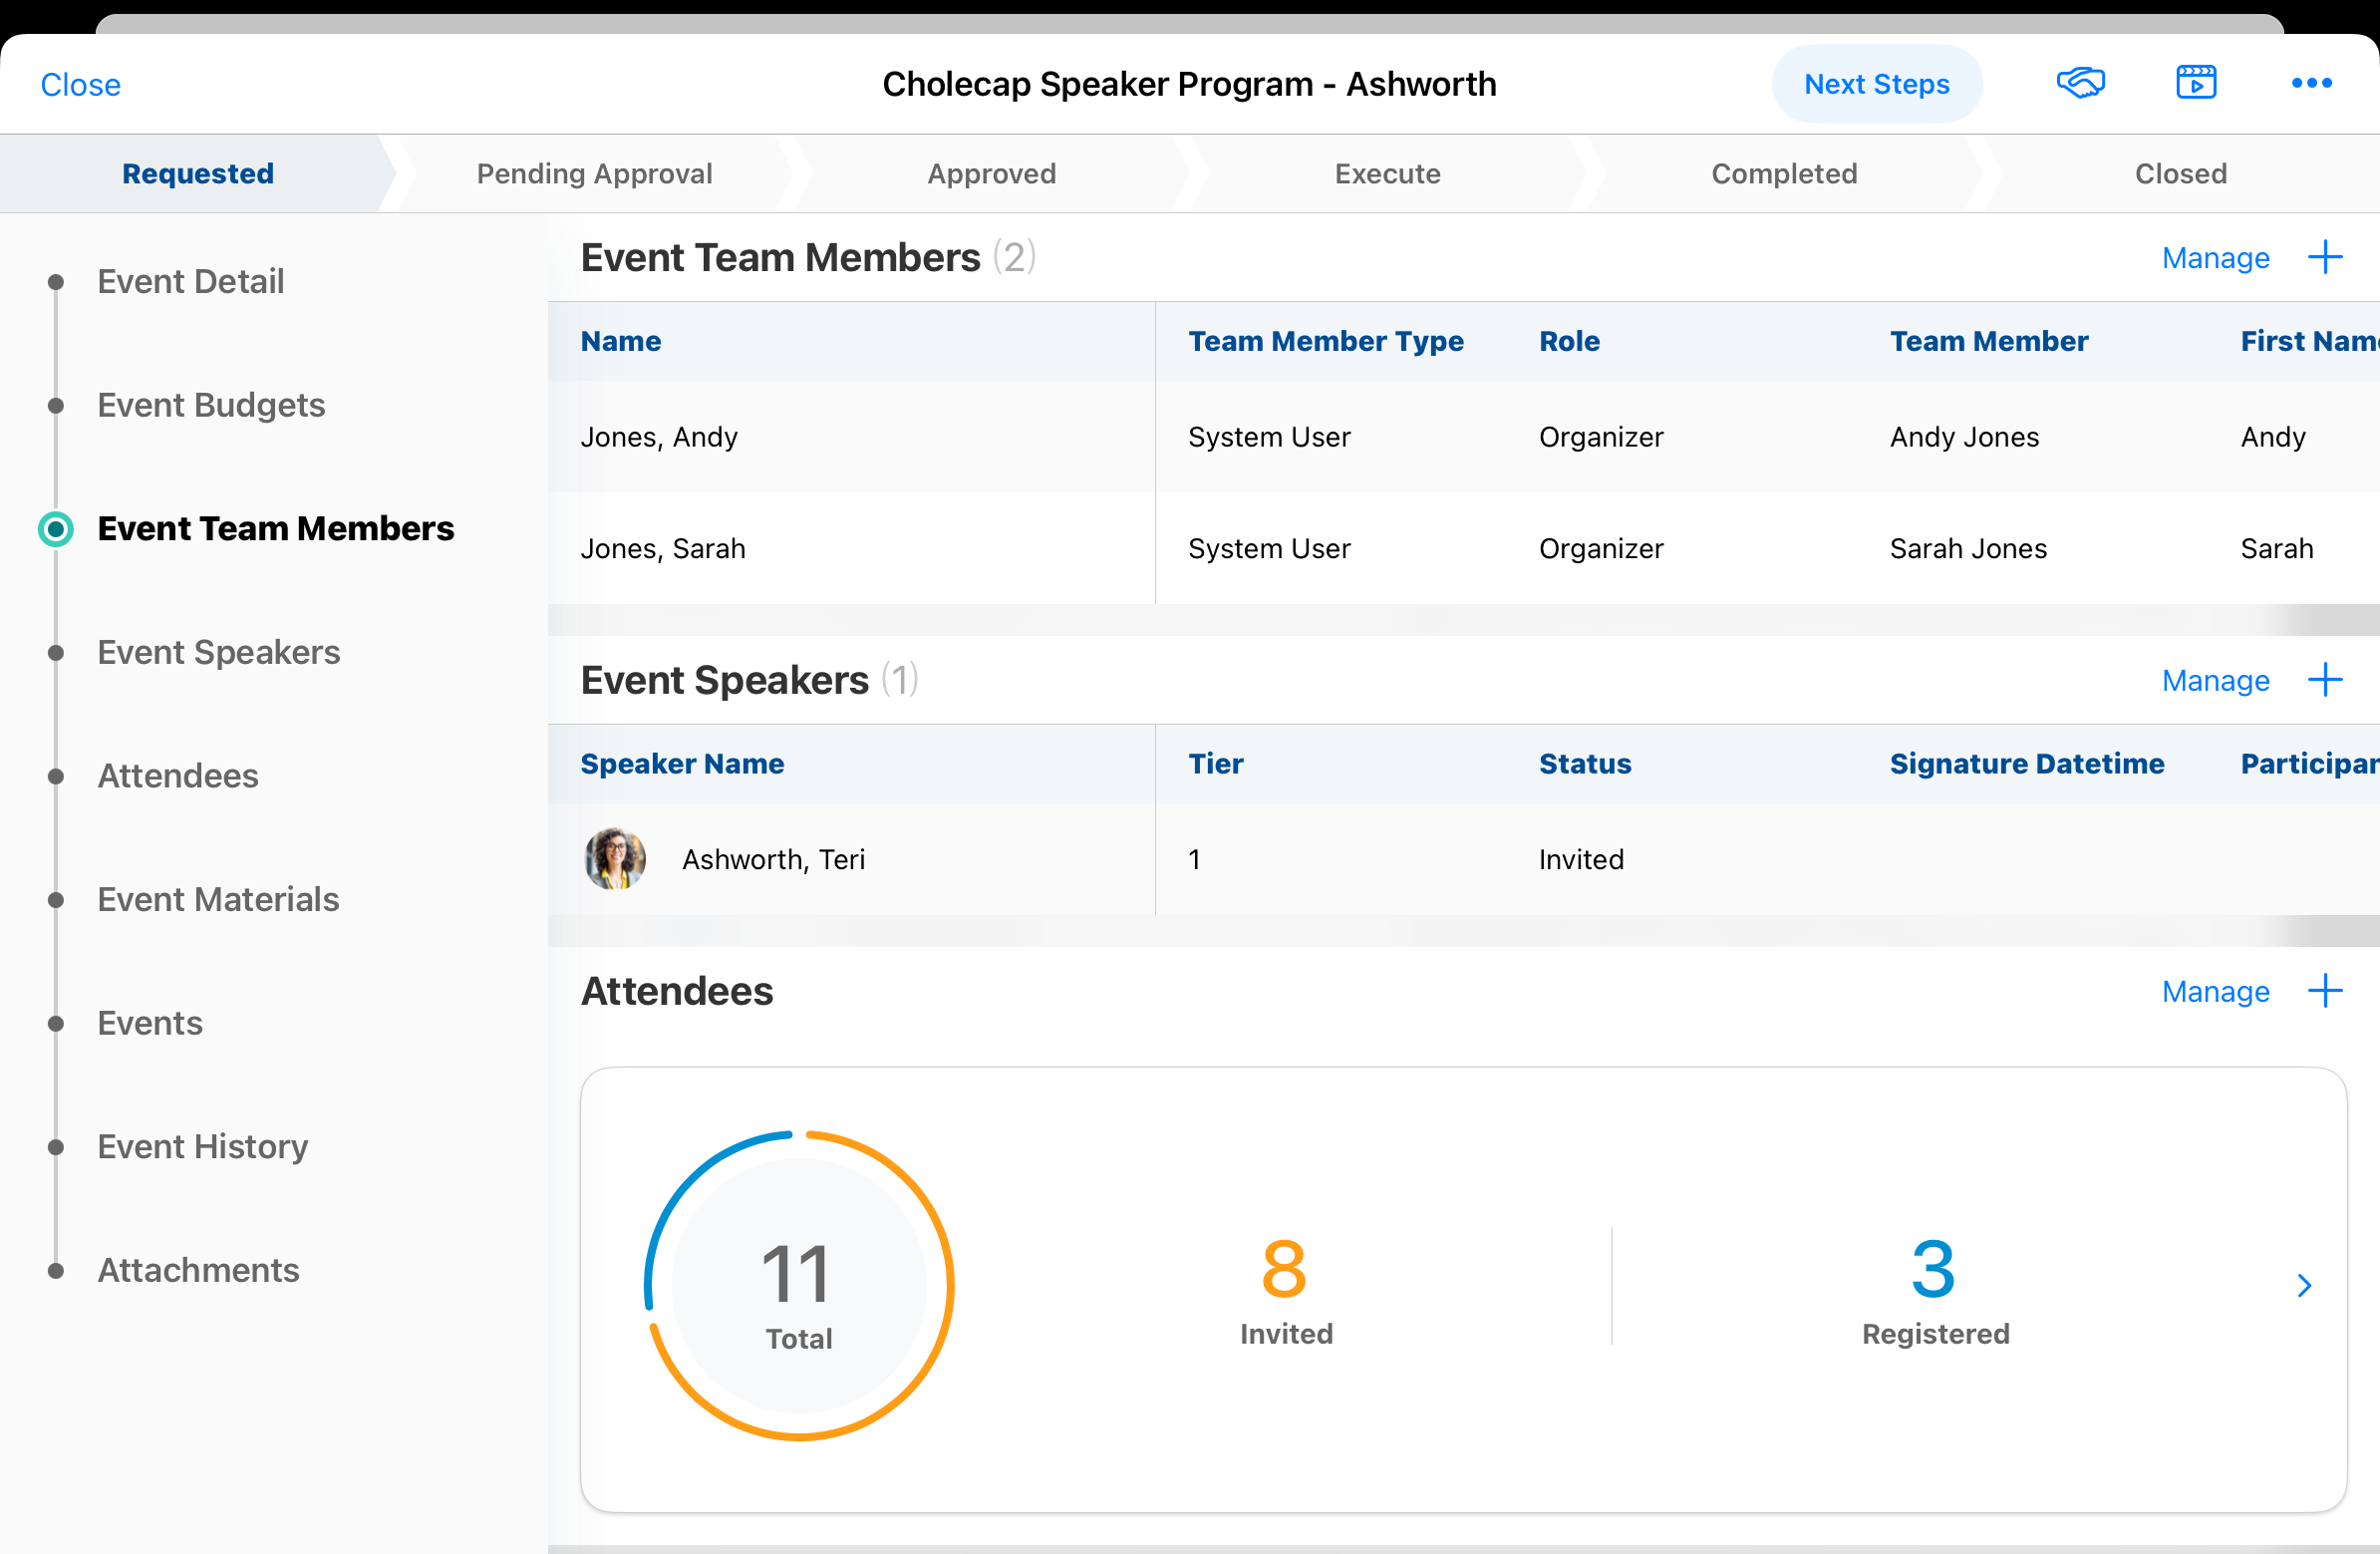
The following related lists display a widget containing metrics about related records:
- Attendees – See Managing Attendees in the Refreshed Events Management UI for more information
- Event Budgets – See Managing Event Budgets in the Refreshed Events Management UI for more information
All other related lists display up to ten records, sorted based on the configured related list. See Managing Related Lists for Events Management for more information.
If the organizer has the appropriate permissions and related list configuration, the Add button displays in each related list section. Select this button to add additional related records.
Viewing the Next Steps Section
Select the Next Steps button at the top right of the screen to view the defined Next Steps for the event.
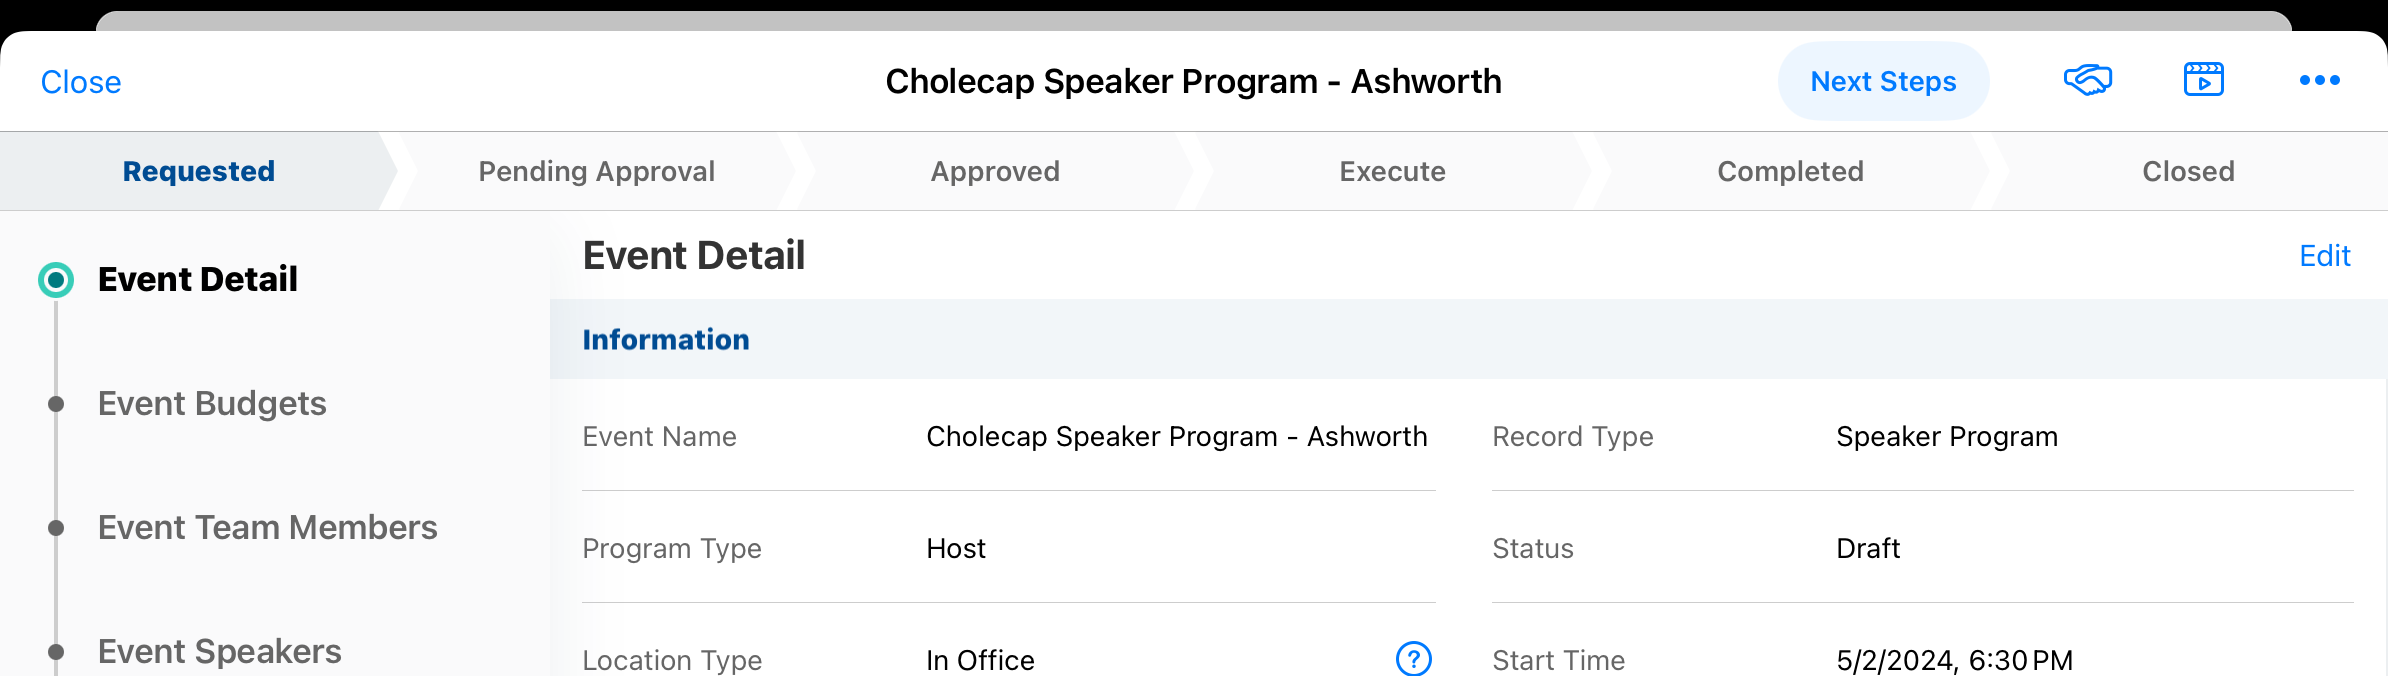
The expanded Next Steps section remains static at the top of the page, enabling users to view the section while scrolling through the record.
Select the X button at the right corner of the Next Steps section to collapse the section.
The Next Steps section also displays when creating or editing an EM_Event_vod record.
Related Lists in the Event Summary Page
Certain related event objects have specific functional differences when using the refreshed user interface.
Managing Related Records
Select the Manage button to display a dedicated page for organizers to view, search, and modify the records.
See Managing Related Lists for Events Management for more information.
Attendees
Event organizers can add attendees to their event, add and reconcile walk-in attendees, and view key metrics about those attendees.
See Managing Attendees in the Refreshed Events Management UI for more information.
Event Speakers
Event organizers can add one or more speakers to their event using the Select Speakers modal.
See Managing Event Speakers in the Refreshed Events Management UI for more information.
Event Budgets
Event organizers can add appropriate Event Budgets to their event and view key metrics about those budgets directly from the Event Summary page.
See Managing Event Budgets in the Refreshed Events Management UI for more information.
Event Materials
Event organizers can view event material records created from event rules. They can also create new event material records and directly add attachments while creating the record.
See Managing Event Materials in the Refreshed Events Management UI for more information.
Event Expenses
Event organizers using the refreshed Events Management UI can add expense lines and headers, including split expenses, to their event and view key metrics about those expenses directly from an event.
See Managing Expenses in the Refreshed Events Management UI for more information.
Expense Estimates
Event organizers using the refreshed Events Management UI can add expense estimates to their event and view key metrics about those estimates directly from an event.
See Managing Expense Estimates in the Refreshed Events Management UI for more information.
Using the Save and New Button
Event organizers can select the Save and New button to add multiple related records at the same time.
The Save and New button is available on the following related event objects:
- Event Estimates
- Event Sessions
- Event Team Members
