

20R1.3 (201.12.0) Functionality Guide
The Functionality guide is intended for Sales Operations, Business Administrators, System Integrators, and others responsible for making decisions about what features are needed for end users to be successful, and which features work together with existing customer configurations.
Information includes an over of each feature, examples, screen shots, and targeted information on how to use each feature. Select the heading link to display the topic which includes configuration instructions, if applicable.
Call Report Sampling
Using Barcodes to Record Call Samples
- iPad
- iPhone
End users can use the barcode on a sample’s packaging to simplify the sampling process by using their device’s camera to scan the barcode. This enables easier and more compliant sampling, as well as more accurate identification and tracking of samples.
For example, Sarah Jones visits Dr. Clinton Ackerman, who requests samples of each available strength of Cholecap and two starter doses of Restolar. Sarah retrieves the samples from her bag and selects Scan Barcode in the Sample and Promotional Items section of the call report. She uses her device’s camera to scan each sample’s barcode. Each scanned sample is automatically added to the call report. Sarah then captures Dr. Ackerman’s signature for all the scanned samples.
Considerations
- Both 1D and 2D barcodes are supported
- Customers may need to update their packaging procedures to ensure the following prerequisites:
- Batch Lot IDs must be assigned to each newly manufactured batch lot
- Barcodes must be included on the packaging and be encoded with a Batch Lot ID
- Sample Lot integration must be updated to include the Batch Lot ID
- This feature only supports samples and products with virtual lot numbers enabled
- End users only need access to a product via a sample lot in order to add the product to a call using the barcode. This means this feature does not respect the following product type restricting section signals:
- --nb
- --ns
- --nas
- --nhvp
- --np
- This feature respects the contents of the Sample_Quantity_Bound_vod and Sample_Quantity_Picklist_vod fields on Product_vod records
- When end users first use this feature, they must grant the application access to their device’s camera if they have not already done so
Validation Disclaimer
In Veeva CRM, Sampling features were historically validated by the Veeva team before a release. New features in Minor Releases are released without validation and are validated with the next Major Release. Using Barcodes to Record Call Samples was extensively tested by our QA team during the development and release process and will go through validation with the 20R2 Major Release in August. This new feature requires enablement and does not affect current validated functionality.
Adding Samples to a Call Using a Barcode
Scanning Sample Barcodes
To scan samples from a call:
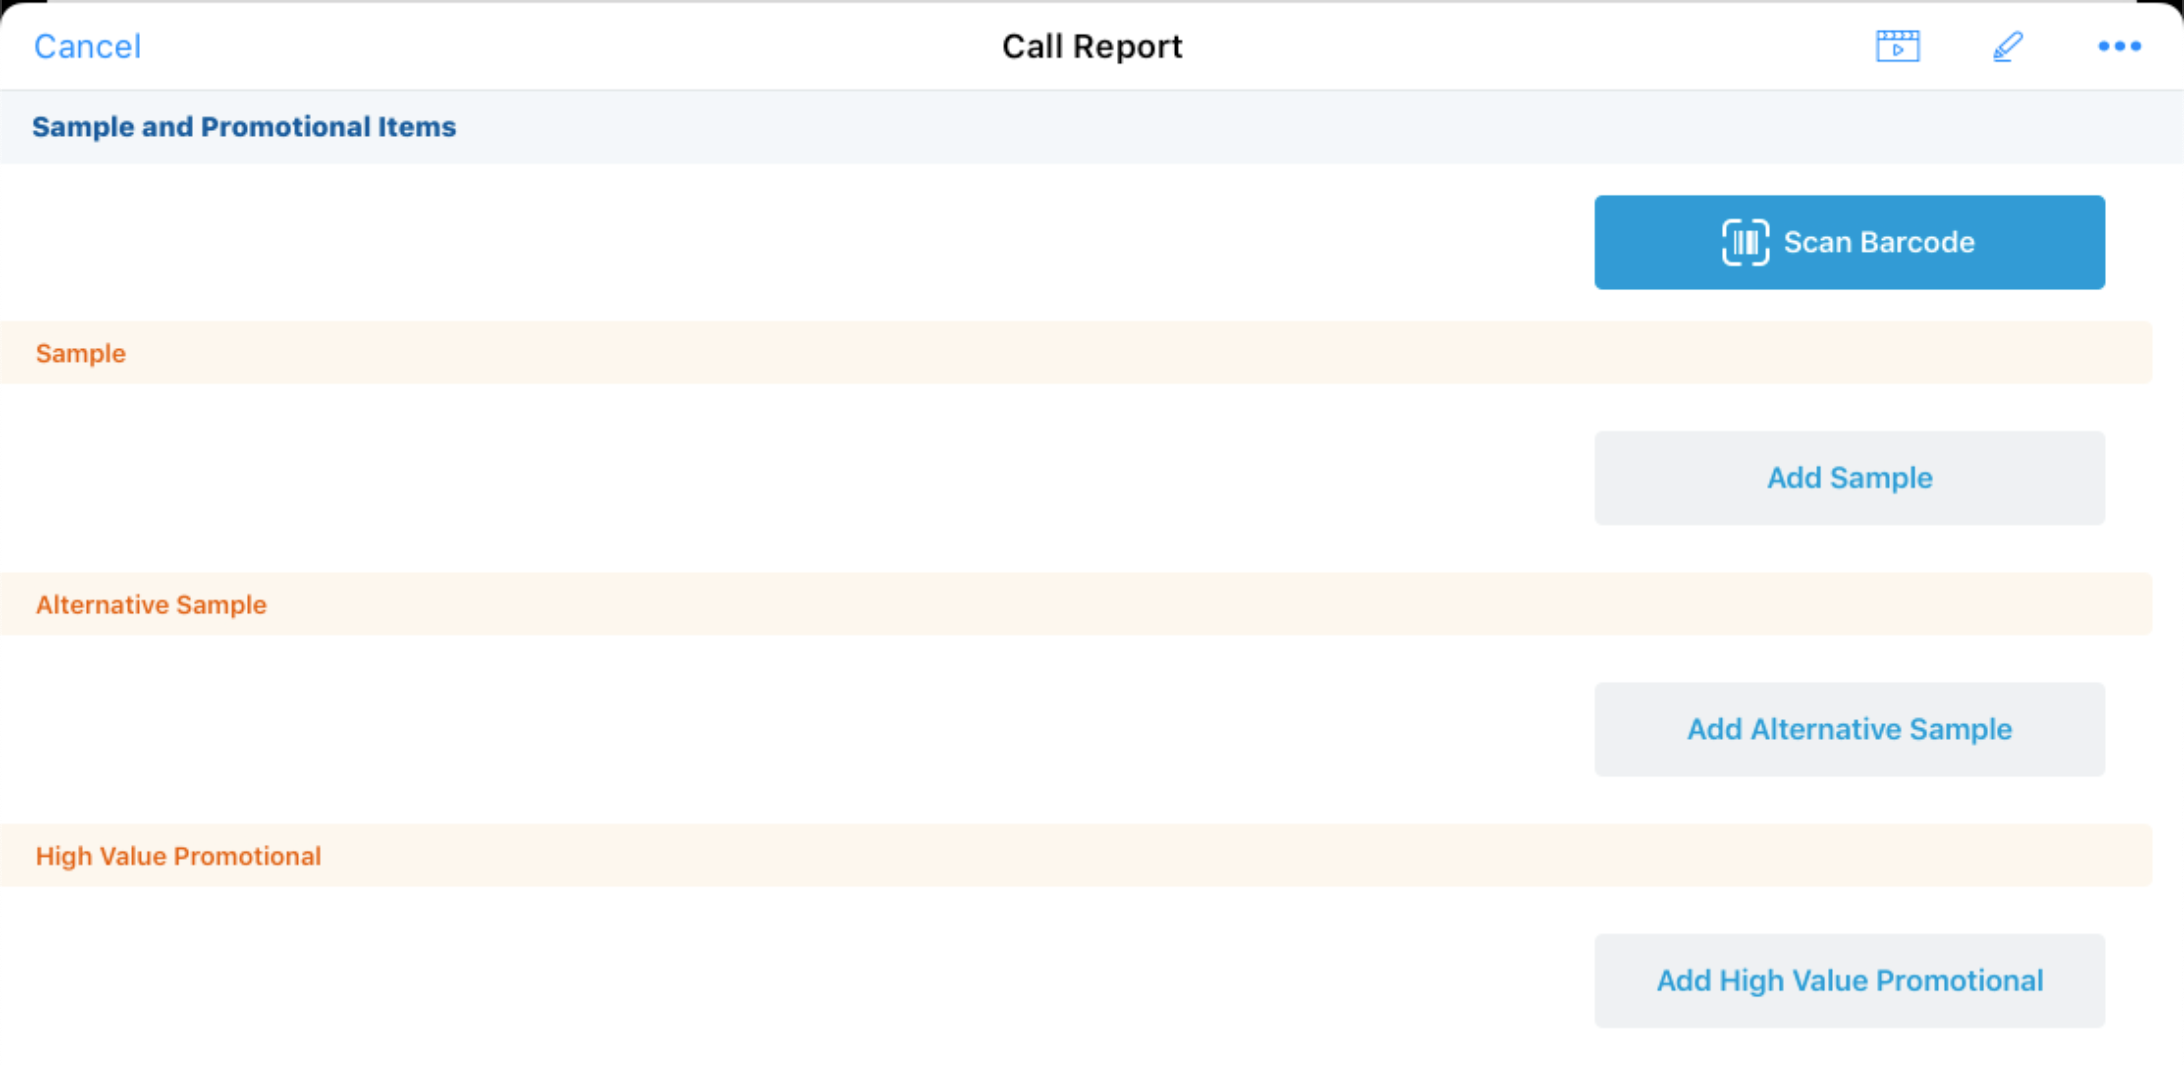
- Navigate to the Samples and Promotional Items section of the Call Report.
-
Select the Scan Barcode button.
-
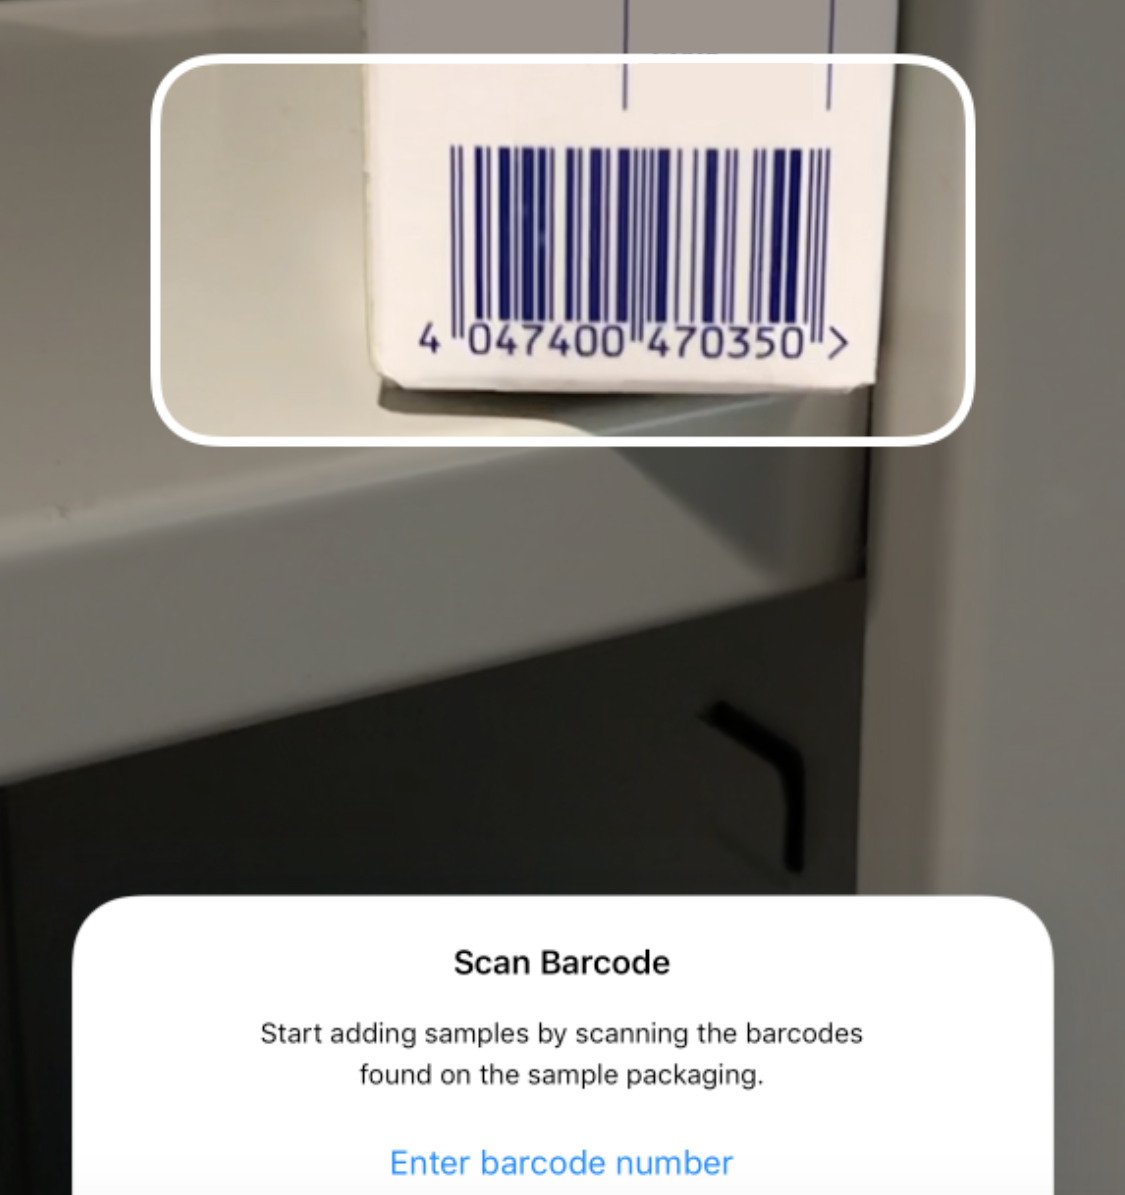
Position the barcode within the shape indicated by the camera. If a valid barcode is detected, Veeva CRM searches for a match against the Batch Lot IDs of all sample lots currently synced to the user’s device.
If there are multiple matching sample lots available for a sample-type product, a picklist displays. Select the appropriate sample lot from the picklist.
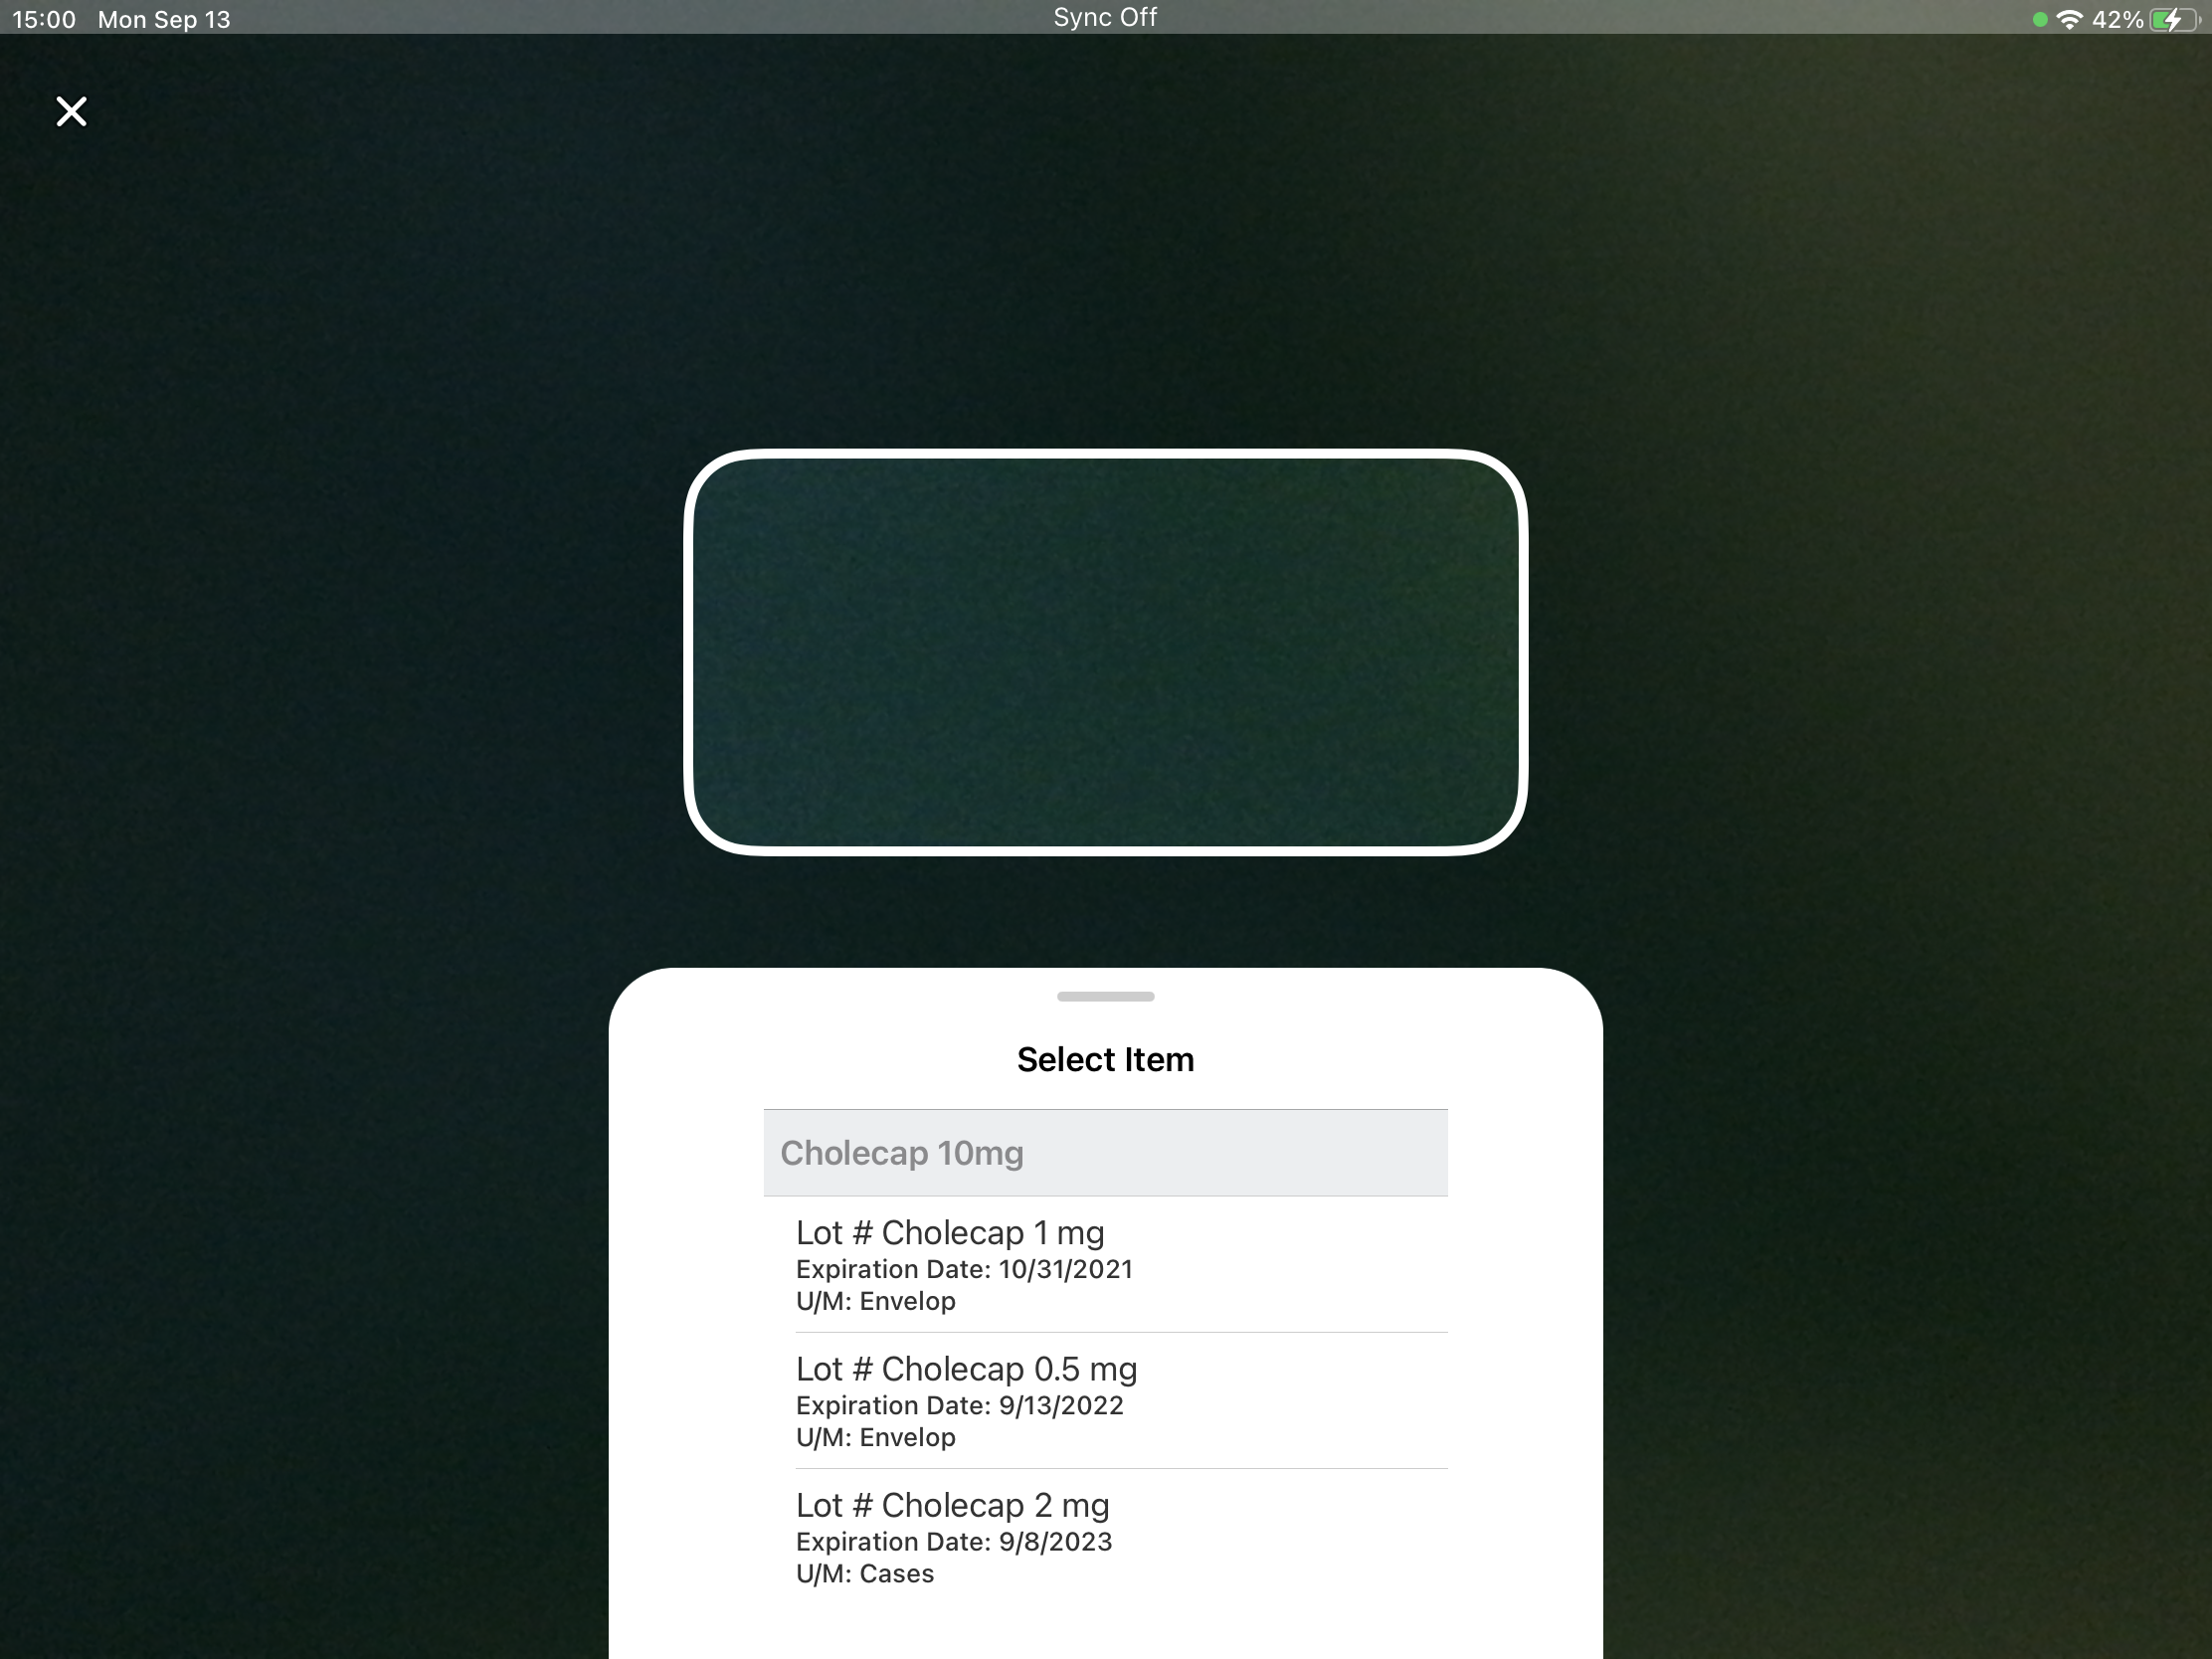
Only sample-type products display in the picklist; products using No_Lot_vod do not display. For products with virtual lot numbers, ensure individual users do not have multiple virtual sample lot records with the same batch lot ID.
-
Review the following displayed Sample_Lot_vod fields to confirm the barcode is correct:
- Product_vod
- Name
- Expiration_Date_vod
- U_M_vod
-
Enter the appropriate quantity.
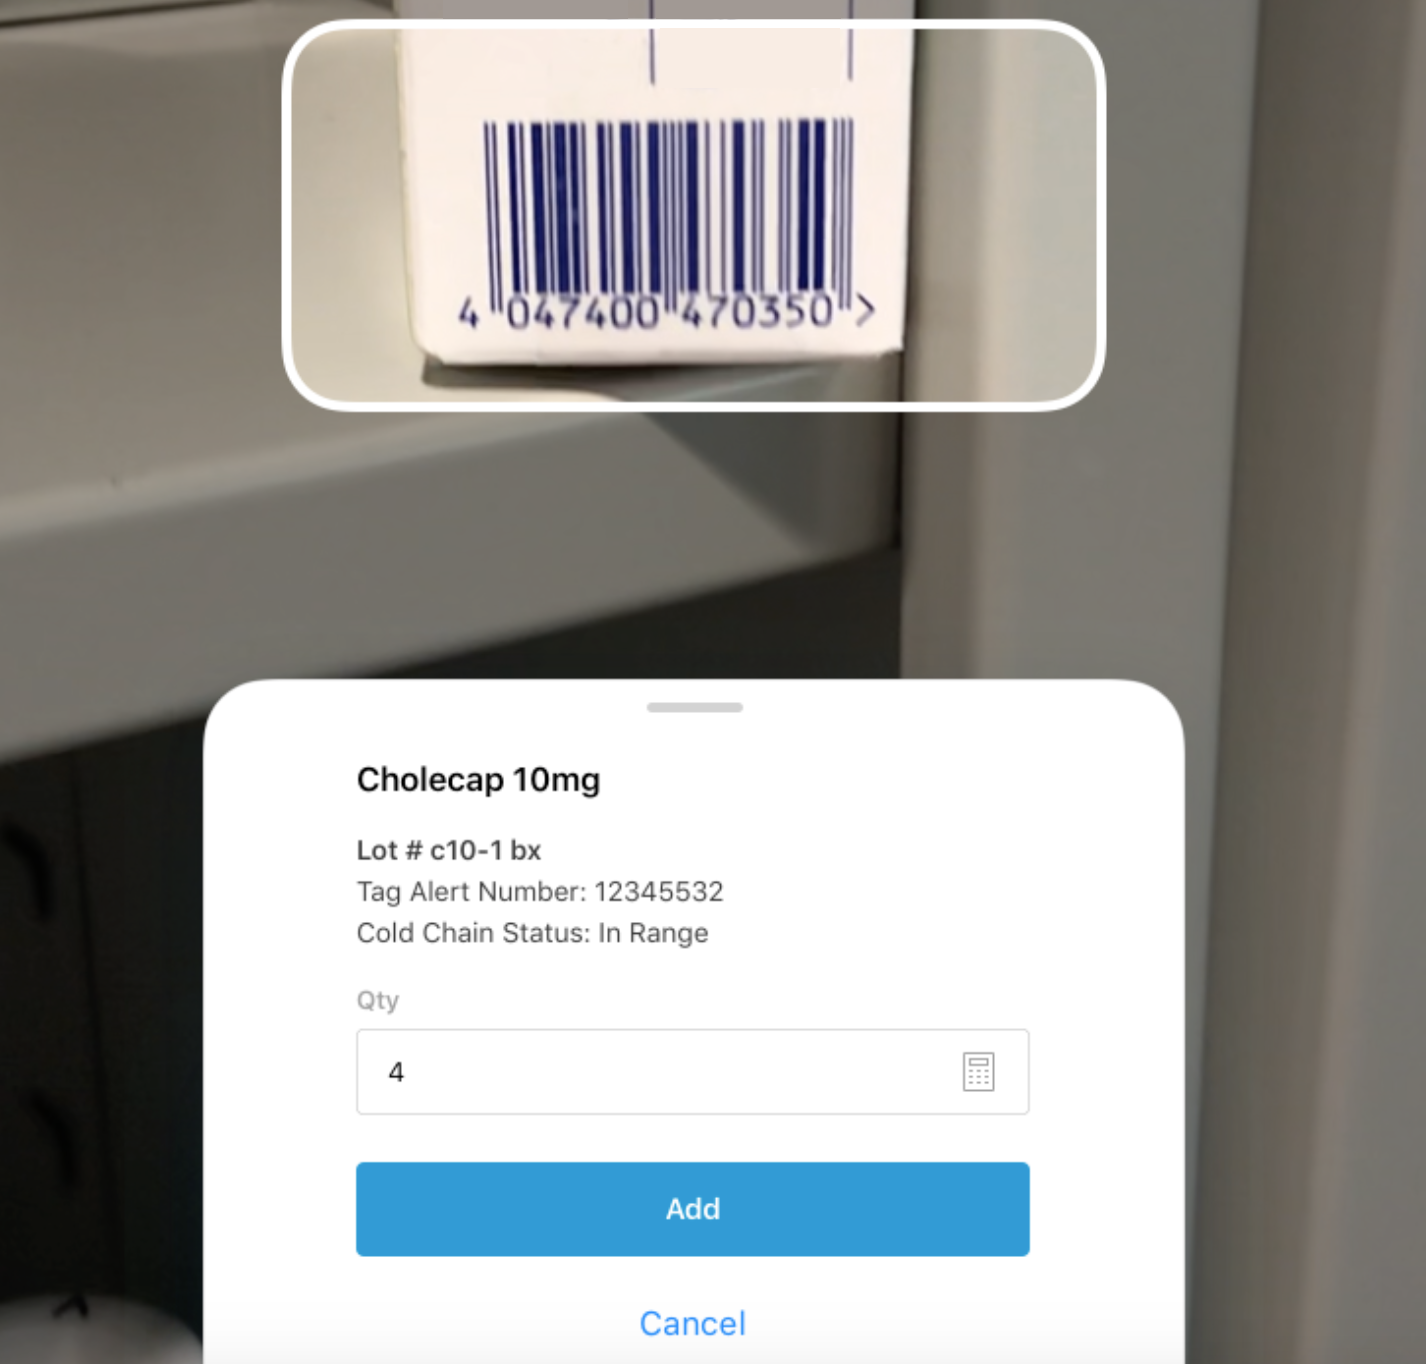
- Select Add.
After adding a sample using the barcode, end users can add more samples or return to the call report by selecting the X button in the top-right corner of the screen.
Manually Entering Sample Barcodes
If a sample lot has a barcode that cannot be correctly scanned or detected, users can manually enter the barcode:
- Select Enter barcode number.
- Enter the barcode number.
- Select Submit.
Veeva CRM searches for a match against the Batch Lot IDs of all sample lots currently synced to the user’s device. If there is a match, end users can add sample lots the same as if the barcode successfully scanned.
Transferring Sample Lots with Batch Lot IDs
If a Batch Lot ID is associated with a sample being transferred from one end user to another, the Batch Lot ID of a sample lot is included in the transfer.
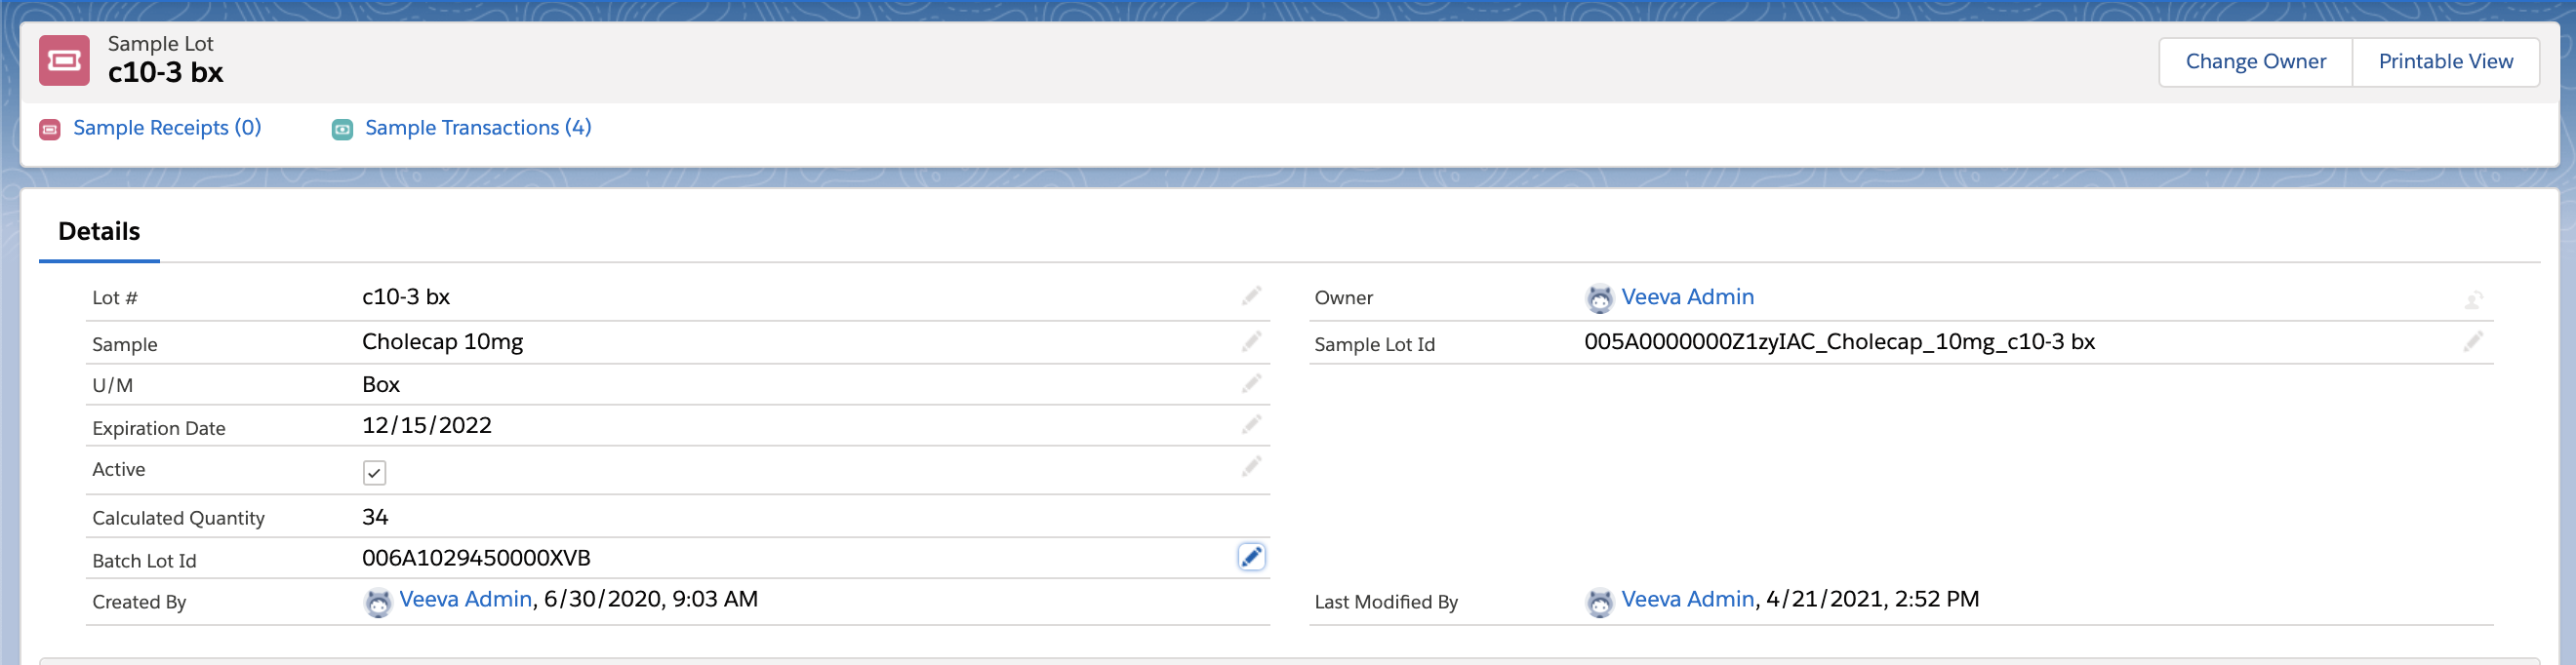
When a Sample Transfer is submitted, all sample lots assigned to the recipient are checked for any matches on the following fields of the transferred sample lot:
- Lot #
- Sample
- Owner
If no records match these fields of the transferred sample lot, a new sample lot is created in the recipient’s name that includes the Batch Lot ID of the transferred lot.
Whether or not the sample lot is created as active or inactive is based on the ENABLE_RECEIPT_ACTIVATION Veeva setting.
If a record matches these fields of the transferred sample lot, the existing sample lot’s Batch Lot ID is overridden with the Batch Lot ID of the transferred lot.
Call Channel Attribute
- iPad | iPhone | Online | Windows
The Call Channel attribute allows a user to specify the method of communication used for a call. Traditionally, users and HCPs met only face to face, but there are alternative methods of communicating with HCPs, for example, phone calls, video calls, emails, and text messages. Knowing how an HCP and user connect allows customers to better understand how methods of communication are used to optimize a customer’s experience.
For example, Sarah Jones’s company has a Cholecap website with a phone number for HCPs to call if they have a question about the product. The phone number goes to a call center agent who is able to answer the HCP’s questions. This interaction is recorded as a call with the Call Channel set to Phone. Sarah’s company can use the data to track the different methods of communications used for calls.
Using Call Channel Attributes
The following options are available in the Call Channel attribute:
- Face-to-Face
- Video – for example, Engage
- Phone
- Email – for example, Approved Email
- Message – for example, WeChat
- Other – any other channel
Consent Capture
Capturing Remote Email Consent with Implicit Default Consent
- iPad | Online | Windows
Customers can use double opt-in and capture consent using confirmation emails for accounts with implicit default consent. This provides flexibility to users when capturing consent from HCPs who previously opted out of email channels. Users can choose to capture signatures or send confirmation emails to confirm consent depending on which method best suits the setting.
For example, Sarah Jones is a rep from Verteo BioPharma, which uses the implicit default consent model. Dr. Clinton Ackerman is an HCP who previously opted out of Approved Email communications. During an Engage meeting, Dr. Ackerman asks Sarah for information about Cholecap. Sarah asks him to opt back in to Approved Email communications so Verteo BioPharma can send him emails about Cholecap. Dr Ackerman verbally consents. Since they are not meeting face to face, Sarah wants to use a confirmation email instead of a signature to confirm consent. She selects the Use email to capture consent toggle on the Consent Capture screen and captures consent for Approved Email communications. Dr. Ackerman receives the email and selects the confirmation link to confirm consent. However, if Sarah were meeting with Dr. Ackerman face-to-face, then she could still choose to confirm consent via signature by not selecting the toggle.
Engage
Capturing Remote Signatures for a Medical Inquiry
- iPad
Customers can capture an HCP's signature before submitting a Medical Inquiry even though the transaction is remote. Requiring an HCP to review and acknowledge the Medical Inquiry content can reduce or eliminate inaccurate requests.
For example, Sarah Jones is not able to visit Dr. Ackerman in person. She creates a remote meeting using Engage and invites Dr. Ackerman. During the meeting, Dr. Ackerman asks a question Sarah cannot answer. She completes the medical inquiry and selects the Remote Signature button. Dr. Ackerman receives the signature request, reviews the details, and provides his signature. Once Sarah receives the signature and reviews it, she accepts the signature and submits the inquiry.
Considerations for Capturing a Remote Signature for a Medical Inquiry
- HCPs are able to receive signature requests on Web Client, iPad, iPhone, and Android HCP apps
- Attendees joining via the Web Client must use Chrome, Firefox, Safari, or Edge Chromium
Validation Disclaimer
In Veeva CRM, medical inquiry features were historically validated by the Veeva team before a release. New features released in Minor Releases are released without validation and are validated with the next Major Release. Capturing Remote Signatures for a Medical Inquiry was extensively tested by our QA team during the development and release process and will go through validation with the 20R2 Major Release in August. This new feature requires Medical Inquiry to be configured for the iPad and does not affect current validated functionality.
Capturing a Remote Signature for a Remote Medical Inquiry
To capture a remote signature, users (hosts) must do the following:
- Schedule and Start an Engage Meeting on iPad or from the CRM Desktop (Windows) app, if High Performance Call Report is enabled.
- Select Create Medical Inquiry from the More Actions menu.
- Complete the Medical Inquiry information.
- Select the More Actions button from the Medical Inquiry.
-
Select Sign.
-
Use the Language picklist to select the disclaimer text language. This picklist only displays if Displaying Country-Specific Disclaimers is enabled.
-
Use the Receipt picklist to select the email address the receipt should be sent to (iPad only). This picklist only displays if Approved Email Receipts for Signature Transactions are enabled.
-
Select Remote as the Signature Method.
- Select Next.
-
Select the appropriate attendee's device if multiple attendees joined using the same Engage meeting ID as the Account. If there is only one device, the list does not display. The signature request is sent to the signee’s device.
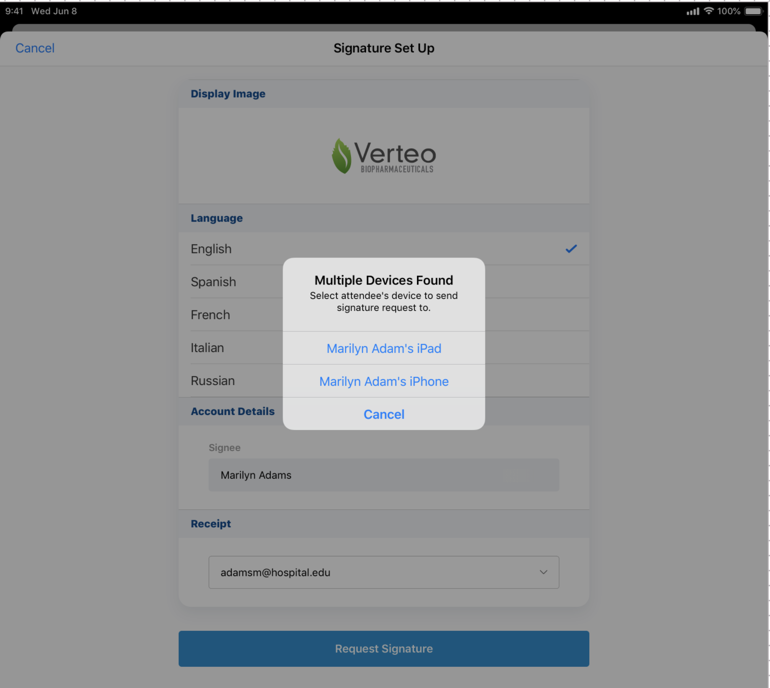
A "Signature Request Failed" error message displays if an unsupported browser is used.
To capture a signature, HCPs must do the following after the signature page launches:
- Review the Medical Inquiry information captured.
- Select Request Receipt if an email receipt is desired.
- Select Next.
- Sign in the Signature box.
- Select Accept. The Signature page is locked, all fields are stamped in the audit trail, and the signature is sent to the meeting host for review.
Once the HCP signs and accepts the signature, a confirmation message displays to the meeting host indicating receipt of the HCP’s signature. When the host selects Accept they are returned to the Call Report.
Events Management
Associating an Account with an Event
- Online | iPad | Windows
Events Management end users often host small events that prompt interactions warranting a call report, for example, a request for a sample. When an account is associated with an event, call reports created from the event inherit information from the event. This simplifies the call report creation process by enabling the end user to avoid entering duplicate information. Associating an account with an event also simplifies the event planning process by filtering the list of available attendees to only display attendees associated with the account.
For example, Sarah Jones hosts a lunch and learn at Chilton Memorial Hospital. When Sarah creates the event, she selects Chilton Memorial Hospital as the account associated with this event. During the lunch and learn, Dr. Ackerman requests a sample of Cholecap. Sarah selects Create a Call from the event and a call is created with Chilton Memorial Hospital automatically selected as the account. Other information from the event also automatically populates based on information from the event, including Dr. Ackerman as an attendee of the call. Sarah uses the newly created call report to disburse a sample to Dr. Ackerman.
Creating Account Based Events
To create an account based event:
- Navigate to the appropriate event.
- Use the Account lookup field to select the proper account.
-
Use the Address lookup field to select the appropriate address. When this feature is enabled in orgs with Lightning for Events Management enabled, as well as when using the iPad, the Address field displays as a picklist with all of the account’s associated active addresses.
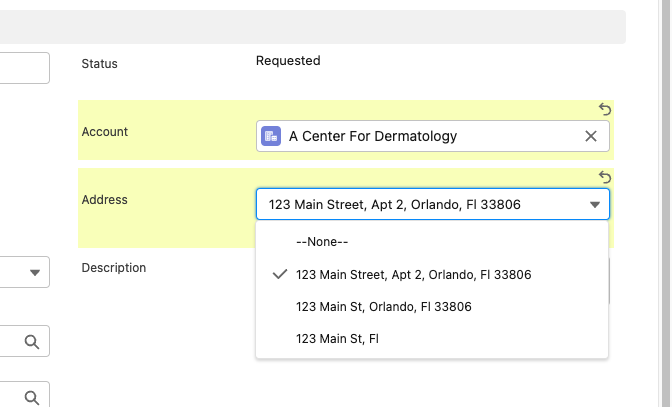
- Select Save.
When adding attendees to an account based event, the list of available attendees automatically filters to only display attendees associated with the account.
Creating a Call from an Account Based Event
End users can create a call from an account based event to quickly record interactions they may have with attendees by selecting the Create a Call button from the event. The created call has the following properties automatically defined:
- Record Type – The record type is defined by the DEFAULT_CALL_RECORD_TYPE_vod Veeva setting. If no record type is defined in this setting, the record type is the user’s default.
- EM_Event_vod – References the event that the call was created from
- Account – References the account defined in the corresponding event’s Account_vod field
-
Address picklist – The picklist automatically populates with the value defined in the corresponding event’s Address_vod field. End users can select a different picklist value for the call while maintaining the original value of the Address_vod field on the event.
When adding accounts to a call created from an account based event, accounts corresponding to the event’s attendees display as suggested attendees on the call.
The parent HCO account of an HCP account must be in the same territory for child accounts to display.
Medical Inquiry
Medical Inquiry on iPhone
Users can now create a Medical Inquiry on iPhone. This allows users to also capture and audit signatures for a medical inquiry. See the Platform table for all features available on the iPhone platform.
Validation Disclaimer
In Veeva CRM, Medical Inquiry features were historically validated by the Veeva team before a release. New features in Minor Releases are released without validation and are validated with the next Major Release. Medical Inquiry on iPhone was extensively tested by our QA team during the development and release process and will go through validation with the 20R2 Major Release in August This new feature requires Medical Inquiry to be configured on the iPad and does not affect current validated functionality.
MyInsights
Sharing MyInsights Content
- iPad | iPhone
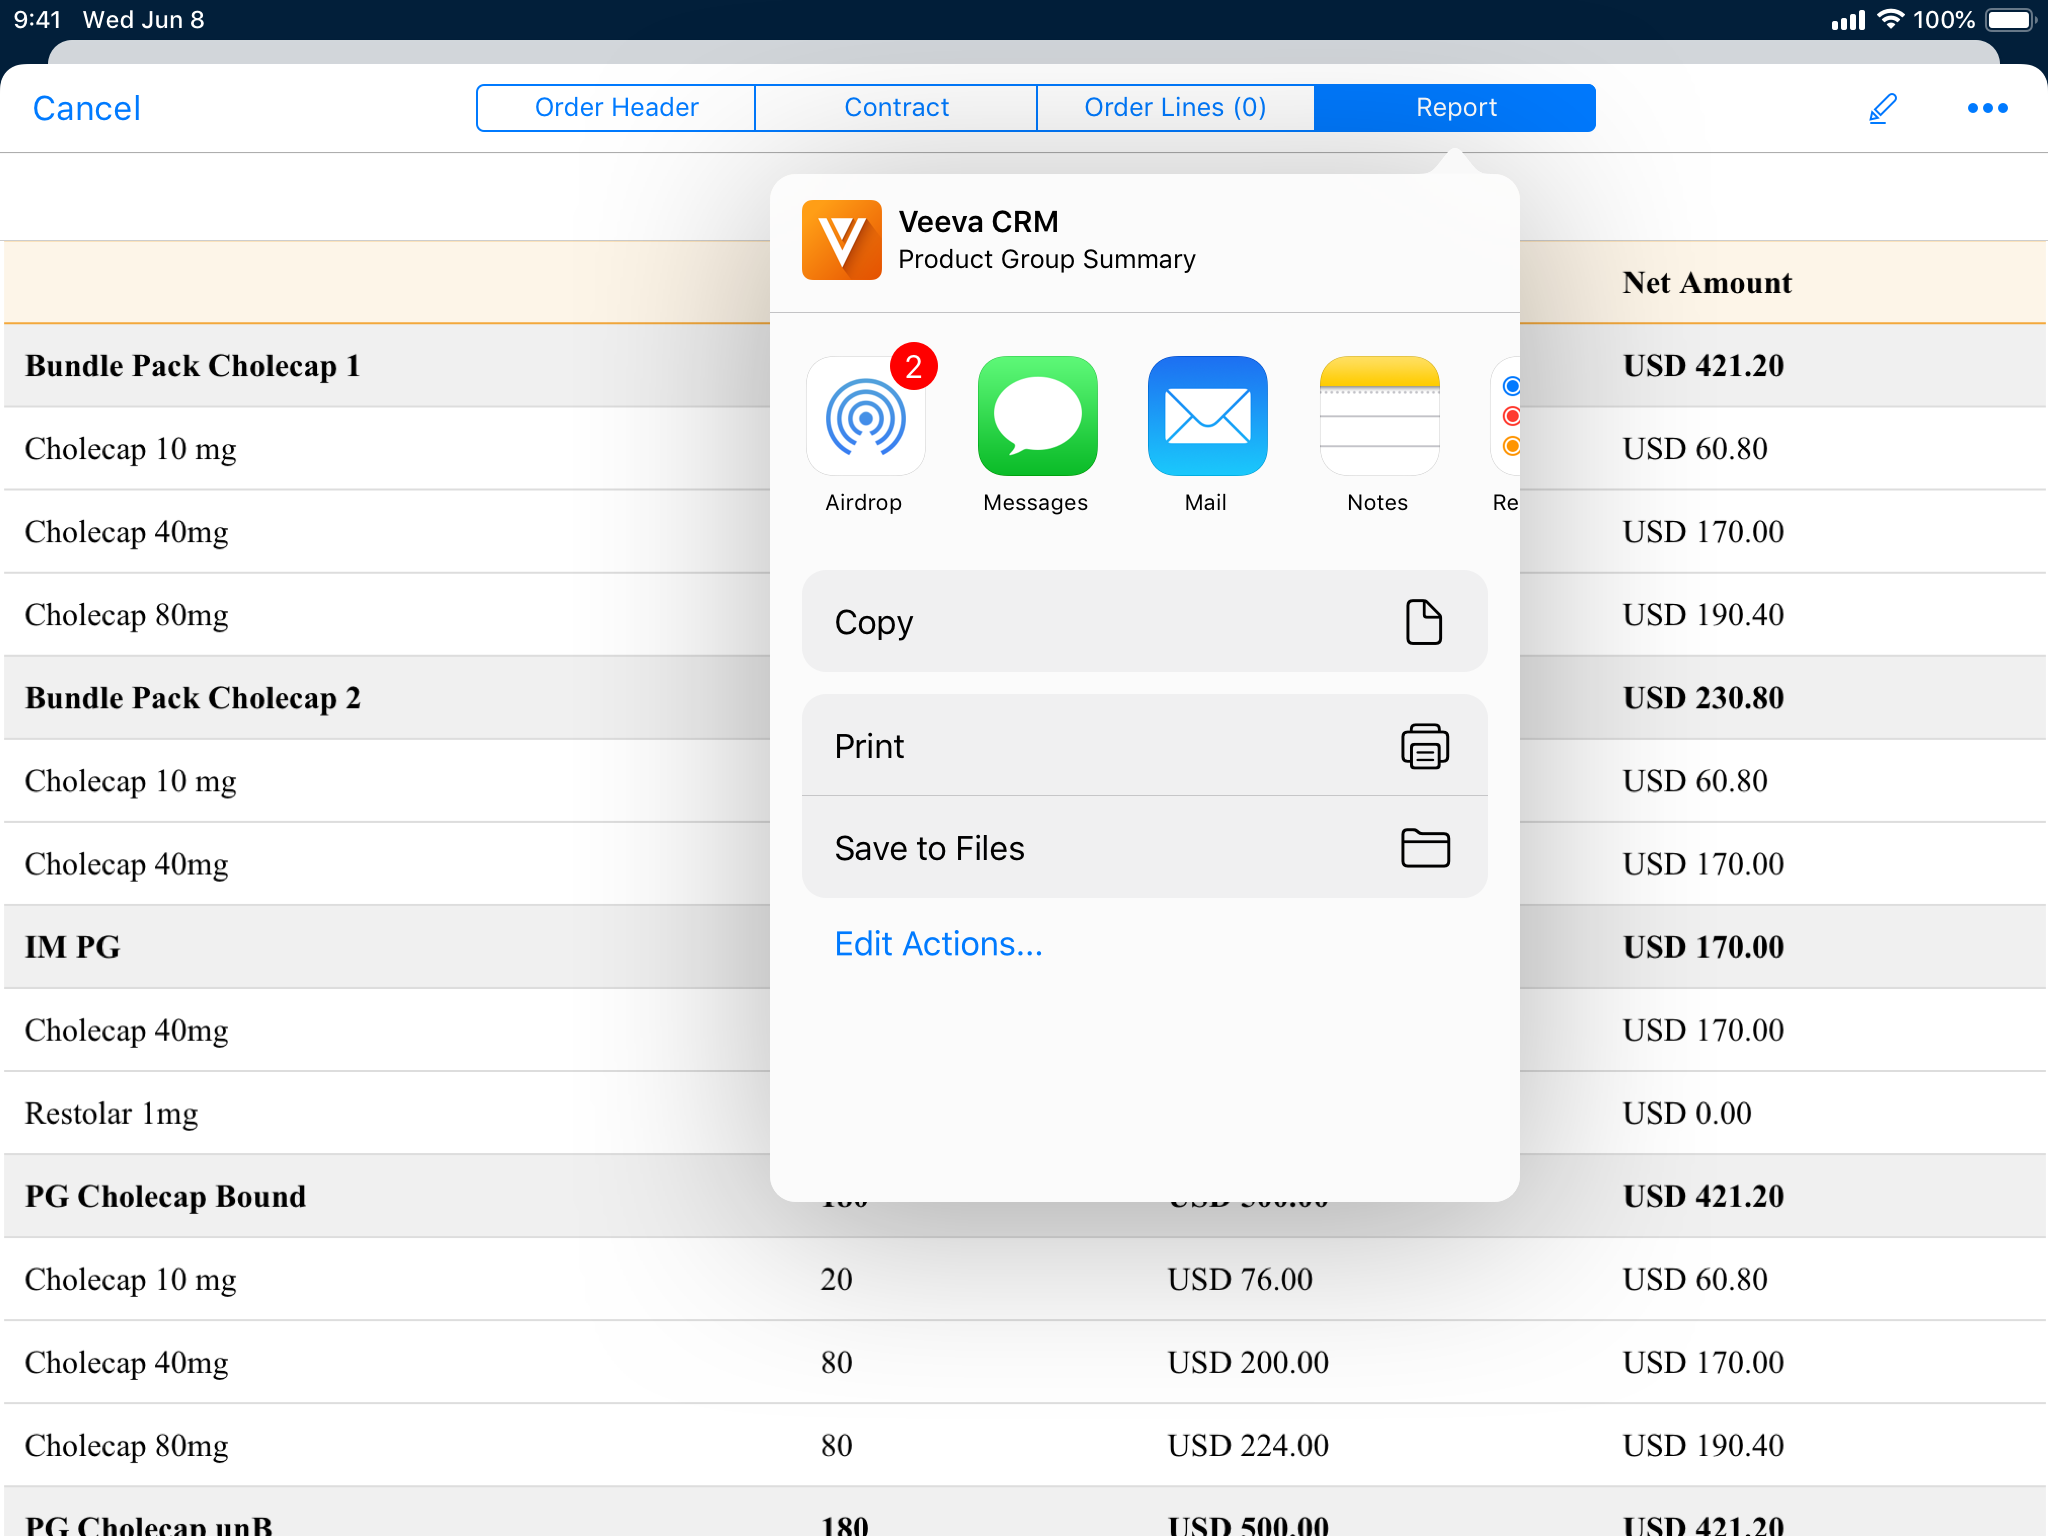
Users can share MyInsights content using iOS share actions. This allows users to share information from customized content with people who do not have access to Veeva CRM. Users can share any content available on their devices, including order and inventory monitoring content on iPad devices. MyInsights content is shared as PDFs. Additionally, users on devices with iOS13 or later can take full page PDF screenshots.
For example, Sarah Jones wants to share information about HCPs in her territory with a company executive who does not have access to Veeva CRM. She navigates to her territory visualization, presses and holds the visualization tab to preview the PDF, then selects the Share button to email the PDF to the executive.
When developing MyInsights content intended to be exported and shared outside of CRM, content creators must test the content before publishing to ensure it is print-ready and displays correctly as a PDF. Some CSS properties can cause content to display incorrectly, for example, using specific pixel widths instead of percentage widths or using the CSS transformation rotate. Additionally, ensure all CSS media queries include the print media type. Testing is not required before taking full page screenshots.
Sharing Visualizations Using Press-and-Hold
After navigating to a MyInsights tab, the Shareable button displays in the bottom right corner to inform users it can be shared. Users can select the Shareable button to view the onboarding animation, which demonstrates how to share MyInsights content.

To share MyInsights content:
- Press and hold the MyInsights tab for at least 1.5 seconds, then release it to view the PDF preview of the content.
- Select Share to view the available iOS share actions.
- Select the appropriate share action, for example, sharing the PDF via email or printing it.
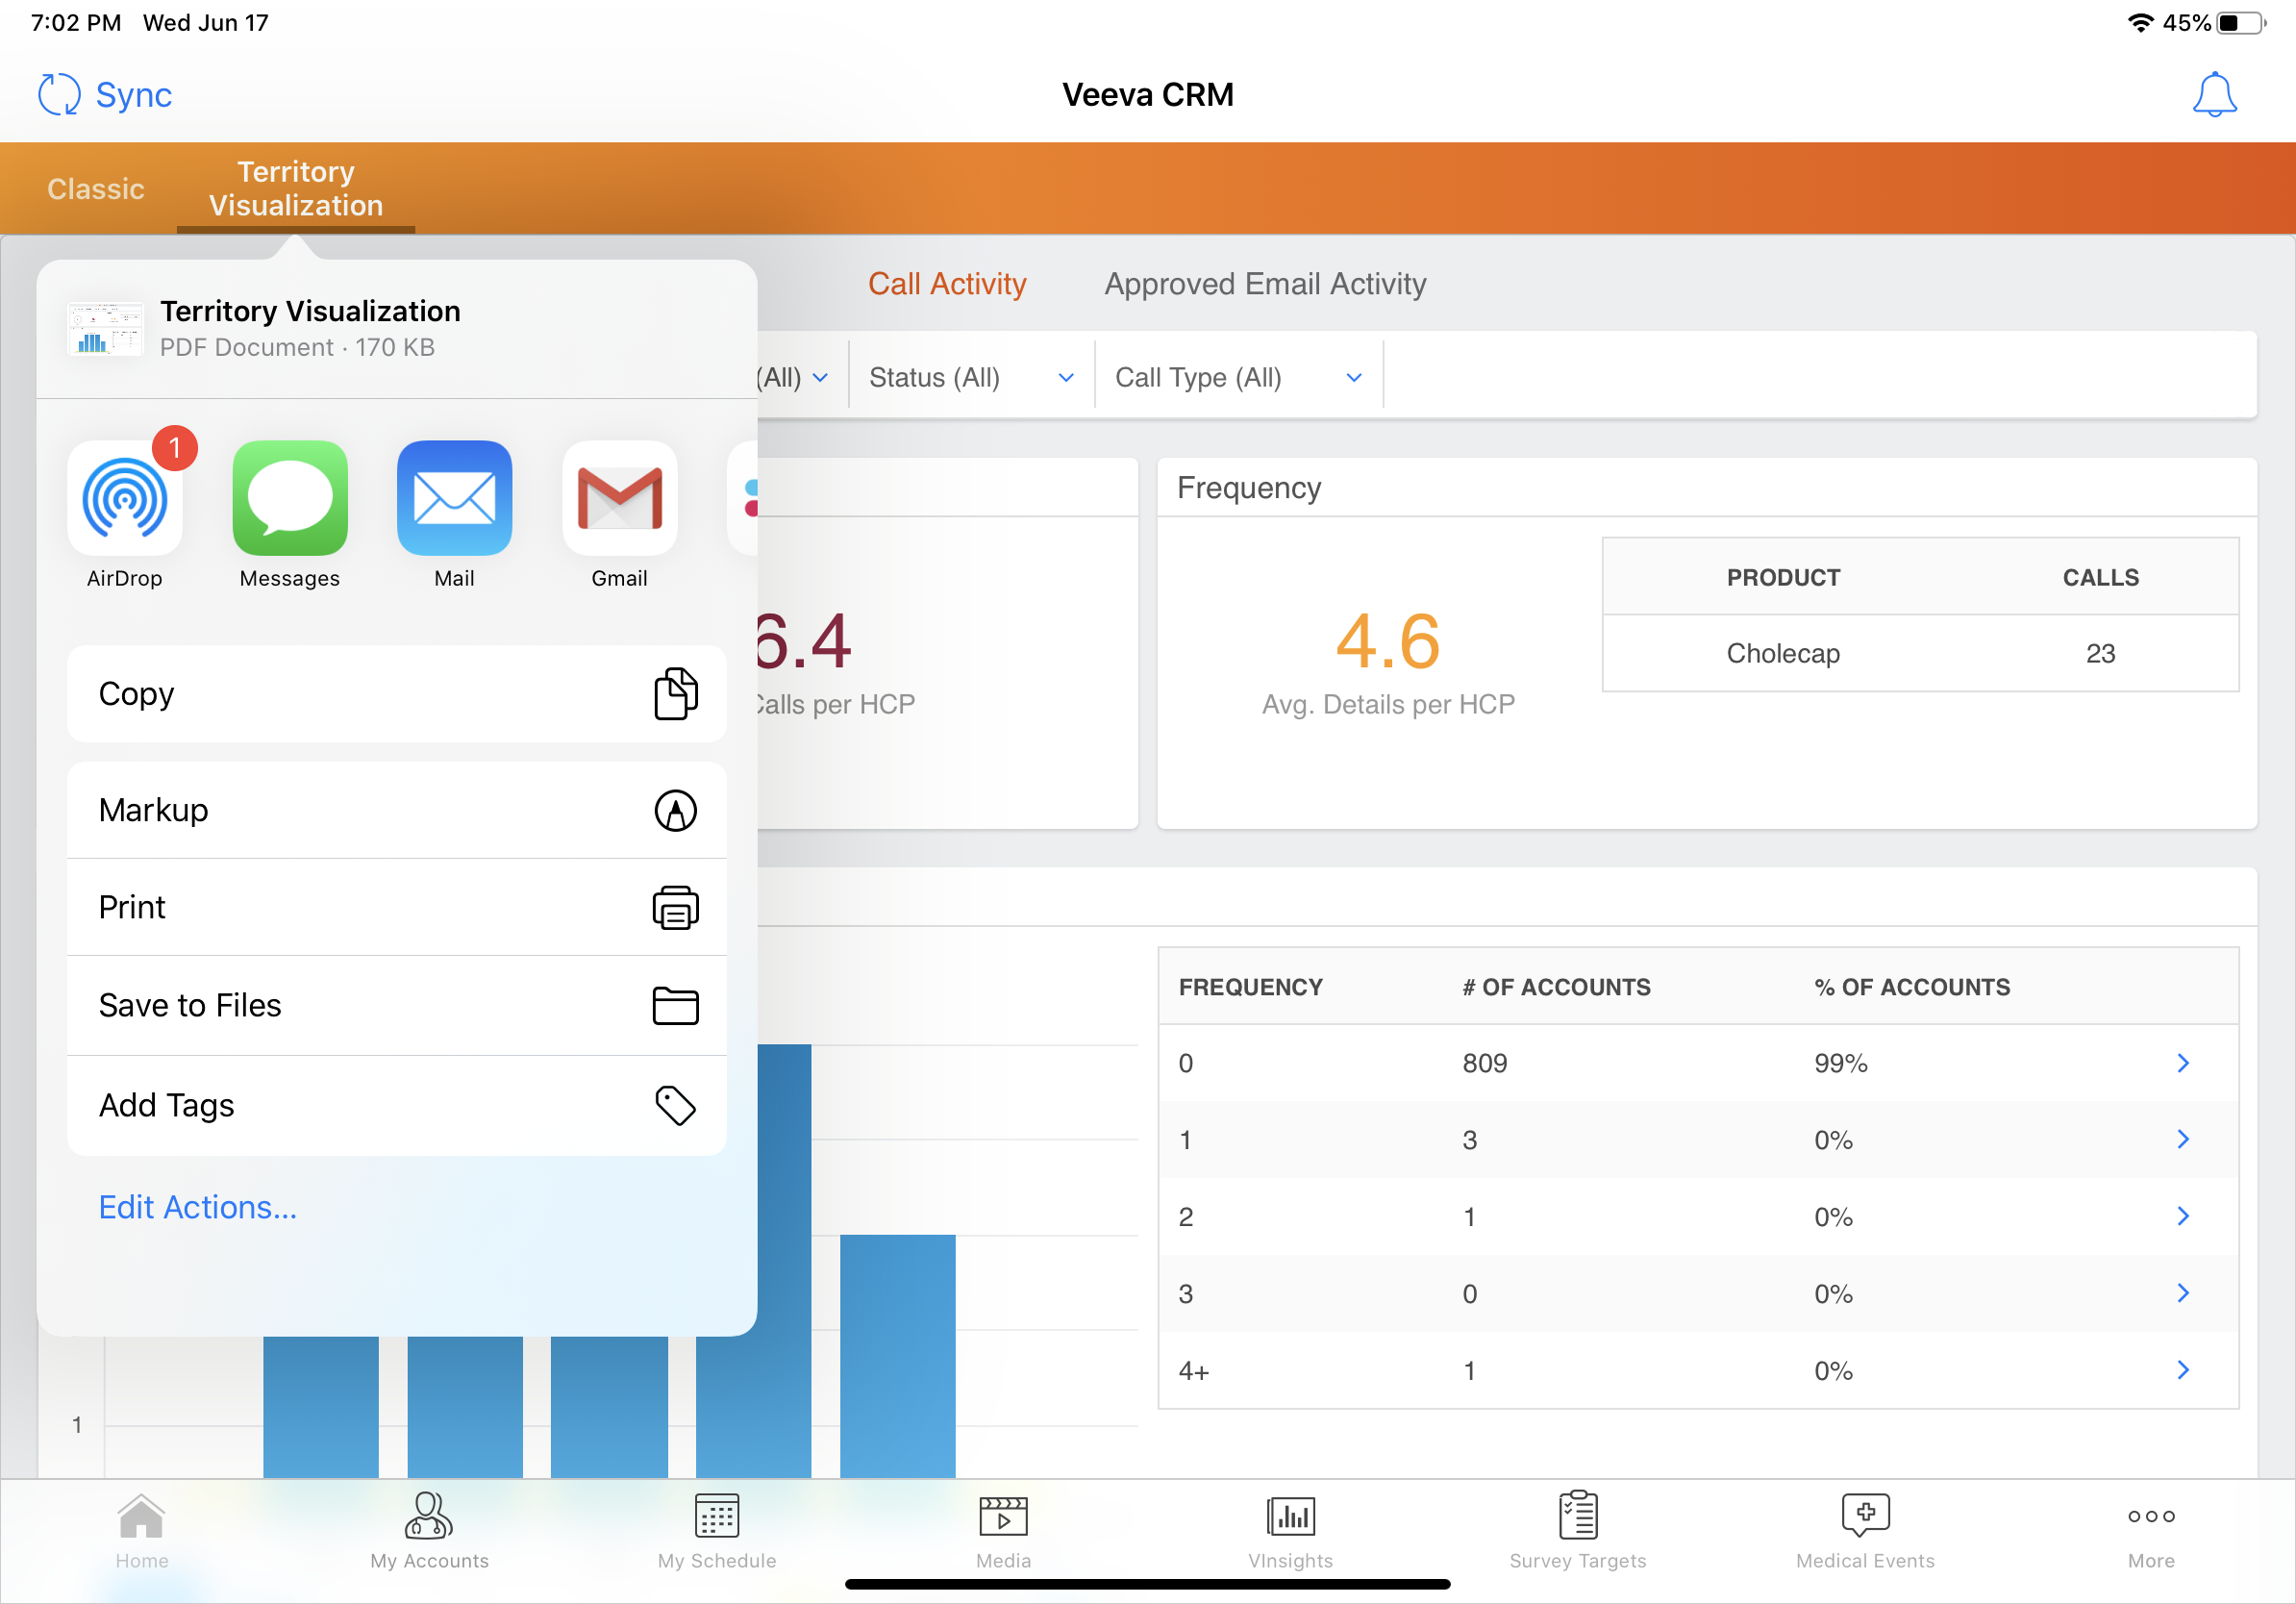
Additionally, users on iPad can share orders and inventory monitoring content by pressing and holding the Report tab.
Sharing Visualizations Using Full Page Screenshots
After taking a screenshot and opening it in the image editor, users on devices with iOS13 or later can select the Full Page button to preview the full page screenshot. Select the Share button in the top right corner to view the available iOS share actions.
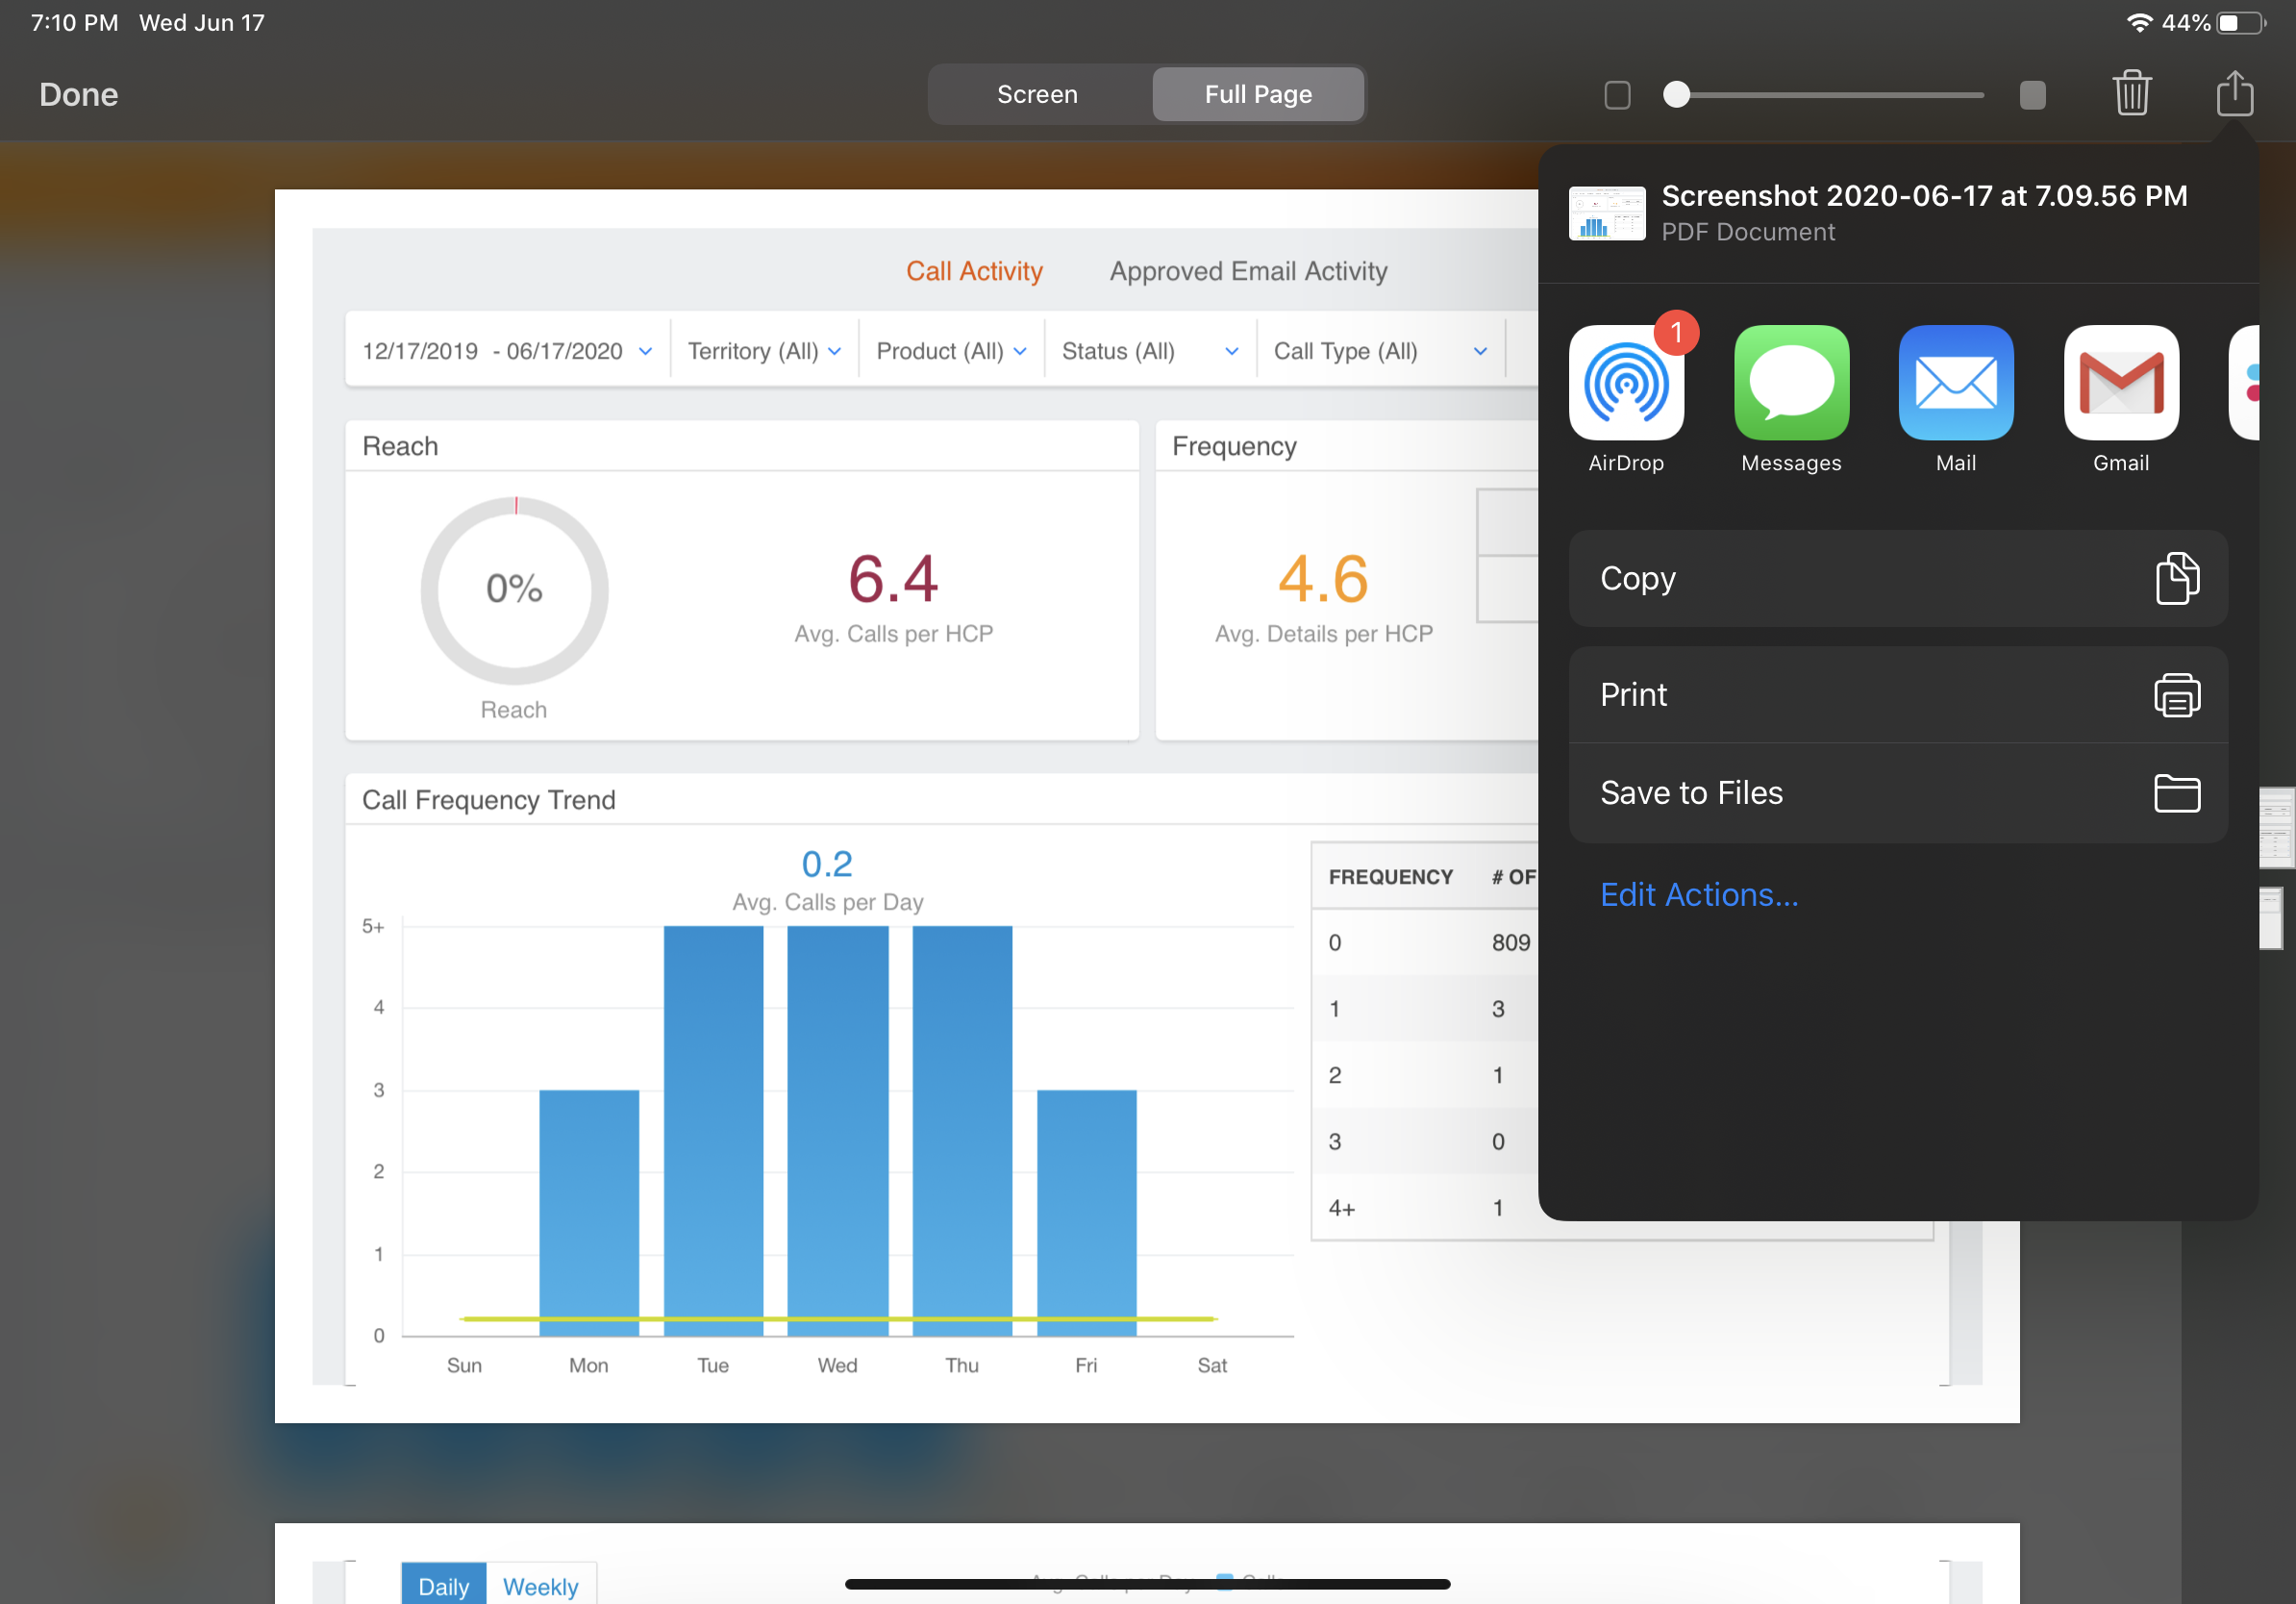
The method used to take a screenshot on iPad and iPhone devices varies by device. See Apple’s documentation for taking iPhone screenshots and iPad screenshots.
