24R3.0 Functionality Guide
The Functionality Guide is intended for Sales Operations, Business Administrators, System Integrators, and others responsible for making decisions about what features are needed for end users to be successful and deciding which features work together with existing customer configurations.
Approved Email
Sending Microsoft Teams Meeting Invitations via Approved Email
With Approved Email, users can send meeting invitations to up to 50 Microsoft Teams meeting attendees at once. Approved Email templates used as Microsoft Teams meeting invitations contain meeting information and attendee-specific URLs that attendees use to join the Microsoft Teams meeting. Approved Email templates and tokens ensure that all of the important details, for example, the date and time, meeting URL, and password (if enabled) are included in the email.
Users on CRM Desktop (Windows) can also schedule Microsoft Teams meetings from within a High Performance Call Report and send emails to HCPs with the meeting details, using Approved Email.
Creating an Approved Email Invite Template
Content Creators must create an Approved Email template before users can send meeting invites. Follow the guidelines below when creating an Approved Email invite template for Microsoft Teams meetings in PromoMats/MedComms.
- Set the template type to microsoft_teams_meeting_invite__v.
- Email templates should include the following tokens:
- Meeting Datetime - {{parentCallDatetime}}
- Meeting URL - {{Call2_vod__c.Remote_Meeting_vod__r.MS_Teams_Meeting_Link_vod__c}}
Adding the tokens above to the template automatically populates key meeting details, including date, time, and joining instructions. Other tokens in the template personalize the message to the recipient.
Sending Microsoft Teams Meeting Invitations via Approved Email
To invite users to a Microsoft Teams meeting using Approved Email:
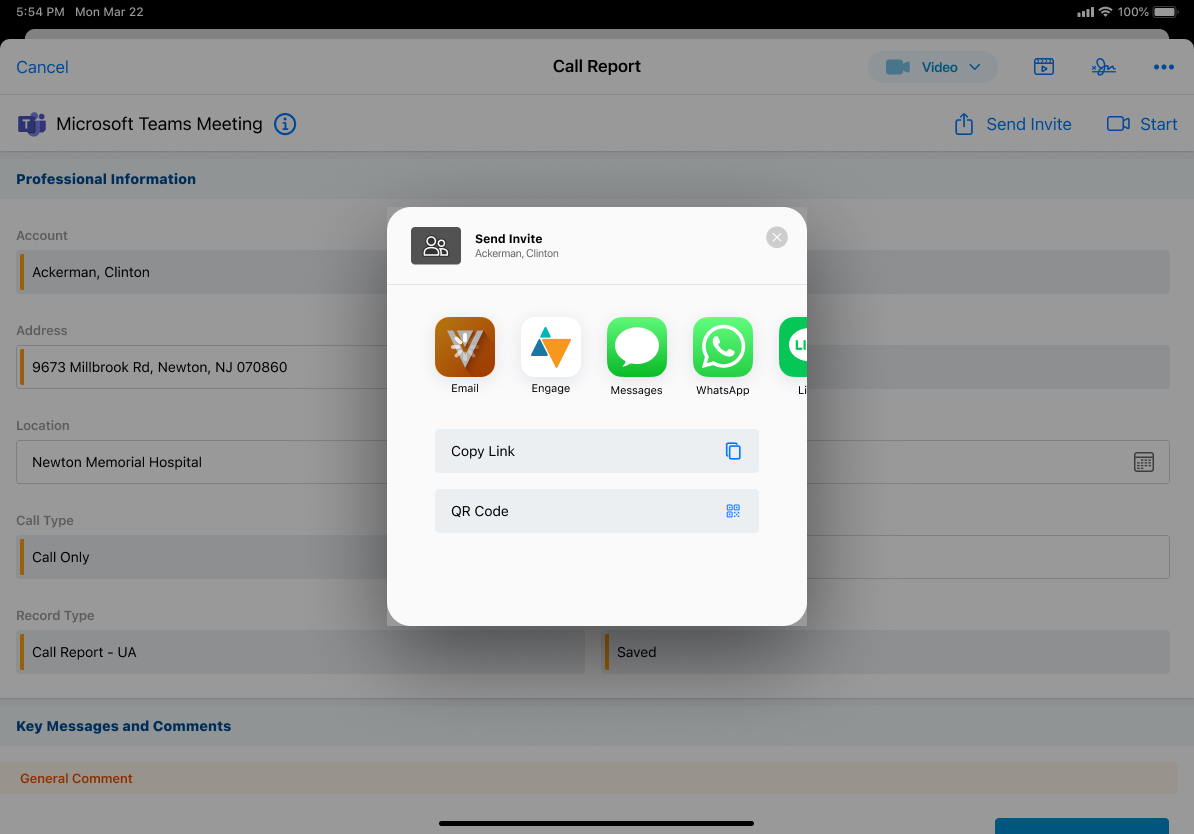
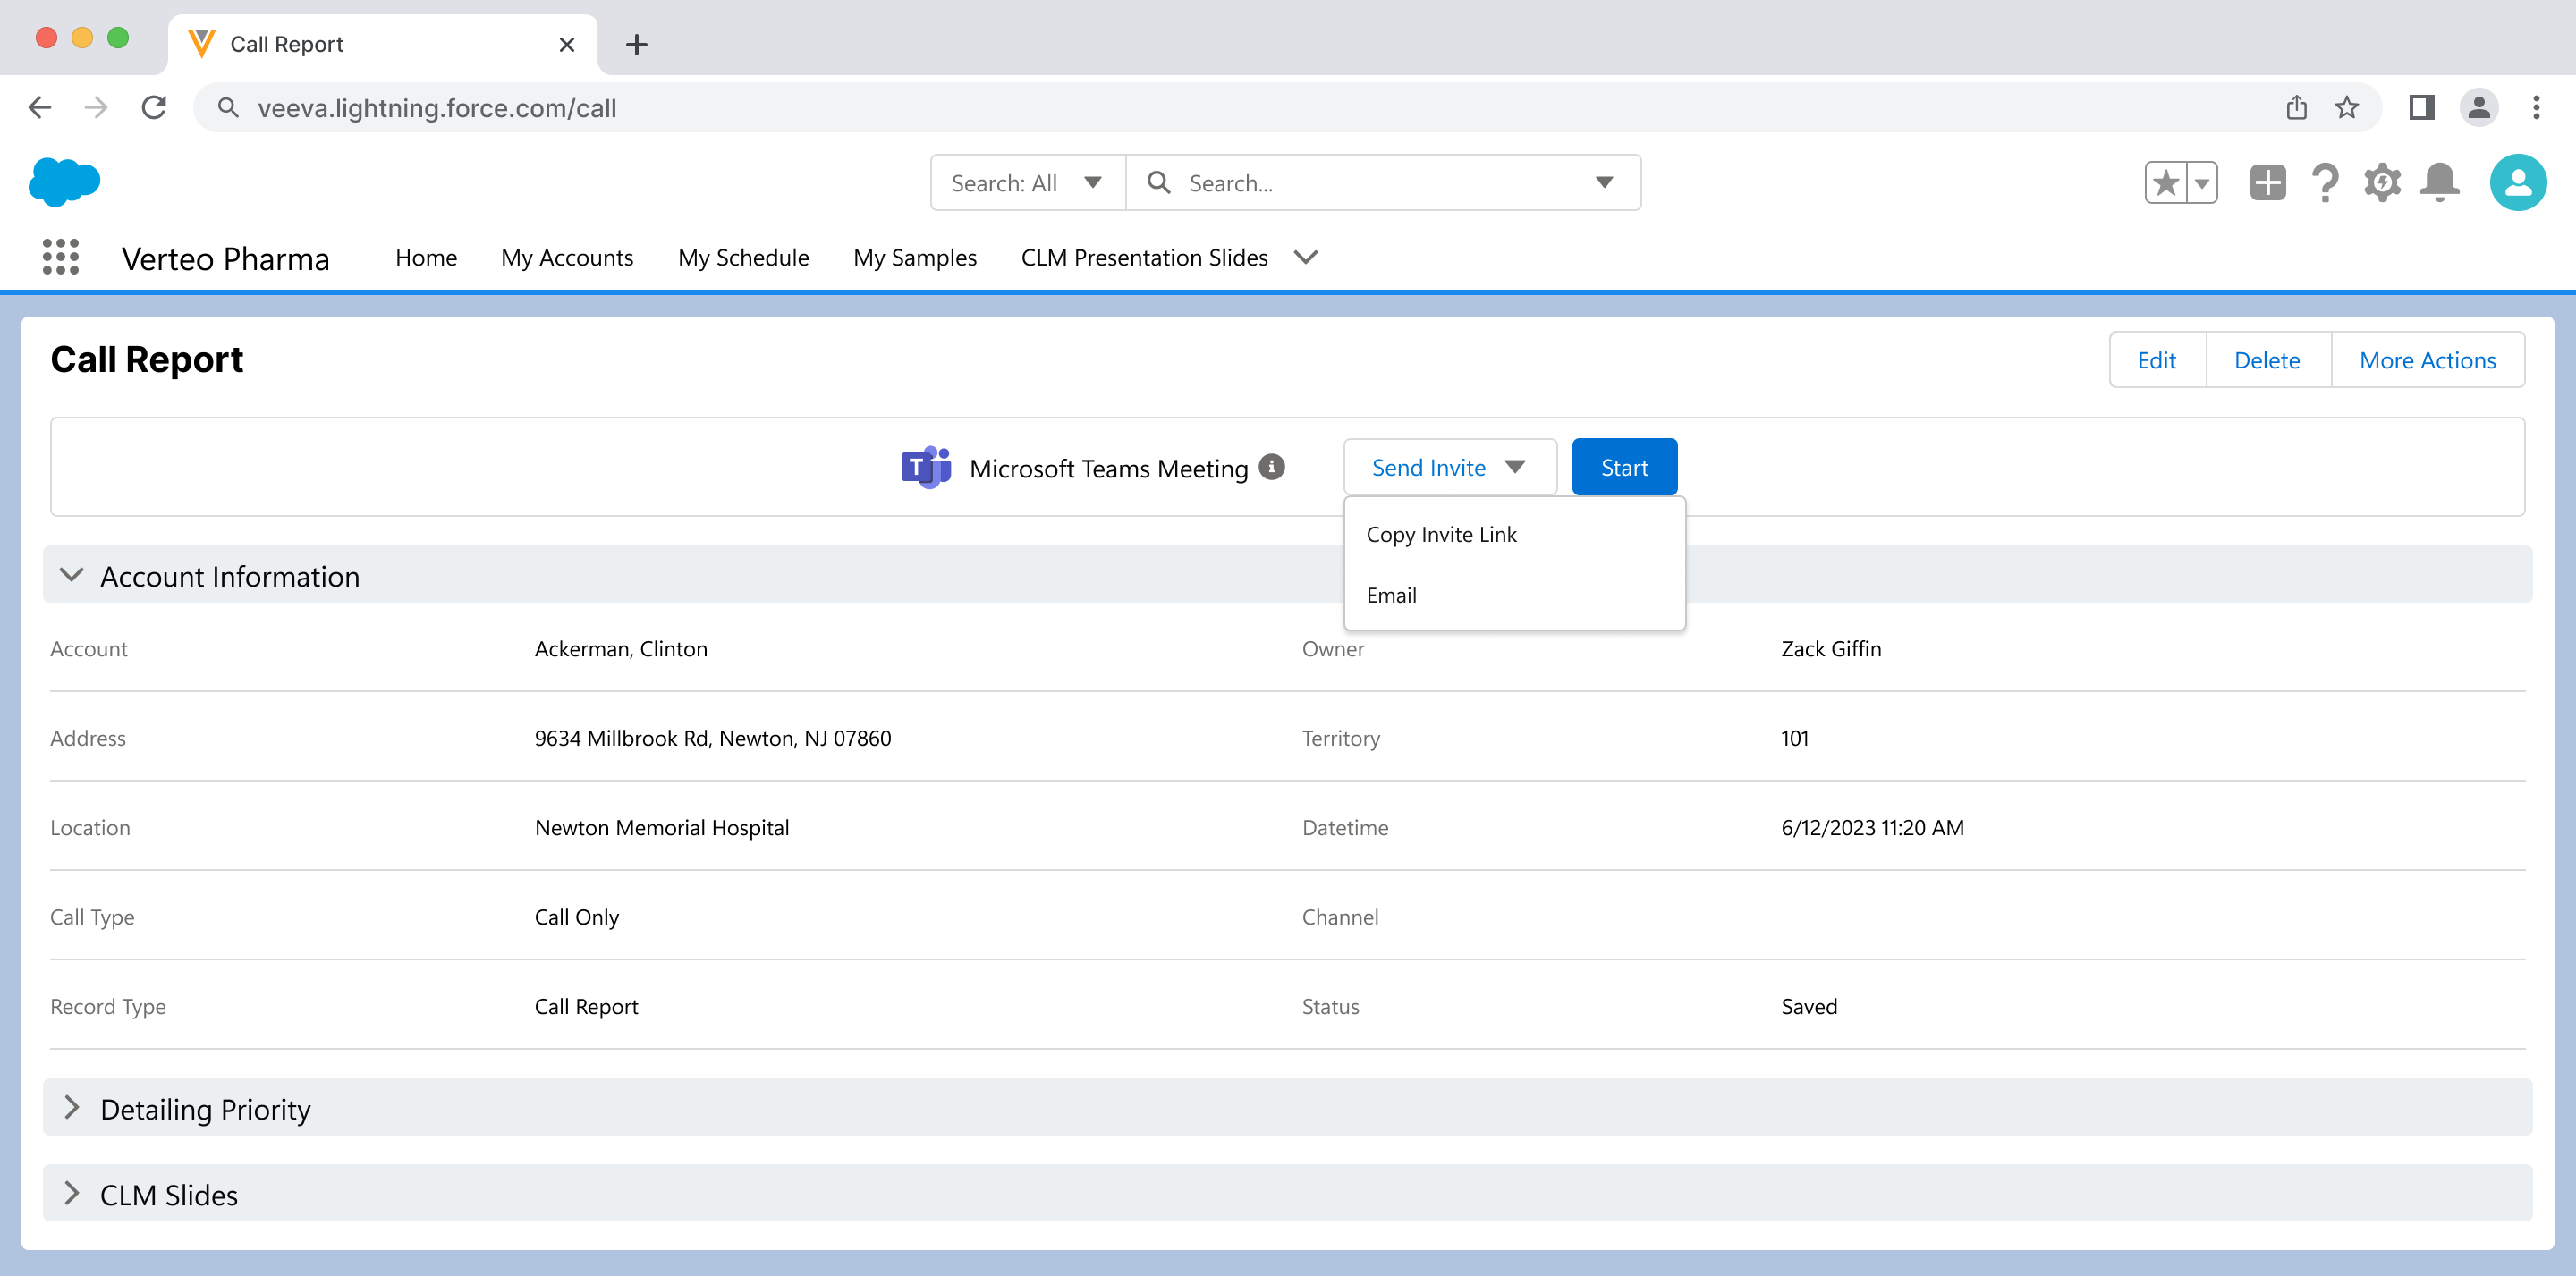
- Select the Send Invite button on the call report.
-
Select Email in the share modal (iPad) or from the dropdown menu (Browser).


- Select an Approved Email template for the invite. If only one template is available, the template displays by default.
The Recipients field is populated with all account call attendees. User attendees are not included. If Group Emails is enabled, the business account on the call displays as a recipient.
- Send the Approved Email invite.
A sent email record is created to track engagement and store the details of the invite.
Approved Email meeting invites do not count against the Threshold value for Sent Email.
Invitations do not send to business accounts.
In addition to standard call reports, users can schedule MS Teams meetings from within High Performance Call Reports, and invite HCPs to the meetings using Approved Email.
To share a meeting invite from a high performance call report, select the Share Invite button.
Adding a Calendar Reminder to a Microsoft Teams Meeting Invitation
Approved Email content creators can add a calendar reminder to a Microsoft Teams meeting invitation.
Calendar reminders can be added to a Microsoft Teams meeting invitation by adding the {{addToCalendar}} token anywhere in the Email Template. This token generates an .ICS (Internet Calendaring and Scheduling) file that attaches to the Microsoft Teams meeting email invitation.
Veeva recommends providing instructions in the Email Template about opening the attached .ICS file and adding the event to their calendar.
Using .ICS Attachments in Approved Email Invitations
The .ICS attachment is generated automatically when a user sends an Approved Email for a Microsoft Teams meeting. The information in the file is generated from the following fields:
- Meeting Title – Call2_vod__c.MS_Teams_Remote_Meeting_vod__r.Meeting_Name_vod__c
- Meeting Start Time – Call_Datetime_vod field on the Call2_vod object
- Meeting Duration – Duration_vod field on the Call2_vod object. If null, then 30 minutes is the default.
- Meeting Location – Call2_vod.MS_Teams_Remote_Meeting_vod__r.MS_Teams_Meeting_Link_vod__c
- Meeting Description – Call2_vod.MS_Teams_Remote_Meeting_vod__r.MS_Teams_Meeting_Link_vod__c
By default, the calendar reminder is set to alert the recipient ten minutes before the start of the meeting.
Updates to existing calendar invitations are not supported.
Engage
Using the Share Digital Business Card Home Page Component
The Share Digital Business Card (DBC) component on the home page allows CRM users to send their DBC to HCPs. HCPs can view the CRM user's DBC in the browser or in the Engage app, if installed. Additionally, HCPs who are signed into Engage can connect to the CRM user. CRM users must have DBCs enabled, but do not need to have Chat or Ping enabled. See Sending Engage Connection Invites to HCPs for more information.
Configuring the Share Digital Business Card Component
To configure the Share Digital Business Card home page component:
- Ensure either Digital Business Cards or the Engage Tab is configured for users who can send Engage connection invites.
- Ensure Sending Engage Connection Invites to HCPs is enabled:
- The Engage profile indicator is not required
- Displaying send messages on the account timeline is not required
- Grant end users FLS Read permission to the zvod_share_dbc_vod field on the VMobile_Home_Page_Layout_vod object.
- Add the zvod_share_dbc_vod field to the appropriate VMobile_Home_Page_Layout_vod object page layout.
Sharing Digital Business Cards from the Home Page
When users select Share Digital Business Card from the home page, the sharing options display.
Users can select the appropriate sharing option to send Engage connection invites or select Preview Digital Business Card to ensure their digital business cards display correctly before sending. See Previewing Digital Business Cards as a CRM User for more information.
Users on iPhone can add and share their digital business cards from the Apple Wallet. See Adding Digital Business Cards to Apple Wallet for more information.
Events Management
Designating Self-Registration Disclaimers as Optional
By default, event registrants must acknowledge disclaimers before registering. This ensures they agree to certain terms and conditions. Business admin users can configure disclaimers to be optional, enabling organizations to capture different types of acknowledgment, for example, consent, identification, and privacy policy during the registration process that can be used for external communications and reporting.
Designating an Optional Disclaimer
To designate a disclaimer as optional:
- Navigate to the appropriate Registration_Form_vod type EM_Catalog_vod record.
- Select the Disclaimer_Optional_vod check box.
When attendees complete a registration form with the Disclaimer_Optional_vod check box selected, they can register for the event without agreeing to the disclaimer.
Stamping Disclaimers on Event Speakers and Attendees
When registrants agree to the disclaimer on a registration form and successfully register for an event, the Registration_Disclaimer_vod field on the EM_Attendee_vod or EM_Event_Speaker_vod automatically populates with the disclaimer text from the registration form's Disclaimer_Text_vod field. This enables business admins and other users reporting on event registration to view the text a speaker or attendee agreed to when they registered.
Network Integration
MCSR CDS License Integration
Massachusetts has requirements for Controlled Substance Registrations (MCSR) for HCPs. MCSR CDS licenses are required for each address at which the practitioner stores stock or sample controlled substances.
Veeva Network supports the integration of MCSR CDS licenses between Network, OpenData, and Veeva CRM. The Network integration populates the CDS licenses for Massachusetts only to the specified address and populates the CDS drug schedule information.
Enabling MCSR Mapping
To enable mapping for MCSR CDS license integration in CRM, grant the Integration user FLS edit and all other users FLS read permission to the CDS_Schedule_vod__c field on the Address_vod object.
Using MCSR CDS License Integration
When a user downloads a record from Network that has an MCSR CDS license, the MCSR CDS license information is included in the account during the import process.
For example, a sales rep meets an HCP in Massachusetts. In OpenData, the HCP has an MA CDS license. The sales rep wants to log a call and give the HCP samples. The sales rep uses Network Account Search to download the HCP to her territory. The applicable HCP address is updated with the MCSR CDS license information.
Users can also submit an Edit Address DCR to edit MCSR CDS license information in Network, or submit a DCR to create an MCSR CDS license in Network.
The Network Bridge process populates the MCSR CDS license information in Veeva CRM.
For information on adding a sample on a call in a state where a CDS license is required, see Configuring CDS Validation for Non-Controlled and Schedule Specific Sampling.


