

23R1.1 Functionality Guide
The Functionality Guide is intended for Sales Operations, Business Administrators, System Integrators, and others responsible for making decisions about what features are needed for end users to be successful and deciding which features work together with existing customer configuration.
Engage
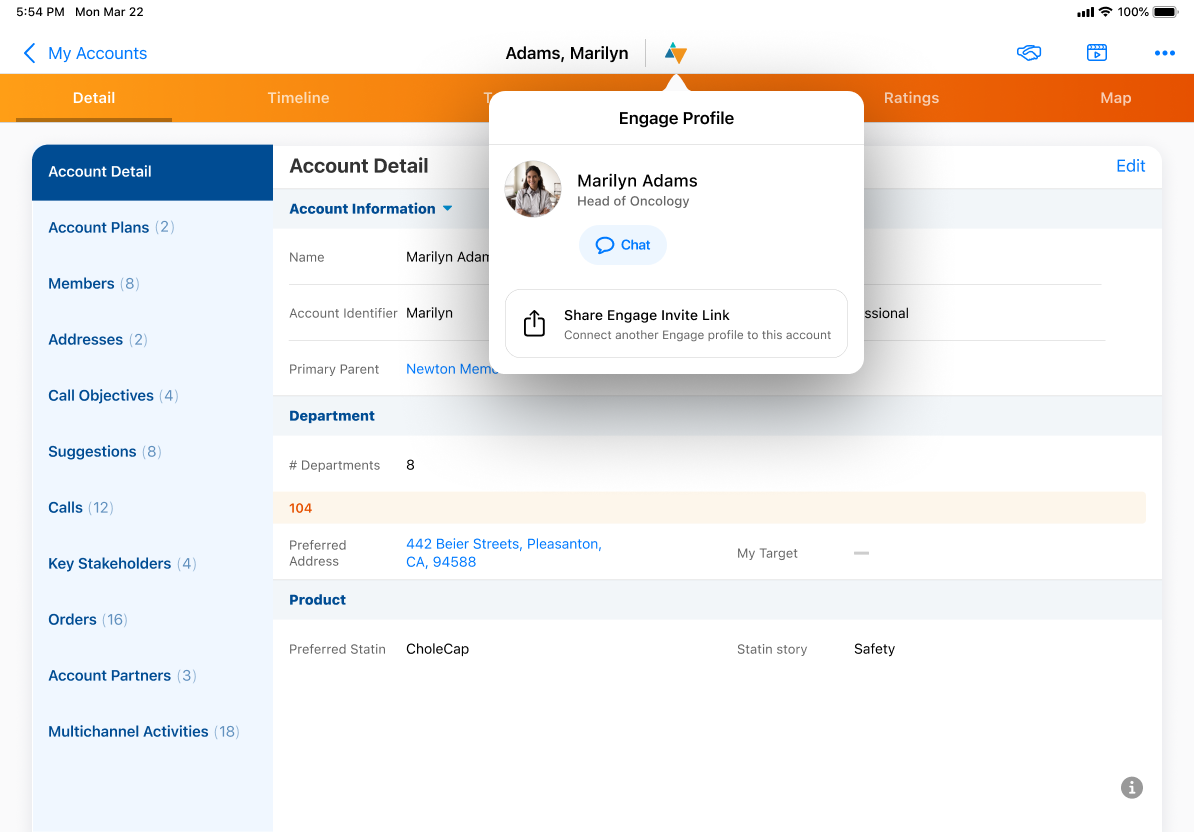
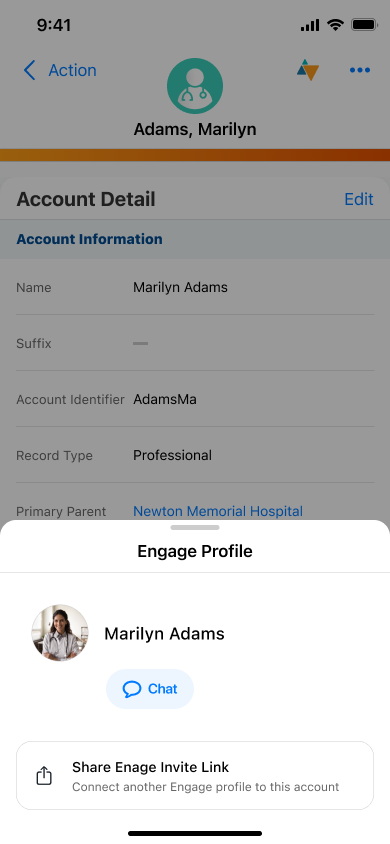
Displaying the Engage Profile Indicator on Accounts
The Engage profile indicator is an icon displayed on accounts, usually for HCPs, to indicate the account is linked to an Engage profile, allowing users to connect and chat with HCPs.HCPs who have signed up for an Engage account have profiles, which include their personal information and available communication methods.
Using the Engage Profile Indicator
When users select the Engage profile indicator on an account, a popover displays the following for each Engage profile associated with the account:
- Profile photo
- Display Name of the profile. See Editing Display Names in Engage and Engage Connect for more information about display names.
- Connection Status, Connect button, or Chat button, depending on whether the user has digital business card enabled and/or has chat/ping enabled in CRM:
- Connection Status, which displays when:
- The user does not have digital business card enabled and does not have chat/ping enabled in CRM
- The user has digital business card enabled and is connected to the profile, but does not have chat/ping enabled in CRM
- Connect button, which displays when the user has digital business card enabled or has chat/ping enabled in CRM, but the user is not connected to the profile. Selecting the Connect button for a profile sends a connection invite to the HCP and Invite Pending displays.
- Chat button, which displays when the user is connected to the Engage profile and has chat/ping enabled in CRM. Selecting the Chat button for a profile displays the user’s chat thread with that profile in the Engage tab in CRM.
- Connection Status, which displays when:
- Share Engage Invite Link, which displays when Sending Engage Connection Invites to HCPs is configured. Selecting the Share Engage Invite Link button displays a share modal for sending a connection invite to the HCP via one of the configured channels.
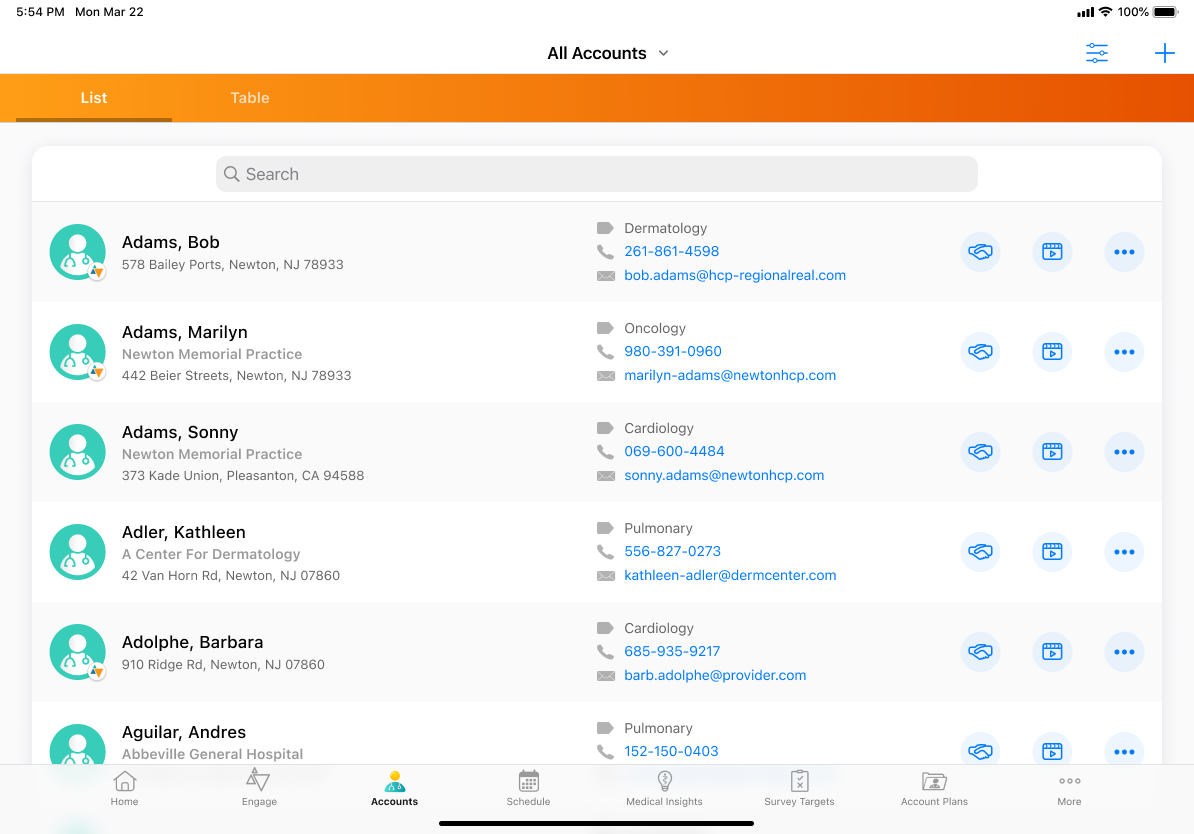
The Engage profile indicator also displays on account icons in My Accounts in the list and table views, and in child account hierarchies for parent accounts.
Events Management
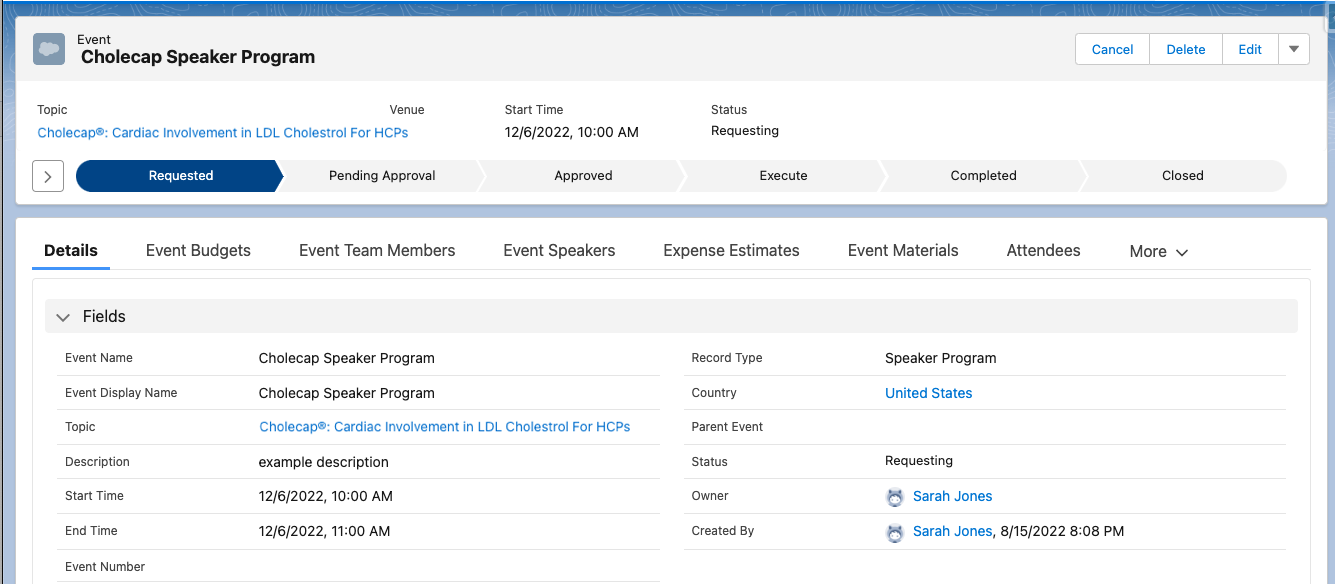
Defining Lifecycle Stages for Events
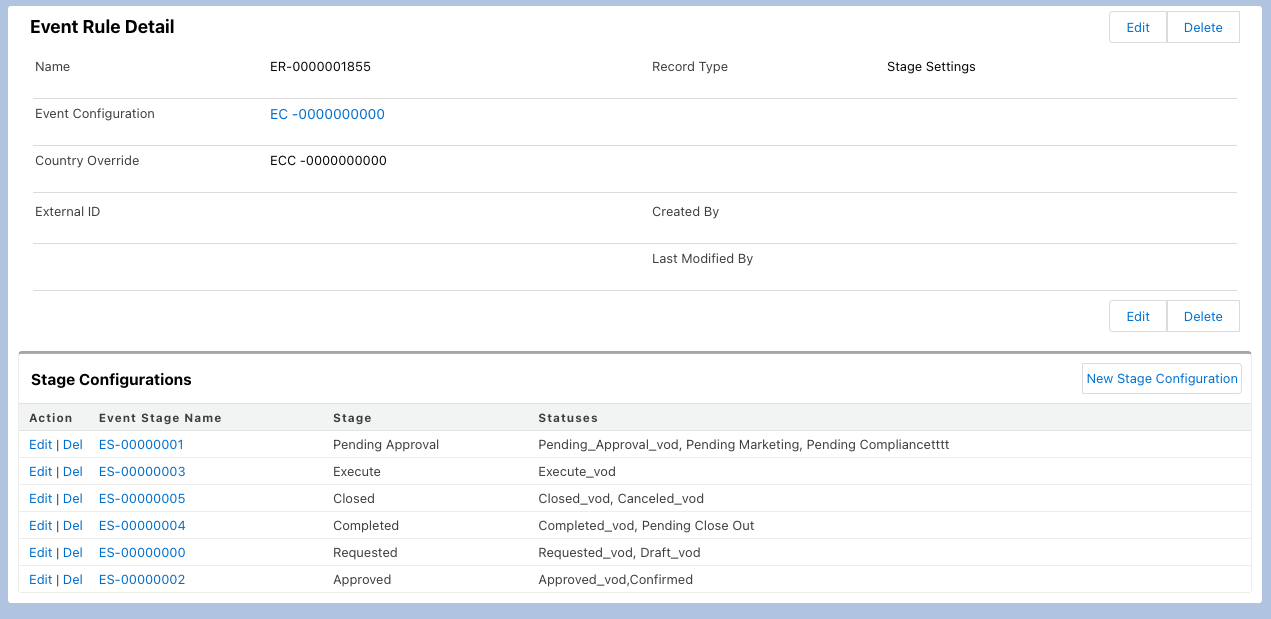
Events Management administrators can map their organization’s event statuses to standardized lifecycle stages that display when viewing an event. This allows event team members to visualize the current event stage within the lifecycle of the event workflow.
For example, if you organized a new Speaker Program event, the lifecycle component displays the event as Requested. When the event is submitted for approval, the event’s status updates to Pending Compliance, a custom event status at your company mapped to the standard Pending Approval lifecycle stage. The lifecycle component updates to Pending Approval, letting you know that after approval is granted, you can execute the event.
Defining Stages for Events
Lifecycle stage mappings are determined by an EM_Event_Rule_vod record associated with the event. This record determines displayed lifecycle stages and the event statuses mapped to each stage.
Lifecycle stages display in a preset order. Stages can be relabeled, but custom values are not supported.
To define lifecycle stages:
- Navigate to the appropriate EM_Event_Configuration_vod record.
- Select New in the Event Rules related list.
-
Select Stage Settings for the record type.
- Select Continue.
-
Enter the appropriate Country Override, if applicable.
Country-specific stages are not supported on the Browser platform.
- Select Save.
- Select New Event Stage Configuration.
-
Populate the following fields:
- Stage_vod – Available values are:
- Requested
- Pending Approval
- Approved
- Execute
- Completed
- Closed
-
Statuses_vod – A comma delimited list of the appropriate values from the Status_vod picklist on the EM_Event_vod object. For example:
Requested_vod,Draft_vod

Canceled_vod status should be configured in the Closed stage.
- Select Save.
- Repeat this process for all desired lifecycle stages.
If a stage is not applicable to your organization’s event workflow, it can be excluded. Stages without mapped statuses do not display on events.
Creating the Path Element
After all lifecycle stages have been defined, admins can add the Salesforce Path element to the EM_Event_vod object page layout:
- Navigate to Setup > Path Settings.
-
Create a new Path for the appropriate EM_Event_vod record types.
The Key Fields, Guidance for Success, and Celebrations components of Salesforce Paths are not supported.
-
Add the newly created Path component to the EM_Event_vod object Lightning record page layout.

- Select the Hide Path Update Button check box.
Viewing Lifecycle Stages in an Event
Once at least two lifecycle stages are defined, the lifecycle component displays on new events. Otherwise, it does not display.
When an event is created, the Stage_Setting_vod and Stage_vod fields on EM_Event_vod are stamped based on the configured EM_Event_Rule_vod records.
Existing events may have these fields as blank. To display the lifecycle stages in these events, update existing events to populate these fields.
The current stage of the event is determined by the Event Lifecycle Stage mapped to the event’s Status_vod field. When the user updates the event status and lifecycle stage, for example, if the user submits the event for approval, the lifecycle stage updates accordingly.
Whenever an event changes lifecycle stages, a Event_Stage_History_vod type EM_Event_History_vod record is created to track when the event changed lifecycle stages.
Lifecycle stages are not supported when Approval Processes automatically approve upon submission.
Custom Subdomains in the Speaker Portal
The subdomain is a portion of the URL to an organization’s speaker portal that can be customized
For example, the Event admin at Verteo BioPharma enables the Speaker Portal and edits the subdomain to VerteoBioPharma in order to better brand the org’s Speaker Portal.
https://verteo.speakers-am.veevacrm.com
Editing an Org’s Speaker Portal Subdomain
To edit an org’s Speaker Portal subdomain:
- Navigate to the Events Management Integration Administration tab.
- Select Speaker Portal.
-
Navigate to the Custom Subdomain section.
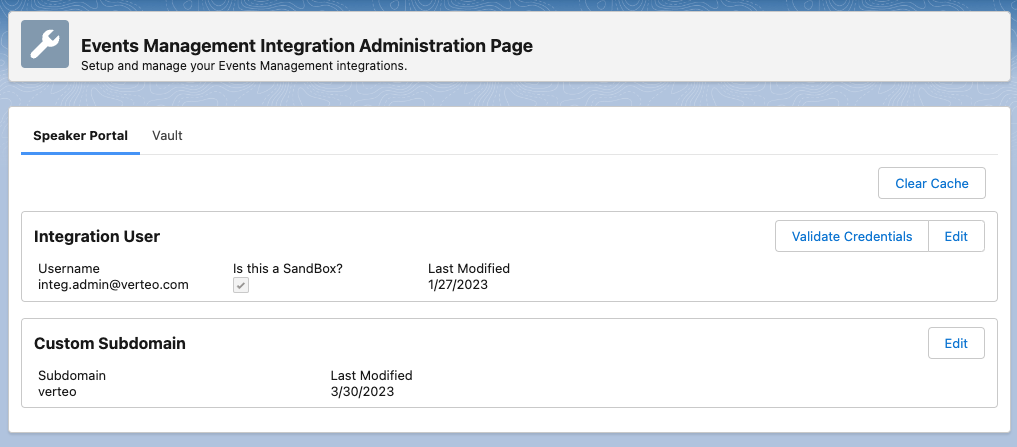
- Select Edit.
-
Enter the appropriate subdomain name. Subdomain names must meet the following requirements:
-
Names must be less than 80 characters
Names are automatically converted to lower case when saved. For example, VerteoBioPharma becomes verteobiopharma.
-
Names must contain only alpha-numeric and single dash characters
Do not begin a sub domain name with a dash character.
-
-
Select Save.
After updating the sub domain, existing Speaker Portal links, including bookmarks and links within email invitations, are no longer valid.
