

Sphere of Influence
- Browser
- iPad
For example, Sarah Jones is planning a set of visits at Newton Memorial Hospital. To better understand account relationships at Newton Memorial Hospital, she views Dr. Ackerman’s Sphere of Influence. Sarah sees that Dr. Ackerman and his colleague, Dr. Beacher, have strong influence over patient treatment at Newton Memorial Hospital, so she prioritizes visits to these two HCPs.
Ensure initial configuration is complete to use this functionality.
Using the Sphere of Influence
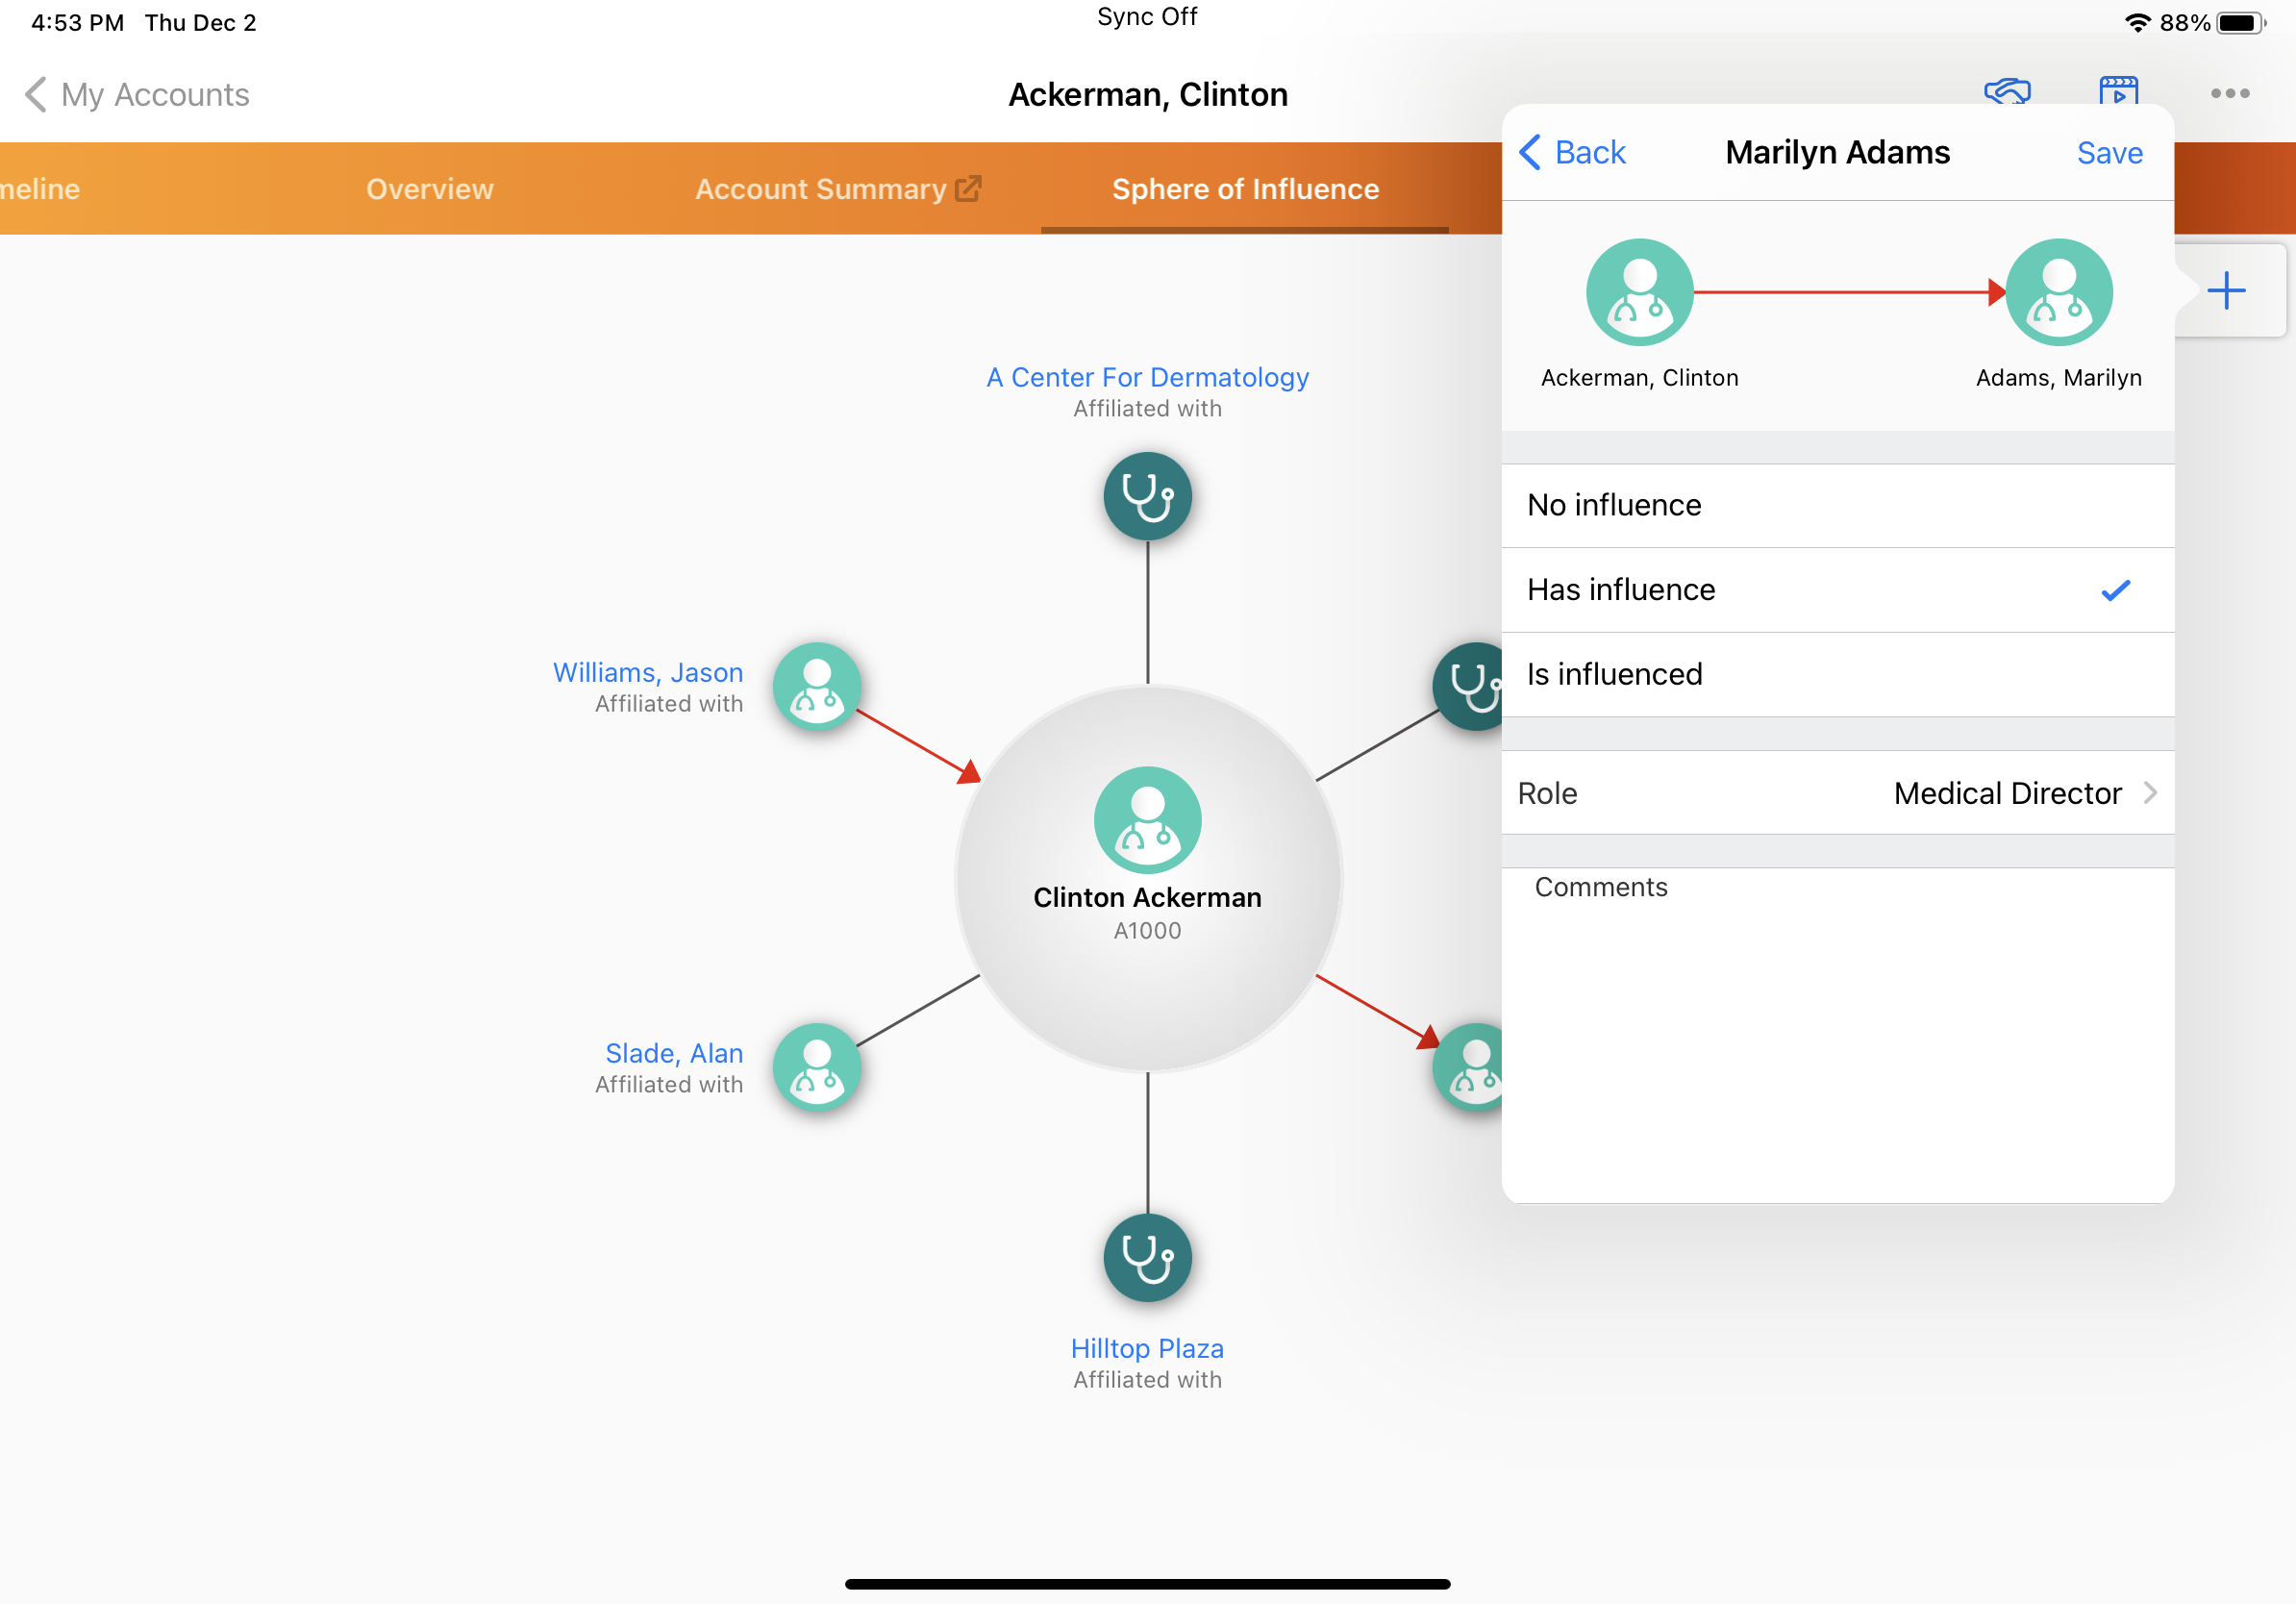
To view the SOI for an account, navigate to the Account Detail page for the account, then select the Sphere of Influence tab from the navigation bar.
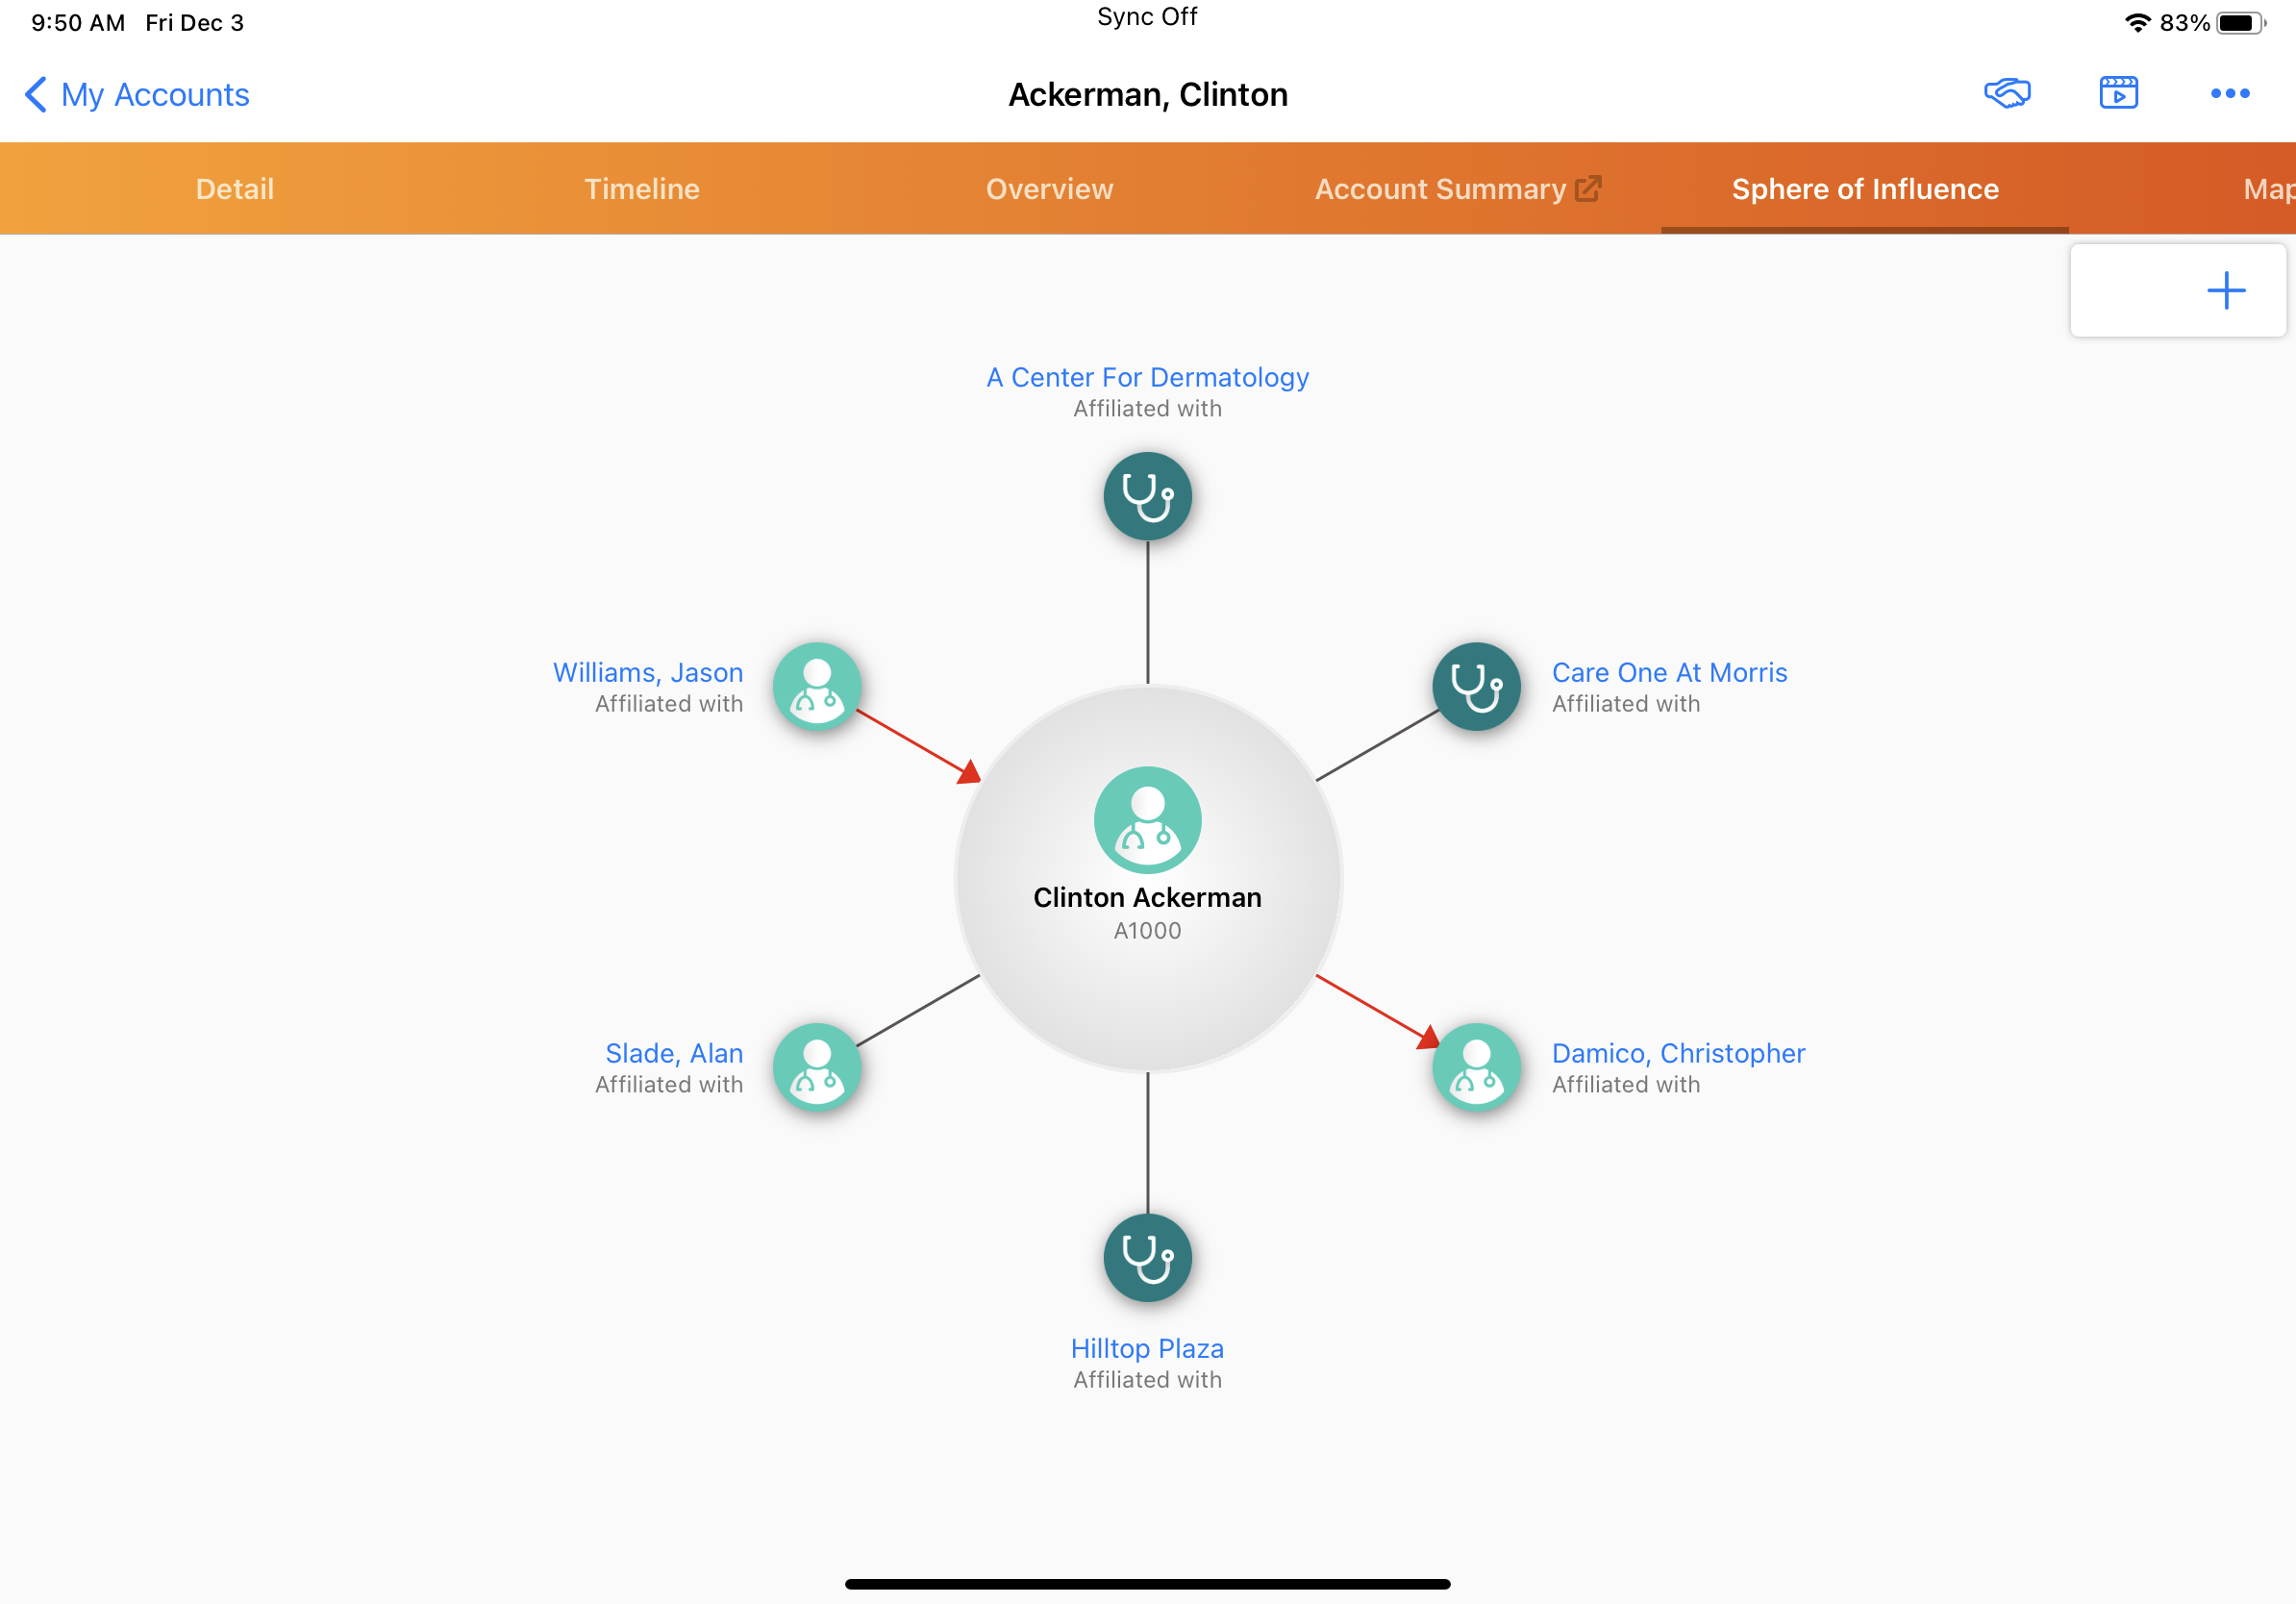
The Sphere of Influence displays the selected account in the center of the screen. The direction of influence between the account’s affiliations and contacts is indicated by the style of the arrow connecting them. A black line indicates no influence. A red line indicates influence. The influence direction is indicated by the arrow at the end of the line. For example, in the image above, Jason Williams has influence over Dr. Ackerman, and Dr. Ackerman has influence over Christopher Damico.
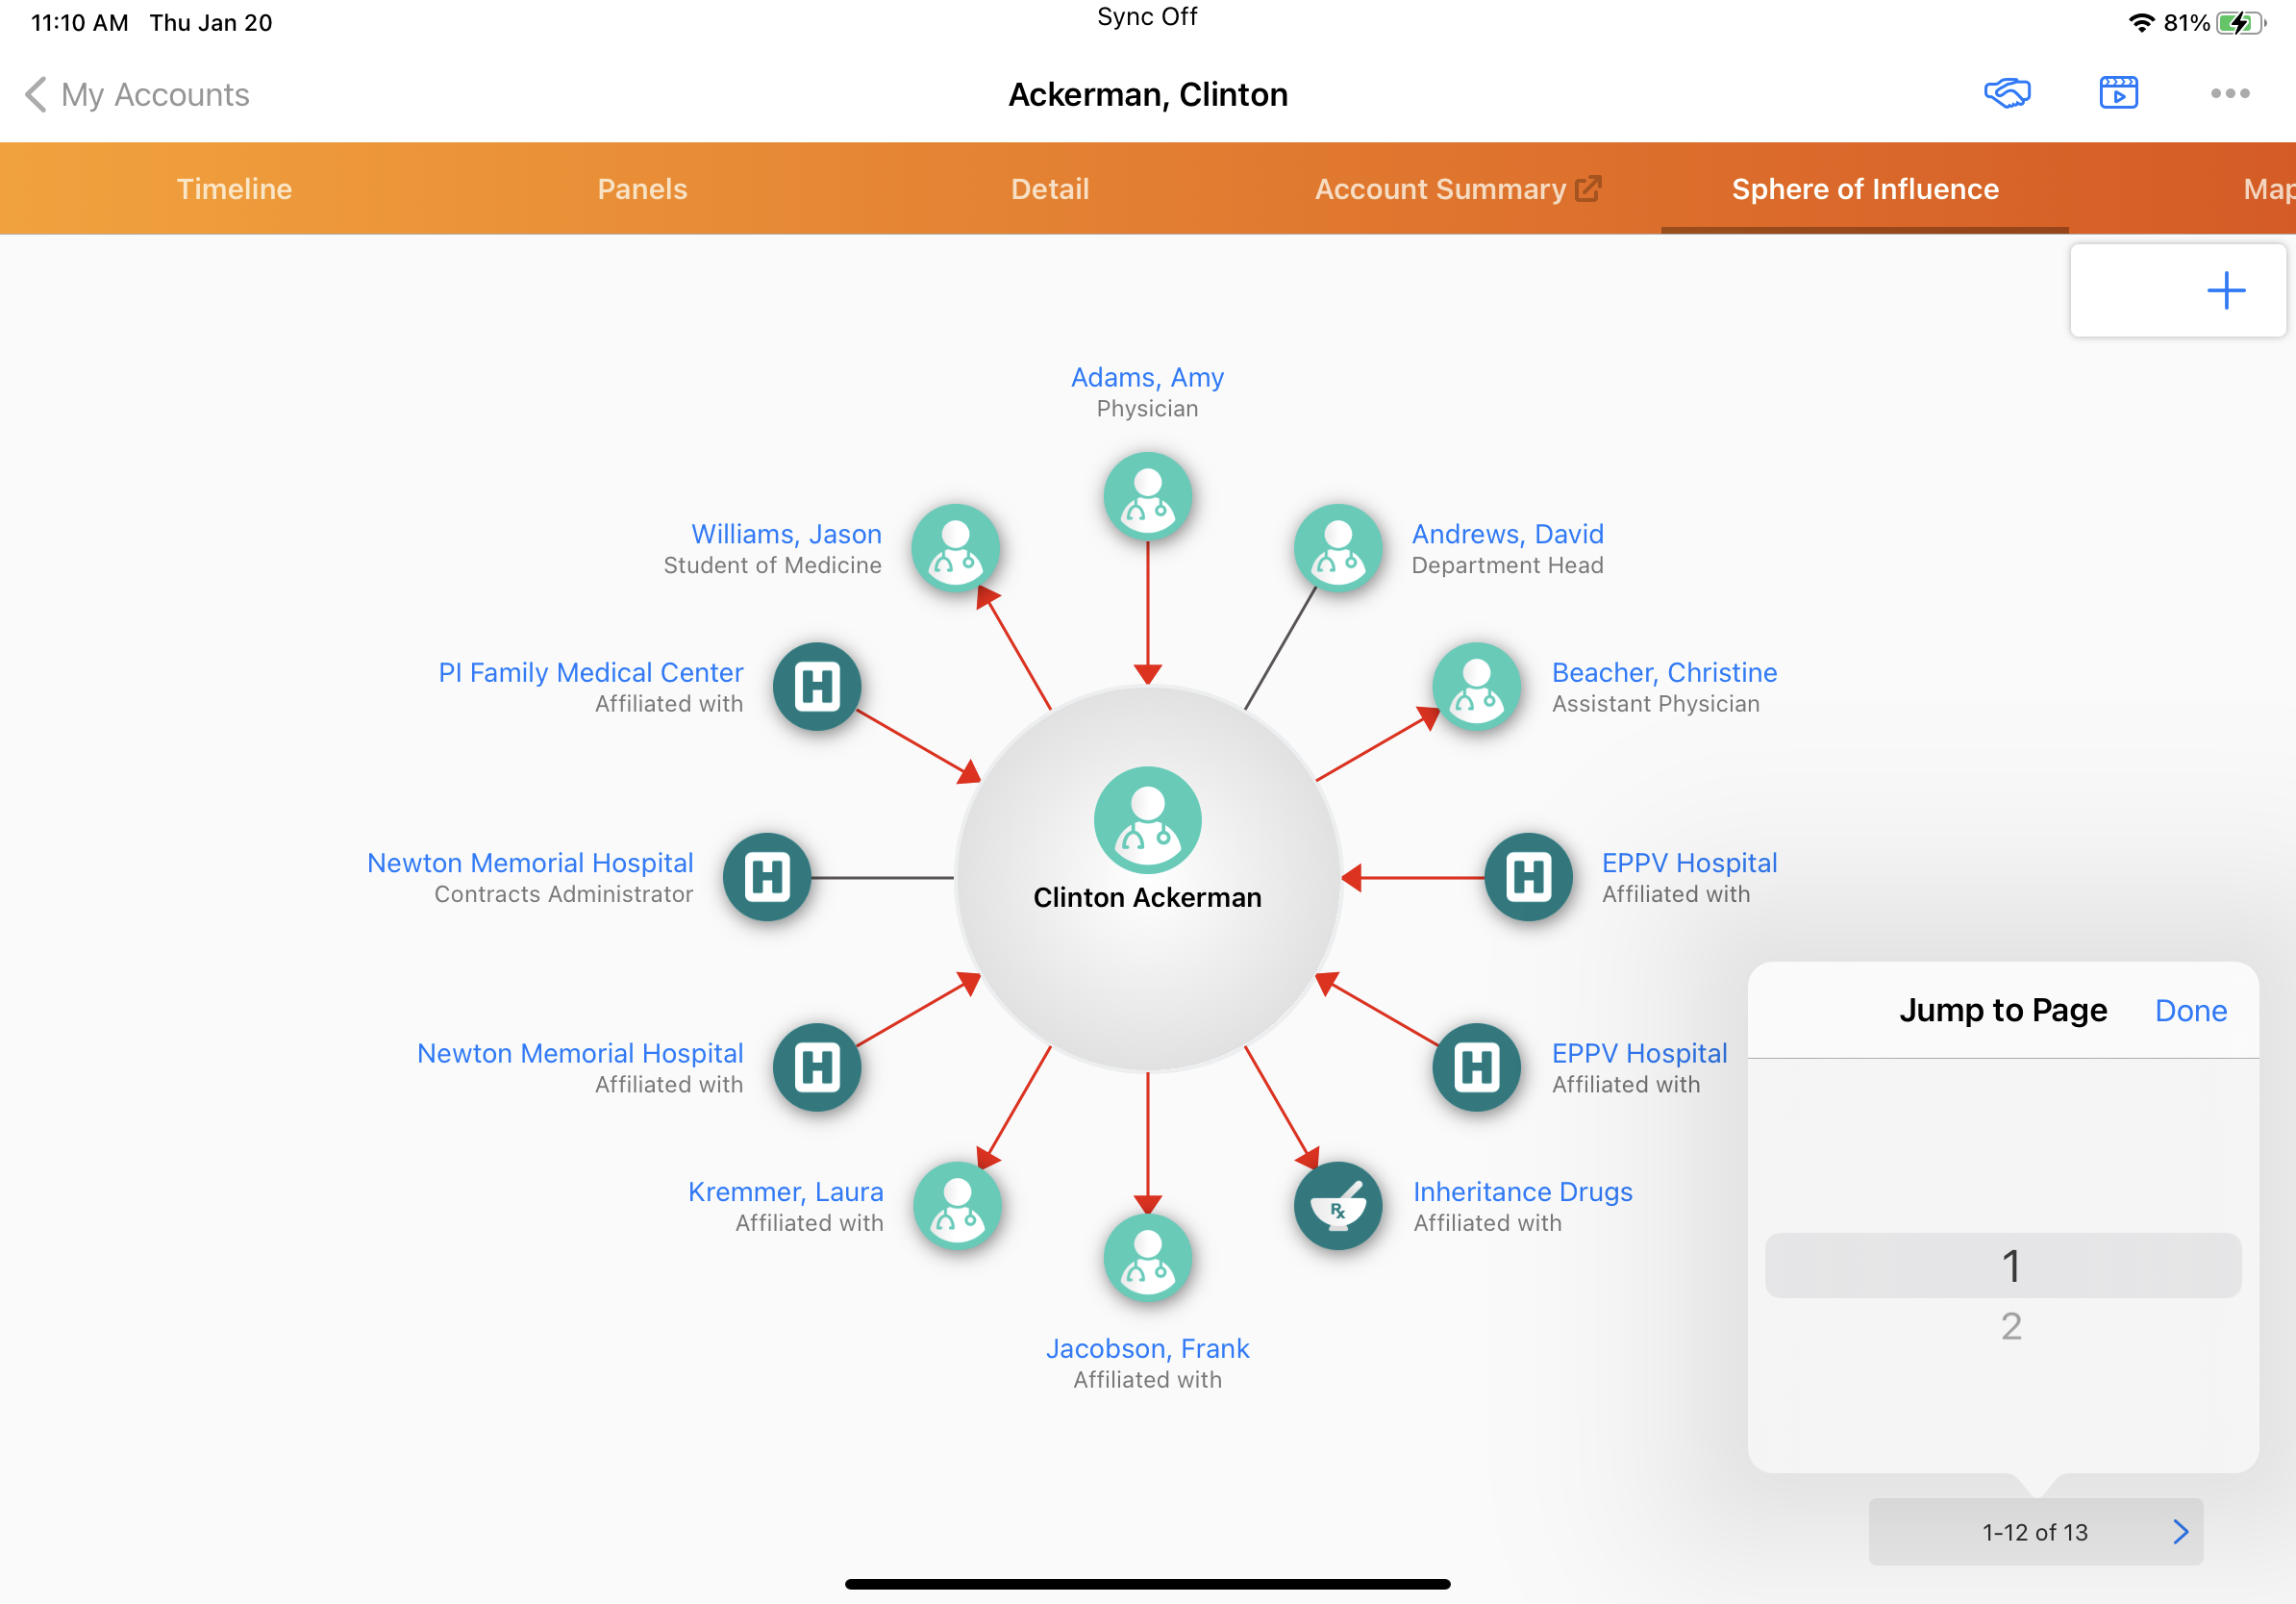
Pagination controls display when there are several affiliations for an account. The number of affiliations required for pagination controls to display depends on the user’s platform:
- Browser - when there are more than 20 affiliations, pagination controls display
- iPad - when there are more than 12 affiliations, pagination controls display
Select the pagination arrow to display pages with additional affiliations.
To control whether out-of-territory accounts display to mobile users viewing the Sphere of Influence, grant the users Read FLS to the To_Account_Name_vod field on the Affiliation object.
Managing and Editing Affiliated Accounts
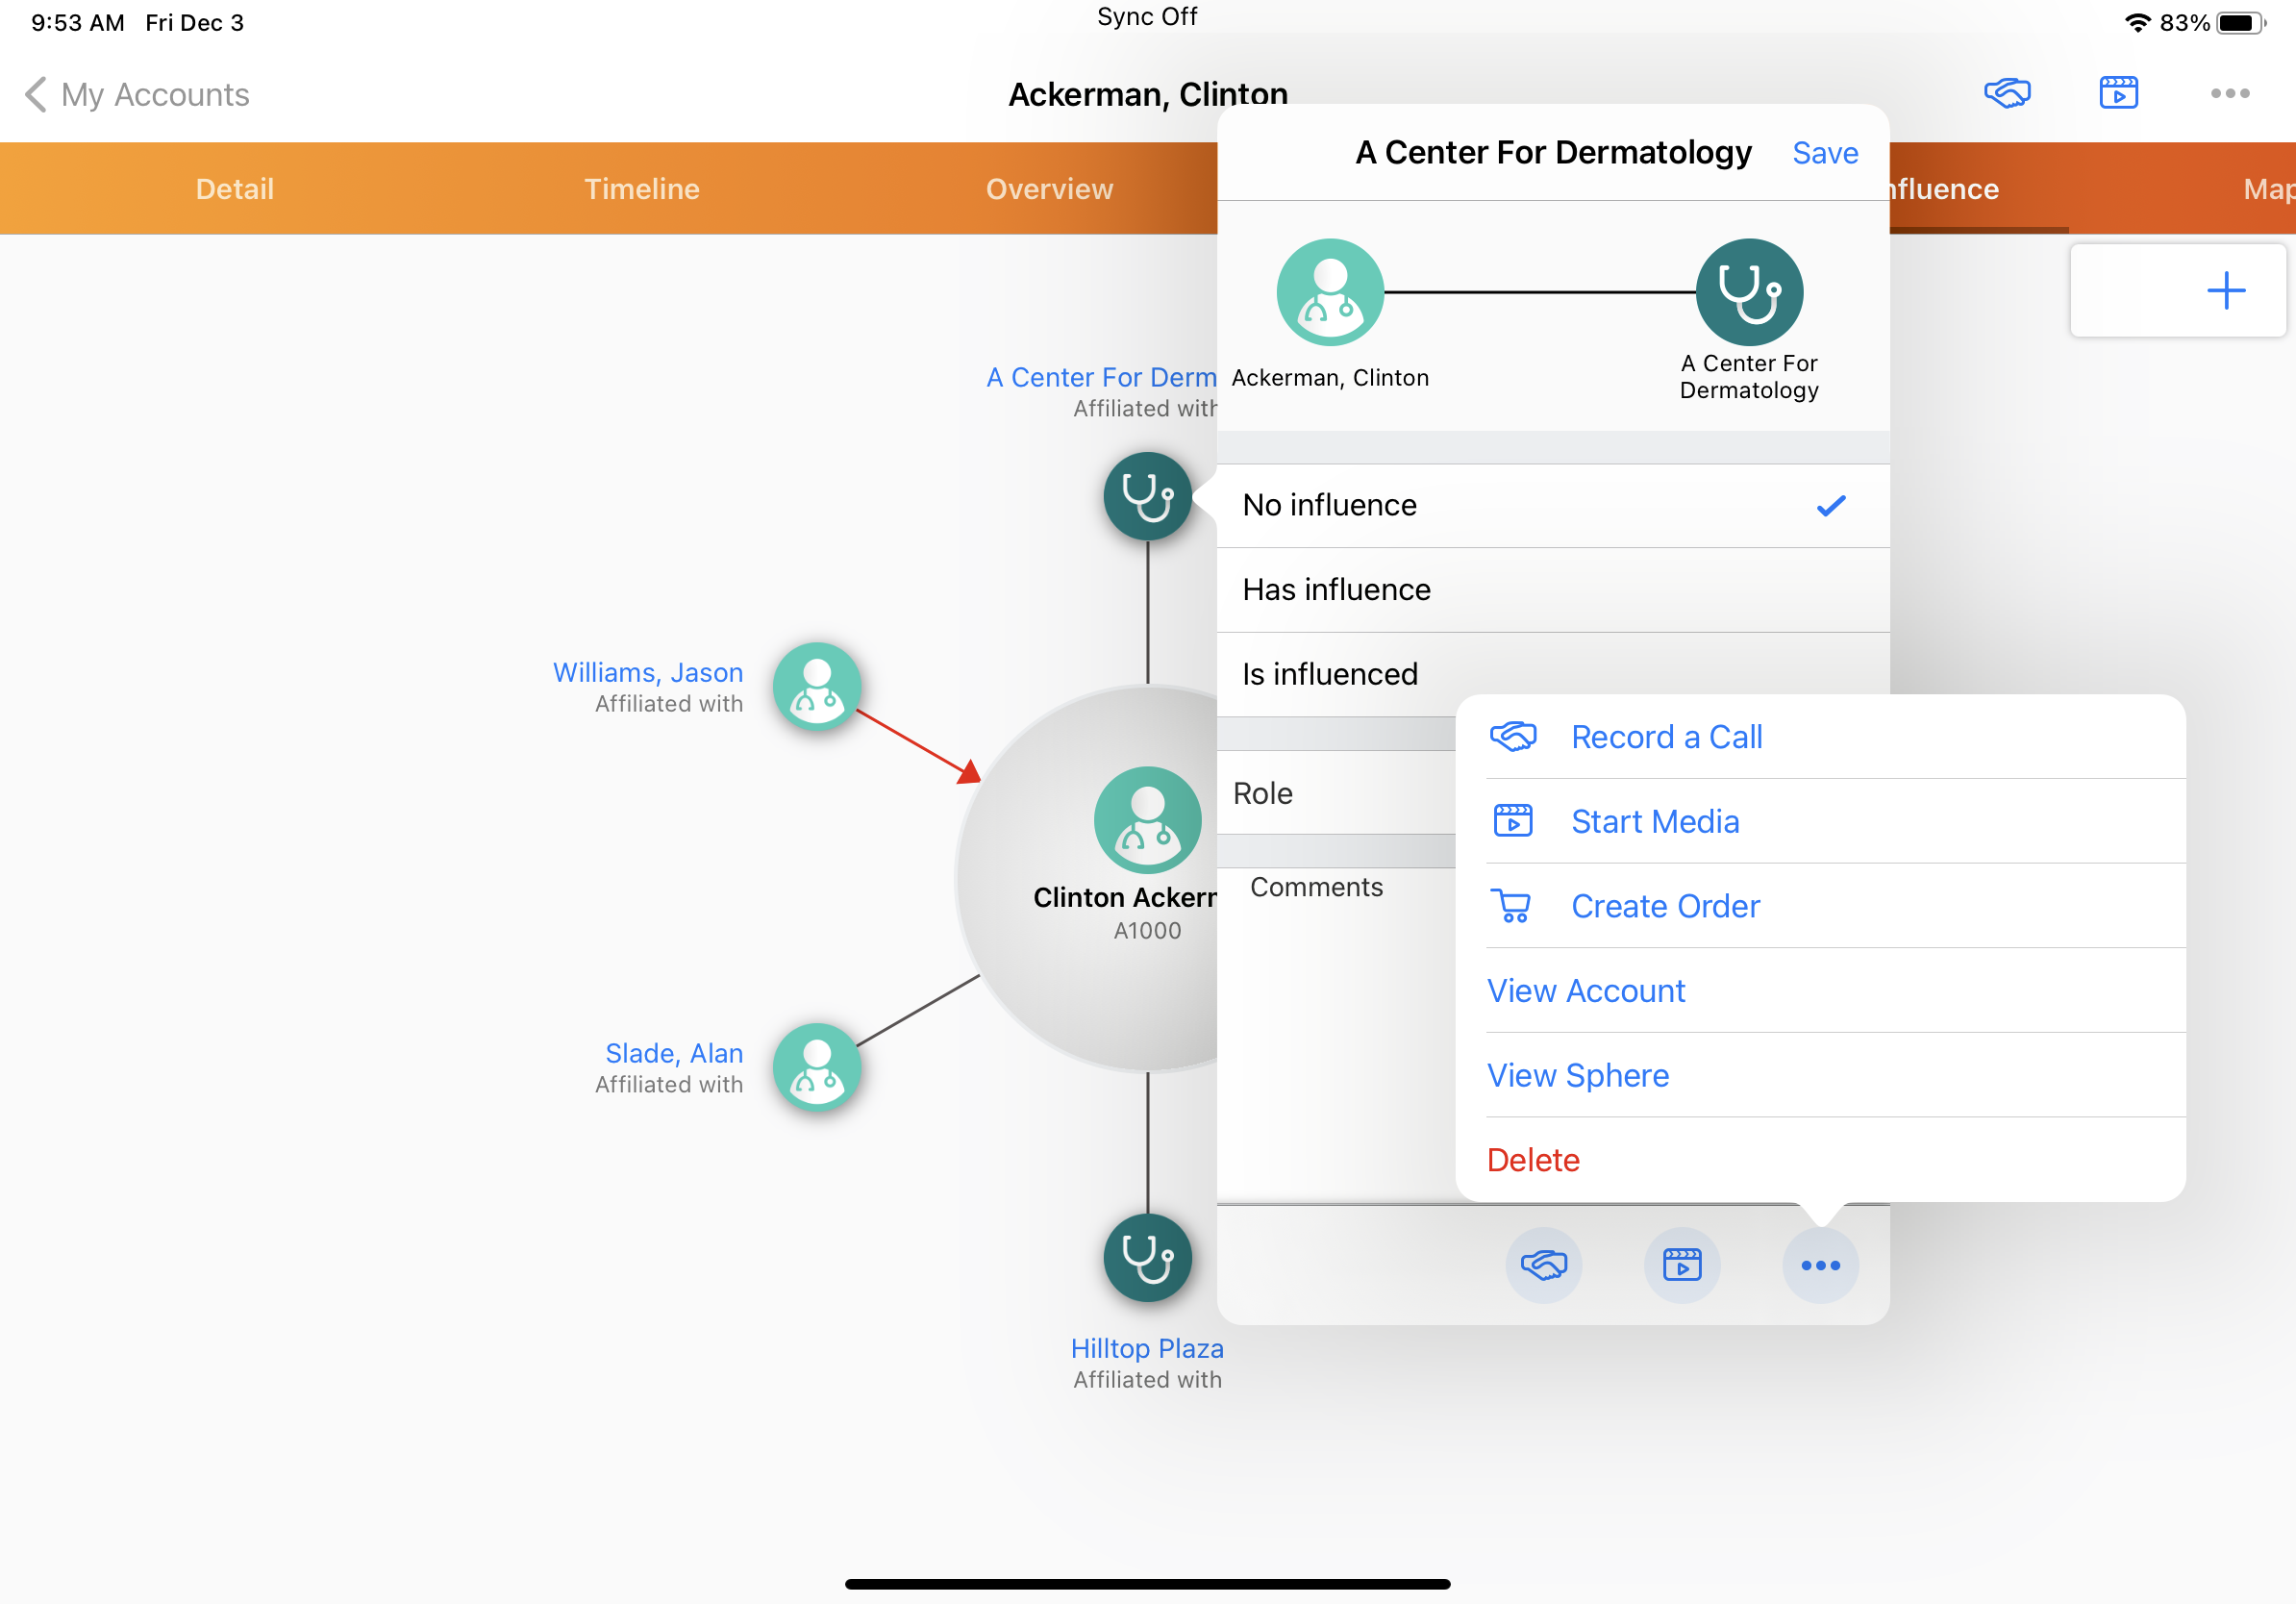
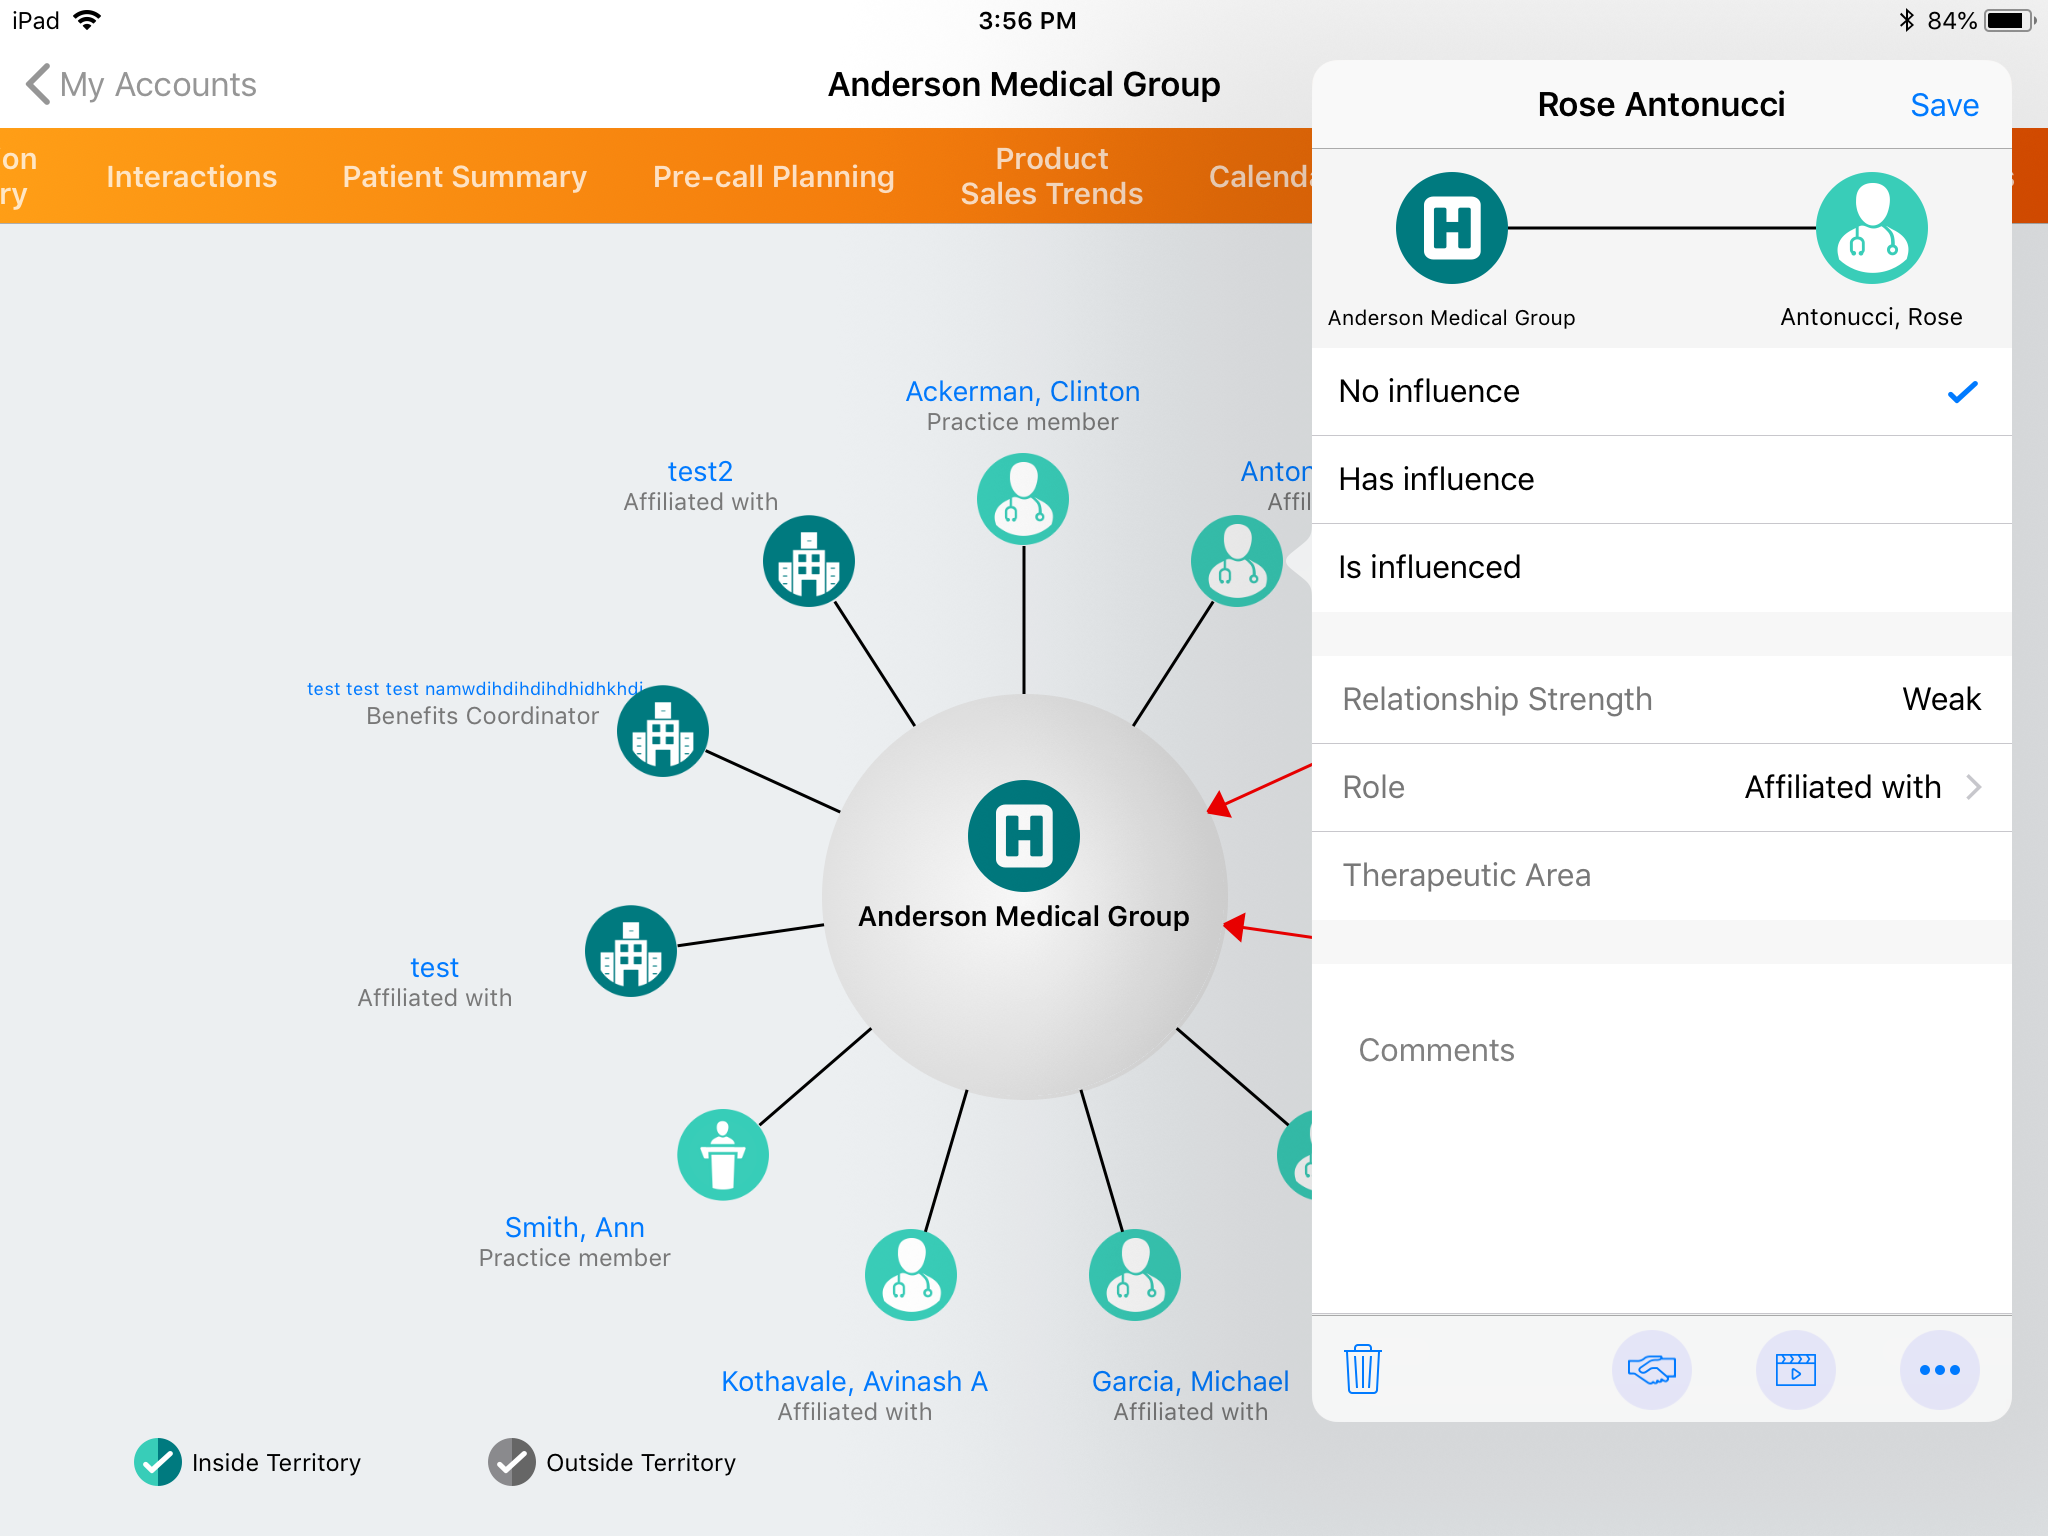
Users can manage affiliations and capture account information from the Sphere of Influence. Select the account icon to display the affiliation details window, where users can edit the affiliation details or take any of the following actions:
- Record a Call - A new call report opens with the selected account as the primary account on the call
- Launch Media - CLM launches with the selected account as the primary account
- Create Order - Create an inventory order for the selected account
- View Account - The account details page displays for the selected account
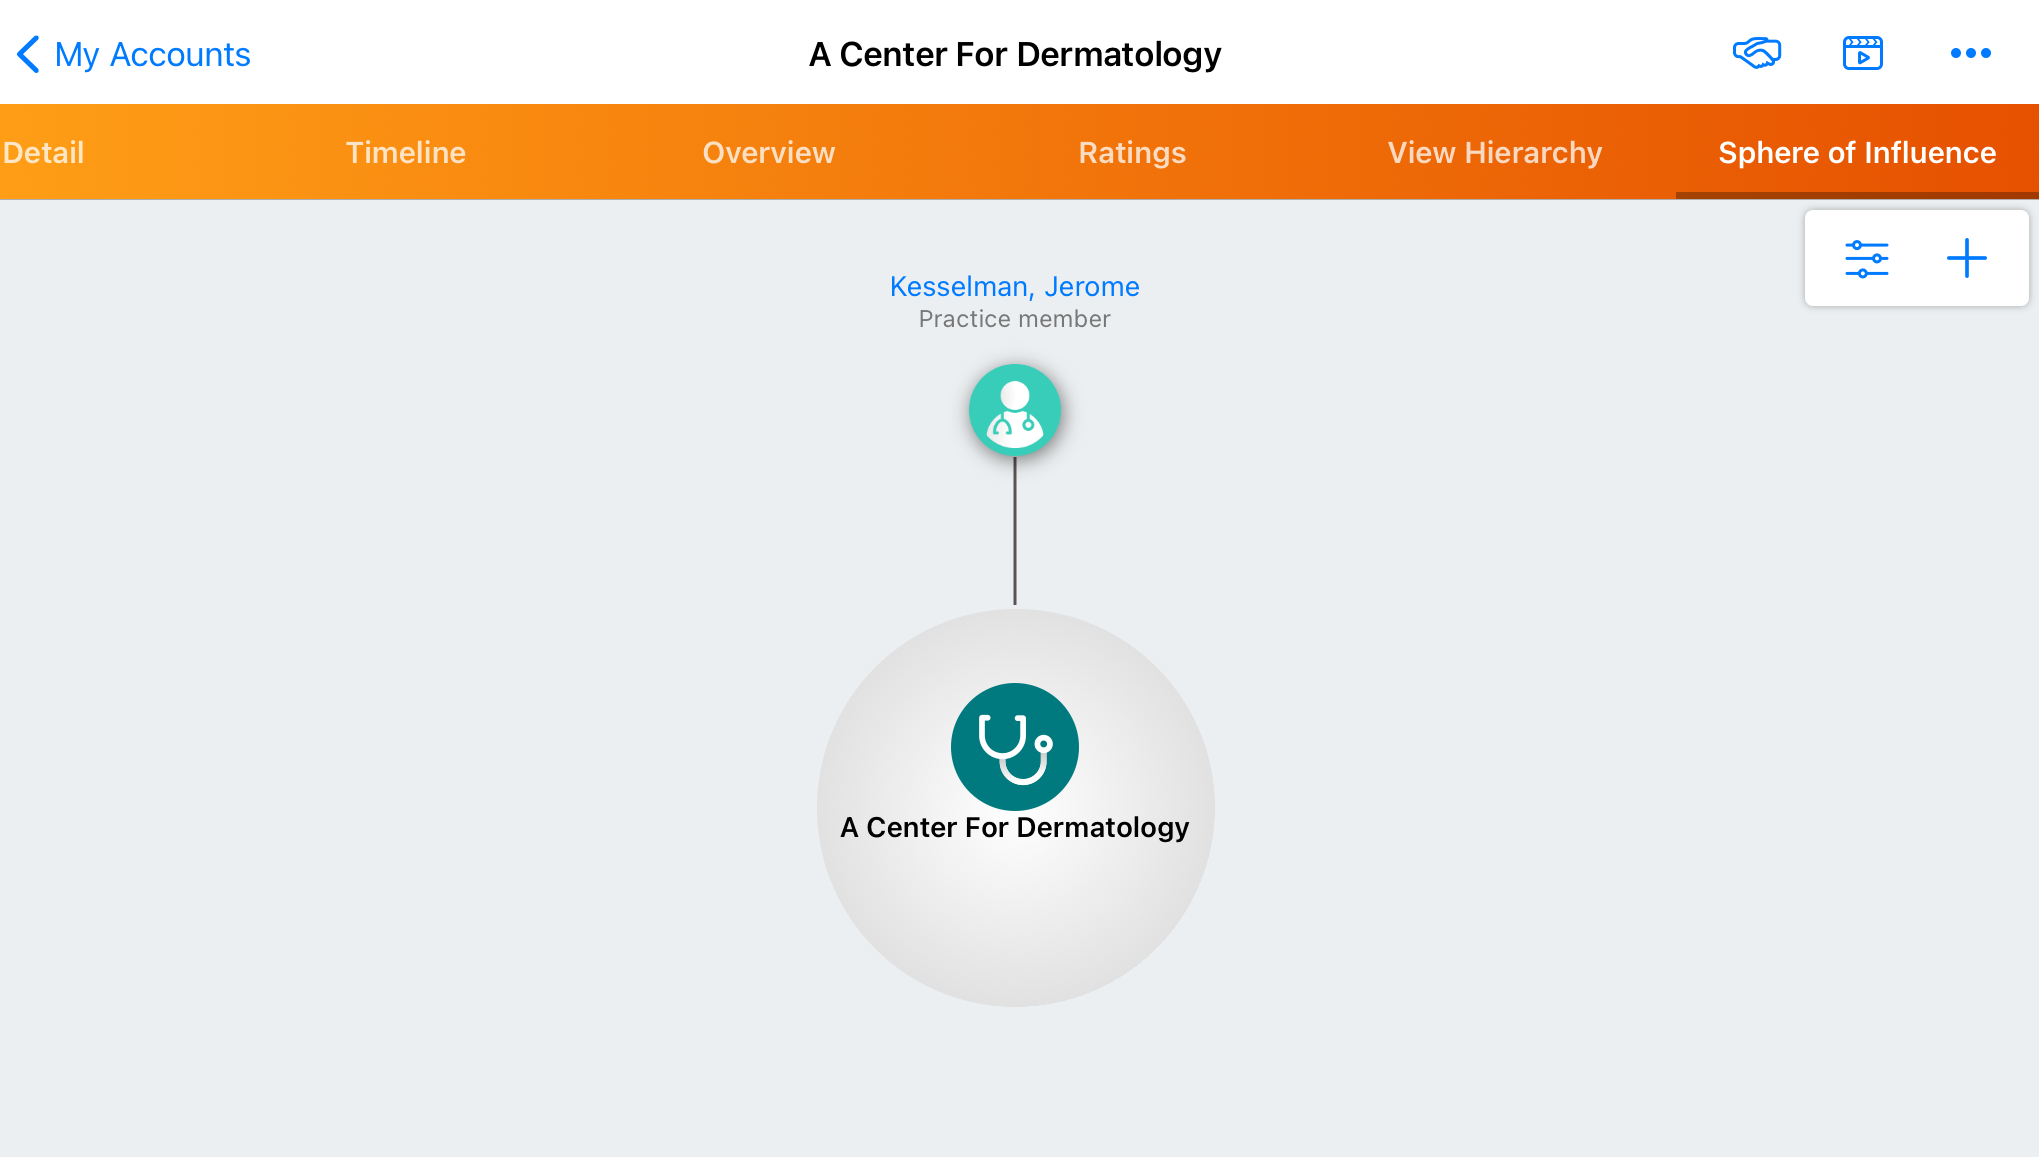
- View Sphere - The Sphere of Influence refocuses to display the selected account at the center of the visualization. iPad users can also select an account name to refocus the SOI around the selected account, without navigating to the affiliation details window.
- Delete - Delete the selected affiliation (displays if users have Delete permission on the Affiliation_vod object)
Data for the Sphere of Influence is stored in the Affiliation_vod custom object.
Filtering Affiliations
To filter the affiliations displayed in the SOI based on Role, Account Type, and Influence, select the filter button in the toolbar.
If additional SOI fields are enabled, CRM for iPad offers more robust filtering by custom field, relationship strength, account identifier, and therapeutic area. Filtering by the account’s therapeutic area uses a ‘like’ clause, where the value chosen is a match among all values. For example, filtering by “Oncology” displays accounts with therapeutic areas matching “Oncology”—accounts with “Pediatrics, Oncology”, “Geriatrics, Oncology” and “Oncology” values would all display.
Creating New Account Affiliations
To create a new account affiliation from the SOI, select the new record button in the toolbar to open the account search. Select the appropriate account from the search results.
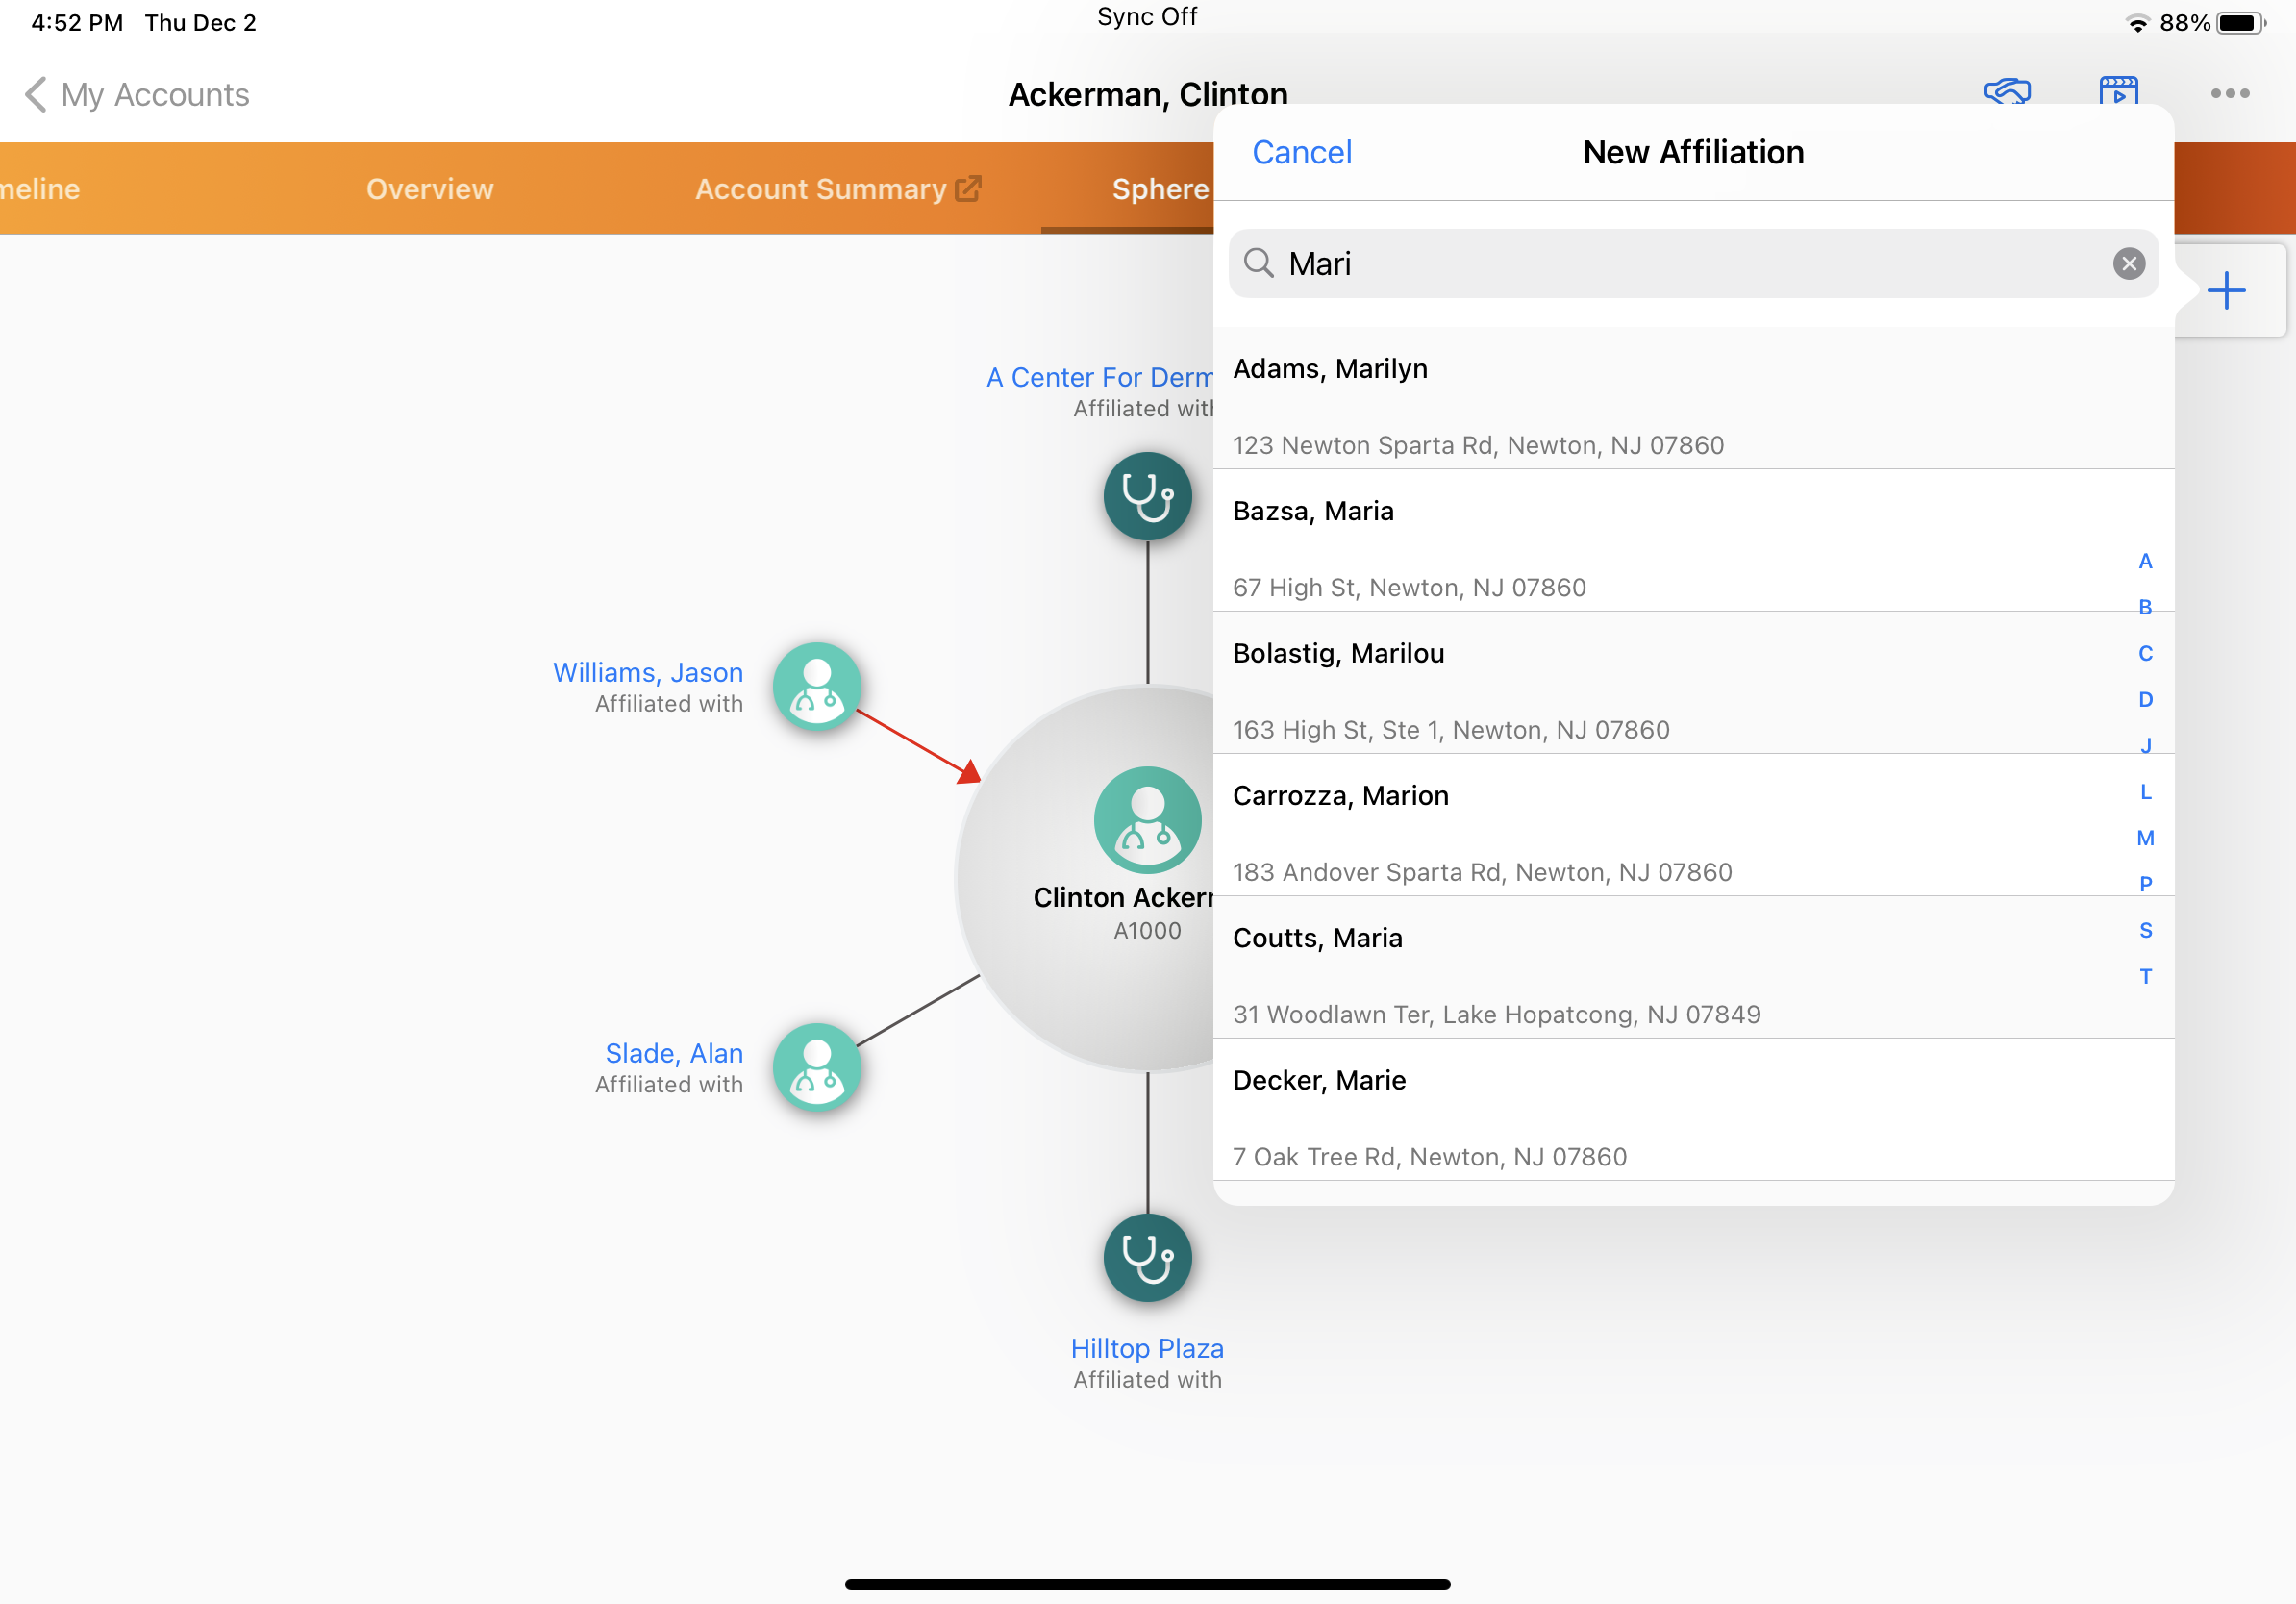
After selecting an account, users can set the Influence, Role, and Comments attributes for the new affiliation. On CRM for iPad, depending on FLS, users can also edit the relationship strength, account identifier, custom fields and therapeutic area.
To maintain data quality on the Affiliation_vod object, the Sphere of Influence prevents users from creating duplicate affiliations.
Displaying Out-of-Territory Relationships on iPad
Users on the iPad platform can view out-of-territory account affiliations related to their in-territory accounts. For example, Dr. Ackerman is affiliated with Dr. Beacher. Sarah selects both Inside Territory and Outside Territory. Even though Dr. Beacher is an out-of-territory account for Sarah, Dr. Beacher displays in the SOI because she is affiliated with Dr. Ackerman.
To view out-of-territory account affiliations, select the Outside Territory button at the bottom of the screen.
The labels for the Inside Territory and Outside Territory buttons are set using the TERRITORY_VIEW_INSIDE_TERRITORY_vod and TERRITORY_VIEW_OUTSIDE_TERRITORY_vod Veeva Messages.
An account identifier automatically displays for in-territory accounts when Identifying Accounts with Account Identifier or Account Name Expansion is enabled.
Adding Out-of-Territory Accounts to a Users’ Territory
Users can add out-of-territory accounts to one of their territories from the SOI, if Veeva Network credentials are configured for the org.
To add an account to a territory from SOI, select an out-of-territory account to display the affiliation details window. From the window, select Add Account.
Depending on territory configuration, the account can be automatically assigned to the user’s territory, or the user can select a territory. Accounts are assigned to territories based on the following configuration:
| Territory Selection Method | Configuration | Territories assigned to Account |
|---|---|---|
|
Automatically assign to user's default Territory |
Territory field is read only and NETWORK_NAW_ASSIGN_ALL_TERR setting is disabled. |
All previous territories + user's default territory or the first territory in the list. |
|
Automatically assign all territories to the Account |
Territory field is read only and NETWORK_NAW_ASSIGN_ALL_TERR setting is enabled. |
All previous territories + all of the user's assigned territories (except for child territories). |
|
Allow user to choose which territories via a multi-select |
Territory field is NOT read only (ignores the NETWORK_NAW_ASSIGN_ALL_TERR setting). Territory field is always required for the multi-select option (otherwise users would not be able to add accounts to their view). |
All previous territories + territories selected by the user. All territories assigned to the user display. |
Disabling Influence Direction
Some countries have data visibility standards requiring influence direction to be disabled. In this case, the Sphere of Influence displays a connection between affiliations without the influence direction.
To disable influence associations, ensure the user does not have any type of FLS permission to the Influence_vod field on the Affiliation_vod object. A black line displays between the accounts, but an arrow does not display.
If users have the ability to create new affiliations, these affiliations are created with an influence direction based on the default picklist value, as defined in the Influence_vod picklist.
