

Packaging Custom CLM Content
- CRM Desktop (Mac, Windows)
- iPad
After creating a piece of media, content creators must prepare the media before it can be loaded into Vault. The content is then synced from Vault to Veeva CRM. See Managing CLM Syncs for more information. Overall, the process involves creating lower resolution versions of the media, putting all files into a folder, and compressing the folder into a zip file. Each piece of media in the system is encapsulated into a separate zip file before loading.
Each piece of media is loaded into the system as a zip file containing the media, thumbnails, and supporting files.
For information about creating website content, see Creating Website Content in CRM.
Formatting Content Packages for Vault
Vault uses this packaging format when auto-generating distribution zip files for Multichannel.
There is a zip called <filename>.zip. The contents of the zip files vary depending on content type.
- image zips - contain files named image.png and thumb.png
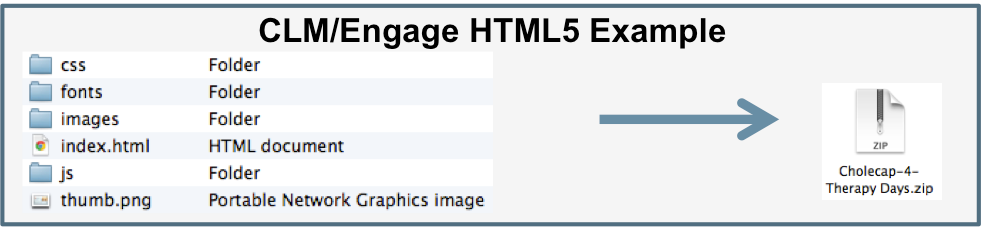
- html zips - contain index.html and thumb.png
- pdf zips - contain pdf.pdf and thumb.png

- video zips – contain video.mp4, poster.png, and thumb.png
- Powerpoint zips - contain <document name>.pptx, poster.png, and thumb.png
Folders should not be inside the zip file for non-HTML content. CLM creates a folder called <filename> and unzips the contents of the zip into that folder.
For HTML content, folders inside the zip file must use the following names to ensure CLM content displays correctly when sharing web links for the content:
- img
- image
- images
- shared
- html
To share assets across multiple key messages, see Using Shared Resources.
Packaging Thumbnails and Full-Screen Images
When users view a list of media, small thumbnail images display. These smaller images are also generated before loading into the system in order to maximize the performance of the application.
When the thumbnail image is selected, the full page HTML, PDF, or image displays. For videos, the full-screen preview image displays until the user starts the video.
To support thumbnails, each piece of media in the system (including an image file) must be packaged with a thumbnail. Video content must include an image for both the thumbnail and the full screen preview. These images should be highly compressed JPGs to minimize download time. Setting the JPG quality to 75% results in the sizes below for a piece of media named Media1.jpg:
|
Type |
Name |
iPad Resolution |
Windows Resolution |
Typical Size |
|---|---|---|---|---|
|
Original Media |
Media1.jpg |
2048 x 1536 |
1920 x 1080 |
250 kb |
|
Preview Image |
Media1-full.jpg |
1024 x 768 |
1600 x 900 |
70 kb |
|
Thumbnail |
Media1-thumb.jpg |
200 x 150 |
195 x 110 |
7 kb |
images in the 4:3 aspect ratio display centered with black borders on the sides.
To quickly generate preview images, a screen capture application is helpful. Once installed, set the computer’s screen resolution to 1024 x 768, view the media full screen, and capture the preview images.
To quickly generate thumbnails, an imaging editing application is helpful.
