

Data Grid Loader for Recommended Email
- Browser
- CRM Desktop (Windows)
Business admin users and other users that manage and support Recommended Email campaigns can use the Data Grid Loader to import campaign targets by copying and pasting data from spreadsheets into the Veeva CRM Desktop app, improving efficiency when managing large target lists, while enabling admins greater control over the fields business admin users can data load into Veeva CRM. This allows for faster and more convenient target list updates to support Recommended Email campaigns.
Who can use this feature?
- Platforms - Browser, CRM Desktop (Windows)
- Licensing - Users require an Approved Email License
- Users - Admin Users, Business Admin Users
Configuring the Data Grid Loader for Recommended Email for Admin Users
To configure this feature for admin users:
-
Grant the following permissions:
Object
OLS
Record Type
Fields
FLS
Data_Grid_Loader_Configuration_vod
CRUD
Data_Grid_Loader_Configuration_vod
- Active_vod
- Object_Name_vod
- Field_List_vod
- Country_vod
- Sharing_Group_vod
Edit
- Grant access to the Data Grid Loader Configurations tab.
Configuring the Data Grid Loader for Recommended Email for Business Admin Users
To configure this feature for business admin users:
-
Ensure the following features are enabled:
-
Grant the following permissions:
Object
OLS
Record Type
Fields
FLS
Campaign_Target_vod
CRU
n/a
- Campaign_vod
- Target_Account_vod
- Mobile_ID_vod
- Any fields used for loading data
Edit
Data_Grid_Loader_Configuration_vod
R
n/a
- Active_vod
- Object_Name_vod
- Field_List_vod
- Country_vod
- Sharing_Group_vod
Read
- Grant access to the Launch_Data_Grid_Loader_vod Visualforce page.
- Grant access to the DataGridLoaderController Apex class.
- Add the Launch Data Grid Loader button to the Campaign Targets related list of the appropriate Campaign_vod object page layouts.
-
Activate the CRM Desktop (Windows) VMOCs for the following objects:
- Campaign_vod
- Campaign_Target_vod
- ContentVersion
- ContentDocument
- ContentDocumentLink
- Data_Grid_Loader_Configuration_vod
- Account – Only required when using an External ID field on the Account object
Creating Data Grid Loader Templates as an Admin
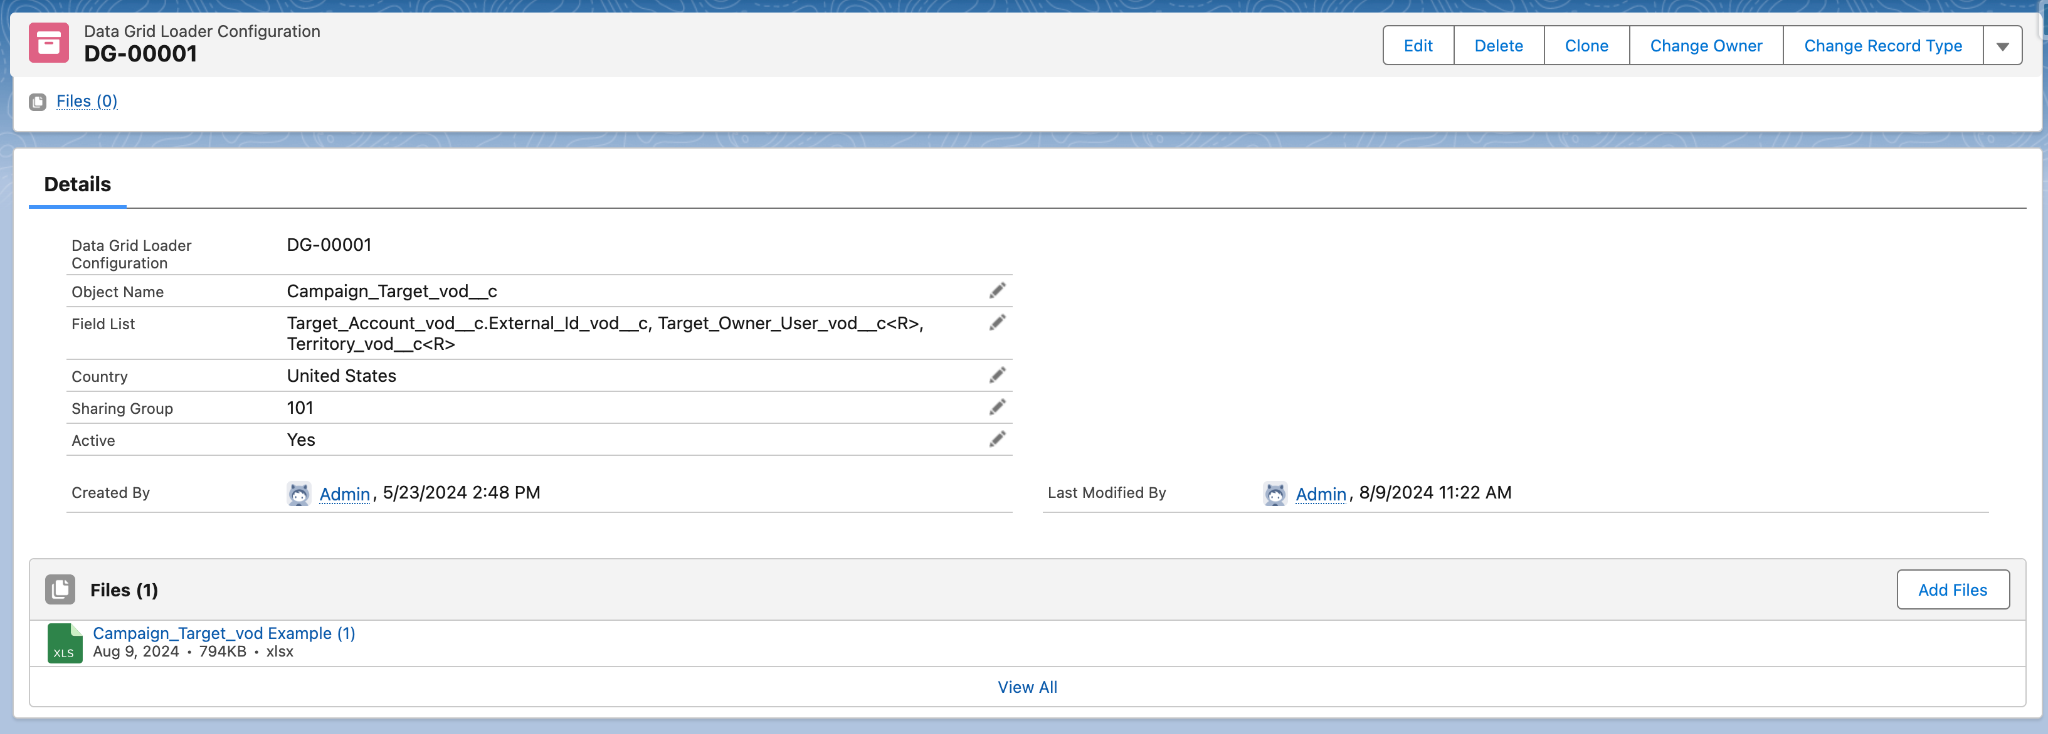
Admins must set up templates by creating Data_Grid_Loader_Configuration_vod records that enable user groups to use the Data Grid Loader.
To create a template, create a Data_Grid_Loader_Configuration_vod record with the following fields populated:
- Object_Name_vod = Campaign_Target_vod__c
-
Field_List_vod – A comma separated list of Campaign_Target_vod Field API names available for loading. Field names are case-sensitive and display in the Data Grid Loader in the order they are entered. Admins can mark certain fields as being required by adding the <R> parameter after a field. Fields required at the object level do not need this parameter.
For example, Target_Account_vod__c,Target_Owner_User_vod__c<R>,Territory_vod__c
Ensure users have FLS Edit permission to any listed field.
When defining the list of fields, admins should consider specific behavior for the following fields:
-
Lookup External ID Fields – Admins can reference an External ID field of a related record. By default, relationship fields use the record's ID when loading. To use External ID fields, use the format <Lookup Field>.<External ID Field on the Lookup Object>.
For example, Target_Account_vod__c.External_ID_vod__c
Ensure users have at least FLS Read permission to the appropriate External ID field.
- Id – Enables updating existing records, rather than creating new records. When users populate the Id column in a row, the upload updates that record. If the Id column is blank, or if it is not added to the list of fields, the uploads create new records instead.
- External ID fields – External ID fields can be added to the list of fields and populated in the Data Grid Loader, but are not used for upserting existing records. If a row has a blank Id column with a populated External ID column, the upload creates a new record.
- RecordTypeId – By default, new records created by the upload use the default record type assigned to the user. Admins can configure the RecordTypeId field on the Campaign_Target_vod object as a column in the fields list to enable users to specify the record type of each row.
-
Lookup External ID Fields – Admins can reference an External ID field of a related record. By default, relationship fields use the record's ID when loading. To use External ID fields, use the format <Lookup Field>.<External ID Field on the Lookup Object>.
- Country_vod – This field is optional. When this field is populated, the template applies specifically to users matching the country. If this field is left blank, the template applies to all users.
- Sharing_Group_vod – This field is optional and enables admins to configure sharing rules that restrict visibility to the template.
- Active_vod – Select Yes_vod to make the template available for use or No_vod to keep the template unavailable for use.
If more than one Data Grid Loader Templates are active, records with the appropriate country of the user are used first. If more than one active record with the same country is applicable, the most recent template is used, based on the record's ID.
Attaching a Downloadable Template File
To provide instructions and guidance to format data correctly when using the Data Grid Loader, each template can have an attached .xlsx file that can be downloaded by users in the Data Grid Loader.
Admins should consider the following recommendations when creating the downloadable .xlsx file:
- Headers in the downloadable file should match the list of fields defined in the corresponding template.
- Add and format instructions or help text to the template file as needed. For example, admins can use comments to provide an explanation of fields to guide users.
- Downloadable files should be localized to the country defined in the template. If there are multiple applicable languages, admins can create separate tabs for each language.
Admins can attach the downloadable file via the Files related list.
If multiple files are attached to the record, the latest file is used.
Launching the Data Grid Loader as a Business Admin
Users can launch the Data Grid Loader from the Browser platform:
-
Navigate to the appropriate Campaign_vod record.
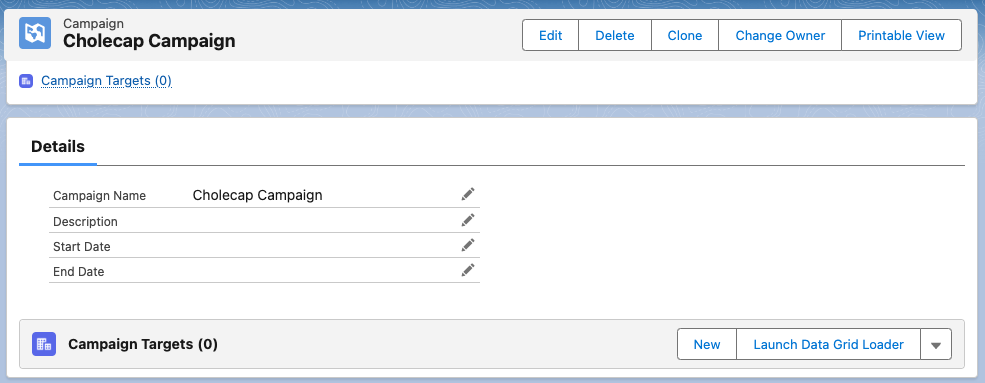
- Select the Launch Data Grid Loader button in the Campaign Targets related list.
If the CRM Desktop (Windows) app is not installed, users are prompted to download and install the application.
Only one campaign can be launched at a time. If the Data Grid Loader is already open for another campaign, a warning displays to prevent launching multiple loaders.
Using the Data Grid Loader as a Business Admin
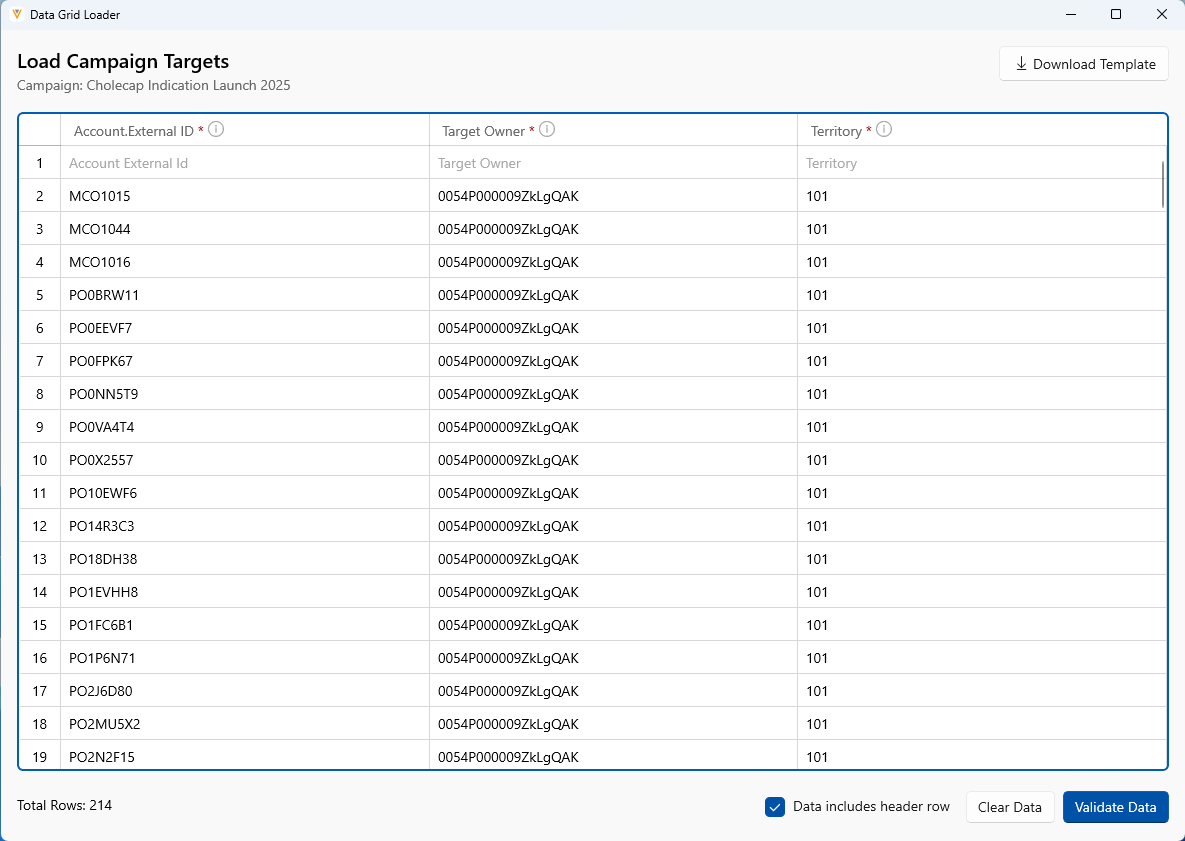
When users select the Launch Data Grid Loader button, the CRM Desktop (Windows) app launches and opens the Data Grid Loader for the selected Campaign_vod record. The Campaign_vod record's name displays in the top left corner of the Data Grid Loader.
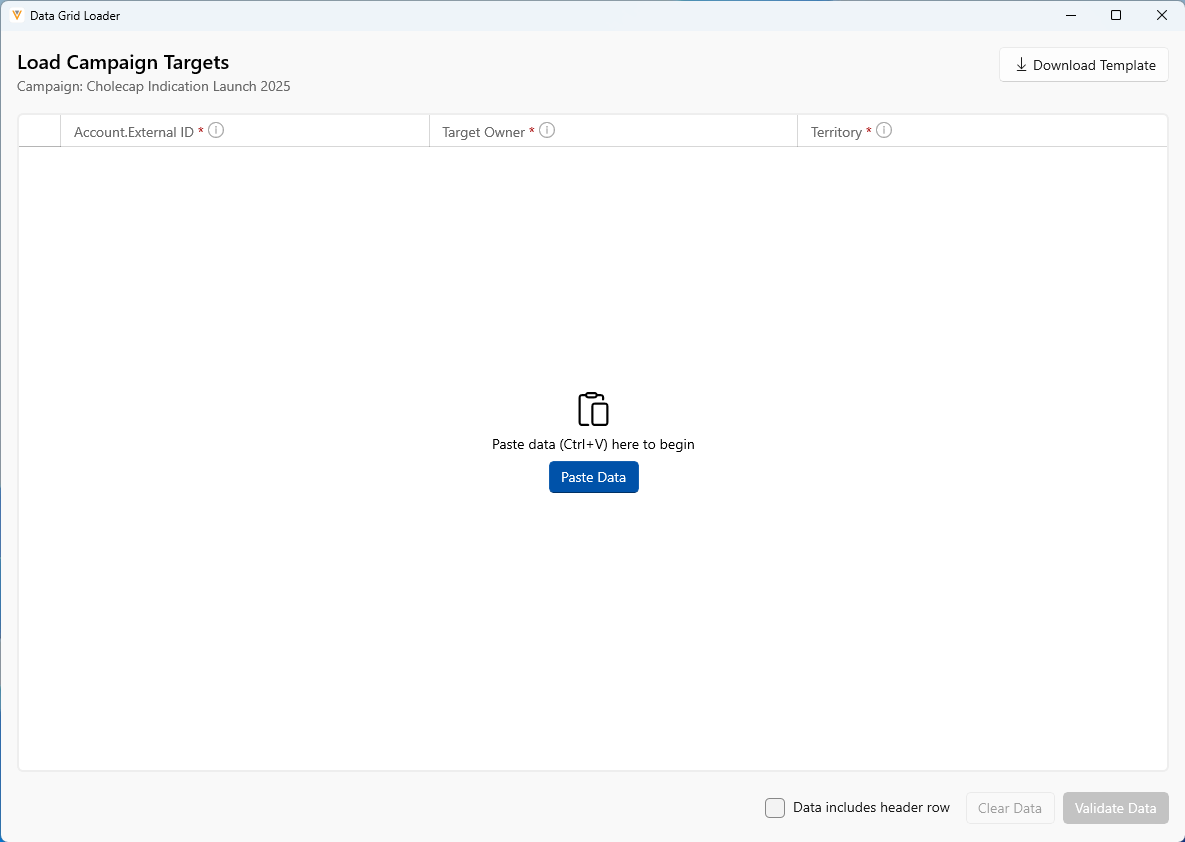
The configured template fields also display, enabling users to see which fields are available for loading.
If the configuration template contains an attached .xlsx file, select the Download Template button to download the attached .xlsx file. This helps format the data before loading.
To begin uploading:
- Ensure the source spreadsheet contains all appropriate rows and data.
-
Copy the data from the spreadsheet.
When data is pasted into the Data Grid Loader, it replaces all data currently in the loader. Ensure all appropriate data is pasted at once.
-
Paste the data into the Data Grid Loader. The following methods are available to paste the data:
- Selecting the Paste Data button in the Data Grid Loader
- Using a keyboard shortcut (Ctrl + V)
- Right-clicking anywhere within the app, then selecting Paste
-
Select the Data Includes Header Row check box if the first row of the pasted data contains column headers. This ignores the first row when uploading.
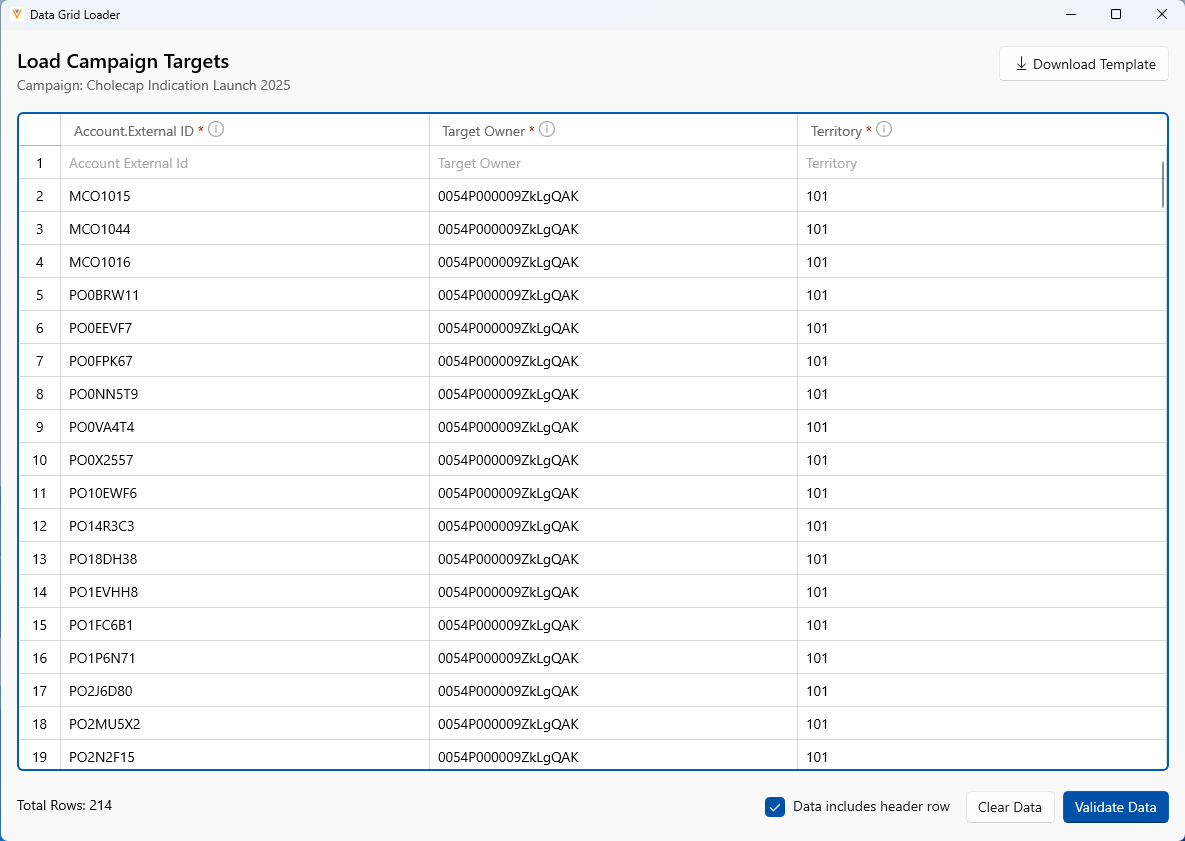
- Select Validate Data. The validation process ensures any required fields are populated for every row in the data.
Validating Data
The validation process ensures any required fields are populated for every row in the data. Rows with validation errors highlight in red. Additionally, the Status column displays a message on the validation results for each row.
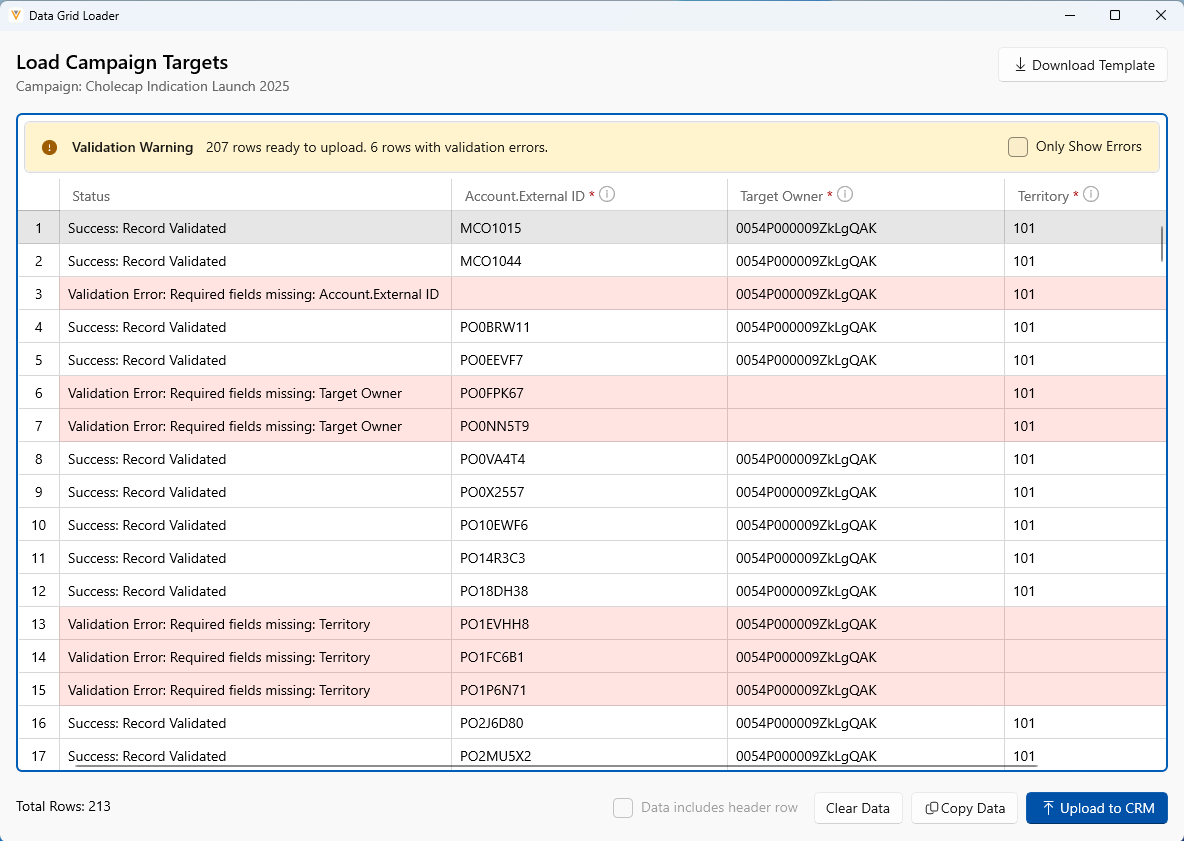
To more quickly identify and resolve validation errors, select the Only Show Errors check box to filter the list of rows to only display rows with validation errors. Users can use the leftmost number column to identify which rows in their source data contain validation errors.
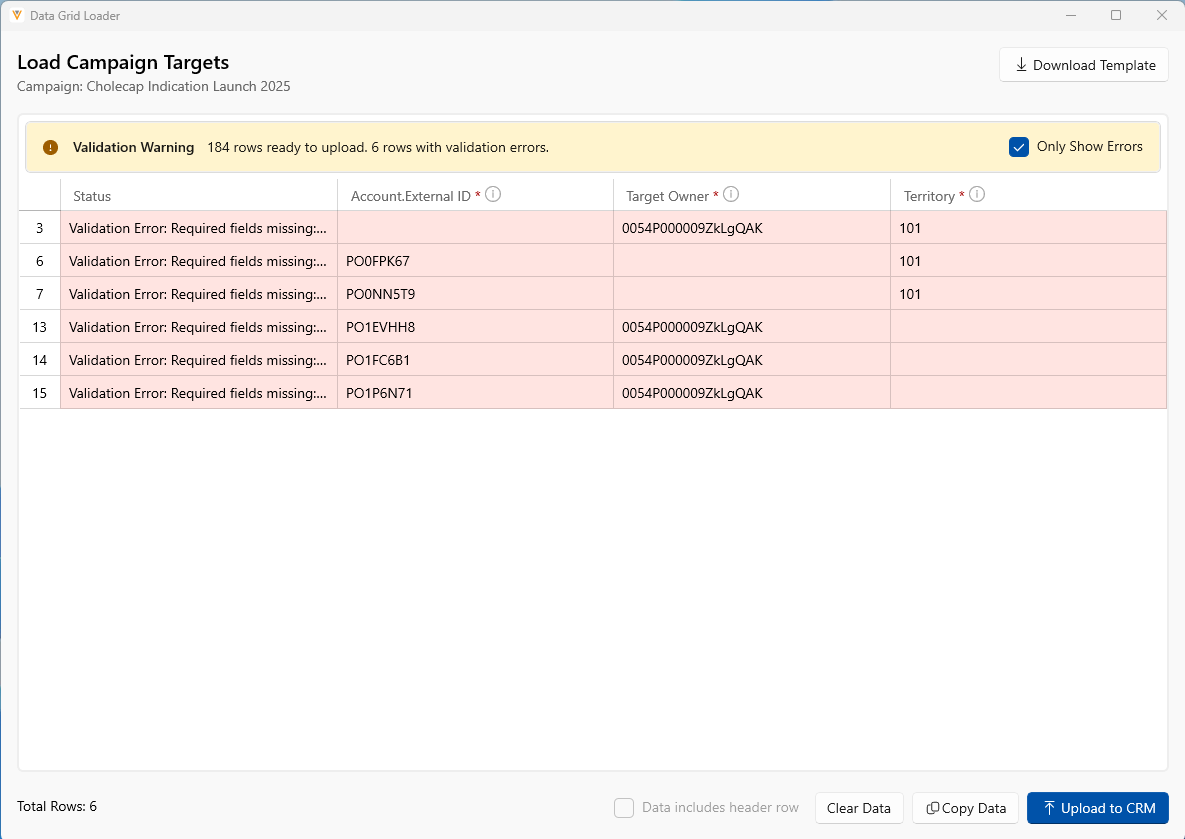
User can proceed with uploading valid rows, or resolve validation errors first.
To resolve validation errors:
- Review validations errors in the Data Grid Loader.
- Correct the errors in the original spreadsheet.
- Copy the corrected data.
- Select Clear Data (keyboard shortcut Delete or Backspace) from the Data Grid Loader.
- Paste the updated data into the Data Grid Loader.
Uploading Data to CRM
After validating the data, select the Upload to CRM button to proceed with uploading the data.
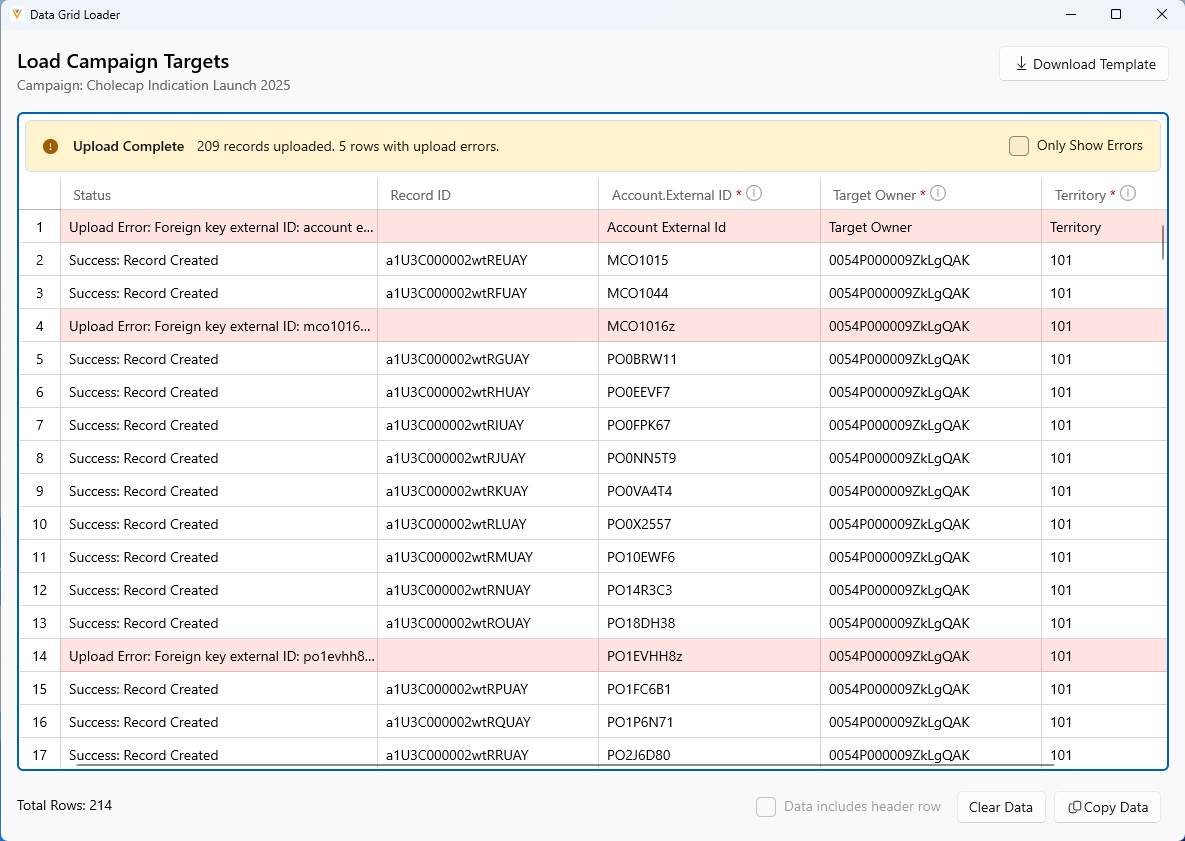
While the upload is in progress, do not close the Data Grid Loader window.
Both upload errors and validation errors highlight in red with a Status column displaying the results for each row. Filter for errors by selecting the Only Show Errors check box to quickly identify any records that could not be uploaded.
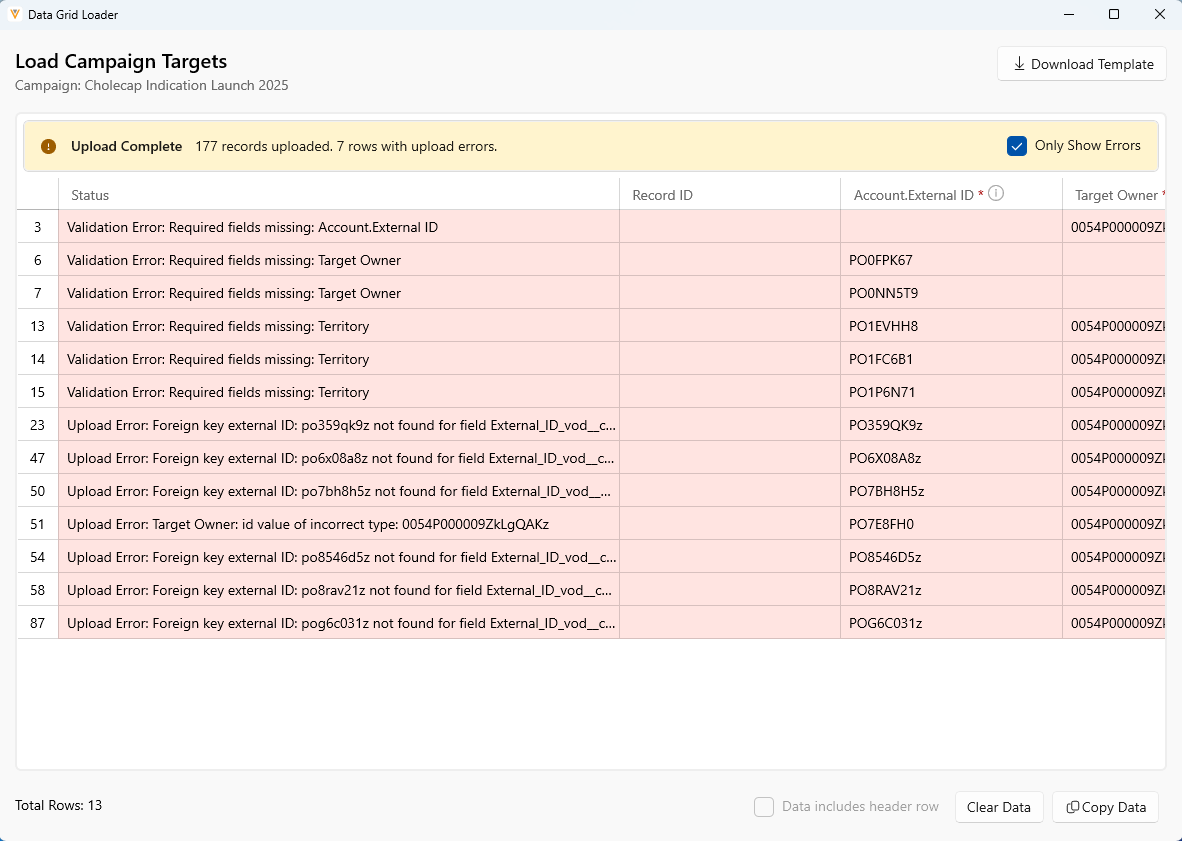
Additionally, if the ID field was not configured in the template, the ID field is added to the grid, enabling users to identify records in the system for later reference.
Once the upload is complete, users can select the Copy Data button to copy the entire grid, including columns and upload results. They can then paste this data into a spreadsheet as a log for the upload. Users can also make any necessary corrections to upload or validation errors and retry importing the data via the Clear Data button and pasting the corrected data.

