

New Account DCR
A New Account DCR can only be initiated from the Network Account Search results page by tapping the New button. Even if the user does not have permission to create new accounts, the New Account button displays on the Network Account Search results page because the user can create a DCR with this button by making edits to the Account.
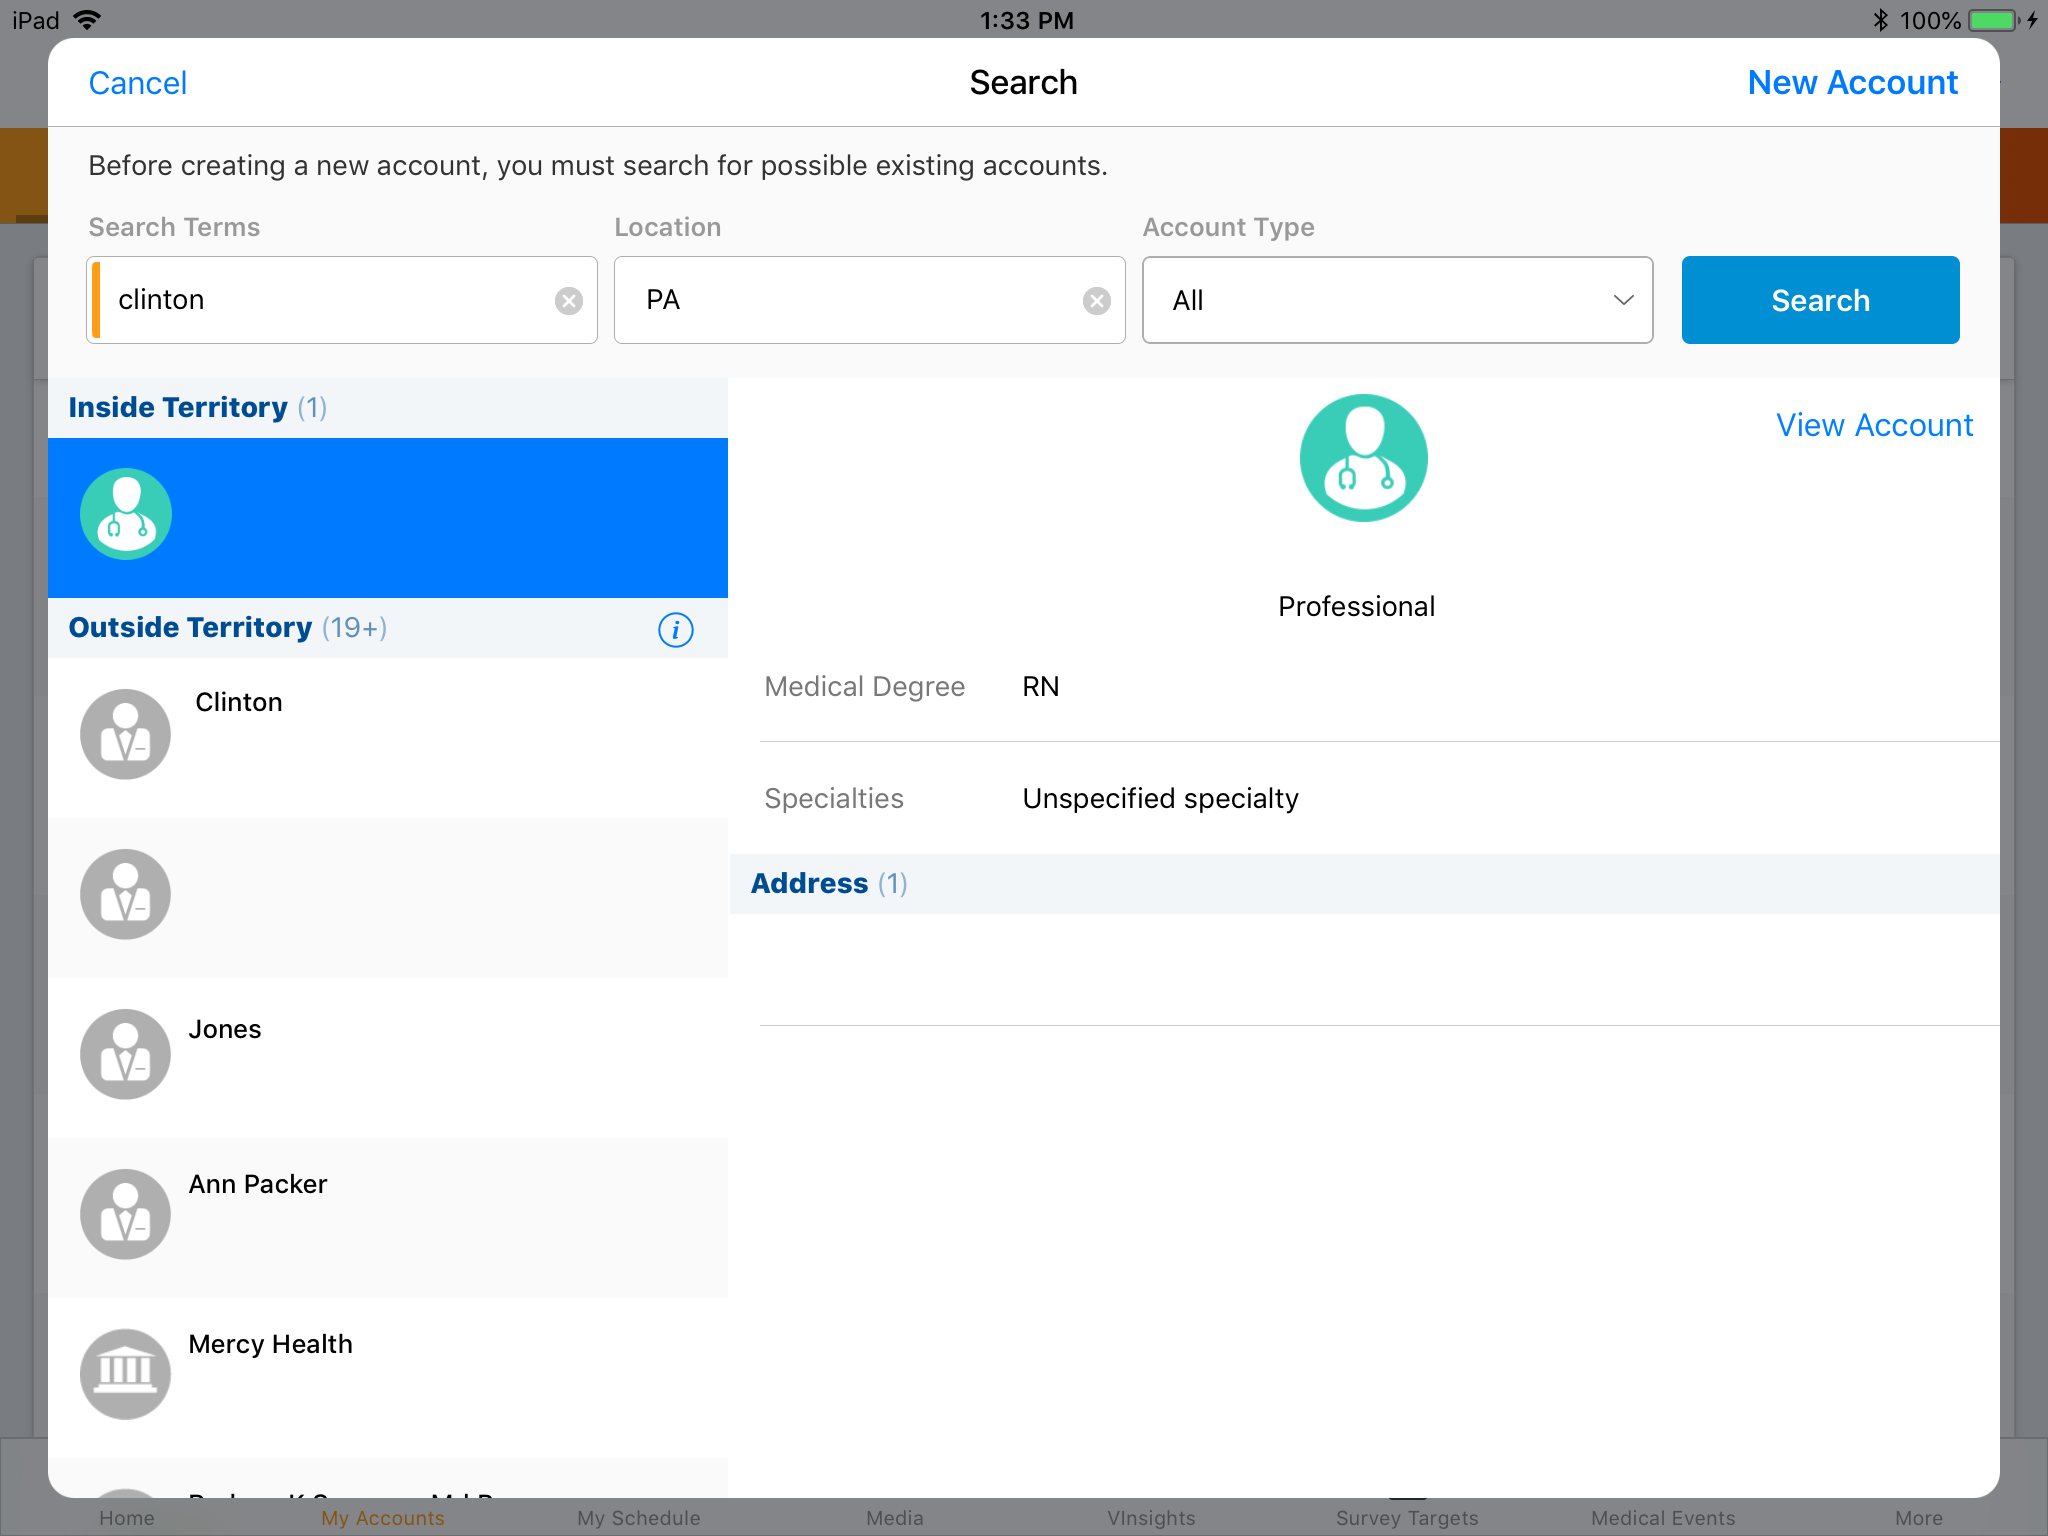
After tapping the New button, the user creates the new account using the standard procedure. After saving the changes, the DCR notes window displays.
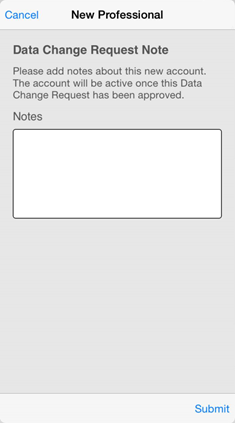
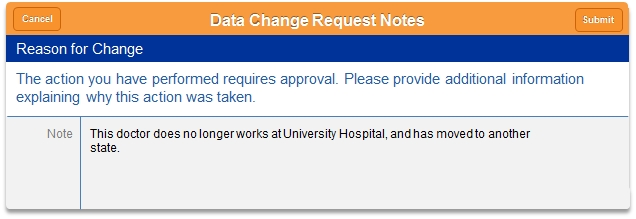
The Data Change Request Notes field is optional (Notes_vod field of the Data Change Request object). Enter the reason for the changes or other notes for the Data Steward or equivalent responsible person.
Do not enter emojis in the Notes_vod field.
Tapping the Submit button submits the DCR for processing at the next sync.
It is normal for the iPad platform to generate more supplemental DCR lines than the Browser platform. Each field on the page layout with a value (including default value, but excluding system fields like LastModifiedDate) is created by a DCR line. Only DCR lines mapped to Network fields are sent to Network.
Edit Account DCR
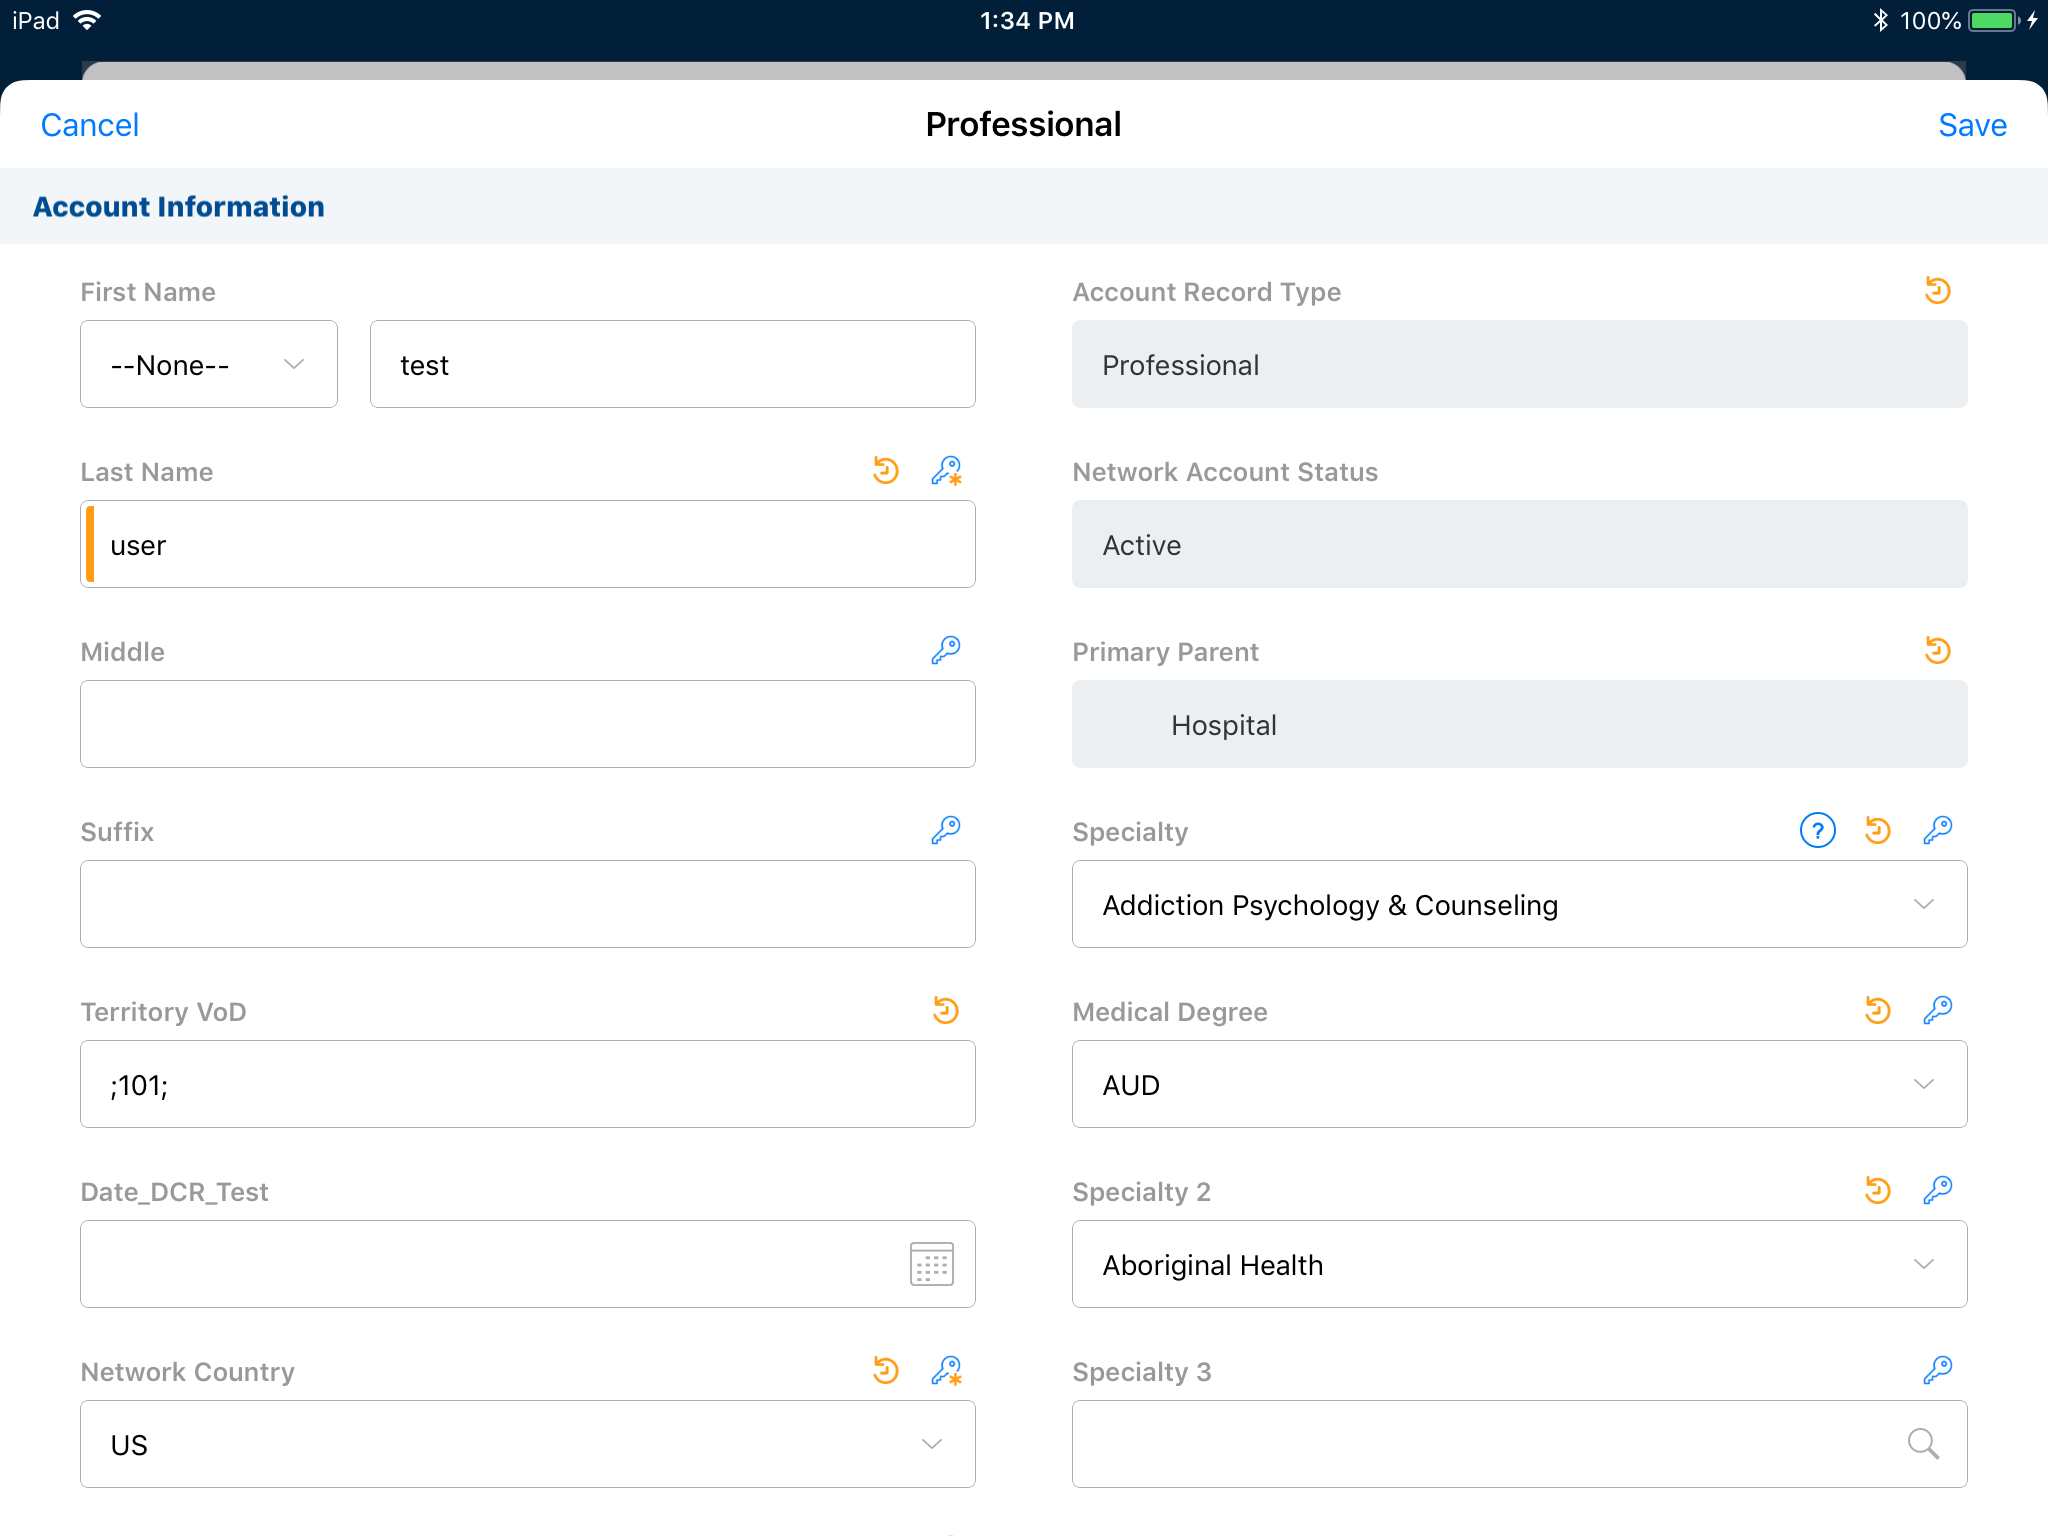
When a user has access to the DCR object and the Account_vod record type, an Account Edit DCR page displays after the user taps the Edit button. DCR-controlled fields display with a lock icon on the right side. If the user changes a value on any DCR-controlled fields, a Data Change Request confirmation window displays when the user taps Save.
Non DCR-controlled fields can be edited normally and are stored when clicking Save.
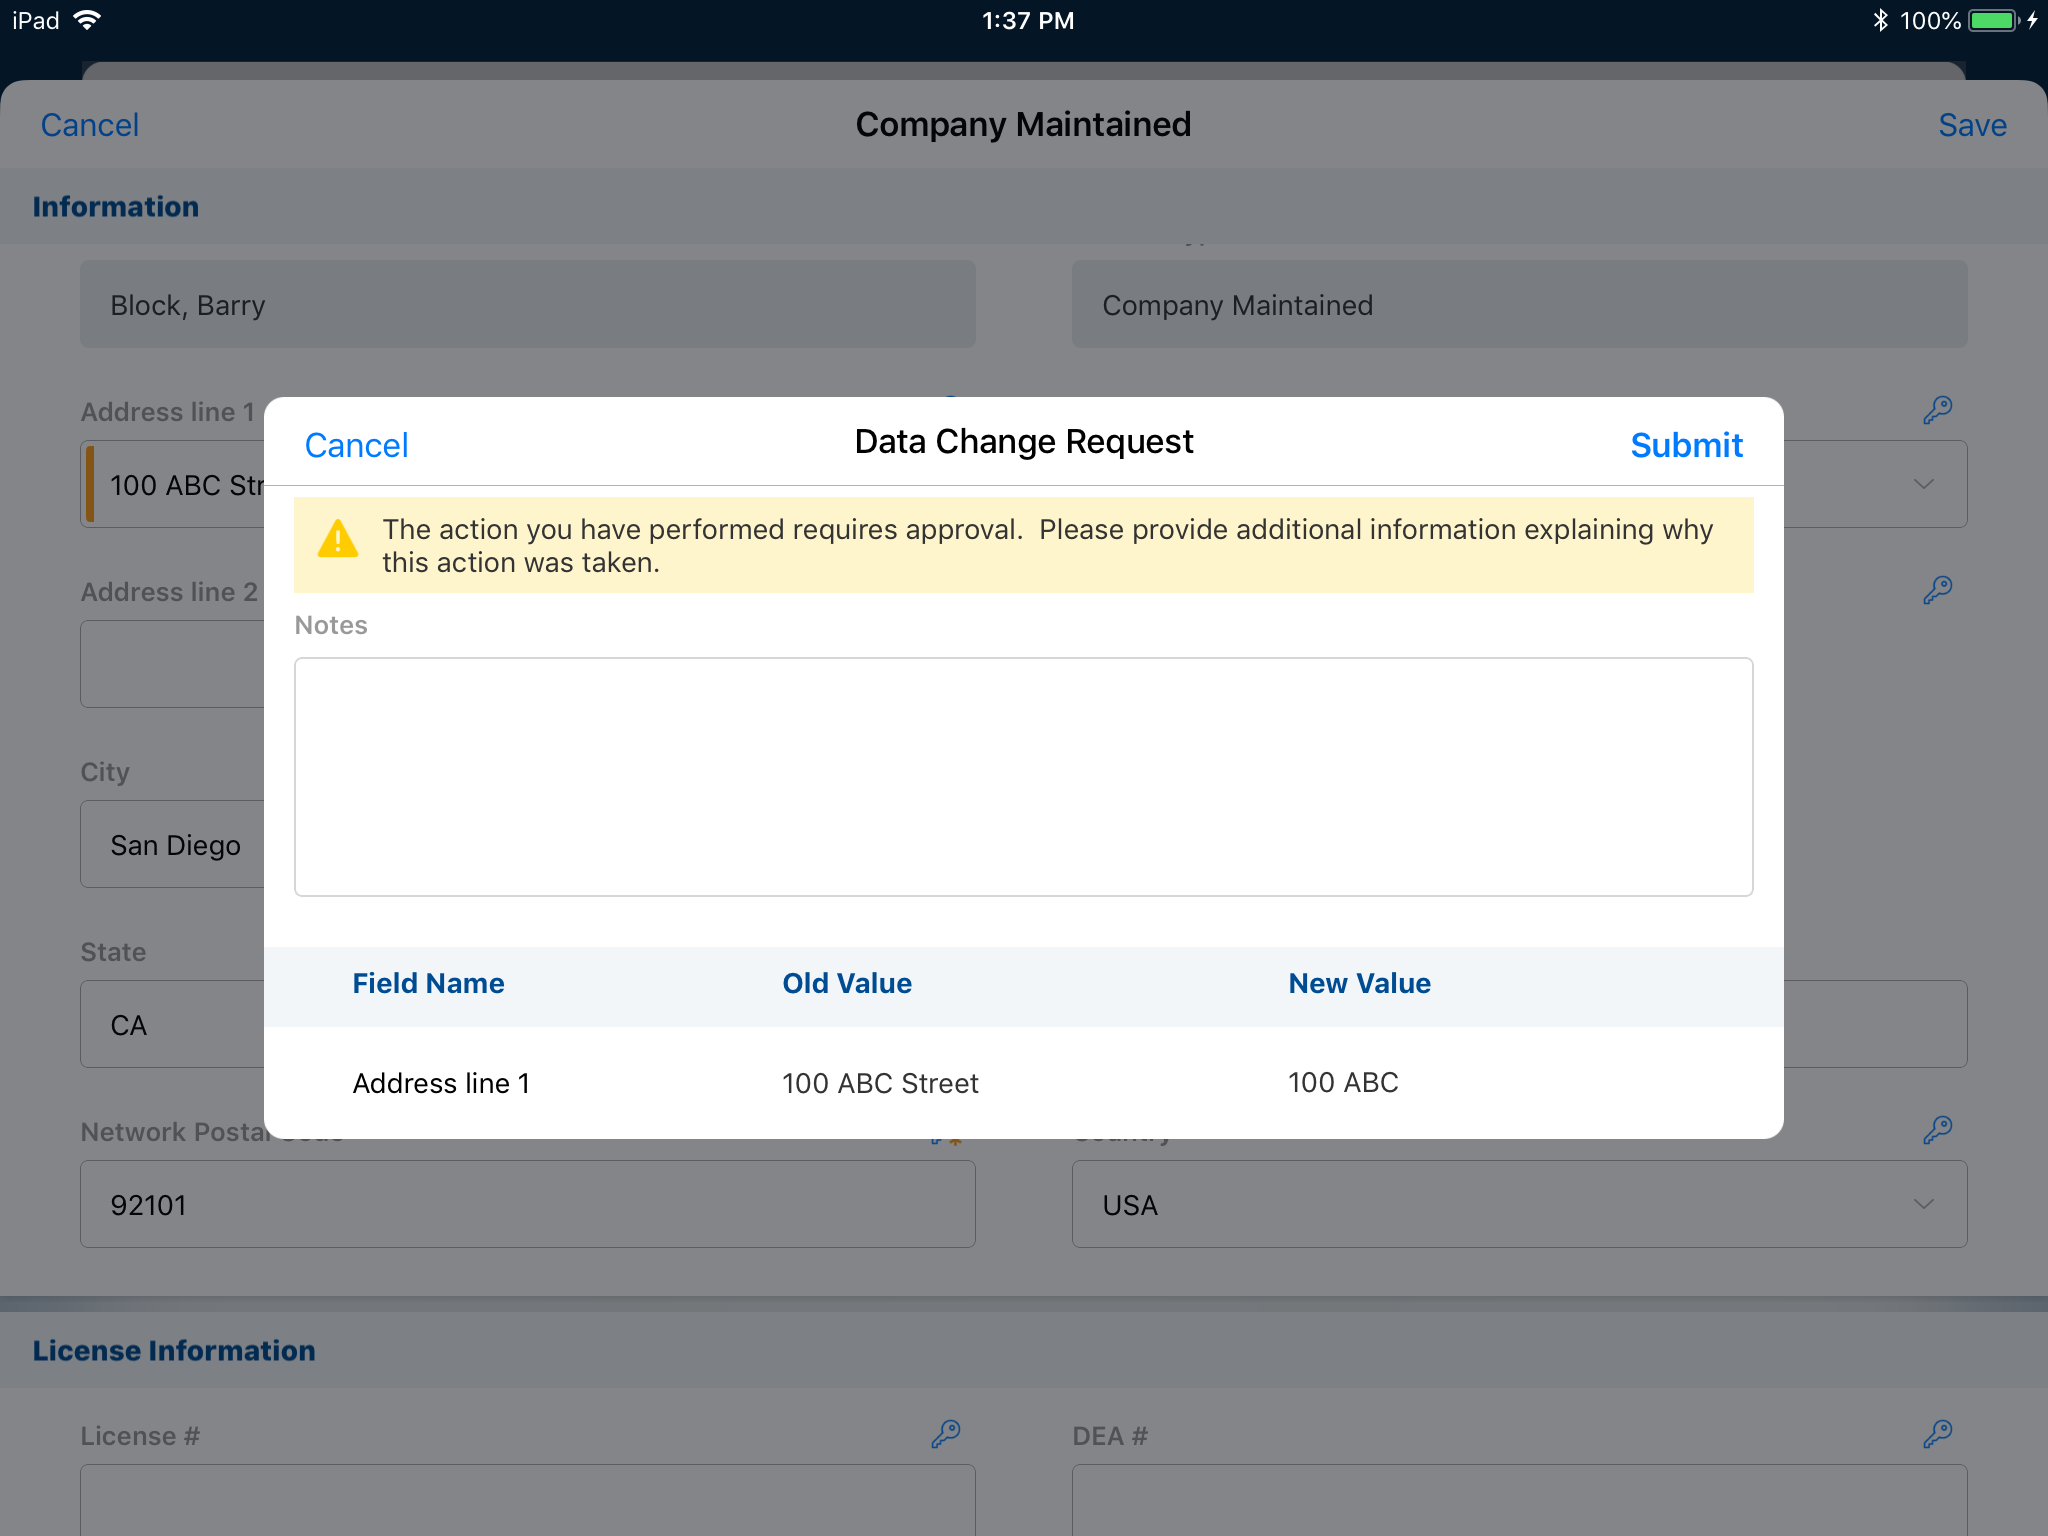
Account DCR Confirmation page
The top section of the Data Change Request confirmation window is a Notes field (Notes_vod field of the Data Change Request object). Enter the reason for the changes or other notes for the Data Steward or equivalent responsible person. The Notes field is an optional field, but it can be made a Required field by enforcing it on the DCR page layout. For information on increasing the size of the Notes field, see Long Notes in Data Change Requests.
Only the DCR controlled fields on the account display in the bottom section of the Data Change Request confirmation window. The New Value displays along with the Field Name and Old Value, and is prepopulated based on Current Value. The New Value field highlights in orange.
Tapping the Submit button submits the DCR for processing at the next sync.

New Address DCR
If a user without create permissions for the Address object clicks the New Address button, a DCR is created via the Address creation page. The user can edit information in the Address creation window. When tapping Save, the Data Change Request Notes window displays for the user to provide more information.
The Data Change Request Notes field is not required.(Notes_vod field of the Data Change Request object). It can be made a Required field by enforcing it on the DCR page layout. Enter the reason for the changes or other notes for the Data Steward or equivalent responsible person.
Tapping the Submit button submits the DCR for processing at the next sync.
Edit Address DCR
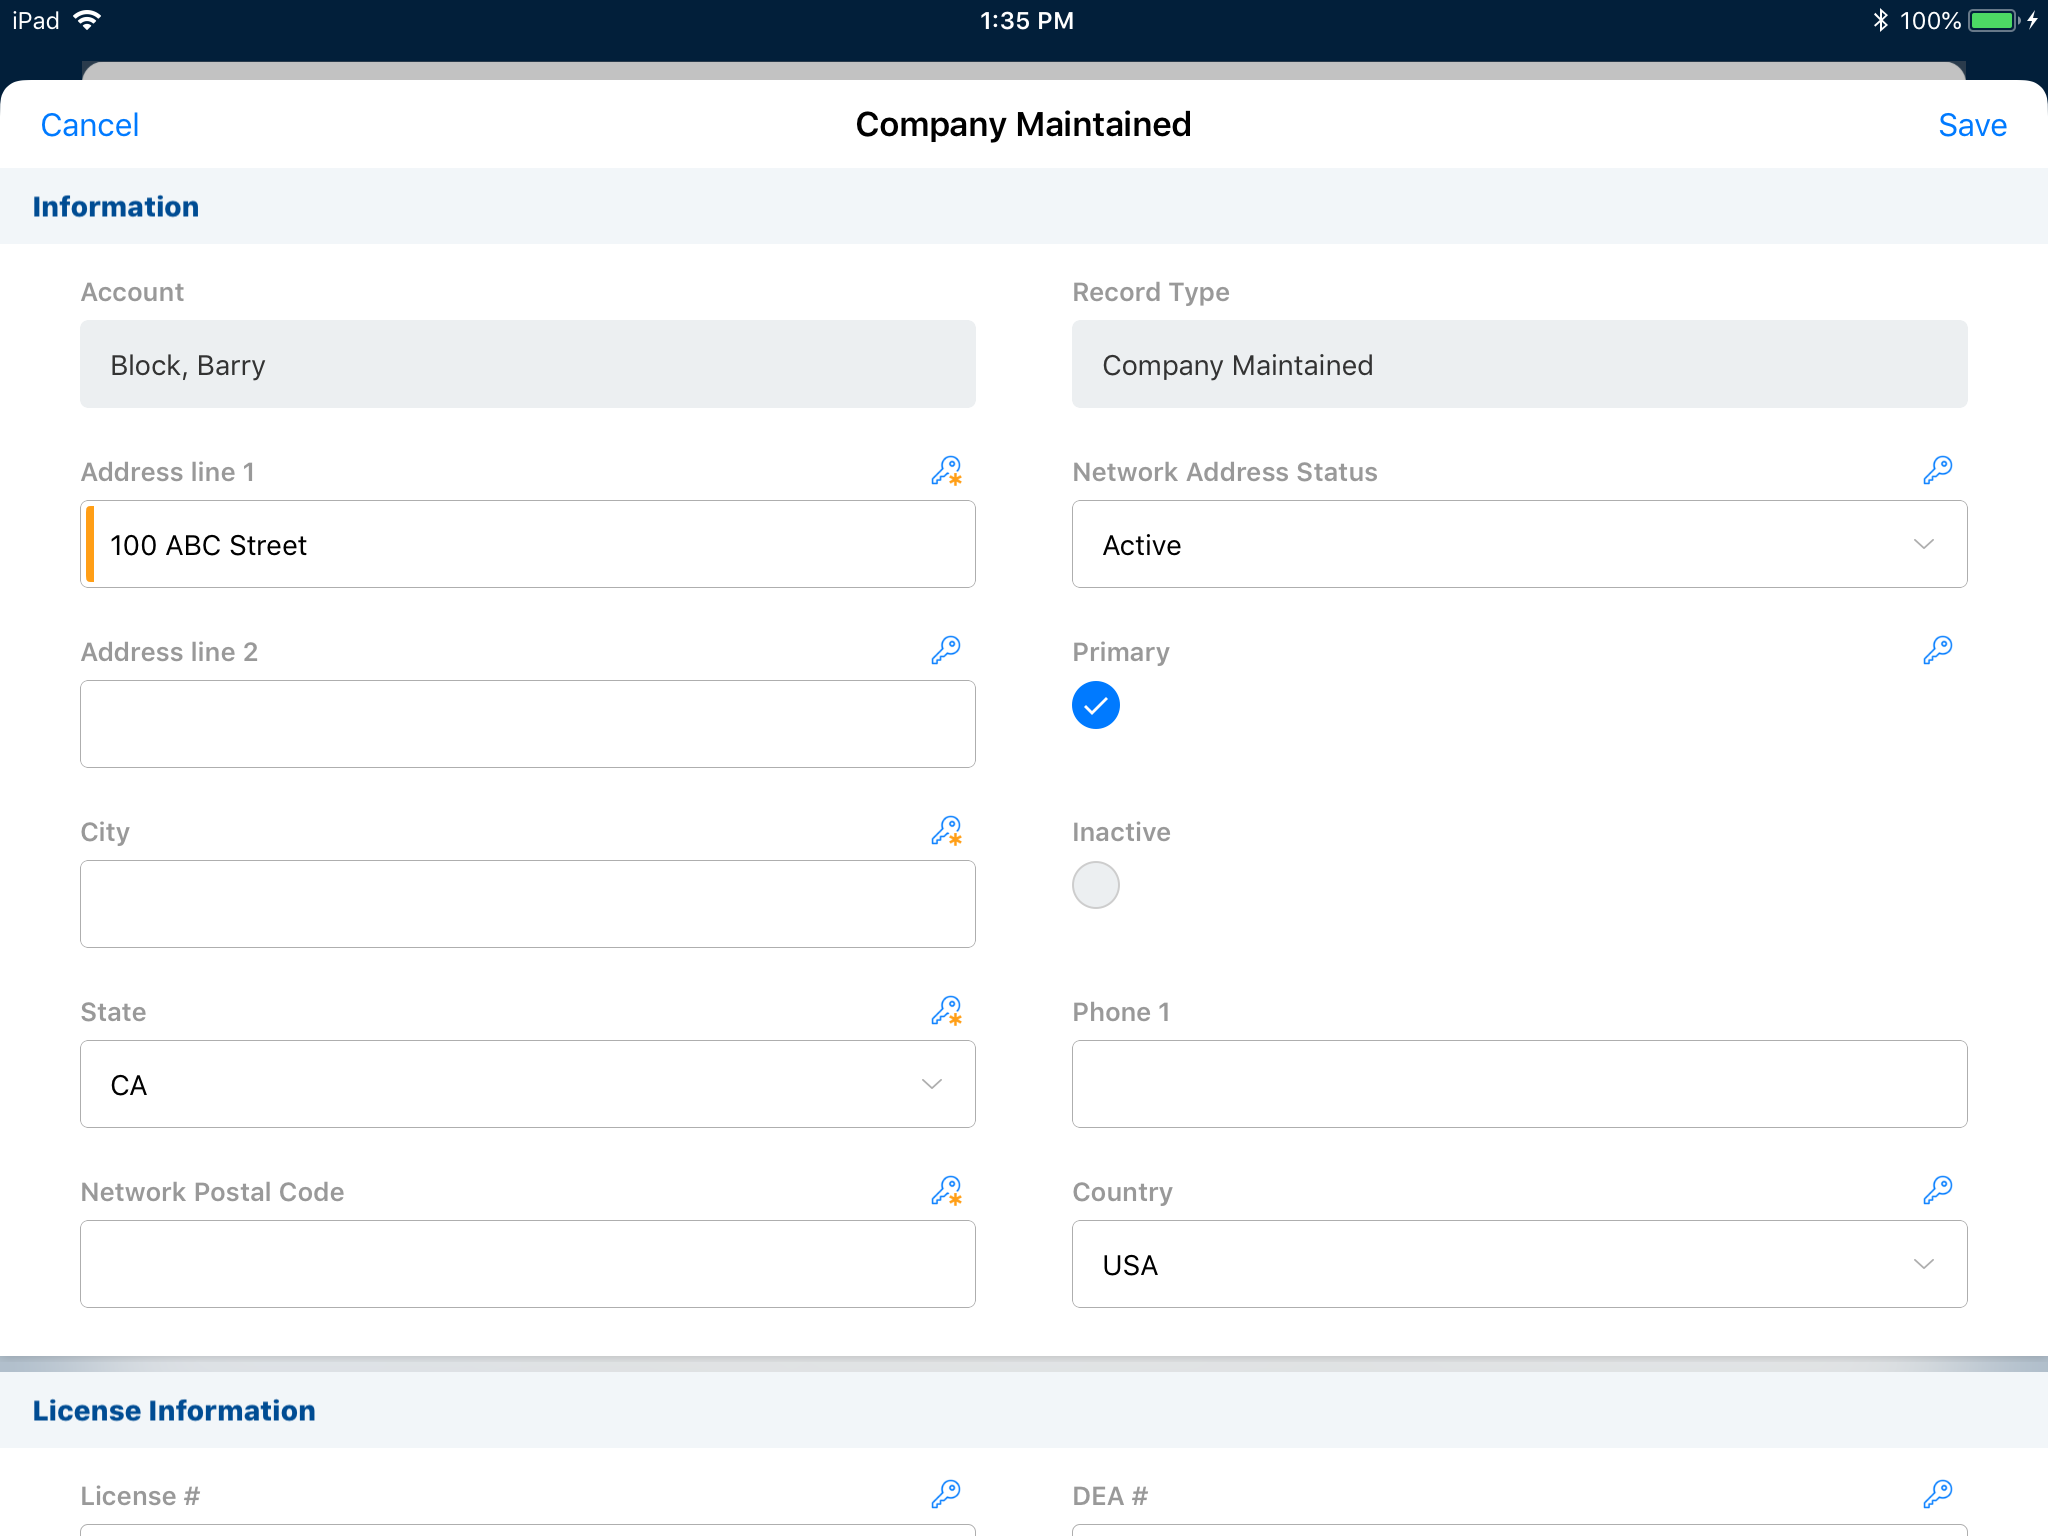
When a user has access to the DCR object and the Address_vod record type, they can submit an Edit Address DCR. DCR-controlled fields display with a lock icon on the right side. The User can change the value as needed on the page. A Data Change Request confirmation window displays when the user taps Save.
Non DCR-controlled fields can be edited normally and are stored after clicking Save.
Address DCR Confirmation page
The top section of the Data Change Request confirmation window is a Notes field (Notes_vod field of the Data Change Request object). Enter the reason for the changes or other notes for the Data Steward or equivalent responsible person. The Notes field is an optional field, but it can be made a Required field by enforcing it on the DCR page layout.
Only the DCR controlled fields on the address are shown in the bottom section of the Data Change Request confirmation window. The New Value displays along with the Field Name and Old Value, and is pre-populated based on Current Value. The New Value field highlights in orange.
Tapping the Submit button submits the DCR for processing at the next sync.
New Child Account DCR
There are two ways to create a new child account:
- Selecting the Member Of related list and tapping the + button on the person Account detail page
- Selecting the Member related list and tapping the + button on the organization Account detail page
If the user has permission to create new child accounts, the standard process is used. If the user does not have permission to create new child accounts, the user can still create DCRs via this method.
- The user must have access to the DCR object in order to create and view Data Change Requests
- The Child_Account_vod record type should be visible for the user
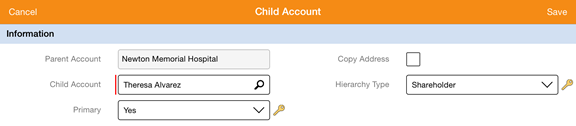
To establish the parent/child relationship:
- Select the Parent account.
- Set the Parent account to Primary, if applicable.
- Select the Child account.
- Select Save. The Data Change Request Notes page displays.
The user can select the Parent account and set it to Primary, if applicable; the user can then select the Child account. The DCR Notes (Notes_vod field of the Data Change Request object) is not required. It can be made a Required field by enforcing it on the DCR page layout. Enter the reason for the DCR or other notes for the Data Steward or equivalent responsible person.
Selecting Submit submits the DCR for processing at the next sync.
Edit Child Account DCR
When a user has access to the DCR object and the Child_Account_vod record type, they can submit an Edit Child Account DCR. DCR-controlled fields display with a lock icon on the right side. The user can change the value as needed on the page. A Data Change Request confirmation window displays when the user taps Save.
Non DCR-controlled fields can be edited normally and are stored when clicking Save.
Child Account DCR Confirmation page
The top section of the Data Change Request confirmation window is a Notes field (Notes_vod field of the Data Change Request object). Enter the reason for the changes or other notes for the Data Steward or equivalent responsible person. The Notes field is an optional field, but it can be made a Required field by enforcing it on the DCR page layout.
Only the DCR controlled fields on the child account are shown in the bottom section of the Data Change Request confirmation window. The New Value displays along with the Field Name and Old Value, and is pre-populated based on Current Value. The New Value field highlights in orange.
Tapping the Submit button submits the DCR for processing at the next sync.
Using Optional Fields in the PAW/NAW
The Parent Account Wizard (PAW) or New Account Wizard (NAW) displays the full account preview page during the account creation process. Users can edit all fields before saving the DCR, allowing more information on the account, like the NPI or phone number. This supplemental information helps the data steward verify the account more effectively.
To enable this feature, enable the ACCT_PREVIEW_DURING_CREATION_vod Network Setting by entering a value of 1. The Save button on the Parent Account Wizard/New Account Wizard is replaced with the Continue button. Clicking the Continue button displays the Account preview page so users can enter values non-required fields.
FLS and object visibility rules apply to the account preview page; only DCR controlled fields can be edited if the user does not have edit permissions to the object.
This feature applies to the following modes:
- Regular Network mode (Veeva Setting "Data Change Request Mode" = 1 AND Veeva Network MDM Setting "Network Customer Master Mode" = 1)
- DCR without Network mode (Veeva Setting "Data Change Request Mode" = 1 AND Veeva Network MDM Setting "Network Customer Master Mode" = 0)
- Create Unverified Records mode (Veeva Setting "Data Change Request Mode" = 2 AND Veeva Network MDM Setting "Network Customer Master Mode" = 1)
