

Product Metrics for Account Profiles
- Browser
- iPad
Data captured by Product Metrics is used in the Salesforce.com Reports module, in queries, and displays in My Accounts. Use FLS to suppress both visibility and edit capabilities for specific Product Metrics for certain groups of users depending on your organization’s needs.
On the user's My Setup page, a row displays for each product selected. Use the No_Metrics_vod_c field on the Product_vod object if an organization would like to have products available for detailing via the My Setup page but does not want the product to display in the Ratings control. By selecting the check box for a product record, the organization can prevent the product from displaying regardless of what the user selects in the My Setup.
Users who have permission to create or edit Account Views can filter Product Metrics by Detail Group in the Account View details page. To use the filter, users must enable Detail Groups and have products set up for those groups.
Data for the Product Metrics is stored in the Product_Metrics_vod custom object with one row for every account/product combination.
There are five types of supported Product Metrics:
- Box Picklist – Displays a visual indicator in the form of boxes with colors ranging from red to green. Use a Box Picklist to indicate progress along with a text value such as Product Awareness Rating.
Box Picklists support a maximum of 10 values specified in the Product Metrics object. If you list more than 10 values, the metric does not display.
- Text Picklist – Displays a text value. Use a Text Picklist metric to display a text value such as Formulary Status.
- Number – Displays a number. Use a Number metric to display a quantity such as Engagements or a currency.
- Arrows – Displays up, horizontal, and down arrow indicators in red, yellow, or green. Use an Arrows metric to display change in numeric data, such as Movement. Follow the configuration steps below to control how the arrows are depicted.
- Check box – Displays a check box. Use a Check box metric to display a true/false indicator such as Target or Speaker.
Five to six Product Metrics can be displayed on a screen with a resolution of 1280 x 1024 or greater. Lower resolutions will have the best results with fewer Metrics displayed.
To ensure the most relevant data displays, Product Metrics can be tailored by Account profile and role. For example, you may want to make the Awareness, Segment, and Movement Product Metrics available only for specialty sales reps. And you want to expose three additional Product Metrics to MSLs, such as Speaker Skill (box), Investigator Readiness (box) and Engagements (number). Finally, you want a third set of Products Metrics visible only to the Managed Markets team, which would track Selling Stage (box), Formulary Status (text) and moving 12 month TRx Chg. Altogether you need nine fields defined in the product_metrics_vod object to store the data and a matching set of nine entries in the Metrics Configurations tab to determine the layout and cosmetic aspects of the Metrics as they display on the UI.
Enabling Product Metrics for an Account Profile
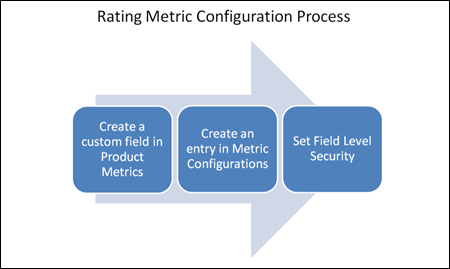
To configure Product Metrics for an Account profile:
- Create a custom field on the Product_Metrics_vod object to store the data:
- Navigate to the Product_Metrics_vod custom object and drill into the object.
- Create a new custom field for your metric. The following field types are supported:
- Picklist
- Number
- Percent
- Currency
- Check box
-
Enter the details for your field. The help text for each field displays next to the corresponding column in the Ratings control and on the Product Metric Record Page Layout.
Help Text for Product Metrics is visible only on the Browser platform.
- Set Field Level Security to control access to the field.
- Select Save when you get to the Add to Page Layout screen, accepting the default. This is not relevant to configuring Metrics.
- Navigate to the Metric Configurations tab to create a corresponding entry in Metric Configurations to control the field display.
- Select New.
- Enter the API name of your metric. This must match exactly the API name of the custom field you created in step 1, including the “__c” suffix. For example, a field with the label Current Month should be entered as Current_Month_vod__c. The API name is case-sensitive. If the Metric API name does not match the field API name in the Product Metrics table, it will not display in the Ratings control.
- In the Display Order field, Enter a numeric value in the Display Order field that corresponds to the order in which this metric is displayed.
- Select all the Account profiles in the Applies To field that this metric will be visible on.
- Select the type in the Metric Type field which reflects how the metric should be displayed. If you chose the Metric Type Arrows, enter the threshold values as follows:
- In the Red/Yellow field, enter the numeric value at which the arrow will change direction and color. Any value less than this threshold displays with a down red arrow. Any value greater than this threshold but less than the Yellow/Green threshold displays with a horizontal yellow dash.
- In the Yellow/Green field, enter the numeric value at which the arrow will change direction and color. Any value less than this threshold displays with a horizontal yellow dash. Any value greater than this threshold displays with a green up arrow.
Setting Field-Level Security
- Determine which user groups should have visibility to each of the fields. Some may have read-write access, some may have read-only access and some may have no visibility to the metric at all.
- Follow standard Salesforce.com procedures for setting Field Level Security on your new metric.
Now you can create a data load routine if you plan on sourcing the metrics with an external data source. For more details on using the Salesforce.com Data Loader refer to the Salesforce.com User Guide.
Product Metrics - CRM for iPad
Enable the following VMOCs for offline devices:
- Product_Metrics_vod
- lookup field - Account_vod
- Where clause - WHERE Account_vod__c IN (SELECT Id FROM Account)
- Metric_Configuration_vod
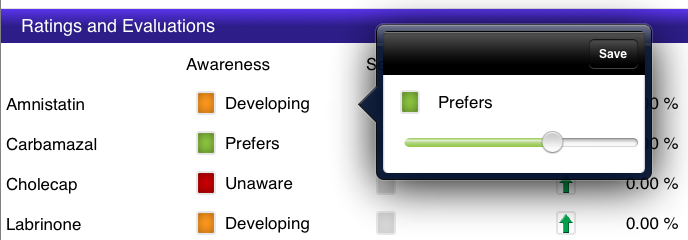
Product Metrics can be accessed from the Sunrise bar. They allow users to enter product-specific information pertaining to the account for company and competitor products visible through My Setup. There are five types of metrics, as online, and each can be edited inline by tapping on the metric in the table.
- Box Picklist – displays a colored indicator next to the picklist value. The user edits the value by using their finger to move a handle along a slider.
- Text Picklist – displays a plain text value
- Number – displays a number, currency, or percent. The user is presented with a keypad to enter the value.
- Arrows – displays up, horizontal, and down arrow indicators in red, yellow, or green to illustrate a trend. The user is presented with a keypad to enter data.
- Check box – displays a check box.
Product metrics for products and detail topics display in separate tables by detail group.
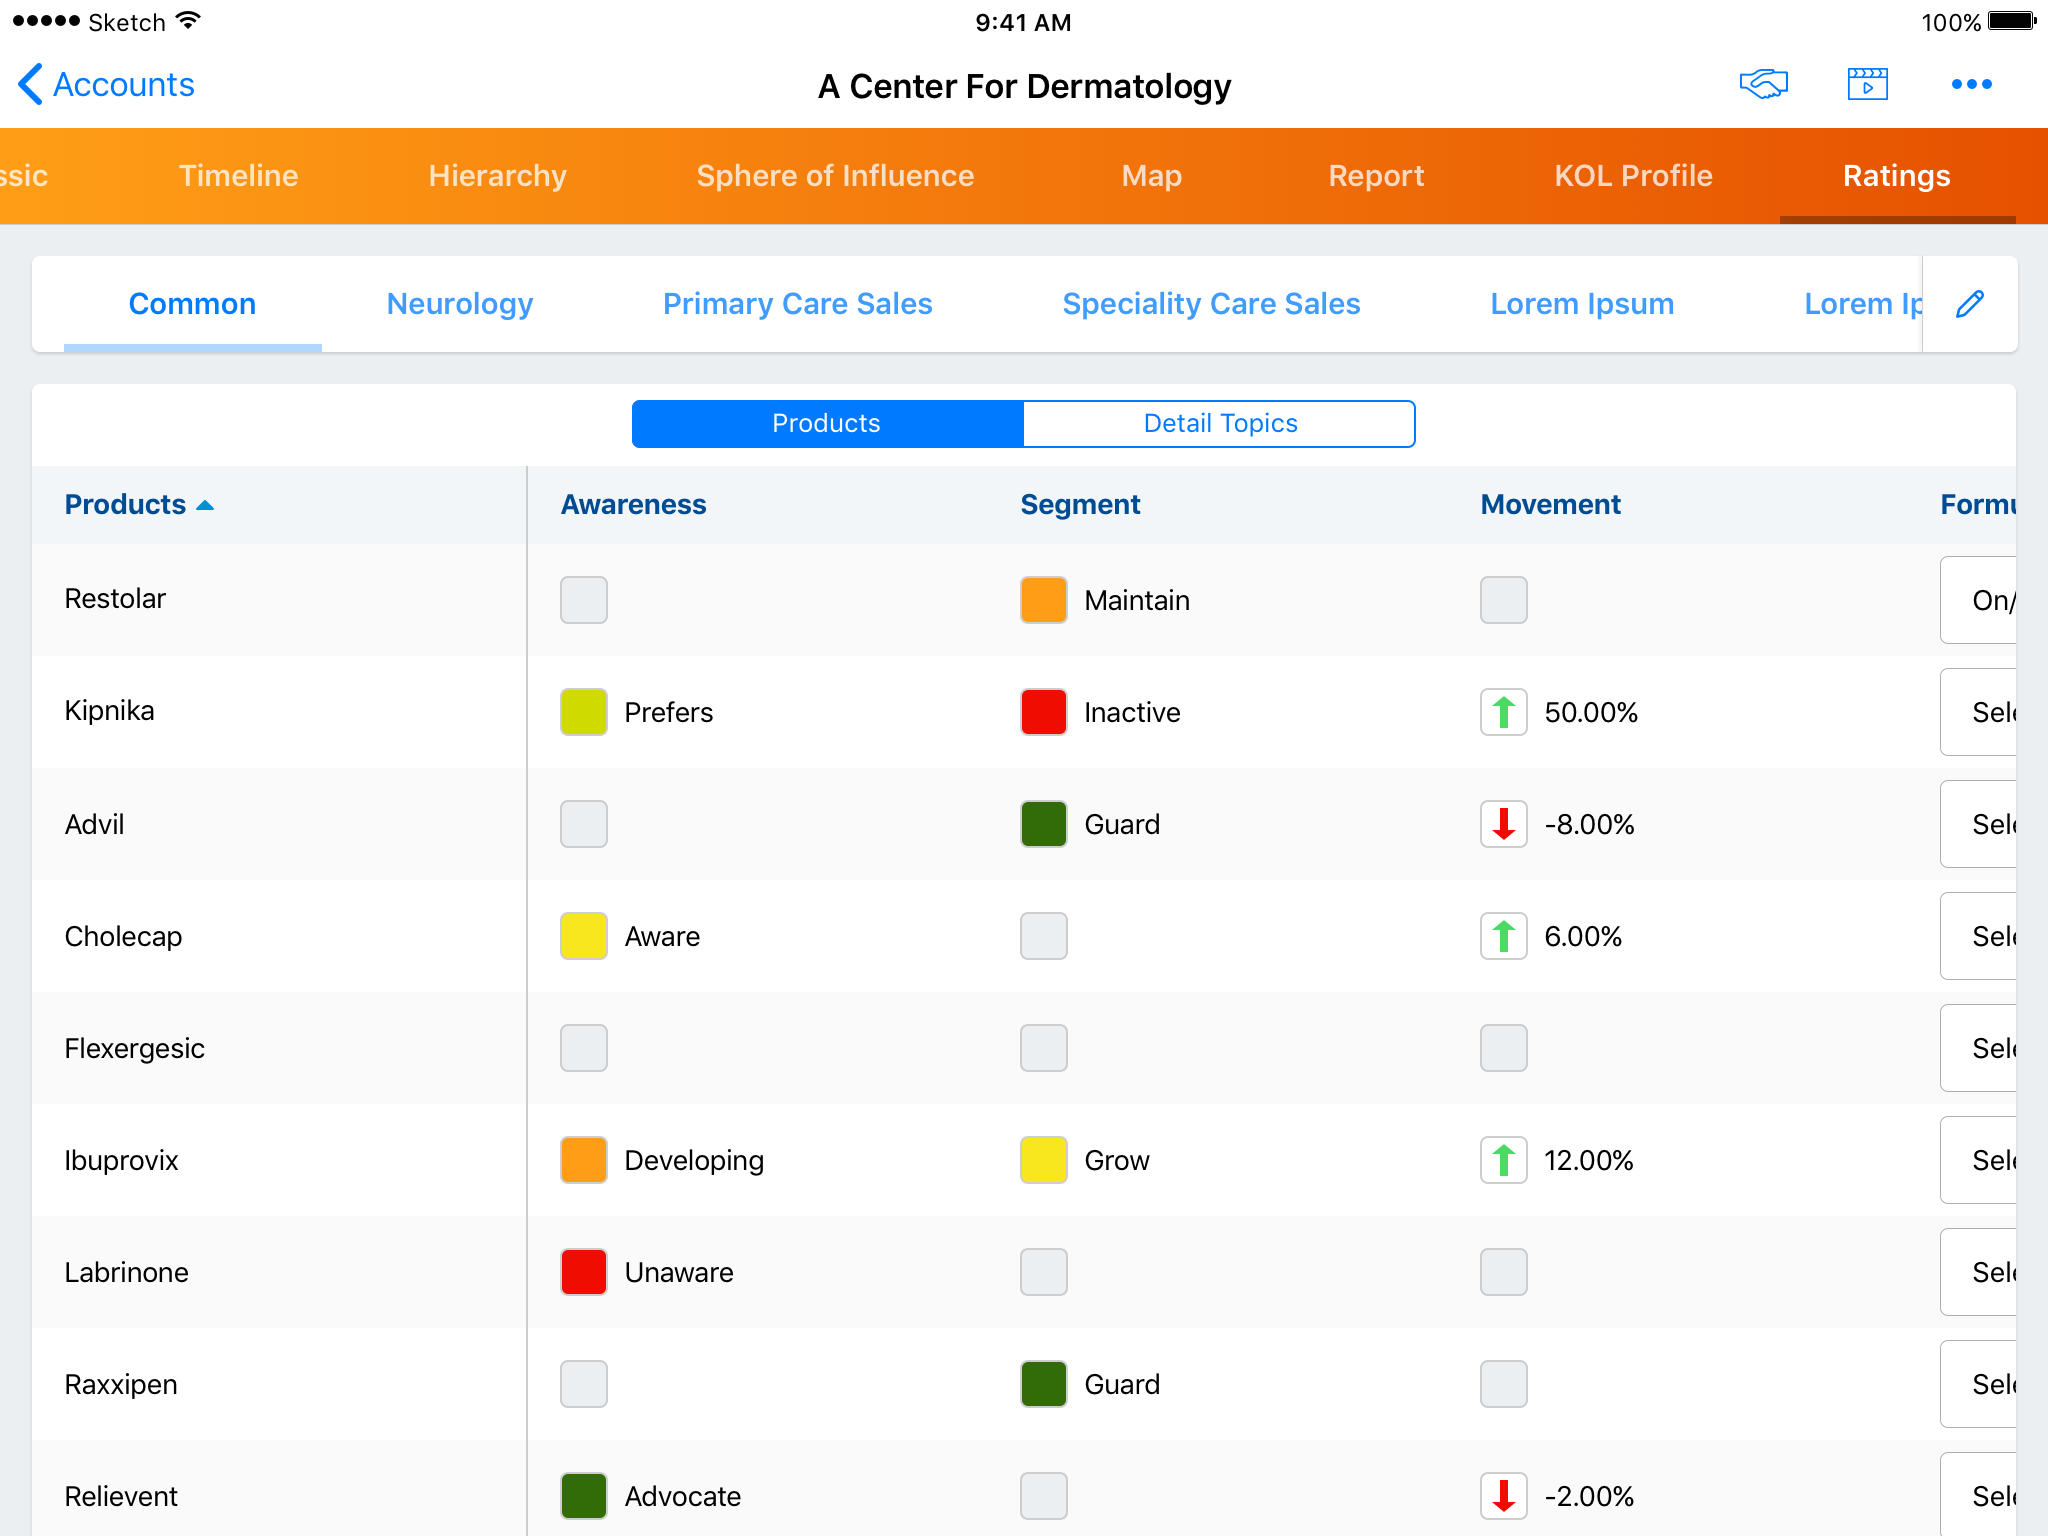
The Common group displays products and detail topics not associated to a detail group. Users can disable the display of specific groups by tapping the edit button.
As with Veeva CRM Online, removing a group deletes the underlying data.
The process for setting up and controlling visibility for product metrics follows the same model as Veeva CRM online.
