

- iPad
- Browser
The Network Account Search (NAS) enables CRM users to search Veeva Network for accounts which may already exist in the system. In this way, reps are sure they are not creating duplicate accounts and are using the most recent, validated data.
Users are able to search against the entire Veeva Network universe when using either the online or CRM for iPad Network enabled New Account Wizard. This is enabled by default in CRM but must be enabled for both the Customer Network instance and for the Network User used by the integration.
Browser vs. CRM for iPad
On all platforms, NAS displays results from the following places:
- Accounts inside the user's territory
- Accounts outside the user's territory
NAS does not display the following results:
- CRM accounts outside of the user's territory that do not exist in Veeva Network
When using the Browser platform, 50 results return. On the iPad, 20 results return.
Search Criteria
By default, Network searches for records that contain any of the search terms provided and sorts the results in order of the records that satisfy most or all of the search criteria. Use a space to separate multiple words being searched. Each word entered is searched across all data.
For example, a search of Woods, NJ generally displays records that contain both Woods and NJ first, followed by records that contain at least one of those terms. Phonetically similar terms and aliases for names are also displayed in the results. For numbers, the search looks for the exact number, or numbers beginning with the number sequence entered.
Searching and sorting in this way ensures Network more accurately provide users with the information needed. When Network searches the local CRM database, it looks for records beginning with the provided search text to avoid inefficient Salesforce queries that could time out.
Special Characters
To refine the search results, use special characters, specifically “ and *. The special characters work only with the Network Search, not the CRM search.
Quotes
When using double quotes (") around a search term, Network searches for an exact phrase. For example, a search of "Sports Medicine" (including the double quotes) produces results that contain both terms used together. Records that contain either term singly, or separated by other words, do not display.
Records display results that contain both terms separated by characters such as a hyphen, or by an alias. For example, searching for "Robert Woods" displays the record for Robert (Bob) Woods, since Bob is an alias for Robert.
Wildcards
When using the wildcard character (*) in a search term, Network searches for occurrences of the search text within a word. For example, a search of *ology produces results containing that string within a word. These results include dermatology, cardiology, ophthalmology, and so on. You are not limited to searching for text at the end of a word; a search for *olo* produces these same terms, along with others, such as Colorado.
You do not need a wildcard to find a word that matches the beginning of the term, because search already does this for you. For example, a search for Jam* and another for Jam would both produce results that included the name James.
Narrowing the Search
The number of results returned is irrelevant and has no impact on performance.
However, the key is to narrow your search terms to get the desired record result near the top of the list. Records that have the most hits on phrases are ranked at the top of the search results.
Search results can be narrowed in several ways:
- Entering names or identifiers, for example, NPI, SLN, or VID, in the general search box returns more relevant results
- Users can refine search results by entering both an account name in the Search Terms field and an address in the Location field in the Search modal
- The Location field searches only on the Address object. For example, US users who enter Boston, MA in the Location receive results of accounts with an address in Boston, MA.
Launching a Network Account Search
When attempting to create a new account, the Network Account Search (NAS) is used when activated for the user. If NAS is not activated, then the standard New Account process is used. See the New Account Wizard documentation.
Using Network Account Search
Enable the ACTIVATE NETWORK ACCOUNT SEARCH Network setting to activate the Network Account Search.
Optionally, set the BEFORE_CREATE Veeva Message to inform users they must first search for an account before they can create a new one.
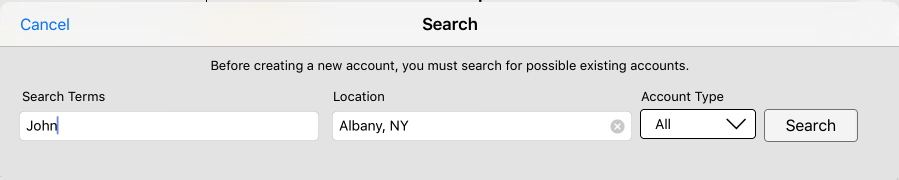
To search for a new account:
- Select New from My Accounts page, or in CRM for iPad, select the + sign. A search dialog box displays.
- Enter a Search term.
- Enter the HCP/HCO's location information.
- Select the Account Type. By default, All is selected.
- Select Search.
Results Overview
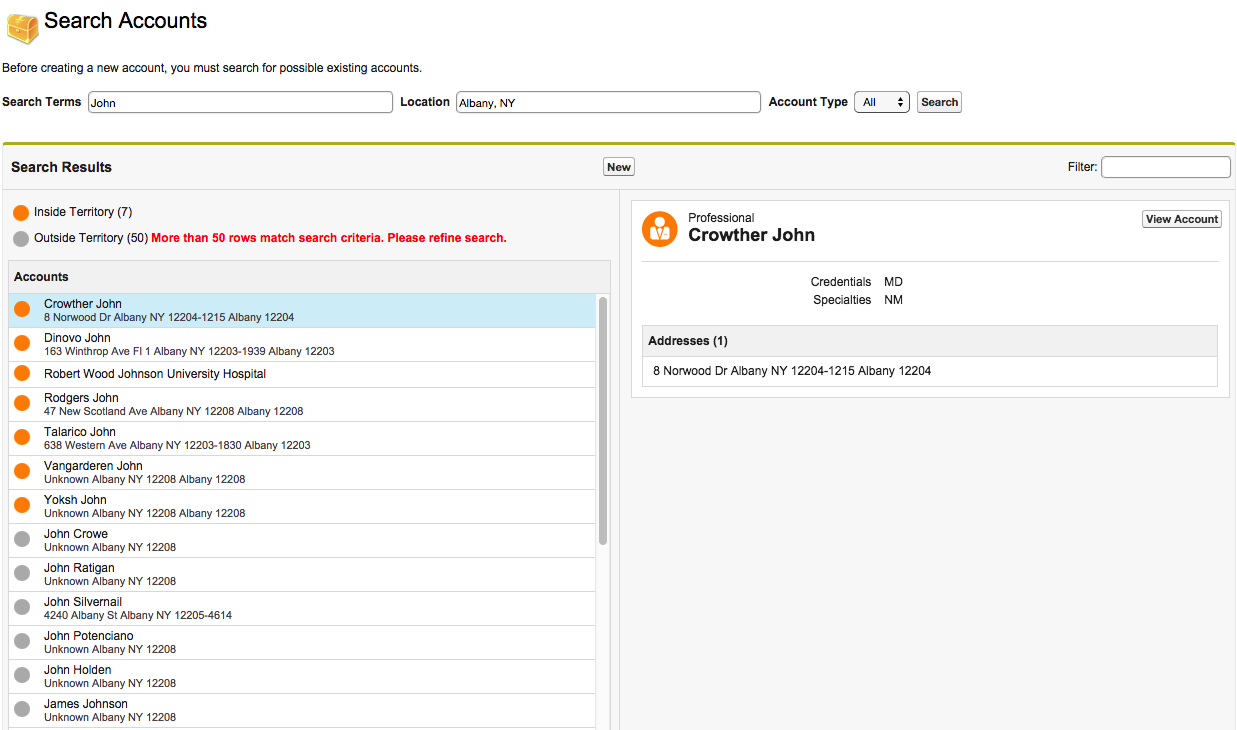
Search results display in a table for easy navigation. The left side of the table displays a list view of all search results, while the right side of the table displays more detailed information of an account when a user selects in the list view. A colored icon on the left side of the account indicates if the account is inside or outside of the user’s territory. The number of results display beside the Inside/Outside Territory caption to indicate how many results are returned.
Information displayed on the search result page is configurable. See “Display Account field in Search” for more information.
Network Account Search Result Page – Online
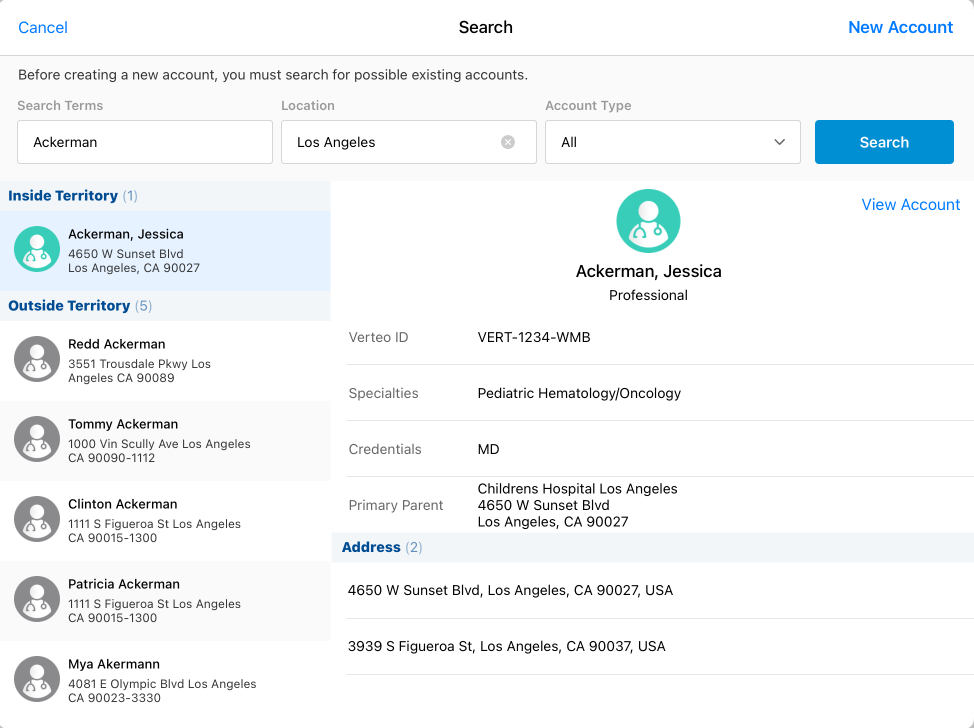
Network Account Search Result Page – iPad
Relevant Network Account Searching
The Network Account Search provides more relevant results enabling the user to find information quicker. Users can now use location to search for Accounts.
- Enable the NAS_LOCATION_AUTO_POPULATION Network Setting with a value of 1.
- Populate the address (city, state, and country are recommended) of each Salesforce user who needs to perform Network Account Searches.
The City and State are extracted from the user's address and automatically populate the Location field when the user opens a Network search window. Users can clear the values and overwrite them with other location information.
This feature is enabled by default.
Displaying Account Field in Search
- iPad
- Browser
To make it easier to identify a correct match in an Account Search, administrators can define which Account fields to display.
By using settings, you can configure different fields to display in the account previews for different user profiles.
Two Veeva Settings contain the values of Veeva Messages which store these field lists:
- NAS_PERSON_RESULT_FIELDS_vod – points to a message that controls which fields display in the account detail preview when searching Network for person accounts. By default, this setting points to the NAS_PERSON_DETAILS Veeva Message.
- NAS_BUSINESS_RESULT_FIELDS_vod – points to a message that controls which fields display in the account detail preview when searching Network for business accounts. By default, this setting points to the NAS_BUSINESS_DETAILS Veeva Message.
Each message needs to contain a semicolon delimited list of the API names of the field names that you want to display in the search results. If the defined fields also have mapped corresponding values in Veeva Network, the values for those fields are returned from Network when displaying out-of-territory account search results.
Additionally, the special syntaxes “Specialties” and “PrimaryParent” display a concatenation of fields.
- “Specialties” contains the values from the Specialty_1_vod__c and Specialty_2_vod__c fields from inside-territory results. For outside-territory results, all listed specialties are returned.
- “PrimaryParent” contains the name and preferred address of the Primary Parent account.
- The default value for the NAS_PERSON_DETAILS message is: Credentials_vod__c;Specialties;PrimaryParent
- The default value for the NAS_BUSINESS_DETAILS message is: PrimaryParent
This feature is enabled by default for Veeva Network users.
Connected vs. Disconnected iPad
If the user is offline (no internet connection) the Network search does not work. The Outside territory messaging area contains text which prompts the user to establish an internet connection to maximize the search results. This message is driven by the UNABLE_TO_CHECK_ONLINE Veeva Message.
If the user is online but the Network search could not be performed due to an API error, then the Outside territory messaging area contains text which informs the user that the connection to Network experienced an error. This message is driven by the NETWORK_CONN_ERROR Veeva Message.
Inside Territory
If an account the user is looking for is in Inside Territory, the user can view the account details by clicking or tapping View Account.
Outside Territory
If the account the user is looking for is outside of the user’s territory, the user can click or tap the account to review more detailed information of the account. If it is the correct account, the user can click or tap Add Account. This initiates an account transfer with a mini sync.
The Mini Sync
If the user adds an account, the system attempts to perform a Mini Sync to retrieve the account data being added. The Mini Sync window displays to show the progress.
The Mini Sync only runs when adding an account, not when editing an existing account.
The Mini Sync downloads the account data for the account being transferred to CRM for iPad and adds the territory selected by the user. The Mini Sync only retrieves objects that are Network Mapped (for example, Account, Address, Child Account), and only information the user is granted access to.
The account is synced to CRM for iPad and is available for use.
The Mini Sync uses the same principles as a normal full sync; it is downloading only the absolute necessary information. After the Mini Sync, the system navigates to the Full Account page.
If the Mini Sync fails, an error message displays. If the metadata on CRM for iPad does not match the metadata online, the user is prompted to run a full sync.
Users need Read, Create, and Edit permissions on Data Change Requests to use Multi-Stage DCR Processing and to prevent sync errors.
Primary parent accounts are also downloaded and added to the selected territory. To exclude the Primary Parent account, remove PrimaryParent from the NAS_PERSON_DETAILS and NAS_BUSINESS_DETAILS Veeva Messages.
Child Account Pull
When adding an HCP from Network using Network Account Search, the Network Integration also pulls related HCOs and the relationships (Child_Account_vod records) between the HCPs and those HCOs. This provides the end user with a more complete view of the HCPs affiliation map.
No configuration is required to enable this feature.
Filtering by Account Type
Users can now specify an entity type—either HCO or HCP—when searching for an Account. This specification omits records that needlessly return during a search, and reduces the number of search results, making it more efficient and easier to find information. This feature is part of the Network Account Search which must be enabled.
For example, to find “John Muir Hospital”, select HCO from the Account Type picklist on the Search screen. The search returns the hospital but not doctors named “John Muir.”
The Account Type picklist contains three values: All, HCP, and HCO. “All” is the default selection.
Limiting Network Account Search Results
To support compliance regulations, Network Account Search (NAS) can now be limited to a subset of Account records. Companies who are under the Corporate Integrity Agreement or the General Data Protection Regulation, for example, can limit the scope of HCPs and HCOs a user can search. Different filter criteria for end users in the same CRM profile can also be supported by specifying user-specific NAS filters.
For example, Sarah Jones is a user working in the Allergy division of Verteo Biopharma. She can detail HCPs with a specialty of Allergy or Allergy and Immunology. She meets two doctors: John Smith and Bob Jones. Sarah searches for both doctors. John has a specialty of Allergy and returns in Sarah's search; however, Bob has a specialty of pediatrics and does not return in her search.
A CRM admin can specify which HCP or HCO status to include in search by specifying the following in their NAS Filters.
&filters=hcp.hcp_status__v:<hcp status values>&filters=hco.hco_status__v:<hco status values>&parenthcofilters=hco_status__v:<hco status values>
For example, the following filter will return HCPs with a status of Active (A), Retired (R), or Undetermined (U) and HCOs with a status of Active (A).
&filters=hcp.hcp_status__v:A,R,U&filters=hco.hco_status__v:A&parenthcofilters=hco_status__v:A
Configuring Limited Network Account Searches
To enable this feature:
- Grant integration users FLS edit and end users FLS read permission to the NAS_Filter_vod field on the User object.
- Populate the NAS_FILTER_vod Network Setting with the appropriate Network Search Filters to limit Account search results. For example, to limit NAS to HCPs with a primary specialty of Medical Oncology and HCOs whose major class of trade is Hospital or Organization, the setting value is: &filters=hcp.specialty_1__v:ON&filters=hco.major_class_of_trade__v:32,4
Administrators can find more information on Network Search Filters in the Network API Search documentation.
Proximity Search
To locate HCPs and other organizations quickly, users can now search for HCPs based on geolocation.
For example, a user typically visits Dr. Clinton Ackerman at General Hospital. On a visit, she meets Dr. John Smith. She searches for doctors named John Smith who are near her current location so she can quickly find and add Dr. Smith to her Territory.
Configuring Proximity Search
To use this feature, enable the NAS Location Auto Population Network Setting with a value of 2.
A value of 1 sets the Location text box to the user’s configured city and state, while a value of 0 disables the feature.
Using Proximity Search
Users are prompted to accept location services when accessing the Network Account Search for the first time. If users accept, and if geocoding services are available at the user’s location, the Location field in the Account Search is automatically populated with the Current Location label, which represents the user’s current coordinates. If users do not accept location services, or geocoding services are not available, they cannot use the proximity search.
Units of distance are consistent with the user’s locale. For example, in France, proximity searches return results within a 50 km radius and are sorted by distance in ascending order. Results are divided by those inside and outside of the user’s territory.
If a user removes the Current Location label in the Location field and manually enters an address, the search reverts to a text-based relevance search, and proximity search is disabled for that search instance.
This feature is currently only available in the US and France.
Network Account Search Optimization
Network can optimize Network Account Search (NAS) results through analysis of the number of searches a CRM user performs before the user selects an Account or creates an Add Request. Network uses the information to analyze how accurate their search results are and use the information to improve future search results.
Configuring Network Account Search Optimization
To enable this feature, grant integration and end users FLS edit permission to the Network_Session_Id_vod field on the Data_Change_Request_vod__c object.
